Week05. 3D Scanning and 3D Printing
1. Assignment and Result
About the process, I made new page and made links are below, because the long page makes me confuse.
| GROUP ASSIGNMENT | THE RESULT |
|---|---|
| - test the design rules for your 3D printer(s) | Process -> Kitakagaya Week5 westharima - I tested design rule unsupported bridges and overhangs" by using VORON 2.4 R2. |
| INDIVIDUAL ASSIGNMENT | THE RESULT |
|---|---|
| - design and 3D print an object (small, few cm3, limited by printer time) that could not be made subtractively | Process -> 3D Printing (VORON 2.4 R2 - I succeeded 3dprint for my original 3d design, UNSUPPORT by using FDM 3d printer VORON 2.4 R2. - I adjusted the distance between the nozzle and the bed to chang Z height through Mainsail, and success. |
| - 3D scan an object (and optionally print it) | Process -> 3D Scan (CREAFORM AND QLONE) Process as optional -> 3D Print (Form3) |
2. HERO SHOT
-3D printing
- I tried printting out this object with unsupported using VORON 2.4 R2.
- This object that could not be made subtractively, as the shape is the bending pipe. The drill bit cannot reach to the inside of bending pipe, and cannot seen inside of the bending pipe.
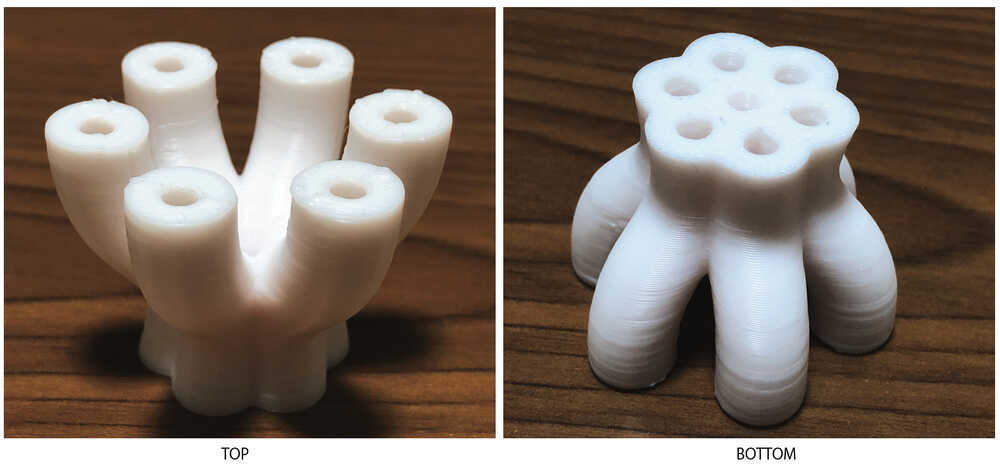
-
About looks, There is no spaghetti, so good. The surface is little noticeable, but it should be my slicer setting. (VORON's 3D printing can more cleaner surface, I think I must continue to study the slicer settings, etc.)
-
The Video of Slicer to prove that it is a pipe.
-3D Scanning
- I got great chance to scan with "CREAFORM HandySCAN 700™|Elite.(LED:Red)".
- After merge, the scan data of 2 sides.
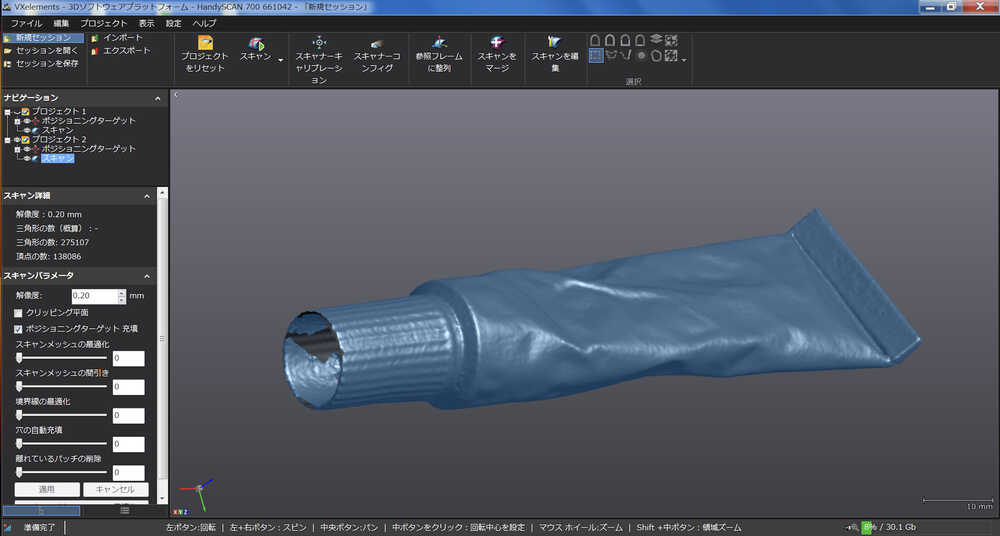
-
After edit by Design X
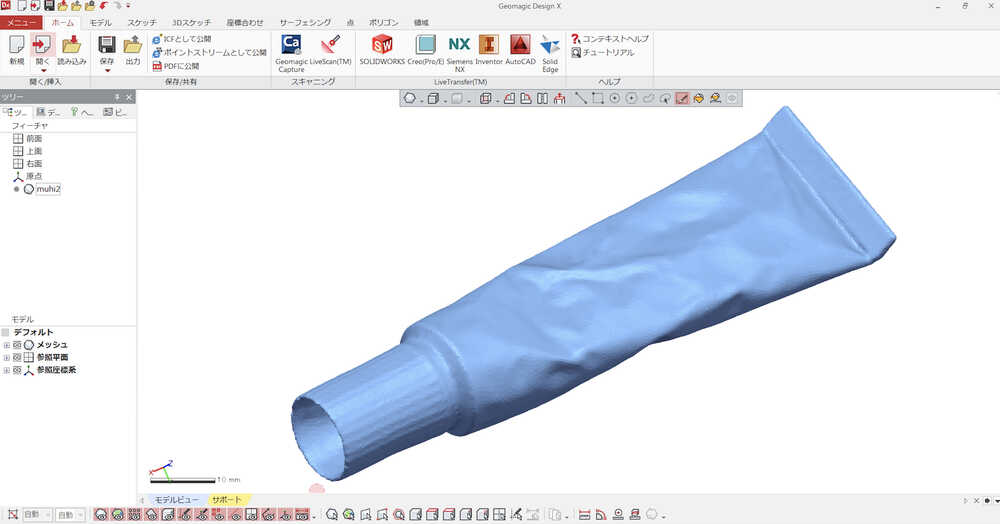
-
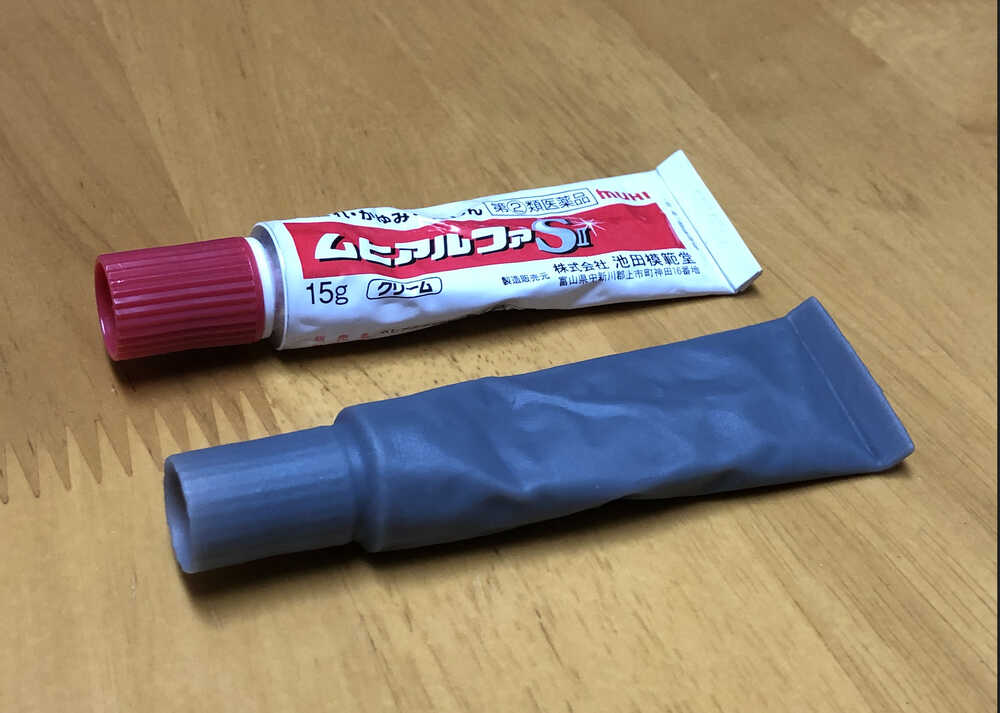
As optional, I 3D print by Form3.
- The quality is great! Looks same! I learned the Form3 can be used with industrial level. And the process of the 3D print was very easy.
3. My thought
3-1) Through this week assightment
-3D Printing (VORON 2.4 R2)
- Through this week's assignment, I tested bridges and overhangs with unsupported using VORON 2.4 R2 to determine the limits of what a 3D printer can output.
- The Design test results were well, I tried and succeeded in outputting the object that could not be made subtractively and UNSUPPORT by using VORON 2.4 R2.
- I learned the output result is affected by various factors such as "machine calibration, material type and storage conditions, temperature changes due to climate, slicer settings, and the distance between the nozzle and bed.
- VORON's 3D printing allows for a much cleaner surface, but this time I can't make smooth surface. I must continue to study the slicer settings, etc., so that I can output a cleaner 3D output.
-3D Printing (Form3)
- Form3 is very easy to use, just follow the instructions of interface.
- I would have been happy if the machine and the resin were more affordable due to their high cost.
-3D Scanning (Creaform)
- It got great chance to be used "CREAFORM HandySCAN 700™|Elite.(LED:Red)".
- Very careful handling due to expensive 3D scanner.
- The Scanner Calibration, and scan needs technique. (Need to do scan with several angle, correct height, include some target seals).
- The result is amazing. Get the shape details correctly.
-3D Scanning (QLONE)
- It seems good to see the image with Texture in Qlone, but I see the shape isn't proper than I expected. Although I wished they would have scanned the shape more nicely as well, Since it was free, I had no choice.
- A tool that can be used when you want a 3D look without worrying about the shape.
- I think it's fun to use, if only to play with it.
3-2) Through My experience
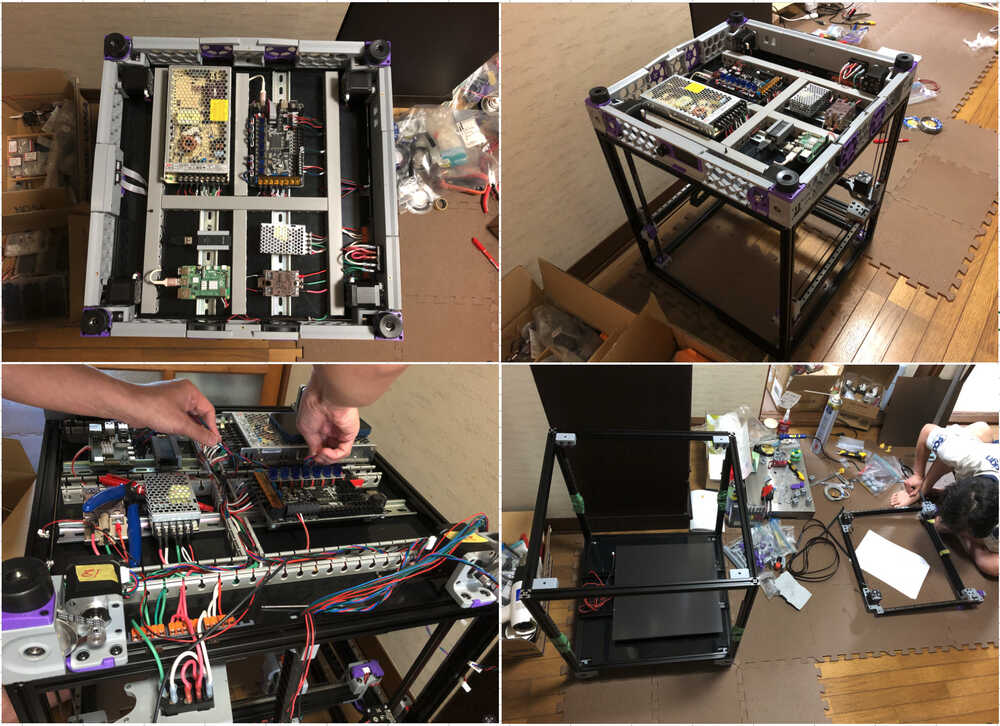
- Luckly, I had chance to look at the process of making the VORON 2.4 R2 at home.
- I think that making a 3D printer is a combination of many special technologies and correct skill of assembly.
- It seemed that the frame building seems so difficult to be correct position.
- He tried to be beautiful wiring works again and again, and tuning the belt, and make interface using Mainsail.
- There was much to learn from his attitude of making sure he was working on one task at a time and moving on to the next step.
- I wish I want to get more skill through this FabAcademy, and can build the VORON.
4. What I learned (Important point for 3D priting)
This week, although I only can work with assignments, I learned that there are so many calibrations and settings needs to do for the 3D printer, through the class and Fab Lab West harima. I would like to learn about them a little at a time at a later date, about calibration too.
4-1) Machine Calibration
- Extrusion multiplier calibration
- Bed Level calibration
- XYZ calibration
- Mesh bed leveling etc
- Verify Temperature (accurate temperature setting)
useful link
- Prusa Calibration
- Voron Initial Startup Checks
4-2) Filament calibration
- need filament cabibration for each filament (When change Manufacturer or filament type or color)
In case of SuperSlicer - Filament Flow calibration - Filament temperature calibration - Extruder retraction calibration - Bridge flow calibration
4-3) Slicer setting:
-
need do many point. as beginner, at first, check and edit if it necessary.
-
Infill with the filament and shape.
-
Base Layer ( Stacking pitch = layer thickness / layer height) About a half of Nozzle diameter
- Perimeters
-
Solid Layers
-
Thickness of wall surface
- Filament injection amount and width
- Infill settings = density of internal fill
- Nozzle temperature
- Temperature of the bed
- Support Settings, Secondary material to hold the shape of the object.
- Printing speed
-
4-4) Design rule:
- help to understand 3D printing capability and limitations with shape.
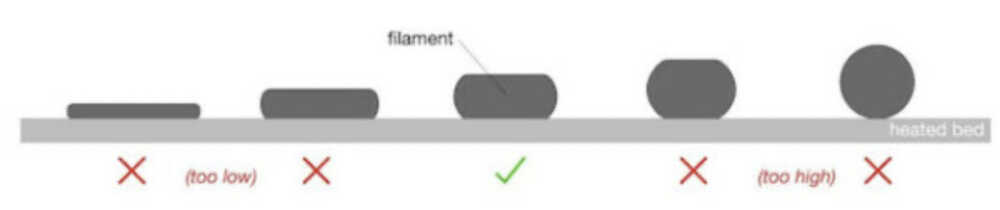
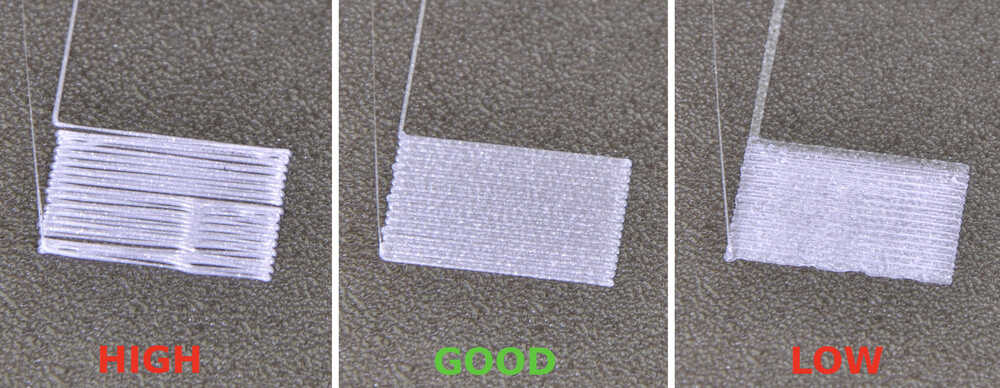
4-5) First Layer calibration
- The quality of the first layer will determine the quality of the output product.
prusa3d.com/ Image of filament status between the nozzle to the print surface
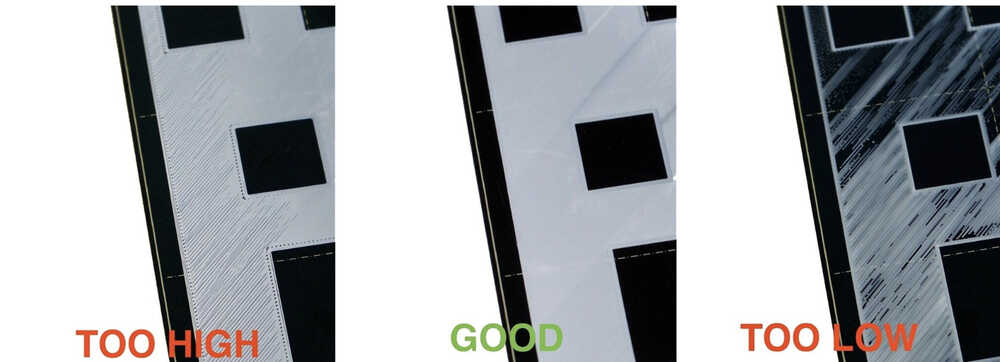
- Good image is found in Prusa : first-layer-calibration
prusa3d.com/ Image of Difference due to adjustment
4-6) Filament status
- Moisture is the enemy. Filament dryer or vacuum-packed storage is recommended.
- Tangling is bad.
4-7) Bed and nozzle temperature
- Since it varies greatly depending on the manufacturer, material, and color, it is recommended the temperature of Bed and Nozzle after filament temperature calibration.
- even if the material is the same, different colors are different temperature.
- Check reliable company's website and labels of filament. and change depend on the machine condition.
The temperature for Prusa, for the reference.
Prusa: Material Table for Prusa 3D printer
| Materials | Bed | Nozzle |
|---|---|---|
| PLA | 50-60 °C | 185-235 °C |
| PETG | 70-90 °C | 215-270 °C |
| PETG HT | 110 °C | 270 °C |
| ABS | 95-110 °C | 235-255 °C |
| PP(Polypropylene) | 0-100 °C | 220-260°C |
4-8) consumable goods
Calibration is different due to deterioration of consumables, so calibration is re-calibrated or consumables are replaced as necessary. (e.g.: nozzles, gears, etc.)
4-9) Tools for 3D printing
| Item | Reference |
|---|---|
| 3D Printer | A machine that can process resin and other materials to create three-dimensional objects based on data created by a computer. |
| Computer | Windows or Mac |
| 3D CAD Software | Software for creating 3D data. (ex: Fusion360) |
| Slicer Software | Software to convert 3D data into data for 3D printers. The accuracy of printing depends greatly on how well you can use this software. |
| Materials | Materials for making 3D models with a 3D printer. (example: Filament ) |
4-10).Slicer Software
I choose SuperSlicer for slicer software.
-About SuperSlicer
- Windows, Linux, and macOS can use it.
- There are two slicers (Cura and Superslicer) that come with built-in profiles for Voron printers. I thought the Superslicer is the better choice, as there is firmware "Klipper", and it has VORON default setting.
-Setup SuperSlicer
- Can install at SuperSlicer:Github.
Go to git releases page - Choose Arachne edition > Assets (Download and install the appropriate file for your PC)
- Open Super Slicer change Tab of "Printer setting" and choose "add printer" of VORON
4-11.What is firmware?
-
3D printers are a mere assembly of various stepper motors, controllers, and structural components. It is the 3D printer's firmware that ties everything together and Firmware reads the G-code from a slicer and translates it into the electrical impulses that control the printer, resulting in extruded objects with remarkable levels of detail.
-
Major firmware:
| Name | Description |
|---|---|
| RepRap | One Operation(Work by 1 board), Farster than Marlin |
| Marlin | One Operation(Work by 1 board), Base of Arduino |
| Klipper | Division of labor type (computation and control). A type that is installed on Raspberry Pi or Linux systems, which is a bit rare at present. |