Xiao RP2040
PC working environment
- PC:MacBook Pro (13-inch, M1, 2020)
- OS: macOS Ventura (ver 13.0.1)
- Terminal:zsh
- Setting : Rosetta
1. Read DATA SHEET
I learned not all contents necessary, but pin map and power information is important.
At first, browse through Seeed Studio XIAO RP2040 and RP2040 Datasheet
- Seeed Studio XIAO RP2040 is based on the RP2040 chip and wrapped in a compact size with multiple interfaces.
- The Language is Arduino, MicroPython and CircuitPython.
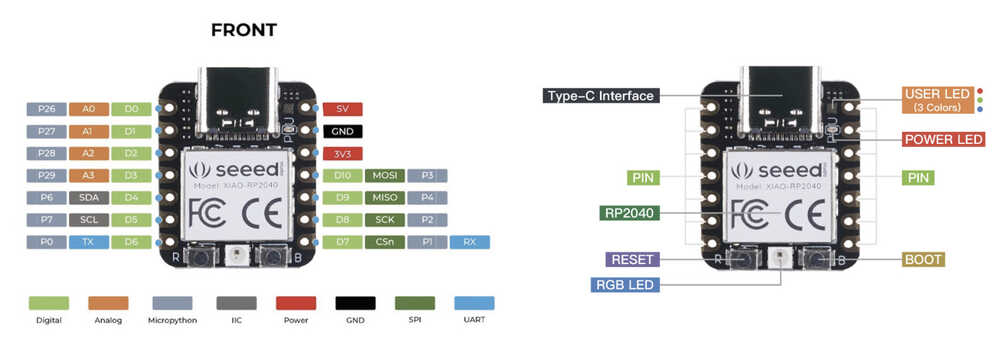
1-1) Pinout
Pinout in Seeed Studio XIAO RP2040
 Pinout in Fab-Xiao by Ardian Torres site.
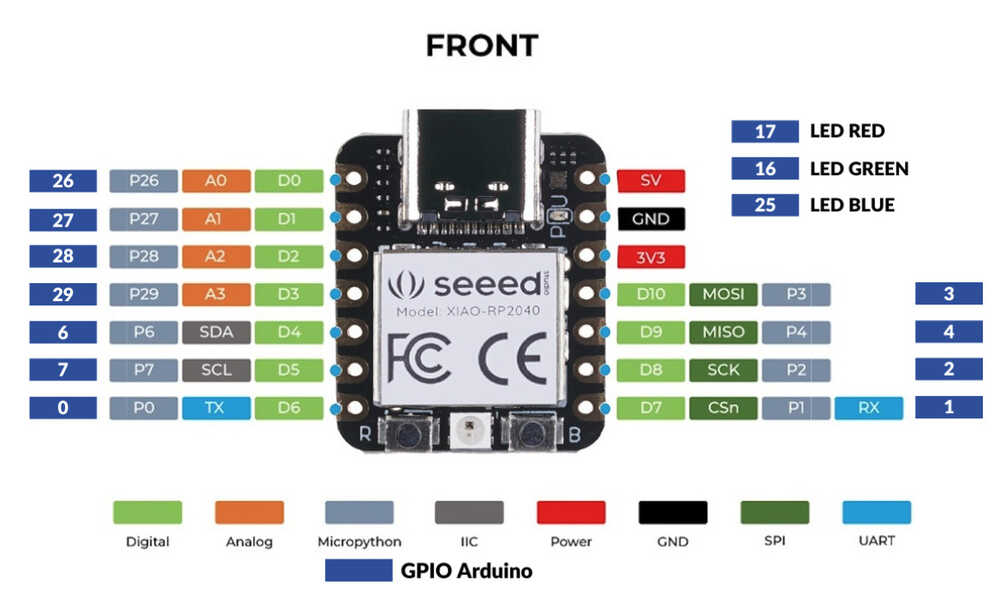
Arduino IDE use GPIO Arduino
1-2) Features
- Powerful MCU: Dual-core ARM Cortex M0+ processor, flexible clock running up to 133 MHz
- Rich on-chip resources: 264KB of SRAM, and 2MB of on-board Flash memory
- Flexible compatibility: Support Micropython/Arduino/CircuitPython
- Easy project operation: Breadboard-friendly & SMD design, no components on the back
- Small size: As small as a thumb(20x17.5mm) for wearable devices and small projects.
- Multiple interfaces: 11 digital pins, 4 analog pins, 11 PWM Pins,1 I2C interface, 1 UART interface, 1 SPI interface, 1 SWD Bonding pad interface.
1-3) NOTE
- For general I/O pins: Working voltage of MCU is 3.3V . Voltage input connected to general I/O pins may cause chip damage if it' higher than 3.3V .
- For power supply pins: The built-in DC-DC converter circuit able to change 5V voltage into 3.3V allows to power the device with a 5V supply via VIN-PIN and 5V-PIN.
- Please pay attention to use, do not lift the shield cover.
2. Programming (LED blink) with Arduino IDE
I tried programming with the Workflow of ADRIÁN TORRES/ Fab xiao site, the site helped me a lot!
2-1) Process
- Open the Arduino IDE. (about Arduino IDE)
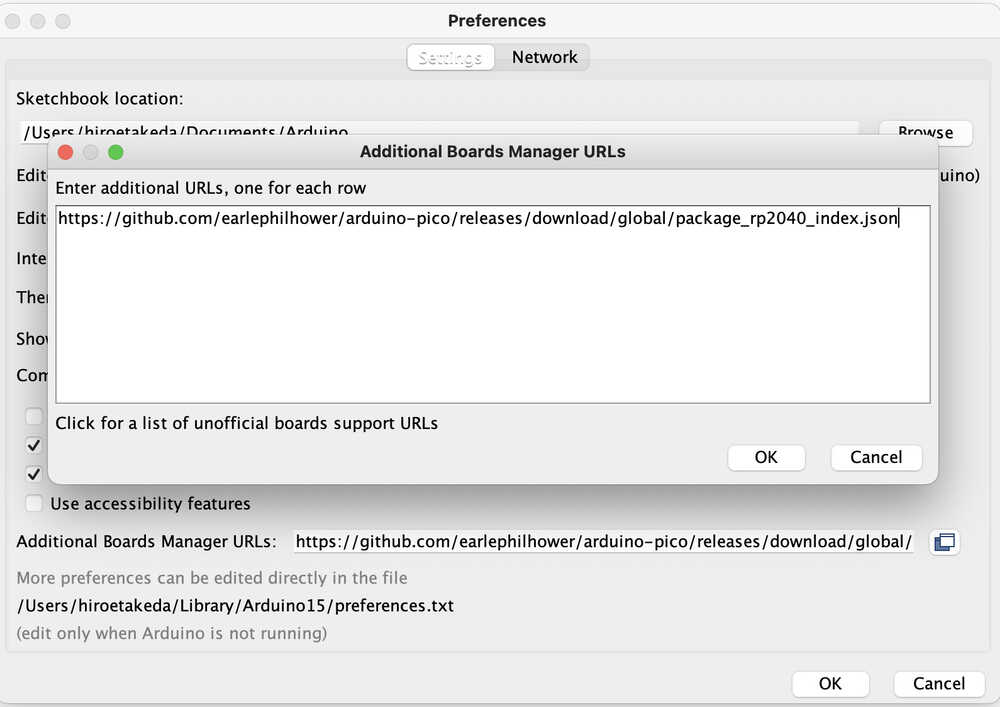
- In Preferences, add the URL of the additional boards for Arduino-Pico that you can find here.
- Download Pico in the boards manager
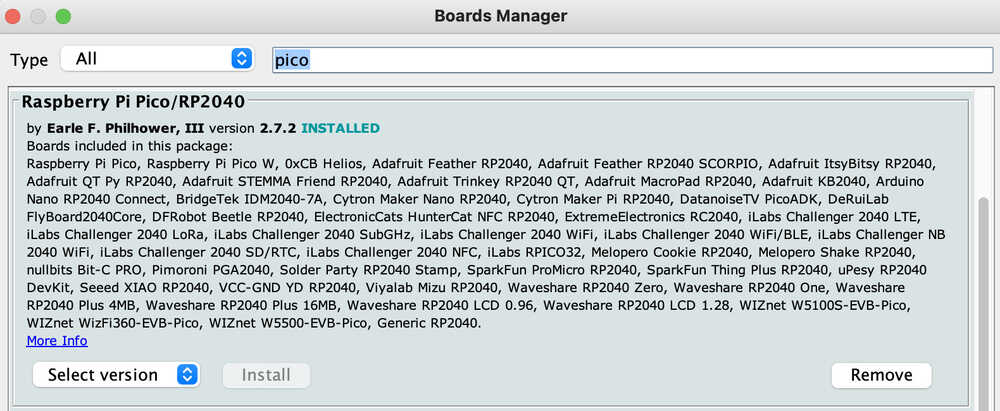
- configure the Arduino IDE (In this time, choose the Seeed Studio XIAO RP2040).
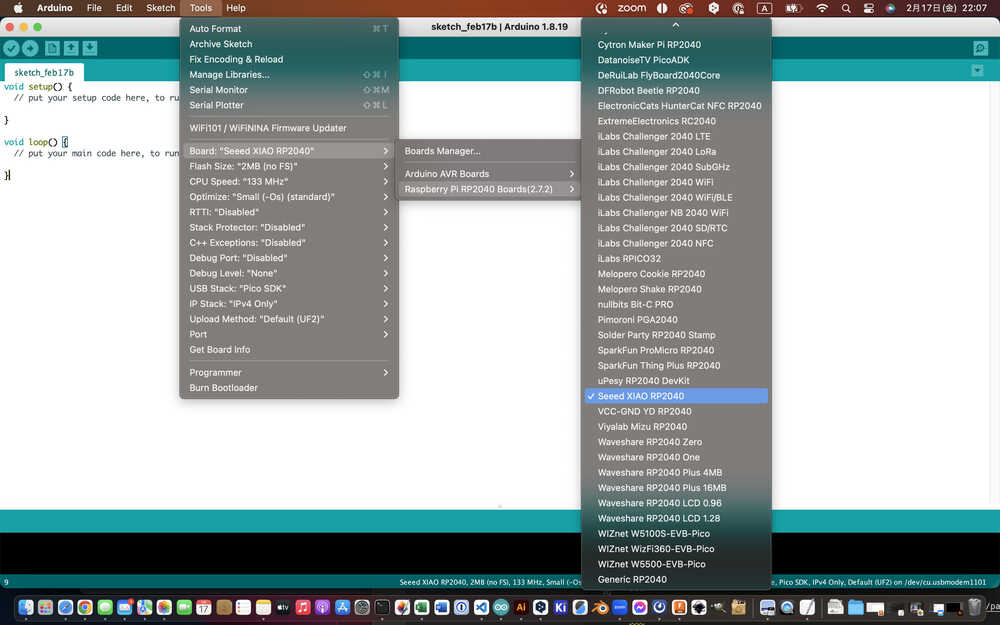 The Seeed Studio XIAO RP2040 will appear in the COM port, in my case in "/dev/cu/usbmodem1101(Raspberry PO Pico)".

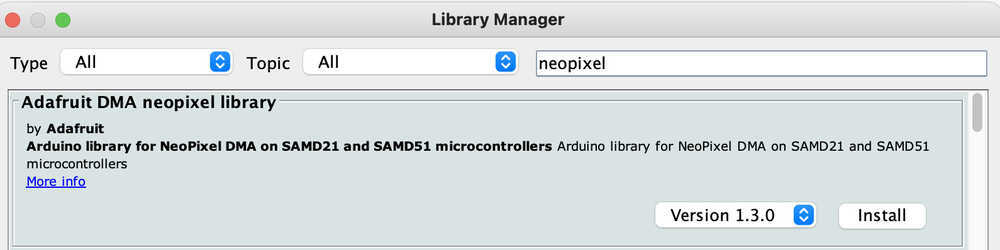
- In library manager, install "neopixel". (To blink LED with neopixel.)
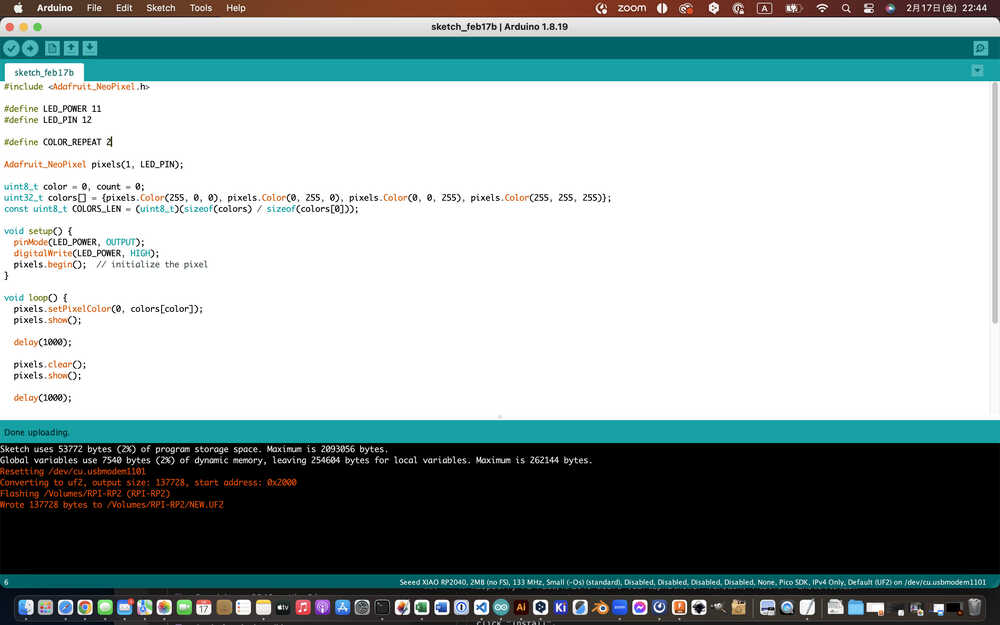
- Input the quote code is as following.
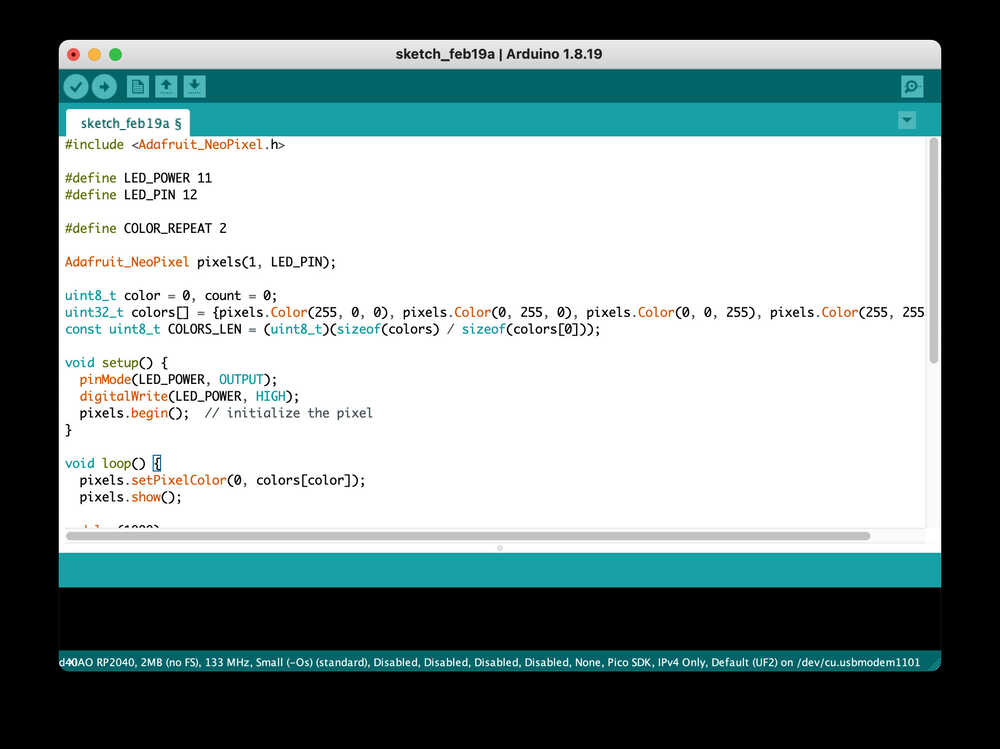
quote code in the blog: aloseed.com.
#include <Adafruit_NeoPixel.h>
#define LED_POWER 11
#define LED_PIN 12
#define COLOR_REPEAT 2
Adafruit_NeoPixel pixels(1, LED_PIN);
uint8_t color = 0, count = 0;
uint32_t colors[] = {pixels.Color(255, 0, 0), pixels.Color(0, 255, 0), pixels.Color(0, 0, 255), pixels.Color(255, 255, 255)};
const uint8_t COLORS_LEN = (uint8_t)(sizeof(colors) / sizeof(colors[0]));
void setup() {
pinMode(LED_POWER, OUTPUT);
digitalWrite(LED_POWER, HIGH);
pixels.begin(); // initialize the pixel
}
void loop() {
pixels.setPixelColor(0, colors[color]);
pixels.show();
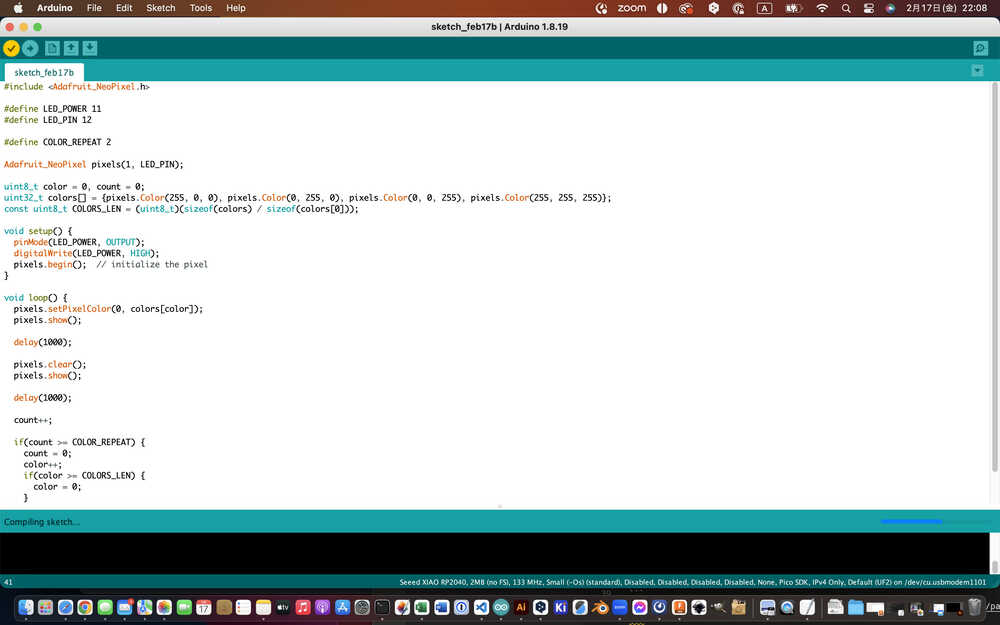
delay(1000);
pixels.clear();
pixels.show();
delay(1000);
count++;
if(count >= COLOR_REPEAT) {
count = 0;
color++;
if(color >= COLORS_LEN) {
color = 0;
}
}
}
- compile the program
- Load the program
2-2) The result (Video):
- Success!!
- In this short video, you can see the operation.
3. Programming (Serial Communication) with Platform IO
Next, I tried other IDE "Platform IO".
3-1) Process
I learned the process with blog aloseed.
- Open "Visual Studio Code"
(About Visual Studio code.) -
Click extension icon on left menu, and Type platformio in the search box, and install the PlatformIO IDE.
(-This process is only the first time-)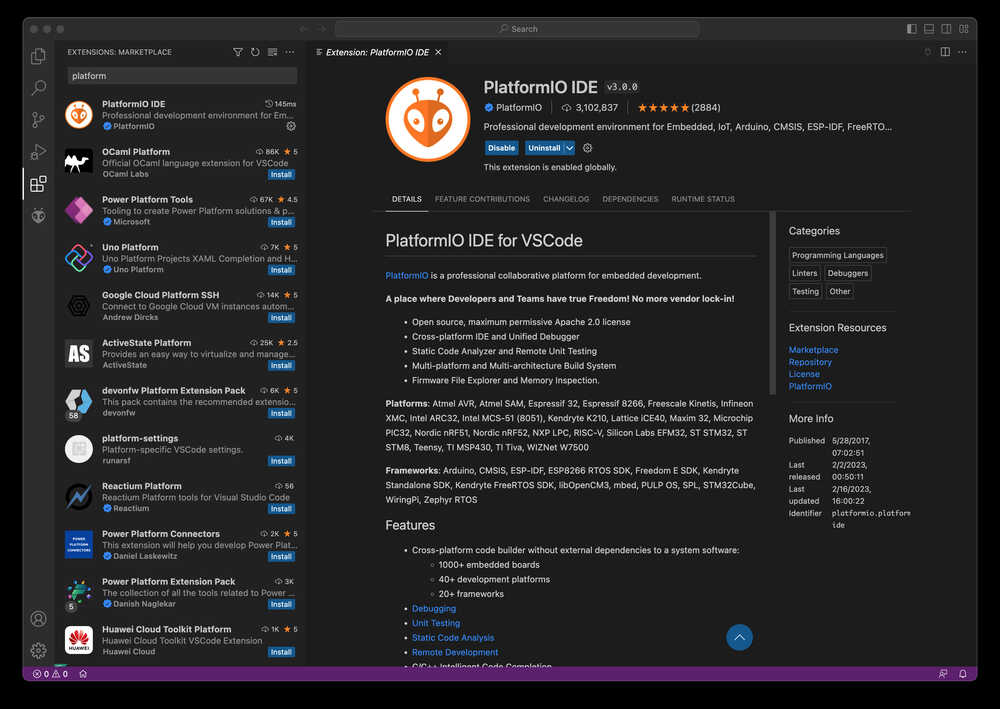
-
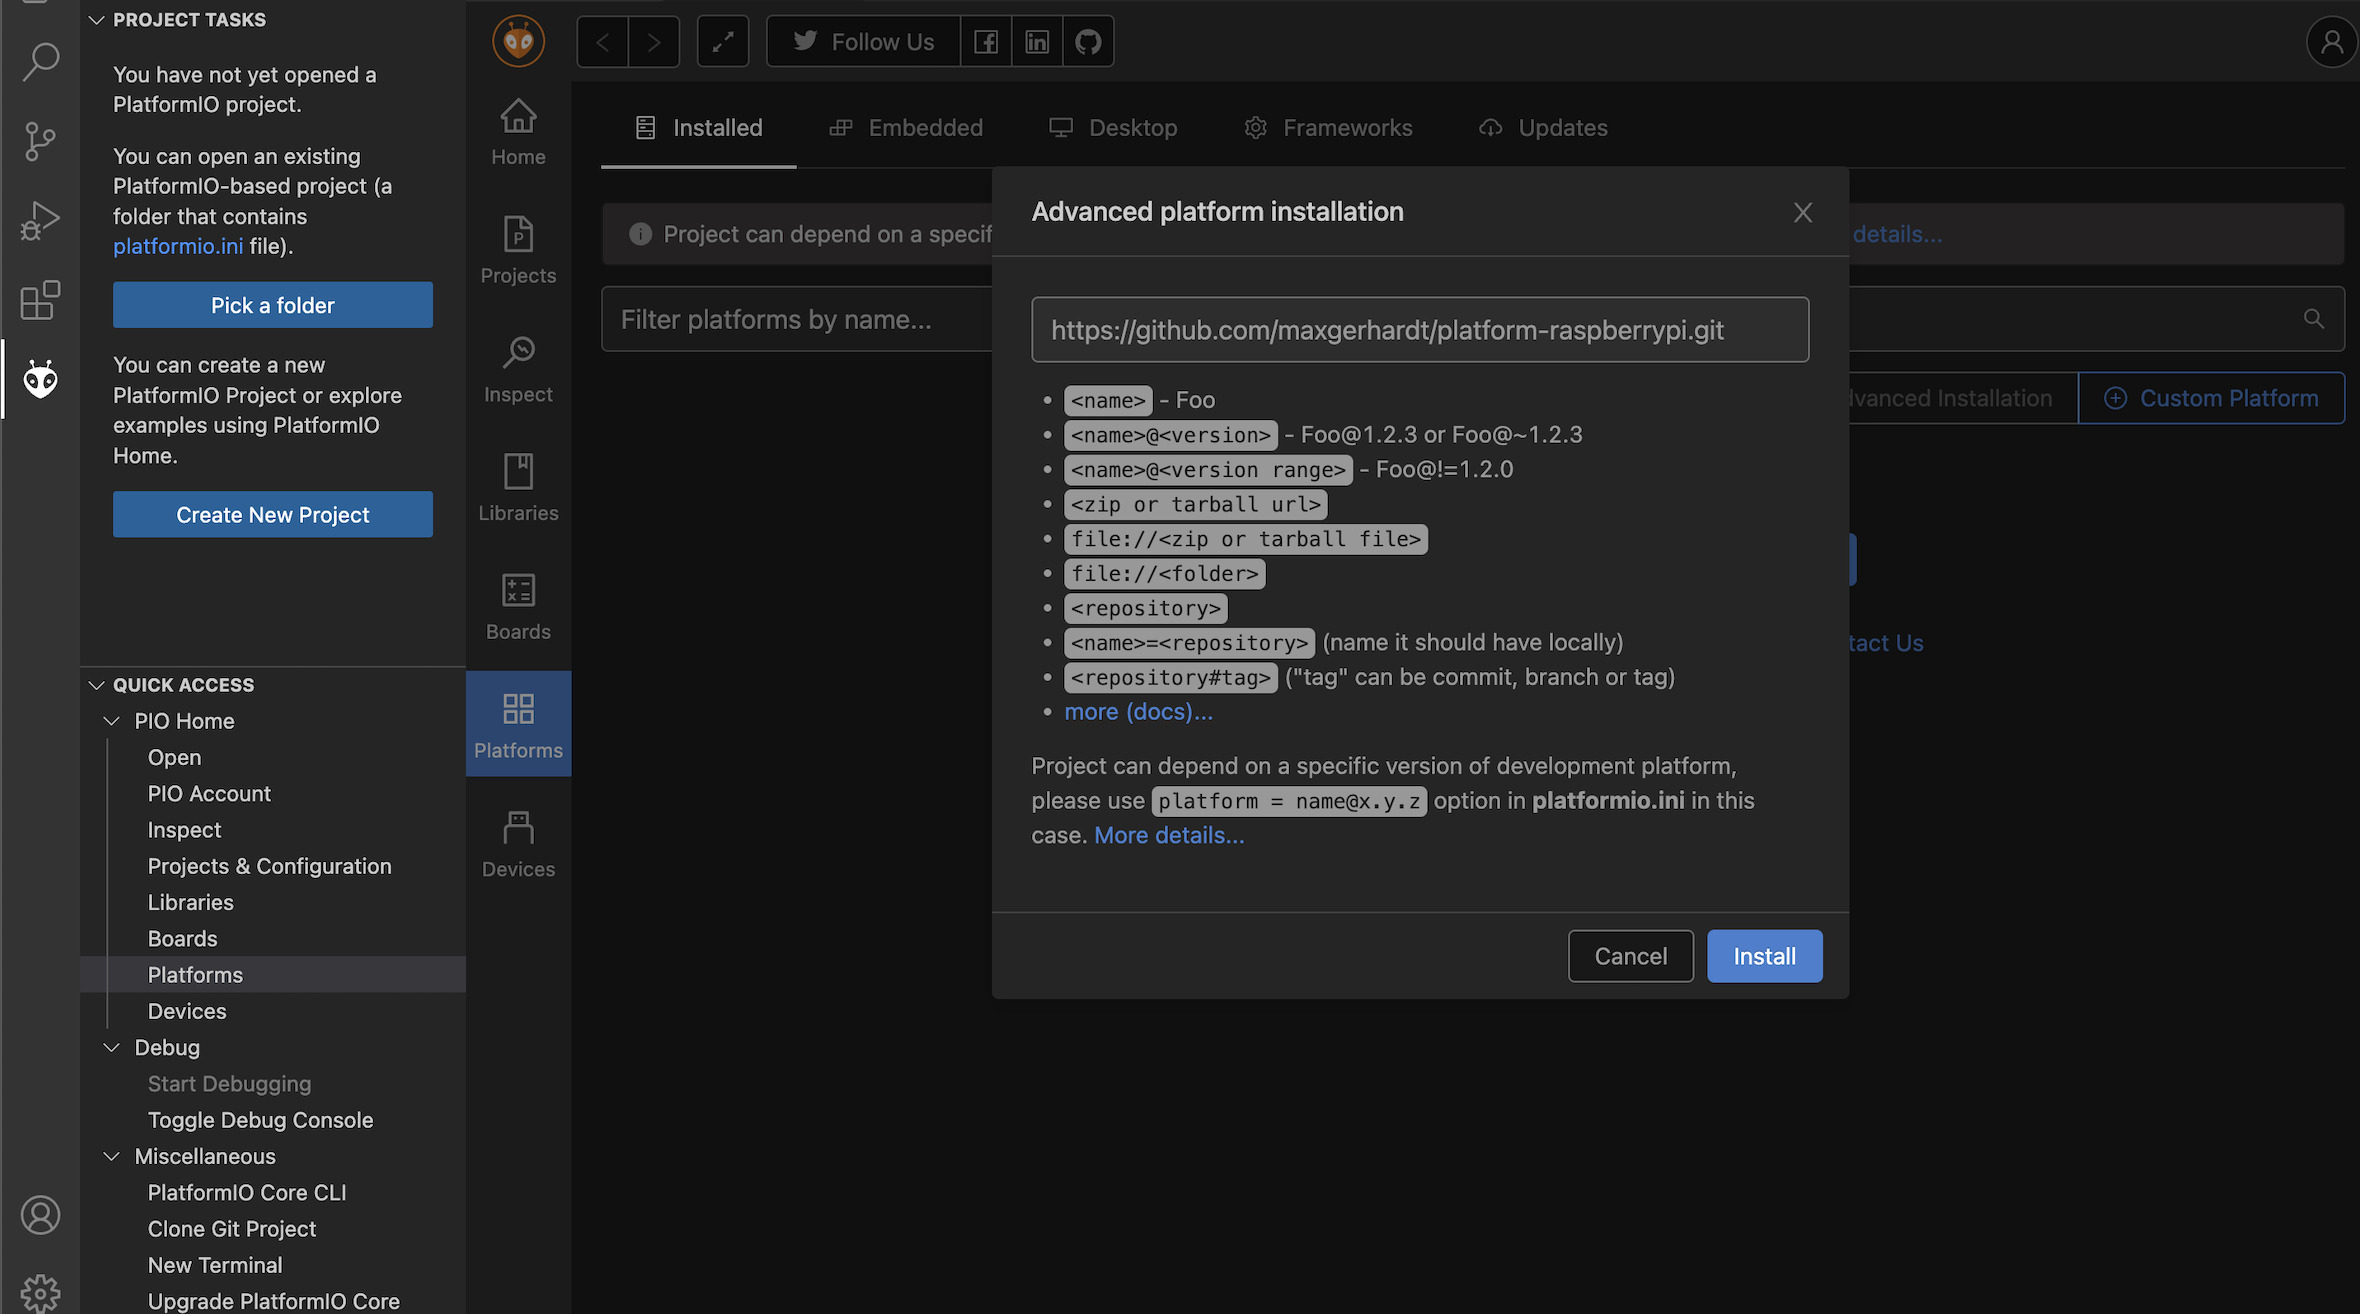
In PIO Home, click on "Platforms" > "Advanced Installation".
Enter the following URL (GitHub repository) for Raspberry Pi Pico/RP2040 board (earlephilhower version) and clidk Install.
(-This process is only the first time- )
https://github.com/maxgerhardt/platform-raspberrypi.git
-
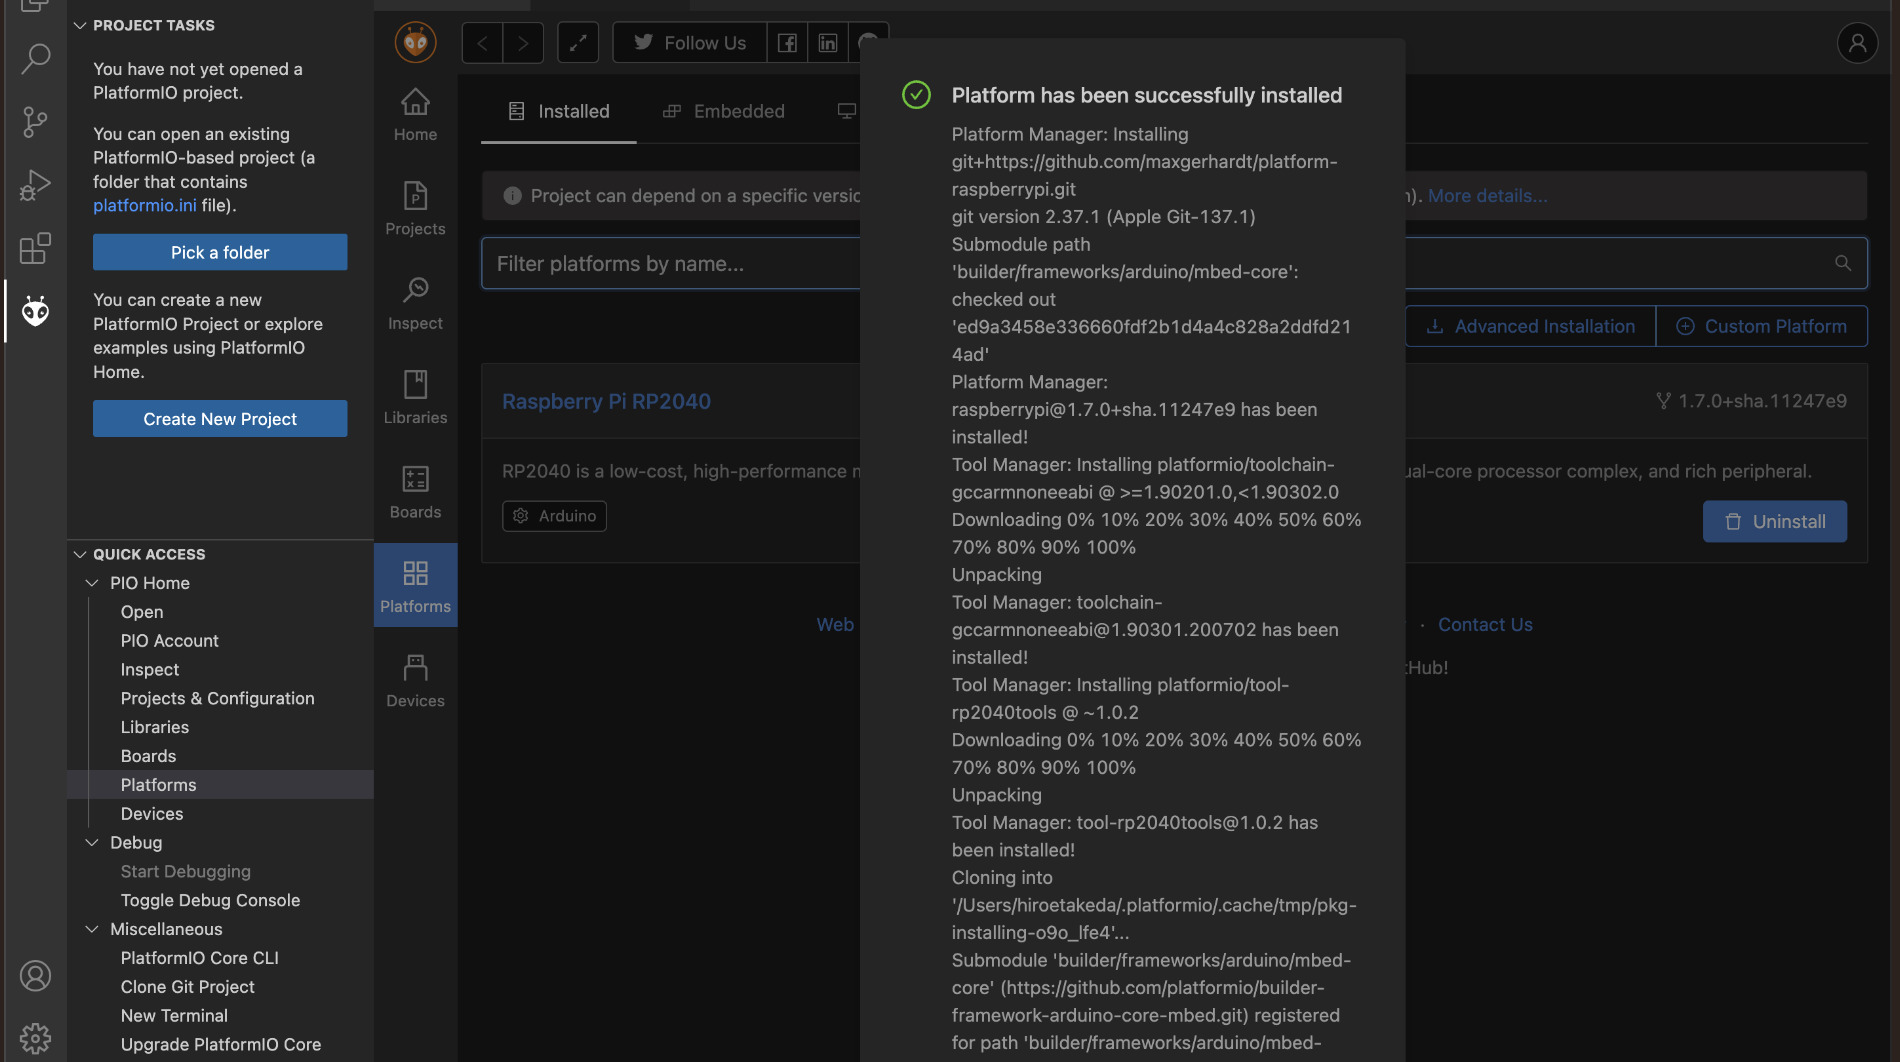
When the installation is successful, the following screen appears, and click "OK" on the bottom of the screen.
-
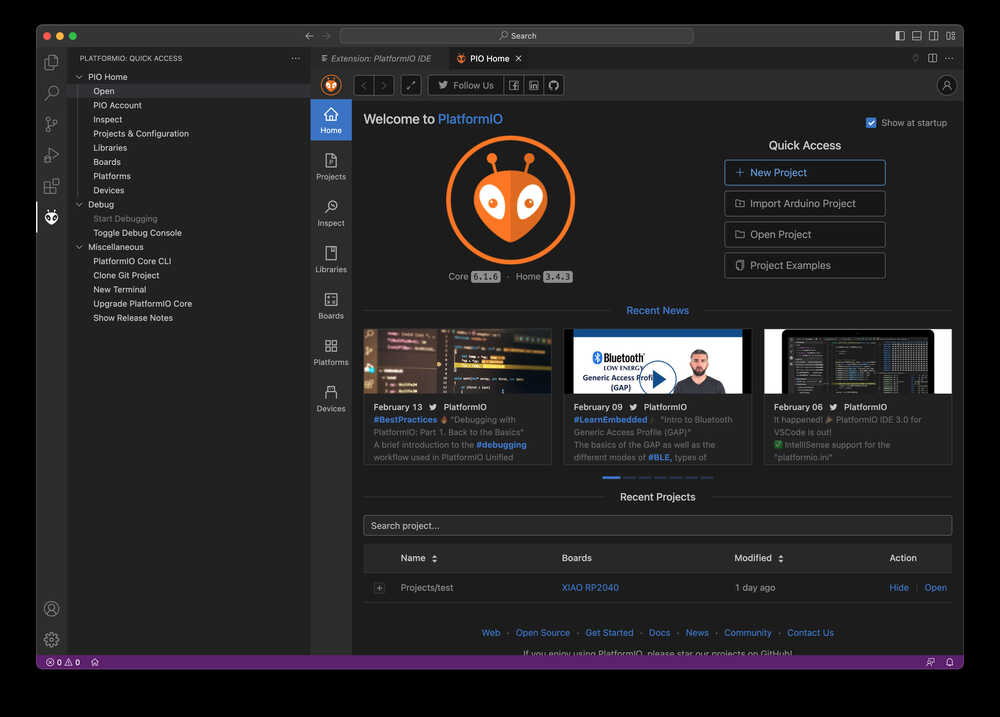
In Platform IO, Make new Project
-
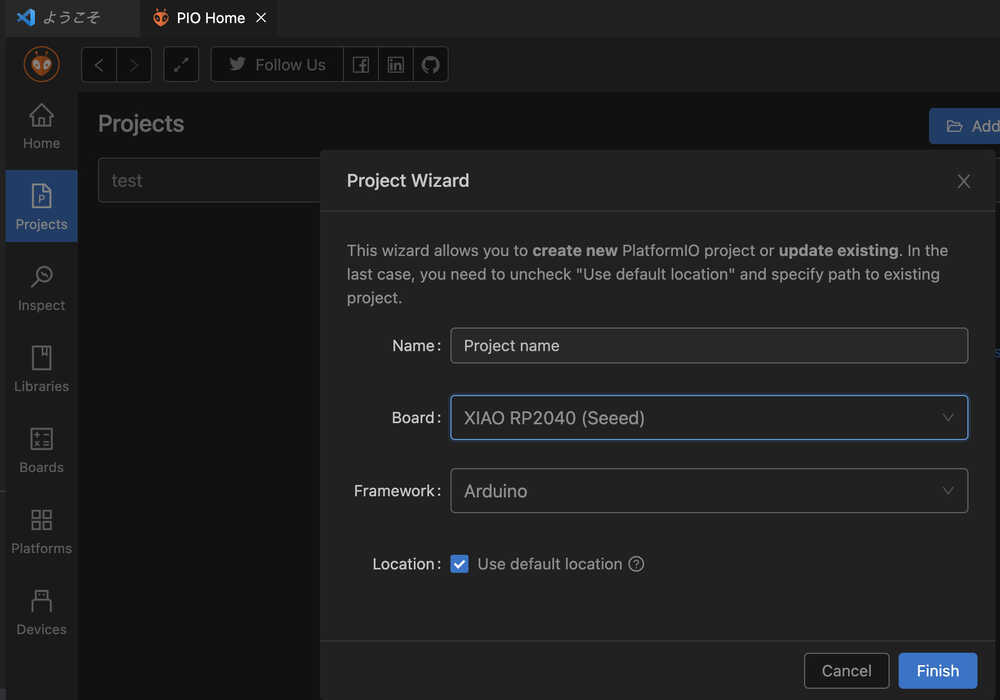
In the Project Wizard, enter project name and choose board.
- Name: (Project name)
- Board: XIAO RF2040 (Seeed)
- Framework: Arduino
-
Open the project automatically
- In srx > main.cpp,
enter the programming code.
Sample code
The code is based on blink-echo.io by Neil, and I changed the code to "NeoPixel" and "serial communication (color change according to keyboard numbers)".
| Keyboard | color | RGB |
|---|---|---|
| 1 | Green | RGB(0,255,0) |
| 2 | Blue | RGB(0,0,255) |
| 3 | Red | RGB(255,0,0) |
//
// hello.RP204-XIAO.blink-echo.ino
//
// Seeed XIAO RP2040 blink and echo hello-world
//
// Neil Gershenfeld 2/12/23
//
// This work may be reproduced, modified, distributed,
// performed, and displayed for any purpose, but must
// acknowledge this project. Copyright is retained and
// must be preserved. The work is provided as is; no
// warranty is provided, and users accept all liability.
//
#include <Adafruit_NeoPixel.h>
//
// globals
//
#define numpixels 1
#define pixelpower 11
#define pixelpin 12
#define bufsize 25
//
// setup
//
Adafruit_NeoPixel pixel(numpixels,pixelpin,NEO_GRB+NEO_KHZ800);
void setup() {
   Serial.begin();
   pixel.begin();
   pinMode(pixelpower,OUTPUT);
   digitalWrite(pixelpower,HIGH);
   }
//
// main loop
//
void loop() {
   if (Serial.available()) {
      char number = 0;
      Serial.println("1=Green,2=Blue,3=Red");
      number = Serial.read();
    if (number == '1'){
      pixel.setPixelColor(0,pixel.Color(0,255,0));
      pixel.show();
      delay(1000);
      pixel.setPixelColor(0,pixel.Color(0,0,0));
      pixel.show();
      pixel.show();
      }

    else if (number == '2'){
      pixel.setPixelColor(0,pixel.Color(0,0,255));
      pixel.show();
      delay(1000);
      pixel.setPixelColor(0,pixel.Color(0,0,0));
      pixel.show();
      pixel.show();
      }

    else if (number == '3'){
      pixel.setPixelColor(0,pixel.Color(255,0,0));
      pixel.show();
      delay(1000);
      pixel.setPixelColor(0,pixel.Color(0,0,0));
      pixel.show();
      pixel.show();
      }


     }
  }
- build(compile) the program
-
Load the program
-
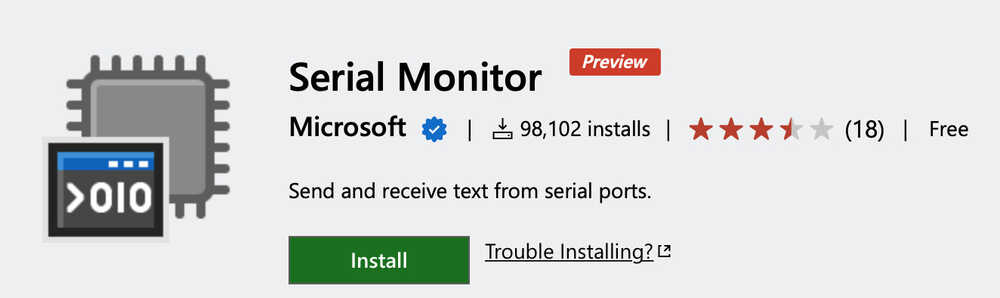
Install The Serial Monitor extension
To get serial monitor, Install Serial monitor (by Microsoft), In extension of Visual Studio code.
3-2) HERO VIDEO / The result
Success!! In this short video, you can see the operation.
4. Personal Impressions
4-1. XIAO RP2040
- The Seeed Studio XIAO RP2040 is powerful and consumes little power, making it ideal for making wearables and small devices.
- As it is cheaper than other microcontroller, it is easier to use.
4-2) IDE
Compared Arduino IDE and PlatformIO, I learned below.
-
ArduinoIDE
- for beginner, as it is easy to understand.
- code completion is not available.
- Slow build (compile) and load.
- There is many code and information in lots of site.
-
Platform IO + VS code
- Development environment that combines program editing screen, tree view, and console (log and serial monitor display) in one
- code completion is available.
- Have to be familiar with VSCode
- PlatformIO is faster to build (compile) and load than the Arduino IDE
4-3) Programming code
- As I am beginner for programming code, I use quote code to do this weeks assignment. I worked with only 1 code to edit, and found it was difficult for me. and need more study.
5. Useful links
I work with below site. These sites helps me a lot!
- ADRIÁN TORRES/ Fab xiao
- Seeed Studio XIAO RP2040
- RP2040 chip Datasheet
- PlatformIO
- blog: aloseed.com