- Create UI and UX with HTML, CSS, and JS
This page is the process of "Create UI and UX with HTML, CSS, and JS".
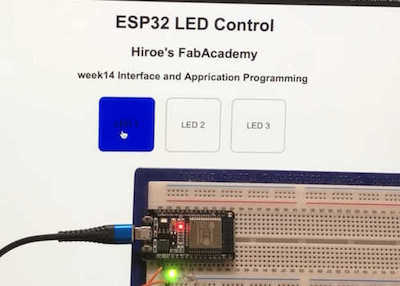
I tried controlled 3 LED on ESP32 Dev Module, through the Browser.
1. IDE and Board I used
- IDE: Arduino IDE
-
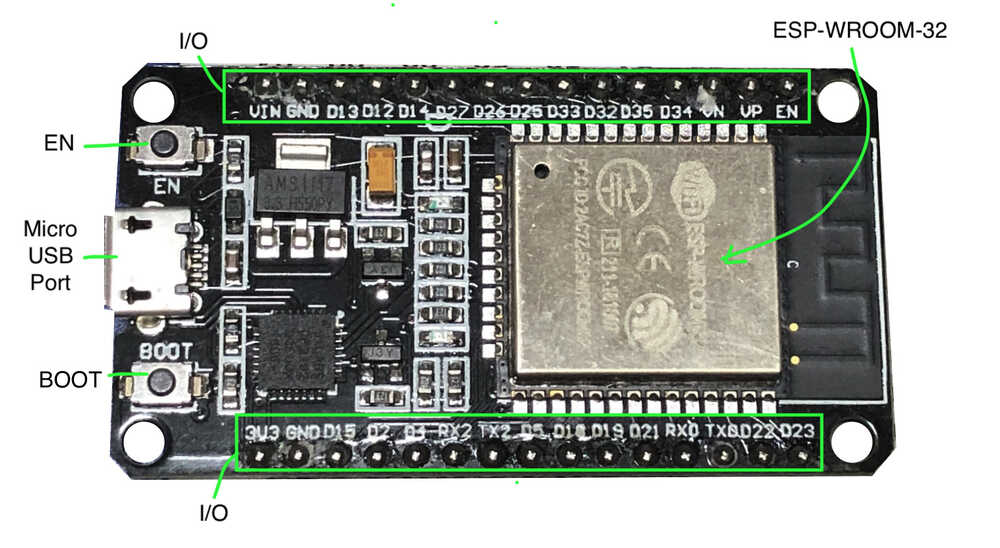
Board: ESP32 Dev Module is a board with ESP-WROOM-32.
-
Boot: Download button.
- EN: Reset button
- I/O: Most of the pins on the ESP module are broken out to the pin headers on the board. You can program ESP32 to enable multiple functions such as PWM, ADC, DAC, I2C, I2S, SPI, etc.
Uplaod method by ESP32 Dev Module is special. When upload the code in Arduino IDE, hold down BOOT button and press EN button once, when the Upload's percentage appear, unpush BOOT button.
2. Main workflow
- Create HTML, CSS, JAVAsclipt files for browser, using Visual studio code.
- Install Arduino Libraries (ESPAsyncWebServer, AsyncTCP)
- Open Arduino IDE and Upload Arduino code, and open Serial monitor, and check ESP IP ADDRESS.
- Replace actual ESP32 IP address in JavaScript file.
- Open index.html in a browser and I could control the ESP32 LED.
NOTE:
- ESP32 and PC connect to the same Wi-Fi network.
3. Generated code with ChatGPT (GPT-4).
Main instructions for ChatGPT (GPT-4)
- connect ESP32 to wifi and control the device from a browser.
- Please write a program to control 3 LEDs from a browser.
- I want to prepare HTML, CSS and JAVAscripts on the PC to control the device from the same wifi network. Please write HTML, CSS and JavaScript for the browser.
The completed code is as follows.
4. HTML file
- file name: index.html
- I added a HEADER to add my own edits. (Line 11-12)
<!DOCTYPE html>
<html lang="en">
<head>
<meta charset="UTF-8">
<meta name="viewport" content="width=device-width, initial-scale=1.0">
<title>ESP32 LED Control</title>
<link rel="stylesheet" href="styles.css">
</head>
<body>
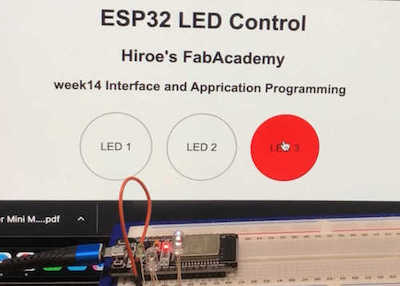
<h1>ESP32 LED Control</h1>
<h2>Hiroe's FabAcademy </h2>
<h3>week14 Interface and Apprication Programming</h3>
<div class="container">
<div class="led" id="led1" onclick="toggleLed(1)">LED 1</div>
<div class="led" id="led2" onclick="toggleLed(2)">LED 2</div>
<div class="led" id="led3" onclick="toggleLed(3)">LED 3</div>
</div>
<script src="script.js"></script>
</body>
</html>
- Explanation of the code:
- This HTML file provides a user interface for the user to control the LEDs.
- Each LED is represented as a clickable
<div>element, and the toggleLed() function is called when clicked. This function call is defined within the JavaScript code.
5. CSS file
- file name: styles.css
body {
  font-family: Arial, sans-serif;
  text-align: center;
}

.container {
  display: flex;
  justify-content: center;
  flex-wrap: wrap;
}

.led {
  width: 100px;
  height: 100px;
  margin: 10px;
  border: 2px solid #ccc;
  border-radius: 50%;
  display: flex;
  justify-content: center;
  align-items: center;
  cursor: pointer;
}

.led.on {
  background-color: #f00;
  border-color: #f00;
}
- Explanation the code:
- This code defines the page and the style of each LED button.
.led: defines the basic style of the button.led.on: defines the style when the LED is on.
6. JavaScript file
- file name: script.js
- NOTE: Replaces actual ESP32 IP address, Line 1. (-> The confirmation method is as follows)
const esp32Url = 'http://192.168.1.81/led';

function toggleLed(ledNum) {
  const ledElement = document.getElementById(`led${ledNum}`);
  ledElement.classList.toggle('on');
  const isOn = ledElement.classList.contains('on');
  const ledState = isOn ? 1 << (ledNum - 1) : 0;

  fetch(`${esp32Url}?state=${ledState}`)
    .then(response => response.text())
    .then(text => console.log(text))
    .catch(error => console.error(error));
}
Explanation the code:
- This code is used to toggle the state of LEDs from a web browser. When the LED state is switched, the new state is sent to ESP32 using an HTTP GET request.
- esp32Url: URL to the ESP32 web server.
- toggleLed(ledNum): Function to toggles the state (on or off) of a specific LED element (a specific
<div>in HTML) - ledElement: Obtains the HTML element to operate on.
- ledElement.classList.toggle('on'): toggles the 'on' class. This will change the display of the corresponding LED in the browser.
- isOn: determines if the LED is on or not.
- fetch: sends an HTTP GET request to the server. The URL of this request contains the status of the LED.
7. Arduino IDE
- Board: ESP32 Dev Module
- Port: /dev/cu.usbserial-0001
Code
#include <WiFi.h>
#include <ESPAsyncWebServer.h>

// Wi-Fi setting
const char* ssid = "your wifi id";
const char* password = "your wifi password";

// LED Pin setting
const int ledPin1 = 2;  // D2
const int ledPin2 = 4;  // D4
const int ledPin3 = 5;  // D5

AsyncWebServer server(80);

void setup() {
  // Start serial communication
  Serial.begin(115200);


  // Set LED pins to output mode
  pinMode(ledPin1, OUTPUT);
  pinMode(ledPin2, OUTPUT);
  pinMode(ledPin3, OUTPUT);

  // Wi-Fi connection
  WiFi.begin(ssid, password);
  while (WiFi.status() != WL_CONNECTED) {
    delay(1000);
    Serial.println("Connecting to Wi-Fi...");
  }
  Serial.println("Connected to Wi-Fi");
  Serial.print("IP Address: ");
  Serial.println(WiFi.localIP());

  // Set route for LED control
  server.on("/led", HTTP_GET, [](AsyncWebServerRequest *request) {
    String stateParam;
    int state = 0;

    if (request->hasParam("state")) {
      stateParam = request->getParam("state")->value();
      state = stateParam.toInt();
      Serial.print("Received LED state: ");
      Serial.println(state);
    }

    digitalWrite(ledPin1, (state & 0x01) ? HIGH : LOW);
    digitalWrite(ledPin2, (state & 0x02) ? HIGH : LOW);
    digitalWrite(ledPin3, (state & 0x04) ? HIGH : LOW);

    request->send(200, "text/plain", "OK");
  });

  // Start Server
  server.begin();
  Serial.println("Server started");
}

void loop() {
  // Do not type anything here.
}
- Explanation the code:
- The function
server.onreads thestatequery variable, interprets its value, and turns on or off the appropriate led.
- The function
8. What happens when I press one of the buttons?
- The user clicks one of the "LED 1", "LED 2" or "LED 3" buttons on the browser. Each of these buttons calls the JavaScript function toggleLed() with the number of the LED clicked (1, 2, or 3).
- The toggleLed() function first finds the button (HTML
<div>element) corresponding to the clicked LED. It then toggles the display of that button (removing the "on" class if there is one, or adding one if there is not). This will change the color of the button. - JavaScript then checks to see if the button (i.e., LED) is on or off. If there is an "on" class, the LED is considered on.
- If the LED is on, make a specific number (bit) corresponding to that LED. If the LED is off, the number is 0.
- the function server.on reads the state query variable, interprets its value and turns the adequate led on or off.
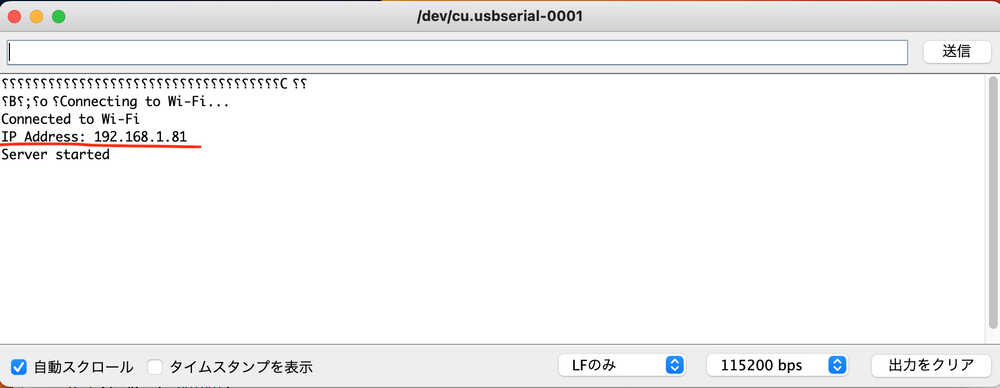
9. ESP IP ADDRESS
Upload Arduino code, and open Serial Monitor and check ESP IP ADDRESS, then, inserted it into the Javascript.
10. Reference
Arduino Libraries's compile error
I got compile error, with installing in the Arduino IDE's library management. Therefore, I reinstalled the libraries manually, as follows.
- Download the following library as a ZIP file from the Github repository
- Unzip the downloaded ZIP file
- Copy the extracted folder to the Arduino's library folder (folder place's example: ~/Documents/Arduino/libraries/). then, I change folder name "ESPAsyncWebServer" and "AsyncTCP"
- Restart Arduino IDE
The library is now correctly installed, and there is no compile error!
11. Trying to edit web page design (CSS editing)
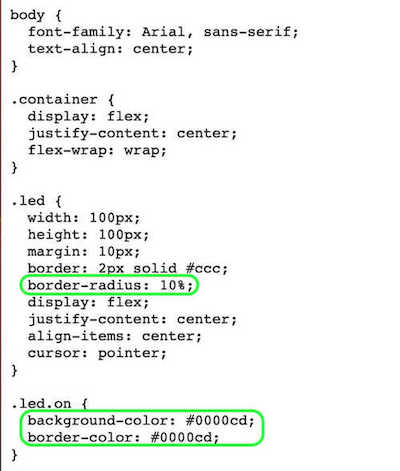
I Tried to change "Web design of LED" and "color LED on" by editing CSS At first, I looked at the CSS code to find circle, but I don't see anything as a circle. I looked up the CSS explanation in ChatGPT, and refer to HTML color code, then edited the CSS as below, and was able to change it.
| Before | After |
|---|---|
| border-radius: 50%; | border-radius: 10%; |
| background-color: #f00; border-color: #f00; |
background-color: #0000cd; border-color: #0000cd; |
styles.css (After)
Before
After
Reference
- html file: builds the web page
- CSS file: controls the design and look of the web page with style sheets associated with the index.html file