Working with 0.96" OLED Display using Adafruit SSD1306 Library

A good device need to be able to communicate to the user effectively. The user should be able to tell what's the status of the device right away. Is the device is turned on yet? Which speed settings are they on? How much battery is left? Is it connected to the internet? And many more. A simple LEDs may suffice for simple or straight forward devices. However, if you have a more complex project, you might want to consider adding a display.
Nowadays there are many kind of displays available on the market. From simple 7 segment display, old school 16 x 2 characters LCD, to the more sophisticated touchscreen display. In this article, we will be looking at 0.96" OLED display module with a SSD1306 driver. It is a tiny monochrome screen with a resolution of 128 x 64 pixels. Commonly there are white, blue, and a combination of yellow and blue pixel color variants.
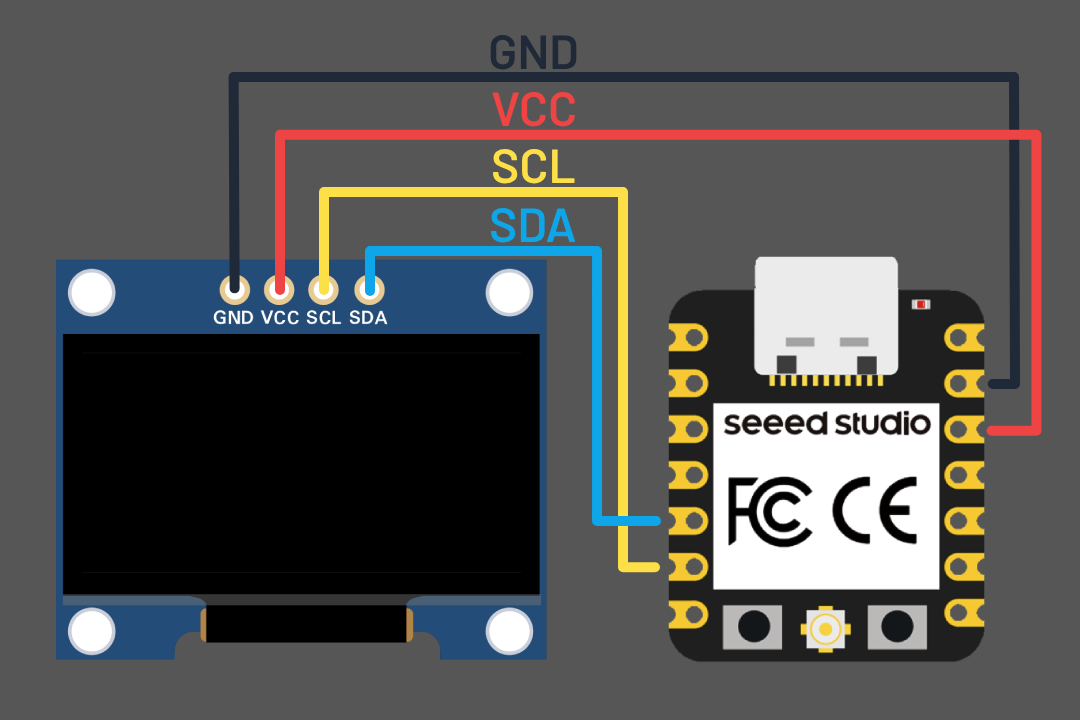
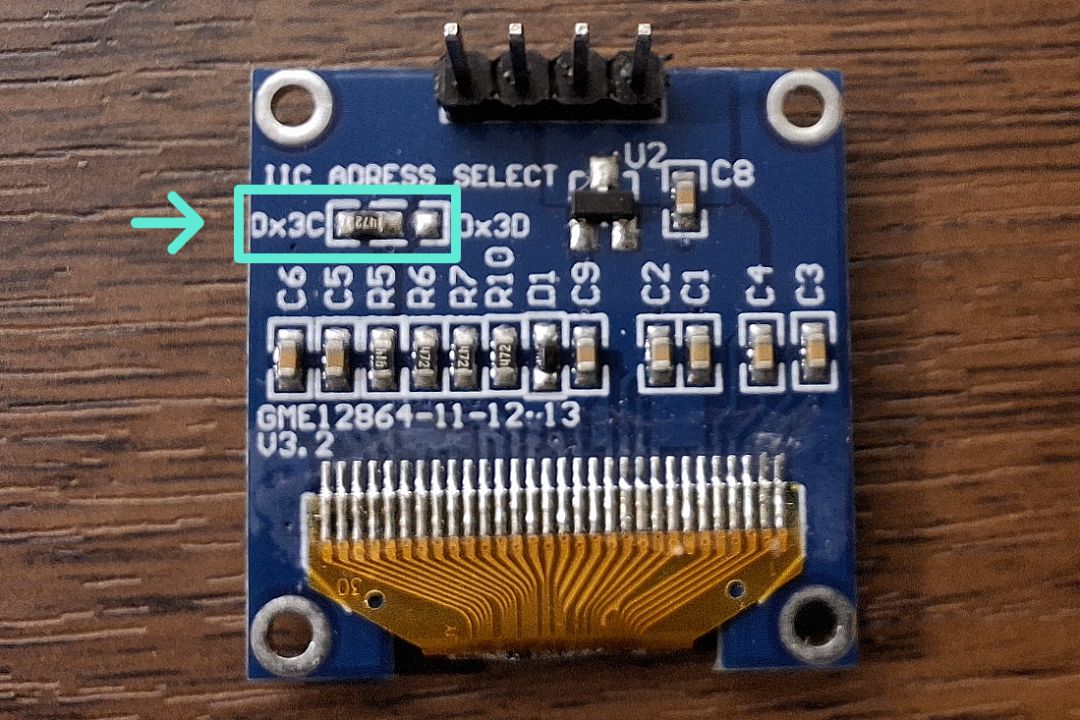
The module in this example that has I2C (inter-integrated circuit) interface. It has 4 pins - GND and VCC (5 V / 3.3 V) to be connected to the power; SCL (serial clock) and SDA (serial data) to be connected to the corresponding pins. It a serial communication protocol that can connect multiple devices in a single circuit without the need for additional wire. To know which device the controller would communicate with, it will need to provide an hexadecimal address of the device. The particular module in the picture has default address set to 0x3C. You can change it to 0x3D by de-soldering and moving the resistor to the other side. We will discuss I2C protocol in more detail on upcoming networking and communications assignment.
Installing Adafruit SSD1306 Library
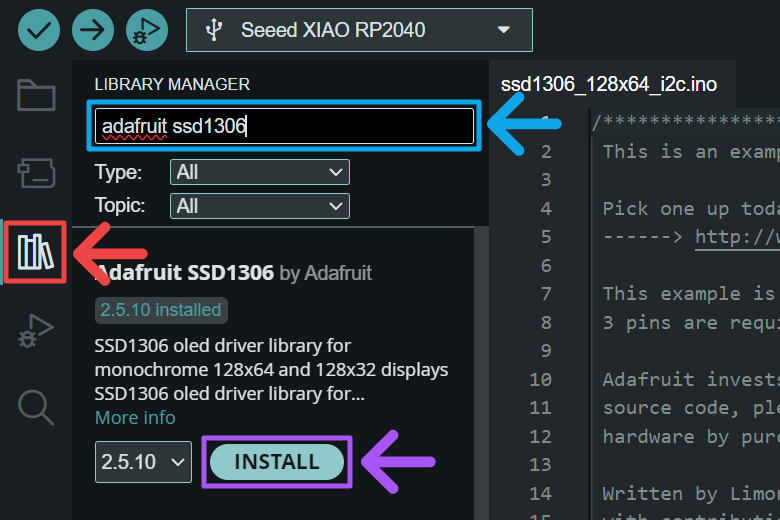
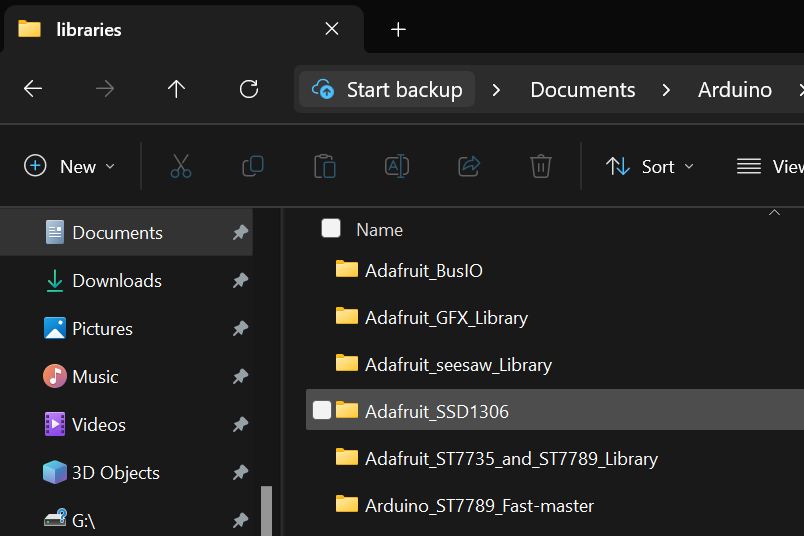
In programming, we don't always need to write our entirety of our code ourself. There are tons of library published online that are free for us to use. Think of library as a reusable set of codes that we can include in our program. To install a library in your Arduino IDE, go to library manager from the side panel. Search for Adafruit SSD1306 and click install. This will download the library and all it's dependencies to our Arduino libraries directory. In Windows, the default location is in C:\Users\Name\Documents\Arduino\libraries.
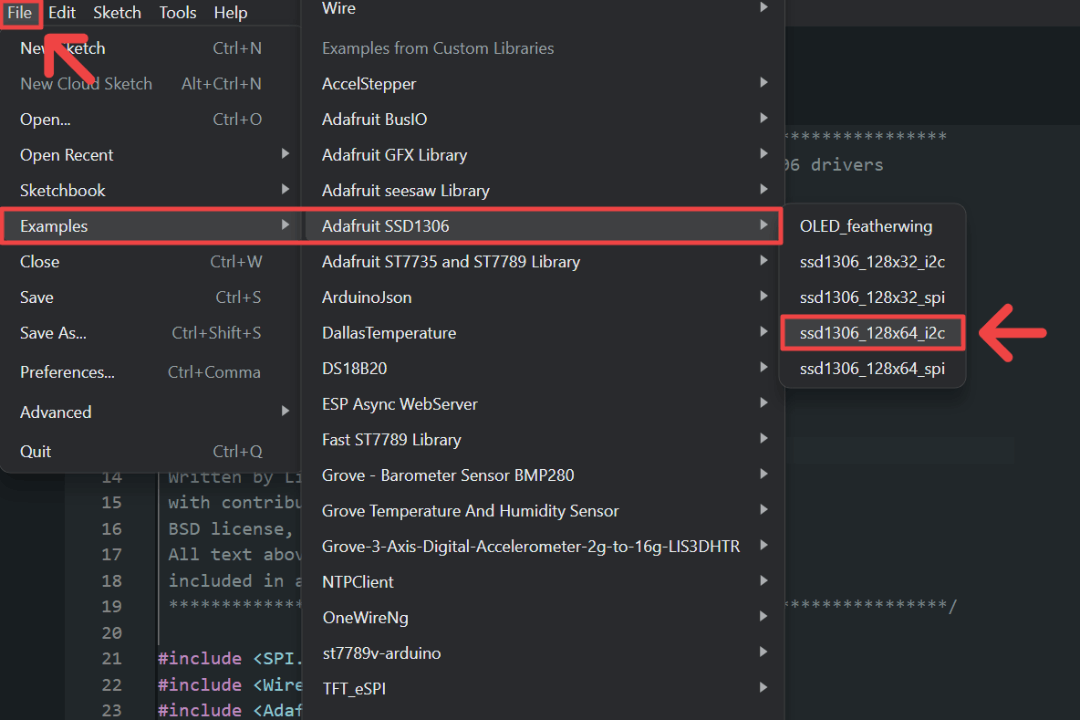
Usually a library also comes with some example codes to show how we can use it. Let's see an example code that will work with our display File > Examples > Adafruit SSD1306 > ssd1306_128x64_i2c. Once opened, you need to make sure if the address it used matched with your display module. Connect your micro-controller and upload this sketch to see it working on our display.
Initialization
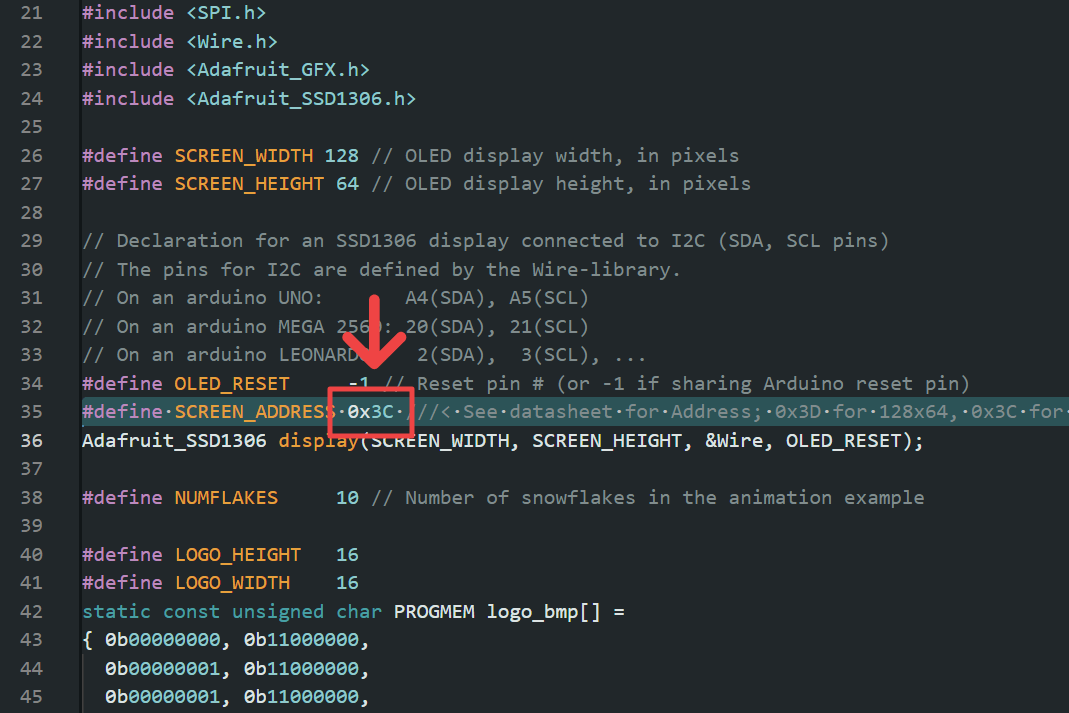
Before we dissect the practical functions provided by this library, let's learn how to initialize it by inspecting this sketch example. When we want to use a library in our sketch, we first need to tell our code to include the header files on the top of the sketch. When we compile our code, these libraries are going to be included. If you check the example, it requires us to include these 3 header files:
#include <Wire.h>
#include <Adafruit_GFX.h>
#include <Adafruit_SSD1306.h>
This library is written as an object with a class of Adafruit_SSD1306. OOP (object oriented programming) is a very common programming concept that used in many languages. We first need to construct our object like shown below. Here we are construct an Adafruit_SSD1306 object named display with given parameter for width, height, I2C wire, and reset pin. Once constructed we can execute the object's own public functions such as display.begin(), display.clearDisplay(), etc. Watch this YouTube playlist to learn more about OOP for embedded programming.
#define SCREEN_WIDTH 128
#define SCREEN_HEIGHT 64
#define OLED_RESET    -1

Adafruit_SSD1306 display(SCREEN_WIDTH, SCREEN_HEIGHT, &Wire, OLED_RESET);
Next we need to start the display in our setup function using display.begin() function. This function will return a boolean indicating if the screen is successfully started. The code example shows us a way to halt our program if the display failed to boot by running an infinite loop when the function return false value.
#define SCREEN_ADDRESS 0x3C

void setup() {
  Serial.begin(9600);

  if(!display.begin(SSD1306_SWITCHCAPVCC, SCREEN_ADDRESS)) {
    Serial.println(F("SSD1306 allocation failed"));
    for(;;); // Don't proceed, loop forever
  }
  ...
}
Set Rotation
Before we see how the library works, there is one function that you might want to execute right after initialization. Depending on the layout of our electronic, you might want to rotate your screen orientation by executing display.setRotation(). The function accept parameter value between 0, 1, 2, or 3.
Basic Workflow
This library works in a very specific way. You will execute functions to "draw" things on the screen, can be text, lines, shapes, or even images. However these functions only store it in a buffer and will not be shown on the display until display.display() function is executed. Think of the buffer like a shopping list. It won't do anything unless you proceed to checkout. Below is a piece of code from the example sketch's setup function that illustrate this workflow.
display.display();
delay(2000);

display.clearDisplay();
display.drawPixel(10, 10, SSD1306_WHITE);
display.display();
Another thing to keep in mind is the buffer works similar like layers in image editing software. Every function executed will create a new layer and drawn on top of previous layer. There are times you want this behavior, but in some cases you might want to start from scratch. To do this, you can execute display.clearDisplay() first to clear the buffer.
Basic Practical Functions
This library comes with tons of functions to make it easy to draw many things, it will take a while if we want to discuss each of them in this article. Let's look into some useful ones that you will likely use again and again.
Text
You can print text to this display with print function, which works just like a serial monitor. It will add the text right after another and only wrapped to a new line if the new text is going out of bound. Example below will print number incrementing one after another every one second.
unsigned int counter = 0;

void loop() {
  display.print(counter);
  display.display();
  counter++;
  delay(1000);
}
Just like serial monitor, this library also has println function. It behave similarly too, instead of the text keep added right after another, it will push the next text into a new line.
// display.print(counter);
display.println(counter);
Some other functions that usually used alongside with print function are setTextSize, setTextColor, and setCursor. All of them are pretty self-explanatory, however keep in mind that these functions effects subsequent print functions. For example if you set bigger text size 2 for a title and you didn't set it back to 1, then all the text will be printed using the bigger size.
display.setTextSize(2);
display.setTextColor(SSD1306_BLACK);
display.setCursor(3, 4);
display.print("Heading");

display.setTextSize(1);
display.setTextColor(SSD1306_WHITE);
display.setCursor(3, 10);
display.print("Sub Heading");
Shapes
Beside text, you often find yourself need to draw basic shapes especially rectangle. This will be used a lot if you want to design a UI or menu on this display. Check out interface and application programming assignment if you interested to see how to design one on this OLED display.
These functions below can be used to draw an outline rectangle display.drawRect() or solid filled rectangle display.fillRect(). The parameter requires coordinate values (x and y), rectangle dimensions (width and height), and color (SSD1306_WHITE or SSD1306_BLACK). Another variants are to draw rounded rectangles with display.drawRoundRect() and display.fillRoundRect(). It requires the same parameter with addition of radius value.
display.drawRect(x, y, width, height, SSD1306_WHITE);
display.fillRect(x, y, width, height, SSD1306_WHITE);

display.drawRoundRect(x, y, width, height, radius, SSD1306_WHITE);
display.fillRoundRect(x, y, width, height, radius, SSD1306_WHITE);
We only look at how to draw a rectangle, but the library has functions for making circle, triangle, line, etc. Each of them require relatively similar parameter values. You can see these functions in the example file or by opening the library file itself C:\Users\Name\Documents\Arduino\libraries\Adafruit_SSD1306\Adafruit_SSD1306.cpp.
Simulating Serial Monitor
As the library code example shows, it's capable to make fairly intricate graphics on this display. However, let's try to make something more practical. The development board from electronic design assignment was designed to be a portable serial monitor in mind.
Below are some simple functions to do it. It consist of a push function to store some string inside an array, an update function to handle all the display object functions, and our own println function as the main function. Simply trigger it with a text as parameter and it will be shown on the display similarly like in serial monitor.
const byte buffer_size = 8;
String buffer[buffer_size] = {};

void push(String txt) {
  for (int i = buffer_size - 1; i > 0; i--)
    buffer[i] = buffer[i - 1];

  buffer[0] = txt;
}

void update() {
  display.clearDisplay();
  display.setCursor(0, 0);

  for (int i = 0; i < buffer_size; i++)
    display.println(buffer[i]);

  display.display();
}

void println(String txt) {
  push(txt);
  update();
  Serial.println(txt);
}
Below is the whole sketch used for the development board shown in the video below. You can simply edit the code inside the loop and you have a portable serial monitor that you can conveniently use when you can't connect your device to Arduino IDE serial monitor.
#include <Wire.h>
#include <Adafruit_GFX.h>
#include <Adafruit_SSD1306.h>

#define SCREEN_I2C_ADDR 0x3C // or 0x3D
#define SCREEN_WIDTH 128     // OLED display width, in pixels
#define SCREEN_HEIGHT 64     // OLED display height, in pixels
#define OLED_RESET     -1 // Reset pin # (or -1 if sharing Arduino reset pin)

Adafruit_SSD1306 display(SCREEN_WIDTH, SCREEN_HEIGHT, &Wire, OLED_RESET);

#define BTN_PIN D2
#define LED_PIN D1

void setup() {
  Serial.begin(9600);

  // SSD1306_SWITCHCAPVCC = generate display voltage from 3.3V internally
  if(!display.begin(SSD1306_SWITCHCAPVCC, SCREEN_I2C_ADDR)) {
    Serial.println(F("SSD1306 allocation failed"));
    for(;;); // Don't proceed, loop forever
  }

  pinMode(BTN_PIN, INPUT_PULLUP);
  pinMode(LED_PIN, OUTPUT);

  display.setTextColor(SSD1306_WHITE);
  println("Dev Board initialized");
}

bool clicked = false;
unsigned int counter = 0;

void loop() {
  if ((digitalRead(BTN_PIN) == LOW) && !clicked) {
    digitalWrite(LED_PIN, HIGH);
    counter++;
    println("Counter: " + String(counter));
    clicked = true;
  }
  else if ((digitalRead(BTN_PIN) == HIGH) && clicked) {
    digitalWrite(LED_PIN, LOW);
    println("Button up");
    clicked = false;
  }
}

const byte buffer_size = 8;
String buffer[buffer_size] = {};

void push(String txt) {
  for (int i = buffer_size - 1; i > 0; i--)
    buffer[i] = buffer[i - 1];

  buffer[0] = txt;
}

void update() {
  display.clearDisplay();
  display.setCursor(0, 0);

  for (int i = 0; i < buffer_size; i++)
    display.println(buffer[i]);

  display.display();
}

void println(String txt) {
  push(txt);
  update();
  Serial.println(txt);
}