VI Flashing process
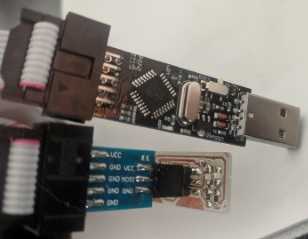
Wiring up
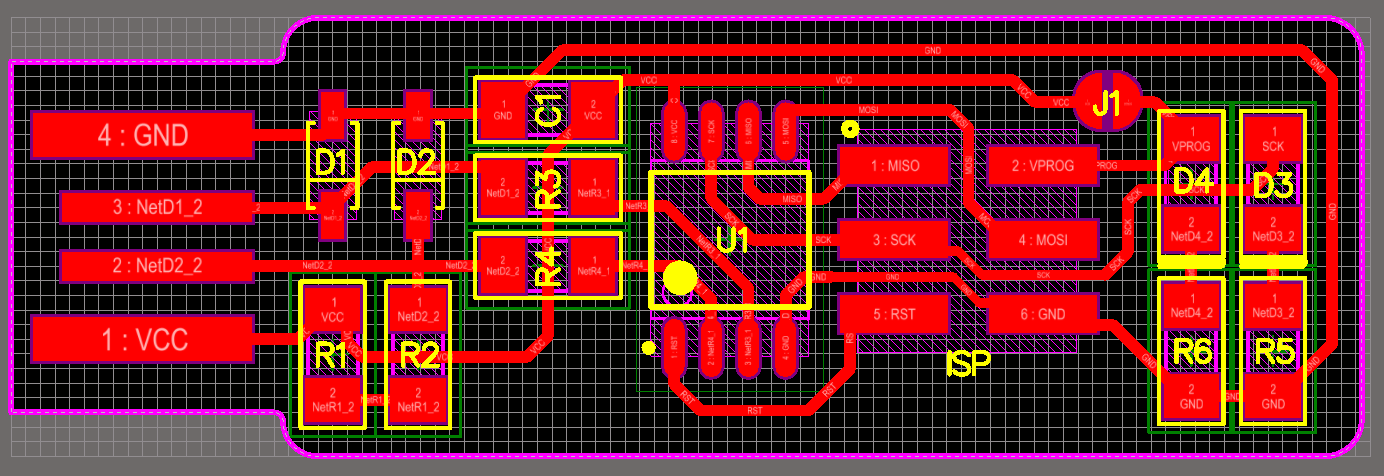
The pinout for the FabTinyUSB pin header is shown on the project page here
| pinout | |
|---|---|
| 1 - Miso | 2 - VProg |
| 3 - SCK | 4 - MOSI |
| 5 - RST | 6 - GND |
I’ve an adapter for my Wavgat USBasp AVR that matches the pinout, so I can use it for flashing.
prepare for flashing
Download and unzip the firmware
Open the makefile in a texteditor and change the programmer entry from usbtiny to USBasp
#PROGRAMMER ?= usbtiny
PROGRAMMER ?= USBasp
Open a command prompt, change into the firmware directory and type make flash
If everything went well, you’ll get an output like this :
C:\Users\admin\Downloads\sciebo\!FabAcademy\!1Workdir\FabTinyISP\fts_firmware_bdm_v1>make flash
avr-gcc -mmcu=attiny45 -Wall -DF_CPU=16500000UL -I. -funsigned-char -funsigned-bitfields -fpack-struct -fshort-enums -Os -Iusbdrv -c main.c -o main.o
main.c:109:13: warning: always_inline function might not be inlinable [-Wattributes]
 static void delay ( void )
             ^~~~~
avr-gcc -mmcu=attiny45 -Wall -DF_CPU=16500000UL -I. -funsigned-char -funsigned-bitfields -fpack-struct -fshort-enums -Os -Iusbdrv -c usbdrv/usbdrv.c -o usbdrv/usbdrv.o
avr-gcc -mmcu=attiny45 -Wall -DF_CPU=16500000UL -I. -funsigned-char -funsigned-bitfields -fpack-struct -fshort-enums -Os -Iusbdrv -c usbdrv/oddebug.c -o usbdrv/oddebug.o
avr-gcc -x assembler-with-cpp -mmcu=attiny45 -Wall -DF_CPU=16500000UL -I. -funsigned-char -funsigned-bitfields -fpack-struct -fshort-enums -Os -Iusbdrv -c usbdrv/usbdrvasm.S -o usbdrv/usbdrvasm.o
avr-gcc -mmcu=attiny45 -o fts_firmware.elf main.o usbdrv/usbdrv.o usbdrv/oddebug.o usbdrv/usbdrvasm.o
avr-size -C --mcu=attiny45 fts_firmware.elf
AVR Memory Usage
----------------
Device: attiny45

Program:    2446 bytes (59.7% Full)
(.text + .data + .bootloader)

Data:         75 bytes (29.3% Full)
(.data + .bss + .noinit)


avr-objcopy -j .text -j .data -O ihex fts_firmware.elf fts_firmware.hex
avrdude -p attiny45 -c USBasp -P usb -e \
                -U flash:w:fts_firmware.hex

avrdude: warning: cannot set sck period. please check for usbasp firmware update.
avrdude: AVR device initialized and ready to accept instructions

Reading | ################################################## | 100% 0.02s

avrdude: Device signature = 0x1e9206 (probably t45)
avrdude: erasing chip
avrdude: warning: cannot set sck period. please check for usbasp firmware update.
avrdude: reading input file "fts_firmware.hex"
avrdude: input file fts_firmware.hex auto detected as Intel Hex
avrdude: writing flash (2446 bytes):

Writing | ################################################## | 100% 3.35s

avrdude: 2446 bytes of flash written
avrdude: verifying flash memory against fts_firmware.hex:
avrdude: load data flash data from input file fts_firmware.hex:
avrdude: input file fts_firmware.hex auto detected as Intel Hex
avrdude: input file fts_firmware.hex contains 2446 bytes
avrdude: reading on-chip flash data:

Reading | ################################################## | 100% 2.47s

avrdude: verifying ...
avrdude: 2446 bytes of flash verified

avrdude: safemode: Fuses OK (E:FF, H:DF, L:62)

avrdude done.  Thank you.


C:\Users\admin\Downloads\sciebo\!FabAcademy\!1Workdir\FabTinyISP\fts_firmware_bdm_v1>
set the clock fuse
Now we have to set the clock fuses by typing make fuses
If everything went well, you’ll get an output like this :
C:\Users\admin\Downloads\sciebo\!FabAcademy\!1Workdir\FabTinyISP\fts_firmware_bdm_v1>make fuses
avrdude -p attiny45 -c USBasp -P usb \
                -U lfuse:w:0xE1:m -U hfuse:w:0xDD:m \
                -U efuse:w:0xFF:m

avrdude: warning: cannot set sck period. please check for usbasp firmware update.
avrdude: AVR device initialized and ready to accept instructions

Reading | ################################################## | 100% 0.02s

avrdude: Device signature = 0x1e9206 (probably t45)
avrdude: reading input file "0xE1"
avrdude: writing lfuse (1 bytes):

Writing | ################################################## | 100% 0.00s

avrdude: 1 bytes of lfuse written
avrdude: verifying lfuse memory against 0xE1:
avrdude: load data lfuse data from input file 0xE1:
avrdude: input file 0xE1 contains 1 bytes
avrdude: reading on-chip lfuse data:

Reading | ################################################## | 100% 0.00s

avrdude: verifying ...
avrdude: 1 bytes of lfuse verified
avrdude: reading input file "0xDD"
avrdude: writing hfuse (1 bytes):

Writing | ################################################## | 100% 0.02s

avrdude: 1 bytes of hfuse written
avrdude: verifying hfuse memory against 0xDD:
avrdude: load data hfuse data from input file 0xDD:
avrdude: input file 0xDD contains 1 bytes
avrdude: reading on-chip hfuse data:

Reading | ################################################## | 100% 0.02s

avrdude: verifying ...
avrdude: 1 bytes of hfuse verified
avrdude: reading input file "0xFF"
avrdude: writing efuse (1 bytes):

Writing | ################################################## | 100% -0.00s

avrdude: 1 bytes of efuse written
avrdude: verifying efuse memory against 0xFF:
avrdude: load data efuse data from input file 0xFF:
avrdude: input file 0xFF contains 1 bytes
avrdude: reading on-chip efuse data:

Reading | ################################################## | 100% 0.02s

avrdude: verifying ...
avrdude: 1 bytes of efuse verified
Don’t close the command prompt !
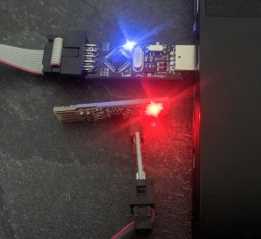
Test the USB Functionality
Now unplug the programmer and the FabTinyUSB
Plug the FabTinyUSB into your USB port and have look into the device manager
If you see this
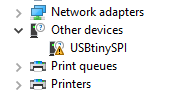
Then everything is okay and we can blow the reset fuse now.
Blow the Reset Fuse
Now unplug the FabTinyUSB and connect it again to the Wavgat USBasp AVR as in the beginning.
Plug the Wavgat back into the USB port and type make rstdisbl
C:\Users\admin\Downloads\sciebo\!FabAcademy\!1Workdir\FabTinyISP\fts_firmware_bdm_v1>make rstdisbl
avrdude -p attiny45 -c USBasp -P usb \
                -U lfuse:w:0xE1:m -U hfuse:w:0x5D:m \
                -U efuse:w:0xFF:m

avrdude: warning: cannot set sck period. please check for usbasp firmware update.
avrdude: AVR device initialized and ready to accept instructions

Reading | ################################################## | 100% 0.02s

avrdude: Device signature = 0x1e9206 (probably t45)
avrdude: reading input file "0xE1"
avrdude: writing lfuse (1 bytes):

Writing | ################################################## | 100% -0.00s

avrdude: 1 bytes of lfuse written
avrdude: verifying lfuse memory against 0xE1:
avrdude: load data lfuse data from input file 0xE1:
avrdude: input file 0xE1 contains 1 bytes
avrdude: reading on-chip lfuse data:

Reading | ################################################## | 100% 0.00s

avrdude: verifying ...
avrdude: 1 bytes of lfuse verified
avrdude: reading input file "0x5D"
avrdude: writing hfuse (1 bytes):

Writing | ################################################## | 100% 0.02s

avrdude: 1 bytes of hfuse written
avrdude: verifying hfuse memory against 0x5D:
avrdude: load data hfuse data from input file 0x5D:
avrdude: input file 0x5D contains 1 bytes
avrdude: reading on-chip hfuse data:

Reading | ################################################## | 100% 0.01s

avrdude: verifying ...
avrdude: 1 bytes of hfuse verified
avrdude: reading input file "0xFF"
avrdude: writing efuse (1 bytes):

Writing | ################################################## | 100% 0.02s

avrdude: 1 bytes of efuse written
avrdude: verifying efuse memory against 0xFF:
avrdude: load data efuse data from input file 0xFF:
avrdude: input file 0xFF contains 1 bytes
avrdude: reading on-chip efuse data:

Reading | ################################################## | 100% 0.02s

avrdude: verifying ...
avrdude: 1 bytes of efuse verified

avrdude: safemode: Fuses OK (E:FF, H:5D, L:E1)

avrdude done.  Thank you.


C:\Users\admin\Downloads\sciebo\!FabAcademy\!1Workdir\FabTinyISP\fts_firmware_bdm_v1>
!!! GREAT SUCCESS !!!
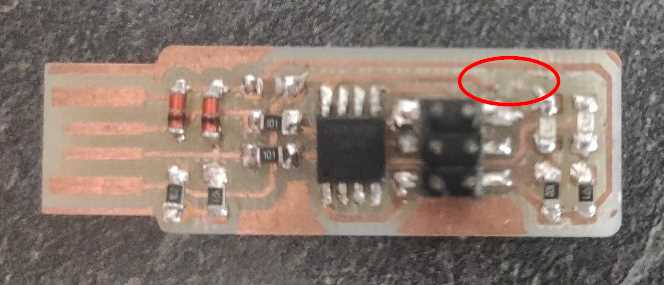
final steps
Now we have to desolder / open the little bridge on the FabTinyUSB.
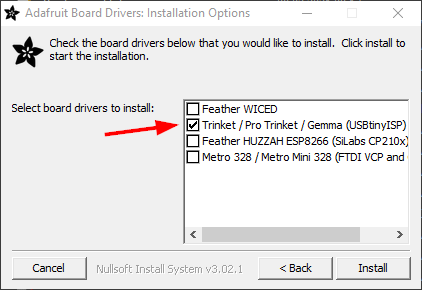
To install the driver download and install the adafruit driver installer
Just check the box shown in the following picture and install the driver
In the device manager, you see now your programmer

The FabTinyUSB is now ready to use…