Bus (Wired) address Communication
First, I watched this tutorial covering how to connect two Raspberry Pi Picos together and make them communicate with each other. One pico will send the message “hello” to the other Pico, which is trying to receive the message. I thought the tutorial was hard as I could not get the Picos to work even after hours of trying.
Wrong boards
At first, I decided to use a Raspberry Pi Pico board with a XIAO board by connecting the RX pin of the XIAO to the TX pin of the Pico board, and vice versa. The TX and RX pins represent the master and sub class on the UART communication tool. I also uploaded the code onto Thonny, which can be found here.
After talking with Mr. Dubick, my instructor, about failing to have a connection between the boards, he mentioned that I am trying to wire a Pico to a XIAO. However, in the video, the person was showing me how to connect 2 Picos. So, what I am doing does not match with the tutorial.
Therefore, I switched to 2 Xiao boards.
Xiao board trouble
Unfortunately, I did not have access to 2 separate Xiao seeed cables, so I resorted to connecting the power pins of the 2 boards together through a breadboard. I also installed MicroPython on both boards and connected to Thonny through different COM ports.
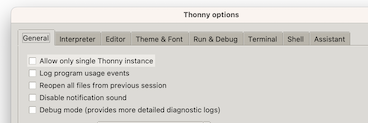
When doing this, I also couldn’t connect get 2 windows to open in Thonny. Then, Dylan Ferro told me that I have to uncheck the option for only allowing one instance of Thonny under the options tab:
However, it turned out that this only worked for Windows. So, I could not use my Mac for this tutorial. Now that I have 2 windows, I connected the shell in each window to a Xiao.
On Windows, the code still did not work, and Dylan explained that I have to save the easy_comms library to the computer itself. I did that, but all I got was the initialization of the code, and no actual indication of a reception of the message sent by Pico 1 to Pico 2:
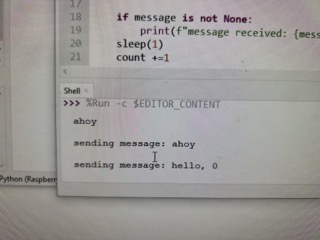
As seen in the picture, the program stops after outputting “ahoy”.
Analogy by Teddy Warner
Fab Academy alumni Teddy Warner examined my program and gave me an analogy comparing the 2 boards to 2 people having a conversation. The problem that I have right now is that one person is alone in a room, trying to listen to the other person in another room. Also, they are talking at different times, so it is impossible for them to hold a conversation at the same time.
Therefore, the solution is to run the 2 programs on both Xiaos at the same time. He mentioned that the timing has to be right.
Editing the code
Following Teddy’s explanation, I took a look at the Easy_comms library that the tutorial provided:
from machine import UART, Pin
from time import time_ns

class Easy_comms:

    uart_id = 0
    baud_rate = 9600
    timeout = 1000 # milliseconds

    def __init__(self, uart_id:int, baud_rate:int=None):
        self.uart_id = uart_id
        if baud_rate: self.baud_rate = baud_rate

        # set the baud rate
        self.uart = UART(self.uart_id,self.baud_rate)

        # Initialise the UART serial port
        self.uart.init()

    def send(self, message:str):
        print(f'sending message: {message}')
        message = message + '\n'
        self.uart.write(bytes(message,'utf-8'))

    def start(self):
        message = "ahoy\n"
        print(message)
        self.send(message)

    def read(self)->str:
        start_time = time_ns()
        current_time = start_time
        new_line = False
        message = ""
        while (not new_line) or (current_time <= (start_time + self.timeout)):
            if (self.uart.any() > 0):
                message = message + self.uart.read().decode('utf-8')
                if '\n' in message:
                    new_line = True
                    message = message.strip('\n')
                    # print(f'received message: {message}')
                    return message
            else:
                pass
                #print("No message recieved")
I noticed that in the first few lines, there was a timeout variable set to 1000 milliseconds or 1 second. I tried to change that time to 3000 so that there could be more time between the 2 boards to establish a connection.
However, that did not work at all.
Working UART Connection
Getting really frustrated, I went to Mr. Dubick again and asked for help. He suggested me to go through the tutorial and rewatch it carefully.
I did as told and carefully traced the code line by line. Then, I made some further modifications to the code, which could be found here.
But most importantly, I changed my wiring. Instead of using a breadboard, I connected the UART line like this:
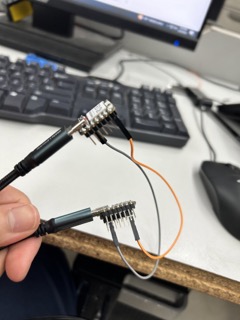
Interestingly, I only connected one TX pin to the other xiao’s RX pin, instead of wiring the connection in both ways. However, when I uploaded the code, the connection was made:
Milling
You can find the milling procedure here.
Wireless
Next, it is time to conduct the wireless connection between 2 Pico Ws, in which I used this tutorial.
I connected 2 Raspberry Pi Pico Ws (the ones that support wireless communication) to my computer through different COM ports:
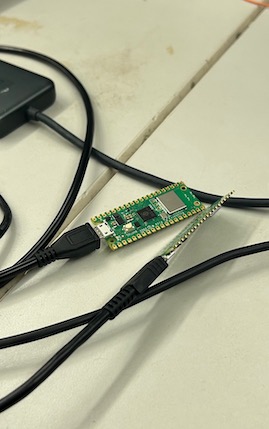
At first, I could not get both pico Ws to connect to their respective COM ports:
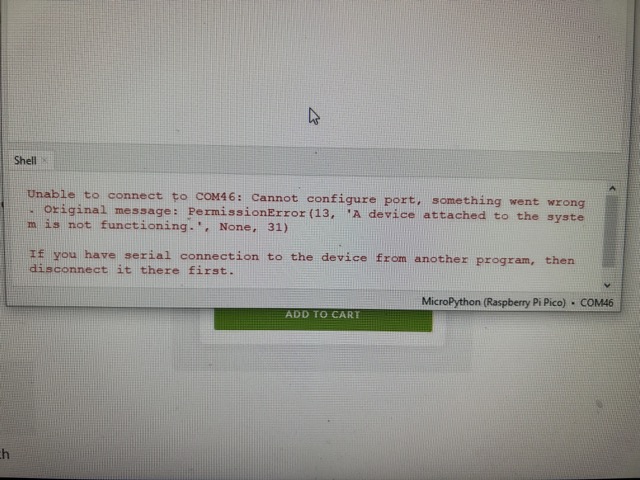
I restarted Thonny and it worked, connecting one Pico W to Com 45 and the other to com 46. Learning from UART, I also made sure to do this in 2 separate windows.
Code
There are 3 parts to the code.
There is a secret.py file that contains the ssid and password of the wireless network, which in this case, is my personal hotspot.
There is a server.py:
# Webserver to send RGB data
# Tony Goodhew 5 July 2022
import network
import socket
import time
from machine import Pin, ADC
from secret import ssid,password
import random
wlan = network.WLAN(network.STA_IF)
wlan.active(True)
wlan.connect(ssid, password)

# Wait for connect or fail
max_wait = 10
while max_wait > 0:
    if wlan.status() < 0 or wlan.status() >= 3:
        break
    max_wait -= 1
    print('waiting for connection...')
    time.sleep(1)

# Handle connection error
if wlan.status() != 3:
    raise RuntimeError('network connection failed')
else:
    print('connected')
    status = wlan.ifconfig()
    print( 'ip = ' + status[0] )

# Open socket
addr = socket.getaddrinfo('0.0.0.0', 80)[0][-1]

s = socket.socket()
s.bind(addr)
s.listen(1)

print('listening on', addr)

# Listen for connections
while True:
    try:
        cl, addr = s.accept()
        print('client connected from', addr)
        request = cl.recv(1024)
        print(request)
        # Do not unpack request
        # We reply to any request the same way
        # Generate 3 values to send back
        r = random.randint(0,255)
        g = random.randint(0,255)
        b = random.randint(0,255)
        # Join to make a simple string with commas as separators
        rgb = str(r) + "," + str(g) + ","+str(b)

        response = rgb # This is what we send in reply

        cl.send(response)
        print("Sent:" + rgb)
        cl.close()

    except OSError as e:
        cl.close()
        print('connection closed')
There is also a client.py code block for the other Pico:
# Program to read RGB values from a local Pico Web Server
# Tony Goodhew 5th July 2022
# Connect to network
import network
import time
from secret import ssid, password
import socket

wlan = network.WLAN(network.STA_IF)
wlan.active(True)
wlan.connect(ssid, password)
while not wlan.isconnected() and wlan.status() >= 0:
    print("Waiting to connect:")
    time.sleep(1)

# Should be connected and have an IP address
wlan.status() # 3 == success
wlan.ifconfig()
print(wlan.ifconfig())

while True:
    ai = socket.getaddrinfo("172.20.10.7", 80) # Address of Web Server
    addr = ai[0][-1]

    # Create a socket and make a HTTP request
    s = socket.socket() # Open socket
    s.connect(addr)
    s.send(b"GET Data") # Send request
    ss=str(s.recv(512)) # Store reply
    # Print what we received
    print(ss)
    # Split into RGB components
    l = len(ss)
    ss = ss[2:l-1]     # Strip to essentials
    p = ss.find(",")   # Find first comma
    r = int(ss[0:p])   # Extract RED value
    ss = ss[p+1:]      # Remove red part
    p = ss.find(",")   # Find comma separator
    g = int(ss[0:p])   # Extract GREEN value
    b = int(ss[p+1:])  # Extract BLUE value
    print(r,g,b)       # Print RGB values
    print()
    # Set RGB LED here
    s.close()          # Close socket
    time.sleep(0.2)    # wait
Installing packages
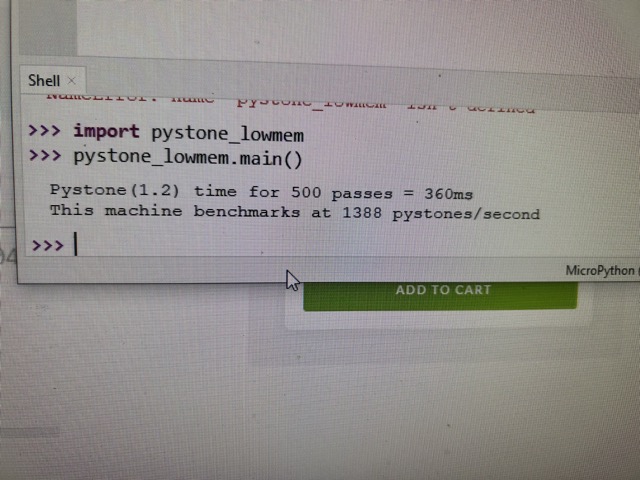
Next, I installed 2 libraries on the Pico boards. They are the pystone_lowmem package and the urequests package. These form the cornerstones of wireless communication used on the Picos.
Server.py
First, I ran
import pystone_lowmem
pystone_lowmem.main()
in the shell user interface. It worked and the speed of the Pico was shown:
Then, I ran the server.py script and see if it could be connected to my phone’s hotspot. Apparently, it failed to connect.
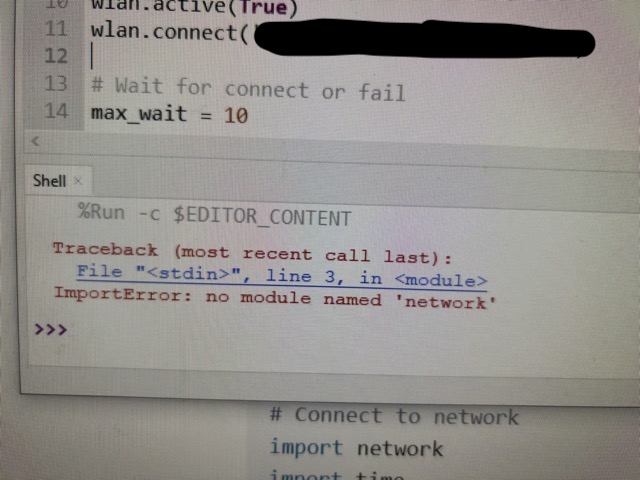
As seen, Thonny tells me that network is not a module. I searched the problem up on Google and one solution I came across was seeing if the .uf2 file was the right kind. This suddenly struck me as the right solution because I actually forgot to install the file for the Pico Ws, which is different than the package for the regular Pico.
The mistake I made was assuming that the package was already installed.
So, I decided to install the files and put the Picos into Bootloader mode so that the local devices showed up on the computer:
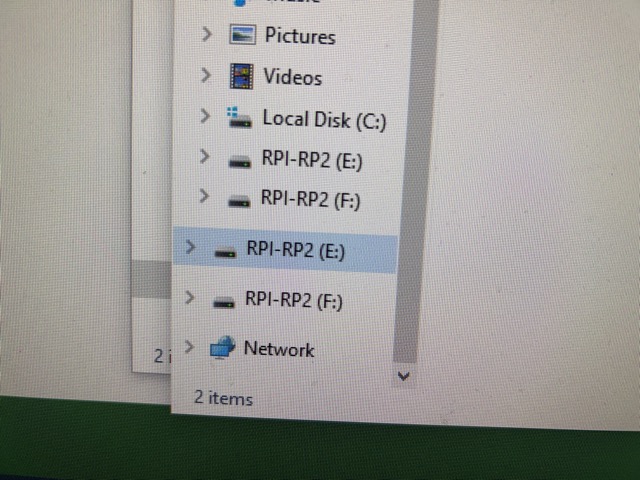
After downloading the .uf2 file from the MicroPython documentation, I moved a copy into each of the devices (E and F).
I ran the server.py program again and it still failed:

But I think it was because it takes a few seconds for the Pico to connect to my phone. After confirming that my hotspot established a connection,

I ran the server.py program again and it worked.
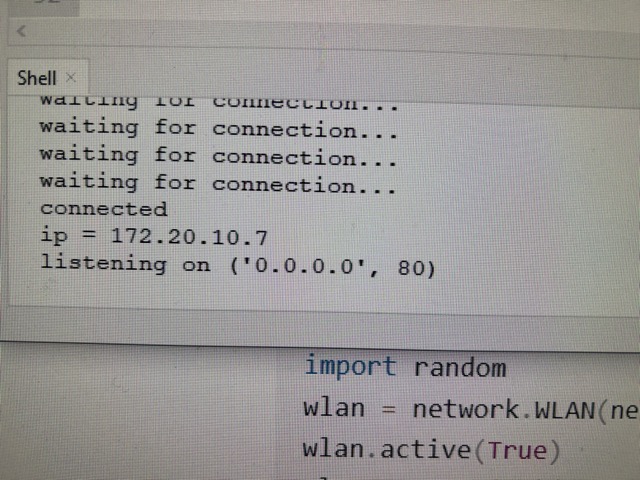
The program displayed the IP address of the Pico.
Client.py
Moving on to client.py, I ran the other Pico’s program and waited for a connection to form.
This particular connection will send random RGB values from one Pico to the other, which outputs the transmitted RGB values.
At first, client.py failed:
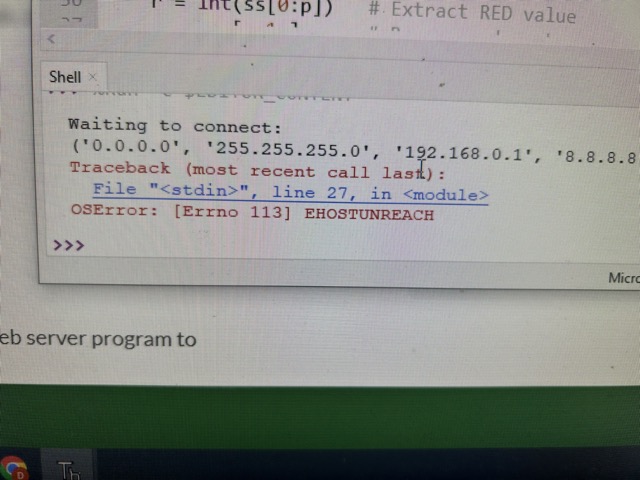
But as it was with the server.py, it takes a second for the connection to form. This was the finished product:
As you can see, the program works flawlessly.