Week 14 Adam & David
UART Communication
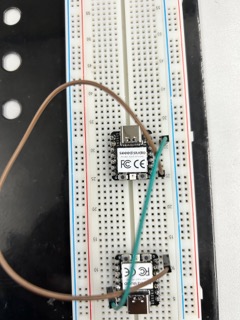
Wiring - David
First, we connected to RP2040 Pico XIAO microcontrollers together using the RX and TX pins together and sent a messsage (hello) from one pico to the other. Then, the other pico tests using a while loop to see if the message is received. The code in Thonny (MicroPython is displayed below).
We also connected the ground of the XIAO to the ground of the other board.
This is the example wiring for reference:
Finding Libraries - David
In order to find the libraries for the code, we used these libraries from GitHub.
Sender Code Modifications - David
It is important to note that there are 2 sets of code in the UART connection that we are testing. The follow is the sender code modifications.
from easy_comms import Easy_comms
from time import sleep

com1 = Easy_comms(uart_id=0, baud_rate=9600)
# com1.start()

count = 0
while True:
    # send a message
    com1.send(f'hello, {count}')

    #check for messages
    # message = com1.read()

    #if message is not None:
     #   print(f"message received: {message.strip('\n')}")
    sleep(1)
    count +=1
After the first couple of connections did not work, I noticed that in the setup, the com1.start() command might be interfering with the communication process. If you look in the library of Easy Comms in the code provided by Adam, you can see that the .start() command prints out “ahoy” and sends the message to the other board.
However, in the while loop, it is sending hello. Therefore, I thought that “ahoy” might be interfering with the hello send loop.
In the while loop, I noticed that the code is asking for the board to check for incoming messages and also sending messages:
 check for messages
    message = com1.read()

    if message is not None:
        print(f"message received: {message.strip('\n')}")
For this reason, I decided to comment this section out, because it was potentially blocking the while loop from continuing and sending “hello”.
Reciever Code Modifications - Adam
I modified the reciever code from the library to the following (with the help of this forum).
from easy_comms import Easy_comms
from time import sleep

com1 = Easy_comms(uart_id=0, baud_rate=9600)
com1.start()

while True:
    message = ""
    message = com1.read()

    if message is not None:
        print(f"message received: {message.strip('\n')}")
    sleep(1)
I also saved this on the pico as easy_comms.py.
from machine import UART, Pin
from time import time_ns

class Easy_comms:

    uart_id = 0
    baud_rate = 9600
    timeout = 1000 # milliseconds

    def __init__(self, uart_id:int, baud_rate:int=None):
        self.uart_id = uart_id
        if baud_rate: self.baud_rate = baud_rate

        # set the baud rate
        self.uart = UART(self.uart_id,self.baud_rate)

        # Initialise the UART serial port
        self.uart.init()

    def send(self, message:str):
        print(f'sending message: {message}')
        message = message + '\n'
        self.uart.write(bytes(message,'utf-8'))

    def start(self):
        message = "ahoy\n"
        print(message)
        self.send(message)

    def read(self)->str:
        start_time = time_ns()
        current_time = start_time
        new_line = False
        message = ""
        while (not new_line) or (current_time <= (start_time + self.timeout)):
            if (self.uart.any() > 0):
                message = message + self.uart.read().decode('utf-8')
                if '\n' in message:
                    new_line = True
                    message = message.strip('\n')
                    # print(f'received message: {message}')
                    return message
            else:
                pass
                #print("No message recieved")
        #else:
        #    return None
Board Design - David
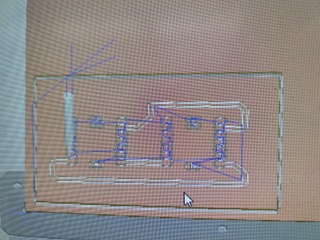
The board design is made with KiCAD, the eeschema schematic design is as follows:

The PCB new design is rendered as such:

Original Design (Ripped Traces) - David
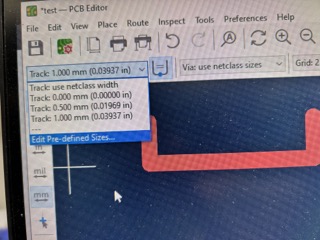
After I plotted the design in KiCAD and loaded the files into Bantam, I realized that the traces were too thin, they were also at 0.25mm.
Milling took several tries as I failed to do all the steps correctly. The first time, the Othermill machine did not work because the bit did not spin. So, I switched to another machine. When I had everything setup, using the Othermill workflow, I realized that the bit went straight down into the copper board:

Fellow student Adam Durrett explained to me that I did not set the height correctly inside the bantam software. Apparently, I forgot to go to BitBraker and lower the bit on to the board, when it does so, it sends out a signal to the software, alerting it has made contact with the board. Then, the software would calculate the height of the stock. This is a basic feature that I forgot to do, and you can see the full workflow here.
Design Corrections - David
When I milled it correctly, I found out that the traces were ripped because of how thin they were. Adam Durrent told me that I could actually change the width of the traces in KiCAD:
Final Mill - David
After making the changes in KiCAD, this is the render in Bantam:
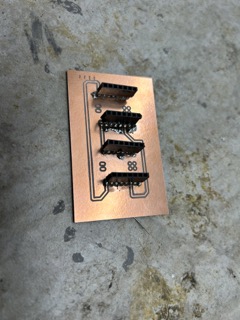
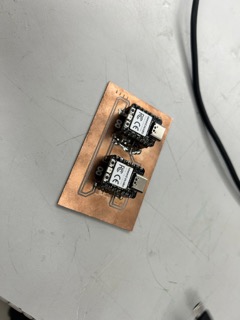
And, I finally had a good board:

Final Solder
I soldered female jumper connectors on to the traces due to the fact that I didn’t want to waste unnecessary Xiaos, since we were low on supply:
Testing Board - Adam & David
After making sure that the plugins were secure, we plugged in the Xiaos (the ones with the code on them) on milled board:
We plugged in the soldered board and it worked first try!
Wireless (Wi-Fi)
Programming - Adam
I used this website and this website to help me with the programming.
To make sure the hotspot was available I ran this. It turned out that, for some reason, only David’s hotspot worked. We also learned you have to turn on Maximize Compatibility in the hotspot settings for the Pico to be able to connect to the hotspot of Apple iPhones.
wifi_scan.py
import network
import time

# Initialize Wi-Fi in station mode
wlan = network.WLAN(network.STA_IF)
wlan.active(True)

# Scan for available Wi-Fi networks
print("Scanning for Wi-Fi networks...")
networks = wlan.scan()

# Print the SSIDs of the detected networks
print("Available Wi-Fi networks:")
for network in networks:
    ssid = network[0].decode('utf-8')
    print(ssid)

# Deactivate Wi-Fi after scanning
wlan.active(False)
I then made this. The SSID is visible as the network name in the hotspot settings on the iPhone.
secret.py
ssid = **MY HOTSPOT NAME**
password = **MY HOTSPOT PASSWORD**
Then, ChatGPT wrote this code, which failed to connect.
server.py (just trying to connect - written by ChatGPT)
import network
import socket
import time
from secret import ssid, password

wlan = network.WLAN(network.STA_IF)
wlan.active(True)

wlan.connect(ssid, password)

max_wait = 10
while not wlan.isconnected() and max_wait > 0:
    max_wait -= 1
    print('waiting for connection...')
    time.sleep(1)

if not wlan.isconnected():
    print('network connection failed')
    print('Wi-Fi status:', wlan.status())
    print('Wi-Fi config:', wlan.ifconfig())
else:
    print('connected')
    status = wlan.ifconfig()
    print('ip = ' + status[0])
Finally, this code worked!
server.py (from tutorial - worked!)
# Webserver to send RGB data
# Tony Goodhew 5 July 2022
import network
import socket
import time
from machine import Pin, ADC
from secret import ssid,password
import random
wlan = network.WLAN(network.STA_IF)
wlan.active(True)
wlan.connect(ssid, password)

# Wait for connect or fail
max_wait = 10
while max_wait > 0:
    if wlan.status() < 0 or wlan.status() >= 3:
        break
    max_wait -= 1
    print('waiting for connection...')
    time.sleep(1)

# Handle connection error
if wlan.status() != 3:
    raise RuntimeError('network connection failed')
else:
    print('connected')
    status = wlan.ifconfig()
    print( 'ip = ' + status[0] )

# Open socket
addr = socket.getaddrinfo('0.0.0.0', 80)[0][-1]

s = socket.socket()
s.bind(addr)
s.listen(1)

print('listening on', addr)

# Listen for connections
while True:
    try:
        cl, addr = s.accept()
        print('client connected from', addr)
        request = cl.recv(1024)
        print(request)
        # Do not unpack request
        # We reply to any request the same way
        # Generate 3 values to send back
        r = random.randint(0,255)
        g = random.randint(0,255)
        b = random.randint(0,255)
        # Join to make a simple string with commas as separators
        rgb = str(r) + "," + str(g) + ","+str(b)

        response = rgb # This is what we send in reply

        cl.send(response)
        print("Sent:" + rgb)
        cl.close()

    except OSError as e:
        cl.close()
        print('connection closed')
But when I ran this on the other pico…
client.py
# Program to read RGB values from a local Pico Web Server
# Tony Goodhew 5th July 2022
# Connect to network
import network
import time
from secret import ssid, password
import socket

wlan = network.WLAN(network.STA_IF)
wlan.active(True)
wlan.connect(ssid, password)
while not wlan.isconnected() and wlan.status() >= 0:
    print("Waiting to connect:")
    time.sleep(1)

# Should be connected and have an IP address
wlan.status() # 3 == success
wlan.ifconfig()
print(wlan.ifconfig())

while True:
    ai = socket.getaddrinfo("172.20.10.6", 80) # Address of Web Server
    addr = ai[0][-1]

    # Create a socket and make a HTTP request
    s = socket.socket() # Open socket
    s.connect(addr)
    s.send(b"GET Data") # Send request
    ss=str(s.recv(512)) # Store reply
    # Print what we received
    print(ss)
    # Split into RGB components
    l = len(ss)
    ss = ss[2:l-1]     # Strip to essentials
    p = ss.find(",")   # Find first comma
    r = int(ss[0:p])   # Extract RED value
    ss = ss[p+1:]      # Remove red part
    p = ss.find(",")   # Find comma separator
    g = int(ss[0:p])   # Extract GREEN value
    b = int(ss[p+1:])  # Extract BLUE value
    print(r,g,b)       # Print RGB values
    print()
    # Set RGB LED here
    s.close()          # Close socket
    time.sleep(0.2)    # wait
I got this error.
Waiting to connect:
('0.0.0.0', '255.255.255.0', '192.168.0.1', '8.8.8.8')
Traceback (most recent call last):
  File "<stdin>", line 27, in <module>
OSError: [Errno 113] EHOSTUNREACH
After restarting the pico by unplugging and replugging it in, then also restarting the hotspot, this connection worked and data was transmitted!
For the working video, see Adam’s site here.