Requirements
This assignment focuses on defining the scope, impact and development strategy of the final project. It requires documenting the project vision, planned fabrication processes, materials, costs, evaluation criteria and communication assets that summarize the project.
Applications & Implications
- Define the purpose and functionality of the project
- Identify similar existing solutions
- Describe sources of information and references
- Define project scope and deliverables
- Specify materials, components and fabrication methods
- Estimate costs and sourcing strategy
- Define evaluation criteria
Project Development
- Develop a project roadmap and timeline
- Create a Bill of Materials (BOM)
- Track project progress
- Document challenges and decisions
- Prepare presentation slide
- Prepare presentation video
- Communicate project outcomes effectively
Project Development Status
Educational platform concept fully defined.
Mechanical and electronic architecture completed.
Custom PCBs designed and validated.
Enclosure and electronic boards manufactured.
Firmware and user interaction implemented.
Complete system assembled and validated.
Project Overview
🚀 Related Final Project
This assignment documents a specific stage of the development of the GameLab Controller. For complete documentation, fabrication files, programming details and final results, visit the Final Project page.
View Final Project DocumentationWhat will it do?
GameLab Controller is a handheld embedded systems educational laboratory designed to help students learn electronics, programming and system integration through a compact and interactive device. The project combines several common embedded systems peripherals into one platform, reducing the need for external wiring during the first stages of learning.
The device allows users to interact with inputs, read sensor data, visualize information and control external outputs from a single controller-like interface. It includes a display, joystick, buttons, LEDs, an IMU motion sensor, power management and GPIO expansion ports connected to an ESP32-S3 microcontroller.
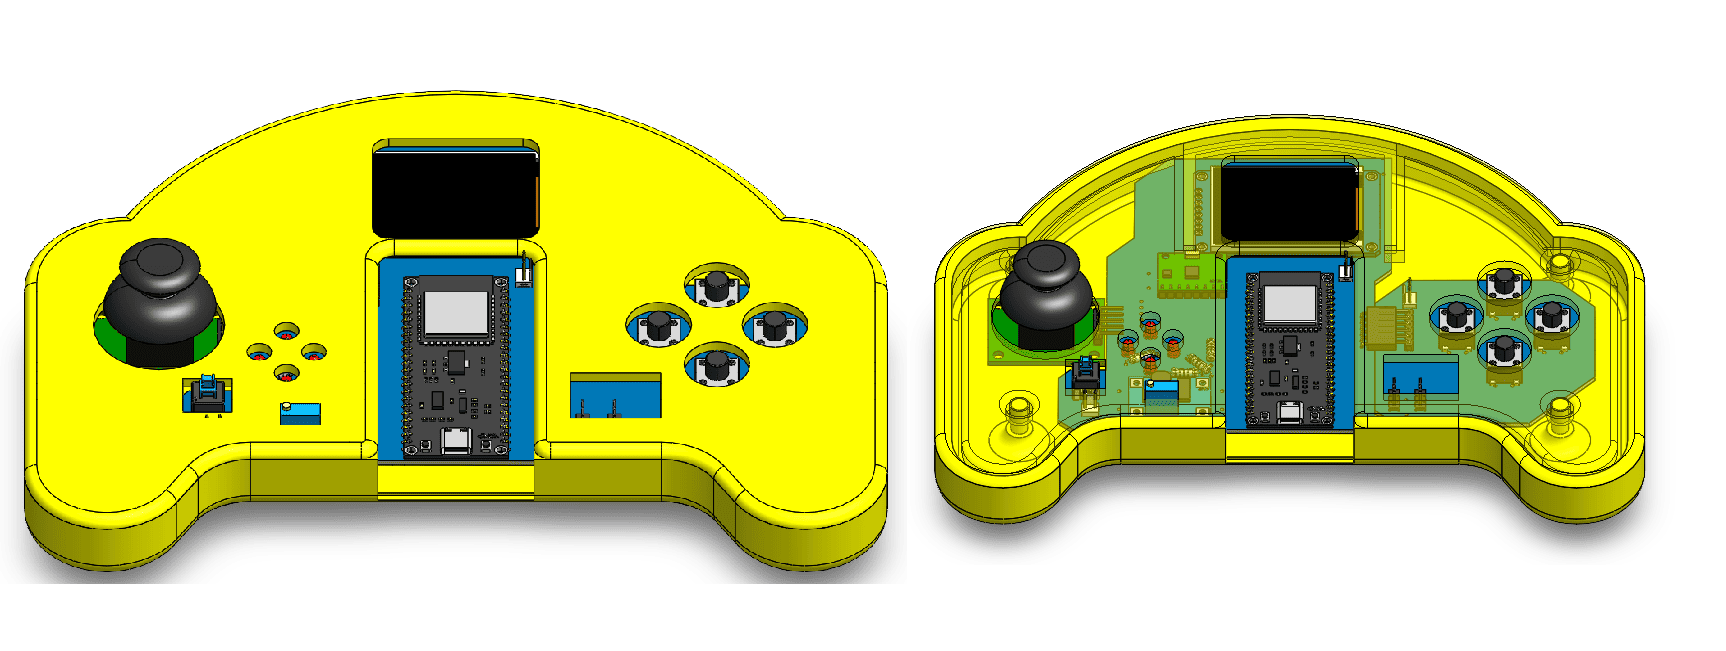
GameLab Controller as a portable embedded systems learning platform.
Problem Addressed
When beginners start learning embedded systems, the first obstacle is often not programming logic but hardware setup. Students must identify electronic components, understand pinouts, create temporary circuits, connect wires correctly and debug mistakes before they can test even a simple example.
These initial steps are important, but they can also slow down the learning process and create frustration. A wrong connection, missing resistor, loose jumper wire or incorrect power line can prevent the activity from working, even if the program logic is correct.
GameLab Controller addresses this by integrating the most common learning peripherals into a ready-to-use platform. This allows students to focus on concepts such as inputs and outputs, sensor reading, graphical interfaces, timing, communication protocols and interaction design.
Educational Purpose
The purpose of the project is not to replace electronics learning, but to provide a smoother entry point. By removing some of the initial wiring barriers, students can first understand how embedded systems behave and then progressively move toward deeper hardware design and circuit development.
The controller can be used as a teaching tool for workshops, introductory electronics courses and Fab Lab learning activities. Its gamepad-inspired shape makes the system familiar and approachable, while the internal architecture exposes students to real embedded systems concepts.
Main Integrated Functions
User Interaction
- Analog joystick for directional input
- Four multi-purpose push buttons
- Four traditional status LEDs
- NeoPixel RGB visual feedback
Embedded System Features
- ESP32-S3 as the main microcontroller
- 1.8" 128×160 RGB TFT display using SPI
- ADXL345 3-axis IMU using I2C
- Li-Po battery power with boost regulation
Expansion Capability
In addition to the integrated peripherals, the system includes two independent GPIO expansion ports. These ports expose ADC and touch-capable pins from the ESP32-S3, allowing users to connect external modules and extend the platform beyond the components built into the controller.
Possible external modules include buzzers, relays, LEDs, analog sensors, servos and motor drivers such as H-bridge modules. This makes the device useful not only as a fixed learning object, but also as a base platform for future experiments and small embedded systems projects.
Expected Use Scenario
A student can begin by programming simple examples such as turning LEDs on and off, reading button states or displaying text on the TFT screen. Later, the same platform can be used to explore analog input with the joystick, motion sensing with the IMU, graphical feedback, power management and external device control through the GPIO ports.
In this way, GameLab Controller acts as a bridge between beginner-friendly learning activities and more advanced embedded systems development. It integrates multiple Fab Academy skills into a single portable educational product: 2D and 3D design, electronics design, PCB fabrication, embedded programming, system integration and packaging.
Existing Solutions and References
Before defining the final architecture of the GameLab Controller, several existing educational and embedded systems platforms were analyzed. The goal was to understand how current solutions approach electronics education, identify their strengths and limitations, and determine which features could be adapted to support a more accessible learning experience.
The research focused on three main categories: traditional electronics starter kits, integrated educational development boards and portable learning devices inspired by gaming platforms. Each category contributed ideas that influenced the design decisions made throughout the project.
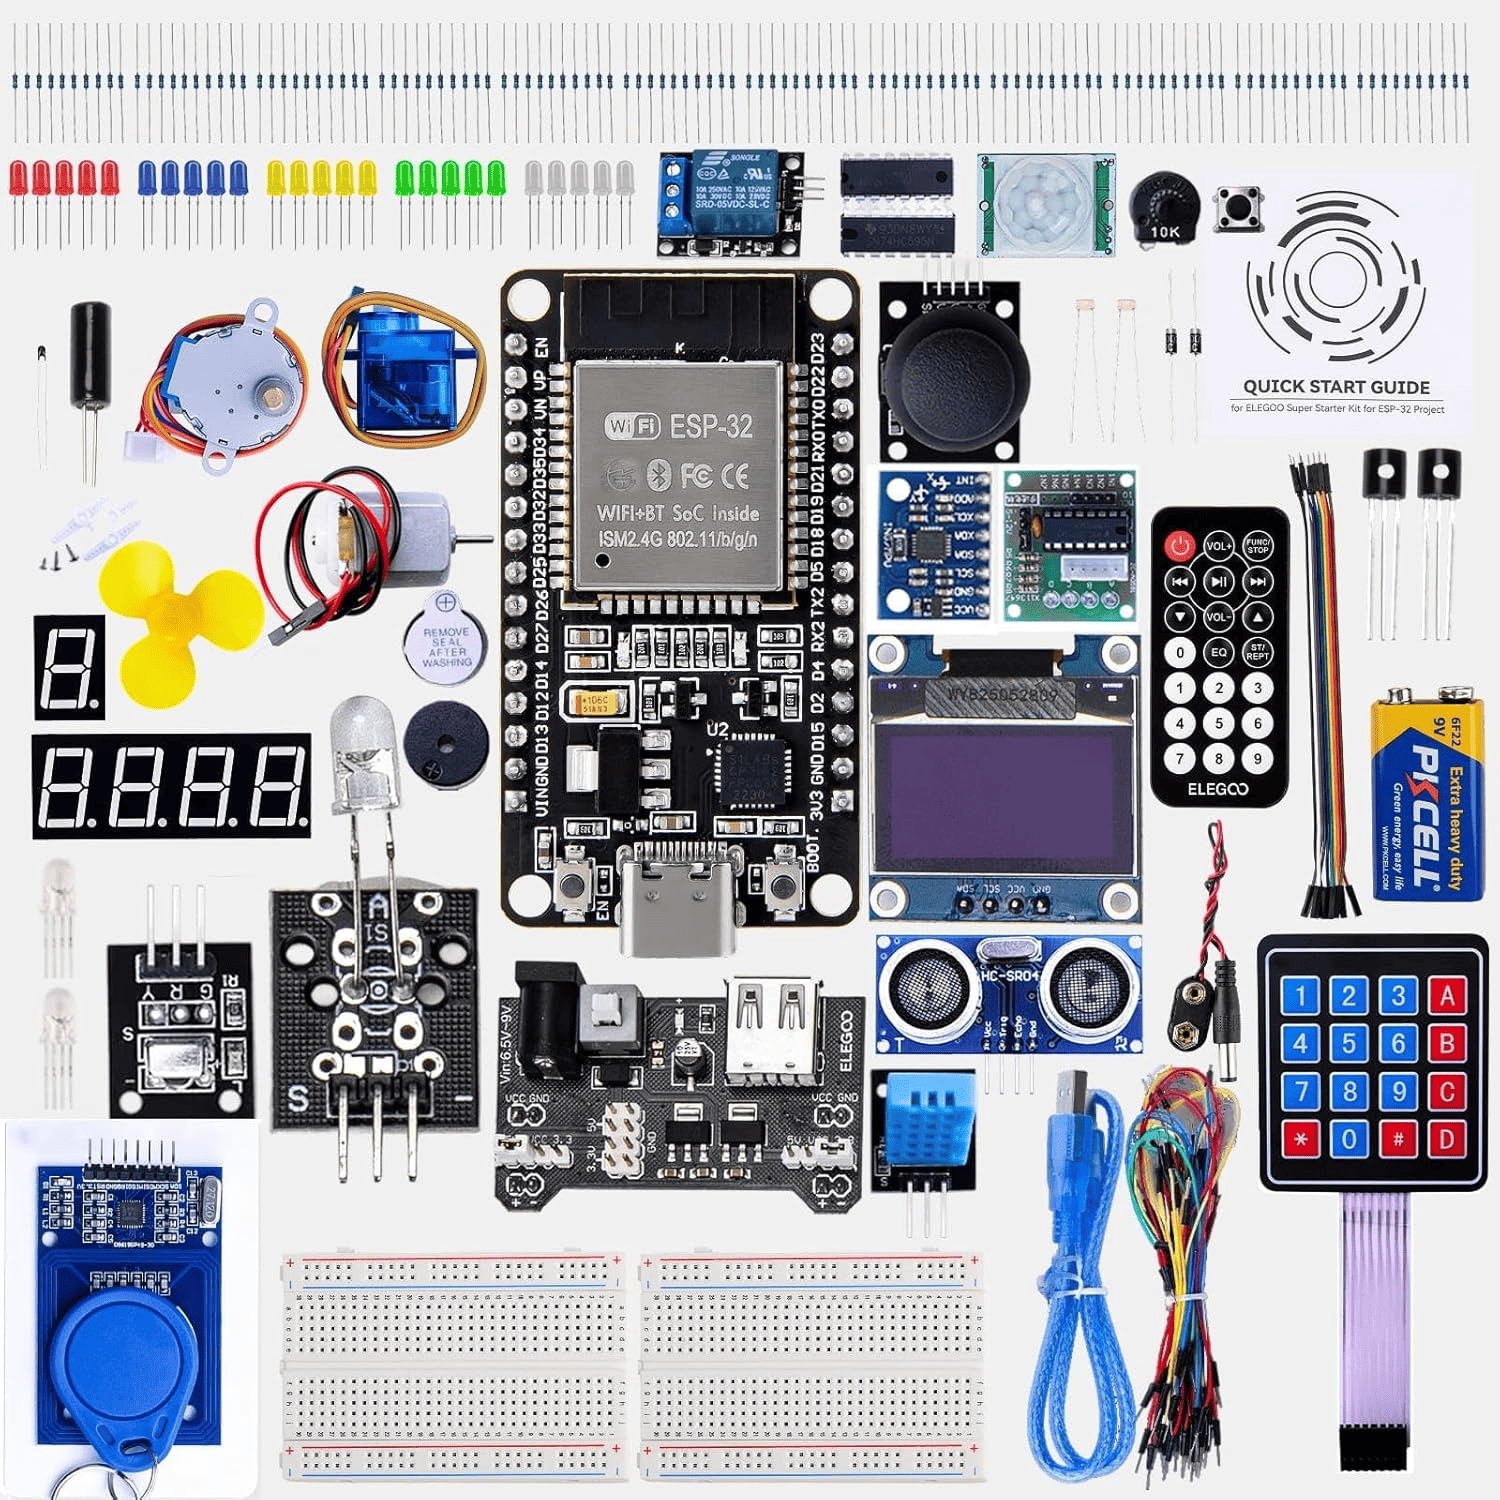
Traditional electronics starter kits based on Arduino and ESP32 boards.
Electronics Starter Kits
Platforms based on Arduino and ESP32 starter kits are among the most common tools used to introduce students to electronics and programming. These kits typically include sensors, LEDs, displays, buttons and communication modules that can be connected using breadboards and jumper wires.
Their greatest advantage is flexibility. Students can build a wide variety of circuits and learn how individual components interact. However, this flexibility often comes with a steep learning curve.
Beginners frequently encounter wiring mistakes, incorrect pin connections and power distribution issues that can delay learning and create frustration before programming concepts are fully understood.
Integrated Educational Platforms
Educational boards such as Micro:bit, M5Stack and similar platforms reduce hardware complexity by integrating sensors, displays and input devices directly into the board. This allows users to focus more on programming and experimentation rather than assembly.
These systems demonstrate the value of providing a ready-to-use environment where learners can immediately begin interacting with embedded systems concepts.
While these platforms offer excellent usability, many are designed as general-purpose development boards rather than dedicated educational laboratories that combine interaction, sensing and expansion in a controller-style format.
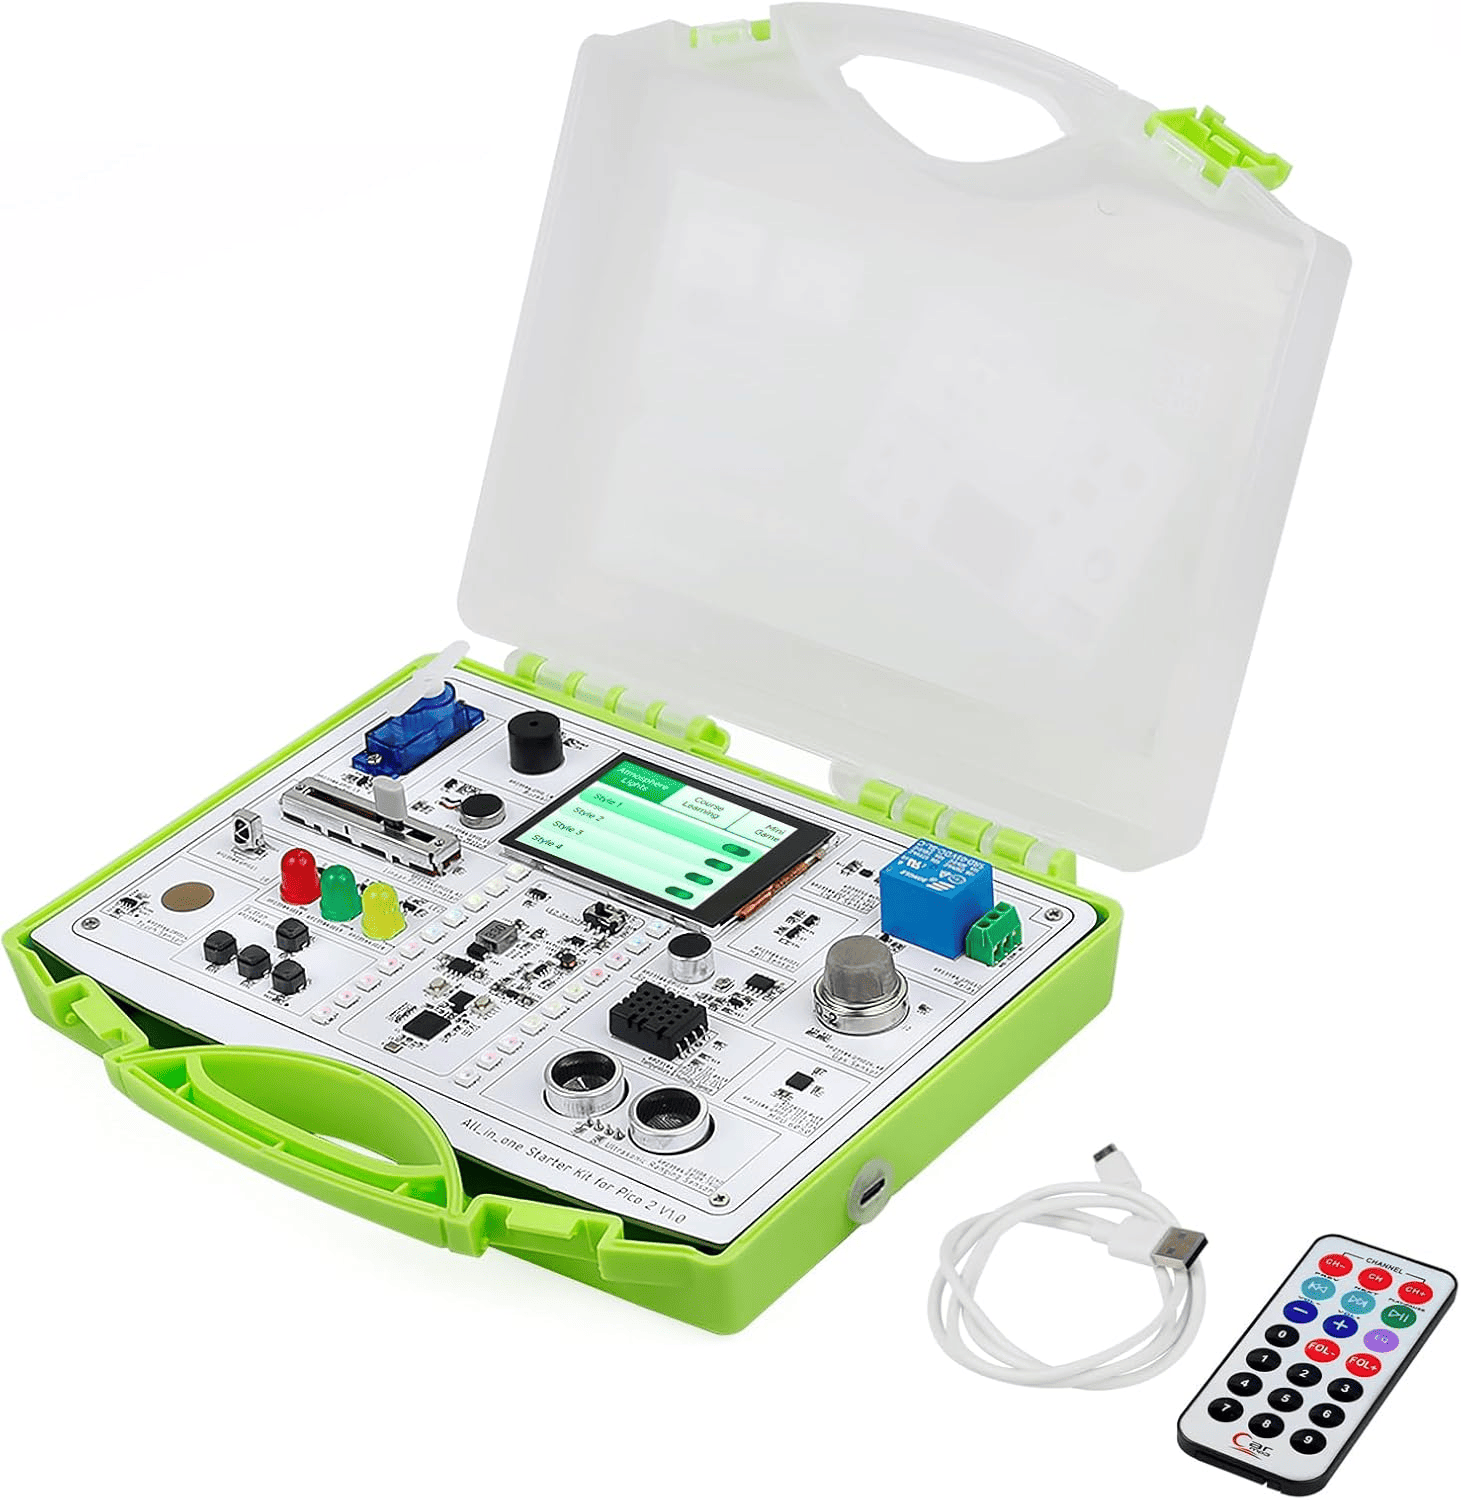
Integrated educational platforms inspired the concept of reducing wiring complexity through built-in peripherals.
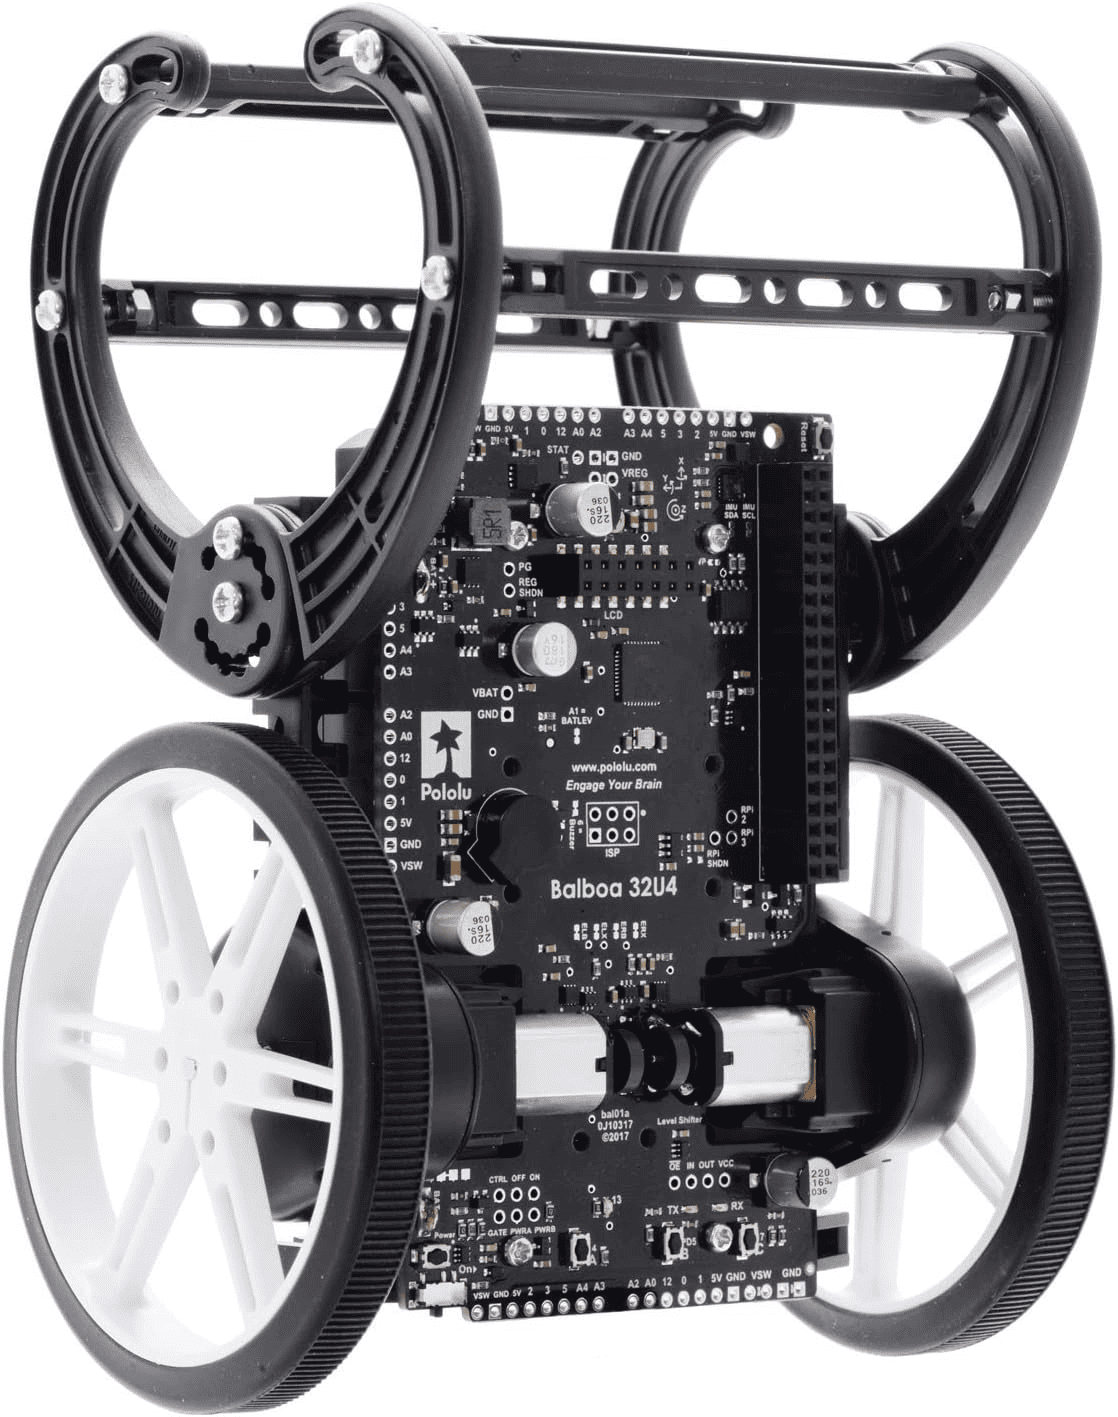
Portable gaming and maker platforms influenced the physical format of the project.
Portable Learning and Gaming Devices
Platforms such as Gamebuino, PyGamer and other handheld development devices demonstrate how game-inspired interfaces can increase user engagement while introducing programming concepts through interactive experiences.
These devices inspired the idea of using a familiar game-controller form factor as a learning tool. A handheld design can make technology feel more approachable, especially for younger learners and students encountering embedded systems for the first time.
However, many of these platforms focus primarily on game development, whereas the objective of the GameLab Controller is broader: providing a complete embedded systems experimentation platform.
How GameLab Controller Differs
The GameLab Controller combines ideas from all three categories. Like a starter kit, it exposes students to real embedded systems concepts. Like integrated educational boards, it minimizes wiring complexity by providing built-in peripherals. Like portable gaming platforms, it uses a handheld format that encourages interaction and exploration.
The main difference is that the project was specifically designed as a portable embedded systems laboratory. Rather than focusing on a single application, the platform integrates sensing, visualization, user input, battery-powered operation and hardware expansion into a single device.
By combining these elements, the GameLab Controller aims to provide a more accessible pathway into embedded systems education while maintaining the flexibility required for experimentation, prototyping and future development.
Sources and Knowledge Base
The development of the GameLab Controller was supported by a combination of technical documentation, hardware references, software development tools and knowledge acquired throughout Fab Academy. Since the project integrates mechanical design, electronics, embedded programming and system integration, multiple sources of information were required during different stages of development.
Rather than relying on a single reference, the project was developed using an iterative workflow where component datasheets, design software, fabrication constraints and previous Fab Academy assignments were combined to guide engineering decisions and validate design choices.
Technical Documentation
The primary source of information for the electronic design was the technical documentation provided by component manufacturers. Datasheets were used to verify operating voltages, communication interfaces, electrical limitations and recommended implementation practices.
These documents were particularly important during the schematic design, PCB layout and firmware development stages, ensuring compatibility between all integrated subsystems.
- ESP32-S3 technical documentation and pinout references
- ADXL345 accelerometer datasheet and I²C communication guide
- 1.8" TFT display controller documentation
- HW-373 battery charging module documentation
- Boost converter module specifications
- NeoPixel LED communication reference
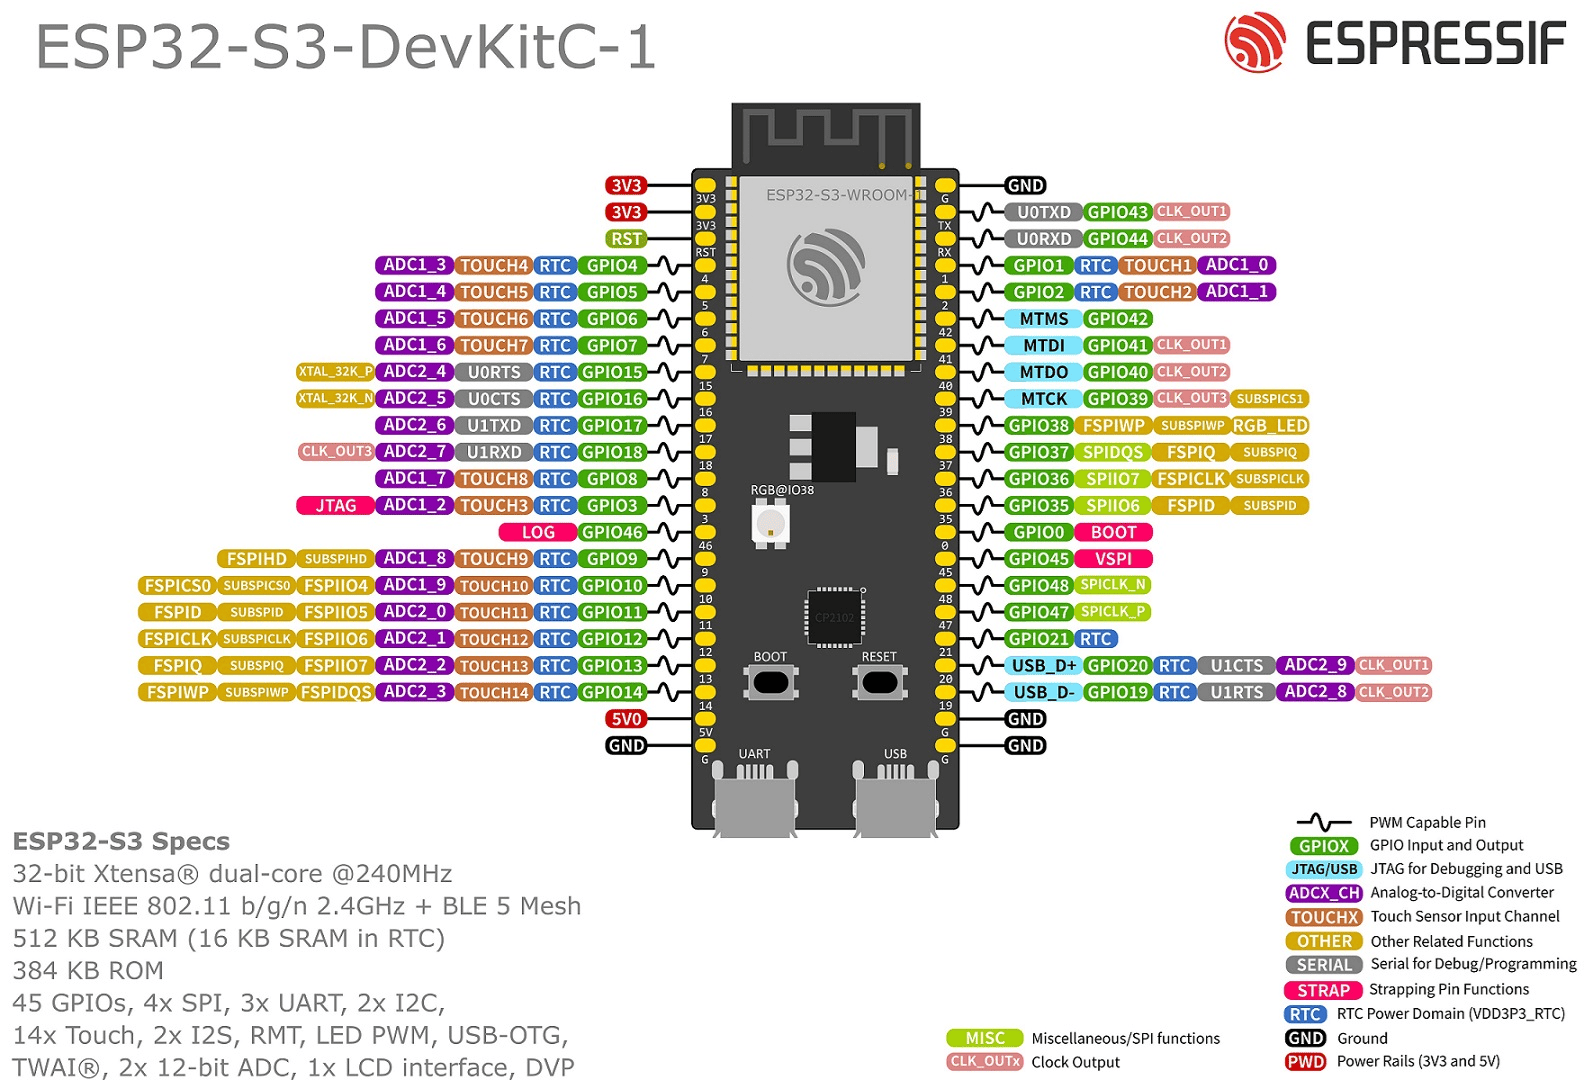
Datasheets and technical references used during the electronic design and programming stages. Click the image to access the official ESP32-S3 DevKitC-1 documentation from Espressif.
CAD (SolidWorks), electronics (EasyEDA) and programming (Arduino IDE) tools used throughout the project.
Design and Development Tools
Several software tools were used to transform the initial concept into a functional prototype. Each tool contributed to a specific aspect of the development process, from mechanical modeling to electronics design and firmware implementation.
- SolidWorks for 3D CAD modeling and assembly validation
- EasyEDA for schematic capture and PCB design
- Arduino IDE for ESP32-S3 firmware development
- GitHub for project documentation and version control
- Fab Academy website infrastructure for documentation
These tools enabled rapid iteration and helped maintain consistency between the mechanical, electrical and software subsystems.
Fab Academy Knowledge Integration
One of the most valuable sources used during the project was the knowledge acquired throughout the Fab Academy program itself. Each weekly assignment contributed a specific skill that later became part of the final project.
Rather than developing the project as an isolated activity, the GameLab Controller evolved as a practical integration of multiple Fab Academy topics and fabrication techniques. The final result combines mechanical design, electronics development, digital fabrication, embedded programming and system integration into a single educational platform.
Throughout the program, individual assignments provided the technical knowledge required to design and manufacture the enclosure, develop the electronic architecture, program the ESP32-S3 and integrate all subsystems into a fully functional product.
The following assignments directly contributed to the development of the GameLab Controller and provided the foundation for the final project.
Community and Open-Source Resources
Additional support was obtained from the open-source hardware and maker communities. Examples, tutorials and implementation references helped validate hardware configurations, communication protocols and software libraries used throughout the project.
Community-generated content was particularly useful when integrating the ESP32-S3, TFT display and ADXL345 sensor, as these components are widely used within the embedded systems ecosystem and benefit from extensive publicly available documentation and example projects.
Knowledge Consolidation
Beyond the individual references, the most important source was the combination of all acquired knowledge into a single engineering workflow. The project required balancing mechanical constraints, electrical design, fabrication limitations and educational objectives simultaneously.
As a result, the GameLab Controller became not only a final project but also a demonstration of how the different disciplines explored during Fab Academy can be integrated into a cohesive and functional product.
Scope of the Project
The scope of the GameLab Controller was defined as the design and development of a portable embedded systems educational laboratory. The project focuses on integrating the most common learning peripherals into a single handheld device, allowing students to explore embedded programming, sensor interaction, visual feedback and hardware expansion without starting from disconnected electronic modules.
The project does not aim to replace advanced electronics prototyping, but to provide an accessible entry point for learning. Its purpose is to simplify the first interaction with embedded systems while still allowing expansion through external GPIO ports.
The project began with a simple hand-drawn sketch used to explore the overall concept and identify the key functionalities required for the platform. At this stage, the objective was not to define dimensions or technical details, but to visualize how the different educational features could coexist within a single handheld device.
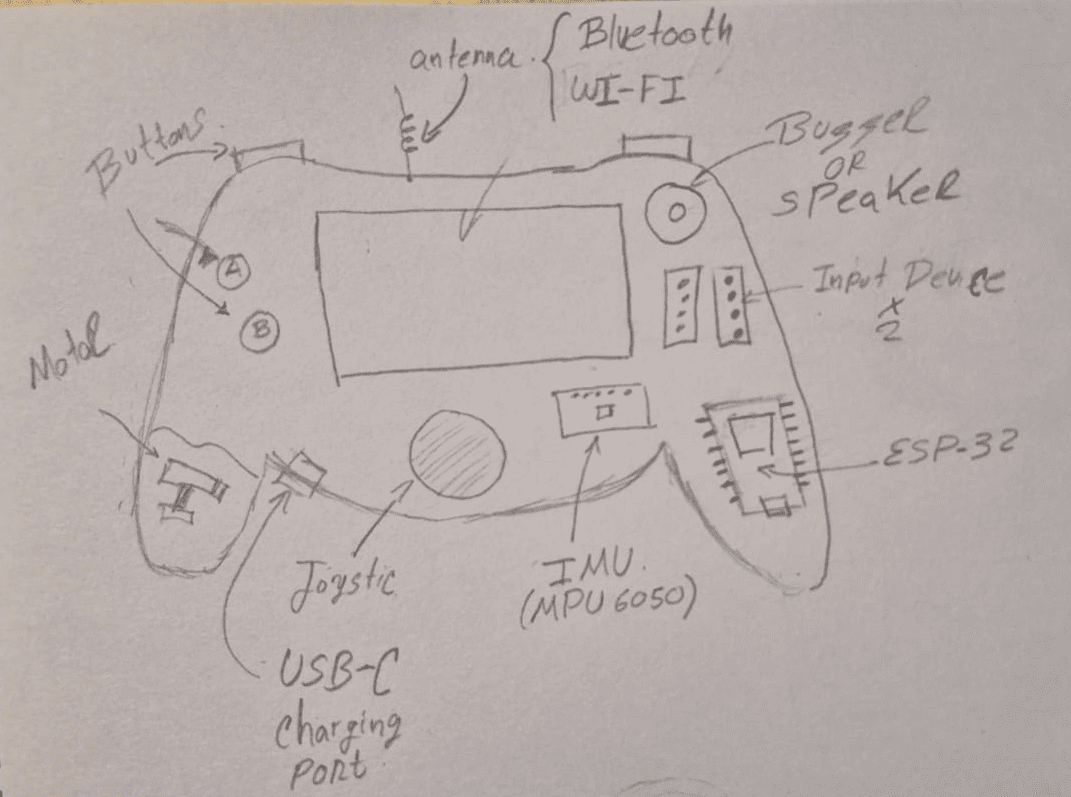
Initial hand-drawn concept sketch of the GameLab Controller. This early design helped define the overall form factor, component distribution and educational objectives before moving to CAD modeling and electronics development.
What will I design?
Mechanical Design
- Handheld controller enclosure
- Top cover and main housing
- Internal space for battery and PCBs
- Openings for display, buttons, LEDs and ports
Electronic Design
- Main PCB for ESP32-S3, display, IMU and power system
- Secondary PCB for buttons and GPIO expansion
- Interconnection between both PCBs
- Power management using Li-Po battery and boost converter
Software Design
- ESP32-S3 firmware
- Input reading from joystick, buttons and IMU
- TFT display interface
- LED feedback and expansion port interaction
Project Boundaries
To keep the project achievable within the Fab Academy schedule, the first version of the GameLab Controller focuses on the controller platform itself. The core objective is to demonstrate a complete integration of mechanical packaging, custom electronics, embedded programming and educational interaction.
Included in this version
- Custom handheld enclosure
- ESP32-S3 based embedded system
- 1.8" RGB TFT display
- Joystick and four multi-purpose buttons
- ADXL345 3-axis IMU
- Four status LEDs and NeoPixel indicator
- Two GPIO expansion ports
- Battery-powered operation
- Presentation slide and video clip
Future development
- Additional plug-and-play educational modules
- Custom joystick PCB instead of commercial module
- Improved power management board
- More compact PCB revision
- Wireless educational activities
- Dedicated curriculum or workshop exercises
Final Scope Statement
The final scope of the project is to create an independently operable handheld embedded systems learning platform that integrates 2D and 3D design, additive fabrication, electronics design and production, embedded programming, system integration and packaging into one complete Fab Academy final project.
Materials, Components and Bill of Materials
The GameLab Controller combines electronic components, fabricated parts and commercial modules. The following tables summarize the function of each main component and the estimated cost of the materials used for the project.
Main Components and Function
| Component | Function in the Project |
|---|---|
| ESP32-S3 | Main microcontroller used to control inputs, outputs, display and expansion ports. |
| 1.8" RGB TFT Display | Visual interface for menus, feedback and educational activities. |
| ADXL345 IMU | 3-axis motion sensing module connected through I2C. |
| Analog Joystick Module | Directional input device for interaction and control activities. |
| Four Push Buttons | Multi-purpose digital inputs for user interaction. |
| Four LEDs | Basic visual output indicators for programming exercises. |
| NeoPixel RGB LED | Programmable RGB visual feedback output. |
| Li-Po Battery 3.7V 500mAh | Portable power source for the controller. |
| HW-373 Charging Module | USB battery charging and power management support. |
| Boost Converter | Regulates battery voltage for stable system operation. |
| FR-1 Copper Boards | Material used to fabricate the custom PCBs. |
| 3D Printed Enclosure | Mechanical packaging for electronics, battery and user interface. |
Bill of Materials
| Item | Qty | Estimated Cost | Source / Purchase Link |
|---|---|---|---|
| ESP32-S3 Development Board | 1 | $11.99 USD | Purchase link |
| 1.8" 128×160 RGB TFT Display | 1 | $9.99 USD | Purchase link |
| ADXL345 IMU Module | 1 | $7.29 USD | Purchase link |
| Analog Joystick Module | 1 | $8.80 USD | Purchase link |
| Push Buttons | 4 | $6.99 USD | Purchase link |
| KIT LEDs | 4 | $7.99 USD | Purchase link |
| KIT HEADERS | 1 | $9.99 USD | Purchase link |
| Li-Po Battery 3.7V 500mAh | 1 | $8.69 USD | Purchase link |
| HW-373 Charging Module | 1 | $6.99 USD | Purchase link |
| Boost Converter Module | 1 | $5.96 USD | Purchase link |
| KIT FR-1 Copper Board | 2 | $7.99 USD | Purchase link |
| PLA Filament | ~250 g | $14.44 USD | Fab Lab inventory |
| Total Estimated Cost | $107.11 USD |
Processes and Fabrication Methods
The GameLab Controller was developed using a combination of digital design, electronic fabrication, additive manufacturing and embedded programming processes. The project integrates multiple skills acquired throughout Fab Academy and demonstrates how different fabrication workflows can be combined to create a complete embedded systems product.
Rather than relying on commercially available solutions, most of the mechanical and electronic subsystems were designed and fabricated specifically for the project. The following sections summarize the main processes used during development.
Computer-Aided Design
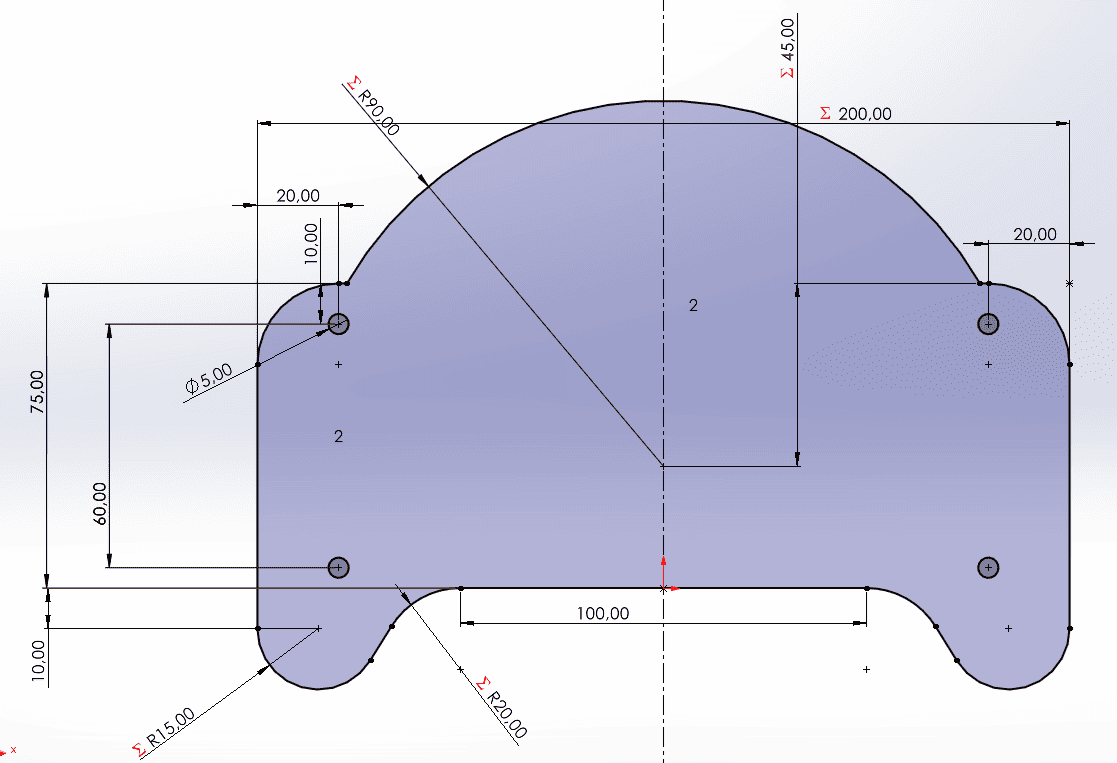
The development process started with the creation of conceptual sketches and CAD models. SolidWorks was used to design the controller enclosure, define internal component placement and validate assembly constraints.
The CAD workflow made it possible to evaluate ergonomics, battery placement, PCB clearances and accessibility before manufacturing the physical parts.
Electronics Design
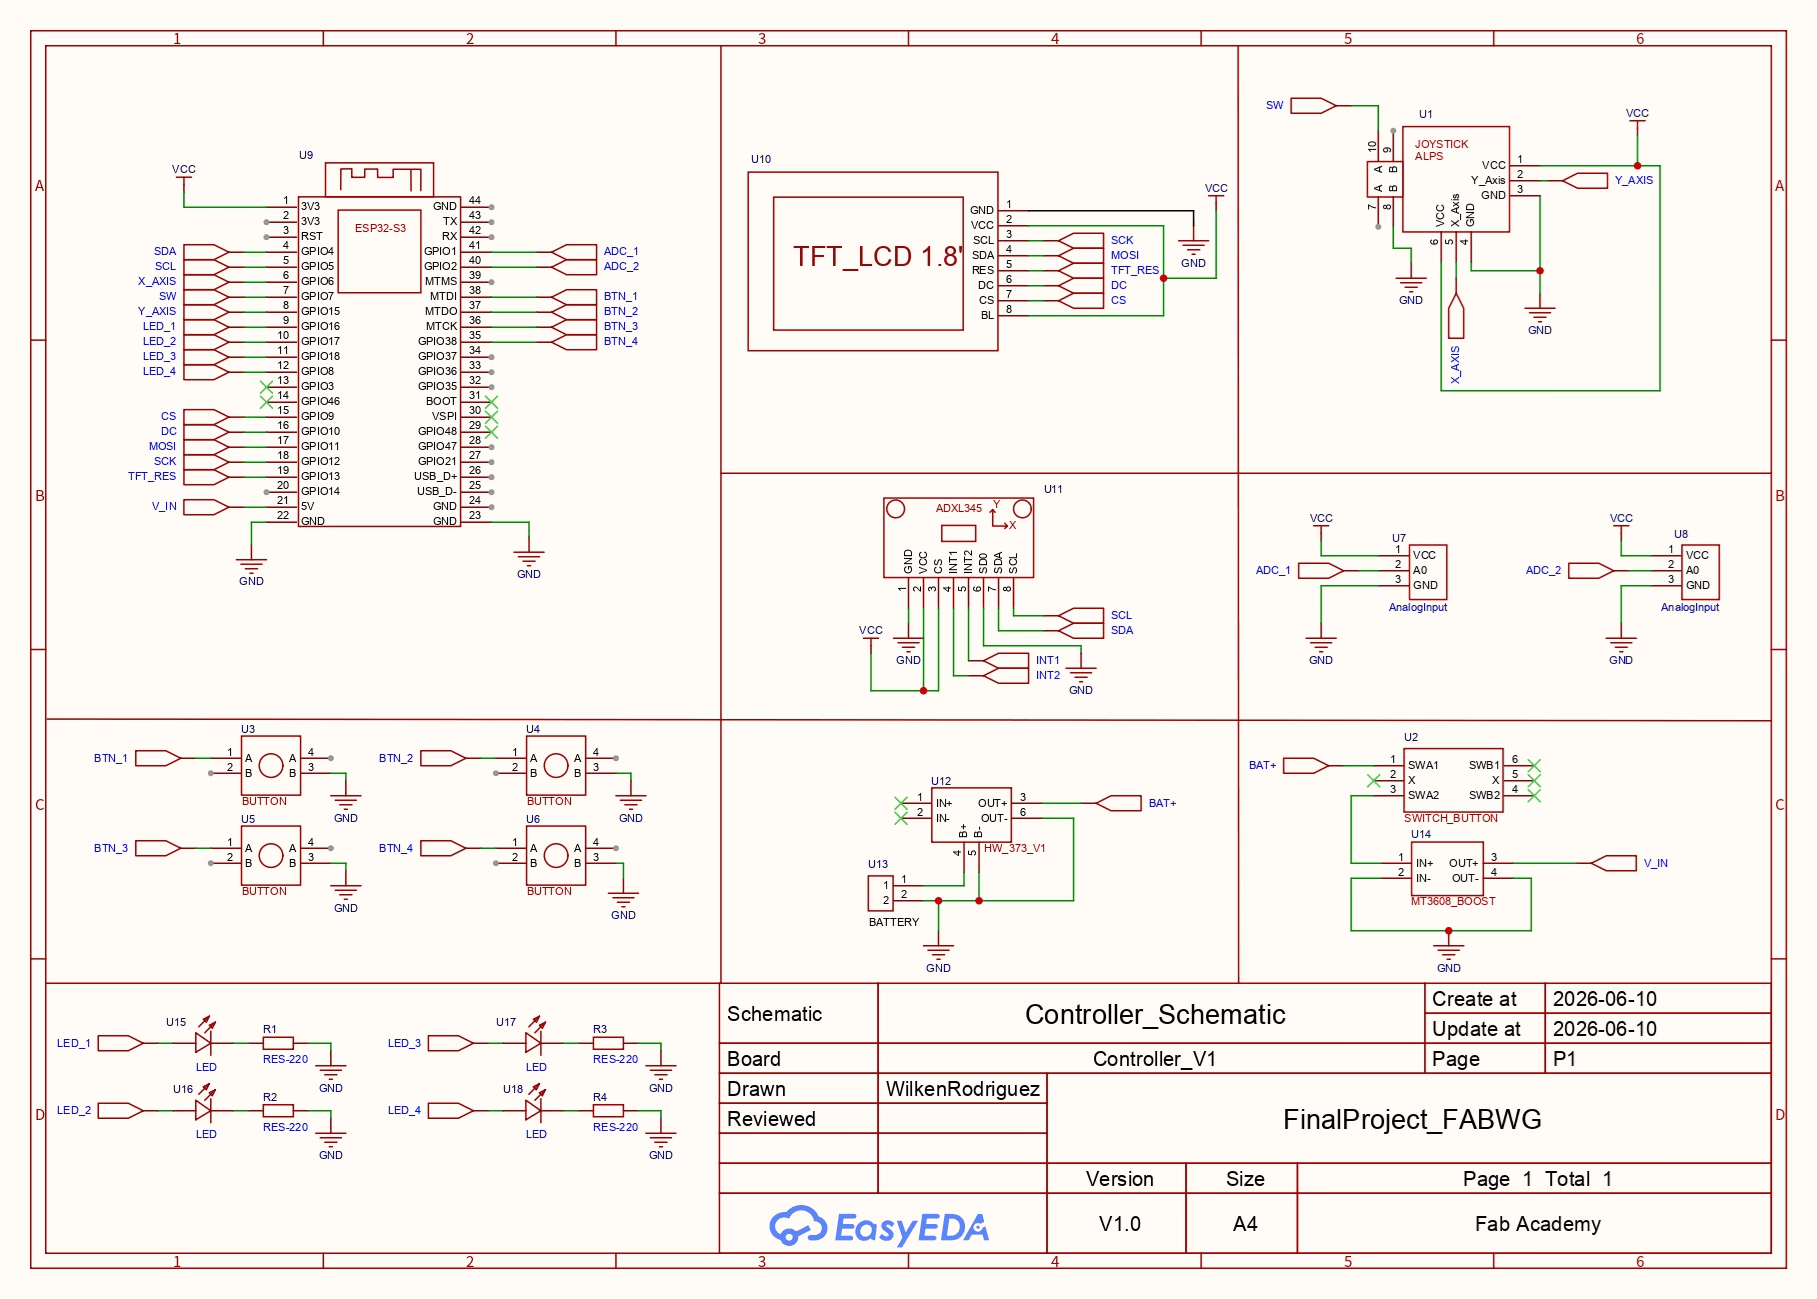
The electronic architecture was developed in EasyEDA. Schematics were created to integrate the ESP32-S3, TFT display, IMU sensor, battery management system, LEDs and expansion ports.
PCB layouts were optimized to fit within the available fabrication constraints, ultimately resulting in two interconnected custom boards.
Electronics Production
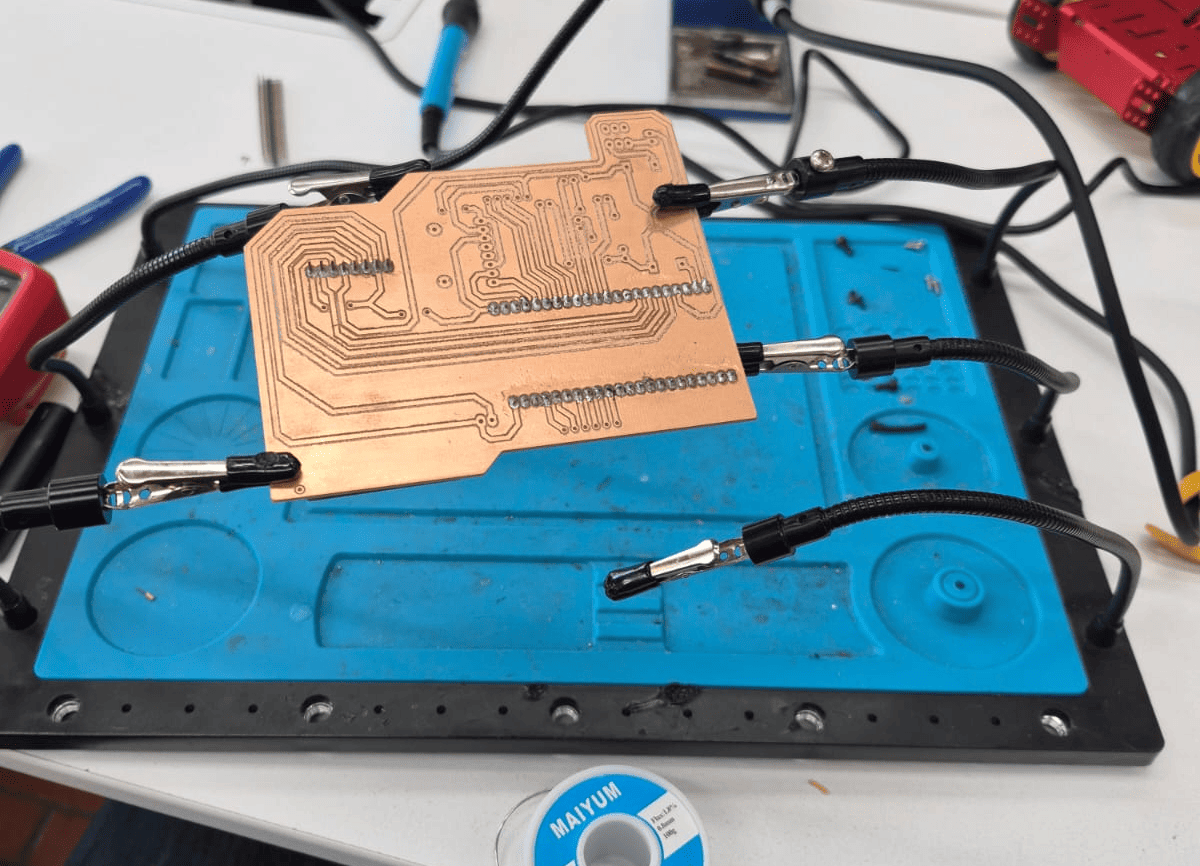
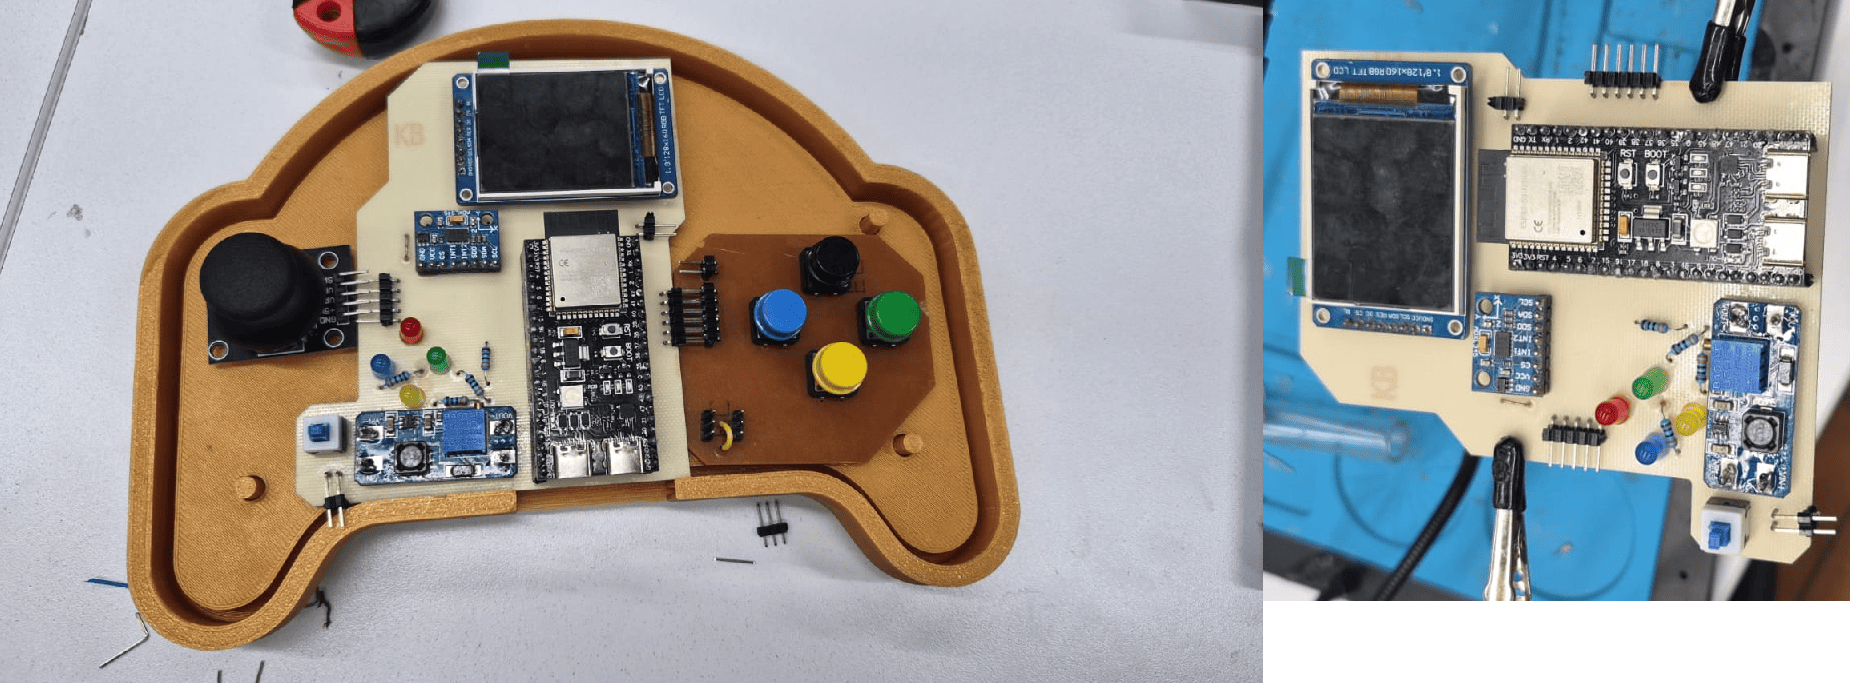
The custom PCBs were fabricated from FR-1 copper boards using the PCB production workflow developed during Fab Academy. After milling, all electronic components were soldered and electrically tested.
This process produced the main PCB and the secondary button and GPIO expansion board used in the final assembly.
Additive Manufacturing
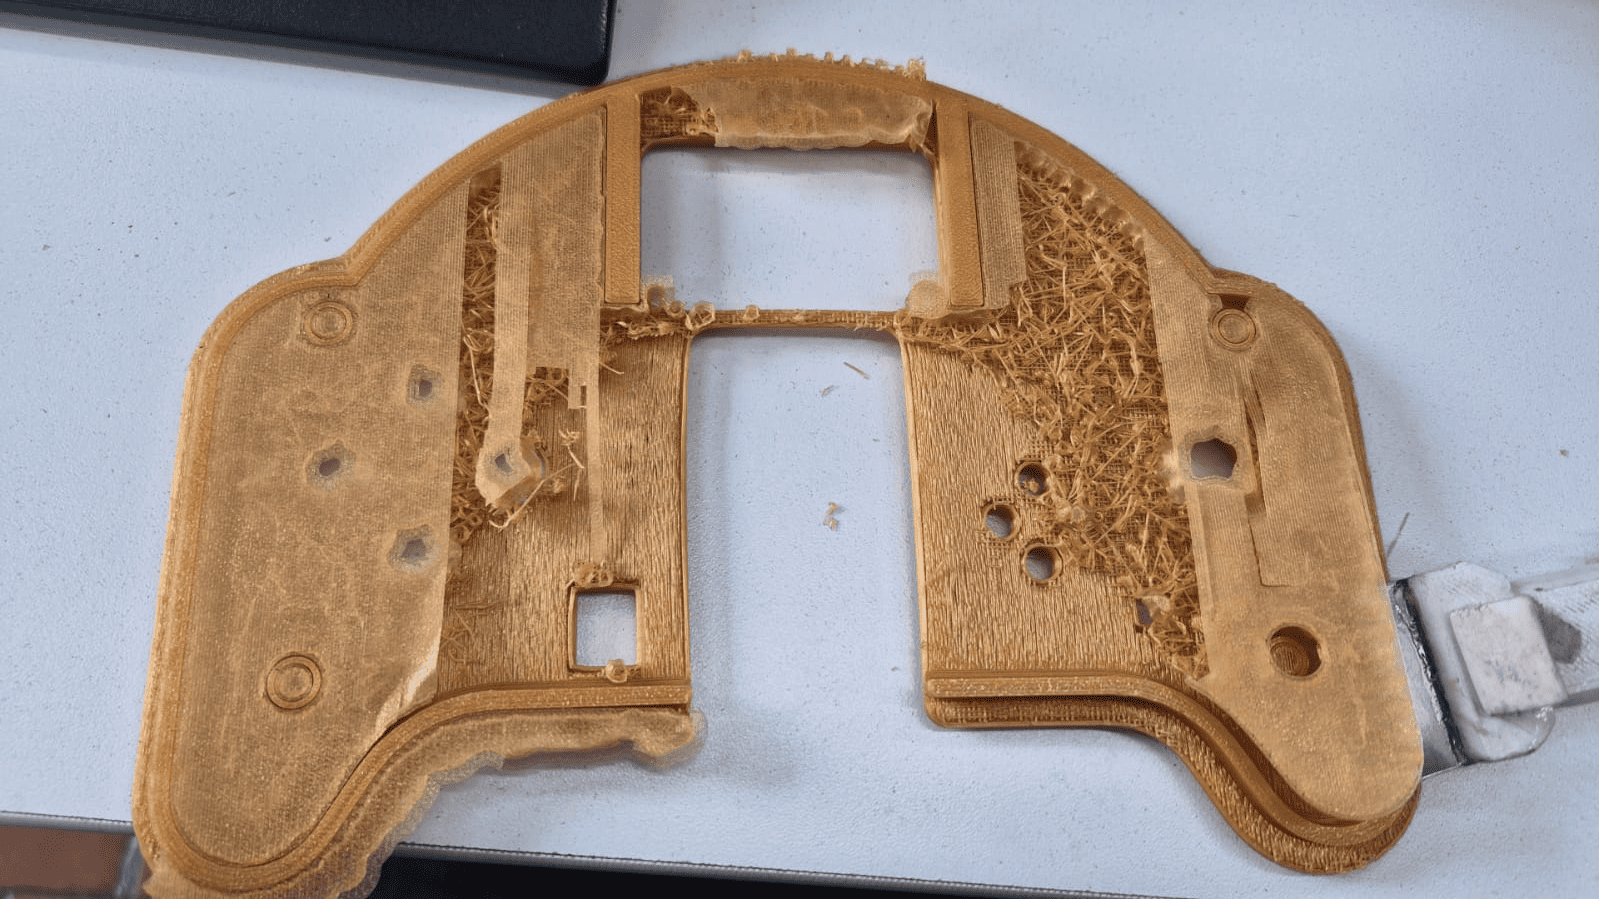
The enclosure was manufactured using FDM 3D printing with PLA filament. The housing and top cover were printed separately and later assembled to create the final controller body.
Additive manufacturing enabled rapid prototyping and made it possible to iterate the mechanical design before final assembly.
Embedded Programming
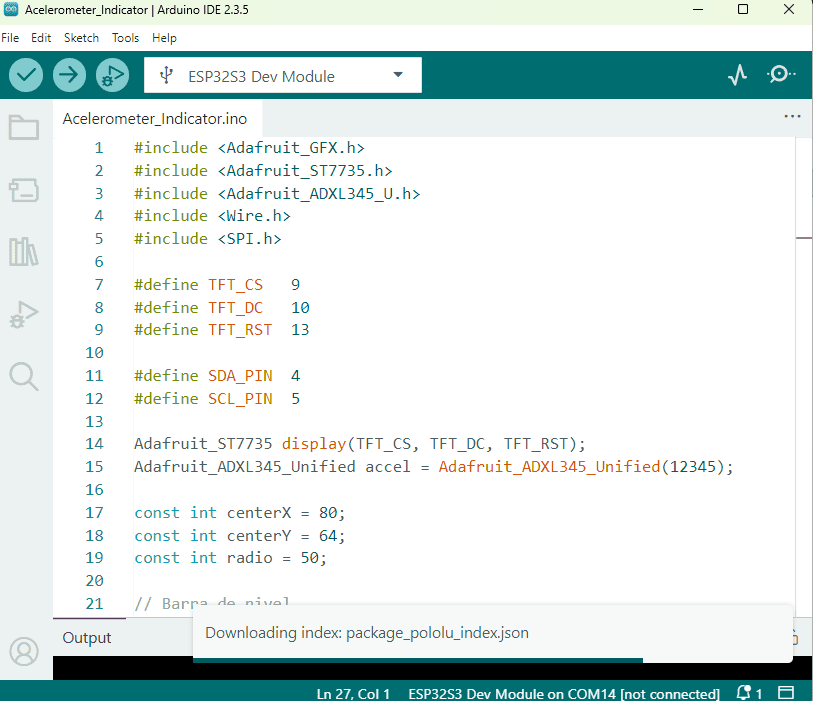
Firmware was developed using the Arduino framework for ESP32-S3. The software integrates all hardware peripherals, including the display, joystick, buttons, LEDs and accelerometer.
The programming stage transformed the fabricated hardware into an interactive educational platform capable of demonstrating embedded systems concepts.
System Integration and Packaging
The final stage consisted of assembling the electronic subsystems, battery, wiring and enclosure into a complete product. Mechanical and electrical integration were validated through both virtual assemblies and physical testing.
The resulting device combines sensing, visualization, user interaction, embedded programming and expansion capabilities into a single portable educational platform.
Development Timeline
The GameLab Controller will be developed following an incremental workflow that combines mechanical design, electronics development, fabrication, programming and system integration. The objective is to progressively transform the initial concept into a fully functional embedded systems educational platform while maintaining continuous validation throughout the development process.
The proposed timeline prioritizes early definition of the architecture and component selection, followed by fabrication and iterative testing. This strategy reduces integration risks and ensures enough time for debugging, optimization and documentation before the final presentation.
Planned Development Phases
| Phase | Expected Activities |
|---|---|
| Concept Development | Define educational objectives, system requirements, user interaction model and overall architecture. |
| Mechanical Design | Create CAD models, evaluate ergonomics, define internal component placement and prepare files for fabrication. |
| Electronics Design | Develop schematics, select components and design custom PCBs for the embedded platform. |
| Fabrication | Manufacture PCBs, print enclosure components and prepare all mechanical and electronic parts. |
| Programming | Develop firmware for the ESP32-S3, including display management, input processing and sensor communication. |
| System Integration | Assemble all subsystems, validate mechanical fit and verify electrical connections. |
| Testing & Optimization | Evaluate performance, solve integration issues and improve user experience. |
| Documentation & Presentation | Produce final documentation, presentation assets, demonstration video and project summary. |
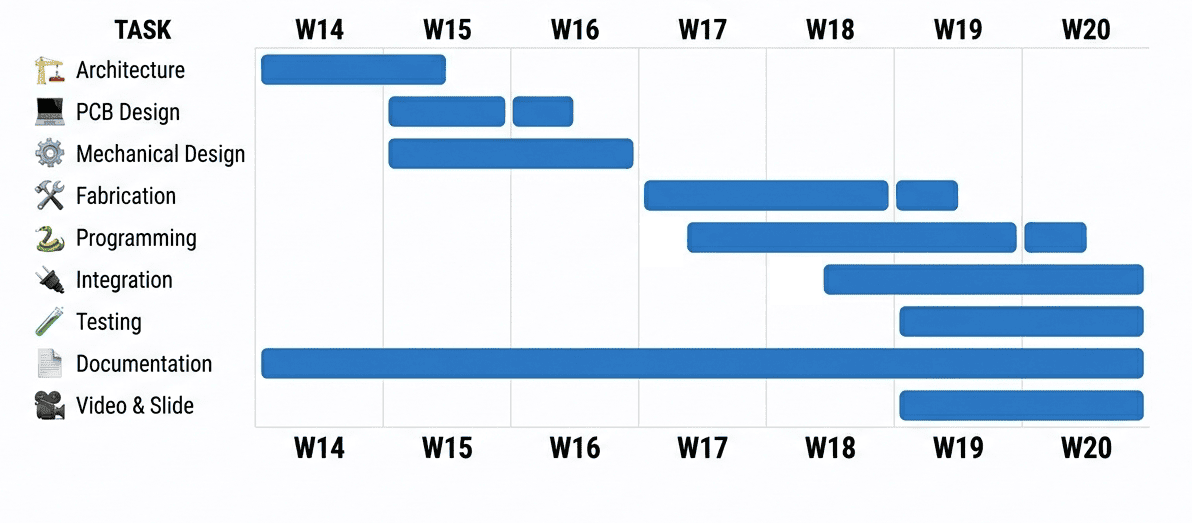
Planned roadmap describing the expected development stages of the GameLab Controller from concept definition to final delivery.
Development Strategy
The project will follow an iterative development methodology. Instead of waiting until all subsystems are completed, each stage will be validated as soon as possible to identify design issues early and reduce integration risks.
A minimum viable version of the platform will be prioritized first, ensuring that the controller can operate with its core functions before additional features and refinements are introduced.
This approach is expected to improve project reliability while providing enough flexibility to accommodate modifications that may arise during the fabrication and testing stages.
Challenges and Open Questions
Before fabrication began, several design questions needed to be answered in order to transform the initial concept into a functional educational platform. These questions influenced the mechanical design, electronic architecture and user experience of the GameLab Controller.
Ergonomics
What size should the controller have to remain comfortable during
extended use?
The enclosure must be large enough to integrate the display, battery
and electronics while remaining comfortable for different users.
Internal Layout
How much space do the battery and PCBs require?
The internal volume must accommodate all components while ensuring
proper clearance, cable routing and access to the ESP32-S3.
User Interaction
At what height and position should the buttons and joystick be
placed?
The interface elements must be positioned to provide intuitive and
comfortable interaction while fitting within the enclosure.
Power Management
How long will the battery last during normal educational
activities?
The battery capacity must provide enough autonomy to support
demonstrations, workshops and classroom activities.
Educational Usability
What characteristics make the platform easy for students to
use?
The system should reduce wiring complexity and provide immediate
access to sensors, inputs and outputs without requiring additional
hardware assembly.
Mechanical Robustness
How can the enclosure be made strong enough for repeated
handling?
The housing must protect the electronics while remaining easy to
assemble, maintain and transport.
Expected Outcome
Answering these questions throughout the development process will help ensure that the GameLab Controller achieves its goal of becoming a portable embedded systems laboratory that is ergonomic, reliable, educational and suitable for long-term use in learning environments.
Evaluation Plan
The success of the GameLab Controller will be evaluated from three main perspectives: technical functionality, system integration and educational usability. This ensures that the project is not only able to operate correctly, but also fulfills its purpose as a learning platform for embedded systems.
Functional Evaluation
Verify that each electronic subsystem works correctly, including the display, joystick, buttons, IMU sensor, LEDs, battery system and GPIO expansion ports.
Integration Evaluation
Validate that all mechanical and electronic subsystems fit together inside the enclosure, remain accessible and operate as a single integrated device.
Educational Evaluation
Evaluate whether the platform reduces wiring complexity and allows students to begin experimenting with embedded systems in a more intuitive way.
Success Criteria
| Area | Evaluation Criteria | Expected Result |
|---|---|---|
| Display | The TFT screen must show graphics, text and feedback correctly. | Visual interface works reliably. |
| Buttons | All four push buttons must be detected by the ESP32-S3. | User inputs are readable. |
| Joystick | The analog joystick must provide stable X and Y readings. | Directional input is functional. |
| IMU Sensor | The ADXL345 must provide motion data through I2C communication. | Motion sensing is available. |
| LED Feedback | The four LEDs and NeoPixel must respond to programmed commands. | Visual feedback is operational. |
| Power System | The controller must operate from the Li-Po battery and boost converter. | Portable operation is achieved. |
| GPIO Expansion | External devices must be connectable through the two GPIO ports. | The platform supports future modules. |
| Mechanical Packaging | All components must fit inside the enclosure without interference. | The device is compact and assembled correctly. |
| Educational Goal | Students should interact with inputs and outputs without complex wiring. | The platform simplifies embedded systems learning. |
If these criteria are met, the project can be considered successful because it will demonstrate a complete integration of digital fabrication, electronics design, embedded programming and educational product design.
Final Presentation Assets
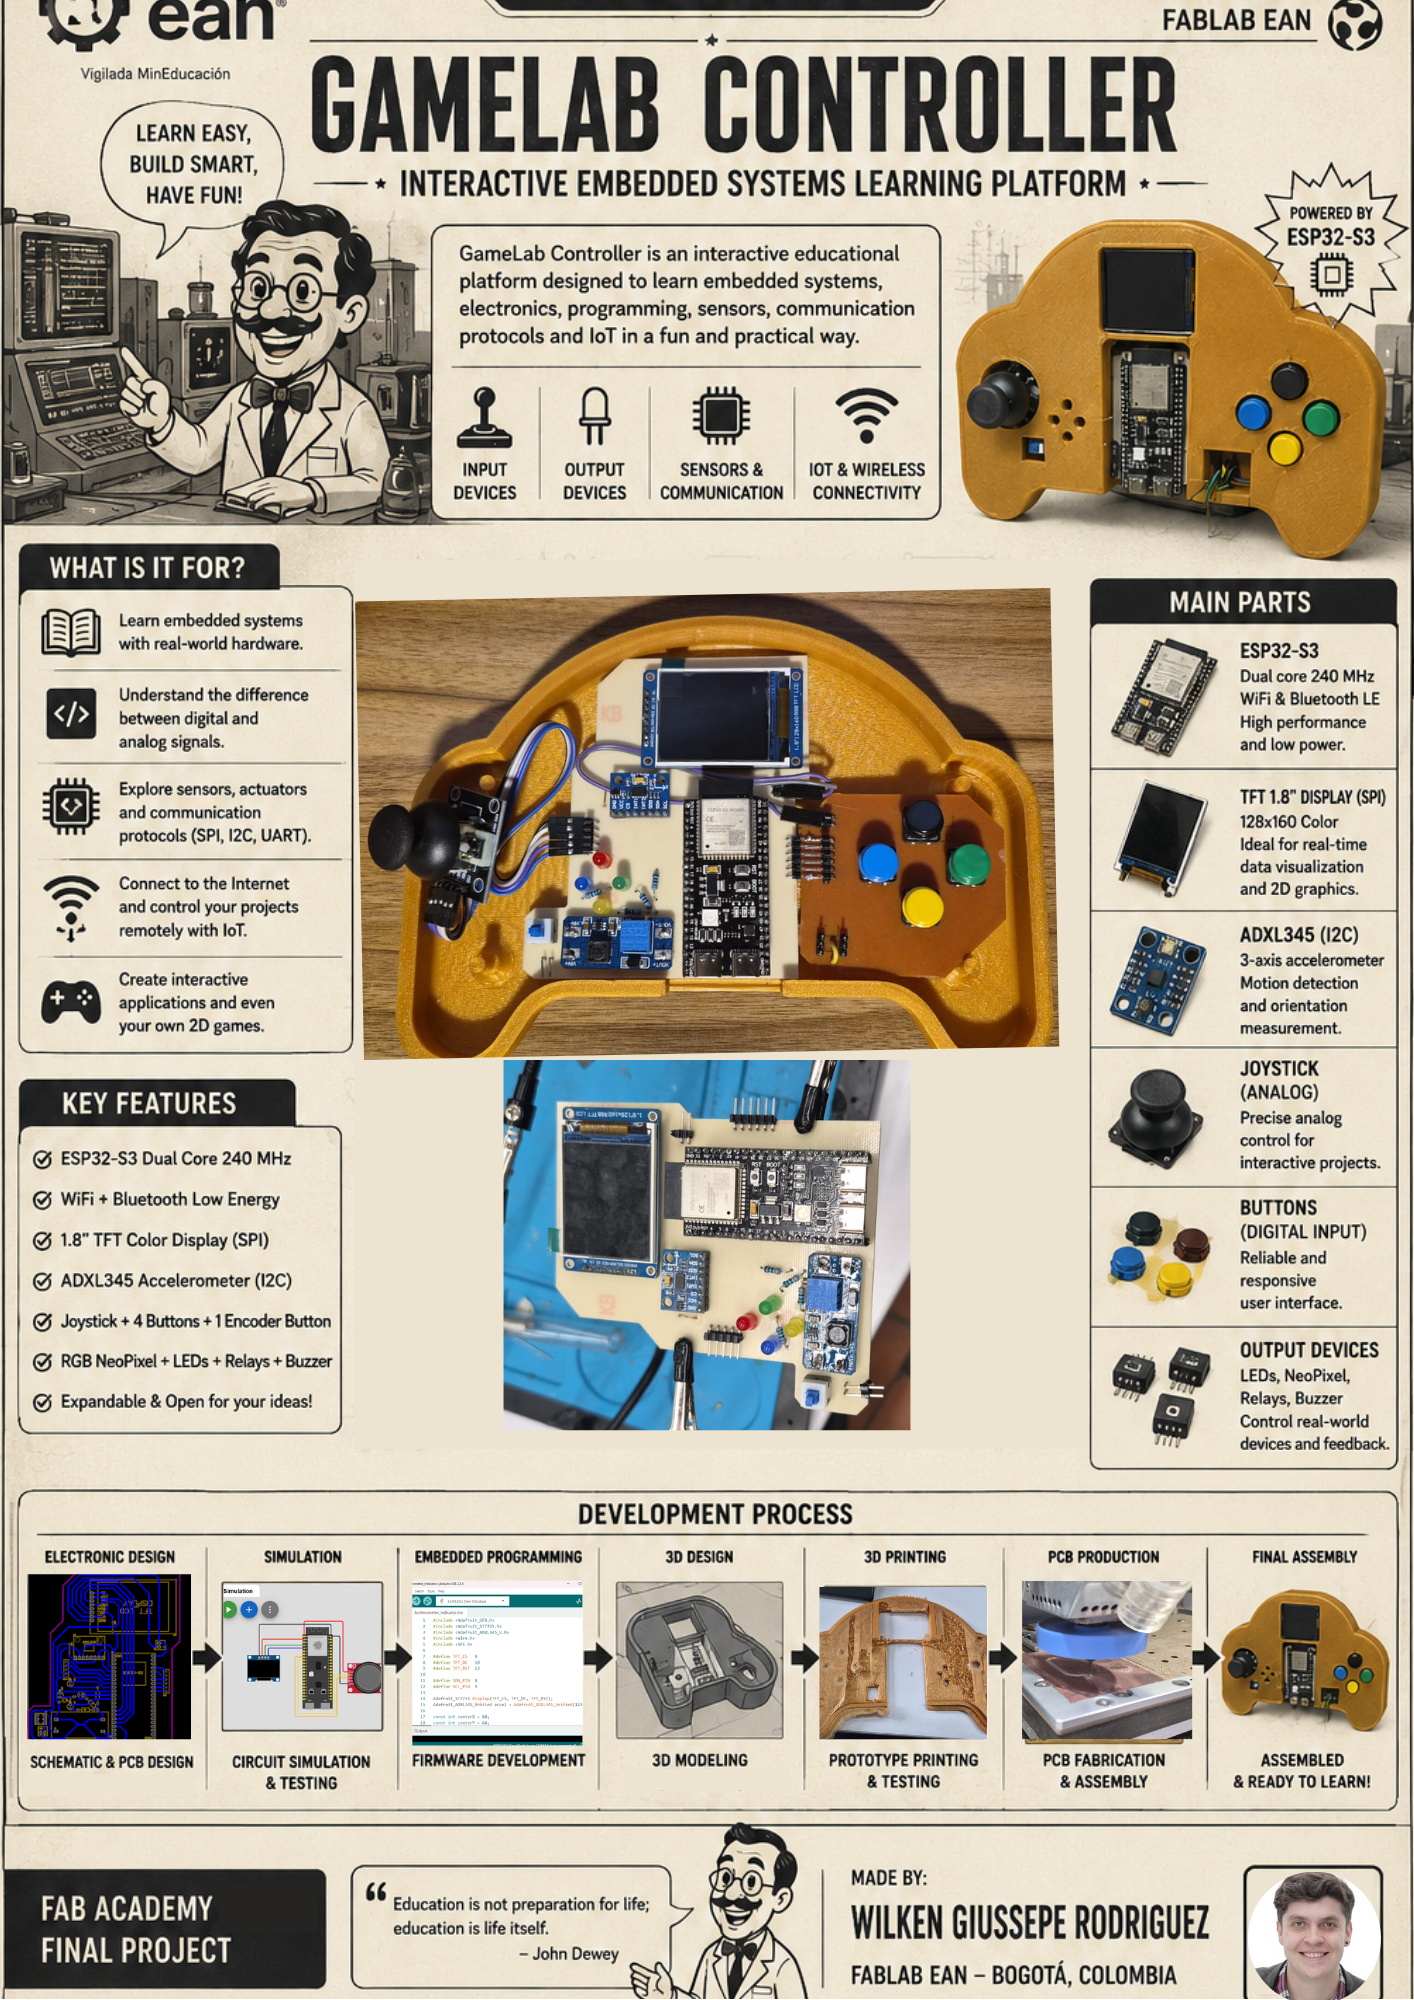
As part of the Fab Academy final project requirements, a summary slide and a short presentation video were prepared to communicate the purpose, development process and final outcome of the GameLab Controller.
These assets provide a concise overview of the project and are intended to showcase the most important aspects of the design, fabrication, electronics, programming and system integration process.
Presentation Slide
Final project summary slide prepared according to Fab Academy presentation requirements.
Presentation Video
Short project demonstration video showing the main features and functionality of the GameLab Controller.
Both files are located in the root directory of the project and are linked according to the Fab Academy final presentation requirements.
Reflection
Defining the scope and implications of the GameLab Controller was an important step in transforming an initial idea into a realistic and achievable final project. This process required balancing educational objectives, technical complexity, fabrication constraints and available development time.
One of the most valuable lessons learned during the planning stage was the importance of clearly defining the purpose of the project before making technical decisions. Rather than starting from a specific sensor, display or microcontroller, the development process began by identifying a real educational challenge: reducing the barriers students face when learning embedded systems for the first time.
This objective influenced every design decision throughout the project. Component selection, enclosure design, user interaction and expansion capabilities were all chosen to create a platform that simplifies learning while still exposing students to real embedded systems concepts.
Another important aspect was understanding how different Fab Academy topics could be combined into a single product. The project became an opportunity to integrate CAD design, electronics production, additive manufacturing, embedded programming and system integration into a cohesive educational device rather than treating each skill independently.
Looking forward, future versions of the GameLab Controller could include additional educational modules, custom-designed input devices and more advanced communication features. However, the current scope successfully demonstrates the feasibility of creating a portable embedded systems laboratory that supports experimentation, learning and future expansion.
Overall, this stage reinforced the importance of project planning and systems thinking. Defining clear objectives, identifying constraints and establishing evaluation criteria provided a strong foundation for the successful development of the final project.
Downloads
The following files summarize the planning, development and presentation materials prepared for the final project. These resources provide an overview of the GameLab Controller and support the final project documentation.
🖼️ Presentation Slide
Final project summary slide prepared according to Fab Academy presentation requirements.
🎥 Presentation Video
Short demonstration video presenting the main features and functionality of the GameLab Controller.
Downloads
All downloadable resources required to reproduce the GameLab Controller are stored directly within this GitLab repository. The files include the mechanical design, PCB manufacturing files, source code, printing assets, and documentation developed throughout the project.
| Resource | Description | Format | Download |
|---|---|---|---|
| 🖨️ 3D Controller Design | Complete 3D CAD model of the controller enclosure and mechanical components. | ZIP | Download |
| 🎨 Printing Graphics | Artwork and printable graphics used for the controller labels and assembly. | ZIP | Download |
| 📄 Electrical Schematic | Complete schematic diagram of the custom PCB. | View | |
| ⚡ EasyEDA Project | Editable EasyEDA project containing the schematic and PCB layout. | ZIP | Download |
| 🏭 Gerber Files | Manufacturing files for professional PCB fabrication. | ZIP | Download |
| 💻 Arduino Programs | Source code developed for the ESP32-based controller. | ZIP | Download |
| ✂️ PCB Vector Files | Vector files used for PCB fabrication and laser/CNC workflows. | ZIP | Download |
All downloadable resources are included directly in the GitLab repository, ensuring long-term accessibility and compliance with Fab Academy documentation guidelines.