Setting Up GitLab
I used this tutorial to help me setup git.
Git
Installing Git
I installed Git here, but it didn't work at first. When I opened the command prompt after installing, the git command worked perfectly, but for some reason, I recieved the following error in the VSCode terminal.
'git' is not recognized as an internal or external command,
operable program or batch file.
I attempted to fix this the same way I addressed Python not being recognized when setting up MkDocs by adding the following lines to the PATH variable on my system's environment variables.
C:\Program Files\Git\bin\
C:\Program Files\Git\cmd\
Unfortunately this did not solve the problem. I reinstalled git and resarted my computer, then it worked!
Logging Into GitLab
I opened GitLab in Chrome and logged in with Fablabs.io, using the login information I was emailed. I then navigated to the repo that was created for me.
Pulling And Pushing
Cloning The Repo
Next I navigated to Clone > Open in VSCode, yet I recieved an error message asking me to install Git from here, which is a different link from the one I used before. (I later learned that I first accidentally installed Git For Windows and not simply Git - to learn more see this page).
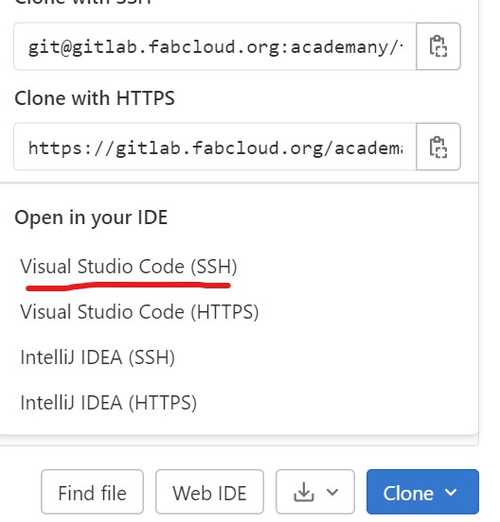
This also did not work, but copying the SSH string from the Clone button on my GitLab repo and inserting into this command did, explained here.
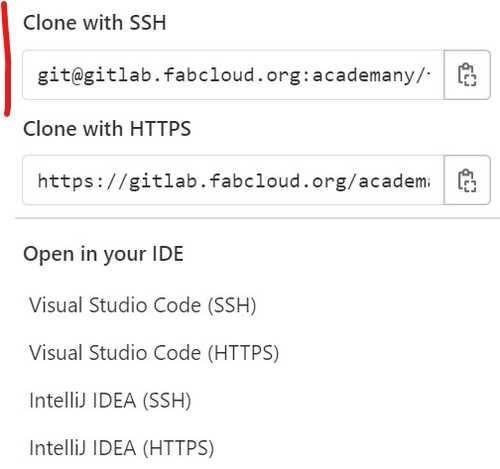
This command will create a subdirectory with the name of the repo in the current directory, so make sure you run this command from the desired location.
git clone https://gitlab.fabcloud.org/academany/fabacademy/2023/labs/charlotte/students/adam-stone.git
Comitting Changes And Pushing The Repo
After cloning the repo, I navigated to the newly-created directory.
cd adam-stone
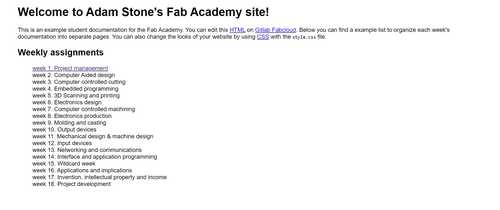
There I changed the default site to say Adam Stone instead of <Your Name> in the index.html and about.html files, and ran the following commands to add my current directory to the list of local changes, display my changes (to make sure everything was executed as intended), create a new commit, and send my commit to GitLab in the cloud.
git add .
git status
git commit -m "DESCRIBE CHANGES HERE"
git push origin main
When I reopened the site on the web, nothing changed. This was because my browser had cached the old website, meaning that it locally stored the website instead of asking the server for the webpage corresponding to the URL every time I refreshed. To force the browser to ask the server to update the page, I pressed Fn + F5, and it worked! My page was updated!
Building MkDocs
This tutorial helped me push my MkDocs site into GitLab.
Creating The Build
In order to display my site on GitLab, I needed to build my website, meaning it compiled my docs directory into a format web browsers can easily display. To do this, I navigated to the directory containing my MkDocs project and executed the following command.
mkdocs build
This created a site directory on the same level as the docs directory. I deleted everything inside of the public directory in the repo I cloned and pasted the contents of the site directory, instead.
I also changed the .gitlab-ci.yml file in my cloned repo to the following, as the tutorial instructed.
image: python:3.8-buster

before_script:
  - pip install -r requirements.txt

test:
  stage: test
  script:
  - mkdocs build --strict --verbose --site-dir test
  artifacts:
    paths:
    - test
  rules:
    - if: $CI_COMMIT_REF_NAME != $CI_DEFAULT_BRANCH

pages:
  stage: deploy
  script:
  - mkdocs build --strict --verbose
  artifacts:
    paths:
    - public
  rules:
    - if: $CI_COMMIT_REF_NAME == $CI_DEFAULT_BRANCH
Pushing Trouble
When I pushed the new changed, though, I recieved an error that I was uploading more than 10MB, the limit for one push. I realized the problem: earlier today I was playing around with downsizing JPGs, but all of the original very large JPGs (and the many copies I created while testing) were all in the docs directory I was trying to push. To solve this, I deleted the high-quality images from the directory, yet I recieved the same message. Eventually, I deleted the entire public directory and still recieved the same error, even though I had less than 2kb in the entire local repo!
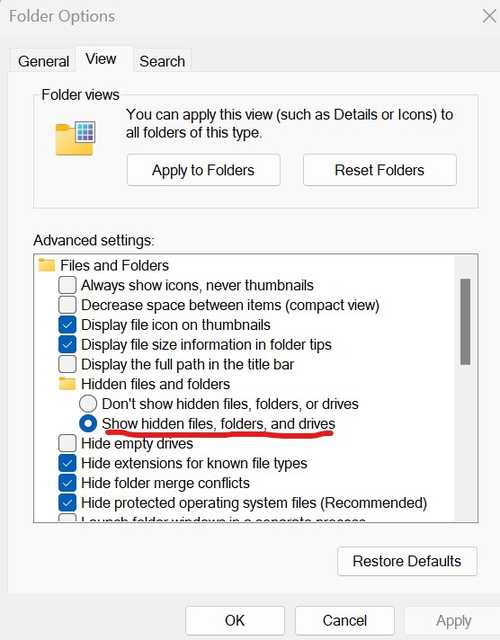
After much thought, realized that the only way a folder could be bigger than the contents I saw was if there were more contents that I couldn't see! I went to my File Explorer > Options > View and selected the Show hidden files, folders, and drives option. Now I saw the .git folder that was taking up so much space! It turns out that when I removed the large files from my local copy of the repo and made a new commit, I wasn't deleting the last commit, so Git had to store both commits on my local machine and kept trying to push both of them to GitLab.
To fix this, I decided to go to a brand new directory, clone the repo again, and copy the built MkDocs site without the high-quality JPGs. After pushing the changes to GitLab, my site worked beautifully!

In the future, this is probably a better solution that I'd like to explore. This page will also be helpful if I encounter similar problems in the future.
Branching
This tutorial helped me create, pull, push, and merge new branches.
Creating A Branch
It turned out that when I recloned my repo, my .gitlab-ci.yml file reverted back to the default, yet the site still worked. I was still curious about what the different .gitlab-ci.yml configuration would do, so I decided to make a new branch to test the changes. Following the tutorial, I executed the following command in the directory of my cloned repo to create a new branch named yml-config.
git checkout -b yml-config
Now that I was in the new branch, I pasted the new .gitlab-ci.yml file content, committed the change, and pushed it to the new branch.
git add .
git status
git commit -m "yml configured"
git push origin yml-config
Merging A Branch
Then I tried to merge the yml-config branch with the main branch to test the website, and the command seemed to have worked successfully.
git checkout main
get merge yml-config
But alas, no merge appeared when I went to GitLab! This source explains that merge requests work best in GitLab when made from the web, not the terminal.
Accidental Tangent
On a side note, while I was on GitLab on the web, I quickly decided t update my readme.md file with my name, but this created a new branch with the changes instead of commiting them to the original. I navigated to the branch and clicked the Merge Request button to merge the changes to the main branch.
To keep my repo clean and organized, this article suggested that I check the Delete Source option when making my merge request so that the branch I'm merging doesn't continue to appear as an active branch.

Failed Pipeline
Back to the yml-config branch - I saw a Failed Pipeline error in GitLab and recieved an email that my merge request had failed, and that there were errors with my branch.
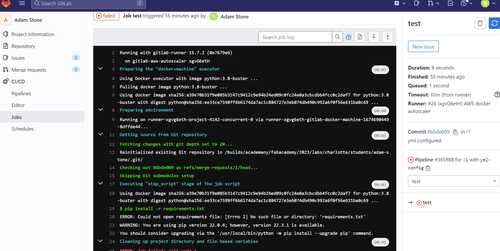
It turned out the changed I tried to make to the file assumed there was a requirement.txt file in the MkDocs build that listed the necessary packages, but my build did not contain this file.
Deleting A Branch
Therefore, I decided to close this merge request, following this tutorial.
Then, I deleted the branch using the GitLab website.
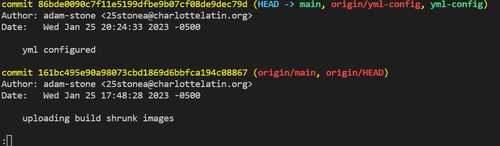
Commit History
To see commit history I used the git log and git log --all commands. Press enter to go further along in the history, and press q to quit.
SSH Key
After all of the above, I realized that I never generated an SSH key so my repo wasn't secure. This tutorial helped me understand how to create and use an SSH key with GitLab.
First, I made sure SSH was installed and working on my machine by running the following command - I did not recieve any errors.
ssh -v
I then navigated to a new directory where I wanted to store my private-key and ran this command.
ssh-keygen -t ed25519
It then prompted me for the file to save the key in as well as a password for the key (it turns out navigating to the directory I created didn't make a difference). I accepted the default file location C:\Users\adams/.ssh/id_ed25519.
Then, as the tutorial instructed for connecting to GitLab, I ran the following command in Git Bash on my computer (a program that automatically installed with Git). This command automatically copies the key to my clipboard.

I then opened my profile preferenced in GitLab and pasted the key signature into the Key input box. I changed the title to Work Computer and deleted the experiation date.
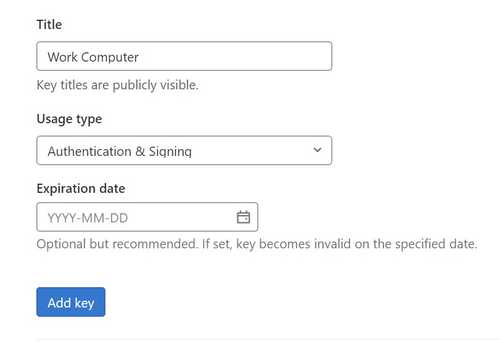
After pressing Add Key, I ran the following command (the address is the same as in this step)
ssh -T git@gitlab.fabcloud.org:academany/fabacademy/2023/labs/charlotte/students/adam-stone.git
Yet, I recieved the following error message.
ssh: Could not resolve hostname gitlab.fabcloud.org:academany/fabacademy/2023/labs/charlotte/students/adam-stone.git: No such host is known.
Noticing that the tutorial's example ended in .com, I tried the following command, and after putting in my SSH password created earlier, it worked! Now my GitLab is secure.
ssh -T git@gitlab.fabcloud.org
This was the resulting message.
Enter passphrase for key 'C:\Users\adams/.ssh/id_ed25519':
Welcome to GitLab, @adam-stone!
Remember to put in your password after pushing and not to go right to GitLab - I forgot this many times and didn't realize why my push wasn't going through
Student Agreement
Using the web IDE, I copied the Fab Academy Student Agreement into a new file in my repo called students.md and commit the change directly to the main branch.
Expanding My Repertoire
The are two more methods of using Git that I want to learn: VSCode and Git GUI.
VSCode
Using this tutorial, I downloaded the GitLab Workflow Extension in VSCode. This extention required authentication of my GitLab account, yet I didn't see fablabs.io as an option when logging in. I decided to use the default Git functionality that comes with VSCode instead, and I uninstalled the extension.
In the Command Pallet in VSCode (Ctrl + Shift + P or View > Command Pallet) I see many different commands as soon as I type in git. I try Git: Commit, click Yes in the popup, then type my commit message in the window that appears. Then I click the checkmark in the top right corner and make a commit!

To confirm this, I ran git log in the console and saw the commit!

Next, I did the same thing in the command pallet, except this time I found the Git: Push command, typed in my SSH key in the dialog box, and went to GitLab to check whether it was successful. It worked!
Git GUI
Git GUI is a visual interface for interacting with Git that automatically installed with Git on my machine. I searched for the app, opened it, and clicked Open Existing Repository. Then I selected the folder of my cloned repo and clicked Open. I'm then met with a dialog box that starts with the message This repository has approximately 320 loose objects..., but this forum explains that it is not a problem and that I should simply press No.
Now I see a visual display of all of my changes to the repo. I write a commit message, press Commit, press Push, and leave the branch set to main. Nothing happens and is stuck on a loading page, but it turns out another dialog box appeared, which for some reason didn't come to the front of my screen, which asked for my SSH key. After a couple seconds, the Push window showed a green success message. I checked GitLab, and the changes were successful.
Conclusion
While it was fun to learn about alternatives to the terminal for Git, I feel much more comfortable with the CLI and will probably continue to use it.
Storage Troubles
As I created more commits, I noticed that the Project Storage displayed in my repo was becoming far higher than the storage taken my the repo cloned on my machine (~20MB) - it was almost as if every time I commited the local storage was added to the total storage number. Here I read that the Project Storage number includes previous commits and history, and that's why the number was so large.
I used the following command to read the storage of my repo.
git count-objects -vH
And this was the output.
count: 11
size: 10.61 KiB
in-pack: 296
packs: 1
size-pack: 3.68 MiB
prune-packable: 0
garbage: 0
size-garbage: 0 bytes
After running git gc, this was the output.
count: 5
size: 3.09 KiB
in-pack: 302
packs: 1
size-pack: 3.68 MiB
prune-packable: 0
garbage: 0
size-garbage: 0 bytes
Later in the day, I noticed the number started to go down. It was still larger than it should have been, but the size decreased. I decided to ask about the best path moving forward (fewer commits, waiting for automatic purging, etc) on the Global Open Time meeting on 1/28/23.
Instructors Adrian Torres and Ricardo Marques explained to me that this is not an issue, and git's version control system saves older versions of my project, increasing my overall project size. They also recommended never renaming images that have been committed, since GitLab will store two copies of the image and not know that they're the same file.
The 500 Error
After Monday's rectation, I was having trouble pushing any changes to GitLab as I would recieve a 500 Interal Server error. After trying to push 2-3 times, it suddenly went through. This time, I got a notification that the pipeline had failed, but after clicking the Retry button, everything worked smoothly. My assumption is that there were simply too many people trying to push to GitLab and the servers were overloaded.