Group Assignment: Molding and Casting
Project Overview
This group assignment based on the "Molding and Casting" course content completed two practical projects:
- Creating a dog pen holder ceramic figure using LEGO bricks, clay, and polyurethane resin (PU)
- Casting small tin soldier models using indium-tin-bismuth low-temperature alloy, with the help of hot water and syringes
These two projects applied core skills learned in the course including mold making, soft mold casting, demolding techniques, and low-temperature metal casting, demonstrating the application of different materials and techniques in mold making and casting.
Materials and Tools
Dog Pen Holder Materials:
- Original ceramic dog pen holder (for creating the mold)
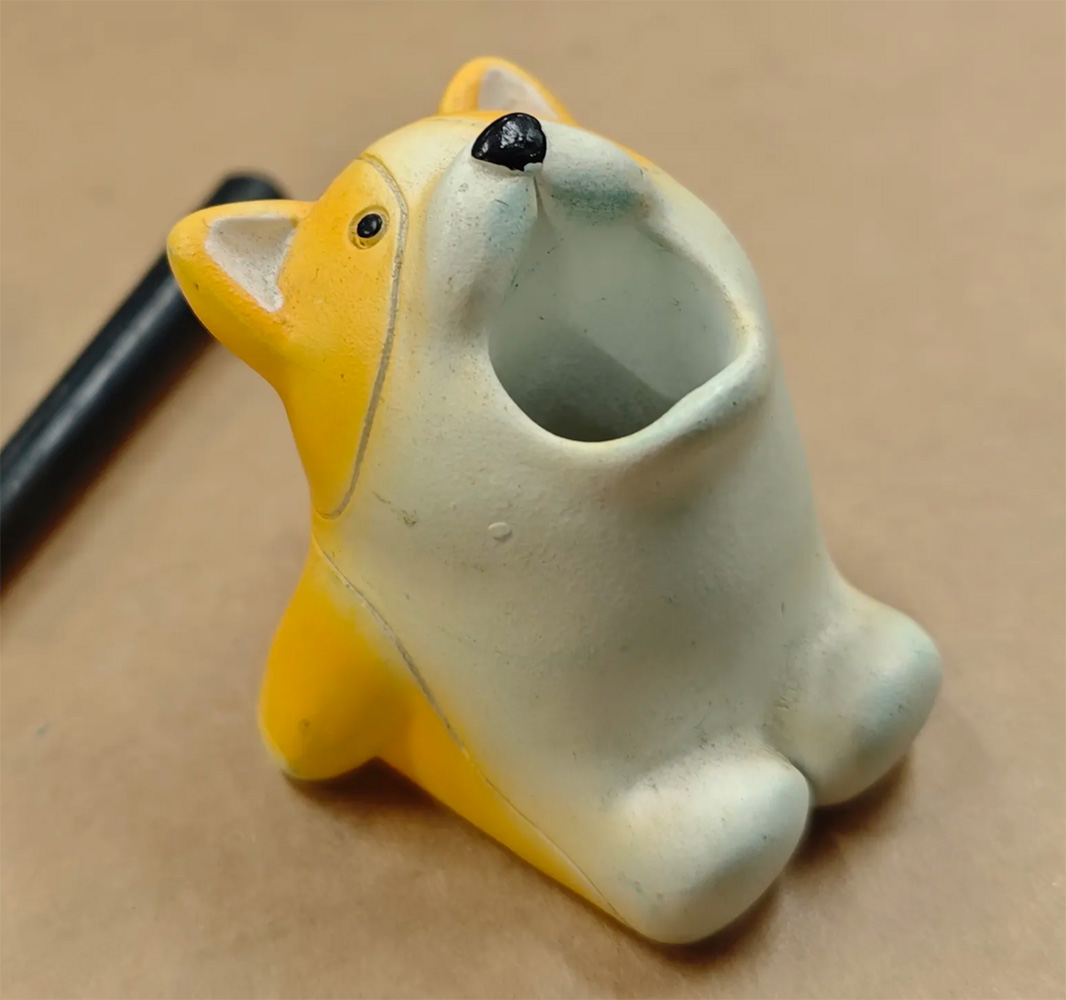
Ceramic dog pen holder original
- Transparent blue LEGO bricks (for creating the mold frame)
- Modeling clay
The blue bar-shaped material in the plastic bag packaging is modeling clay, blue LEGO bricks are used to make the model frame
- Silicone rubber (for making flexible molds)
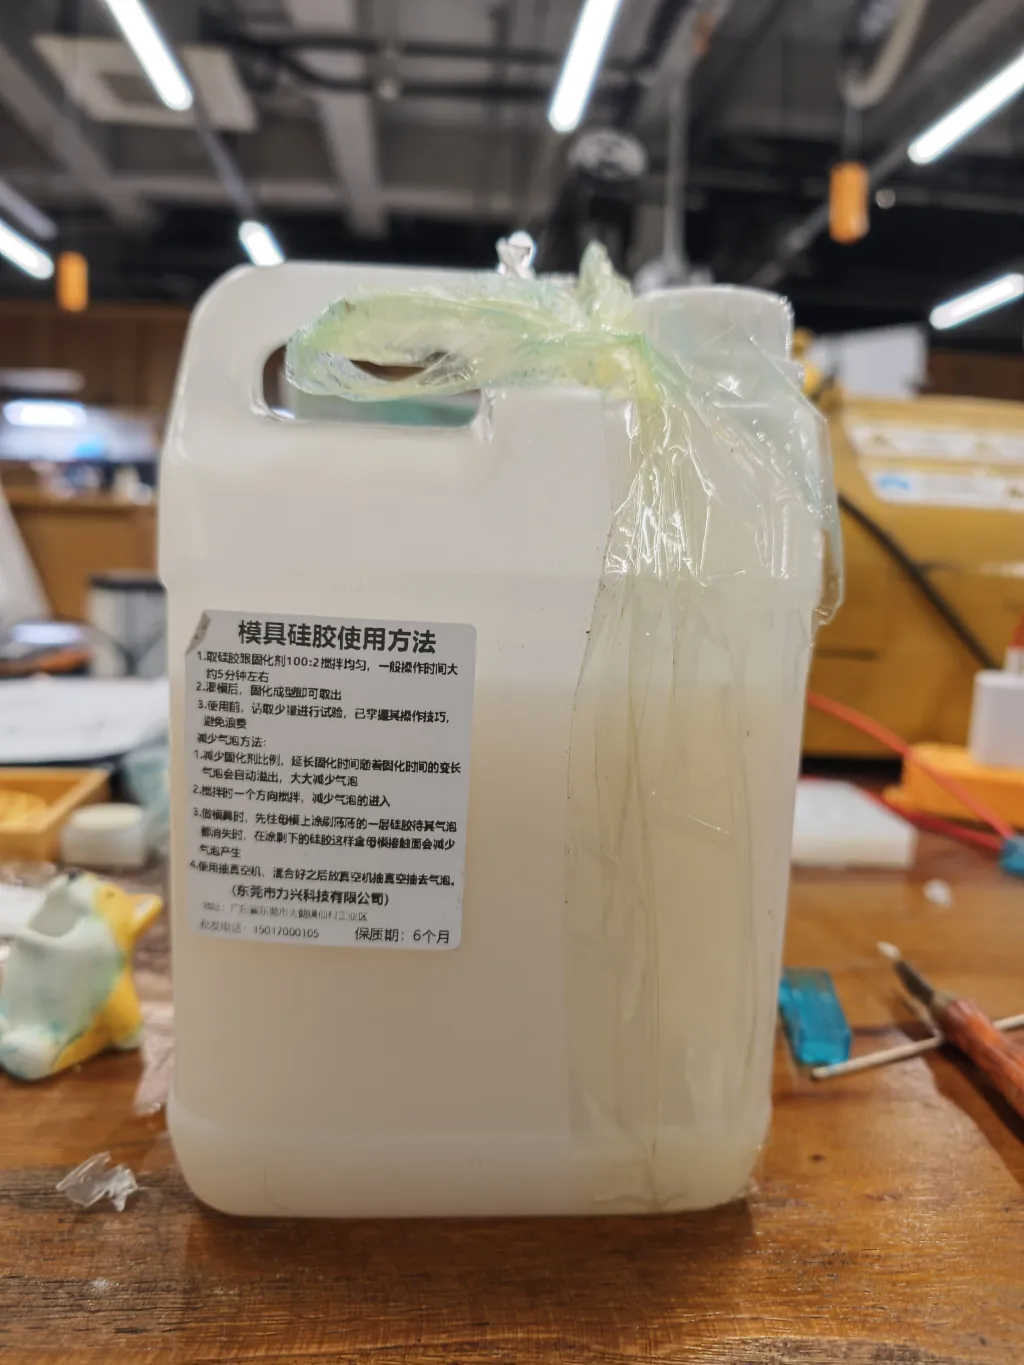
Silicone rubber in plastic container
Silicone Rubber Usage Instructions
1. Mix silicone with hardener at a ratio of 100:2 evenly, general operation time is about 5 minutes.
2. After pouring into the mold, it can be removed once cured.
3. Before use, test with a small amount to learn the operation techniques and avoid waste.
Methods to reduce bubbles:
1. Reduce hardener ratio to extend curing time, allowing bubbles to naturally rise and escape.
2. Stir in one direction to reduce bubble introduction.
3. When making molds, first brush a thin layer of silicone on the master model and wait for bubbles to disappear before pouring the remaining silicone to reduce bubbles at the contact surface.
4. Use a vacuum machine to extract bubbles after mixing.
(Dongguan Lixing Technology Co., Ltd.)
Address: Xiancun Industrial Zone, Dalang Town, Dongguan City, Guangdong Province
Shelf life: 6 months- Polyurethane resin quick-dry AB liquid (ShinBon PU quick-dry model AB liquid, for final product casting)
ShinBon PU Quick-dry Model AB Liquid
This product is an AB two-component system, mixed at a 1:1 weight ratio to cure into PU, easy to sand with a short demolding time.
- Measurement: The weight mixing ratio of AB liquid is 1:1. Measure each liquid with containers. If the weight deviation is too large, it will cause the surface of the cured product to not fully cure or the color to deviate.
- Mixing: Thoroughly mix the weighed AB liquid, with stirring time recommended at 15-20 seconds. Since AB liquid will cure within 1.5-2 minutes after mixing, operate as quickly as possible.
- Pouring: After thoroughly mixing, quickly pour into the silicone mold. If a vacuum machine is available, place it in the vacuum machine to remove moisture and air from the liquid. After vacuum, you can get a beautiful product with minimal shrinkage and no air holes.
- Demolding: After vacuum, place the silicone mold filled with AB liquid on a flat workbench and wait for 10-20 minutes before demolding. Due to the heat generated by the curing reaction, please be careful to avoid burns. If demolded too early, the high-temperature cured product may deform due to sudden cooling.
Usage precautions:
- Moisture adversely affects the quality of both A/B liquids, so absolutely avoid introducing water.
- Component B will react with moisture to produce white turbidity or cure. If it has become opaque or has already cured, please do not use it.
- Any pigments/chemical materials will react with this material, causing more bubbles, so please avoid adding any pigments.
- The provided droppers and measuring cups are just containers. AB liquids have different densities, so do not use them for AB ratio balancing.
- It is recommended to use the product within 3 months of receipt. Component A will shrink, component B will expand, do not store for long periods to avoid bottle cracking and leakage. After use, please clean the bottle mouth, seal it, and store in a dry, dark place away from direct sunlight.
- White Vaseline release agent
- Product name: WHITE VASELINE
- Usage: Mainly used as model lubricant and silicone mold release agent
- Application method: Apply evenly on the mold surface with a clean soft brush
- Weight: 500g/bottle
- Manufacturer: Quanzhou Linde Trading Co., Ltd.
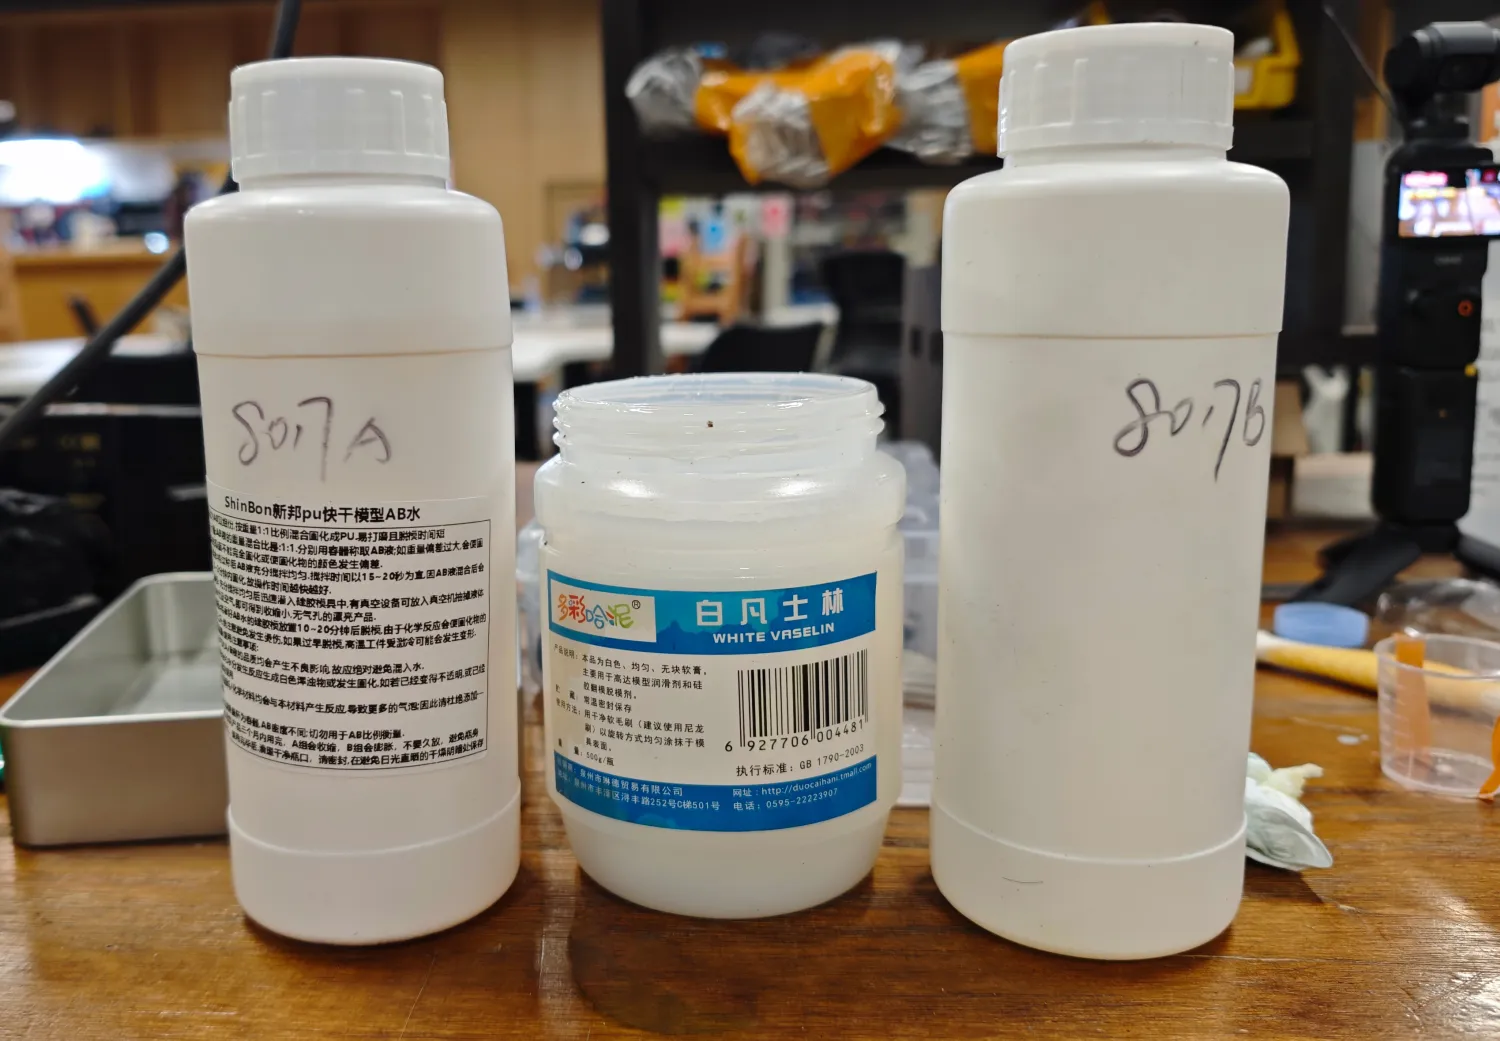
White Vaseline (middle) and AB liquid (two bottles on left and right)
Indium-Tin-Bismuth Small Tin Soldier Materials:
- Indium-tin-bismuth low-temperature alloy
- Melting point: 47°C
- Purity: 99.995%
- Origin: Dongguan, Guangdong
- Manufacturer: Dongguan Dingguan Metal Technology Co., Ltd.
- Blue silicone mold (LEGO minifigure shape)
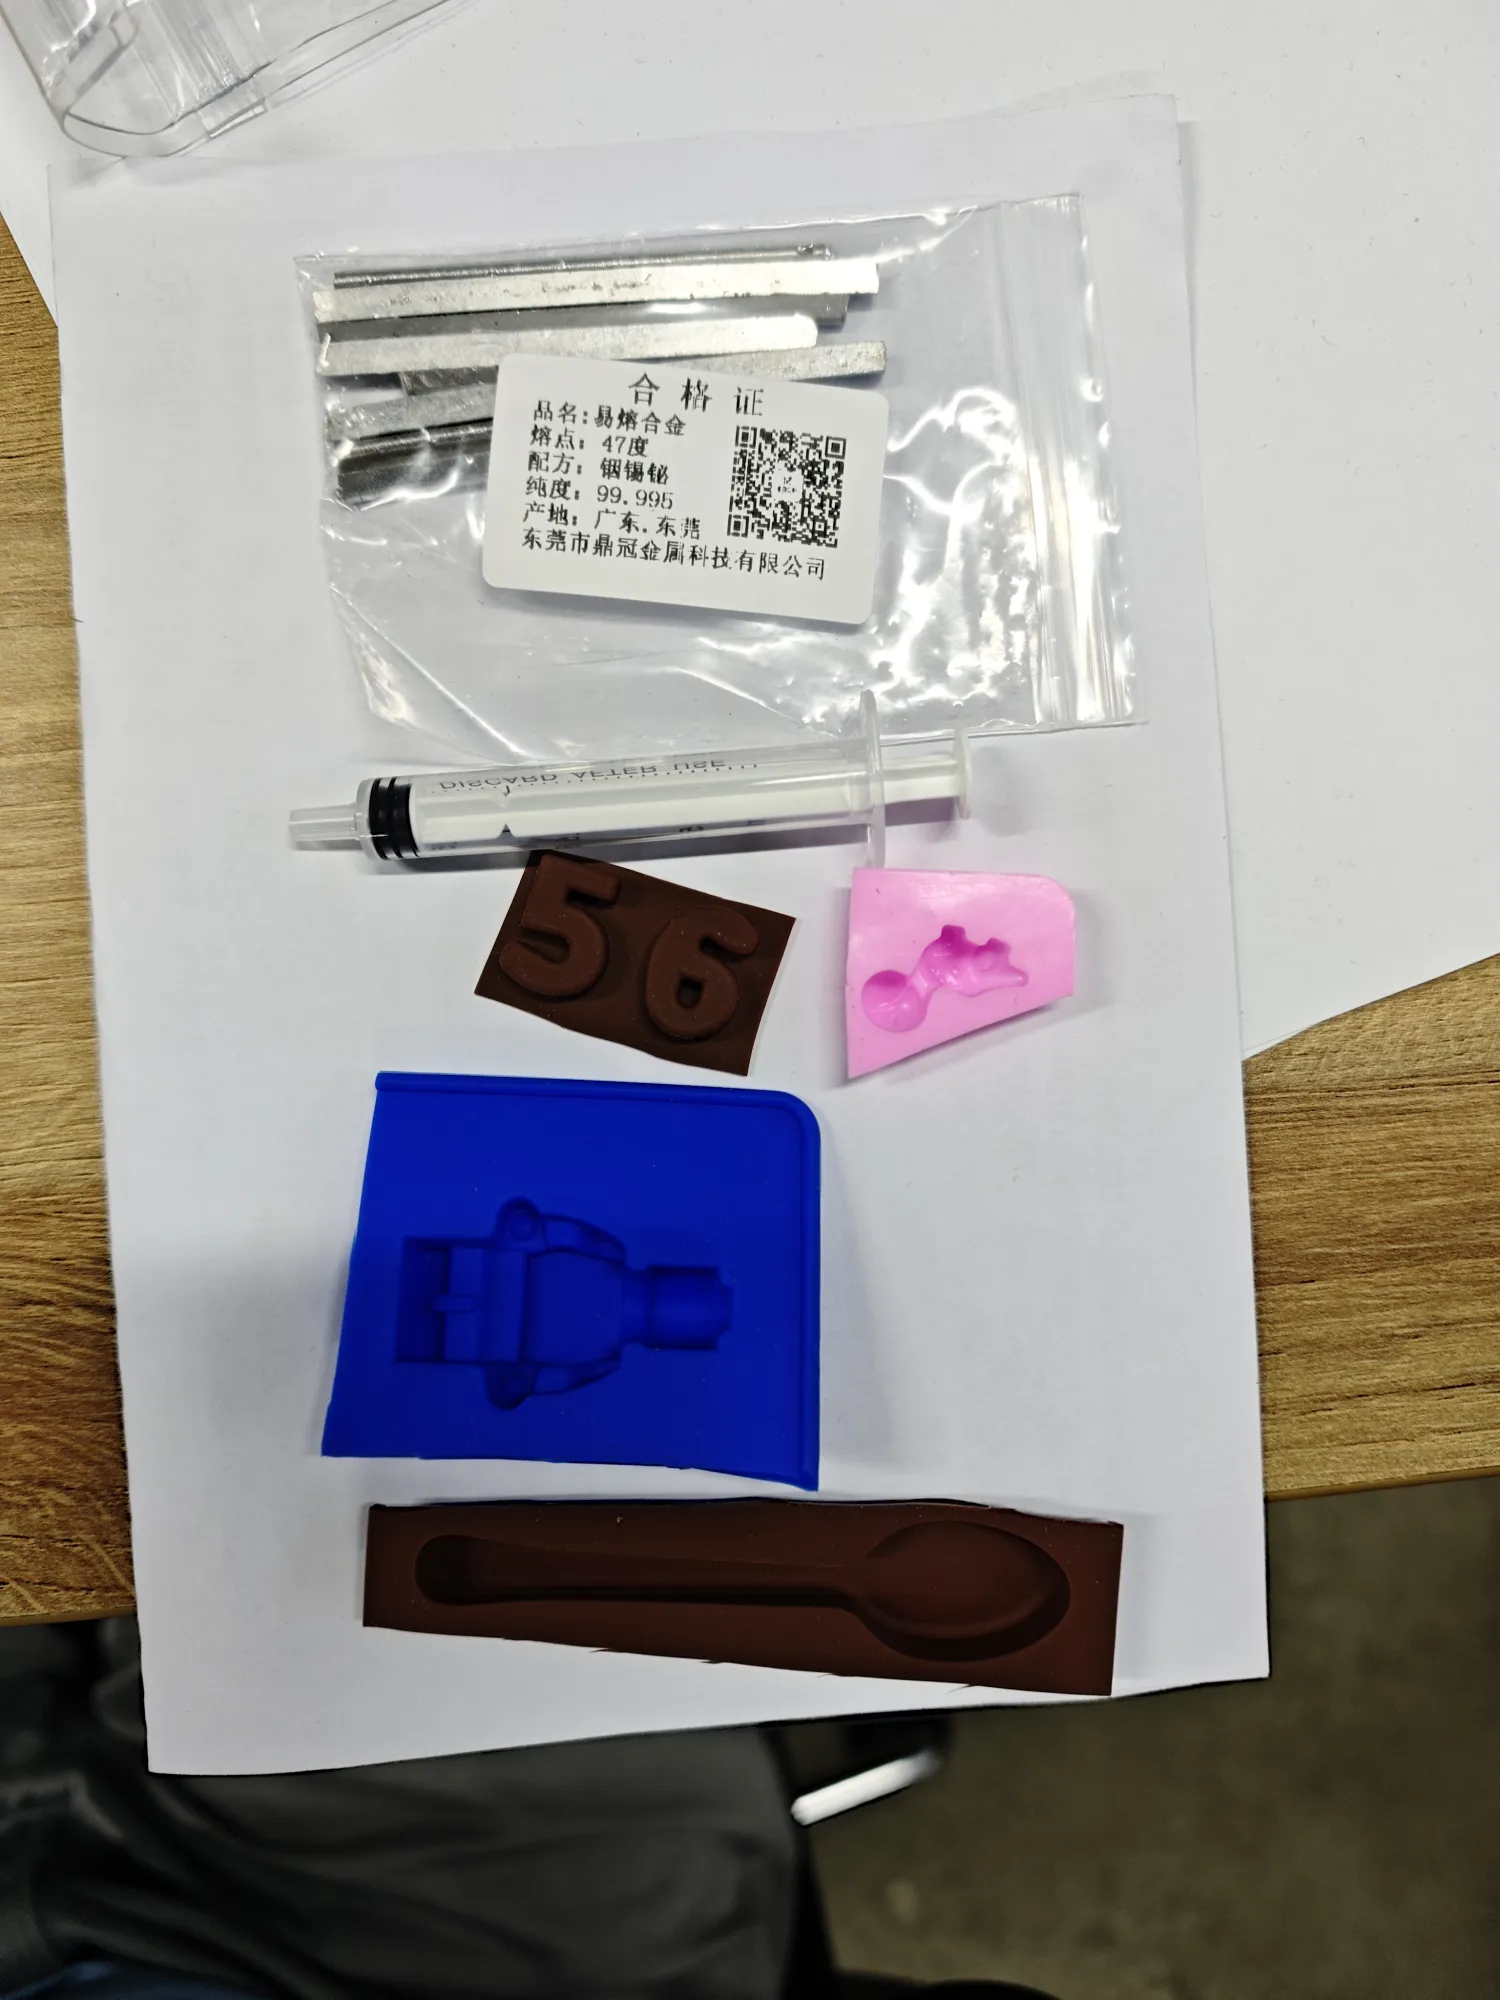
Indium-tin-bismuth low-temperature alloy, syringe, and flexible mold
Tools:
- Syringe (for injecting low-temperature alloy)
- Metal files/tools (for post-processing)
- Hot water (for melting low-temperature alloy)
- Glass measuring cup (for material mixing)
- Disposable plastic bowls
- Plastic syringe
- Wooden stick (for stirring)
- Soft brush (for applying release agent)
- Paper (to protect work area)
- Gloves (for protection)
- Mask
- Eye protection
Dog Pen Holder Manufacturing Process
Preparation
- Clean the workbench (recommended to cover with paper for protection)
- Prepare the original model (ceramic dog pen holder)
- Check all materials and tools
- Ensure the work environment is dry to prevent moisture from affecting material quality
We planned to make the mold in 2 parts that can interlock, to facilitate easy removal of the original statue and extraction of the cast piece after pouring.
Upper Body Mold Frame Construction
- Build a mold frame using transparent blue LEGO bricks
- Adjust the frame to completely surround the original model, leaving enough space for pouring silicone
- Use modeling clay to seal the bottom of the frame to prevent silicone leakage. We pressed the dog statue into the clay, letting the clay cover just the very bottom of the statue, and used a wooden stick to press 4 holes in the clay to create interlocking features for the two-part mold.
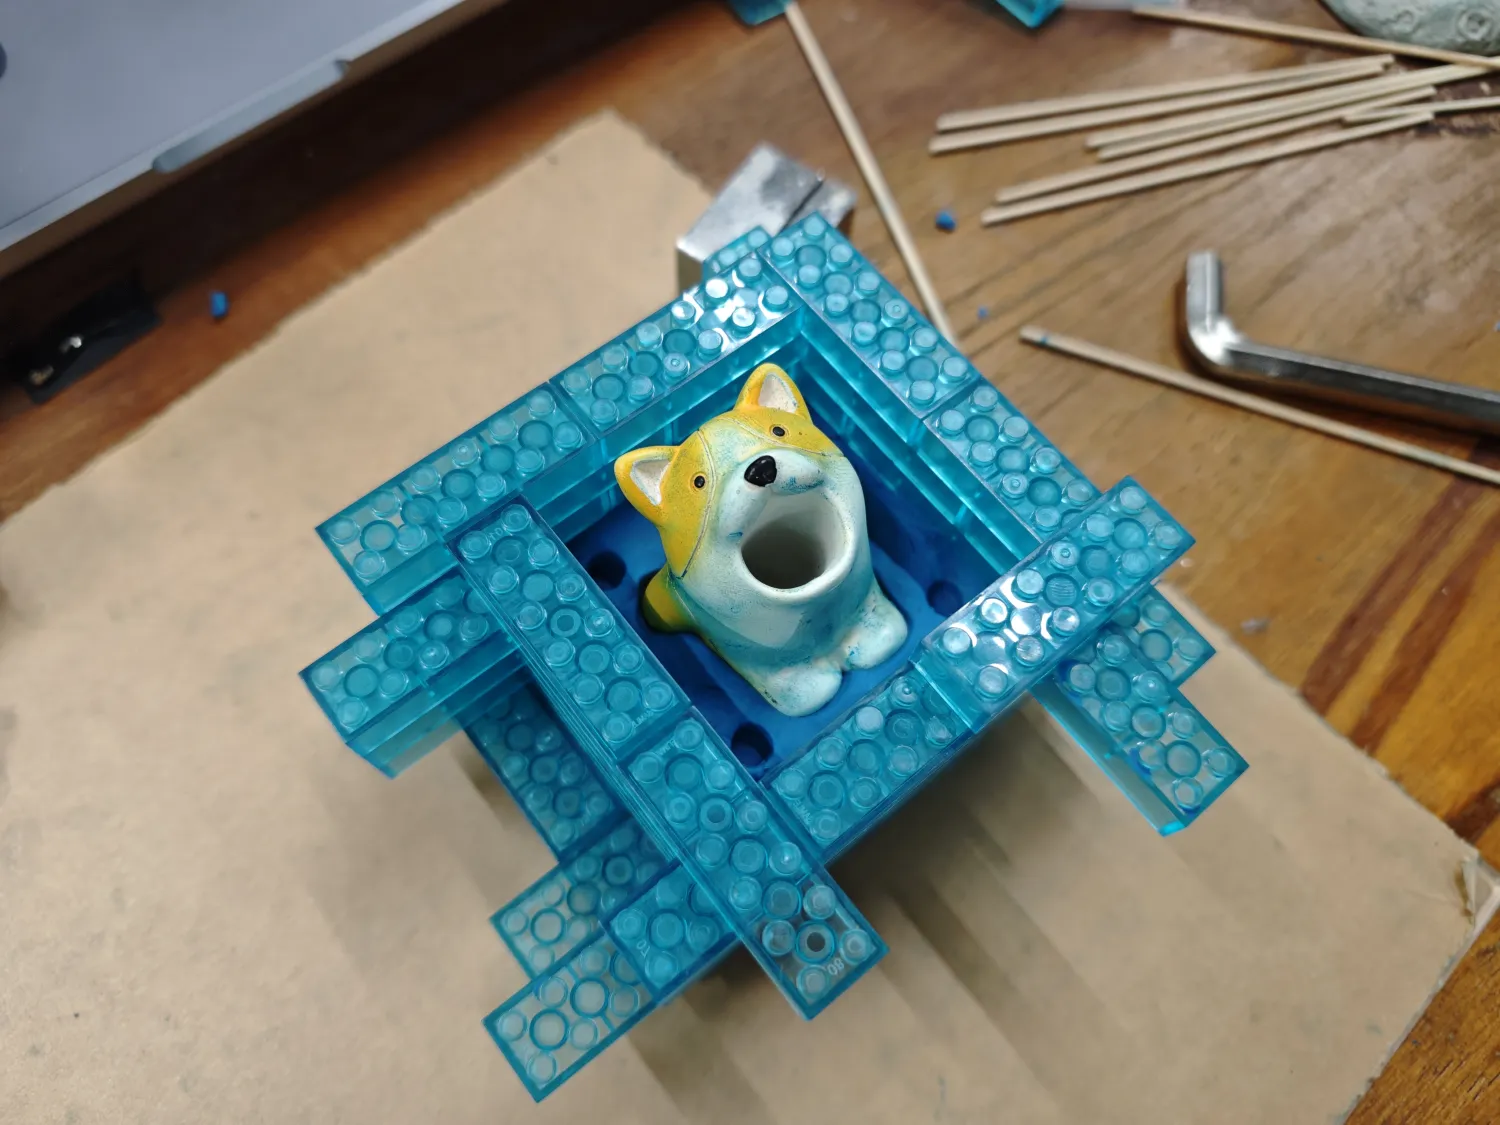
LEGO brick constructed mold frame with clay at the bottom and the dog original placed inside. Four interlocking holes were pressed into the clay. The poor yellow and white dog was stained by the blue clay and became a spotted dog.
- Then stack the bricks about 1 brick height higher than the statue as shown below.
LEGO bricks should be stacked at least 1 brick height higher than the statue
Upper Body Silicone Mold Making
- Prepare silicone rubber and hardener at a 100:2 ratio
- Evenly apply white Vaseline release agent on the dog original's surface
- First apply a thin layer of silicone on the master model, wait for bubbles to disappear
- Thoroughly mix silicone and hardener, stirring in one direction to reduce bubble formation
- Carefully pour silicone using a thin stream, allowing it to gradually cover the original
- Gently shake the mold frame to help remove potential bubbles
- Let stand at room temperature, waiting for the silicone to completely cure (about 5 hours)
Prepare silicone rubber, add hardener at a 100:2 ratio, then mix well and pour into the LEGO frame. Try to complete all this within 5 minutes, so 2 people worked simultaneously - one person responsible for pouring silicone, another person preparing and measuring hardener.
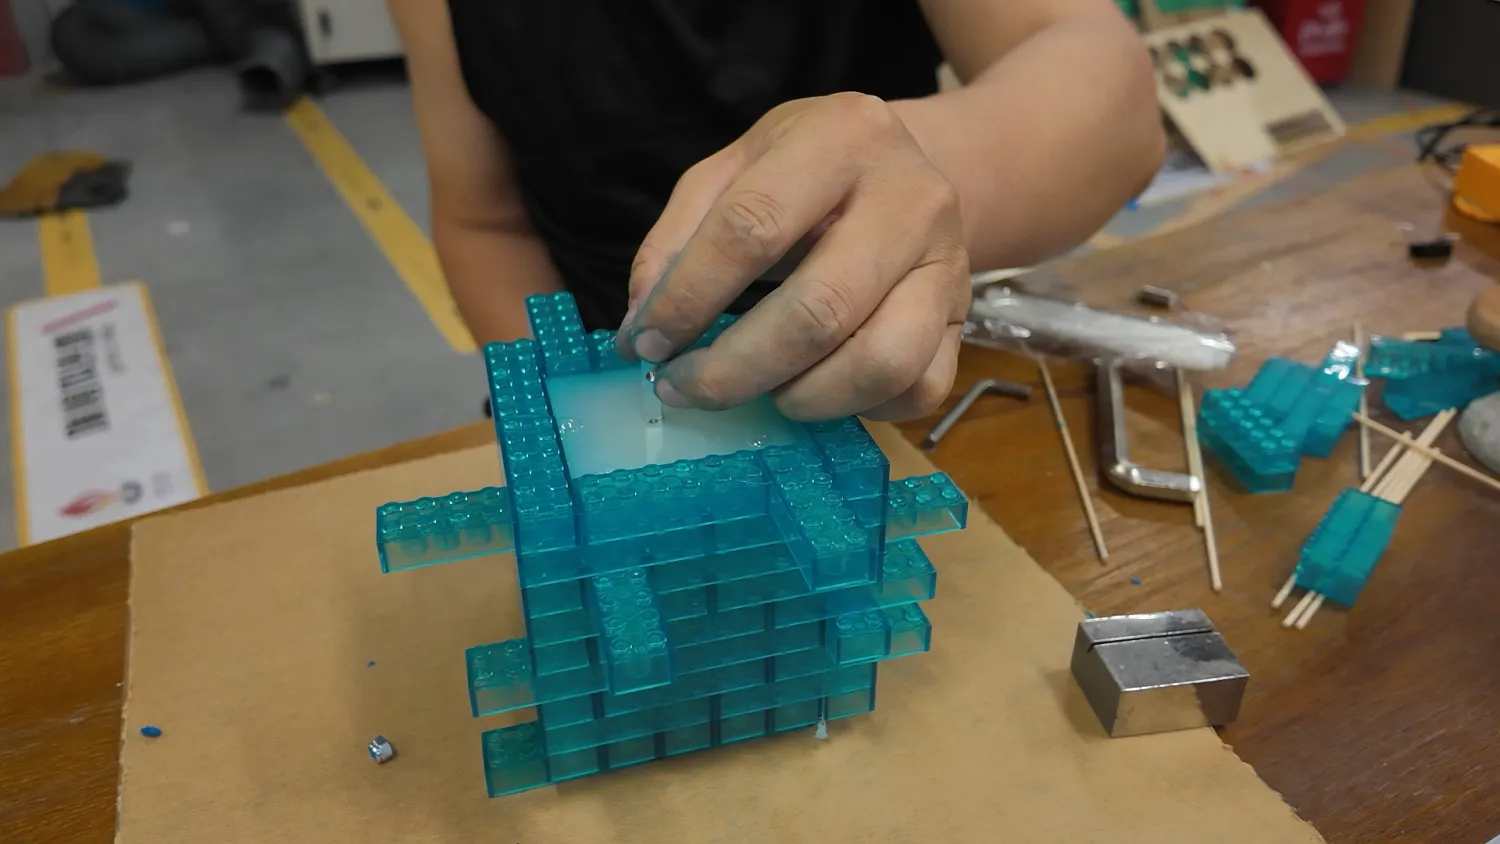
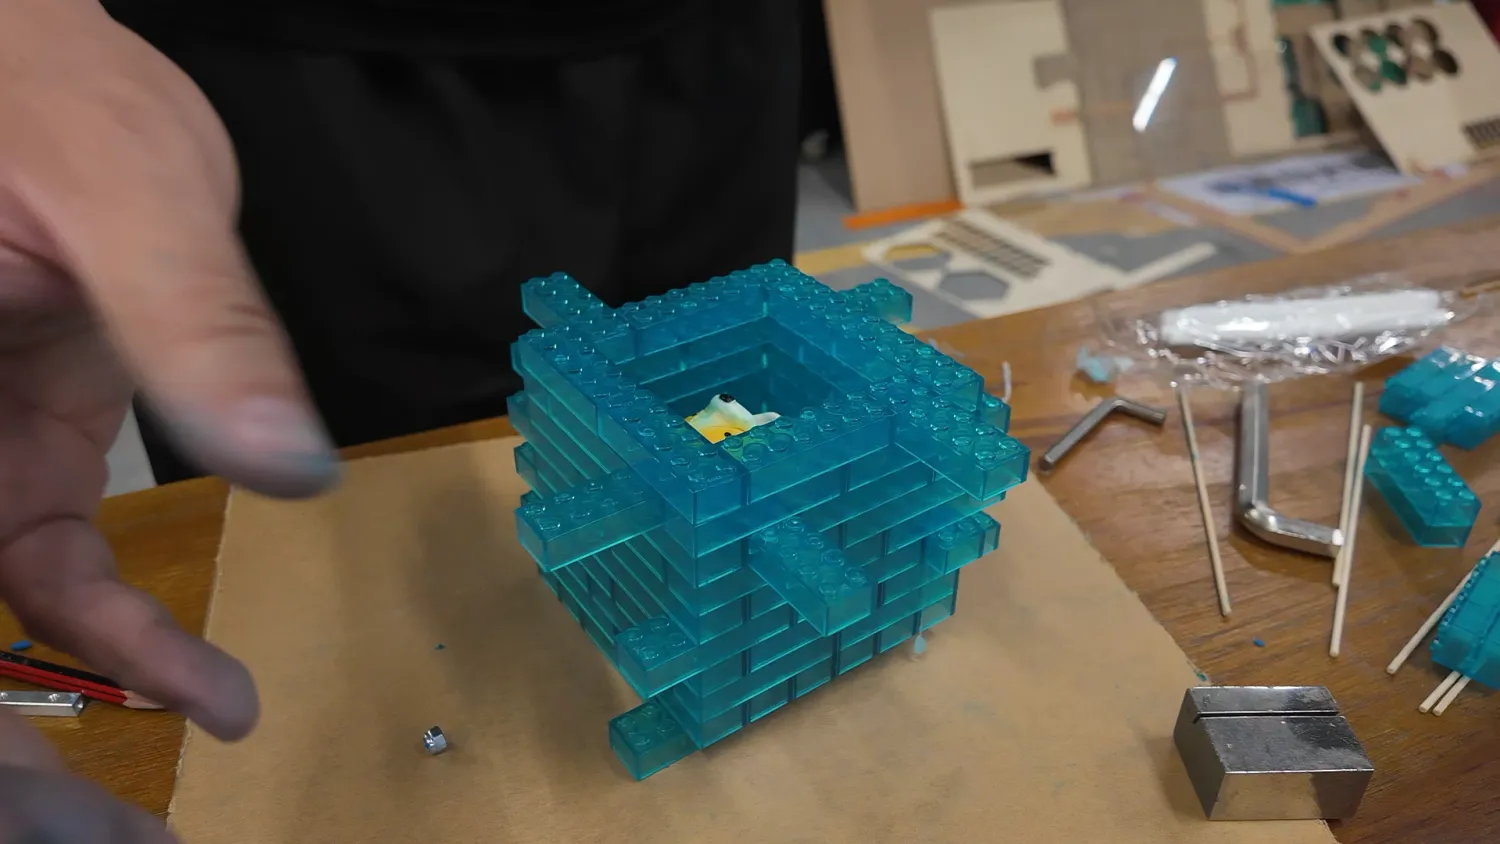
We considered the need for a pouring hole for the AB liquid in the future, so we inserted a metal rod and built a support structure
Lower Body Silicone Mold Making
- To ensure the silicone fully cured, we waited 24 hours before starting this part. We flipped the LEGO frame over and removed the bottom LEGO bricks and clay, as shown below.
24 hours later, after the upper body silicone mold was fully cured, we flipped the frame over and removed the bottom bricks and clay
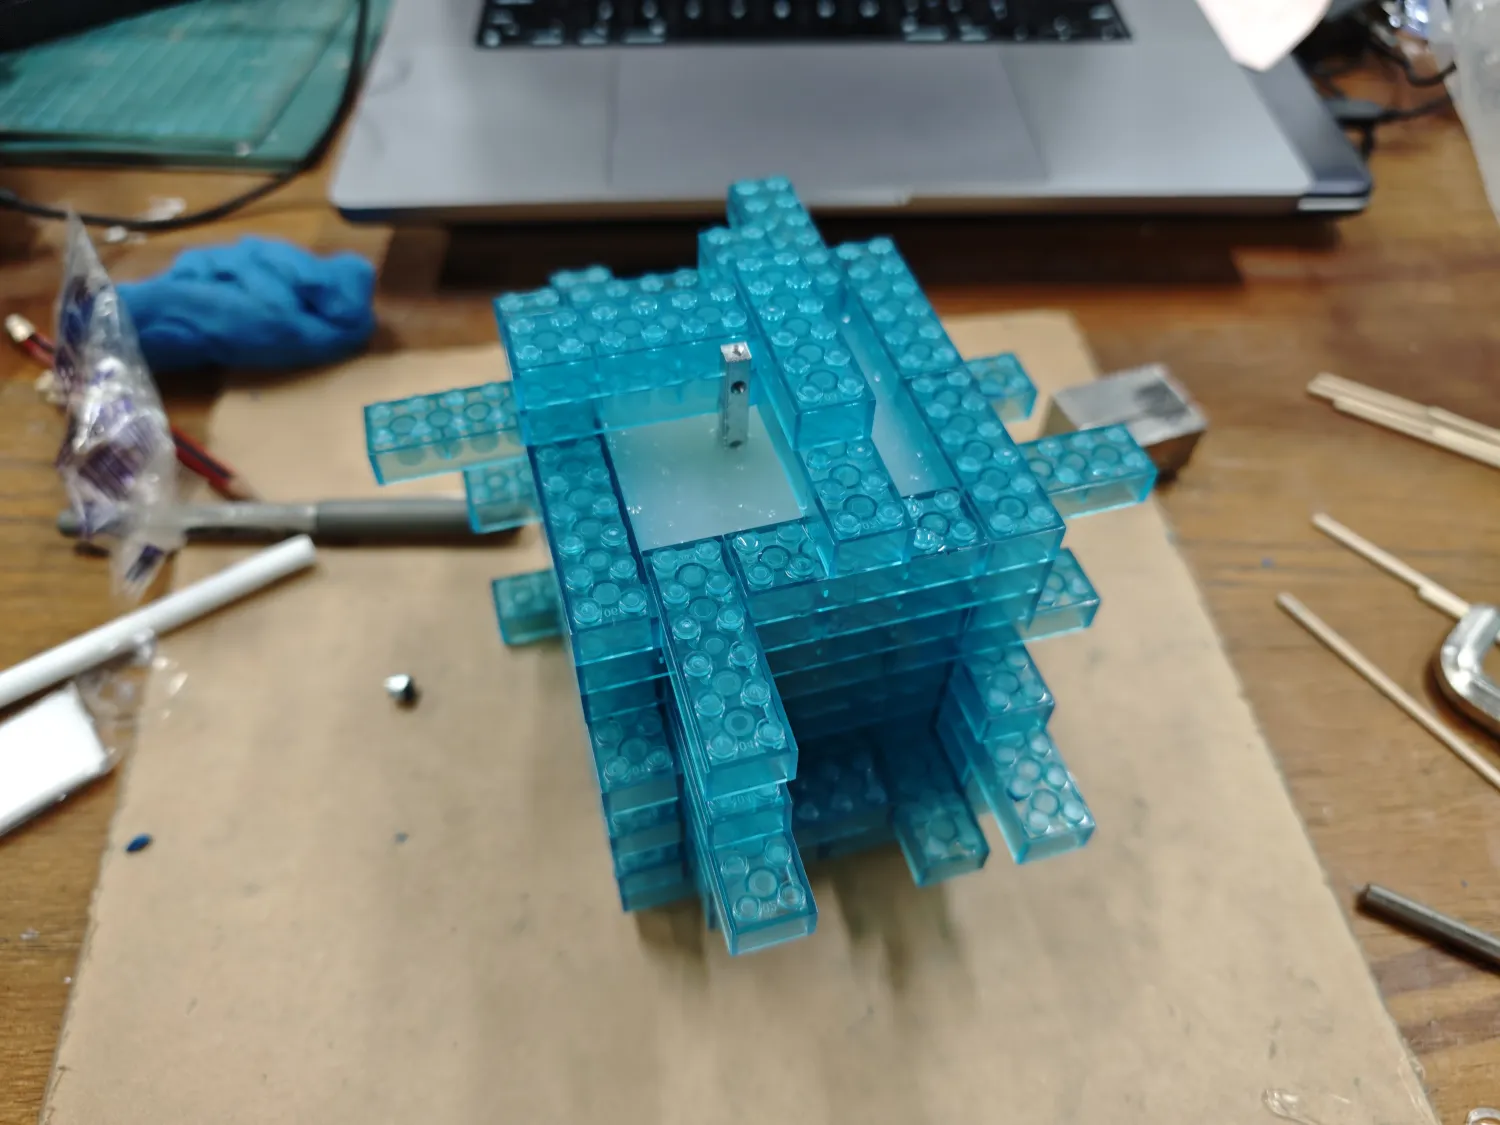
- Continue stacking LEGO bricks to make the frame at least 1 brick height taller than the model. Now we can prepare to cast the lower body, as shown below.
Using LEGO bricks to create the casting space for the model's lower body
- Mix the silicone and hardener properly, then pour to cast the lower body mold silicone, as shown below.
Pouring silicone for the lower body mold
- Since we didn't have a vacuum machine, I repeatedly tapped the mold with poured silicone forcefully on the table (ensuring the LEGO frame was secure), using impact force to remove bubbles, which seemed quite effective.
- The bubbles quickly came to the surface, and then we began another 24-hour curing period.
Beginning the 24-hour curing period
Demolding and Preparation
- Confirm the silicone has completely cured
- Disassemble the LEGO brick frame
- Carefully remove the silicone mold, ensuring no damage to detailed parts
- Check if the silicone mold has completely reproduced all details of the original
First remove the lower body mold
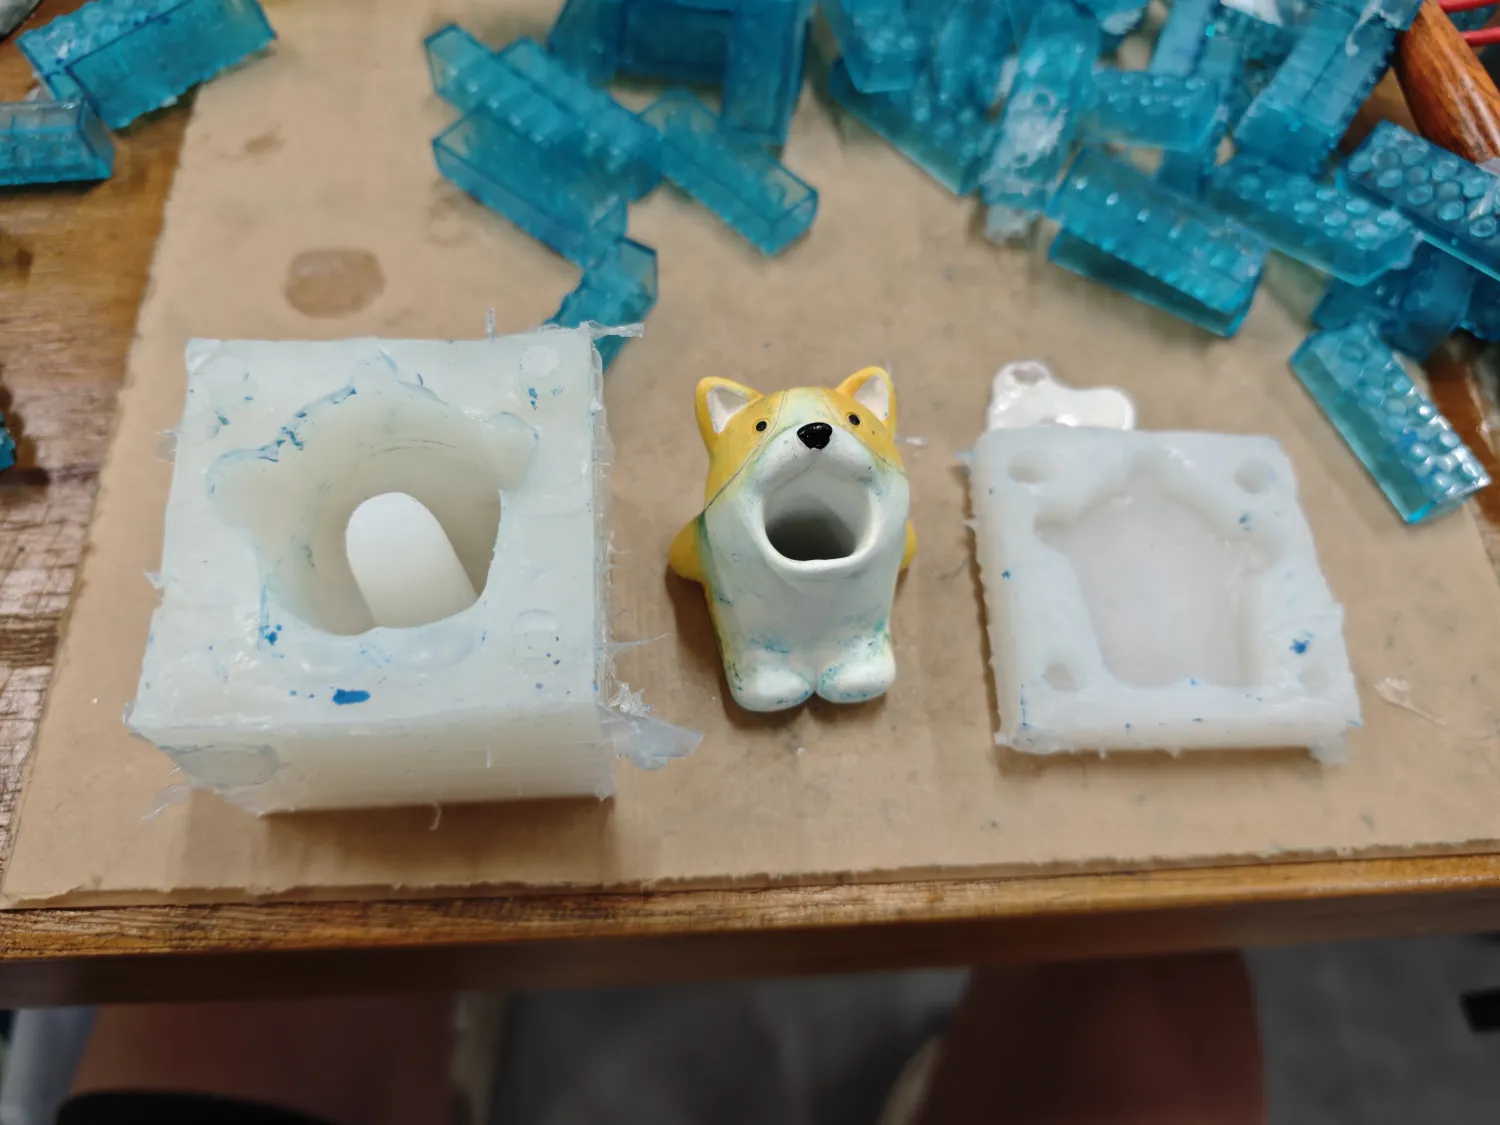
Then carefully remove the upper body mold and dog statue. Now we have 2 complete molds that can be joined together, and we can start casting
But before preparing to cast, we suddenly realized a problem: the pouring hole formed by the metal rod I previously inserted at the top of the model (at the dog's nose) was too small. The AB mixture is viscous, and this small hole would make pouring difficult. Also, without a vent hole, air in the mold would have difficulty escaping, which would lead to cavities or bubble areas.
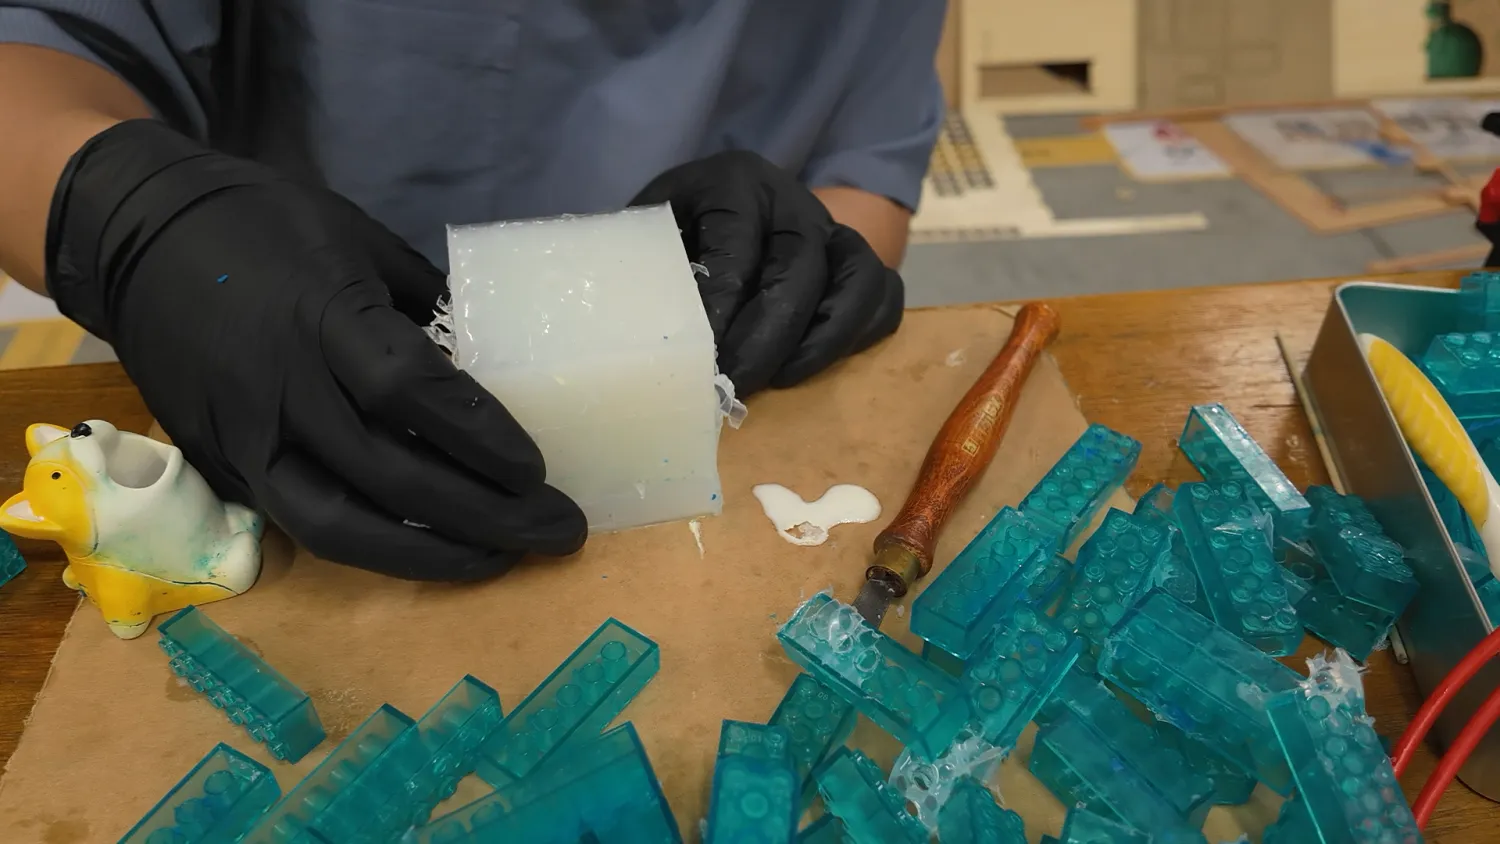
The pouring hole at the top is barely visible and would make casting impossible to complete in a short time
To solve this problem, we came up with a solution: seal the top pouring hole with clay, then flip the mold upside down and cut one large and one small hole at the relatively flat and thin bottom area using scissors. The large hole is for pouring, and the small one for venting, as shown below.
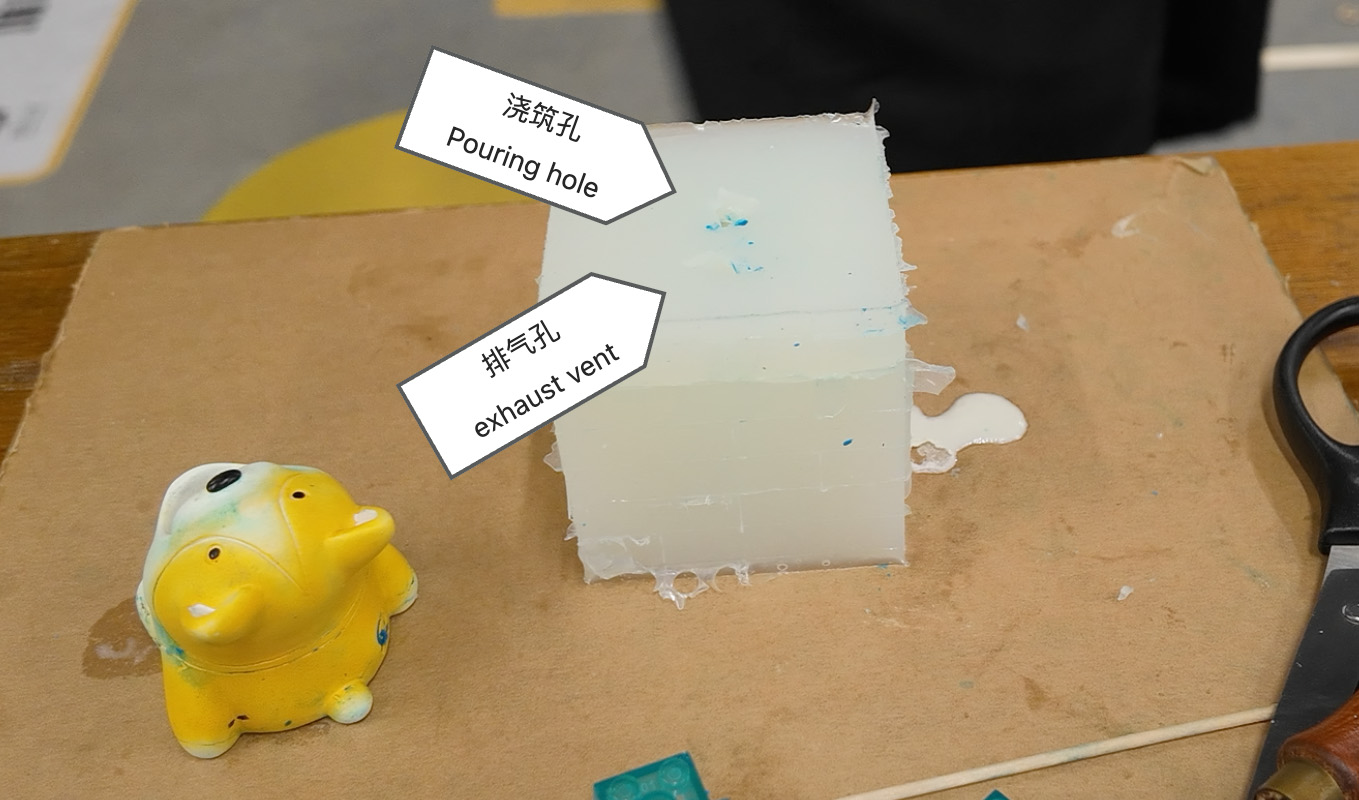
Flip the mold upside down and cut one large and one small hole at the relatively flat and thin bottom area using scissors. The large hole is for pouring, the small one for venting
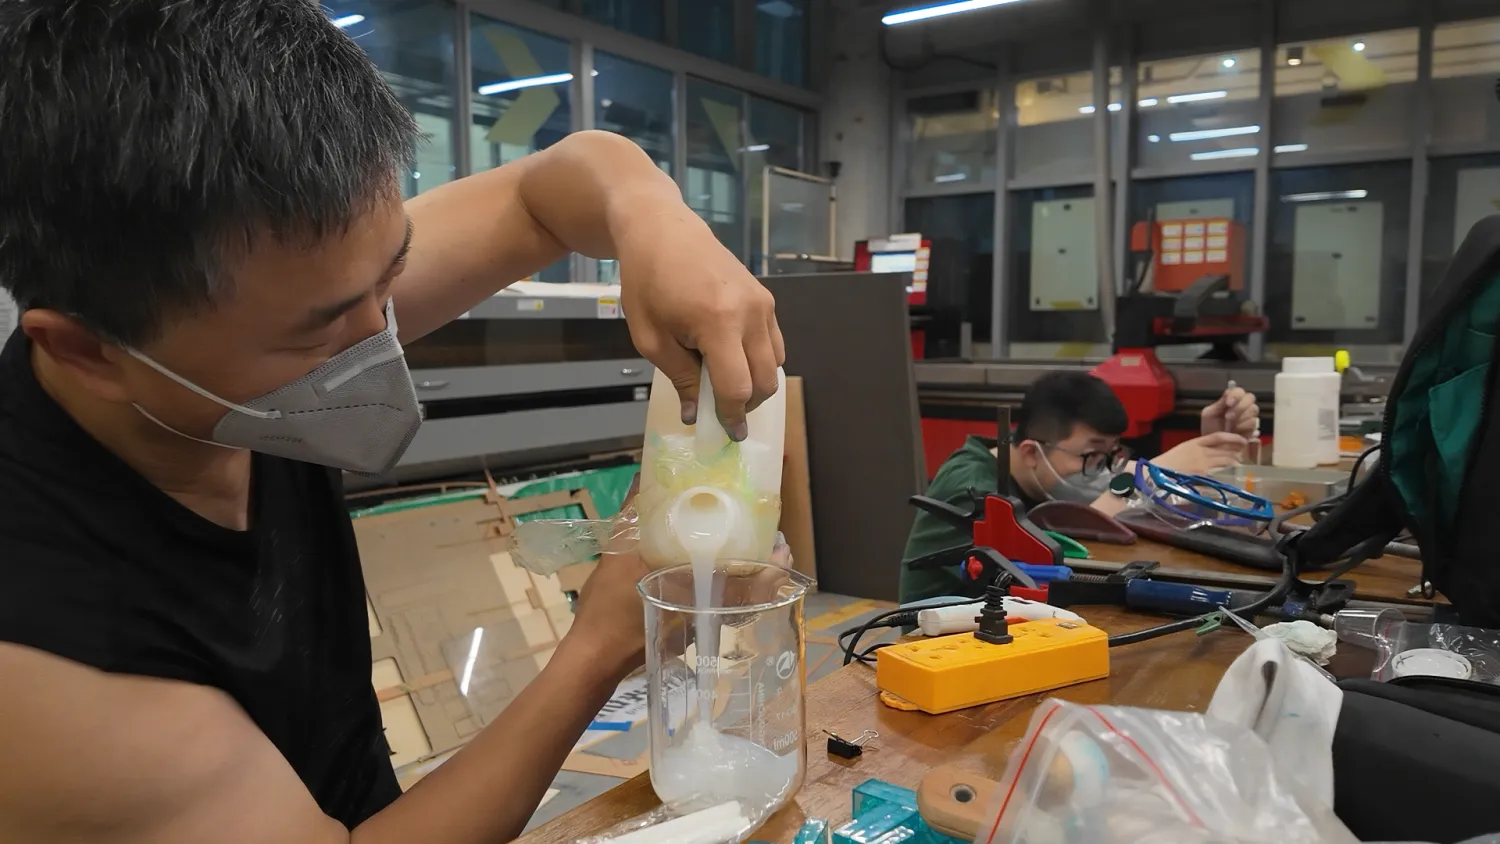
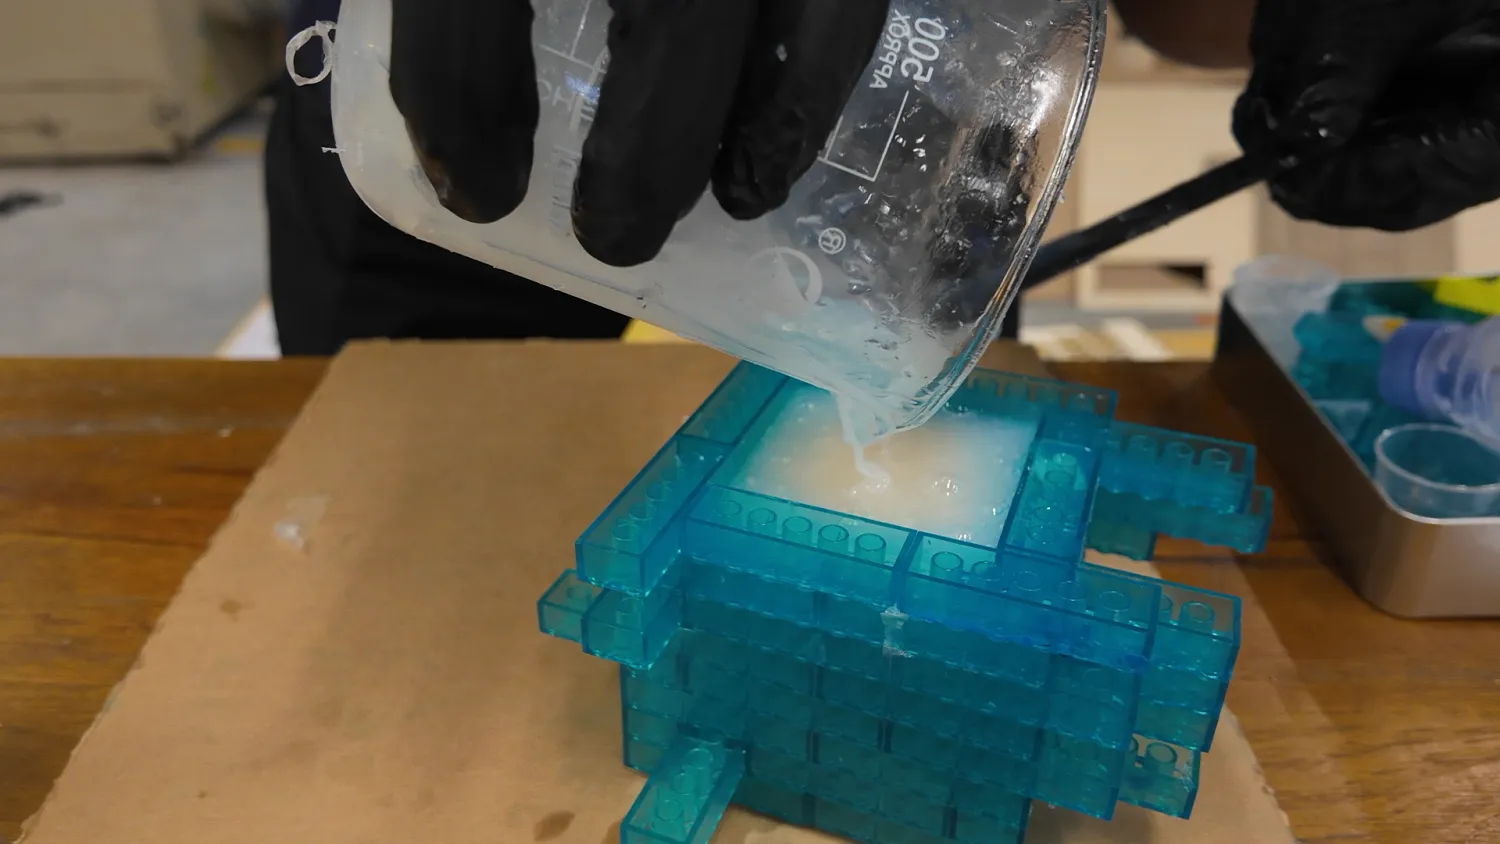
Final Product Casting (Using Polyurethane Resin)
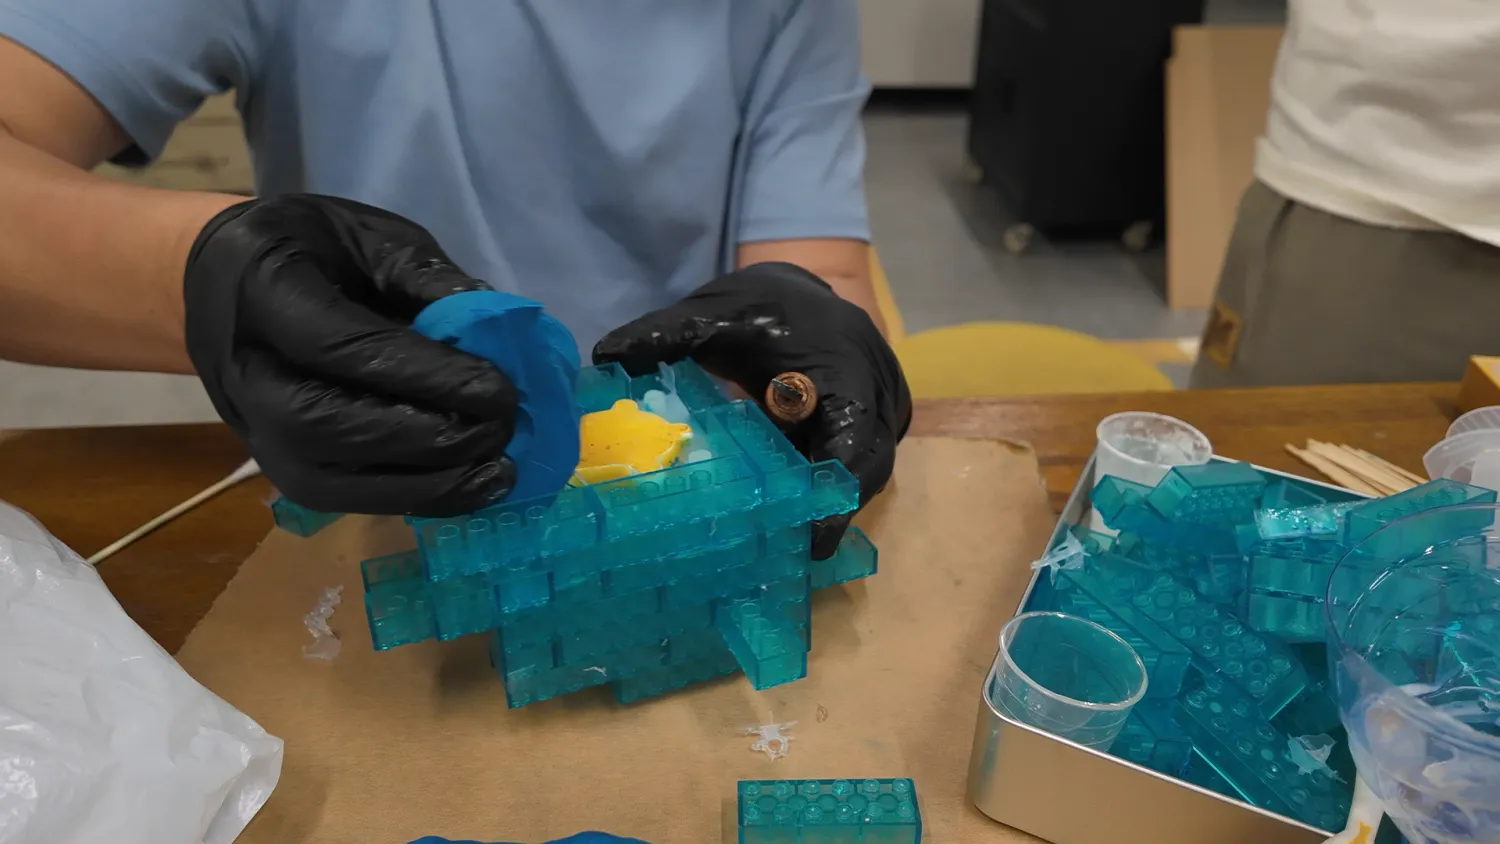
- Prepare AB liquid components A and B at a 1:1 weight ratio
- Evenly apply release agent (Vaseline) on the inside surface of the silicone mold
- Use LEGO bricks to secure the mold
- Quickly mix components A and B in a clean container, controlling stirring time to 15-20 seconds
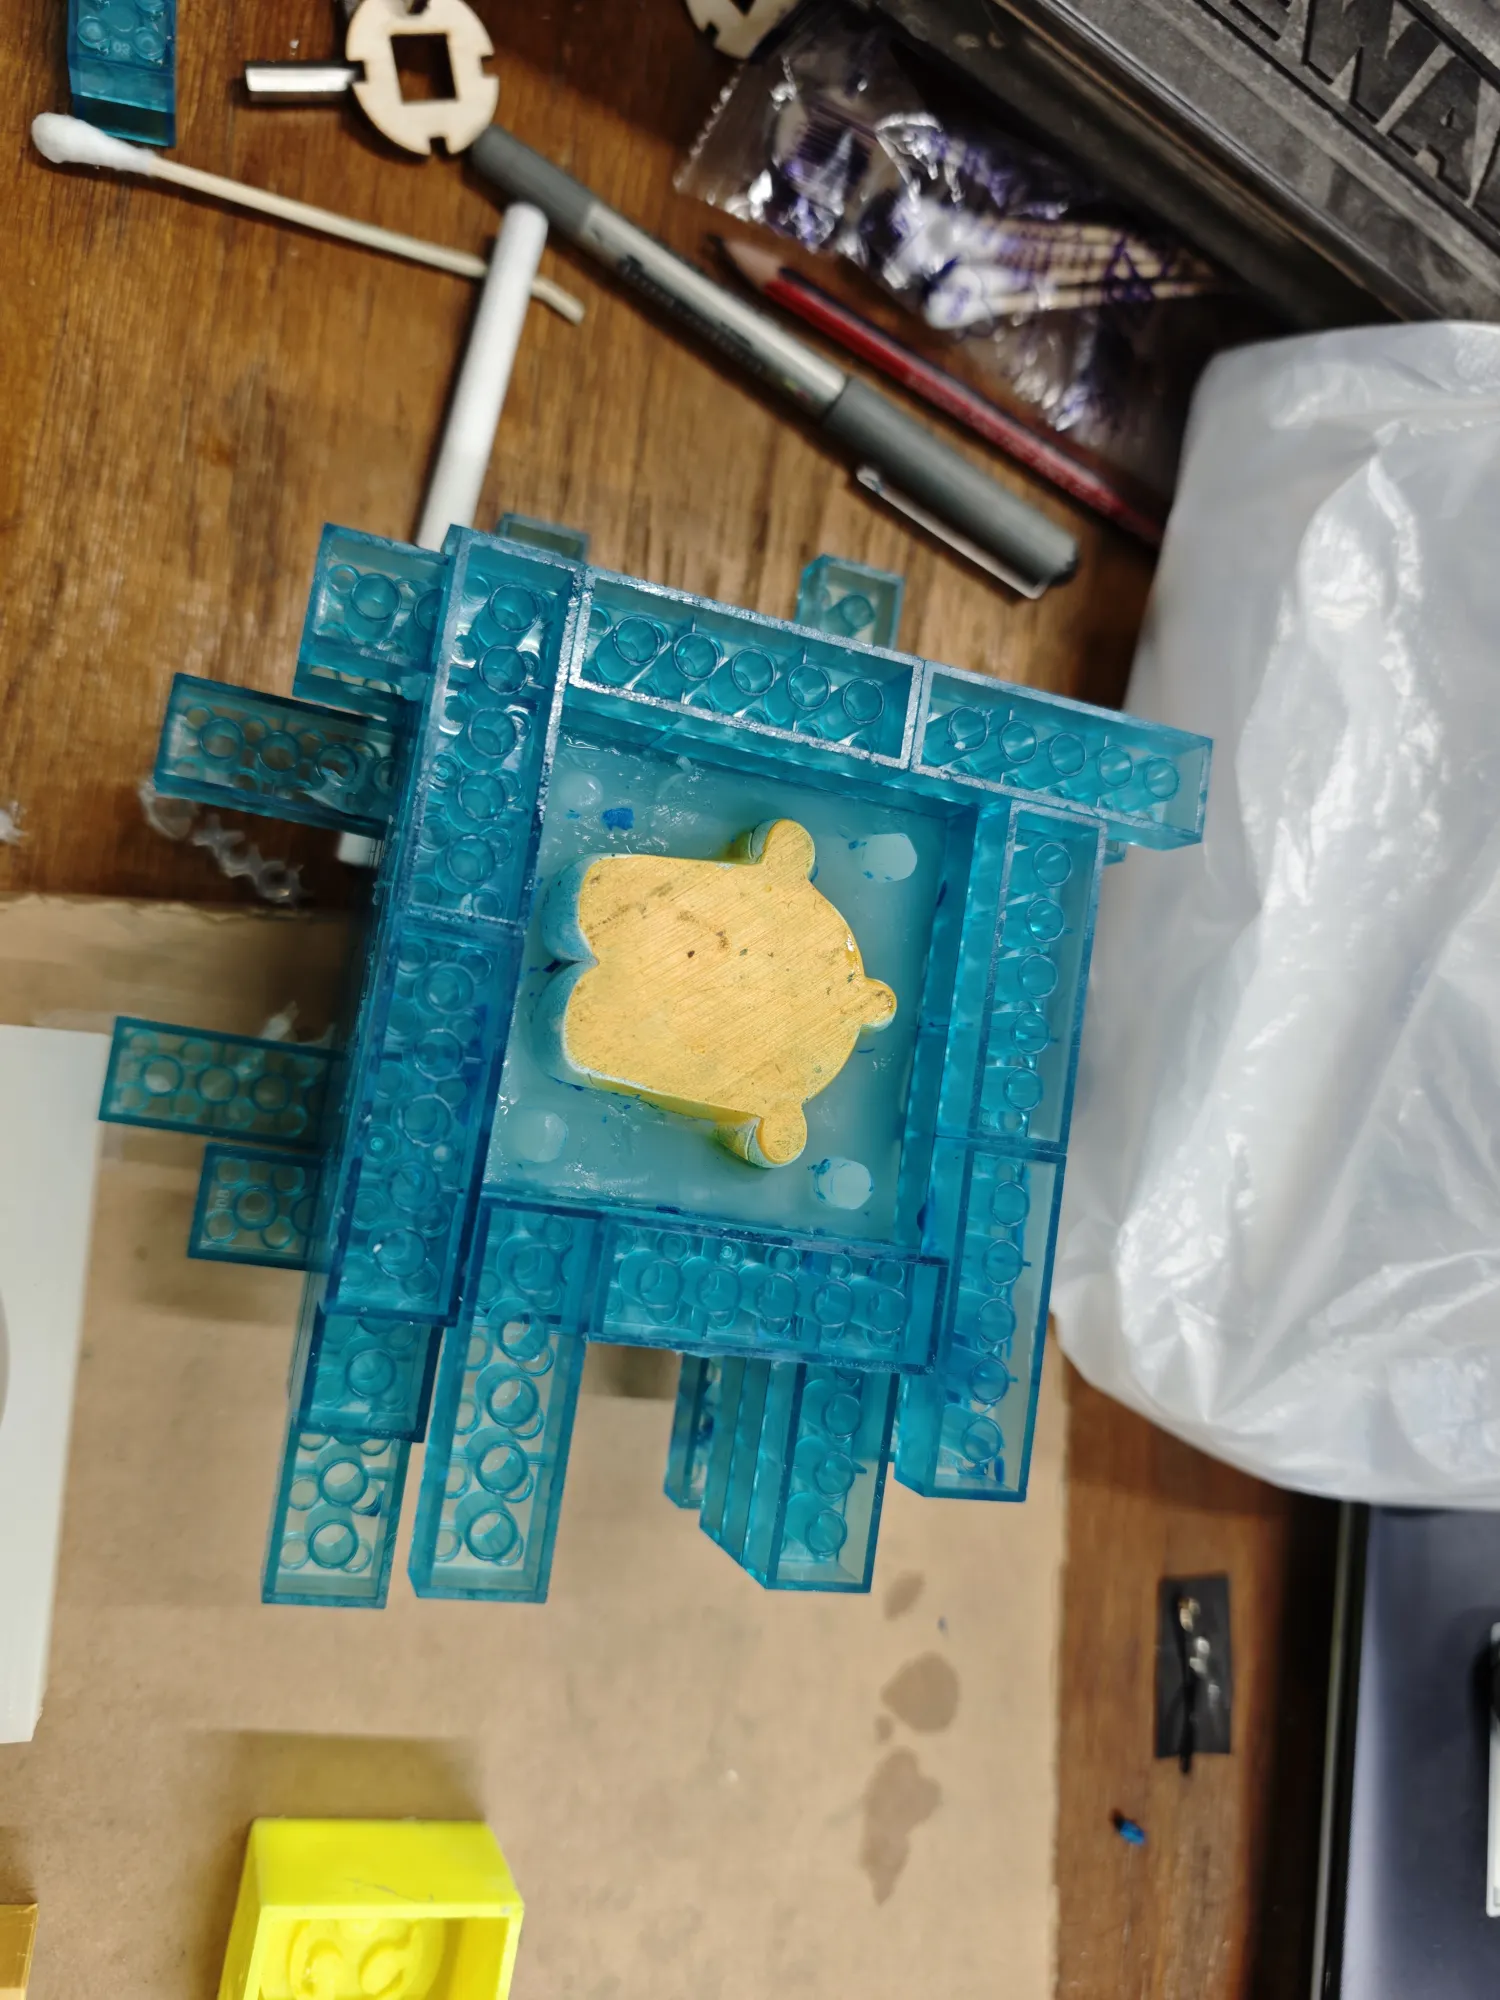
- Within the 1.5-2 minute working time, use a plastic syringe to quickly suck up the mixed AB liquid and inject it into the mold
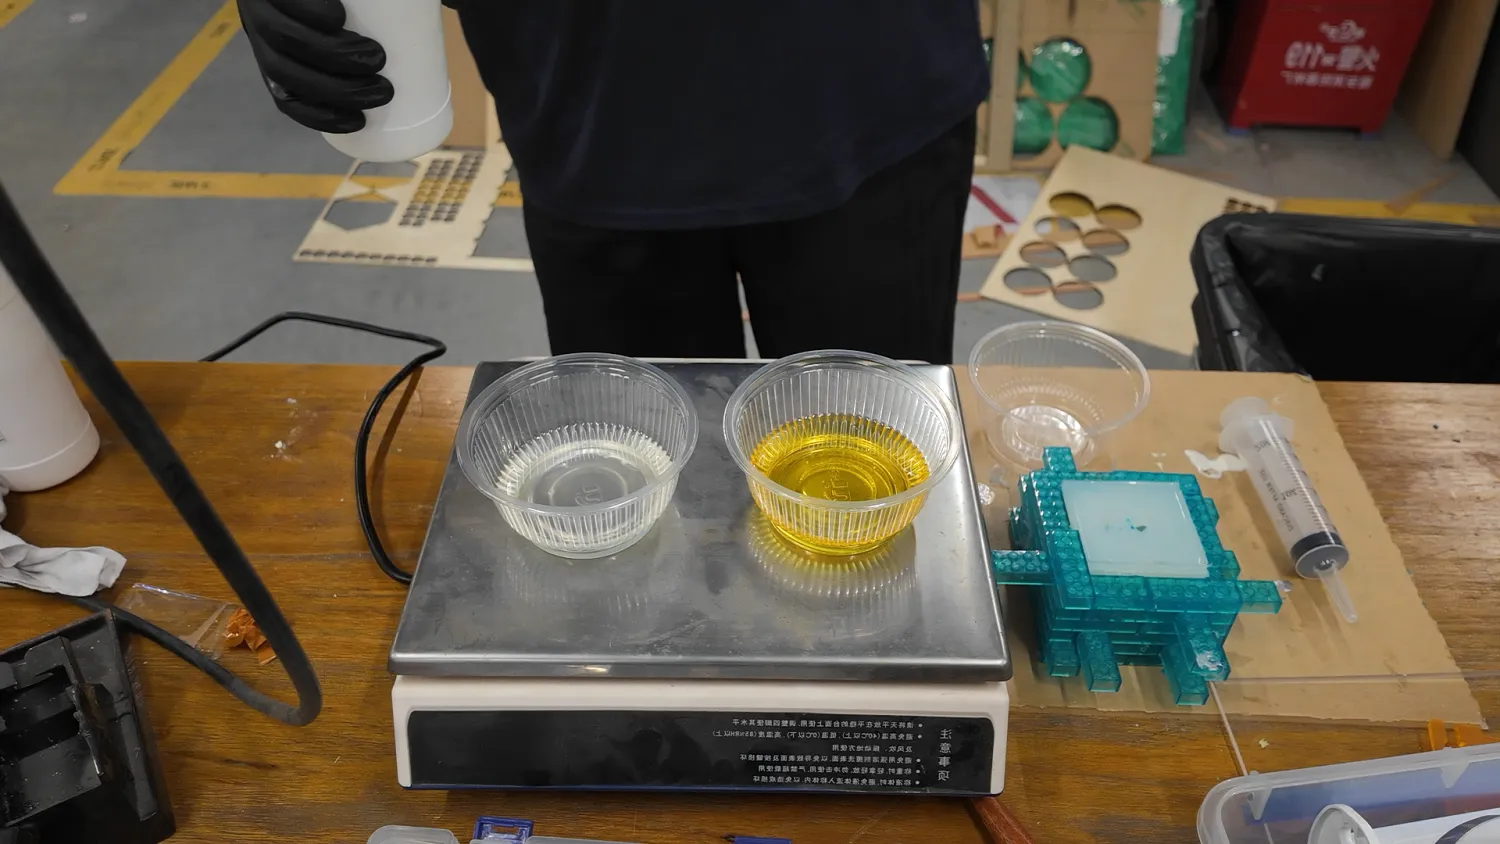
For larger castings, it's recommended to use an electronic scale's tare function to maintain a 1:1 weight ratio. You can first pour liquid A, note the weight, then add the same weight of liquid B
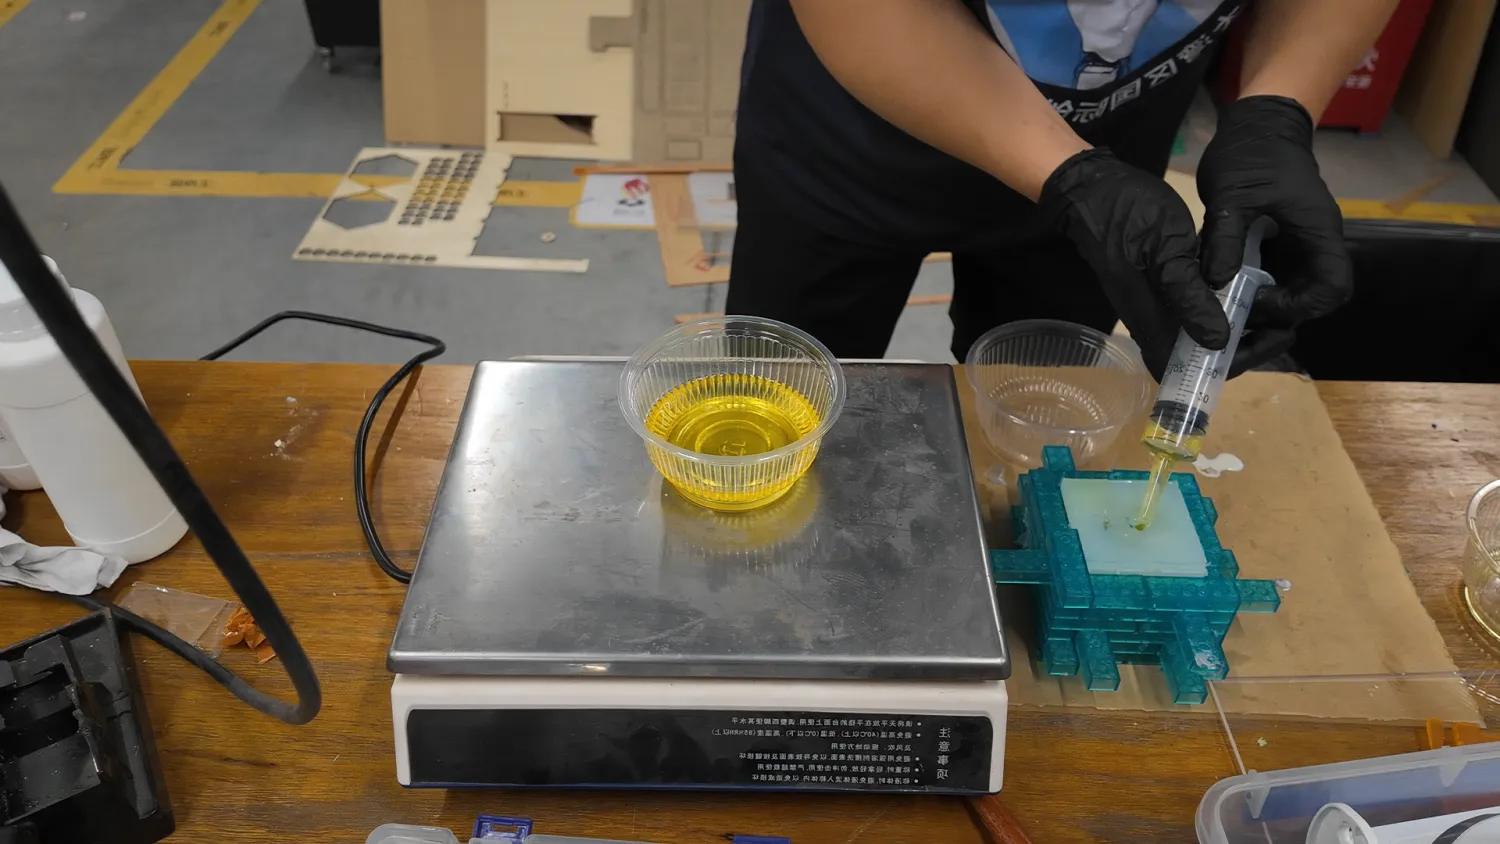
Then directly pour one bowl into another to mix, stir quickly, then use a plastic syringe to inject into the mold until liquid flows out of both the injection hole and vent hole
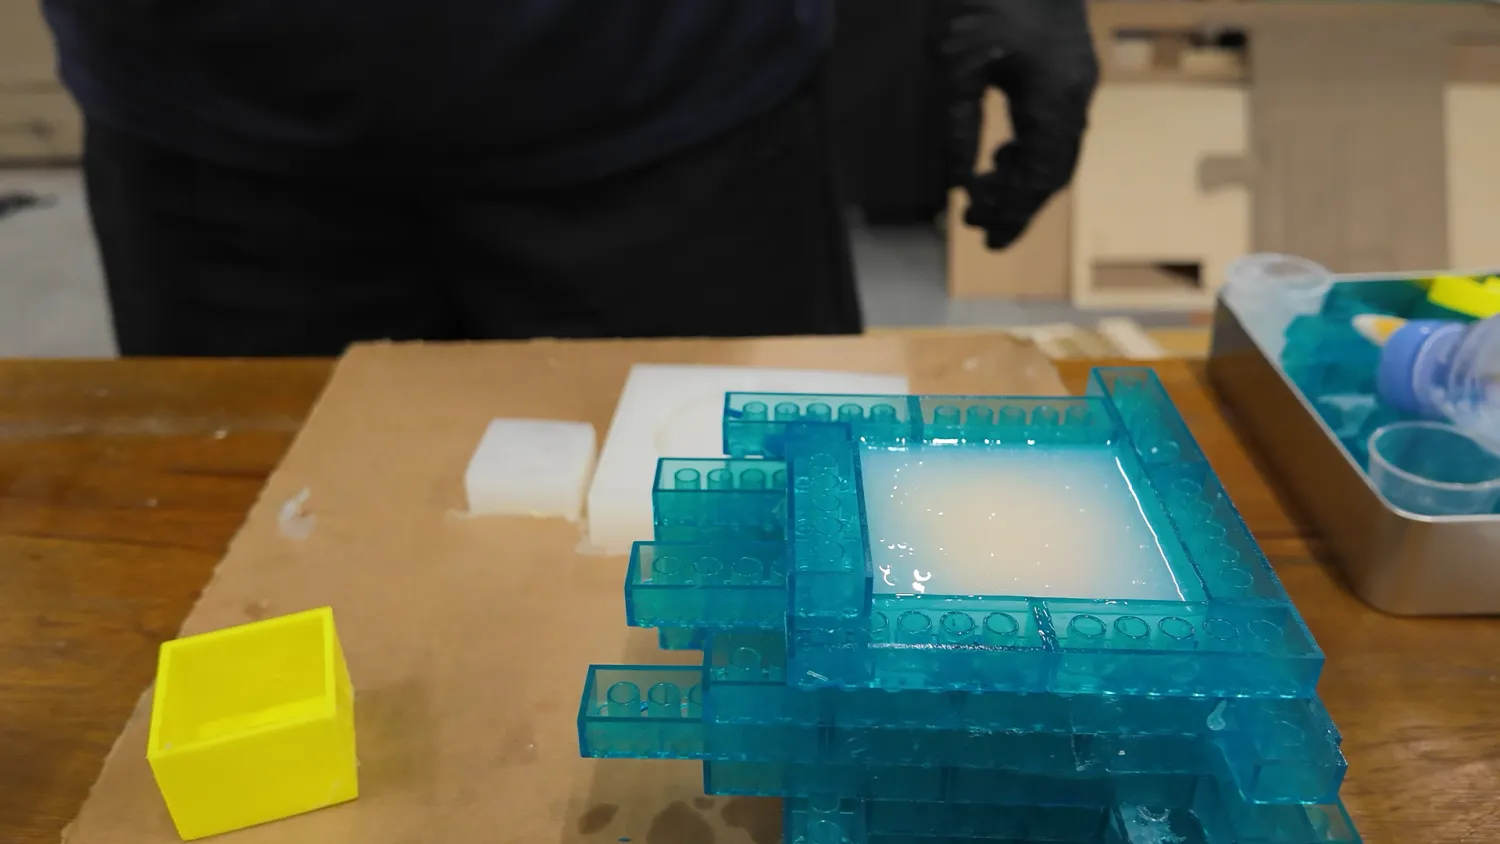
- Gently shake the mold to ensure AB liquid fills all details and expels bubbles
- Let stand at room temperature for about 10-20 minutes, waiting for the AB liquid to fully cure

Curing time is about 10-20 minutes. Since we didn't accurately estimate the amount of AB liquid needed, about half a bowl remained in the plastic bowl
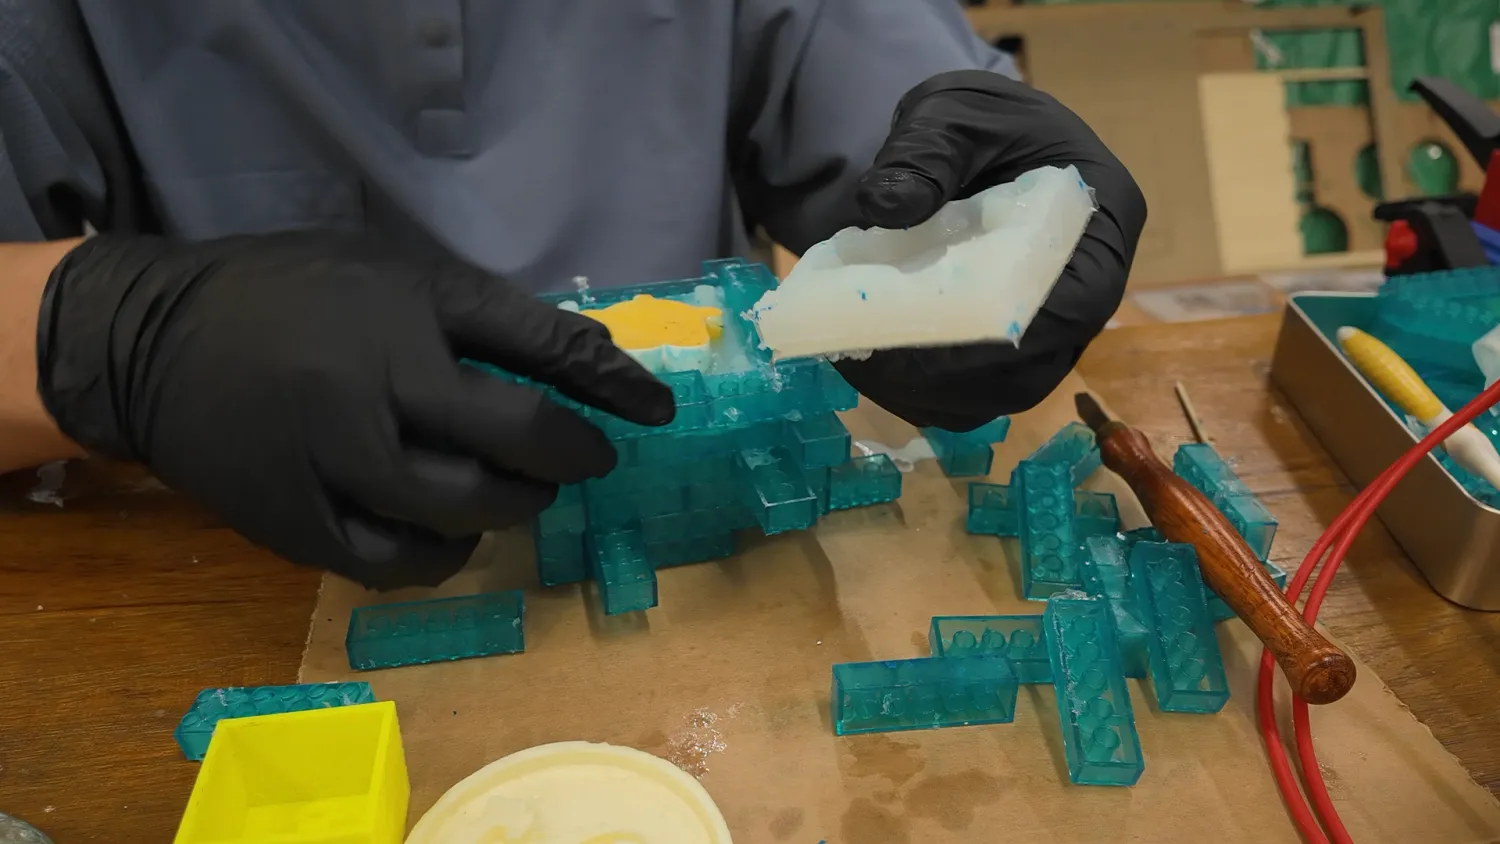
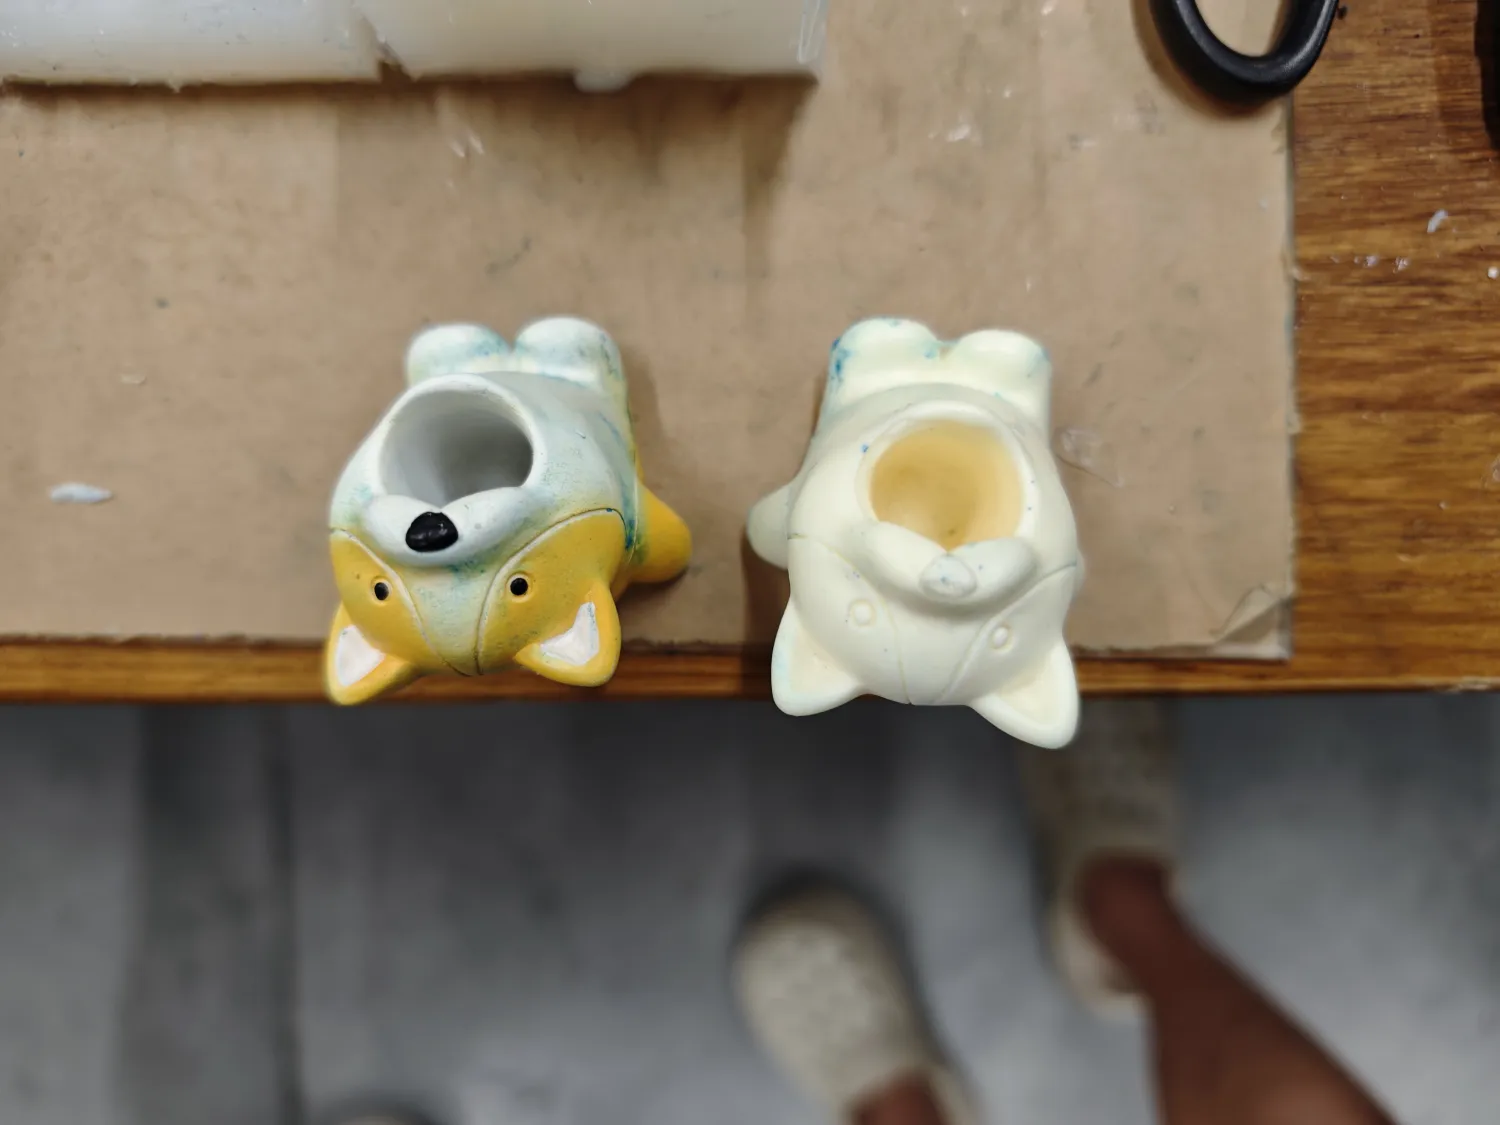
- Carefully remove the finished product from the silicone mold
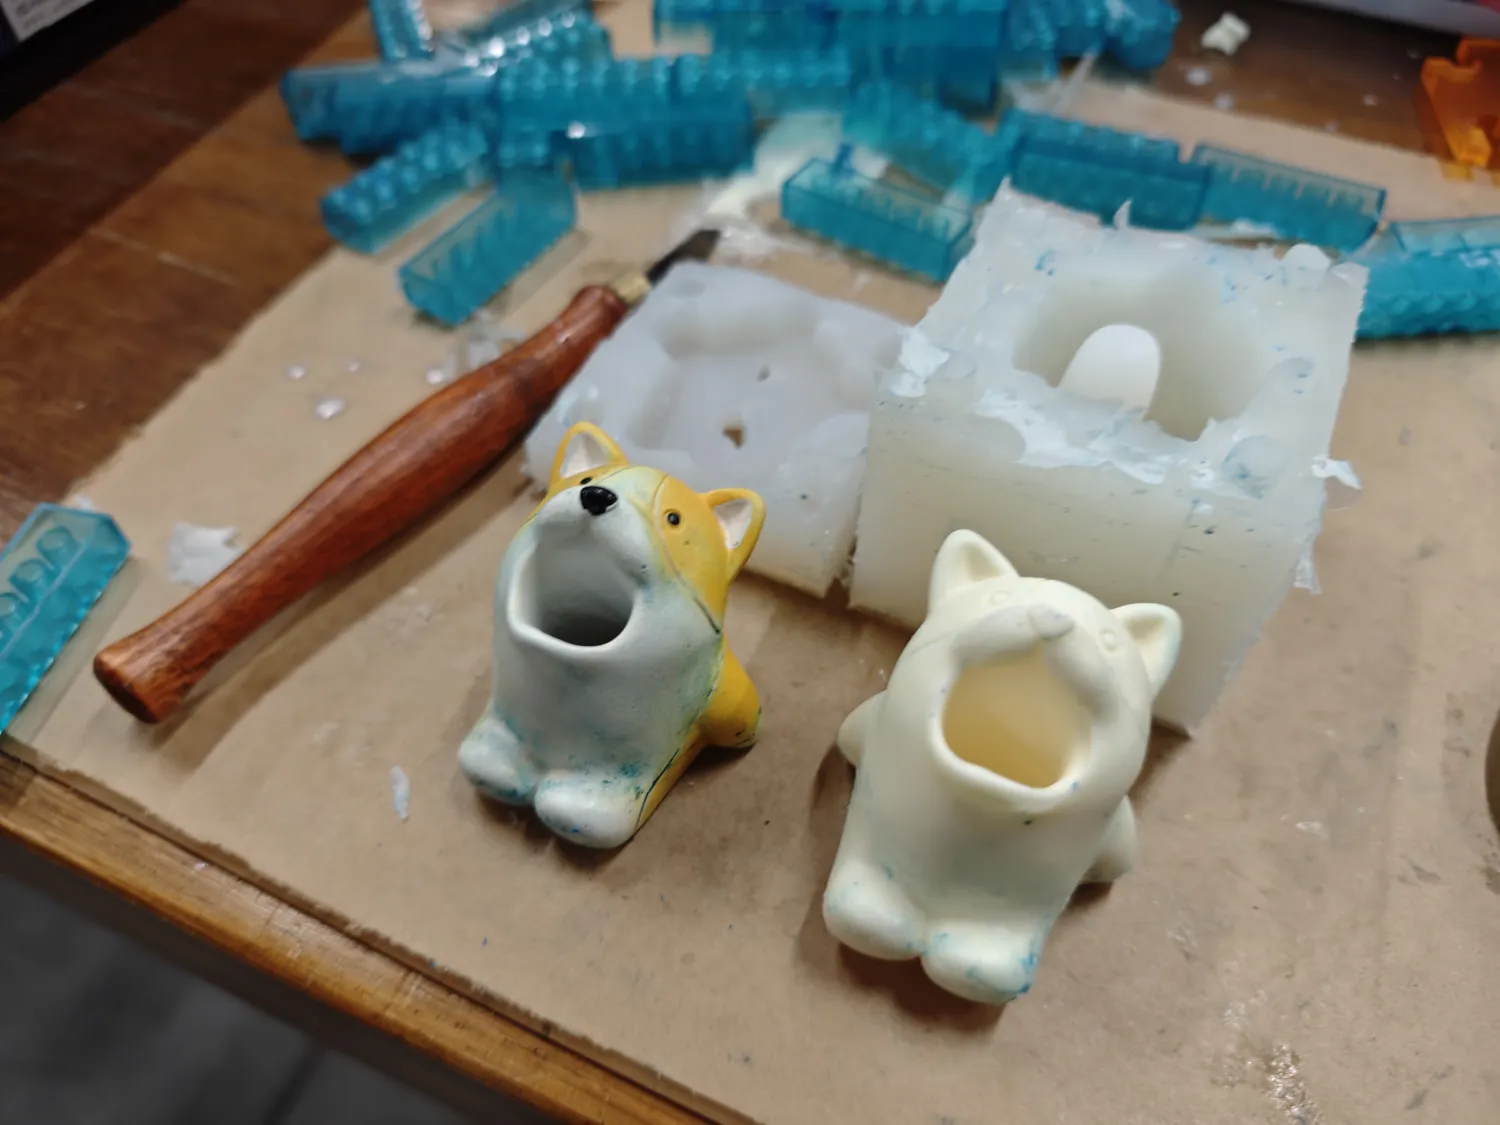
The removed model looks very good, with a smooth and fine surface
We are very satisfied with the finished product
- Painting
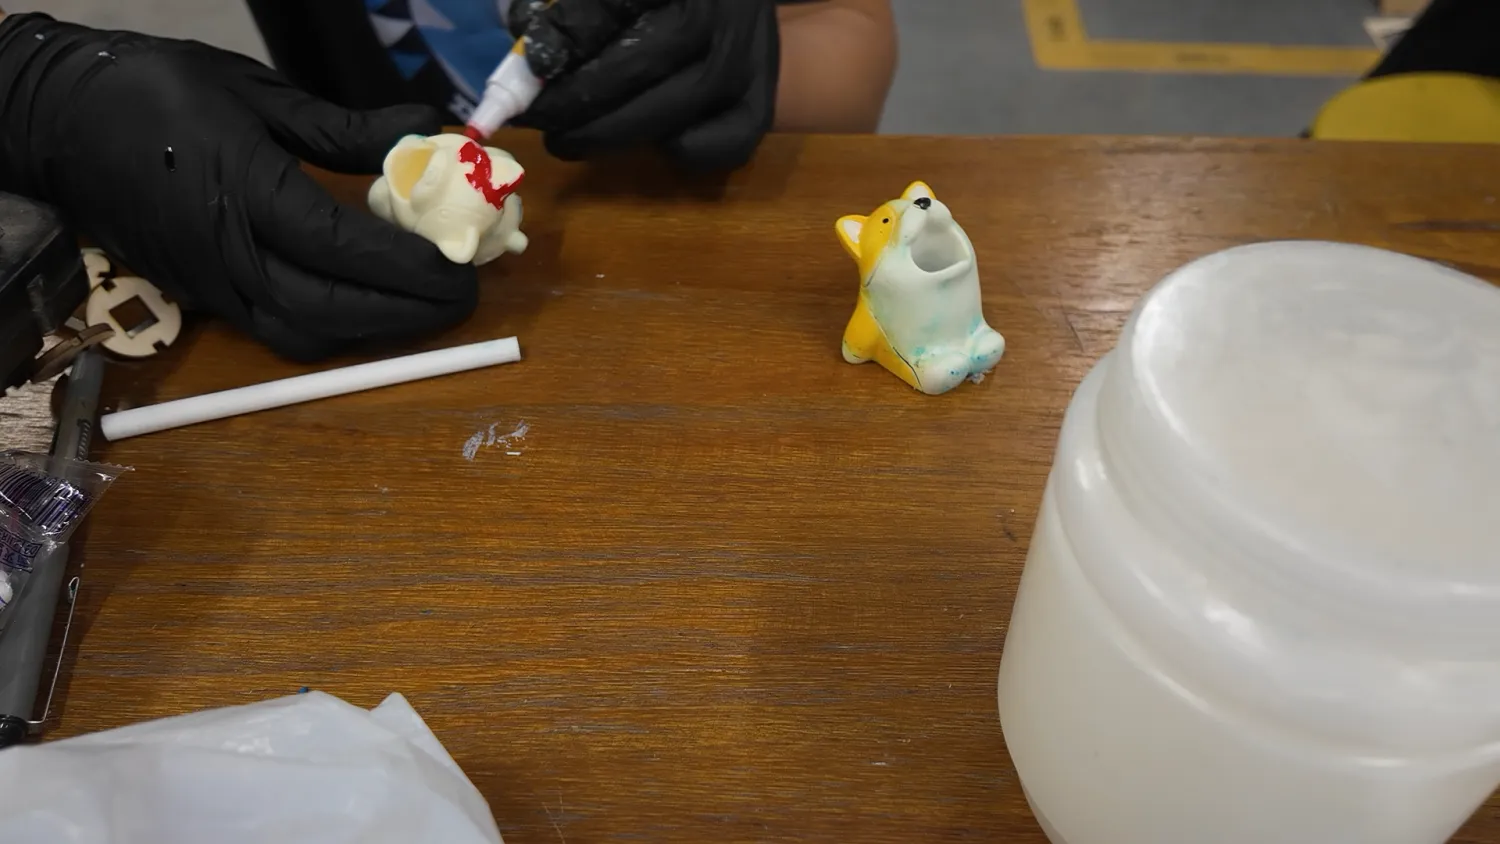
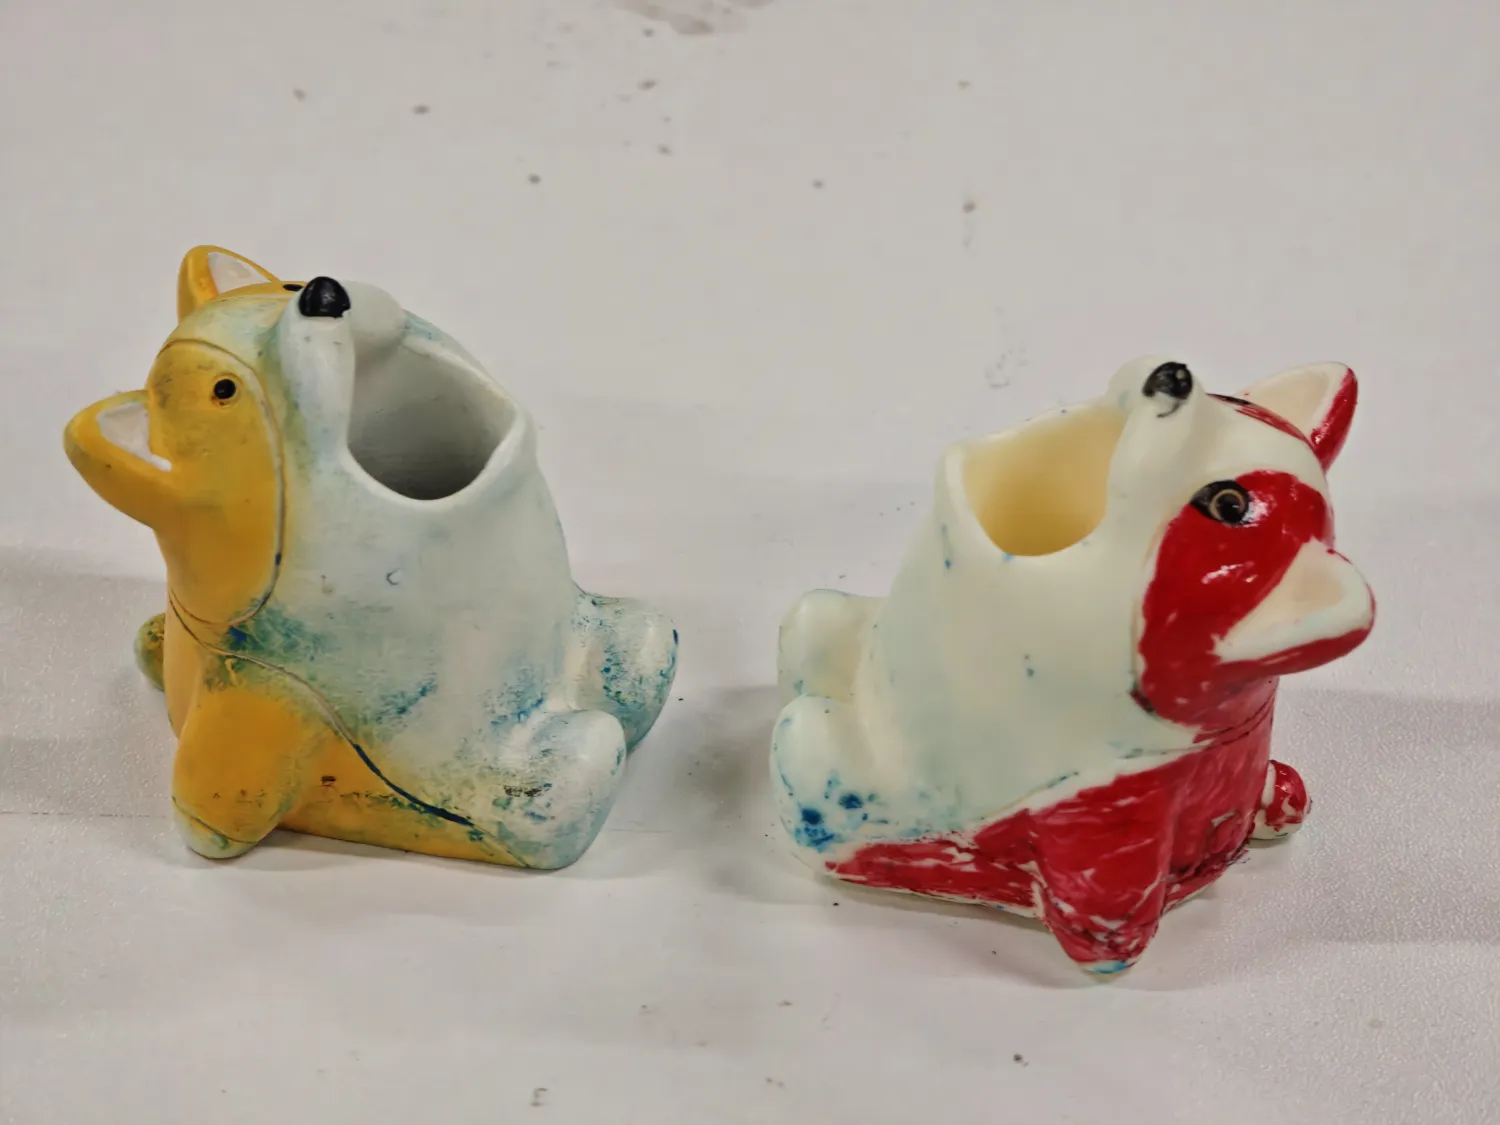
Comparison of the painted replica (red) with the original (yellow)
Unexpected Bonus: Smooth Surface Cast Object
After casting the AB liquid above, the remaining AB liquid in the plastic bowl also solidified. We removed it and unexpectedly found that the "disc's" sides were very smooth and rounded, which means if the mold surface is smooth enough, then models obtained through AB liquid can also be of excellent quality.
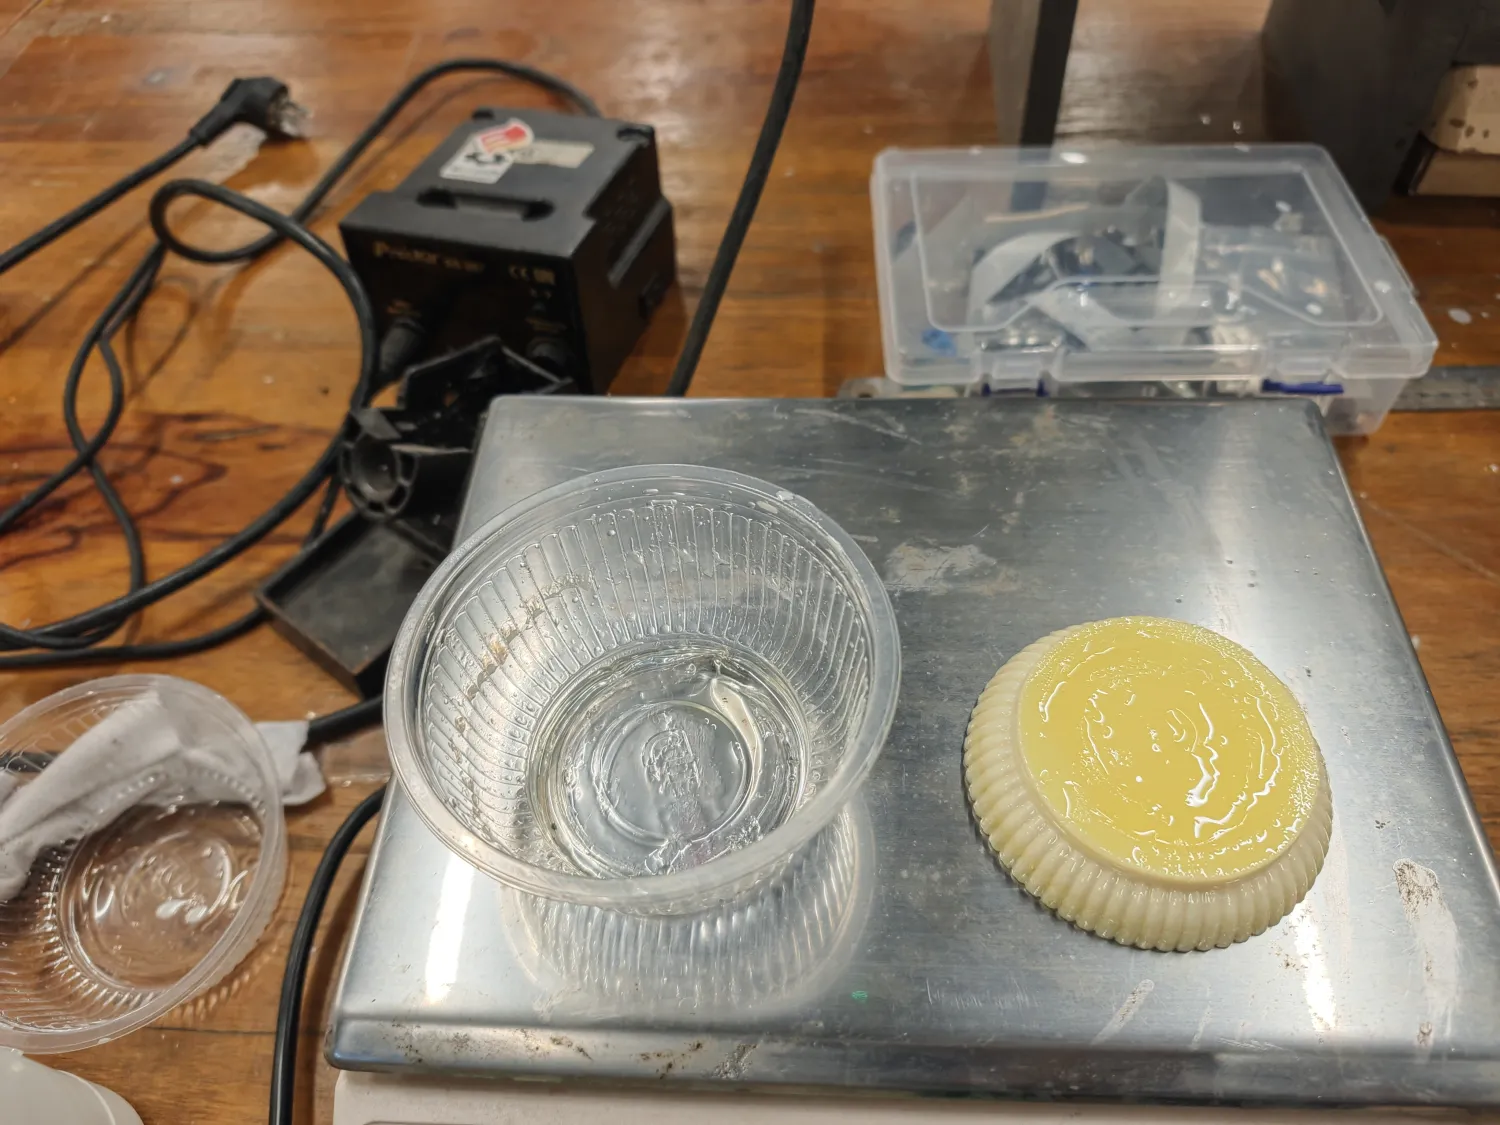
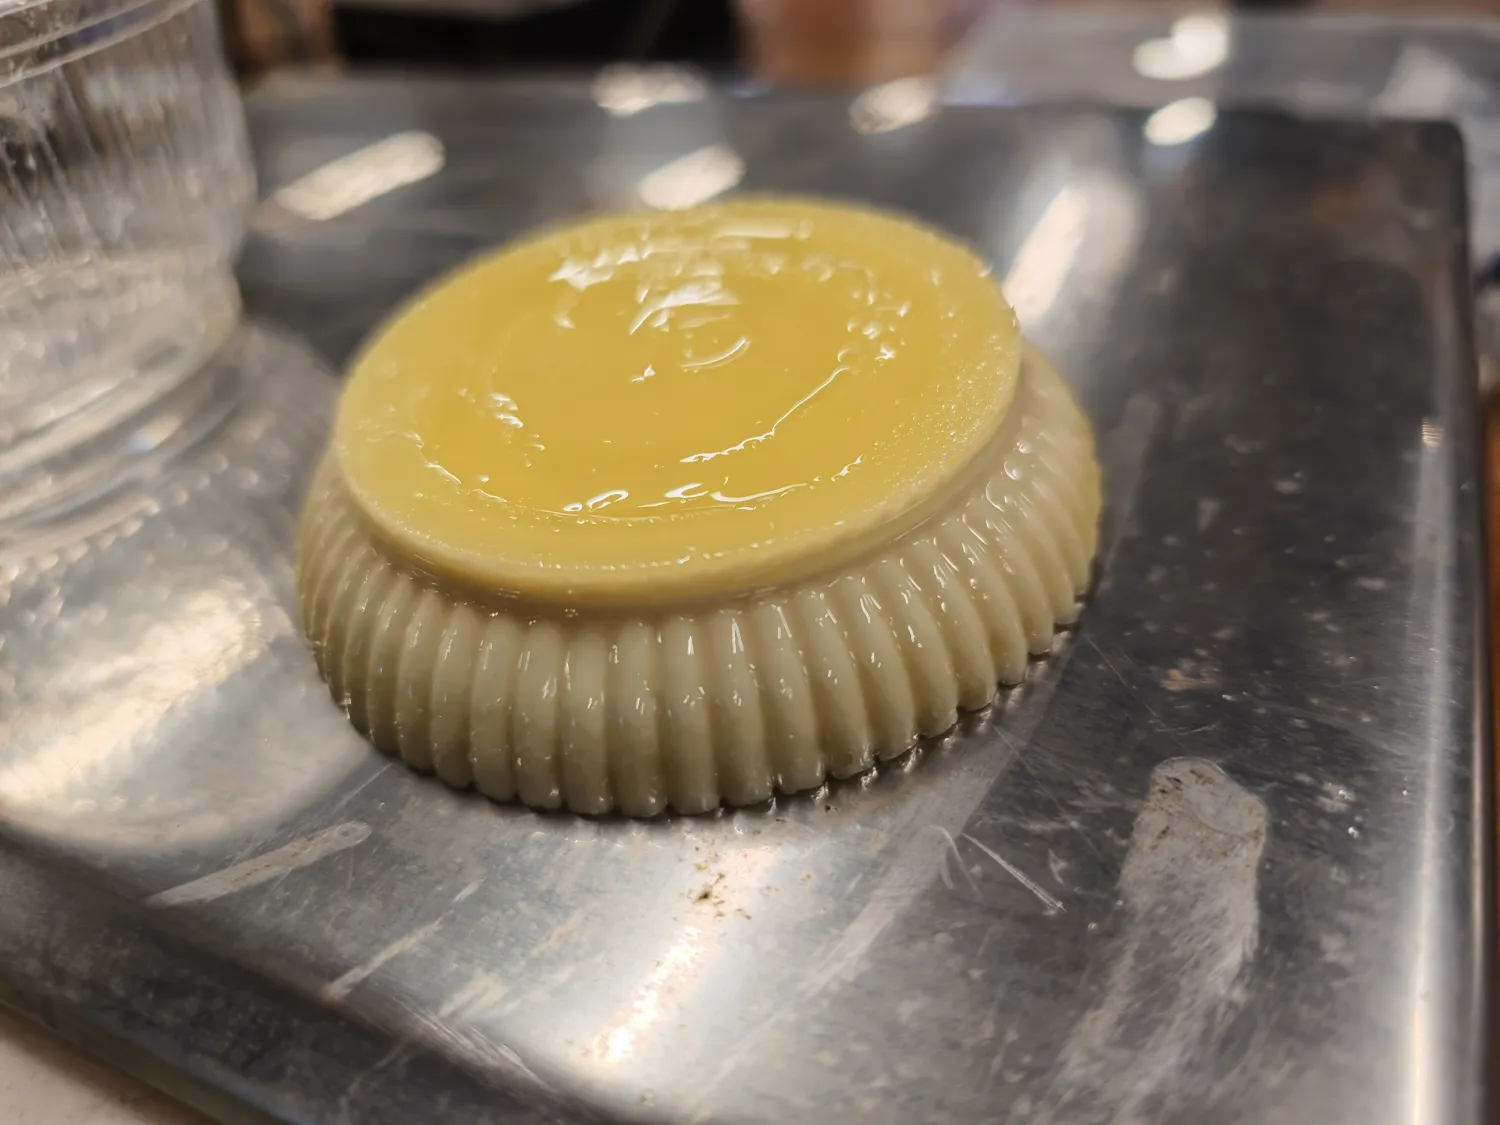
The smooth surface of the plastic bowl created the smooth surface of this leftover piece
Indium-Tin-Bismuth Alloy Small Tin Soldier Manufacturing Process
Preparation
- Check the indium-tin-bismuth alloy material
- Prepare the blue silicone mold (LEGO minifigure shape)
- Prepare hot water for melting the alloy
Alloy Melting
- We found a used plastic soup container, filled it with hot water, and placed the indium-tin-bismuth alloy inside
- Used hot water to indirectly heat the alloy
- Waited for the alloy to completely melt into liquid state (indium-tin-bismuth alloy melting point is only 47°C)

We found a used plastic soup container, filled it with hot water, then threw in the indium-tin-bismuth alloy which quickly became liquid metal
Mold Preparation
- Ensure the mold surface is dry and clean
- Apply appropriate amount of release agent (Vaseline) on the inside surface of the mold
- Check if the detailed parts of the mold are intact
Casting Process
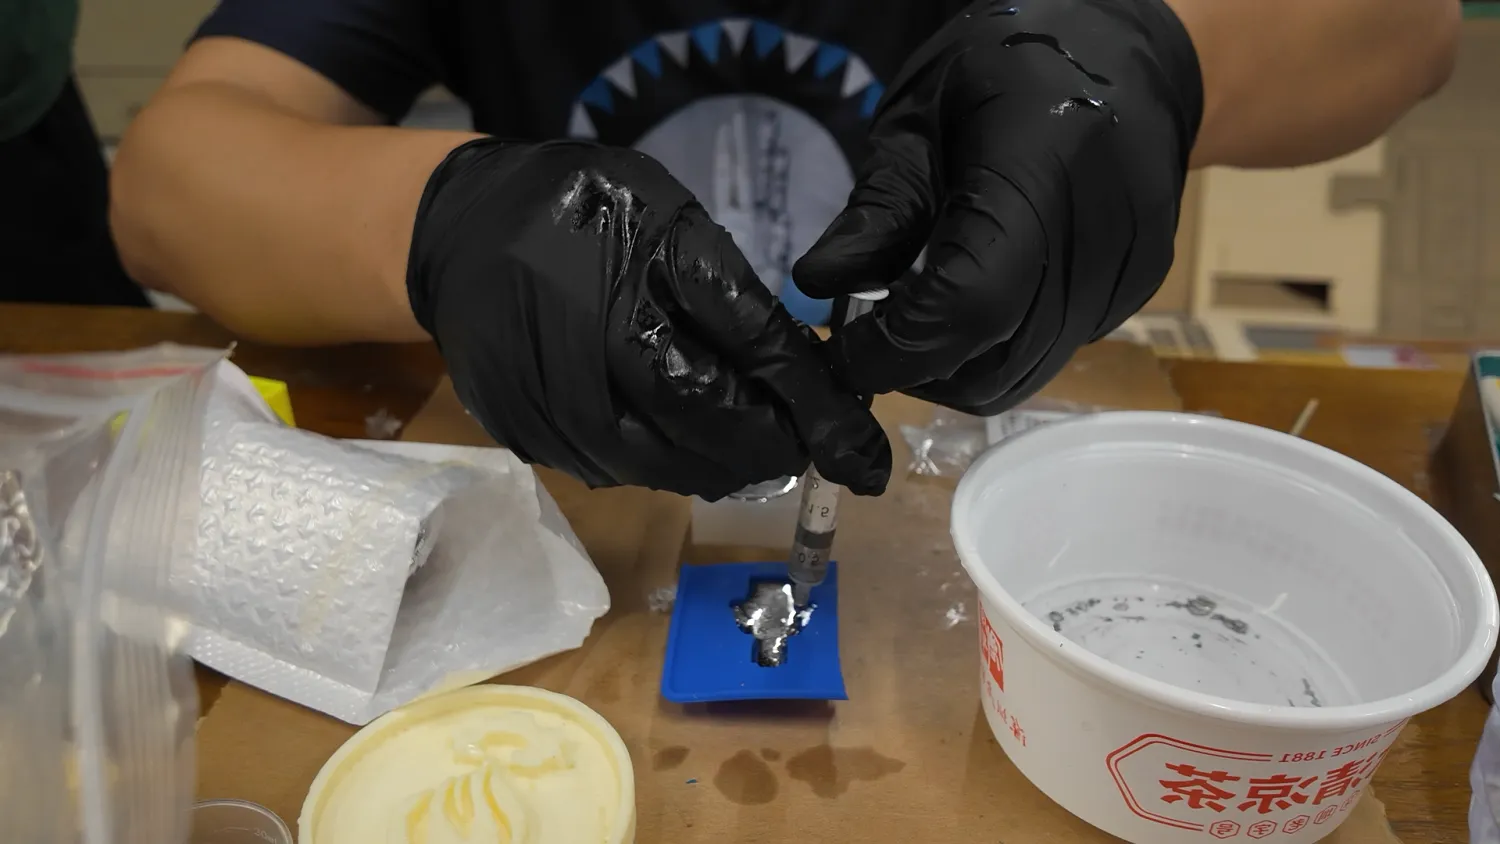
- Use a syringe to draw an appropriate amount of melted indium-tin-bismuth alloy
- Carefully inject the liquid alloy into the mold
- Gently shake the mold to ensure the liquid alloy fills all details
- Wait for the liquid alloy to cool and completely solidify (about 10-15 minutes)
Demolding and Post-processing
- Carefully remove the metal small tin soldier from the mold
- Use metal files or other suitable tools to remove burrs and excess parts
- Check the completeness and detail reproduction of the finished product
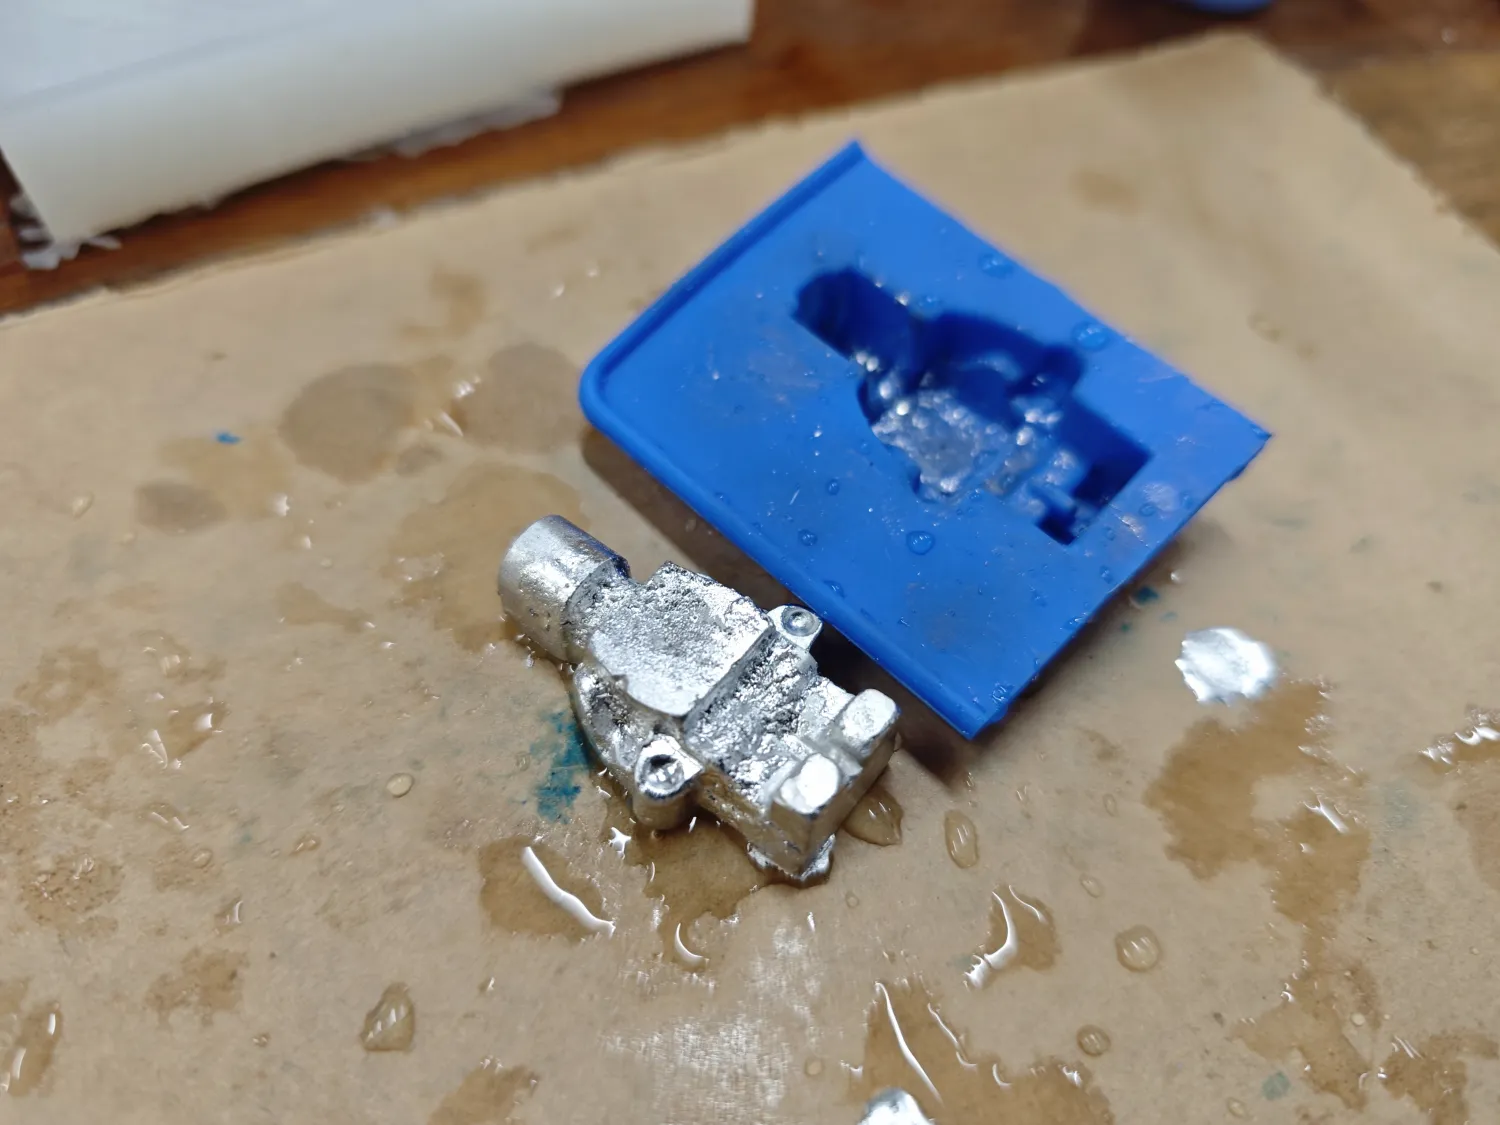
Completed metal tin soldier and mold. Unfortunately, there are still some bubbles causing surface defects, which proved difficult to eliminate despite several attempts
Technical Points and Precautions
Silicone Mold Making Technical Points
- Mixing Ratio Accuracy:
- Strictly mix silicone and hardener at a 100:2 ratio
- Incorrect proportions will affect curing effect and strength
- Bubble Control:
- Stir in one direction to reduce bubble entry
- First apply a thin layer of silicone on the master model, wait for bubbles to disappear before pouring remaining silicone
- Gently shake the mold to help bubbles rise
- Consider reducing hardener ratio to extend curing time, allowing bubbles to naturally dissipate
- Use a vacuum machine to extract bubbles if available
- Operation Time: Silicone working time is about 5 minutes, sufficient for detailed molding
- Release Agent Usage: White Vaseline should be applied thinly and evenly, too much will affect detail reproduction
Polyurethane Resin Casting Technical Points
- Mixing Ratio Accuracy:
- Strictly mix components A and B at a 1:1 weight ratio, preferably by weighing rather than using measuring cups
- Large weight deviations will cause incomplete surface curing or color deviation
- Time Control:
- Complete pouring within 1.5-2 minutes after mixing
- Control stirring time to 15-20 seconds
- Avoiding Bubbles:
- Use horizontal shear mixing rather than vertical stirring
- Pour using thin stream method
- Gently shake the mold to help bubbles rise
- Curing Time: About 10-20 minutes for complete curing at room temperature
- Moisture Prevention:
- Avoid contact of AB liquid with moisture
- Especially component B easily reacts with moisture to produce white turbidity
- Safety Protection:
- Maintain good ventilation during operation
- Avoid direct skin contact, wear gloves when necessary
- The curing process generates heat, be careful to avoid burns
- Avoid early demolding to prevent product deformation
Low-Temperature Alloy Casting Technical Points
- Temperature Control:
- Heating temperature should not be too high, 47°C is sufficient for melting
- Maintain liquid state without overheating to avoid oxidation
- Injection Technique:
- Use syringe to slowly inject liquid alloy
- Avoid generating bubbles
- Cooling Time: Let the alloy cool completely before demolding to avoid deformation
- Safety Precautions:
- Although it's a low-temperature alloy, careful operation is still needed to avoid burns
- Maintain ventilation in the working environment
- Thoroughly clean tools and hands after operation
Experimental Results and Discussion
Dog Pen Holder Results Analysis
- Advantages:
- LEGO bricks provide a flexible and easy-to-disassemble mold frame
- Silicone mold well reproduced the details of the original
- Silicone mold has good elasticity, easy demolding, does not damage the original
- Silicone mold can be reused multiple times
- Polyurethane resin cast product is easy to sand, convenient for post-processing
- Challenges:
- Bubbles easily form during silicone pouring
- LEGO frame needs careful construction to ensure no leakage
- Polyurethane resin has short working time (1.5-2 minutes) after mixing, requiring fast and accurate operation
- Need to avoid moisture contact with polyurethane resin, especially component B
Indium-Tin-Bismuth Small Tin Soldier Results Analysis
- Advantages:
- Low-temperature alloy easy to work with under simple conditions
- Excellent metallic feel
- High detail reproduction
- Can be repeatedly melted for reuse, economical and environmentally friendly
- Challenges:
- Injection process requires stable handling
- Small details (such as hands) are easily incomplete
- Careful demolding needed to avoid damaging detailed parts
Comparison of the Two Techniques
- Material Comparison:
- Silicone mold has good elasticity, suitable for complex shapes, long service life
- Polyurethane resin cures quickly, suitable for rapid product making, but with small operation time window
- Low-temperature alloy has moderate cost, can be recycled multiple times
- Applicable Scenarios:
- Dog pen holder suitable for making functional decorative items
- Small tin soldier suitable for making fine decorative small objects
- Process Complexity:
- Silicone mold making process relatively simple, but with long curing time, ample operation time
- Polyurethane resin casting requires high time control, high operation speed
- Low-temperature alloy casting requires high temperature control, but less time pressure for operation
CNC Milling Mold Making Process Example
Wax Mold Milling Practice Flow
Below is my detailed process of making a badge wax mold using a CNC milling machine:
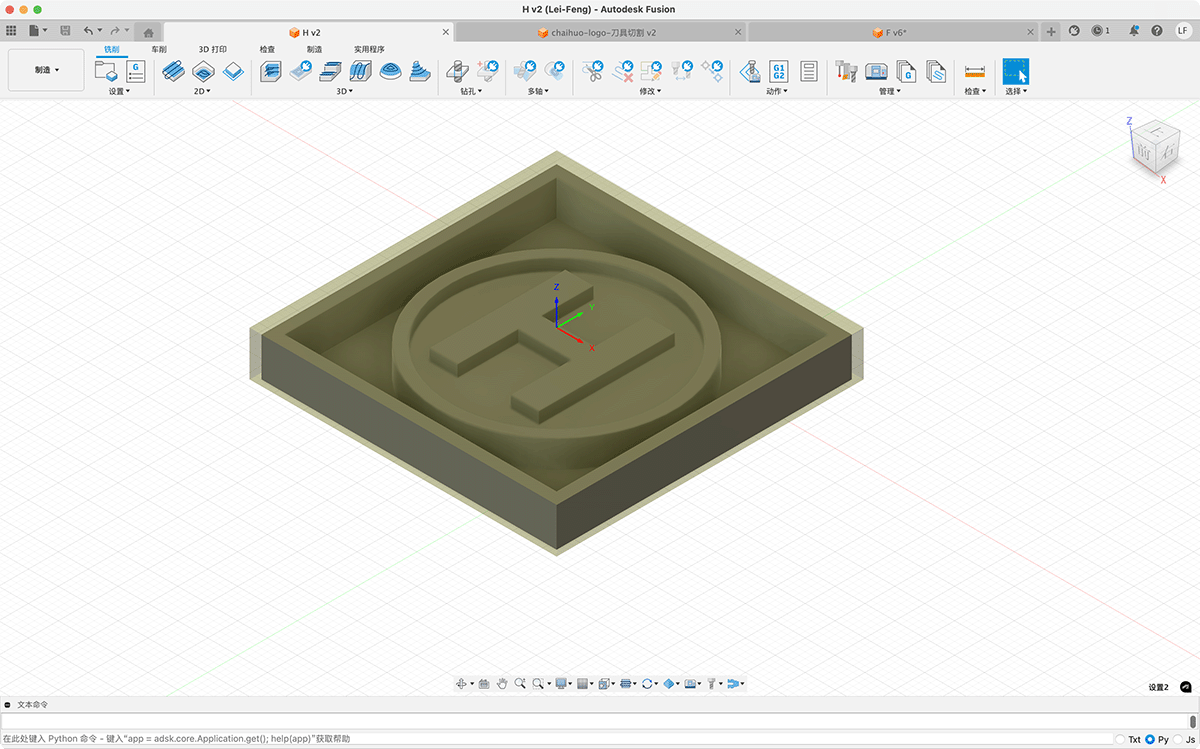
- Design Phase:
- Designed a badge with the letter "F" in Fusion 360
- Designed a 70mm square outer frame (the edge length range of our wax block), with the badge pattern in the middle
- Exported as STL file format
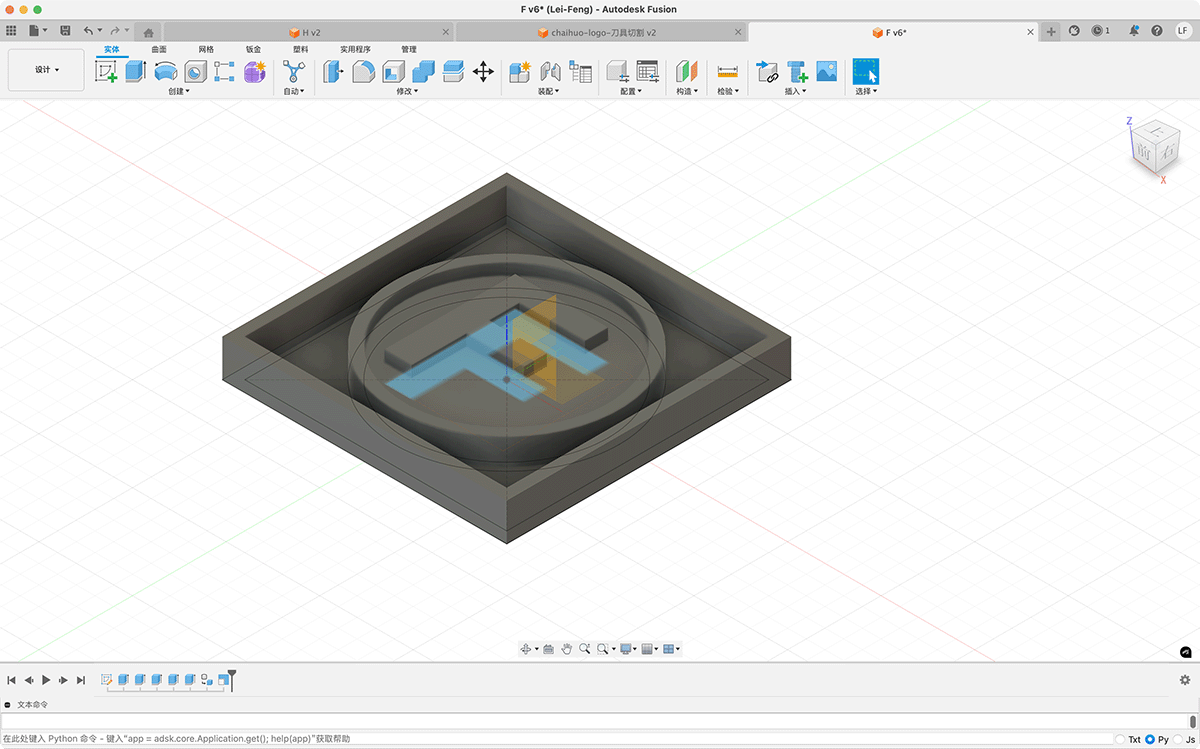
Designing F letter badge in Fusion 360
- Tool Path Generation:
- Visited the ModsProject website
- Right-clicked and selected: programs/open program/G-code/mill 3D stl/
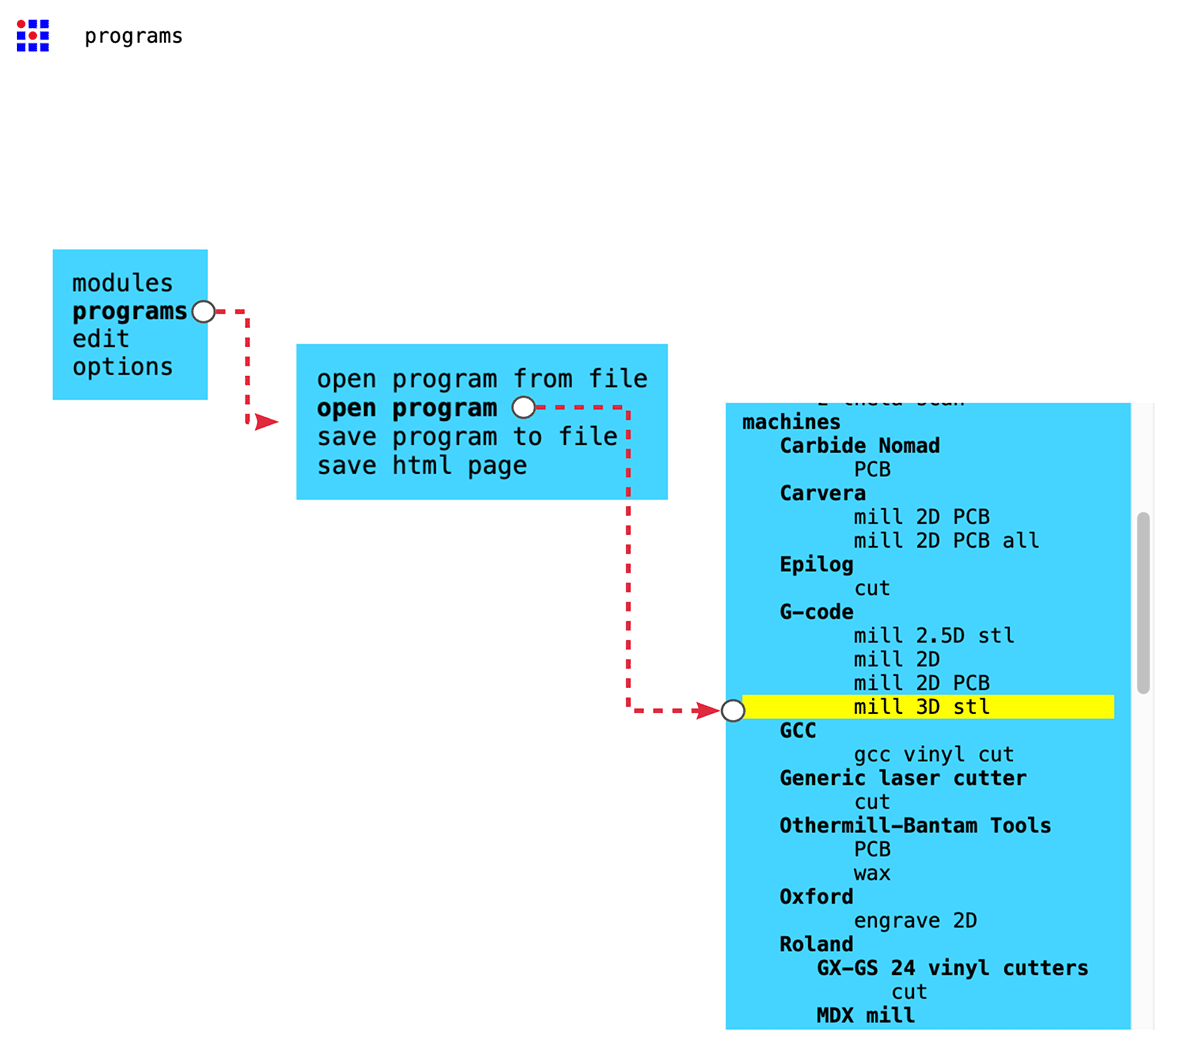
Accessing programs/open program/G-code/mill 3D stl tool from the right-click menu
- In the program window, clicked "select stl file" to choose the exported STL file
- In "mesh units: (enter)", changed the value in the "mm:" field to 1, ensuring the model loads at original scale
- Clicked the "calculate" button to preview the tool path and automatically download the .nc file
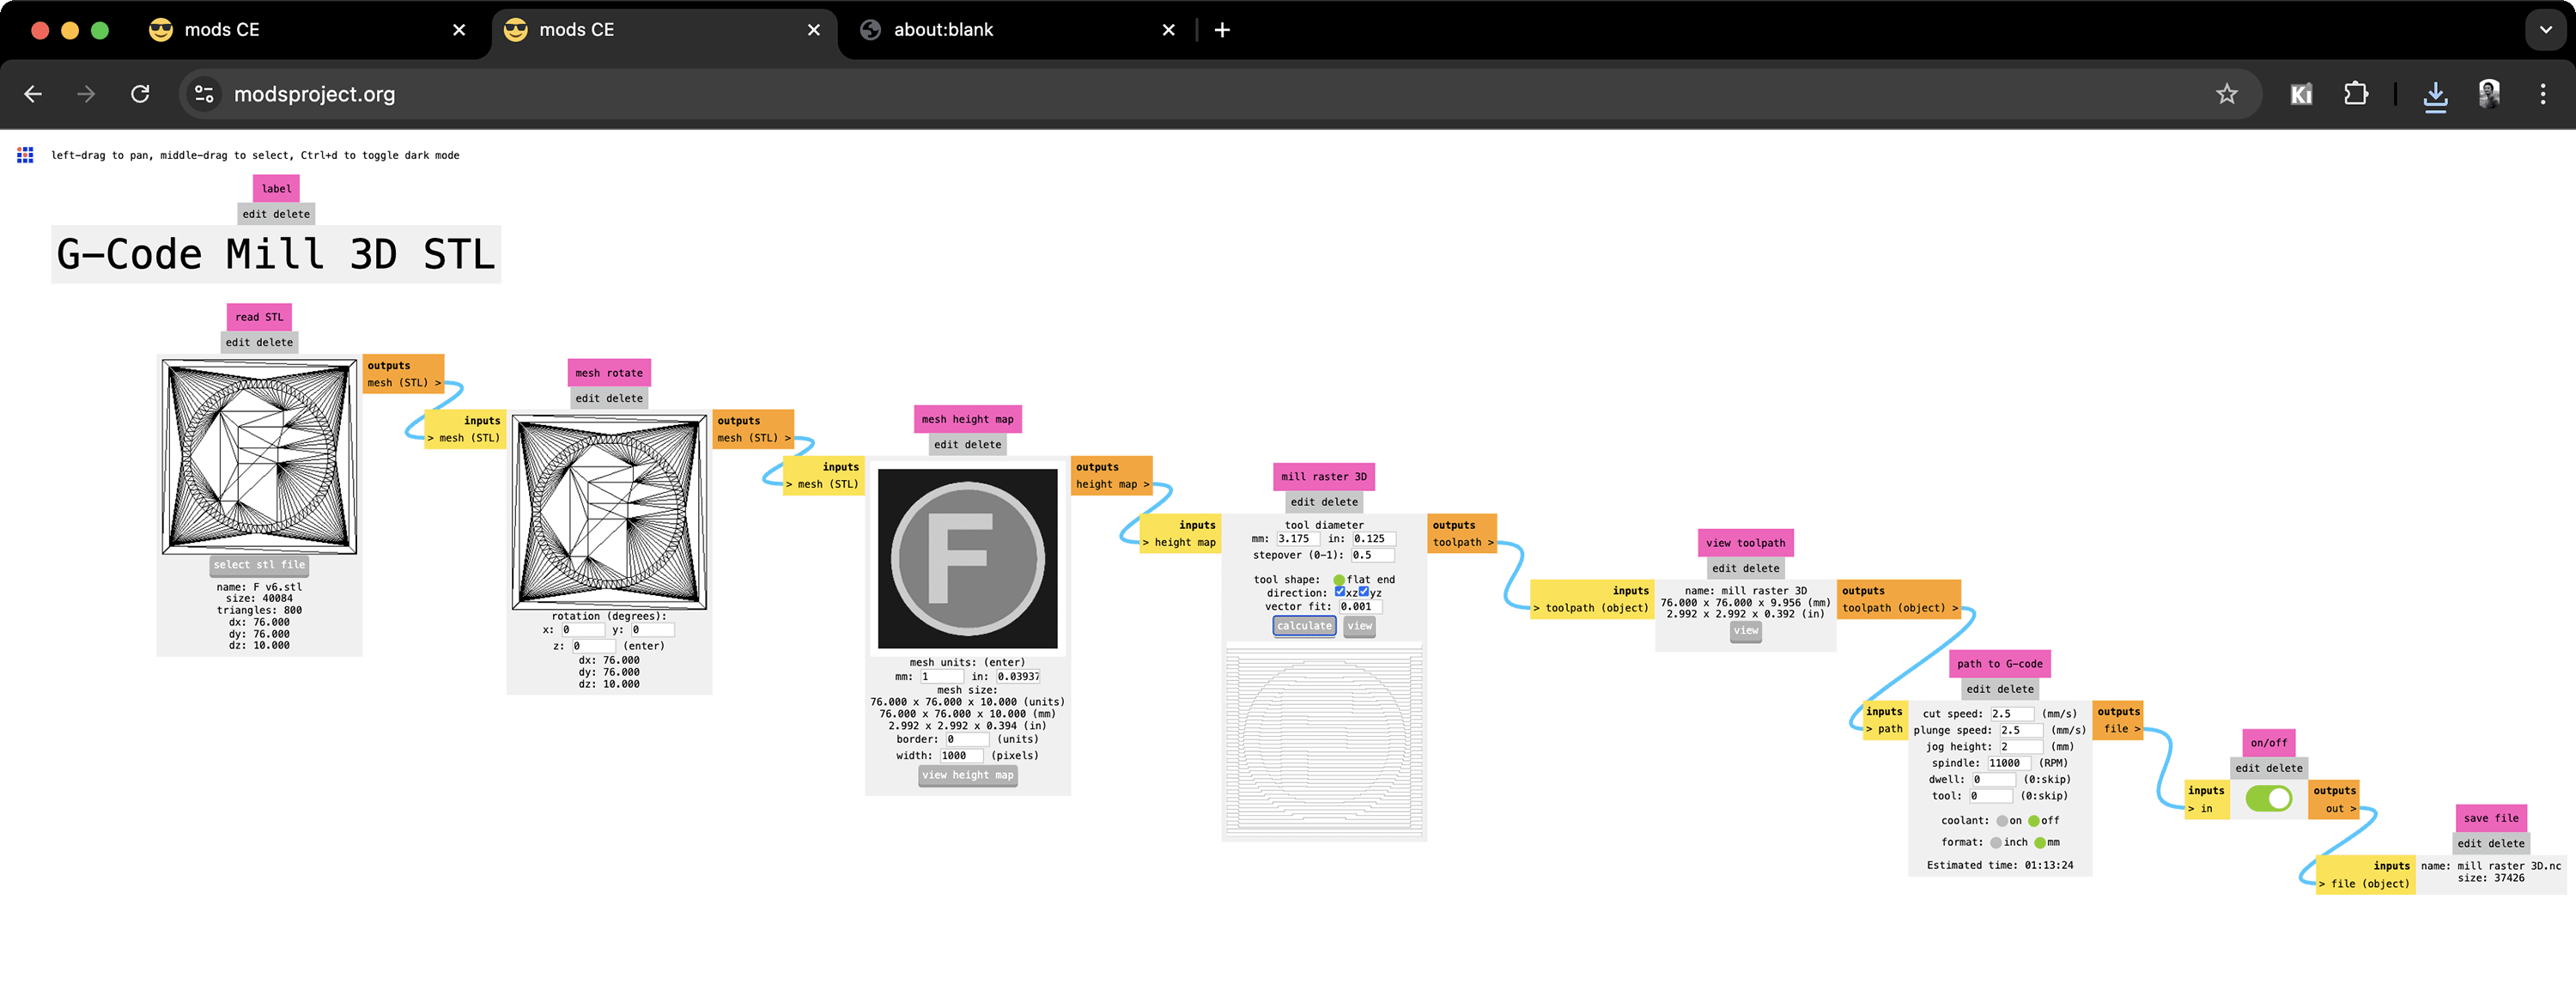
Loading STL file and calculating tool path
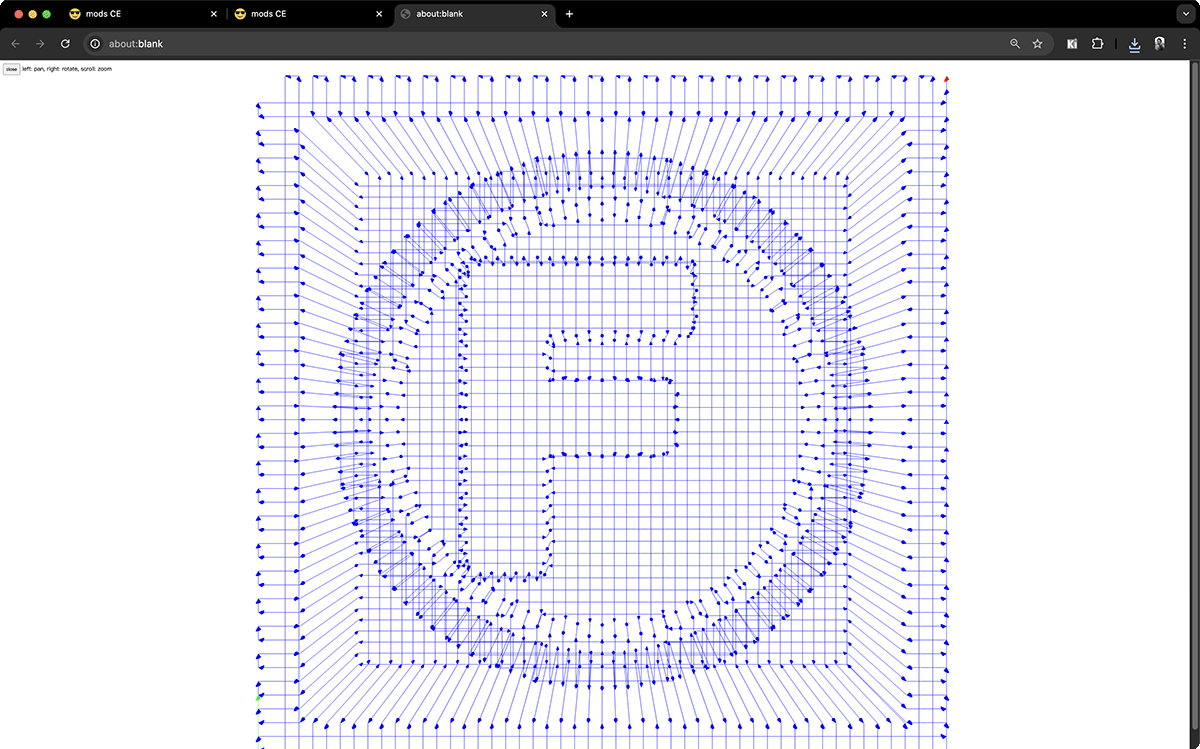
The calculated tool path is automatically downloaded as a .nc file
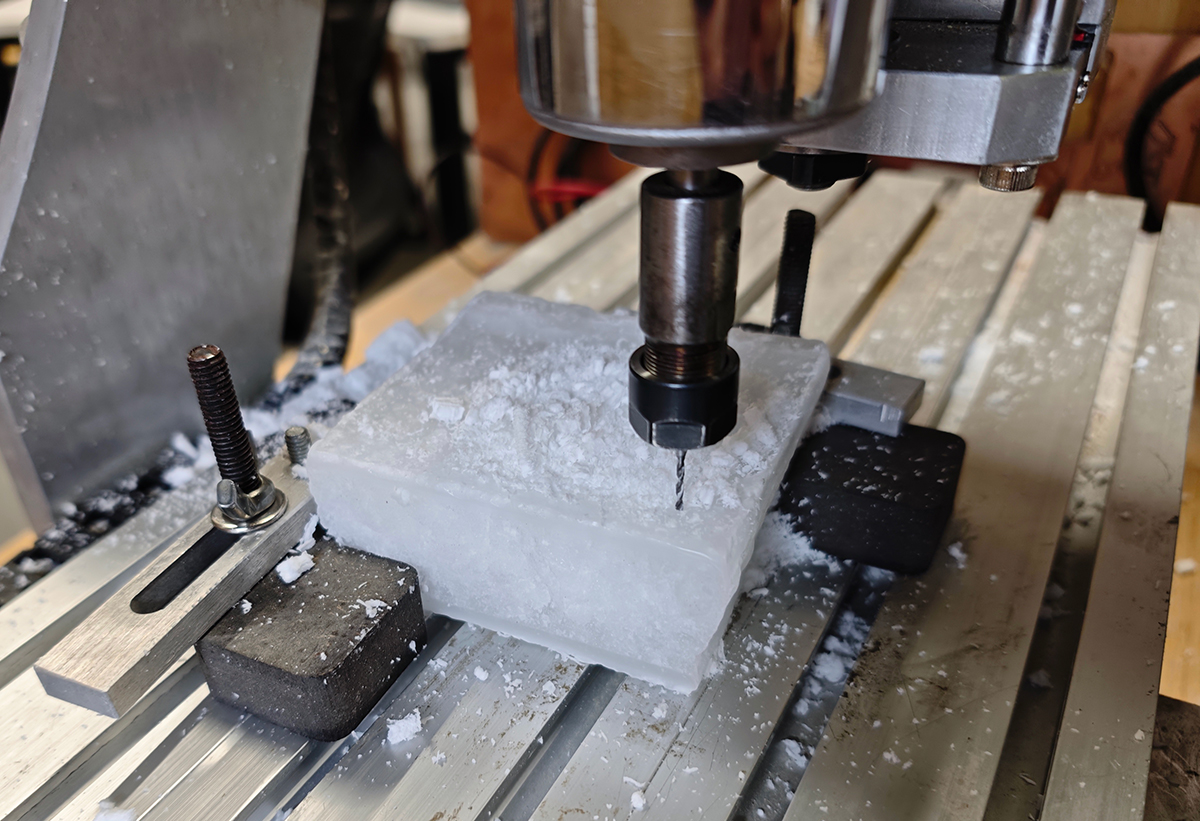
Machine Setup and Processing:
- Started Mach3 software on the computer connected to the CNC milling machine
- Loaded the generated .nc file
- Found a good method to secure the thick wax block
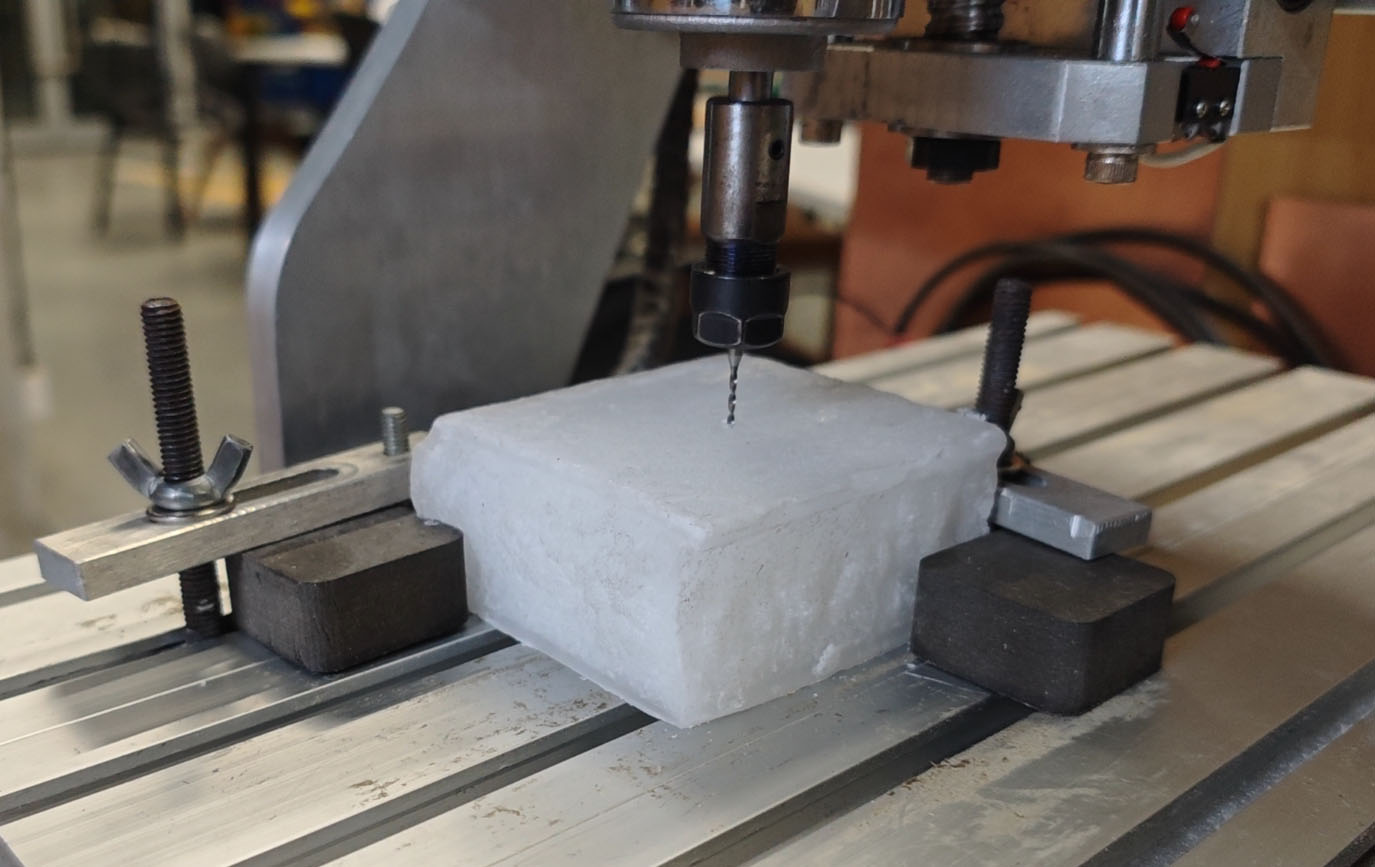
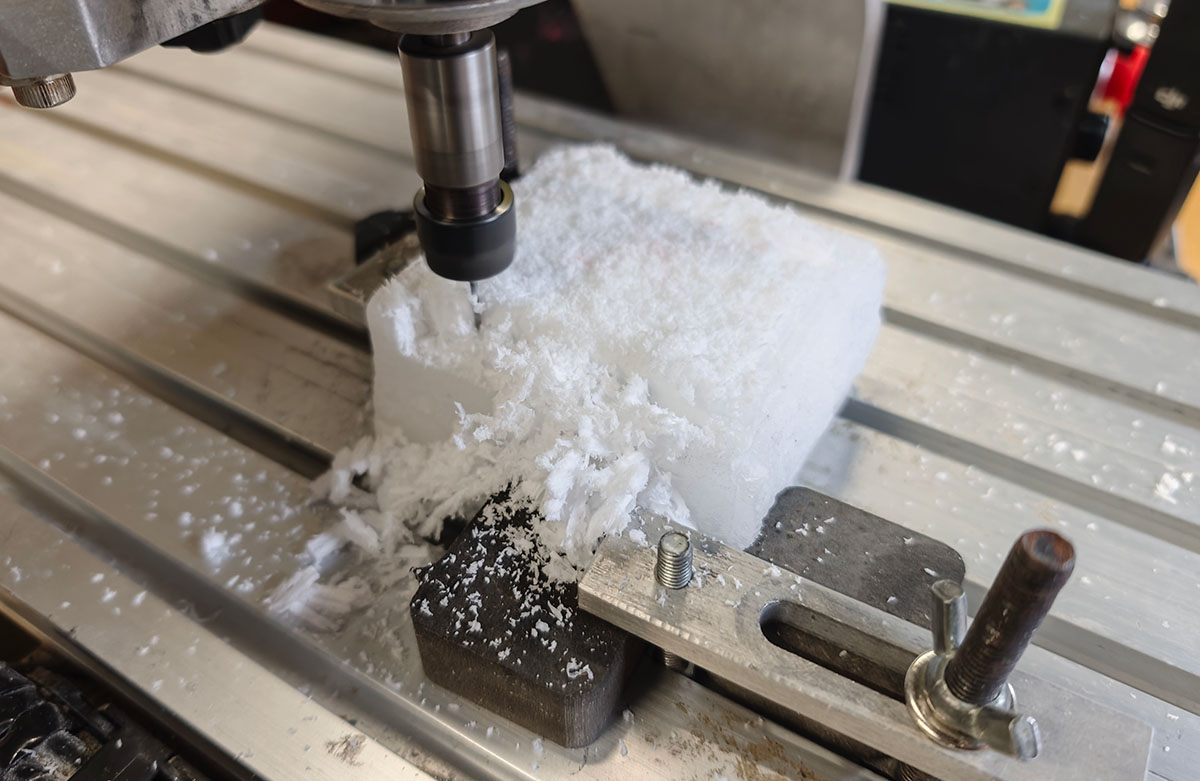
Securing the wax block with 4 wooden blocks and clamps
- Selected and installed an appropriate tool: 38mm long, 1.4mm blade diameter, 10mm blade length, 3mm shaft diameter flat end mill
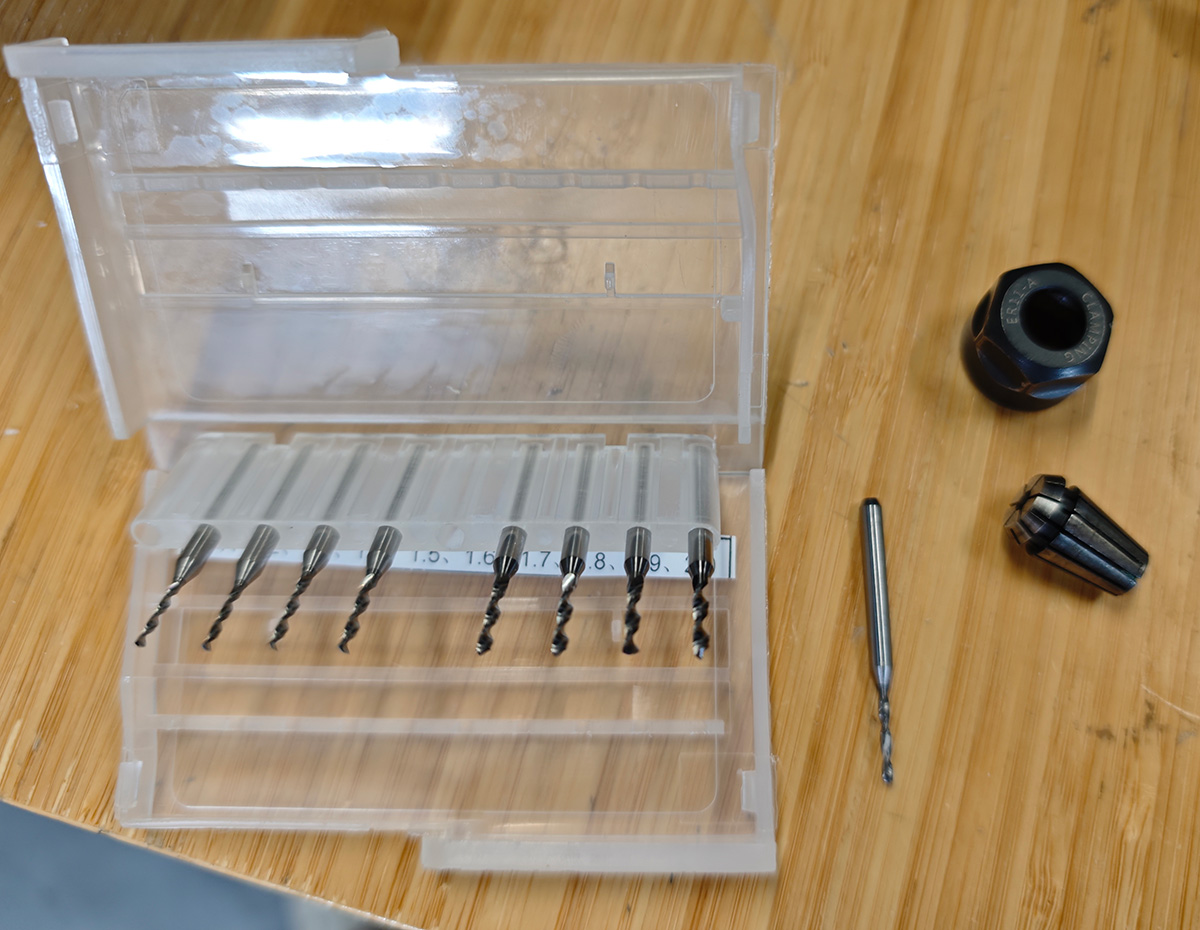
This time trying a φ1.4mm tool
- Set the machining origin and parameters
- Started the cutting process
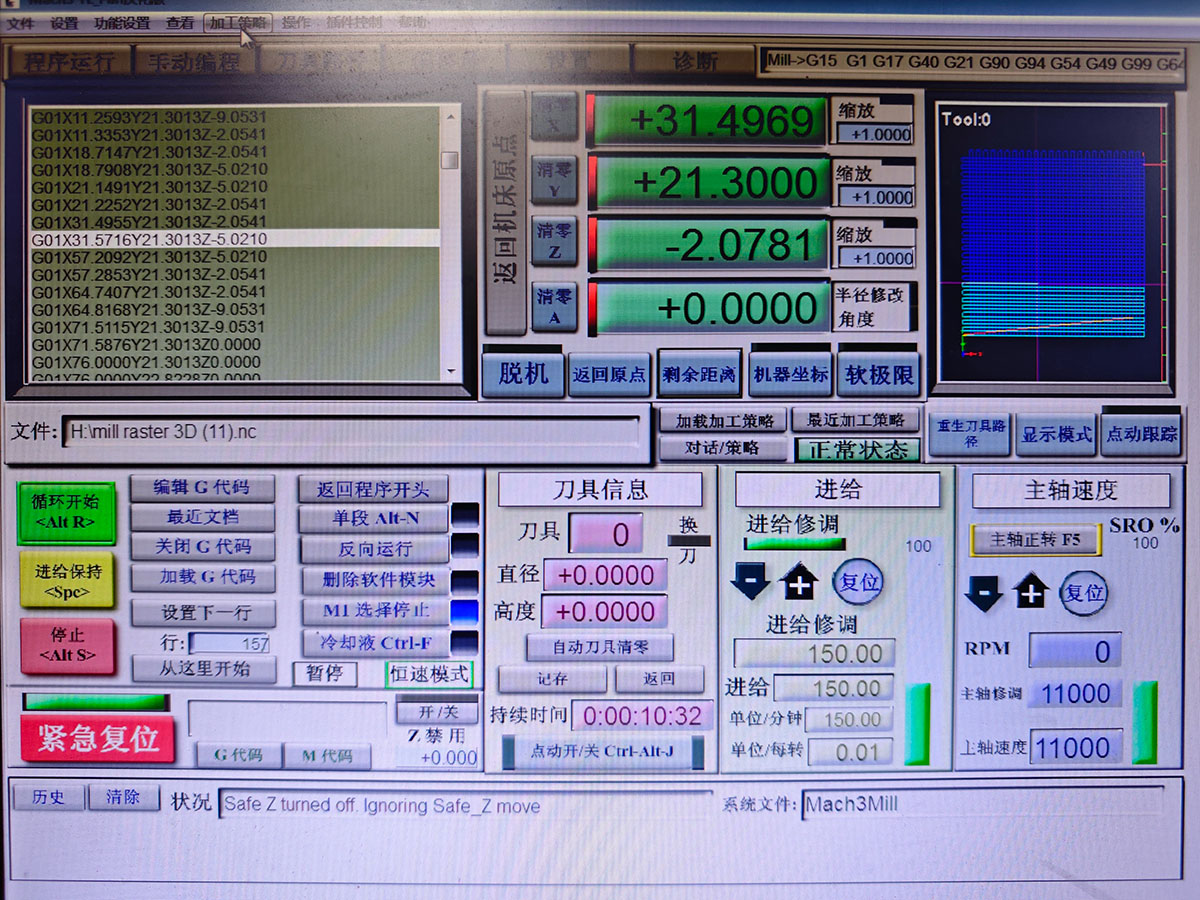
Starting cutting in Mach3
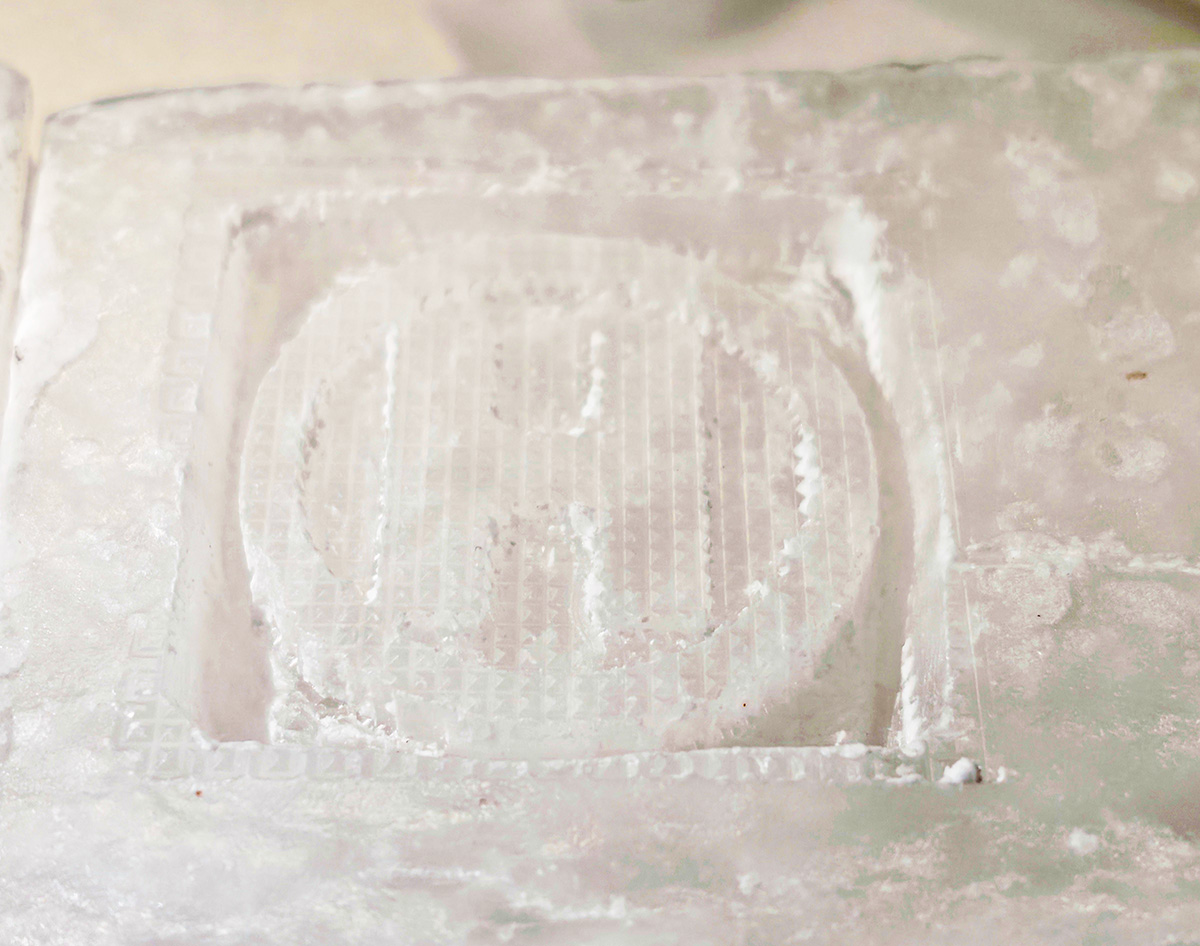
First Processing and Adjustment:
- Discovered the wax block width was slightly insufficient, causing one edge of the model's barrier to be missing
- Used a brush and small scraper to carefully clean the mold surface
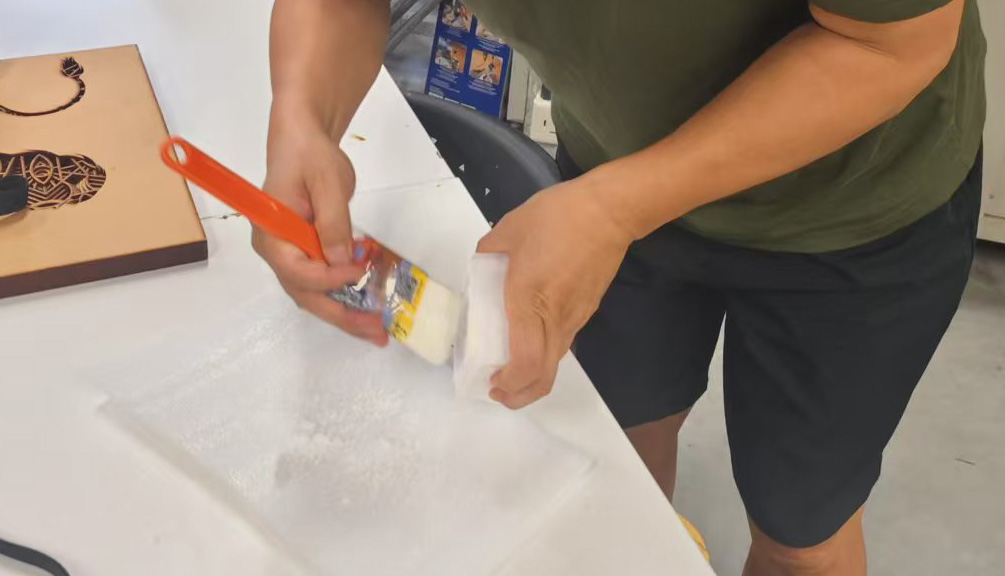
Using a brush and small scraper to carefully clean the mold surface
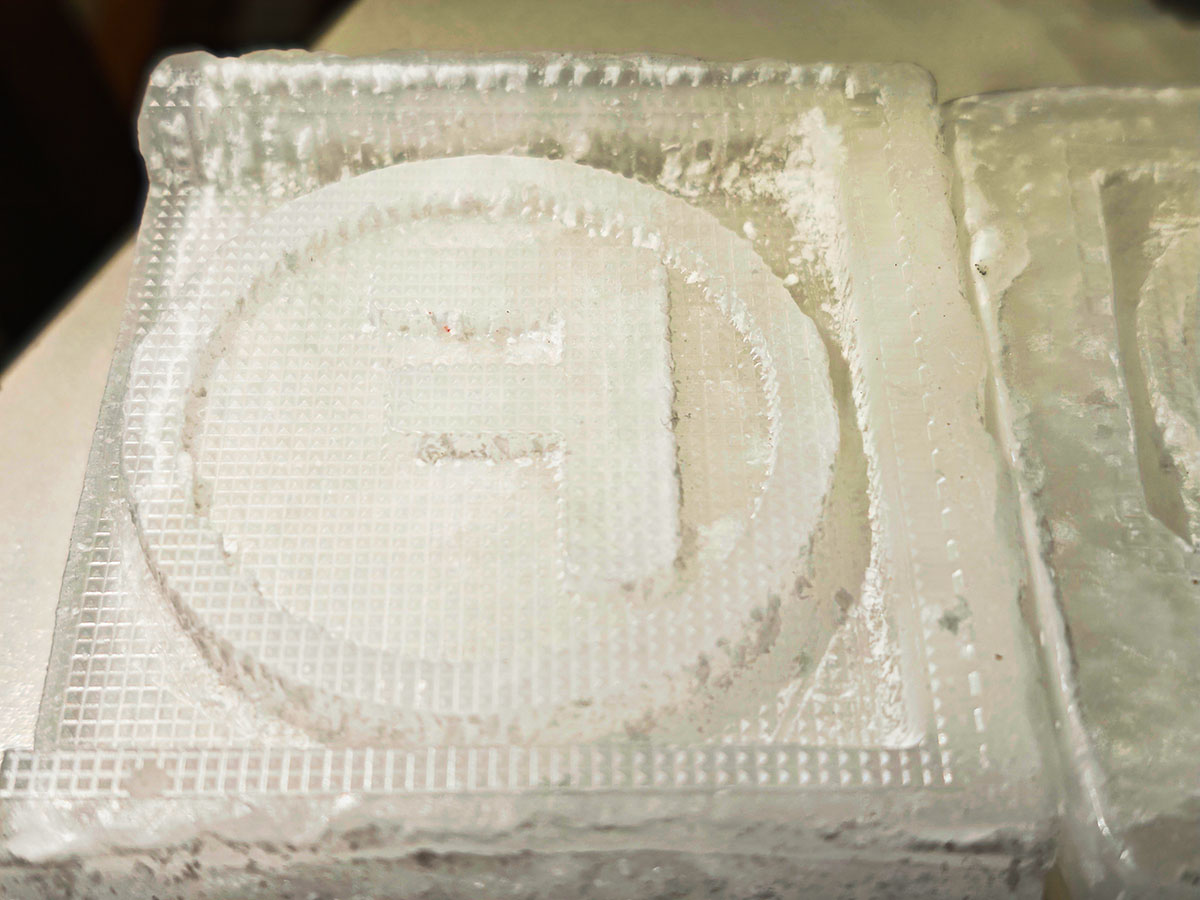
Looks good, except the tool path marks are a bit obvious
Making a Slightly Smaller H Badge Again
- Returned to Fusion 360, modified design parameters, created a smaller "H" letter badge
- Reduced the model to a 50mm square outer frame, exported STL again
Creating another 50mm frame H badge
- Repeated the tool path generation steps, remembering to modify tool settings, then obtained a new .nc file
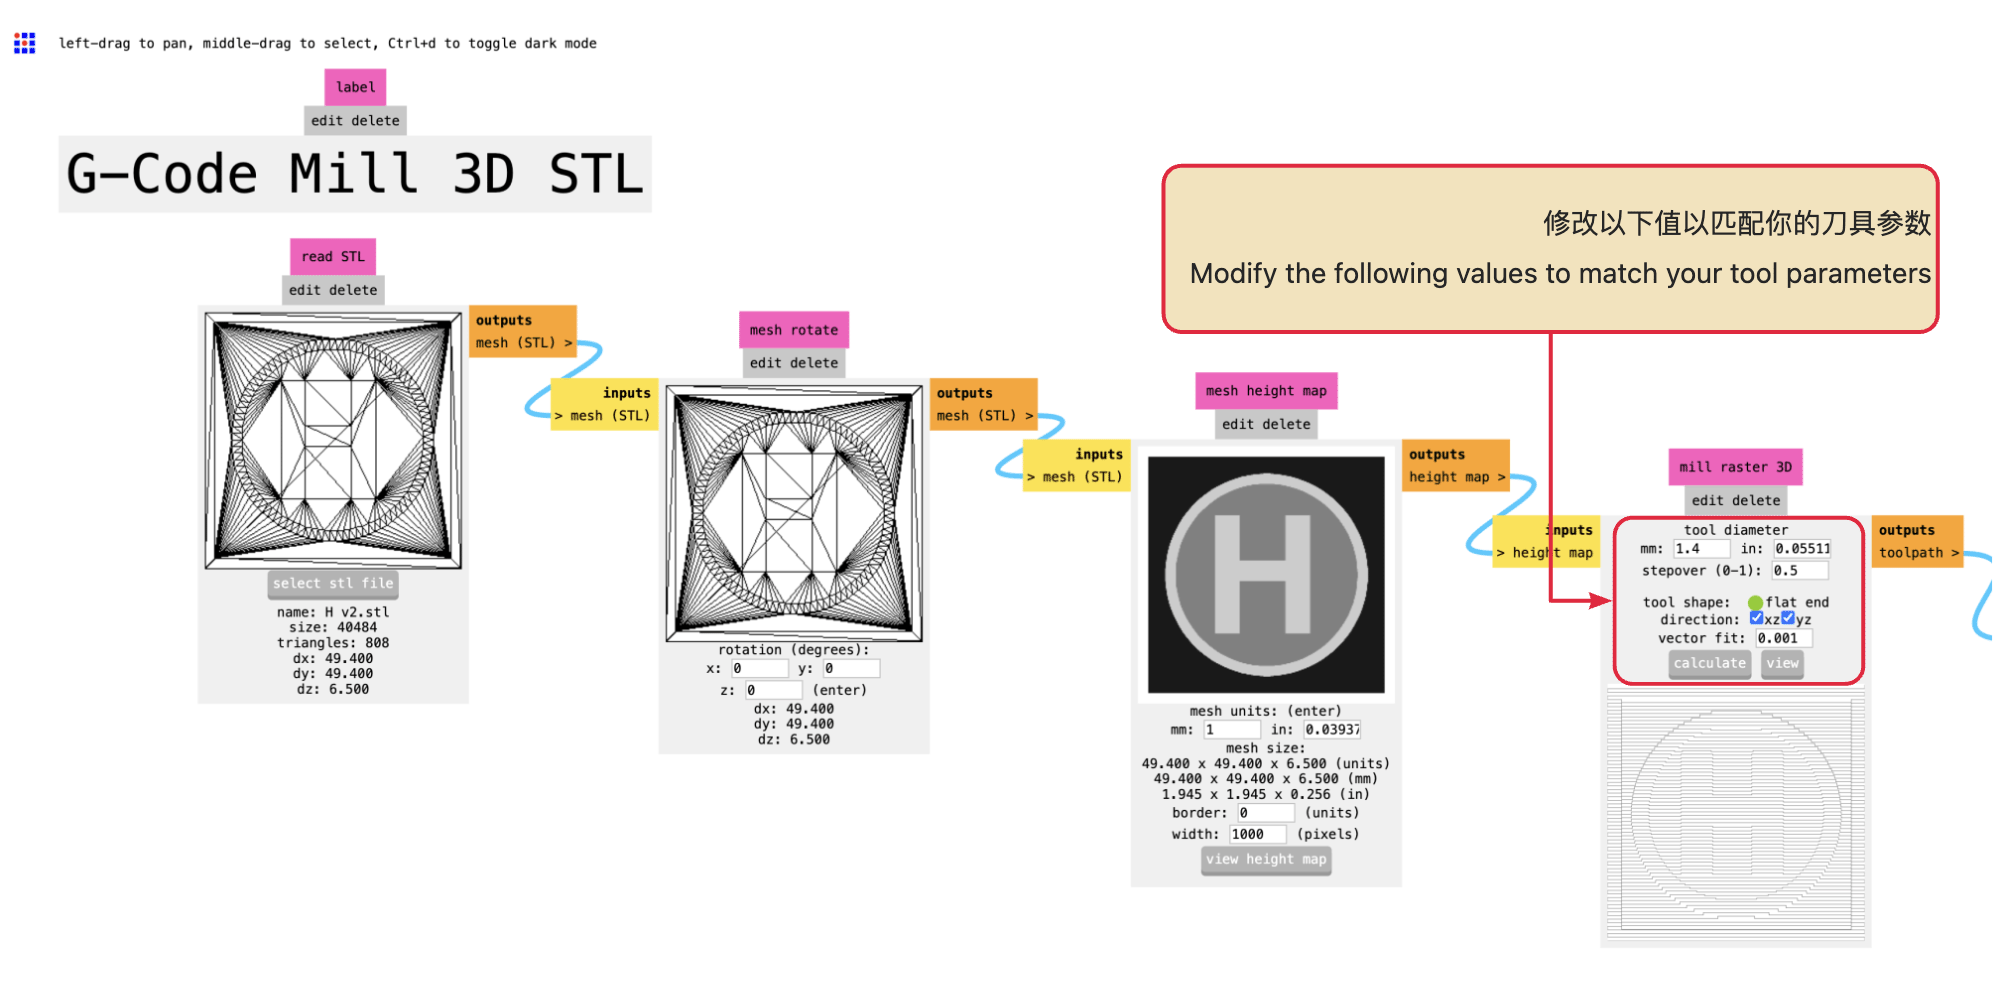
Modify the following values to match your tool parameters:
- tool diameter: Change the value in the "mm:" field from the default 3.175 to 1.4 (your blade diameter)
- stepover: Can be adjusted as needed, default is 0.5 (indicating each lateral movement is 50% of the tool diameter)
- tool shape: Ensure "flat end" is selected, the interface has already selected this option
- direction: Keep the default xyz/z setting unless you have specific requirements
- vector fit: Keep the default value of 0.001, this is a precision setting
After modifying all parameters, click the "calculate" button below to recalculate the tool path.
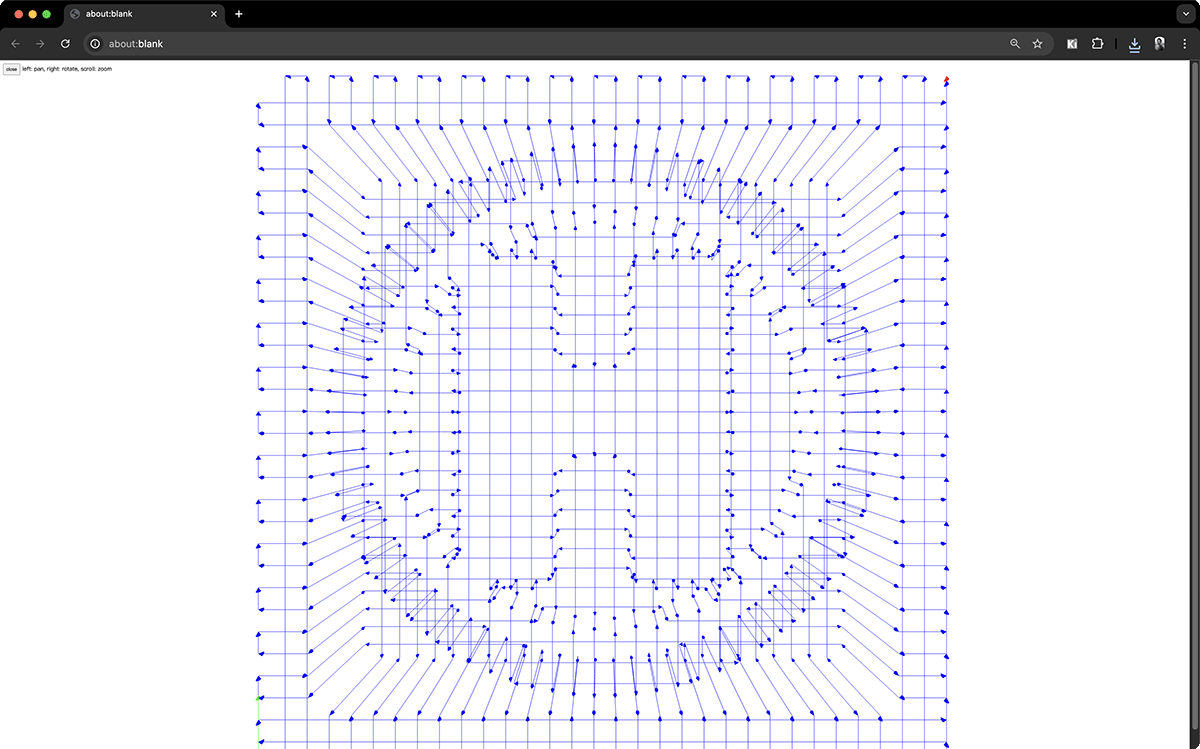
Exporting the H badge tool path
- Used Mach3 for the second cutting, this time the cutting range didn't exceed the wax block boundaries
The range control was better when cutting the H badge mold
Post-processing: - Due to the soft nature of wax, processing residue sticks to the mold - Used a brush and small scraper to carefully clean the mold surface
Silicone Mold Making: - For the "F" badge missing a barrier, manually added a barrier using clay - Mixed silicone and hardener, poured onto the 2 wax molds
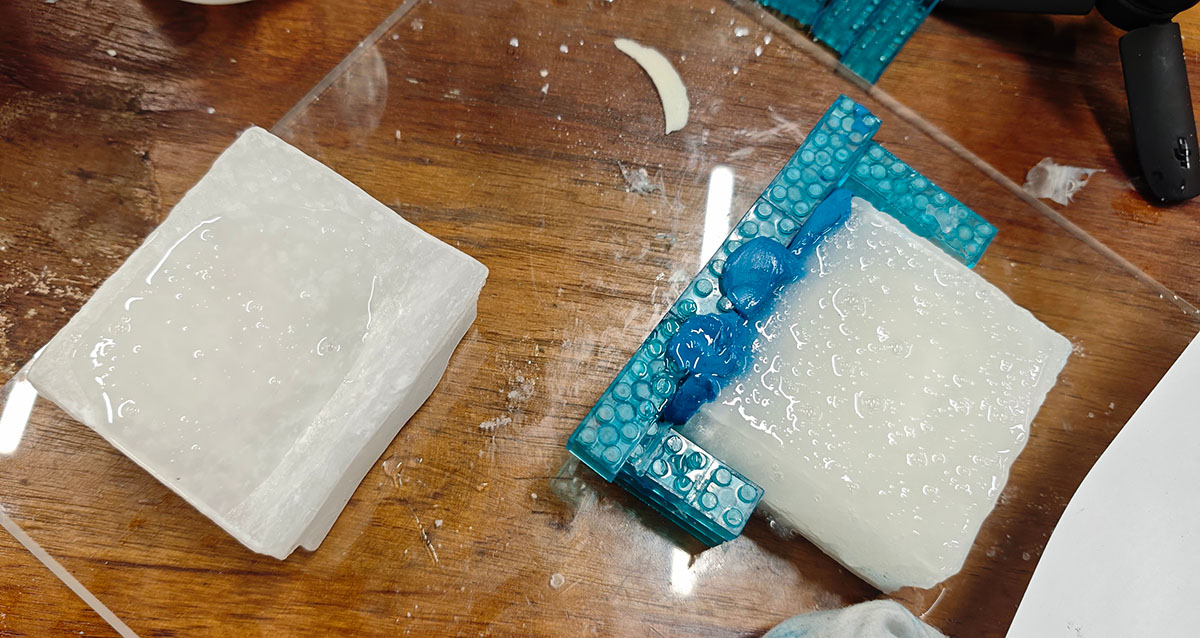
On the left is the slightly smaller H badge wax mold, on the right is the slightly larger F badge wax mold. Since the F badge wax mold was missing a barrier, I built a barrier with clay and LEGO bricks, then poured silicone mixed with hardener on both wax molds
- Waited 24 hours for complete curing
- Removed the silicone molds
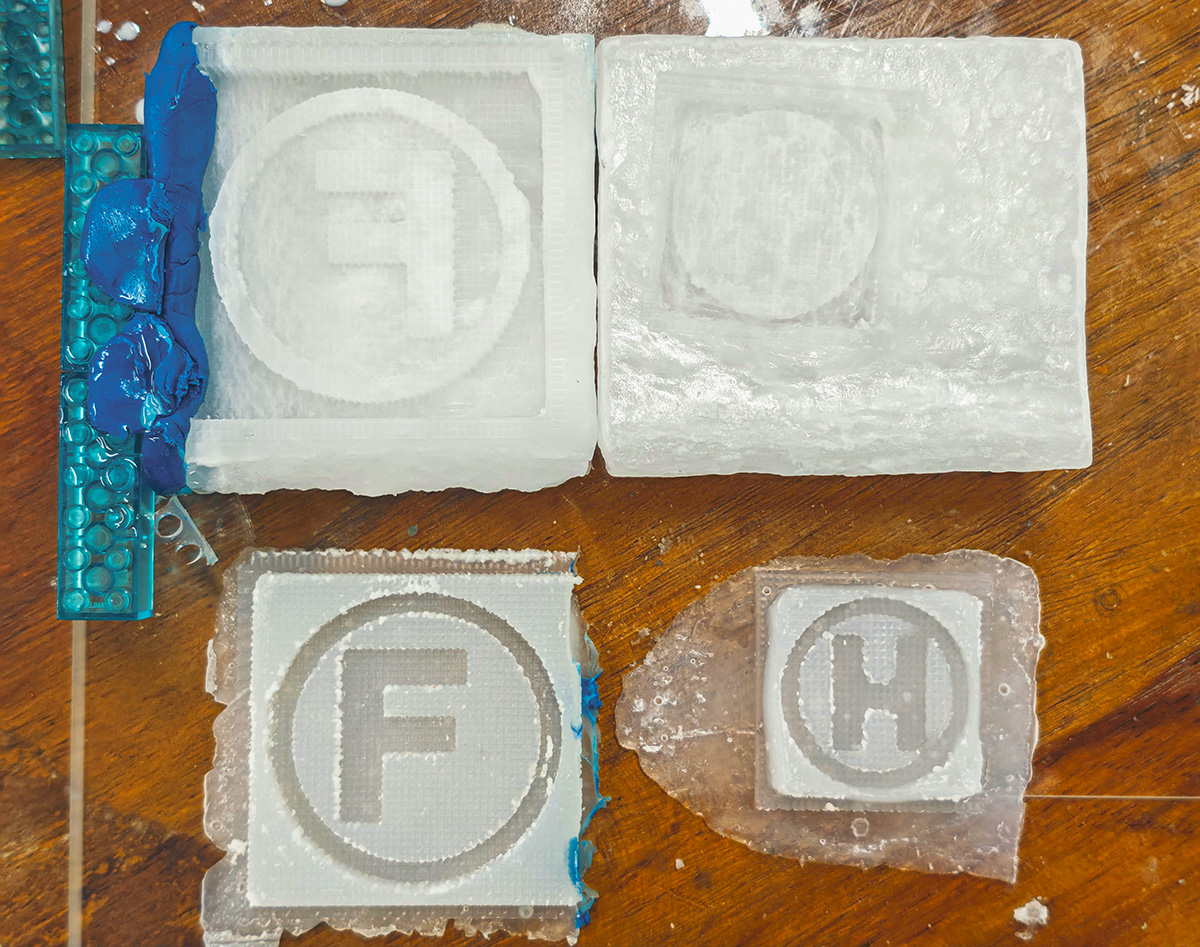
The wax molds above and the cured silicone molds below. From the mold quality, I think the larger F badge quality is better
Final Casting: - Used polyurethane resin mixed 1:1 by weight to pour into the silicone molds
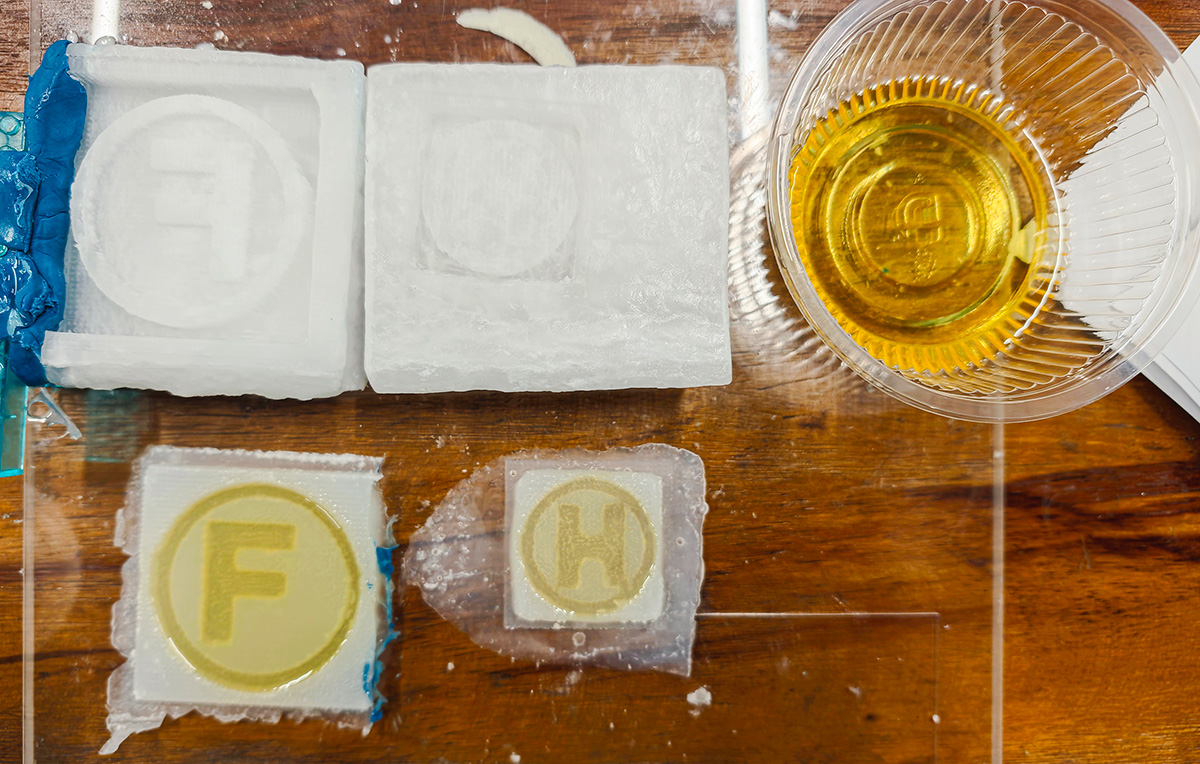
Pouring 1:1 weight-mixed polyurethane resin into silicone molds
- Obtained the final "F" and "H" badge products, but at this point we discovered that the cut wax molds had become negative molds, causing the final F badge to also be reversed.
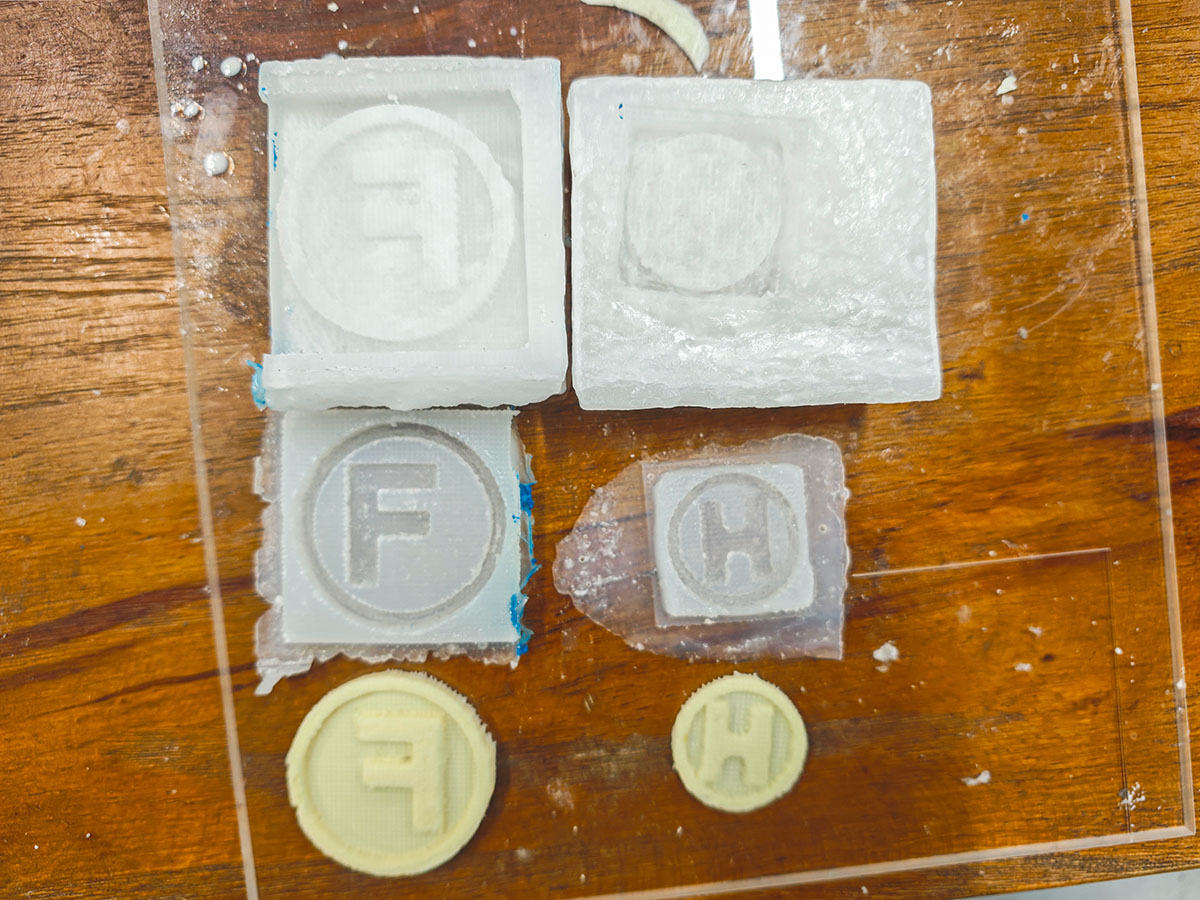
Strangely, our F badge was clearly a positive model, but the cut wax mold became a negative mold, and the final badge cast with polyurethane resin also became reversed
The larger F badge effect seems to be a bit better, though the surface cutting path marks are obvious.
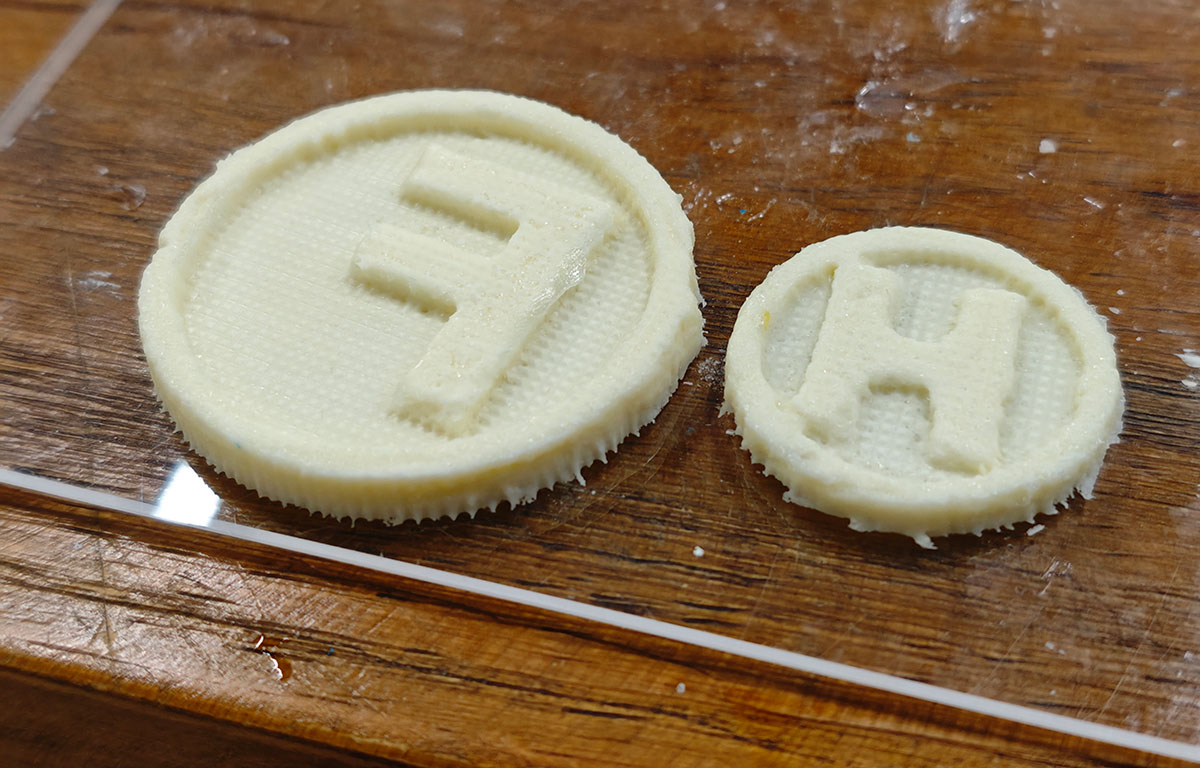
The larger F badge effect seems better, though the cutting path marks are obvious on both badges
3D Printing Mold Making Process Example
See personal assignments:
- Lei Feng: Personal Assignment: Molding and Casting (Chinese version)
- Hongtai Liu: Molding and Casting: Fabricating FabLab Badge Coins
Detailed Comparison of 3D Printing and Milling Molds
Geometric Complexity and Precision
| Feature | 3D Printing | CNC Milling |
|---|---|---|
| Complex Geometric Shapes | ✅ Can create almost any complex shape, including internal structures, overhangs, curves, and organic shapes | ⚠️ Limited by tool accessibility, difficult to process deep grooves, sharp angles, internal cavities, etc. |
| Fine Details | ⚠️ Depends on printing technology, FDM precision is lower, SLA/DLP/SLS can achieve higher precision | ✅ Can achieve extremely high precision (0.01mm level), good surface smoothness, but tool path marks may be obvious if not well controlled |
| Dimensional Accuracy | ⚠️ May be affected by material shrinkage, warping, etc., requires calibration | ✅ High precision, good stability |
| Surface Quality | ⚠️ Layer lines obvious (FDM) or requires post-processing | ✅ High surface smoothness, can be used directly as molds |
| Internal Structure | ✅ Can create complex internal structures and channels | ❌ Difficult to create invisible internal structures |
Materials and Durability
| Feature | 3D Printing | CNC Milling |
|---|---|---|
| Material Selection | ⚠️ Limited, mainly various plastics, some metals and ceramics | ✅ Extensive, almost all solid materials: metals, plastics, wood, wax, stone, etc. |
| Material Strength | ⚠️ Weak interlayer bonding strength, anisotropic | ✅ Maintains original material strength, isotropic |
| Heat Resistance | ❌ Most printed materials have limited heat resistance | ✅ Can process high-temperature materials such as metals, ceramics, etc. |
| Durability | ⚠️ Medium, depends on material and process | ✅ High, especially metal molds |
| Water Resistance | ⚠️ Requires post-processing | ✅ Good, determined by material properties |
Production Efficiency and Cost
| Feature | 3D Printing | CNC Milling |
|---|---|---|
| Preparation Time | ✅ Short, only requires 3D model and slicing | ⚠️ Longer, requires CAM programming and tool planning |
| Production Speed | ⚠️ Slow, especially high-precision printing | ✅ Fast, especially for simple shapes |
| Prototype Iteration | ✅ Rapid, easy to modify designs | ⚠️ Each iteration requires reprocessing |
| Small Batch Production | ✅ Economically efficient | ⚠️ Higher cost |
| Large Batch Production | ❌ Uneconomical, slow speed | ✅ Fast speed, reduced cost |
| Equipment Cost | ✅ Low to medium (home printers are inexpensive) | ❌ High (professional CNC equipment is expensive) |
| Material Cost | ⚠️ Specialized materials relatively expensive | ✅ Standard materials, controllable cost |
| Labor Cost | ✅ Low, simple operation | ❌ High, requires professional skills |
| Waste Generation | ✅ Little, mainly support structures | ❌ High, cutting process generates substantial waste |
Operation and Maintenance
| Feature | 3D Printing | CNC Milling |
|---|---|---|
| Operation Complexity | ✅ Simple, low entry barrier | ❌ Complex, requires professional knowledge |
| Equipment Size | ✅ Small, desktop devices usable | ❌ Large, requires dedicated space |
| Noise and Pollution | ✅ Low noise, slight odor | ❌ High noise, dust or cutting fluid pollution |
| Equipment Maintenance | ✅ Relatively simple | ❌ Complex, requires regular servicing |
| Safety Risk | ✅ Low | ❌ Medium to high (high-speed rotating tools) |
| Supervision Requirements | ⚠️ Medium, may need to monitor printing process | ✅ Once set up, lower supervision needed |
Suitable Mold Types
| Mold Type | 3D Printing | CNC Milling |
|---|---|---|
| Prototype Verification Molds | ✅ Excellent | ⚠️ Feasible but costly |
| Low-Pressure Injection Molds | ✅ Suitable for small batches | ✅ Suitable for medium to large batches |
| Silicone/Soft Mold Masters | ✅ Very suitable | ✅ Very suitable |
| Metal Casting Molds | ⚠️ Only suitable for low-temperature alloys | ✅ Suitable for various metal castings |
| Food-Grade Molds | ⚠️ Requires specialized food-grade materials | ✅ Can process food-grade stainless steel, etc. |
| Large Molds | ❌ Limited by printing space | ✅ Can process large molds |
| Precision Molds | ⚠️ Depends on printing technology | ✅ High precision |
| Transparent Molds | ⚠️ Limited choices | ✅ Can process transparent materials like acrylic |
Lessons Learned in Wax Mold Making
Advantages of Using Wax Material for Milling
In practical operation, using wax material for milled mold making has the following advantages:
- Easy to Process: Wax material is soft, processing is fast, and tool wear is minimal
- Low Cost: Wax material is inexpensive, suitable for multiple attempts and learning
- Easy to Modify: After processing, can be fine-tuned or repaired with hand tools
- Environmentally Friendly: Waste can be recycled and reused
- Good Detail: Soft wax can achieve good surface smoothness
Challenges Encountered in Practice and Solutions
During the wax mold milling process, I encountered several challenges and took corresponding solutions:
- Size Planning Issue:
- Challenge: The wax block size was insufficient in the first processing, causing missing model barrier
- Solution: Redesigned a smaller model and confirmed adequate material size before processing
- Experience: Always reserve sufficient edge space for models
- Material Cleaning Issue:
- Challenge: Wax is relatively soft, after cutting it sticks to the mold
- Solution: Used brush and small scraper to carefully clean
- Experience: Prepare appropriate cleaning tools, patiently perform post-processing
- Local Defect Repair:
- Challenge: One model was missing a barrier
- Solution: Used clay to manually add a barrier to the F badge missing an edge
- Experience: Combining digital manufacturing and manual craftsmanship can be complementary
- Tool Selection:
- Challenge: Need suitable tools for soft materials
- Solution: Used a 38mm long, 1.4mm blade diameter, 10mm blade length, 3mm shaft diameter flat end mill
- Experience: Select appropriate tool parameters based on material characteristics
Decision Guide for Choosing Appropriate Technology
When to Choose 3D Printing
In the following situations, 3D printing is a better choice for mold making:
- When the mold has extremely complex geometric shapes or internal structures
- When budget is limited, without access to professional CNC equipment
- When rapid prototype iteration is needed
- When batch size is small and customization requirements are high
- When the operator lacks CNC programming and operation experience
- When there are strict limitations on noise and dust
- When all work needs to be completed in a small space
When to Choose CNC Milling
In the following situations, CNC milling is a better choice for mold making:
- When high precision and high surface smoothness molds are needed
- When molds need to use special materials (such as metals, high-strength plastics, etc.)
- When molds need to withstand higher temperatures or pressure
- When mold size is relatively large
- When large batch production of identical molds is needed
- When mold design is relatively simple (no complex internal structures)
- When project budget is sufficient, focusing on final quality
Application of Mixed Methods
In practical projects, combining both technologies often achieves the best results:
- Use 3D printing to quickly verify design concepts
- Use milling technology to make high-precision molds for final use
- 3D print complex parts, mill simple parts, then assemble
- 3D print sacrificial models, then use for casting processes
Material Safety Data Sheet Assessment
In the process of mold making and casting, correctly understanding and following the guidance of material safety data sheets (SDS) is very important, not only for the operator's health and safety but also affecting the quality of the final product. Below is a safety information assessment of the main materials used in this project:
Silicone Rubber Safety Assessment
The silicone rubber hardener usage ratio is 100:2, with an operation time of about 5 minutes. According to safety data sheet analysis:
Hazard Identification:
- Low toxicity, but avoid prolonged skin contact
- Releases small amounts of volatile substances during curing, operate in ventilated environments
- Not flammable, but avoid contact with open flames
Protection Measures:
- Wear nitrile or latex gloves for operation
- Work in a well-ventilated environment
- If accidental skin contact occurs, immediately wash with soap and water
- Avoid eye contact during operation, recommend wearing goggles
Storage Requirements:
- Shelf life is 6 months
- Store in a cool, dry place, avoid direct sunlight
- Seal container to prevent air and moisture entry causing curing
Polyurethane Resin (AB Liquid) Safety Assessment
AB liquid weight mixing ratio is 1:1, curing within 1.5-2 minutes after mixing. The safety data sheet shows:
Hazard Identification:
- Component B contains isocyanates, may cause respiratory and skin sensitization
- Curing reaction releases heat, may cause temperature rise leading to burns
- Reaction with water produces carbon dioxide gas, may cause pressure increase in sealed containers
Protection Measures:
- Must wear protective gloves and goggles
- Operate in a well-ventilated environment
- Moisture adversely affects the quality of both A/B liquids, absolutely avoid introducing water
- Component B will react with moisture to produce white turbidity or cure
First Aid Measures:
- Skin contact: Immediately wash with plenty of water and soap
- Eye contact: Rinse with flowing water for at least 15 minutes, seek medical treatment
- Inhalation: Move to fresh air, seek medical attention if symptoms persist
Storage Precautions:
- Recommended to use the product within 3 months of receipt
- Component A will shrink, component B will expand, do not store for long periods to avoid bottle cracking and leakage
- After use, please clean the bottle mouth, seal it, and store in a dry, dark place away from direct sunlight
White Vaseline Release Agent Safety Assessment
Hazard Identification:
- Low toxicity, high chemical stability
- Not flammable, not corrosive
Protection Measures:
- Avoid prolonged skin contact
- Use dedicated tools (clean soft brush) to apply evenly
- Wash hands after operation
Storage Requirements:
- Store sealed at room temperature
- Avoid contamination
Indium-Tin-Bismuth Low-Temperature Alloy Safety Assessment
This alloy has a melting point of only 47°C. Safety data sheet information is as follows:
Hazard Identification:
- Molten state may cause minor burns
- Vapor may contain metal oxides, excessive inhalation is harmful
- Long-term contact may cause skin sensitization
Protection Measures:
- Despite being a low-temperature alloy, using heat-resistant gloves during operation is still recommended
- Avoid contact between molten alloy and water, splashing may occur
- Operation environment should be well-ventilated
- Avoid inhaling possible fumes
First Aid Measures:
- Skin burn: Immediately rinse with cold water, do not use ice
- Fume inhalation: Move to fresh air
- Accidental ingestion: Drink plenty of water, seek medical treatment
Environmental and Disposal:
- Metal can be 100% recycled and reused
- Waste should be collected and remelted for use
- Avoid release into the environment
Industrial Wax Safety Data Sheet Assessment
Industrial wax is a commonly used material in milled mold making, with easy processing and low cost characteristics. According to safety data sheet analysis:
Hazard Identification:
- Low toxicity, stable at normal temperature
- May release hydrocarbon vapors when heated to high temperatures, avoid inhalation
- Molten state may cause minor burns
- Not flammable in solid state, but combustible in molten state
Protection Measures:
- Wear dust mask when milling to avoid inhaling wax dust
- Ensure good ventilation when heating to melt
- If manual adjustment is needed, gloves are recommended to avoid skin contact
- Avoid prolonged skin contact, may cause mild allergies
- Wear protective goggles during milling to prevent debris from entering eyes
First Aid Measures:
- Skin contact: If in contact with molten wax, immediately rinse with cold water, do not tear off wax adhering to skin
- Eye contact: Rinse with plenty of clean water, seek medical attention if discomfort occurs
- Inhalation: If large amounts of dust are inhaled, move to fresh air
Cleaning and Disposal:
- Wax chips can be recycled and reused, melted then reshaped
- Waste should be disposed of according to local regulations
- When cleaning tools and work area, avoid using solvents that may react with wax
Storage Requirements:
- Store in a cool, dry place, avoid direct sunlight
- Keep away from heat sources and open flames
- Storage temperature should be below its melting point (usually 60-80°C)
In our milled mold making practice, we particularly noted the following safety characteristics of industrial wax:
- Processing Characteristics:
- Wax material is soft, chips produced during processing easily adhere to the mold surface
- Need careful cleaning to avoid damaging mold details
- Cutting speed should not be too fast to prevent wax softening due to friction heat
- Usage Precautions:
- Before contact with silicone or other materials, ensure the wax mold surface is clean, free of residual chips
- When wax molds contact silicone directly, silicone may have a slight dissolving effect on wax, appropriate release agent is recommended
Through reasonable protective measures and operation procedures, industrial wax can be safely and effectively used for mold making. Its low toxicity and reusable characteristics make it an environmentally friendly mold material choice.
Safety Operation Summary
During the implementation of this project, we strictly followed the above safety guidelines and took multiple measures to ensure safety:
Personal Protective Equipment Use:
- Wore gloves, masks, and protective goggles throughout the process
Work Environment Management:
- Maintained good ventilation in the work area
- Covered the workbench with paper to prevent chemical contamination
- Operated in separate areas according to material type to avoid cross-contamination
Waste Disposal:
- Treated cured silicone and polyurethane resin waste as general solid waste
- Collected and reused indium-tin-bismuth alloy residue
- Separately collected waste liquid produced during tool cleaning
- Industrial wax cutting fragments can be collected and melted for reuse
By carefully reading and implementing the guidance in material safety data sheets, we not only ensured the operator's health and safety but also improved product quality and work efficiency. In future projects, we will continue to improve safety measures and explore safer, more environmentally friendly materials and processes.