Week 5 Individual Assignment: 3D Scanning and Printing
Project Overview
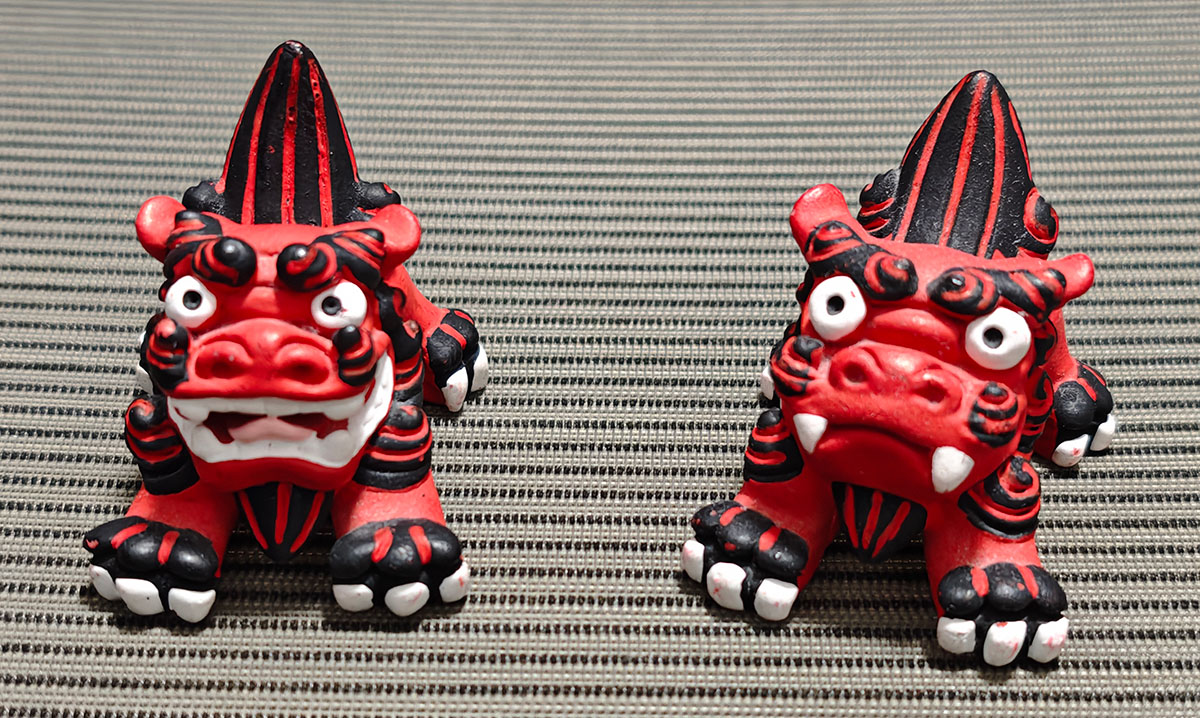
For this project, I selected a gift from a friend - a Japanese souvenir called a Shishi Guardian - as the subject for my 3D scanning and printing experiment. Shishi Guardians are sold in pairs, with each lion having a different expression. I chose the one on the left with an open mouth and protruding tongue. I used a smartphone 3D scanning application to capture the model and completed the final print using a Bambu Lab X1 Carbon 3D printer.
Materials and Tools
- Scanning subject: Shishi Guardian statue
- Scanning tool: KIRI Engine: 3D Scanner App (smartphone application)
- 3D model processing: Bambu Studio
- 3D printer: Bambu Lab X1 Carbon (0.4mm nozzle)
- Printing material: Bambu ABS (white)
Detailed Workflow
1. 3D Scanning Process
Without access to a professional 3D scanner, I opted for a photogrammetry solution. After comparing several different smartphone apps and software options, I ultimately chose KIRI Engine: 3D Scanner App (KIRI Engine) for scanning. This application supports both iPhone and Android, uses photogrammetry technology to reconstruct 3D models from multiple photos, and offers unlimited scanning functionality for free users (limited to 3 model projects, which was sufficient for my test). It's well-suited for beginners.
1.1 Scanning Preparation
- I placed the Shishi Guardian statue on a flat surface with good lighting and a simple background.
- I opened the KIRI Engine app on my phone and selected the video scanning mode.
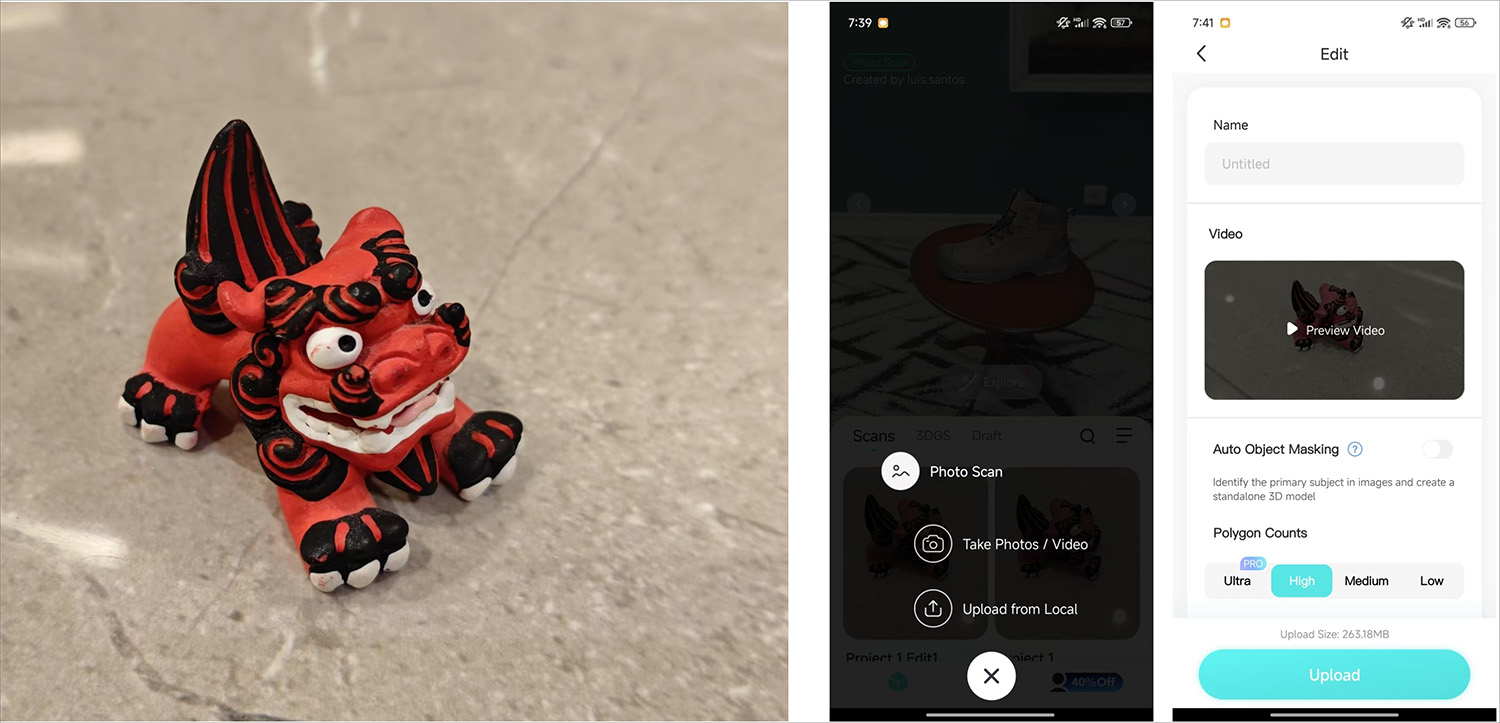
Using the KIRI Engine: 3D Scanner app to record video of the Shishi Guardian and upload it
1.2 Scanning Operation
- I kept the statue centered and maintained a distance of approximately 30cm.
- I chose video mode for scanning to obtain more continuous surface data.
- I recorded two complete circles around the statue from different height angles:
- First circle: Slightly above the horizontal viewing angle.
- Second circle: Slightly below the horizontal viewing angle to capture bottom details.
1.3 Model Generation and Optimization
- I uploaded the video to the KIRI Engine cloud server for processing.
- Processing took approximately 15 minutes, with the system automatically completing point cloud calculations and mesh generation.
- I used the Crop function within the app to remove excess background and base.
- I exported the processed model to my email.
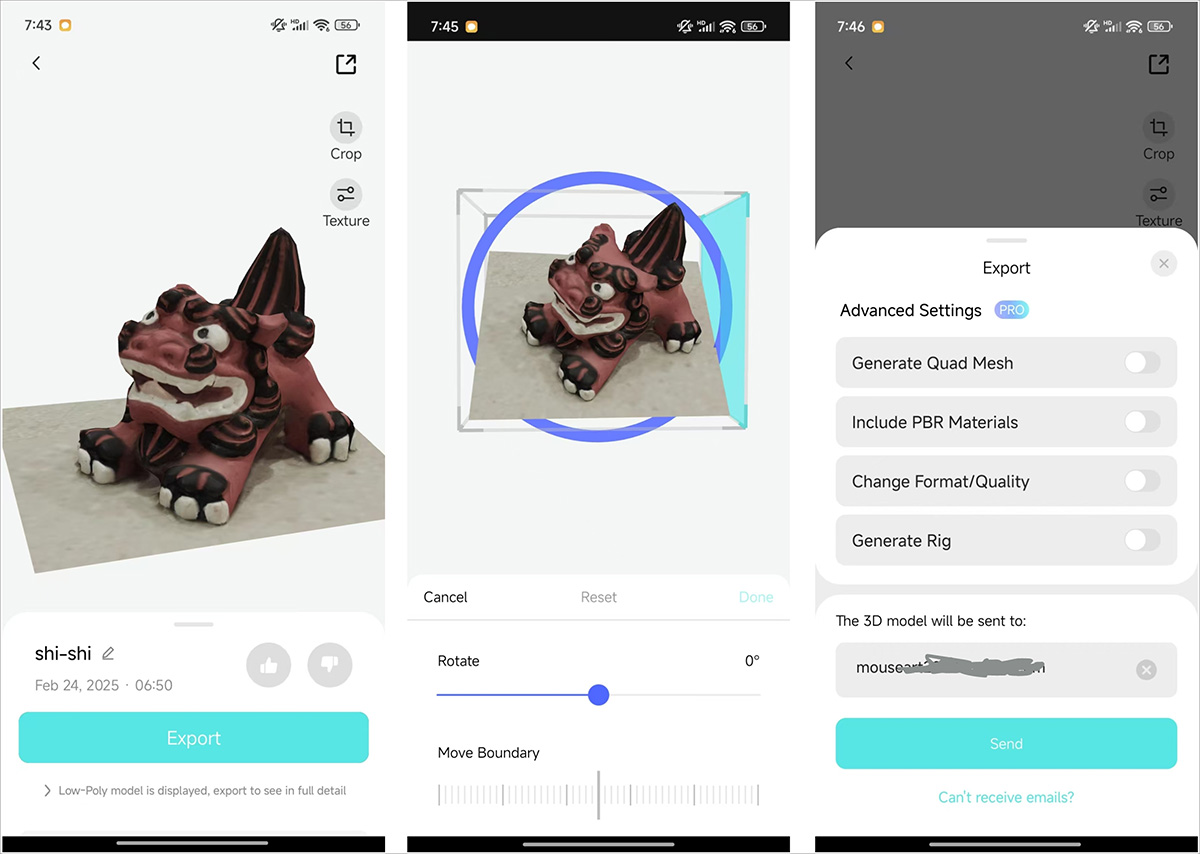
After uploading, the model was processed server-side, then cropped and exported
1.4 Model Acquisition
- I downloaded the linked file (ZIP format) from my email.
- After extracting, I obtained the following files:
3DModel.obj- High-precision model geometry data3DModel.mtl- Material definition file3DModel.jpg- Model texture map3DModel_LowPoly.obj- Simplified geometry data3DModel_LowPoly.mtl- Simplified material definition3DModel_LowPoly.jpg- Simplified texture map
2. 3D Model Processing
2.1 Importing the Model
- I opened Bambu Studio software.
- I used the "Add Model" function to select the
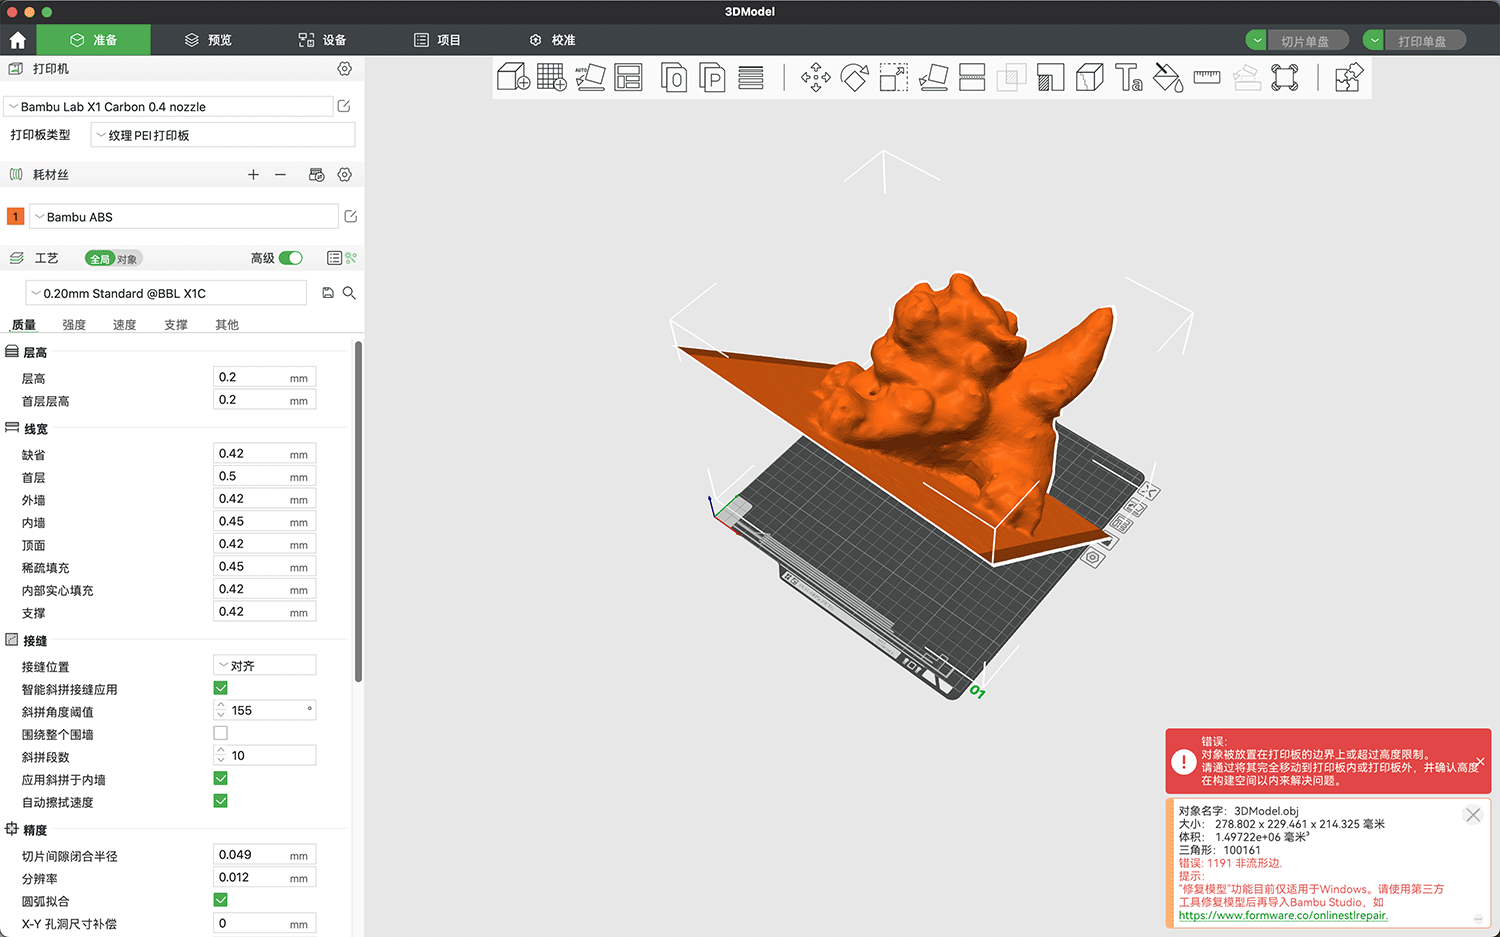
3DModel.objfile. - The model imported successfully, but the orientation was incorrect, and the software displayed warning messages reporting that the model exceeded the print boundaries and contained "100,161 non-manifold edges" errors.
2.3 Model Adjustment
- I used the "Auto Orient" function to adjust the model to the optimal printing direction.
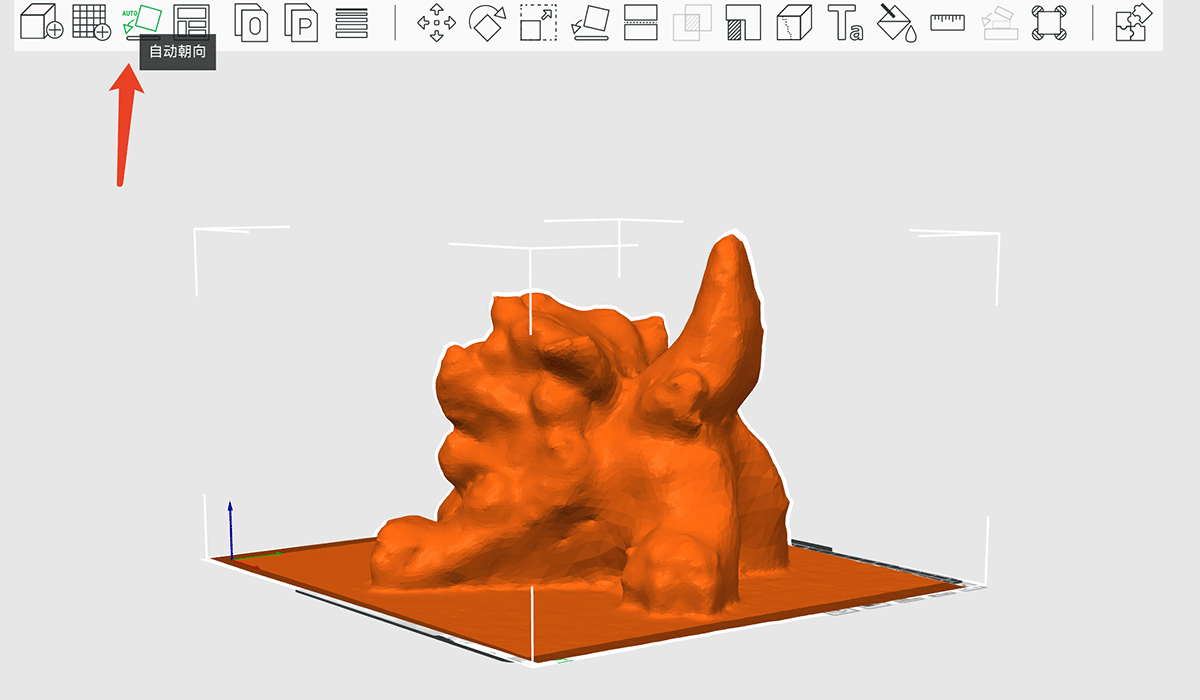
After using the Auto Orient function, the little lion was properly positioned
- I applied the "Scale" function to proportionally reduce the model to an appropriate size.
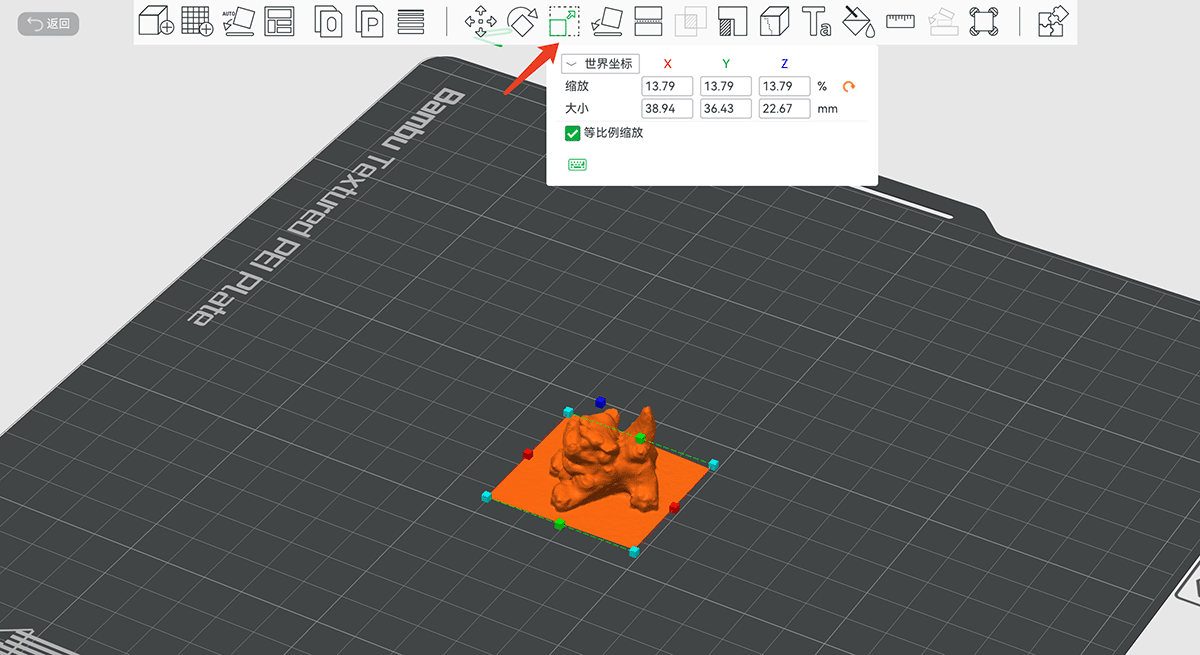
Using the scaling function to adjust the model to a suitable size
- I used the "Cut" function to remove the bottom plane, ensuring a flat printing base.
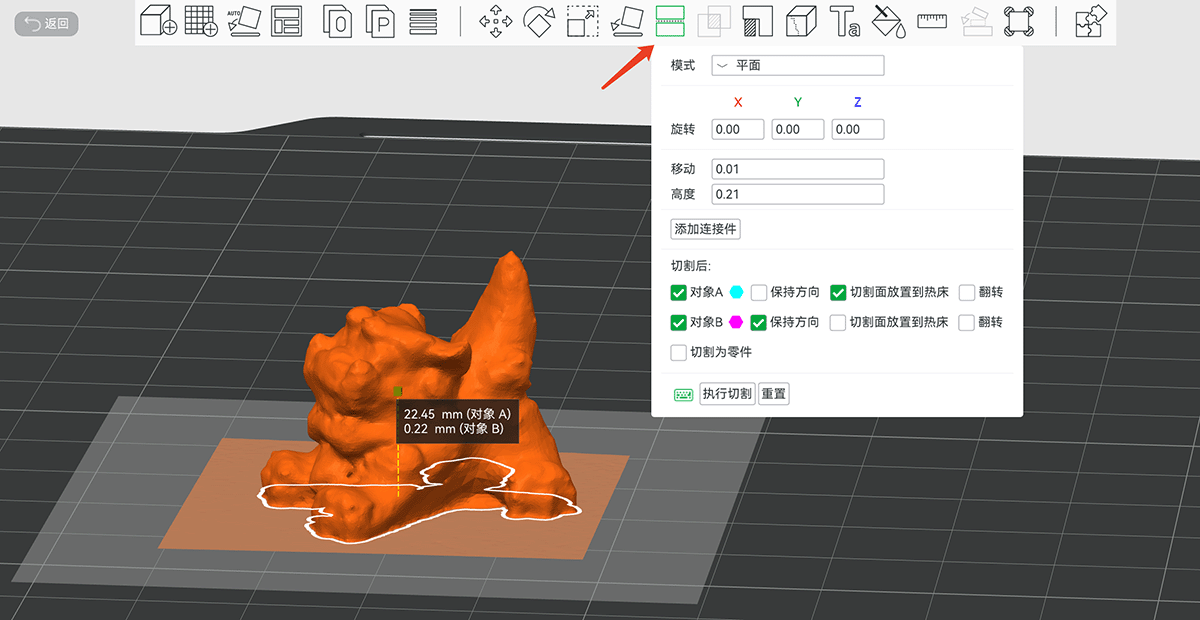
Using the cutting tool to remove the base plane
The model after removing the base is shown below.

The model after base removal
Low poly model display
2.2 Model Repair
- I used Bambu Studio's "Repair Model" function to address non-manifold edges. Note that this repair function is only available in the Windows version of the software, so I found a Windows computer to complete this step.
- After repair, I checked the model's integrity to ensure the surface was closed.
Note: Non-manifold edges refer to incorrectly connected parts in a model, which may include floating vertices or faces with no thickness (Non-Manifold Edges Fix). Repair ensures the model is suitable for printing.
2.3 Variable Layer Height Adjustment
Before slicing, I experimented with Bambu Studio's "Variable Layer Height" function. When accessing this feature, the software uses contour-like visualization to show how layer height might affect surface texture. With the 0.2mm layer height setting, I noticed that relatively flat areas near the top might develop noticeable texture patterns.

After entering the "Variable Layer Height" function, a grayscale line appears on the far right of the screen showing layer height variations at different heights. Since the current setting uses equal heights (0.2mm), the right side shows evenly spaced gray stripes
I clicked the "Adaptive" and "Smooth Mode" buttons in the popup window and observed that the texture lines in the flat area of the head were reduced.
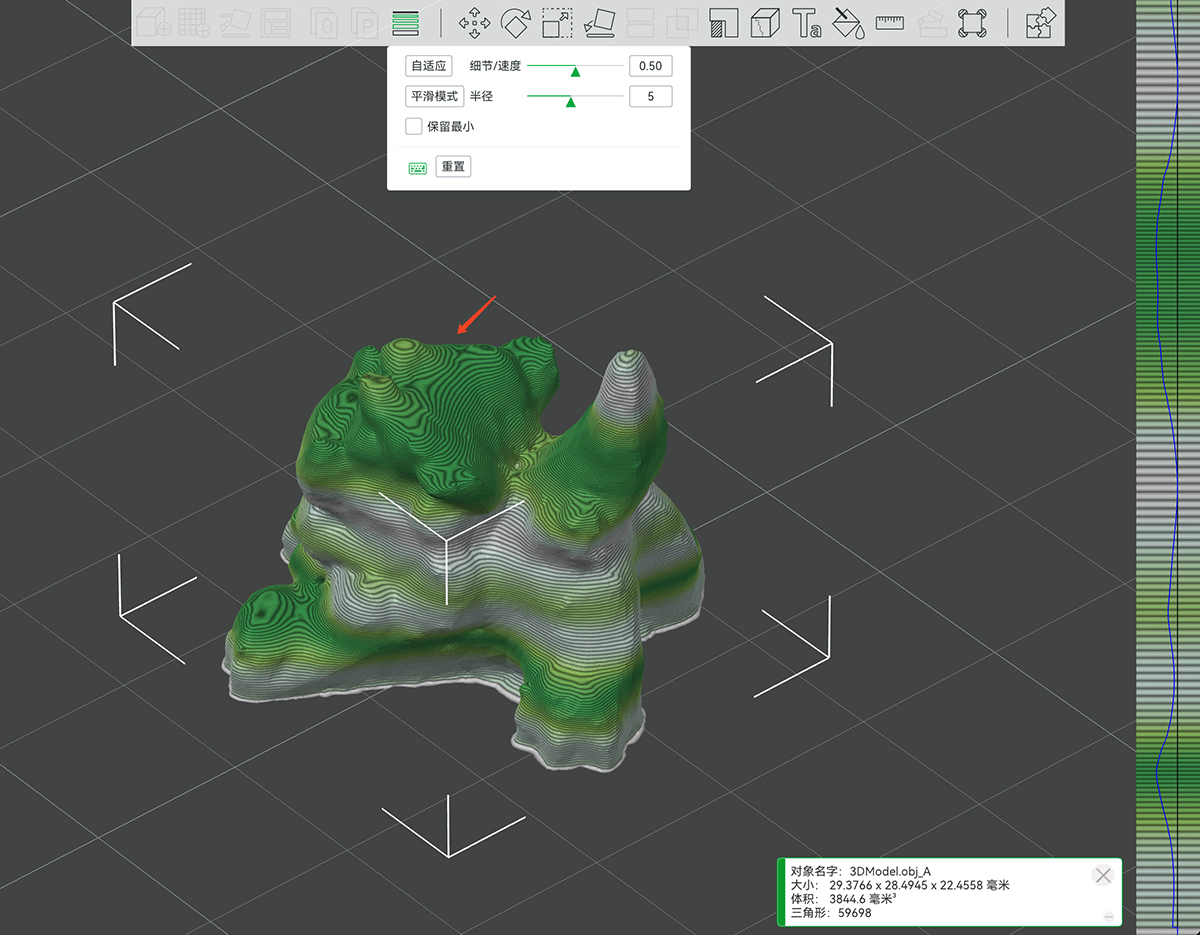
The software automatically added layer height adjustment strategies and smoothing. The right side shows layer height variations at different heights, with darker green areas indicating smaller layer heights (longer printing time)
3. Slicing and Print Preparation
3.1 Print Parameter Settings
- Printer model selection: Bambu Lab X1 Carbon
- Nozzle diameter: 0.4mm
- Material type: Bambu ABS (white)
- Layer height settings: Enabled "Variable Layer Height" function
- Mode selection: Adaptive and Smooth mode
- Layer height: 0.2mm
3.2 Slicing Preview
- I ran the slicing operation.
- The software displayed an estimated material usage of 3.75 grams.
- Estimated printing time: 41 minutes.
- I checked the slicing results to confirm all details would print correctly.
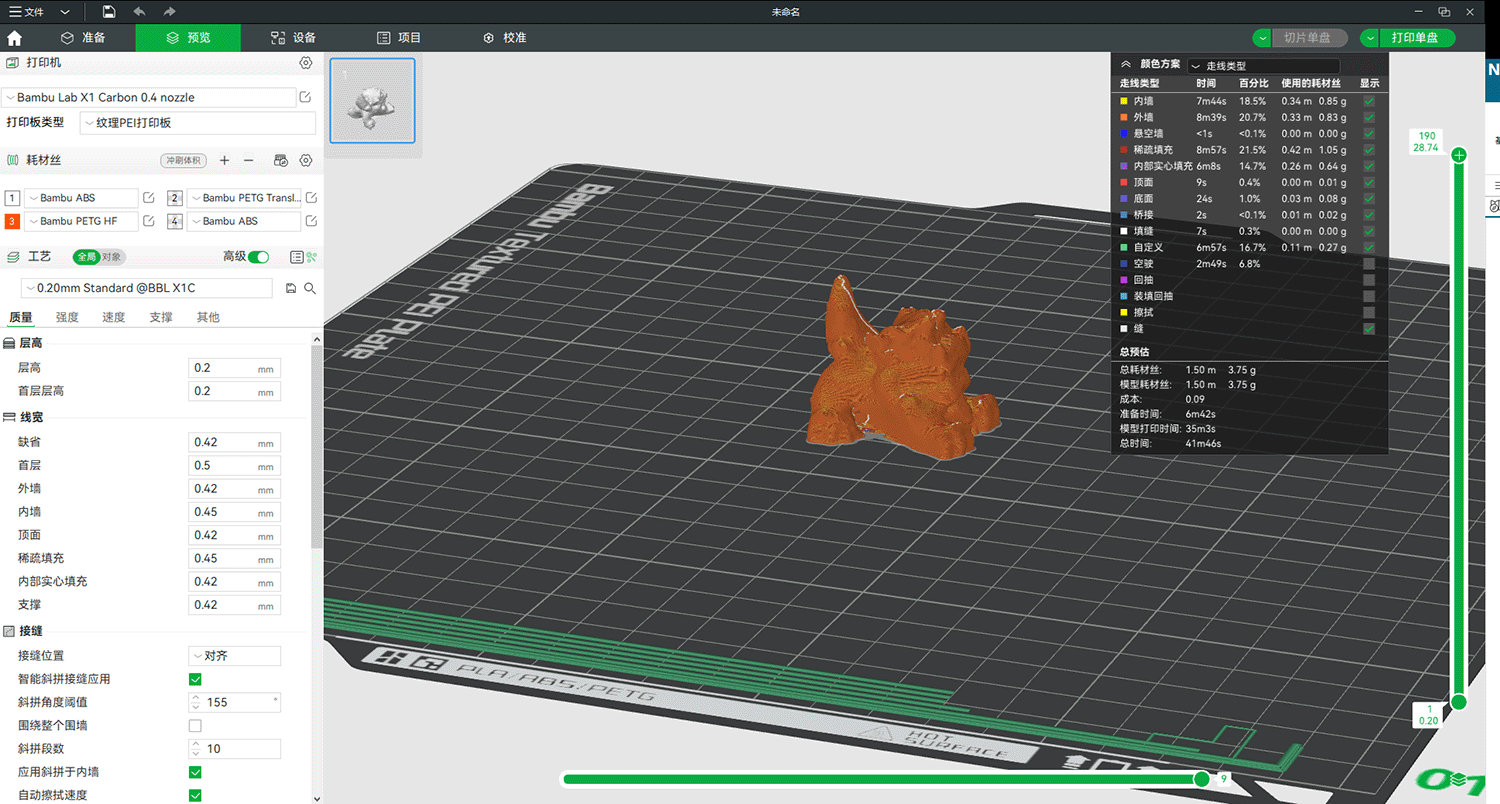
Report generated after slicing
4. 3D Printing Process
4.1 Printer Preparation
- I confirmed the print platform was clean.
- I loaded white Bambu ABS filament and confirmed normal extrusion.
- I transferred the sliced file to the printer.
4.2 Print Execution
- I started the print job and monitored first layer adhesion.
- I observed interlayer bonding and detail formation during the printing process.
- The print completed successfully with no layer shifting or warping issues.
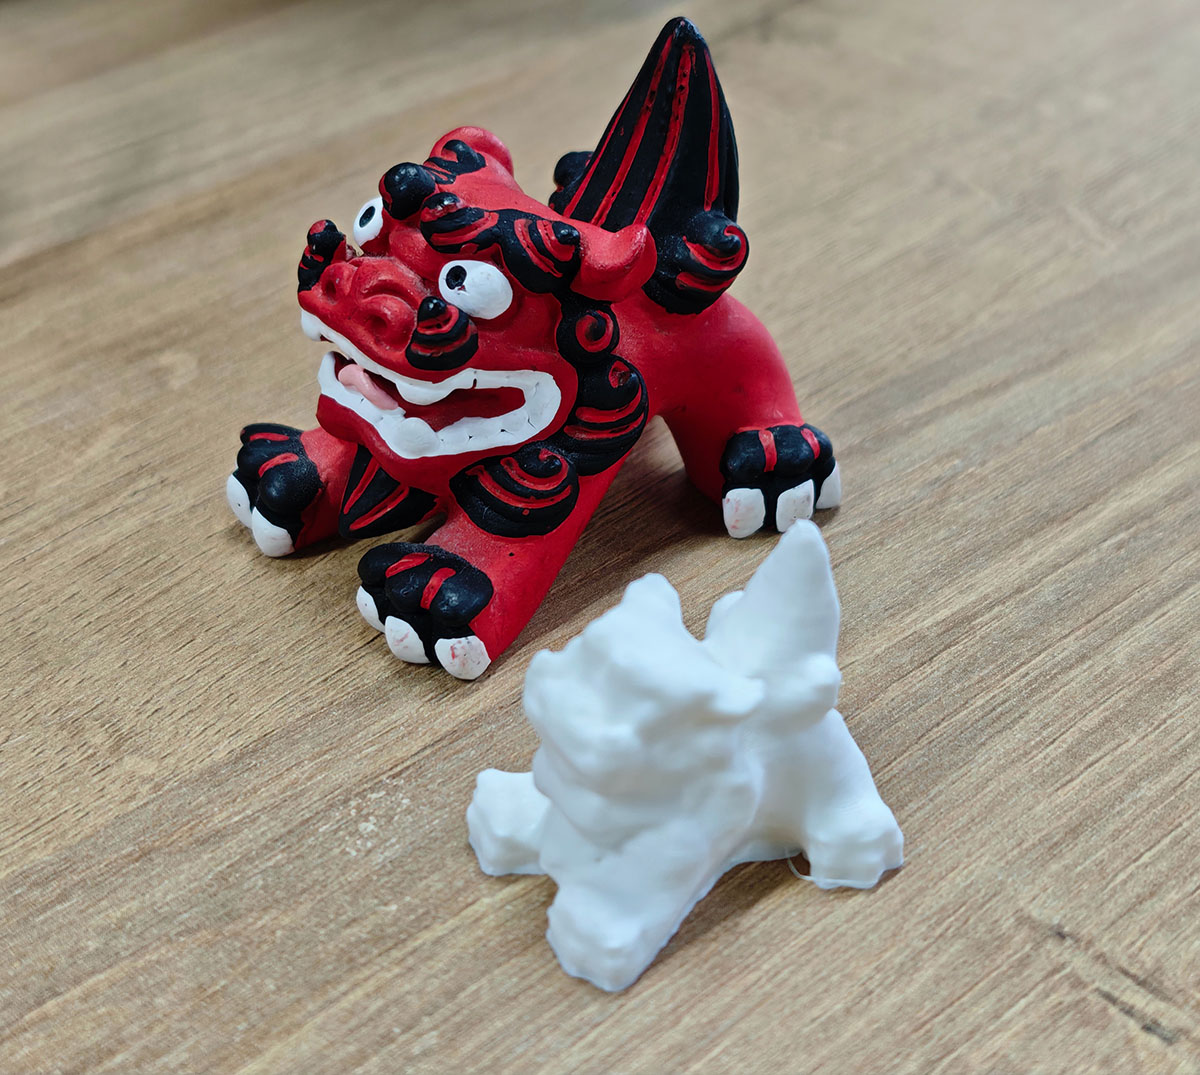
Comparison between the original Shishi Guardian and the 3D scanned and printed replica
5. Results Comparison and Analysis
5.1 Print Results
- The printed piece maintained overall structural integrity, though detail preservation was not ideal. The hollow structure in the lion's mouth was not fully expressed, and the space under the lion's body was not properly represented.
- The white ABS material displayed good surface quality.
- The variable layer height technology effectively improved the smoothness of curved surfaces.
5.2 Comparison with the Original
- Size: The printed piece is smaller than the original (scaled down proportionally).
- Details: Most details such as facial expression and fur texture were successfully replicated.
- Material feel: The original has a ceramic texture, while the print has a plastic texture, resulting in visibly different effects.
- Weight: The printed piece is significantly lighter than the original.
Conclusion and Reflection
Successes
- I completed high-quality 3D scanning using a smartphone application, demonstrating the feasibility of consumer-grade equipment for scanning simple objects.
- I successfully addressed non-manifold edge issues in the model, ensuring print quality.
- Variable layer height technology significantly improved the surface quality of the printed piece, reducing visible layer lines.
Areas for Improvement
- The scanning process could include more angles, especially for capturing details at the bottom and top.
- Consider using post-processing techniques (such as sanding and coloring) to make the printed piece more similar to the original texture.
- Try using a smaller diameter nozzle (such as 0.2mm) to improve detail precision.
Learning Insights
This project demonstrates the complete workflow from physical object to digital model and back to physical object, which is a crucial skill in digital manufacturing. Despite some technical limitations, with the advancement of consumer-grade scanning and printing technologies, this workflow is becoming increasingly accessible, providing great convenience for creative design and rapid prototyping.
Key References
- KIRI Engine: 3D Scanner App for iPhone, Android and Web
- KIRI Engine review: a free, powerful 3D scanning app for Android/iOS
- Software Studio - Bambu Lab
- GitHub - bambulab/BambuStudio: PC Software for BambuLab and other 3D printers
- How to fix non-manifold geometry issues on 3D models
- Variable Layer Height | Bambu Lab Wiki