Week 1:Building a Personal Website: A Workflow from Writing to Publishing
Workflow Overview
Building and maintaining a personal documentation website is a core task in the Fab Academy program. Through this guide, I aim to establish an efficient workflow that details every step from content creation to website deployment. We will be using VitePress, a modern static site generator based on Vue 3 and Vite, which offers excellent development experience and performance.
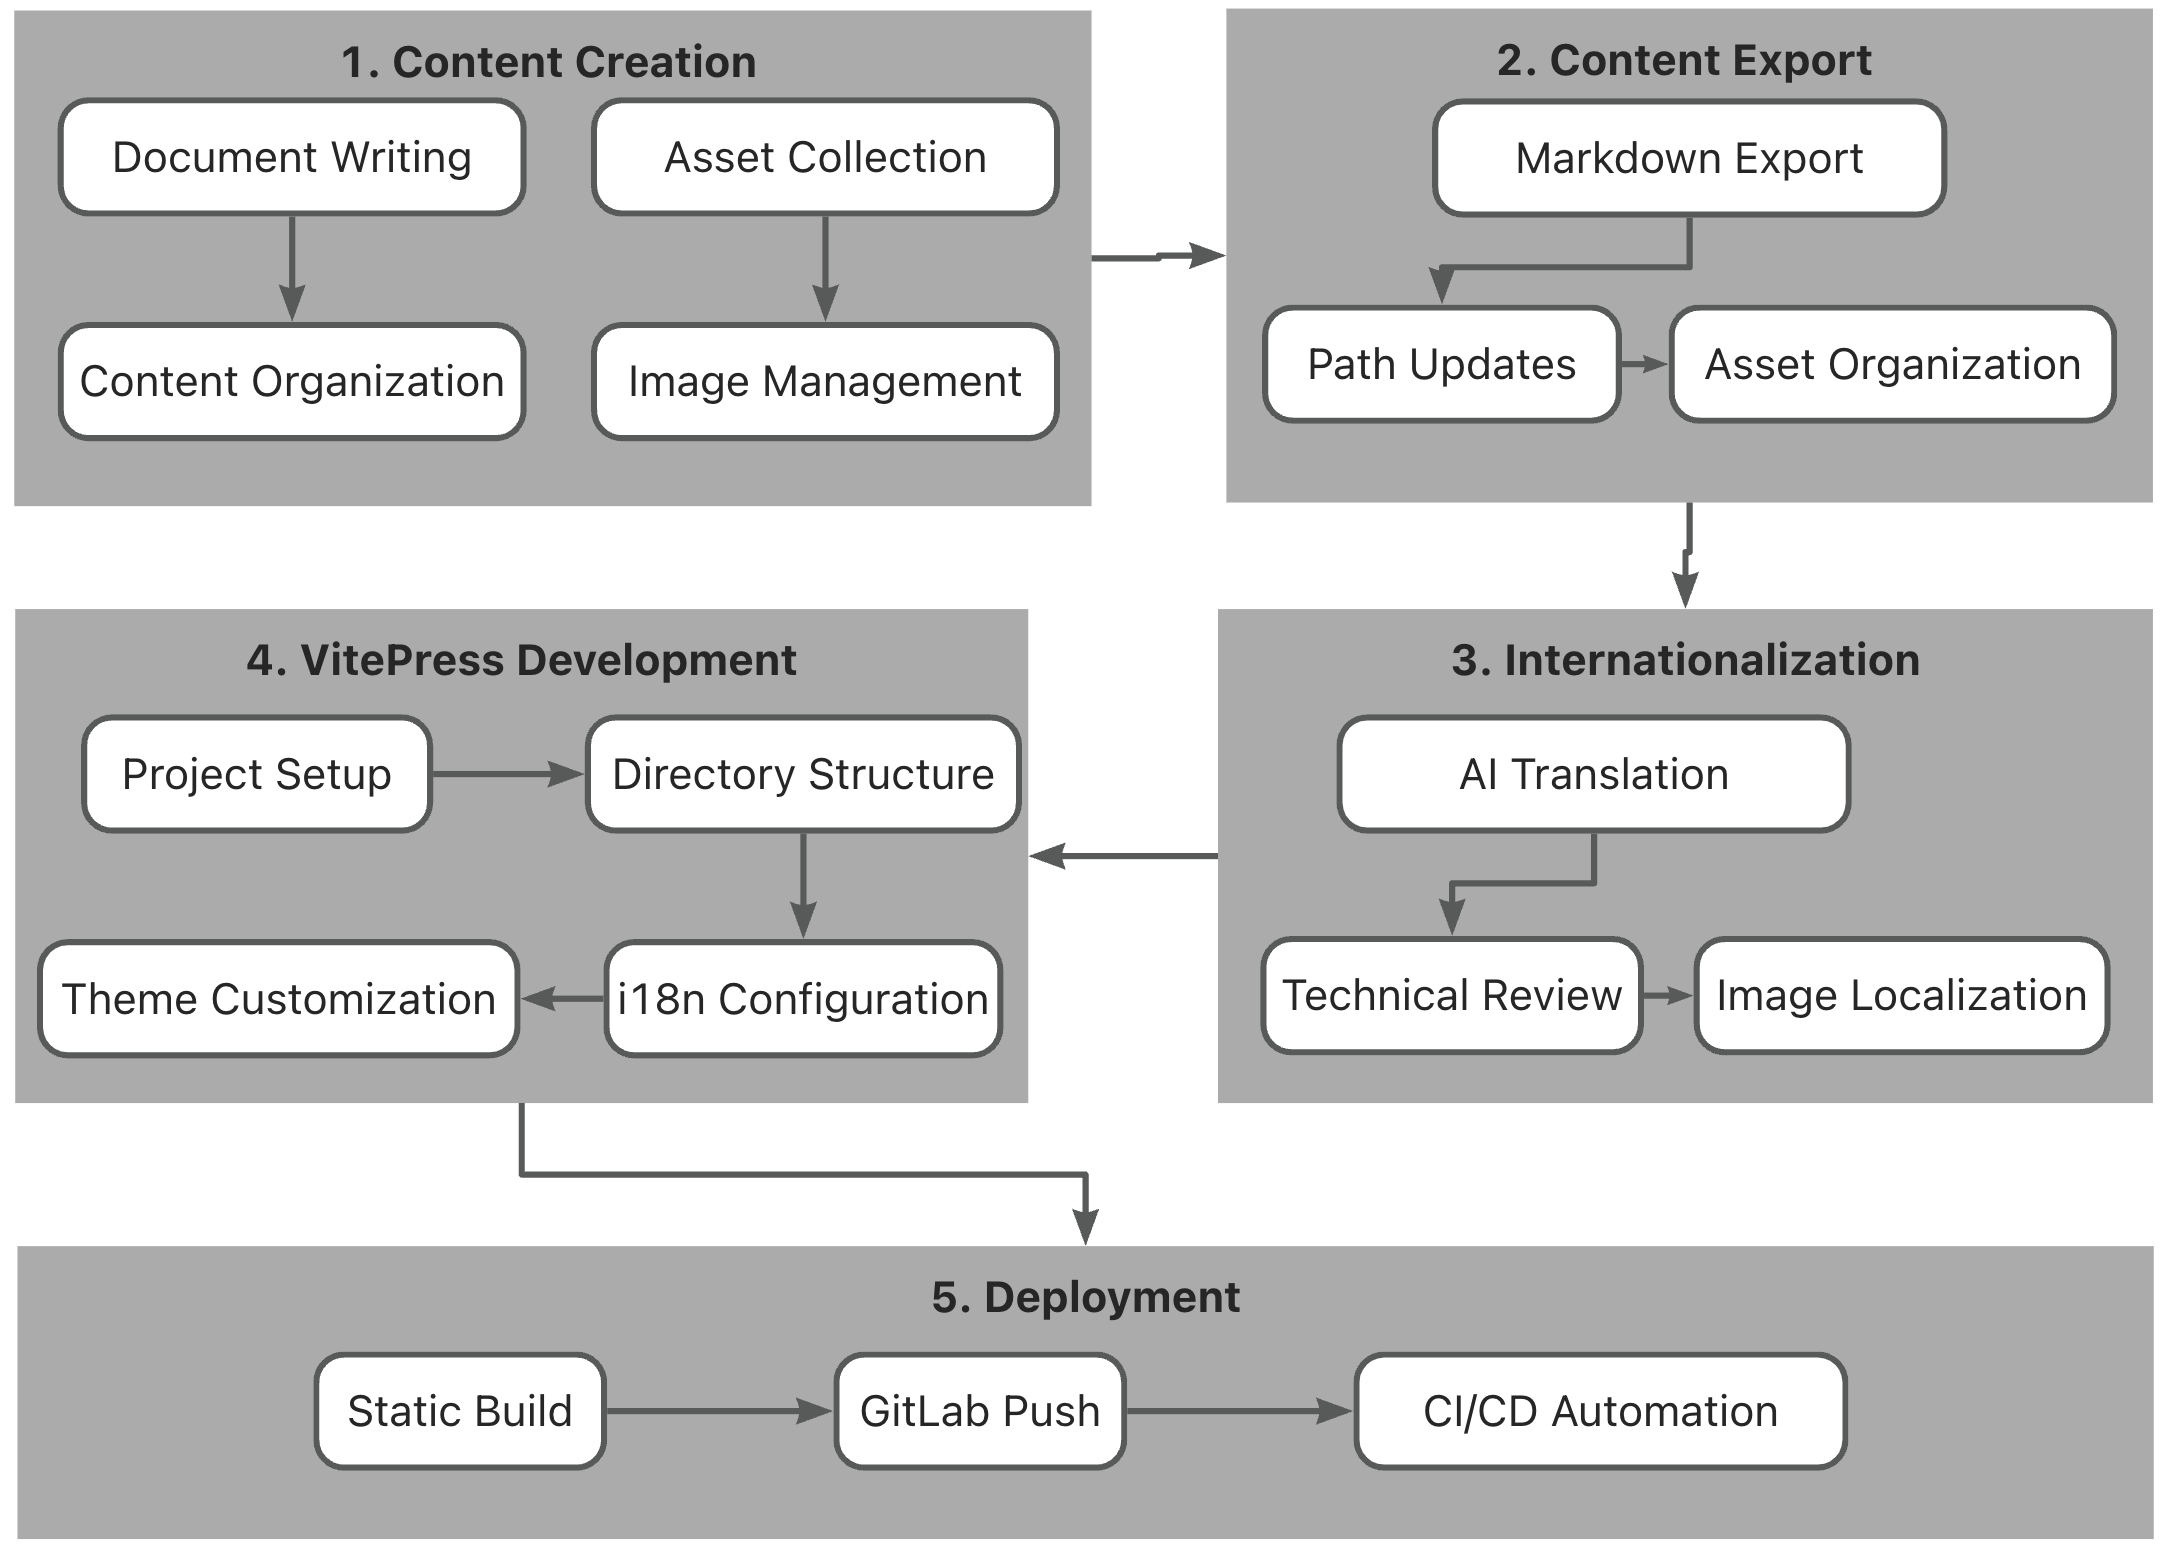
I designed a 5-step workflow to transform documentation into a personal website
This workflow is divided into five main stages, each with its specific tools and considerations:
- Stage 1: Content Preparation
In this stage, I personally prefer to create content in Chinese. Choosing appropriate writing tools allows you to focus on the content itself without being distracted by technical details. - Stage 2: Export and Conversion
Export content from Yuque to Markdown format while processing and optimizing image resources. Ensure all resources comply with the website's organizational structure requirements. - Stage 3: Multilingual Processing
Utilize AI tools for translation assistance and conduct professional terminology review manually to ensure the accuracy and professionalism of bilingual content. - Stage 4: VitePress Development
Develop the website using VitePress, including local environment setup, theme configuration, and content integration. This stage focuses on development experience and website performance. - Stage 5: Deployment
Implement automated building and deployment through GitLab CI/CD to ensure content updates are promptly reflected on the live website.
Through this structured workflow, you can manage documentation work more efficiently and ensure the production of high-quality course documentation. In the following sections, we will detail the specific operational steps and best practices for each stage.
1. Content Creation
While I primarily write in Chinese due to years of practice, modern AI tools have made cross-language content conversion increasingly accessible. I conduct most of my writing work in Yuque, including books I've edited or translated. I chose this tool as my primary content creation platform for several reasons:
- Yuque offers the most powerful online text editing environment I've found, supporting Markdown export and allowing me to focus on content creation.
- Its robust canvas feature enables quick editing of various course illustrations, along with support for formula language, code blocks, text diagram language, UML diagrams, local file embedding, and various third-party services.
- Most importantly, it supports multi-platform access, team collaboration, and version control, making it convenient to communicate and receive feedback from publishers and colleagues during the writing process.

The logo of the Yuque app
Of course, you can choose your own familiar content creation tools, though it's recommended to select those that support Markdown document export for easy web conversion. Dedicated content creation tools allow you to focus on building the content itself without being distracted by coding languages.
For Chinese content creation, there are two main tasks:
- In Yuque, I organize documents according to the Fab Academy course structure, establishing weekly course documents in Chinese to record weekly learning content and project progress.
- Then create an image library to uniformly manage course-related image resources in preparation for web publishing.
When the first week's assignment documents were nearly complete, my document structure in Yuque looked like this:
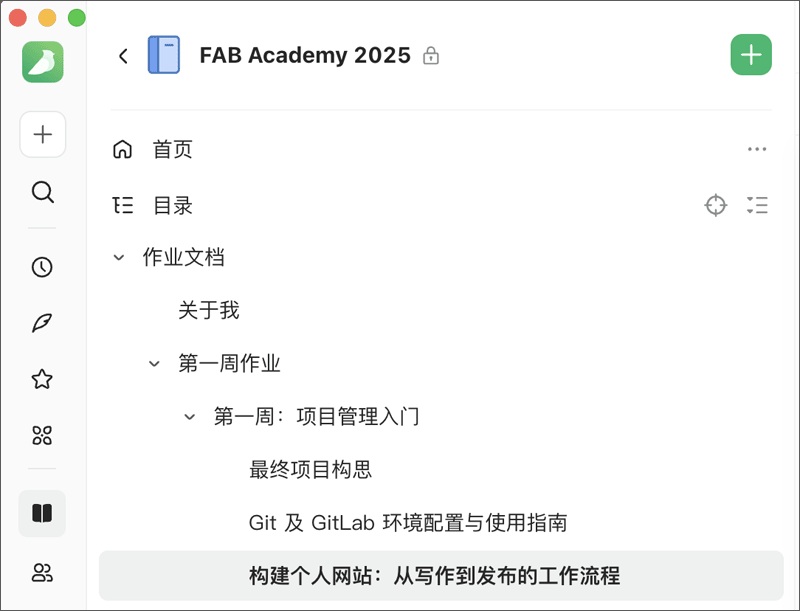
Documents related to Week 1 assignments in Yuque
After completion, export the revised Chinese documents to Markdown format (.md files)
2. Export and Conversion
After completing content creation, we need to convert the documents from Yuque into Markdown format suitable for VitePress and optimize resource files appropriately. This stage is crucial for ensuring website performance and meeting Fab Academy's technical requirements.
Document Export and Format Conversion
When exporting Markdown documents from Yuque, several key points need attention:
- Check if image references use relative paths before exporting
- Ensure code blocks are correctly labeled with programming languages
- Verify proper encoding of special characters
Image Resource Optimization
Given Fab Academy's 10MB size limit per assignment submission, image optimization becomes particularly important. Here are the key steps for processing image resources:
Image Compression Strategy
We adopt different optimization strategies for different types of images:
For photographic images:
- Adjust image dimensions to appropriate display sizes (typically no wider than 1200px)
- Use JPG format with quality set to 80-85%
- Consider using progressive JPEG to enhance loading experience
For screenshots and interface images:
- Use PNG format to maintain text clarity
- Crop appropriately, keeping only essential content areas
- Consider using WebP format as an alternative to significantly reduce file size
Recommended Image Processing Tools
We recommend using the free tool Squoosh for image compression processing.
File Naming Conventions
To maintain project maintainability and multilingual support, we adopt strict file naming conventions.
Document File Naming
Document files should follow this format:
- Chinese documents:
week[XX]_[description]_cn.md - English documents:
week[XX]_[description]_en.md
For example:
week01_project_management_cn.md
week01_project_management_en.mdImage Resource Naming
Image files follow this naming structure:
w[week_number]_[descriptive_name]_[language_identifier].[extension]For example:
- Language-specific screenshots:
w01_git_setup_en.png - Universal images:
w01_3d_model_v1.jpg
File Organization Principles
To ensure long-term project maintainability, we recommend:
- Maintain consistent naming styles
- Use lowercase letters
- Use underscores instead of spaces
- Use v1, v2 format for version numbers
- Organize resource files by category
- Separate screenshots from project photos
- Organize folders by week
- Maintain identical path structures for language versions
Post-Conversion Quality Check
After completing format conversion and resource optimization, perform these checks:
- Verify all image links are correct
- Confirm total file size is within limits
By strictly following these standards and optimization steps, we can ensure the website maintains good performance while being easy to maintain and update. Though these tasks may seem tedious, they are necessary for establishing a professional documentation website.
[Previous content continues...]
3. Multilingual Processing
In the Fab Academy documentation workflow, multilingual content processing is a key component. This stage aims to ensure the accuracy and professionalism of both Chinese and English content while establishing an efficient translation workflow.
AI-Assisted Translation Process
After completing the Chinese content, I use AI tools (such as Claude) for initial translation. When using AI translation, I recommend the following approach:
First, provide the complete Markdown file to the AI, clearly stating that this is a technical document. Request the AI to maintain all Markdown formatting during translation, including heading hierarchies, code blocks, and image references. This ensures the translated document maintains its original format integrity.
Professional Terminology Review
AI-translated content needs human review, with particular attention to:
Compare terminology with official Fab Academy documentation to ensure consistency in technical vocabulary. For example, "3D 打印" should be consistently translated as "3D printing" rather than "three-dimensional printing". Check professional vocabulary in the digital fabrication field to ensure compliance with industry standard terminology. Maintain consistency of technical terms throughout the documentation.
Multilingual Content Synchronization
To ensure synchronized updates of Chinese and English content, it's recommended to open both files side by side in VSCode for comparison. This facilitates content comparison and updates. Additionally, for localization-dependent images (such as screenshots containing text), create corresponding English versions promptly.
While this stage is time-consuming, it's crucial for ensuring documentation professionalism and readability. Establishing a standardized multilingual processing workflow can significantly improve work efficiency and ensure content quality.
4. VitePress Development: Project Setup and Configuration Guide
Project Initialization
Setting up a VitePress project requires specific steps to ensure proper development environment configuration. First, we need to create the project and install necessary dependencies:
# Create project directory
mkdir fabacademy-book
cd fabacademy-book

# Initialize npm project
npm init -y

# Install VitePress and Vue
npm add -D vitepress vue

# Create documentation directory structure
mkdir -p docs/{.vitepress,en,zh,public/images}Directory Structure Setup
In VitePress, the documentation structure directly impacts website navigation and accessibility. Here's the recommended directory structure:
docs/
├── .vitepress/
│   ├── config.ts          # Main configuration file
│   └── theme/            # Theme-related files
├── en/                   # English content
│   ├── about/
│   │   └── about_en.md
│   └── assignments/
│       └── week01/
├── zh/                   # Chinese content
│   ├── about/
│   │   └── about_cn.md
│   └── assignments/
│       └── week01/
├── public/              # Static resources
│   └── images/
└── index.md # Website homepageMultilingual Support Configuration
VitePress's multilingual support is implemented through the configuration file. In .vitepress/config.ts, we need to set language-related configuration items:
import { defineConfig } from 'vitepress'

export default defineConfig({
  locales: {
    '/en/': {
      label: 'English',
      lang: 'en'
    },
    '/zh/': {
      label: '简体中文',
      lang: 'zh-CN'
    }
  },
  themeConfig: {
    locales: {
      '/en/': {
        // English interface configuration
      },
      '/zh/': {
        // Chinese interface configuration
      }
    }
  }
})Navigation and Sidebar Configuration
To ensure a good documentation browsing experience, we need to configure independent navigation menus and sidebars for different language versions in config.ts:
themeConfig: {
  nav: [
    // Top navigation configuration
  ],
  sidebar: {
    '/en/assignments/': [
      // English sidebar configuration
    ],
    '/zh/assignments/': [
      // Chinese sidebar configuration
    ]
  }
}Theme Customization and Style Adjustment
VitePress allows customization of website appearance through theme configuration. Create a .vitepress/theme/index.ts file to customize the theme:
import DefaultTheme from 'vitepress/theme'
import './custom.css'

export default {
  extends: DefaultTheme,
  enhanceApp({ app }) {
    // Register custom components or implement other enhancements
  }
}Markdown Document Configuration
In VitePress, each Markdown document should include frontmatter configuration at the beginning, which defines the page's metadata and specific settings. These configurations are crucial for document organization and presentation.
Here's a standard example of frontmatter configuration:
---
title: Project Management Fundamentals
description: Fab Academy Week One: Introduction to Project Management Methods and Tools
date: 2025-01-15
tags: ['project management', 'documentation', 'git']
prev:
  text: 'Course Introduction'
  link: '/en/about/introduction'
next:
  text: 'Version Control'
  link: '/en/assignments/week01/git-setup'
---Special Considerations for Multilingual Documents
For multilingual websites, we need to ensure frontmatter configurations remain synchronized between Chinese and English documents while adapting content appropriately. The image below shows the corresponding relationship between bilingual documents:
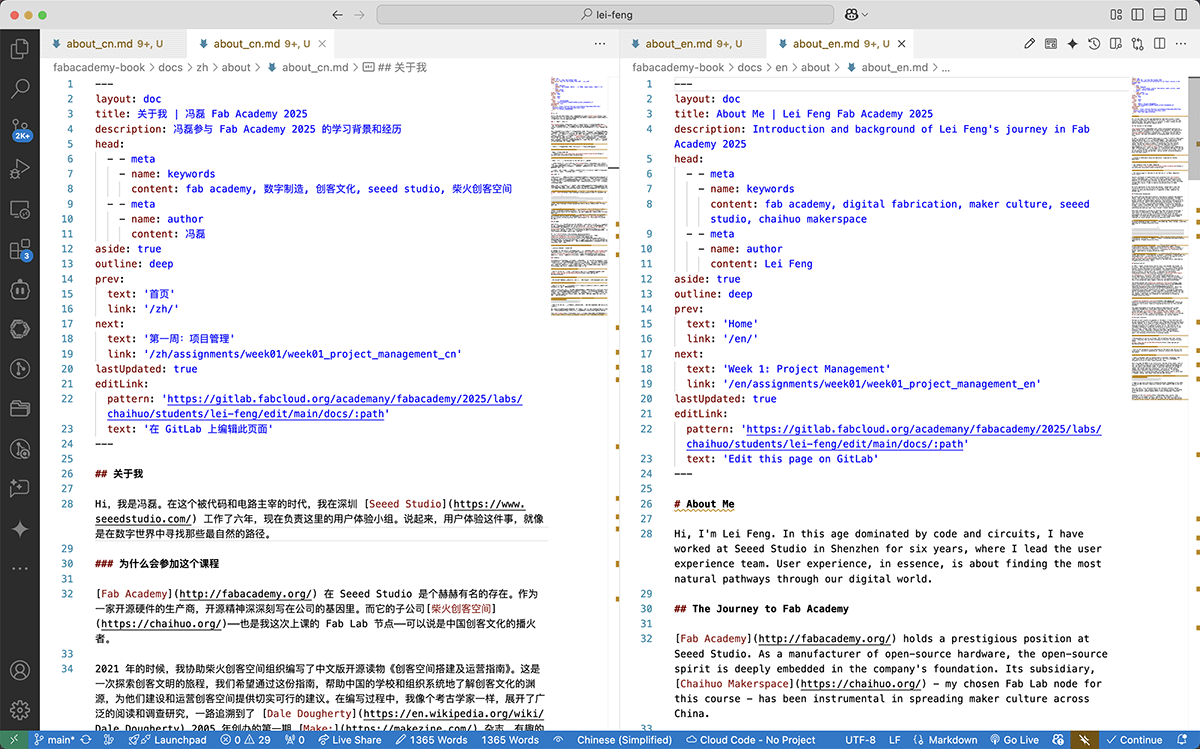
Frontmatter settings added to about_cn.md and about_en.md documents, including previous and next page navigation names and links at the bottom of the page.
Important Frontmatter Fields
When writing documents, pay special attention to these frontmatter field settings:
- title: Defines the page title, displayed in browser tabs and navigation
- description: Provides page description, beneficial for search engine optimization
- date: Records document creation or update date
- lang: Specifies page language, ensuring correct language environment
- layout: Selects specific page layout template
- sidebar: Controls current page's sidebar display
- tags: Adds tags to documents for content organization and search
- prev/next: Defines previous and next page navigation links
Through proper configuration of these frontmatter fields, we can optimize document presentation, improve navigation experience, and ensure correct multilingual support. During development, make it a habit to add appropriate frontmatter to each document, as this is essential for maintaining a professional documentation website.
Local Development and Debugging
After configuration, add development scripts to package.json:
{
  "scripts": {
    "docs:dev": "vitepress dev docs",
    "docs:build": "vitepress build docs",
    "docs:preview": "vitepress preview docs"
  }
}Local Preview and Development Debugging
When conducting local development of the VitePress documentation site, we need to follow specific steps to ensure the best preview results. Here's my development preview workflow.
Clearing Cache and Build Files
First, clean previous build files and cache to ensure preview uses the latest configuration and content:
rm -rf docs/.vitepress/dist
rm -rf docs/.vitepress/cacheThis cleaning step is important as it prevents old build files and cache from affecting new development previews. This operation is particularly helpful in avoiding potential issues after modifying configuration files or encountering anomalies.
Starting the Development Server
After cleaning, start the development server using this command:
npm run docs:devAfter executing this command, VitePress will start a local development server. You'll see the access address in the terminal, typically http://localhost:5173.... You can then open this address in your browser to view the website effect, as shown below.
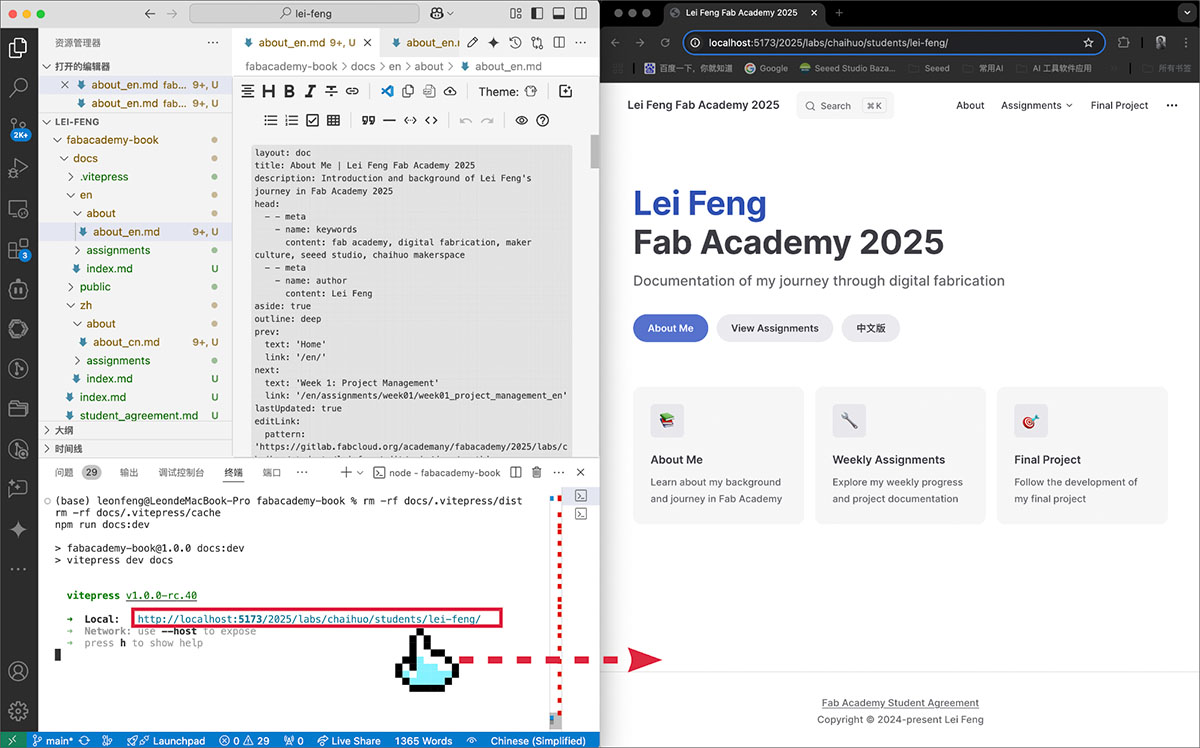
After running the
npm run docs:devcommand in VSCode's terminal, VitePress provides an output link. Access this link through your browser to see the website effect.
Real-time Preview Features
The development server offers numerous convenient features to enhance the development experience. When you modify any Markdown file or configuration file, the website automatically refreshes to display the latest changes. This instant feedback mechanism allows us to quickly adjust and optimize content.
For example, when you:
- Modify Markdown file content, the page updates immediately
- Change configurations in
.vitepress/config.ts, the entire site automatically reloads - Add or modify image resources, related pages refresh in real-time
Performance Optimization Recommendations
To ensure good documentation website performance, consider these measures:
First, for image resources, use appropriate formats and sizes, and consider implementing image lazy loading. Second, organize document structure sensibly, avoiding overly deep directory hierarchies. Finally, utilize VitePress's built-in optimization features, such as route preloading and on-demand loading.
Version Control
We recommend using Git for version control and creating a .gitignore file to exclude unnecessary files:
node_modules
docs/.vitepress/dist
docs/.vitepress/cacheThrough these configuration and optimization measures, we can build a high-performance, easily maintainable documentation website. During development, continuously monitor website user experience and make appropriate adjustments and optimizations based on actual needs.
5. Website Deployment in VSCode
When developing the Fab Academy documentation website in VSCode, we can streamline the deployment process using integrated terminal and Git functionality. Here's a complete operational guide.
Local Build Verification
In VSCode, first open the integrated terminal (shortcut Ctrl + or Command +), and run the build command:
# Clean previous build files and cache
rm -rf docs/.vitepress/dist
rm -rf docs/.vitepress/cache

# Build project
npm run docs:buildAfter building, check the docs/.vitepress/dist directory to ensure all output website files have been generated correctly, as shown below.
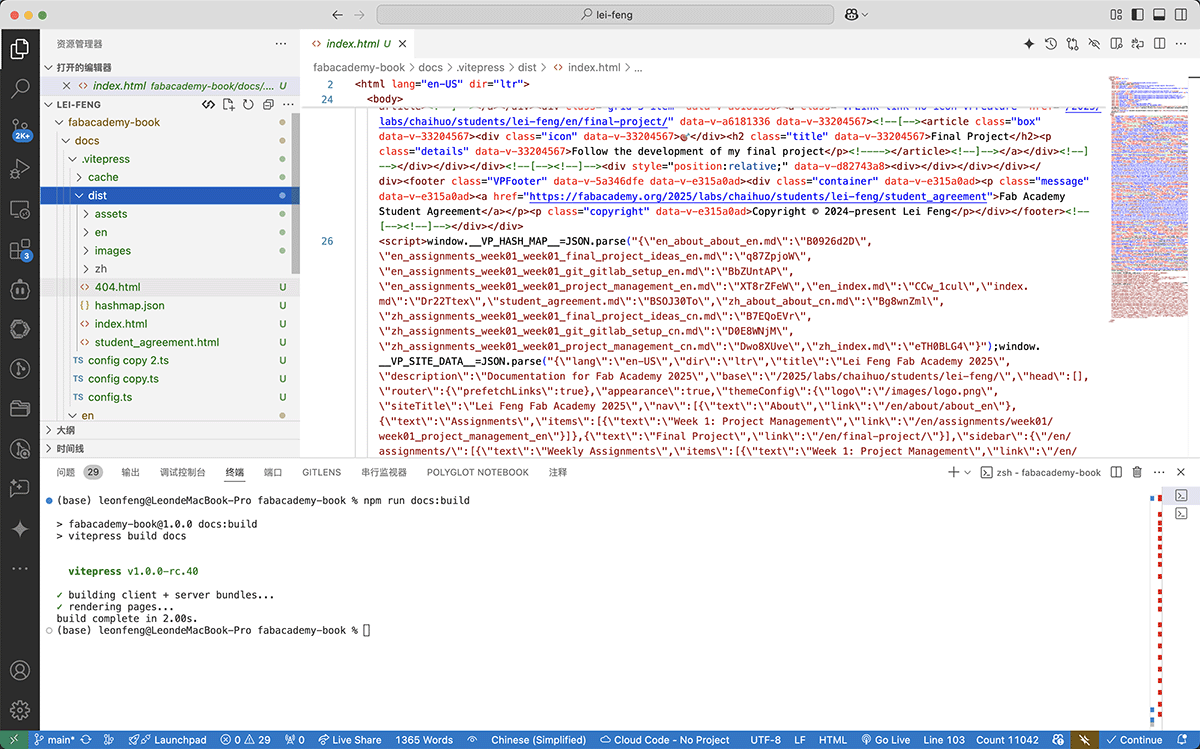
After running the
npm run docs:buildcommand, the exported website files will appear in thedocs/.vitepress/distdirectory. My task is to synchronize all files from this directory to thelei-feng/publicdirectory on GitLab.
Using VSCode's Git Features
VSCode provides excellent Git integration features that help us conveniently manage code commits and pushes. Before committing changes, we should:
- Open VSCode's Source Control view (shortcut Ctrl+Shift+G or Command+Shift+G)
- Review the list of changed files to ensure no unwanted files are included
- Write clear commit messages describing the updates
- Use VSCode's diff view feature to confirm all changes
Commit and Push Process
In VSCode's source control interface:
- Stage changes: Select files to commit, click the "+" icon or use the "Stage Changes" command
- Enter commit message: Input a descriptive commit message
- Commit changes: Click the commit button or use Command+Enter (Mac) / Ctrl+Enter (Windows)
- Push to remote: Click the sync changes button or use the Git: Push command from the command palette
Post-deployment Verification
After committing and pushing, in VSCode we can:
- Use the integrated terminal to open the GitLab Pipeline page
- Monitor build progress
- Check build logs for potential issues
- Use the built-in browser preview feature to view the deployed website
By utilizing these integrated VSCode features, we can manage website development and deployment more efficiently. This centralized work environment not only improves efficiency but also reduces the need to switch between different tools.