1.0. Project Management
Initial Thoughts/Concerns
On Friday (January 7th), Dr. David Taylor gave a presentation to CLS Fab Lab faculty members/students on how to establish and document project work done in Fab Academy. I was very confused throughout the presentation, not understanding what master branches, my computer’s terminal, SSH Keys, merge requests and repository were. I felt so confused, I was extremely anxious; Dr. Taylor reassured me and suggested that I just try to at least generate the SSH key over the weekend. I really wanted to get a head start on my work, and I headed off for the weekend with hopes of mastering the technology side of Fab Academy.
That evening, our entire family was due to arrive at my house for my fiftieth birthday. Little did we know that Covid was about to hit our entire family that weekend. Contracting the illness with several family members, I wound up not being able to teach for six school days, and I fell behind on my goal of working to understand the technology. Being at home for so long isolated me from my colleagues who are taking the Fab Academy course with me; this also meant I was not at school and able to seek help and advice on the “Principles and Practices” that would prove to be very difficult for me. As I was home, I began to use the time I had to watch tutorials and work toward understanding what needed to be set up. Each task required me to do more research, watch more tutorials, read more information; I felt like I was peeling the layers off an onion.
Setting Up MkDocs
I decided to start with setting up MkDocs. I set up a Fab Academy Journal in Microsoft Word, and I began my documentation process. At this time, I had no idea what MkDocs was, and I knew nothing of its functionality or use and how this was going to “help” me in Fab Academy. Referring back to Dr. Taylor’s presentation. (Screenshot 1 below.) As I accessed the introductory tutorial and the User Guide, which took me to the “Getting Started with MkDocs” webpage. Still unsure of what to do, I followed the prompts and clicked on “Installation Guide”. (Screenshot 2 below.)
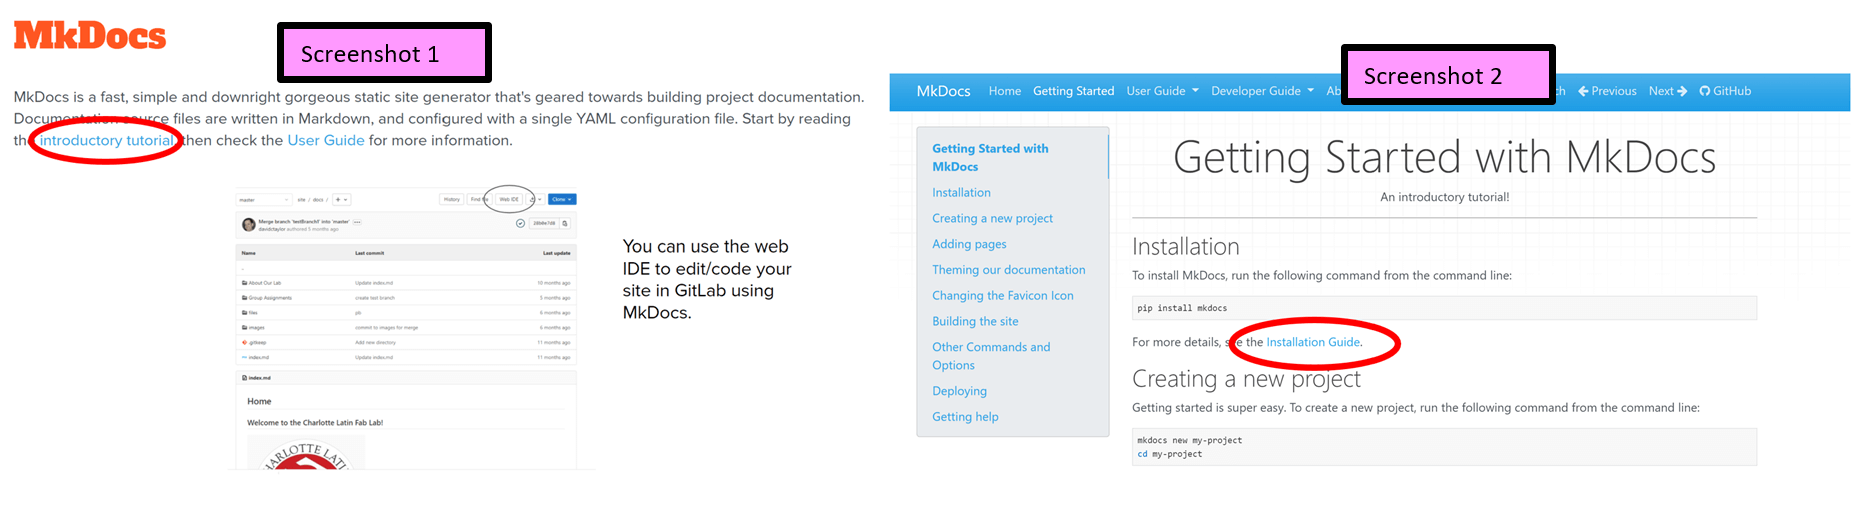
As I accessed the introductory tutorial and the User Guide, which took me to the “Getting Started with MkDocs” webpage. Still unsure of what to do, I followed the prompts and clicked on “Installation Guide”. (See screenshot 3 below.)
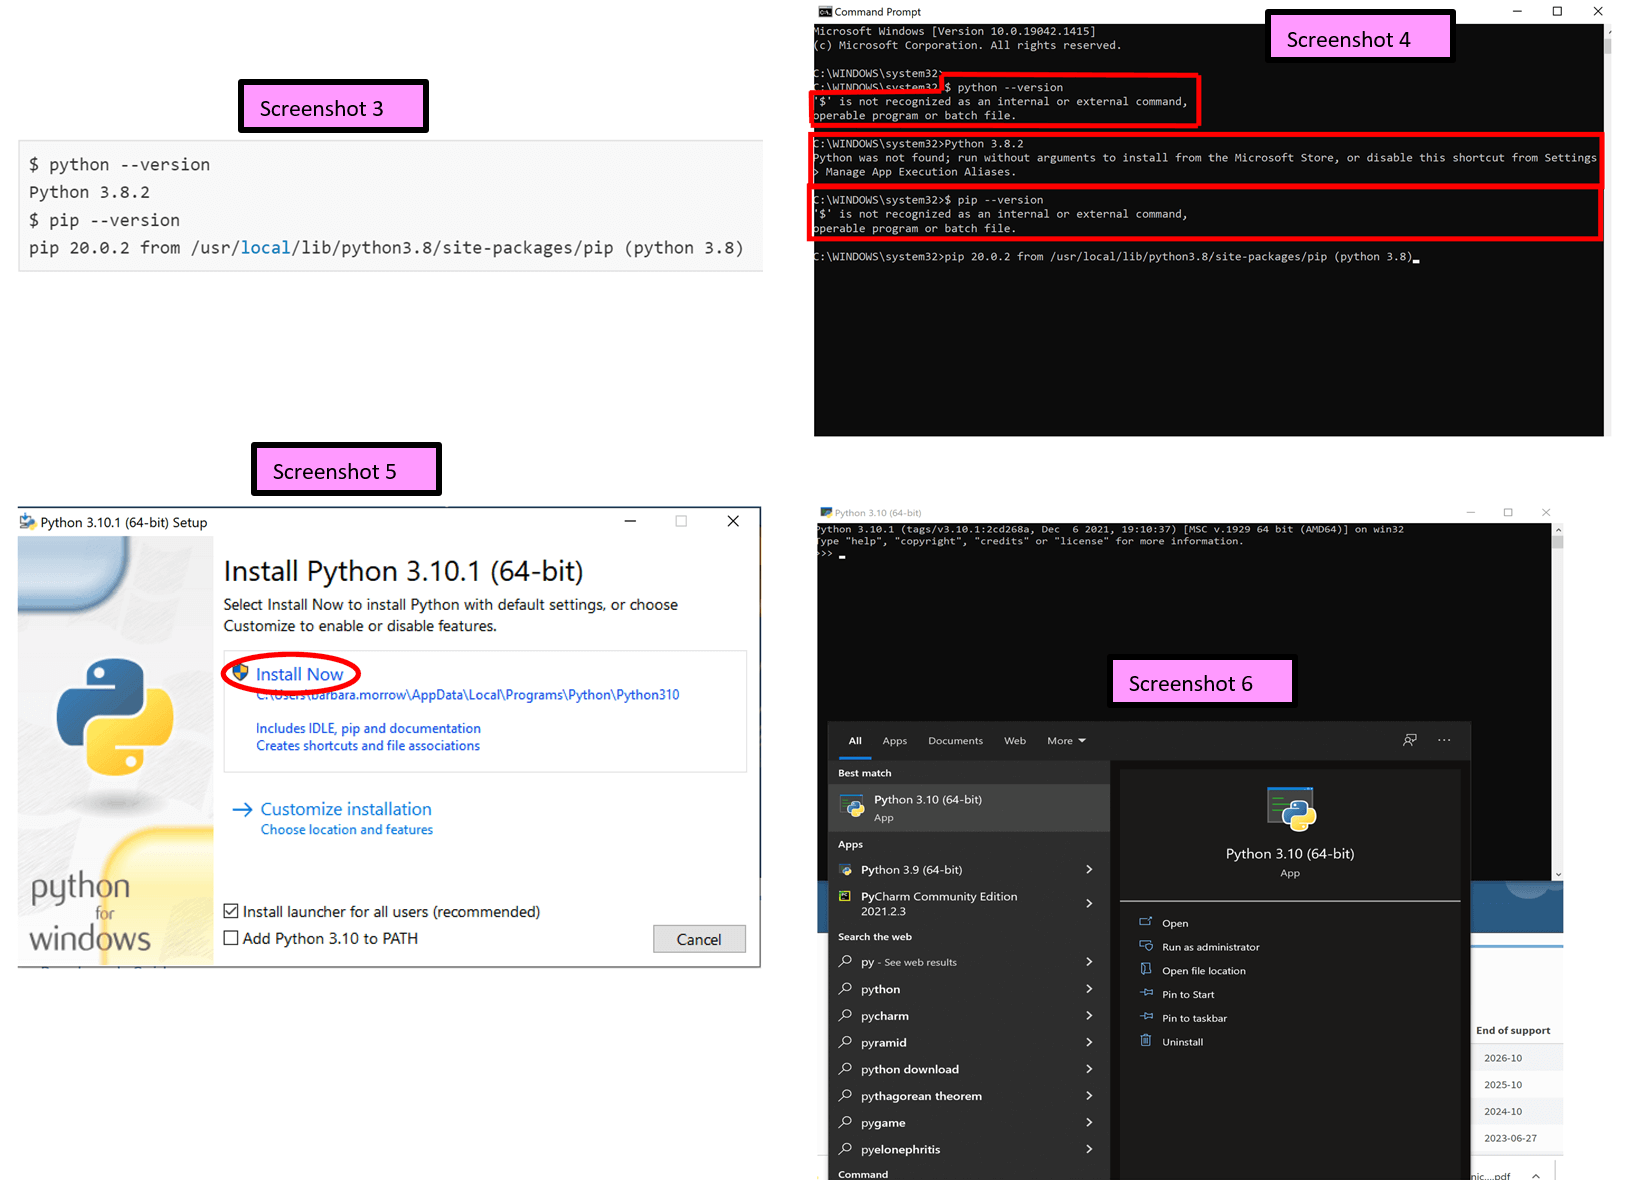
The “Installation Guide” stated I needed check whether python was already installed on my computer, and if so, determine which version had been installed. I remembered Dr. Taylor telling us to access the “Command Prompt” on my Windows machine, I searched for the command prompt, opened it, and copied and pasted the script from Screenshot 3. Screenshot 4 shows what resulted.
In doing this, I learned that hitting the return/enter key resulted in “C:\WINDOWS\system32>” (I would–MANY. MANY DAYS LATER– realize what this was). So I pasted the copied message, and the message (outlined in red in Screenshot 4 below) appeared. From this, I realized I indeed needed to install both python and pip. I clicked on the link to install python (below), and the file went to my “Downloads” folder.
Python & Pip Detour (in trying to install MkDocs)
Python
I opened the downloaded python file and clicked once again on “Install”. Screenshot 5 (above) showed that I had indeed installed the most current version of python on my laptop. Screenshot 6 (also above) shows proof that Python 3.10 was installed on my computer.
Pip
I then went to install pip. It was suggested (Screenshot 7 below) that if I had the most recent version of python, that pip was likely already installed. When I typed “pip install –upgrade pip”, this is what appeared, and pip was not recognized. (Screenshot 8 below). ” Screenshots 9 and 10 show the steps I followed to download pip, the result of me copying and pasting “python get-pip.py” into the command prompt, and the result of the previous action.
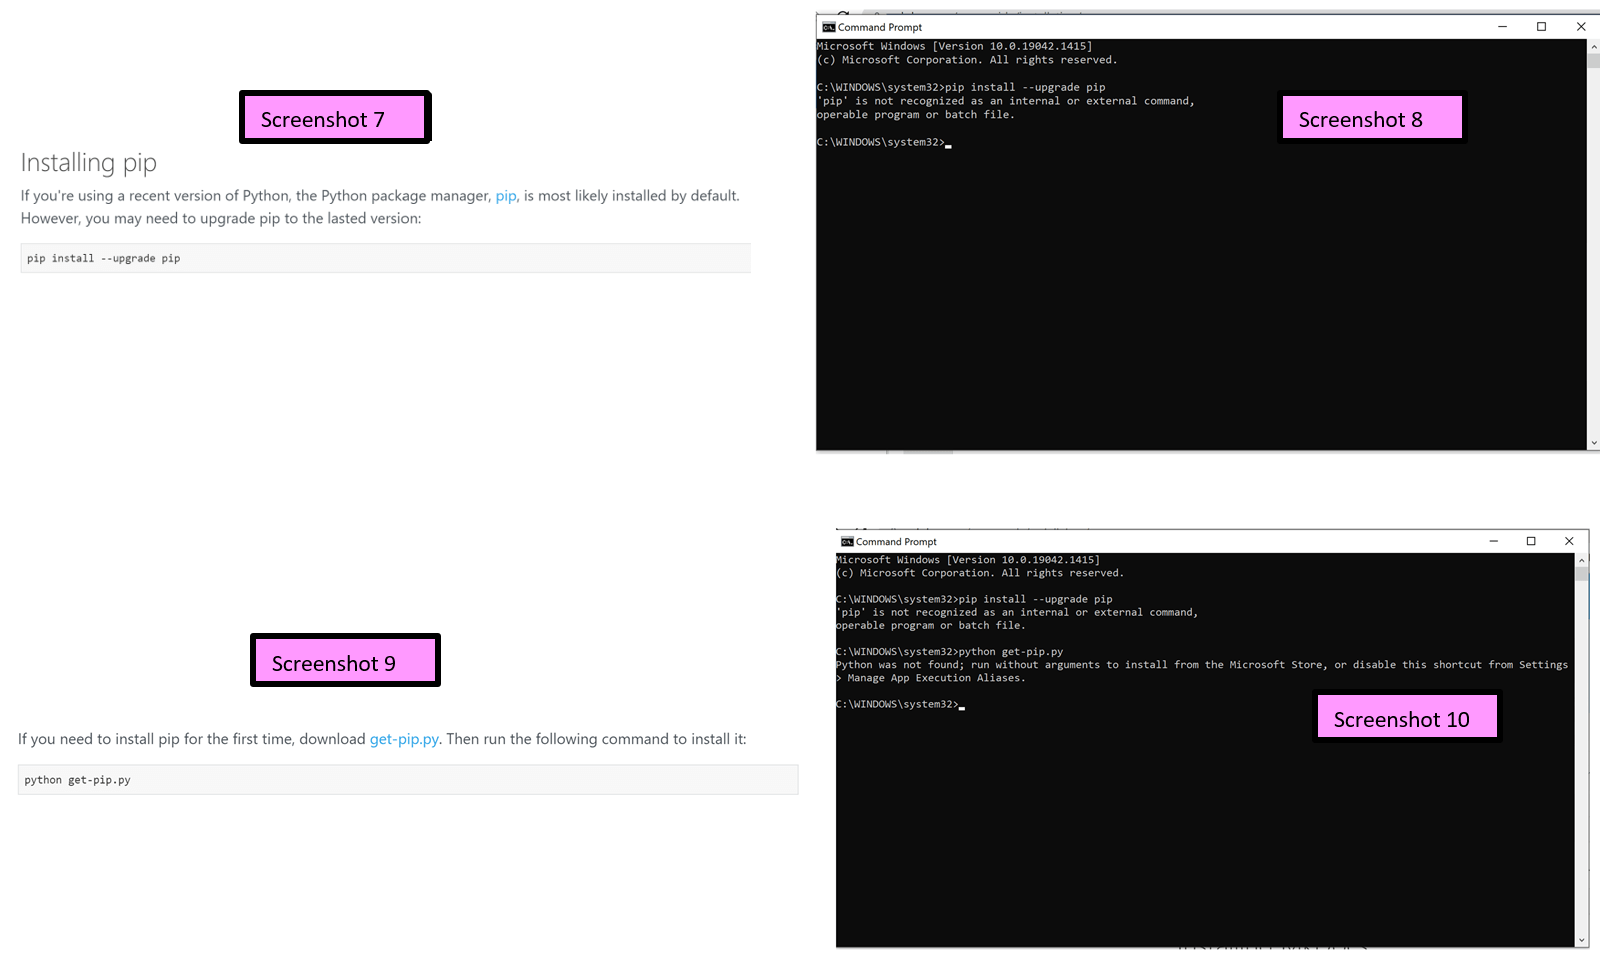
Still not understanding what I was doing, or where I was headed, I went to this website to try to download pip and run it with python. (See Screnshot 11). Screenshot 12 below shows what I found. I clicked on “Windows”, and I copied and pasted “C:> py get-pip.py” into the command prompt. (See Screenshot 13 for what resulted).
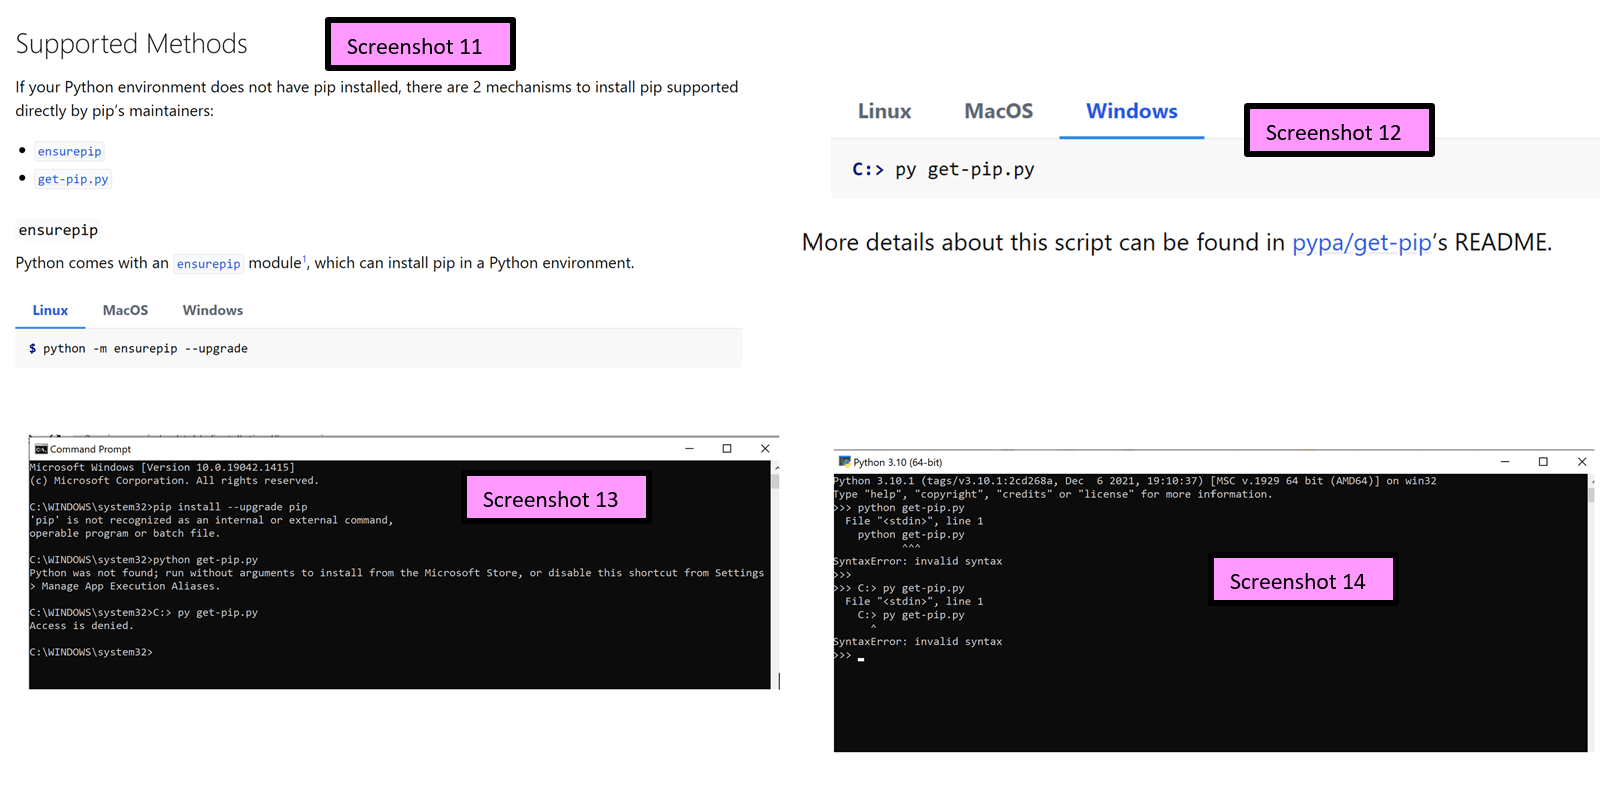
I added this into the command prompt, and I tried copying and pasting it into the python window (Screenshot 15 below). I tried copying and pasting the code command into the command prompt also. After trying numerous other copying/pasting combinations, I became very frustrated, and resorted to an Internet search: “trouble downloading pip on windows with python 3.10”, and I selected this video on YouTube. In this video, I noticed that he selected the bottom box and I had not (See Screenshot 16 below). I wondered if this was why nothing seemed to be working for me.
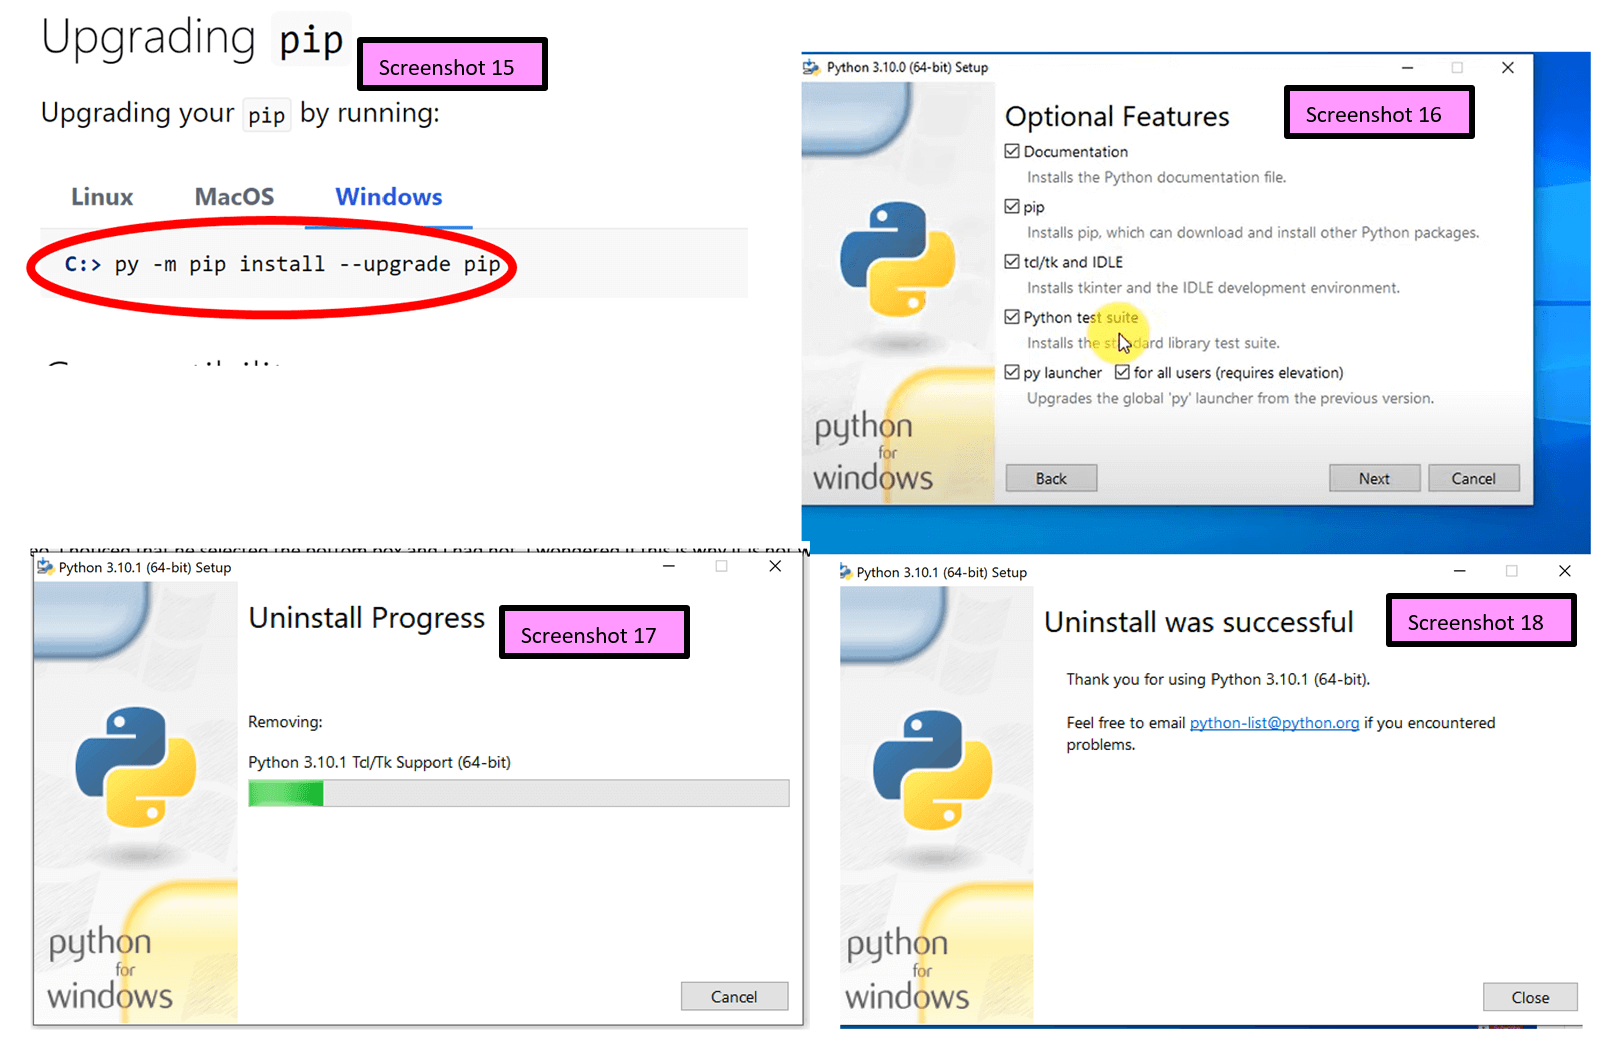
As I continued to watch this video, I saw that he was able to click on another button to see if pip was running using the “Optional Features” (shown above). Feeling completely defeated at this point and not seeming to be successful at anything, I decided to try to download python again, but this time, when I clicked on the download, it asked if I wanted to “Uninstall Python”. I chose to do that and start over. Screenshot 17 shows me uninstalling python, and Screenshot 18 shows it successfully uninstalled.
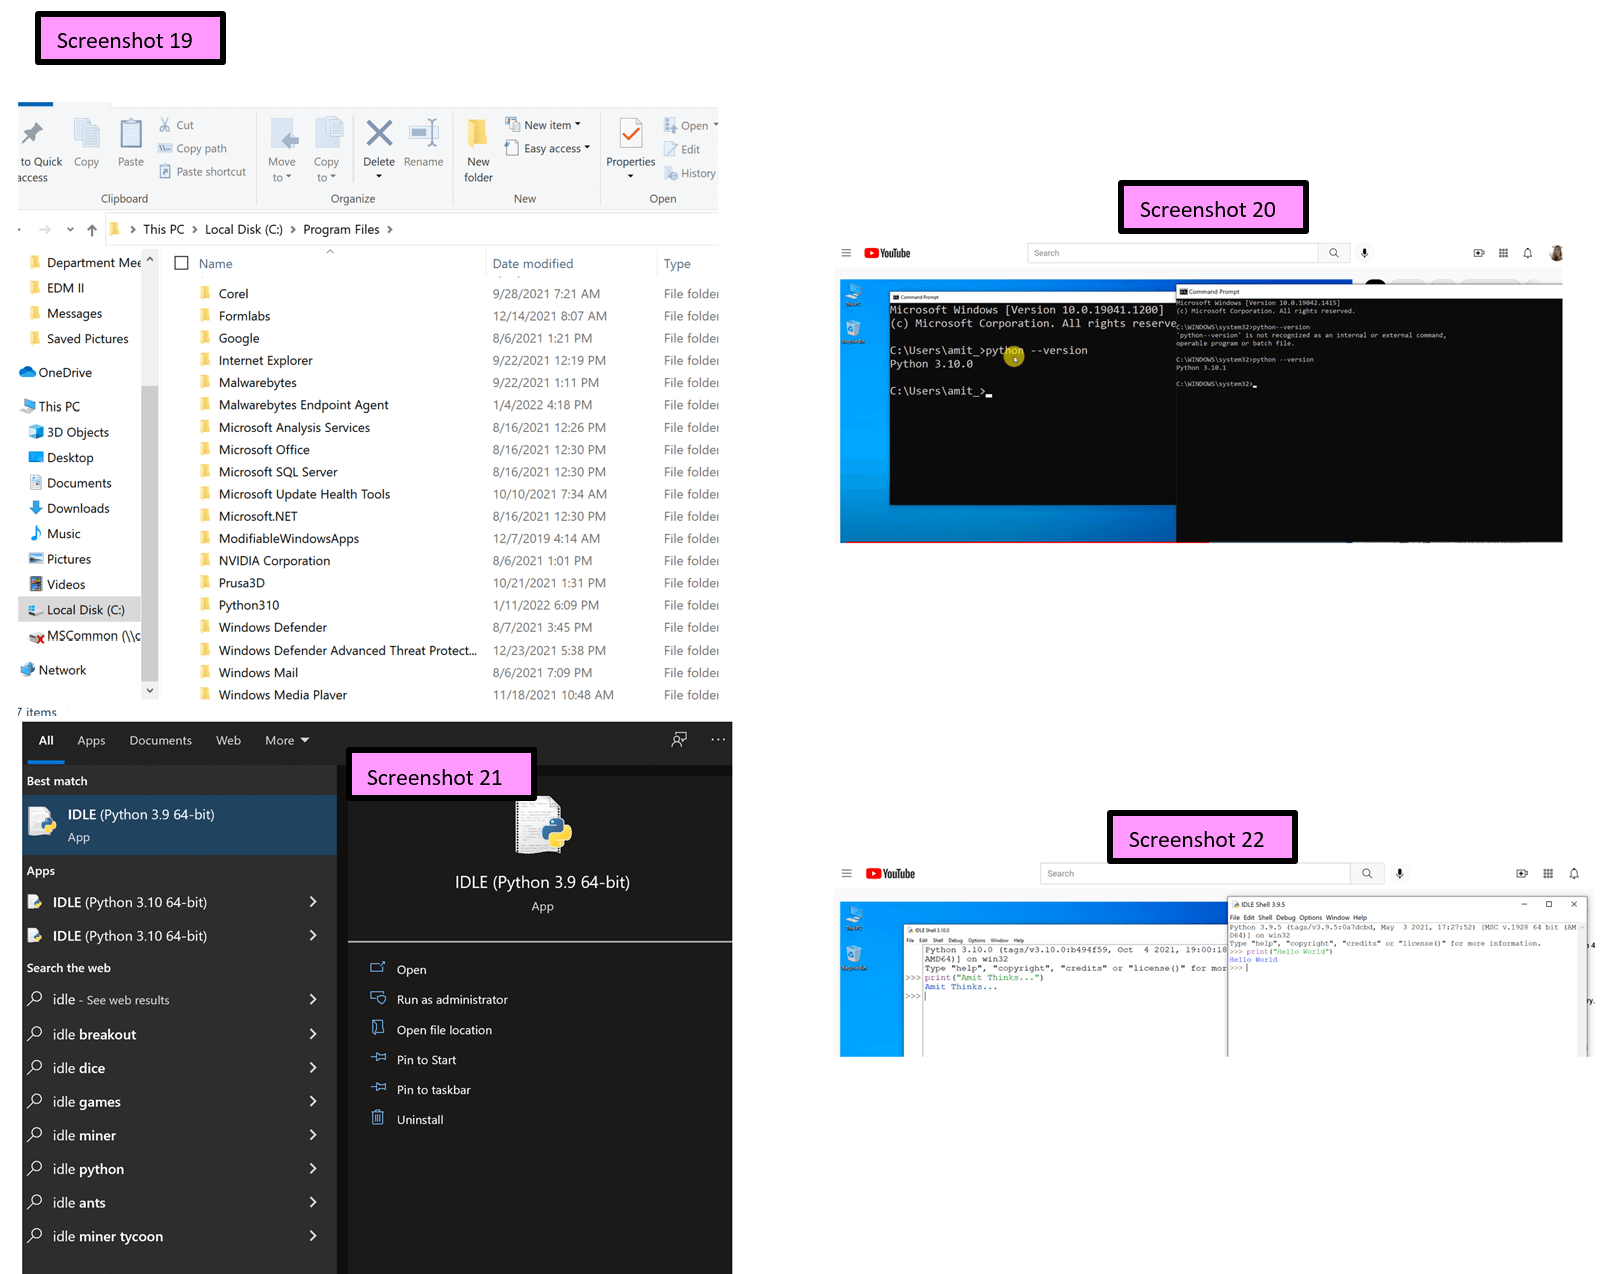
I successfully reinstalled python, but this time when downloading it, I checked to make sure “pip” was selected! I went into my C folder and found Python 3.10.0 had been successfully re-installed (Screenshot 19 below). In the video, he opened the command prompt (I learned I could just type “cmd”). Screenshot 20 shows his command prompt (left) next to my command prompt (right). He also prompted me to go to the search window and type “IDLE” and select “Open”. (See image 21 below). He showed in the window that opened how to print a command. Screenshot 22 shows my window (right) next to his window (left).
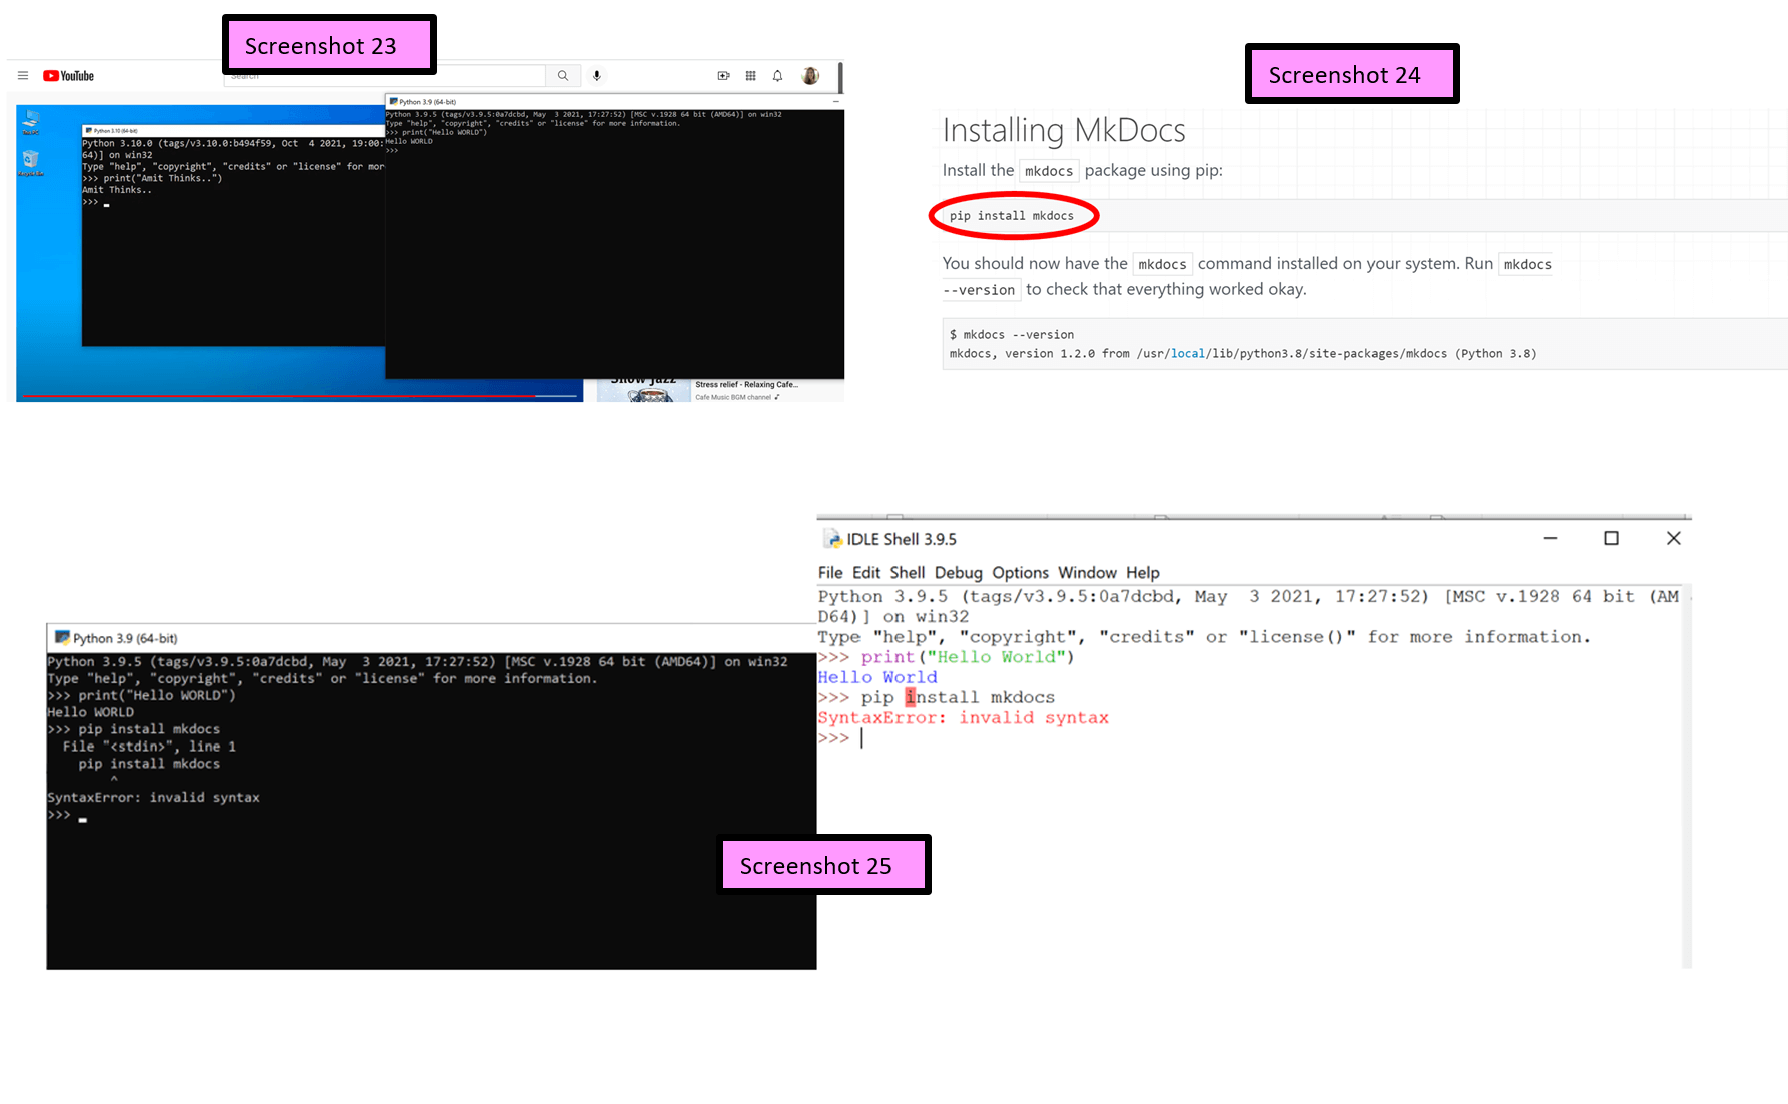
To show that the python app was also working properly, I opened it and typed: print(“Hello WORLD”) (See Screenshot 23-25 below).
After finally seeing some success, I was able to move on to installing MkDocs.
Revisiting MkDocs
I went back to the installation page from the very beginning (Screenshot 24 above)
I copied and pasted “pip install mkdocs” into both python and the IDLE shell, and the screenshot 25 above shows side-by-side what happened in both.
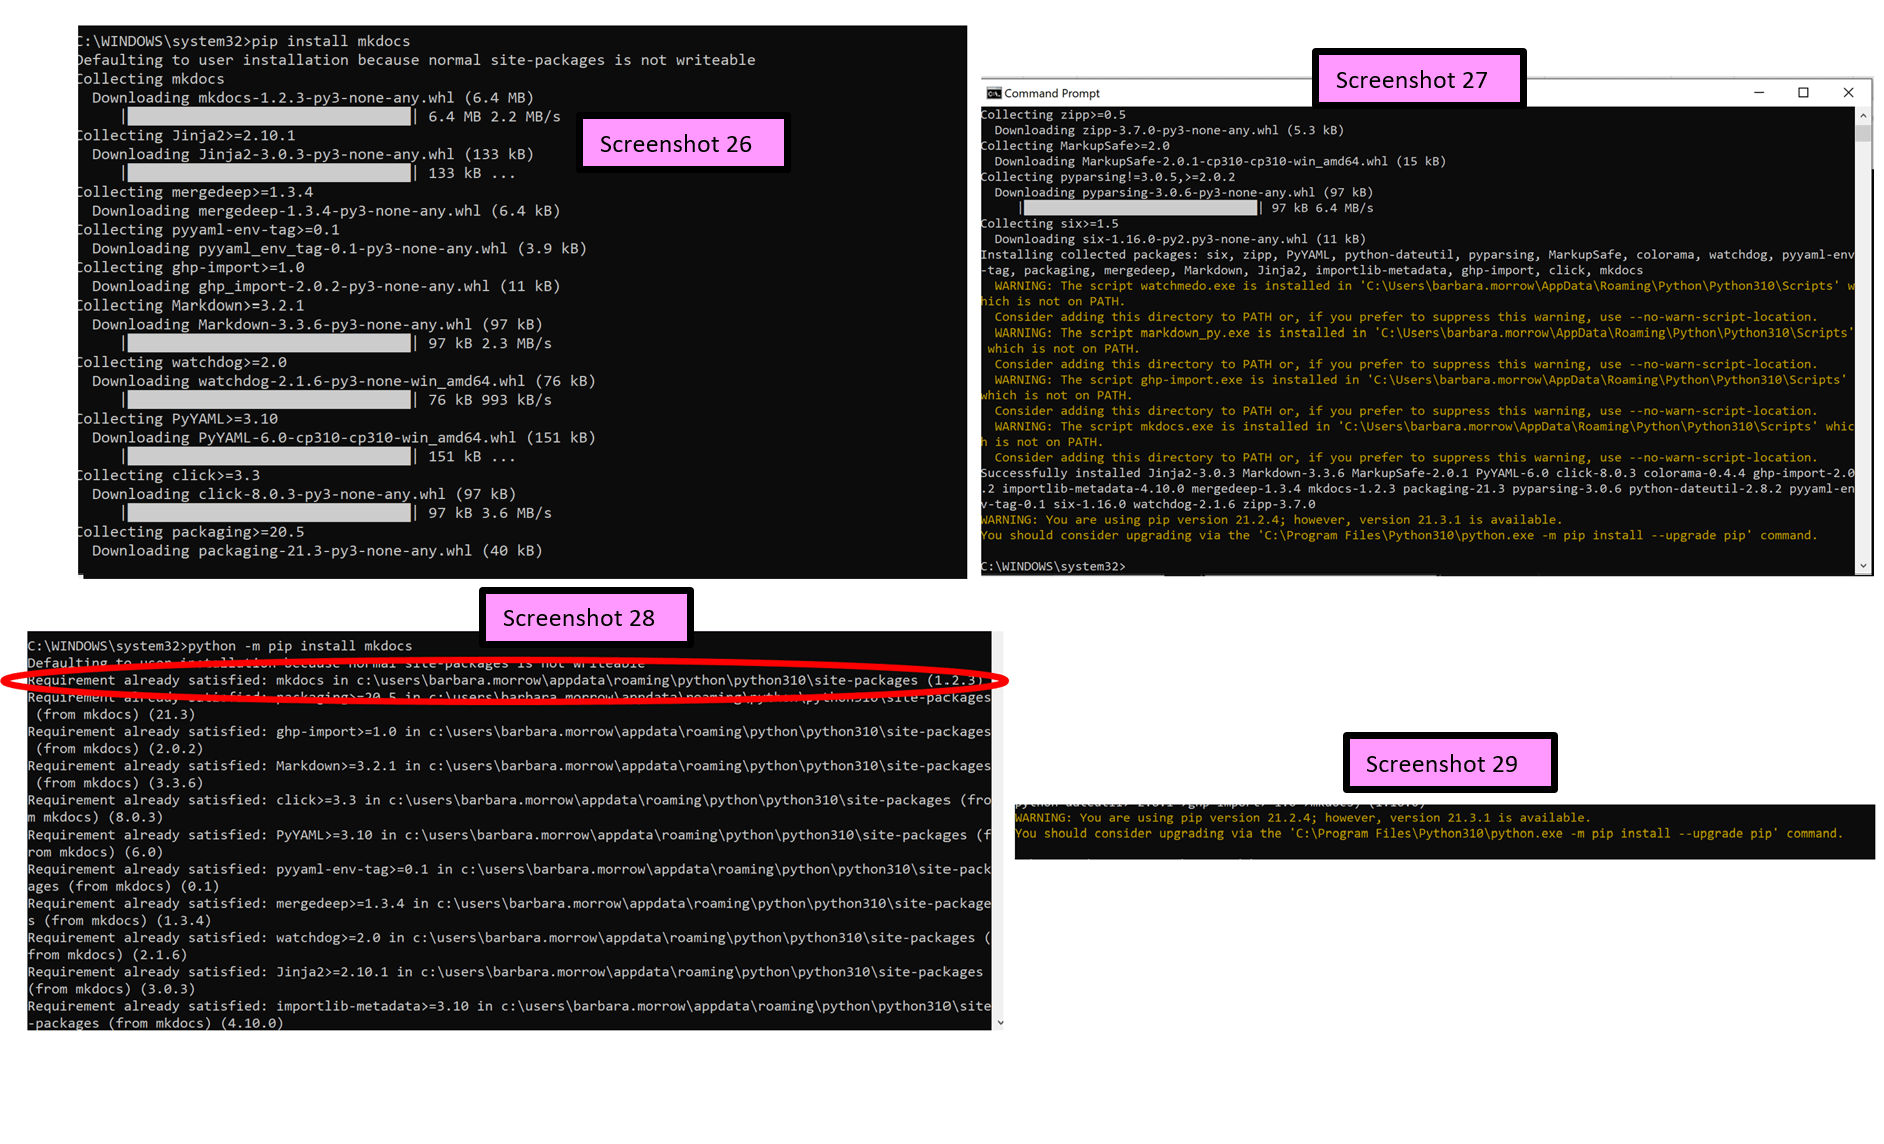
Then I realized I should try typing the command “pip install mkdocs” in the command prompt. Screendsot 26 and 27 (below) show what happened. Once again confused, I started to actually read the script notes (and found the circled portion in Screenshot 28). I went into my “C” folder to search for MkDocs, and I could not find it.
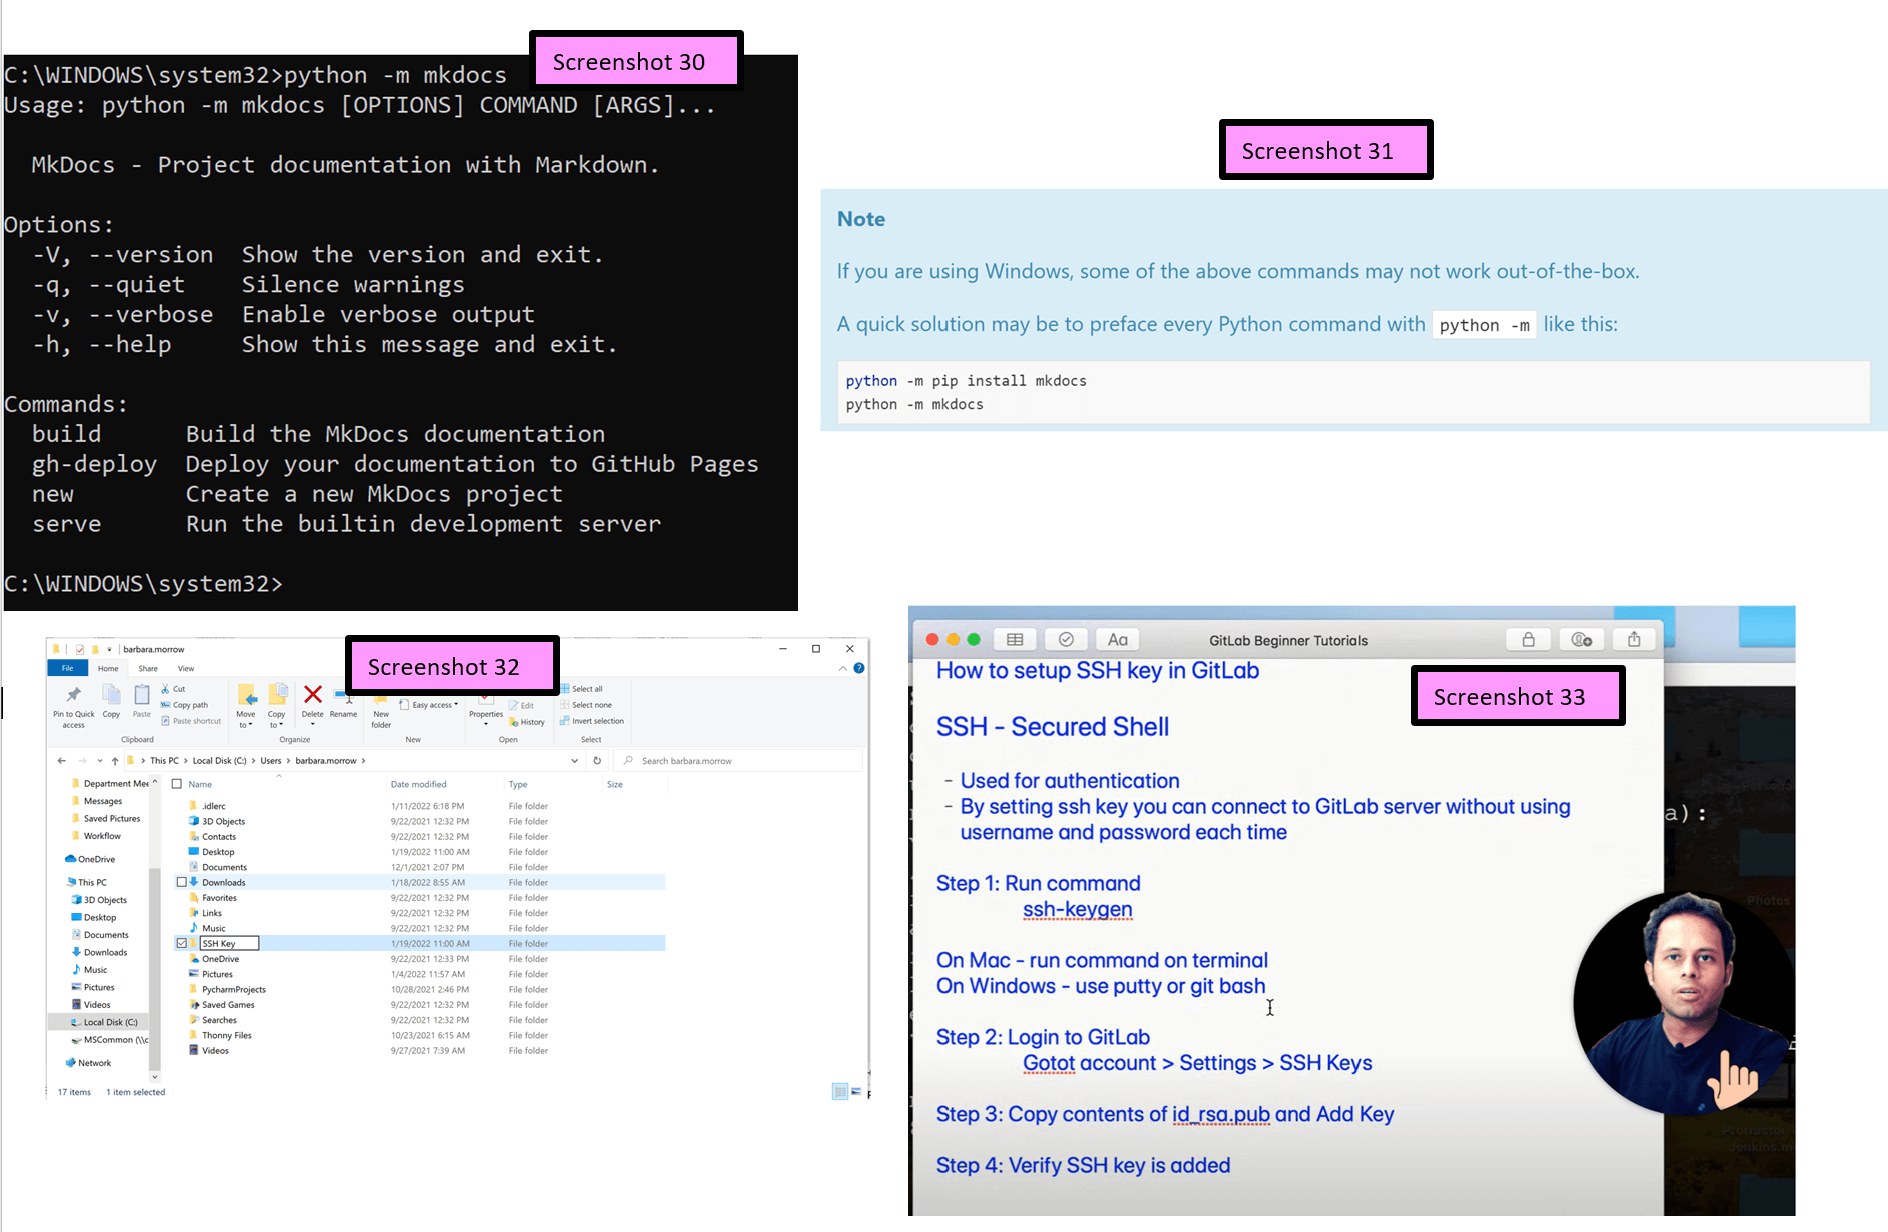
Then, I went into the command prompt and typed “python –m mdocs”, and the following Screenshot 30 (below) resulted.
At this point, I assumed that MkDocs was properly installed (from Screenshot 31 above), and the options and commands were provided by this. I will likely need to refer to this screenshot often. I learned from this that my computer responds to the following suggestion prompt.
Generating an SSH Key
When I began my work in generating my SSH key, it was my first day back at teaching after my Covid illness. (I only note this becuase I was already feeling overwhelmed from having missed six days of teaching with my students.) The week that I returned to school, I found out that numerous other teachers had also contracted Covid, and we were all being asked to cover classes for other colleagues during our “free time”. I wound up having to cover the Honors Biology class for three days, and this actually became a blessing in disguise, as Teddy Warner was a student in that class. (Teddy is a recent Fab Academy graduate and talented engineering student at Charlotte Latin School). He will come into play a little later.
I received the email from the Fab Academy Coordination Team on January 18th, and I began to create the SSH key. While I knew I was going to have to do this, I had no idea how to do it. I ran into one of my colleagues (who is also enrolled in Fab Academy, and I learned that she had already completed all of the technology tasks from this first email. I had been absent from my teaching from January 7th, and I returned to work on January 19th. I was panicked that I was already behind with my teaching, and now I (irrationally) had a moment of severe panic that I was already behind on Fab Academy assignments. This was a critical moment for me. I learned (about myself), that I need to put blinders on in order to complete tasks. While I wanted to seek the help of my colleagues in generating an SSH key, I realized that I have to try this on my own (and even fail) first. After speaking to Tom Dubick about my learning process, I explained this educational logic to him.
I saw that there was a link for how to create an SSH key, but I wanted to know what an SSH key was to begin with. The first thing I did was conduct an Internet search, and I found this tutorial video by Raghav Pal. From this video, I realized I needed to create a folder which would house my SSH key once it was created.
I created a folder as shown in Screenshot 32 (above). After I finished viewing the video, I decided to take a screenshot of the steps that Raghav Pal created (Screenshot 33) in order to be able to refer back to it. My next step was to go back and view the instructions provided in the link from the Fab Academy Coordination team (Screenshot 34); I began following the instructions provided by the Fab Academy Coordination Team (shown in Screenshot 35 below).

Friend and colleague (AP Computer Science Teacher), Adam Durrett (Computer Engineer and Electrical Engineer), came to visit me for lunch, and I asked him which app was best to download for the terminal on a Windows machine. He stated that Putty was the best, so I once again did an Internet search to download Putty at this link. This link did not work, so I went to this site (shown below), and I was able to download puTTY. (Notice, I am now writing it correctly). Screenshot 36 above shows this. Once puTTY was downloaded, I located it and opened it in the search window (Screenstho 37 above). I opened puTTY and followed the pathway of prompts toward the SSH “Key” (as shown in Screenshots 38 and 39 below).
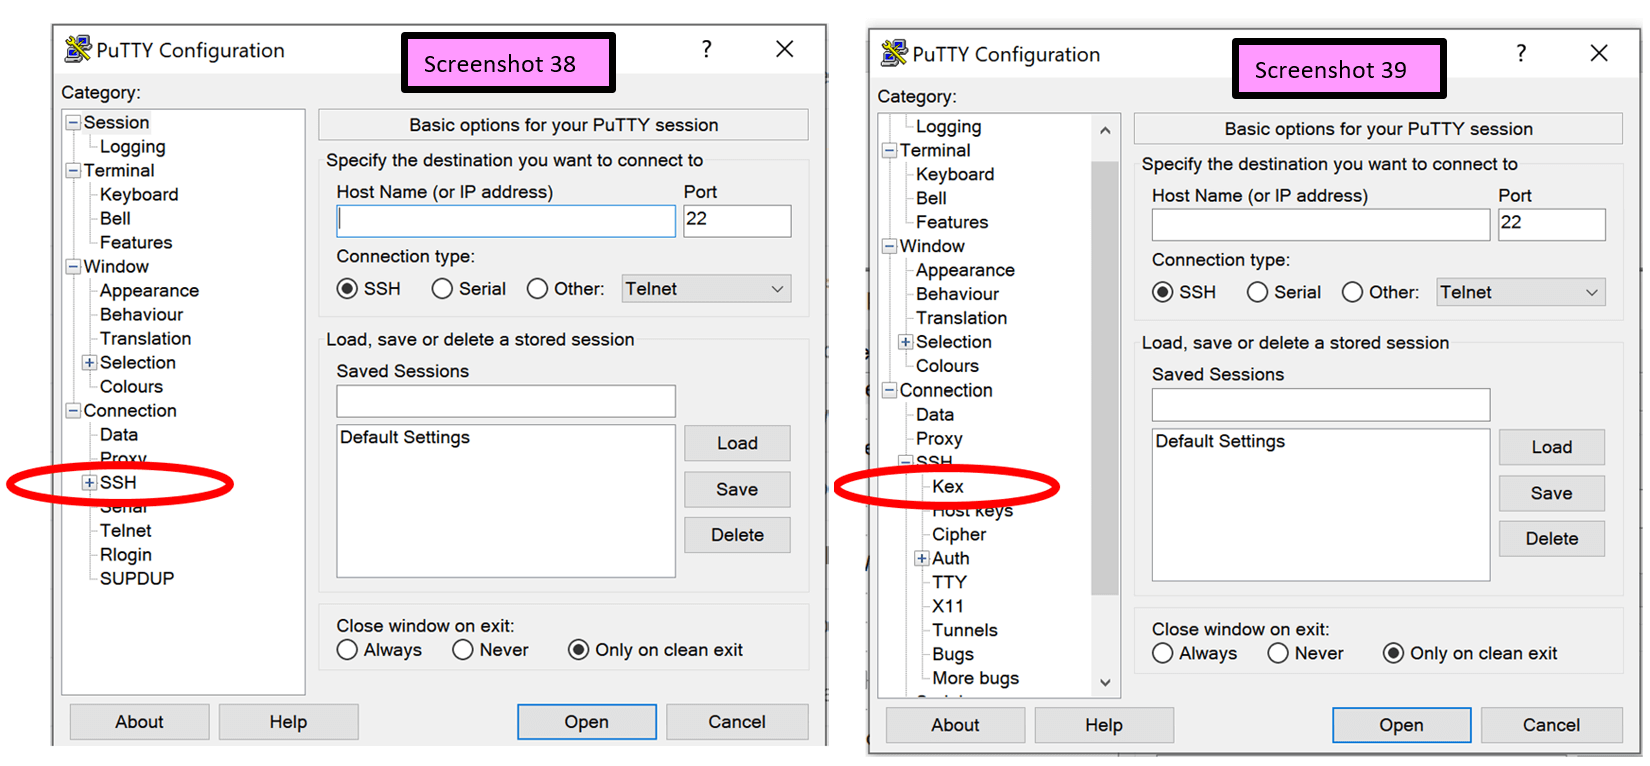
When I clicked “Open” (in Screenshot 39 above), nothing happened. So I decided to go back to my (C:) folder I ended up going to the instructions again on the Fab Academy Coordination Team’s site and typed “ssh-keygen –t” in the command prompt. Screenshot 40 below shows what resulted, and I realized I just needed to go further into the instructions.

Re-reading the script notes, I found I had to add onto the command, “ssh-keygen -t ed25519 -C “
IT WORKED! I went to the C folder and saw what is shown in Screenshot 42 and 43 above .
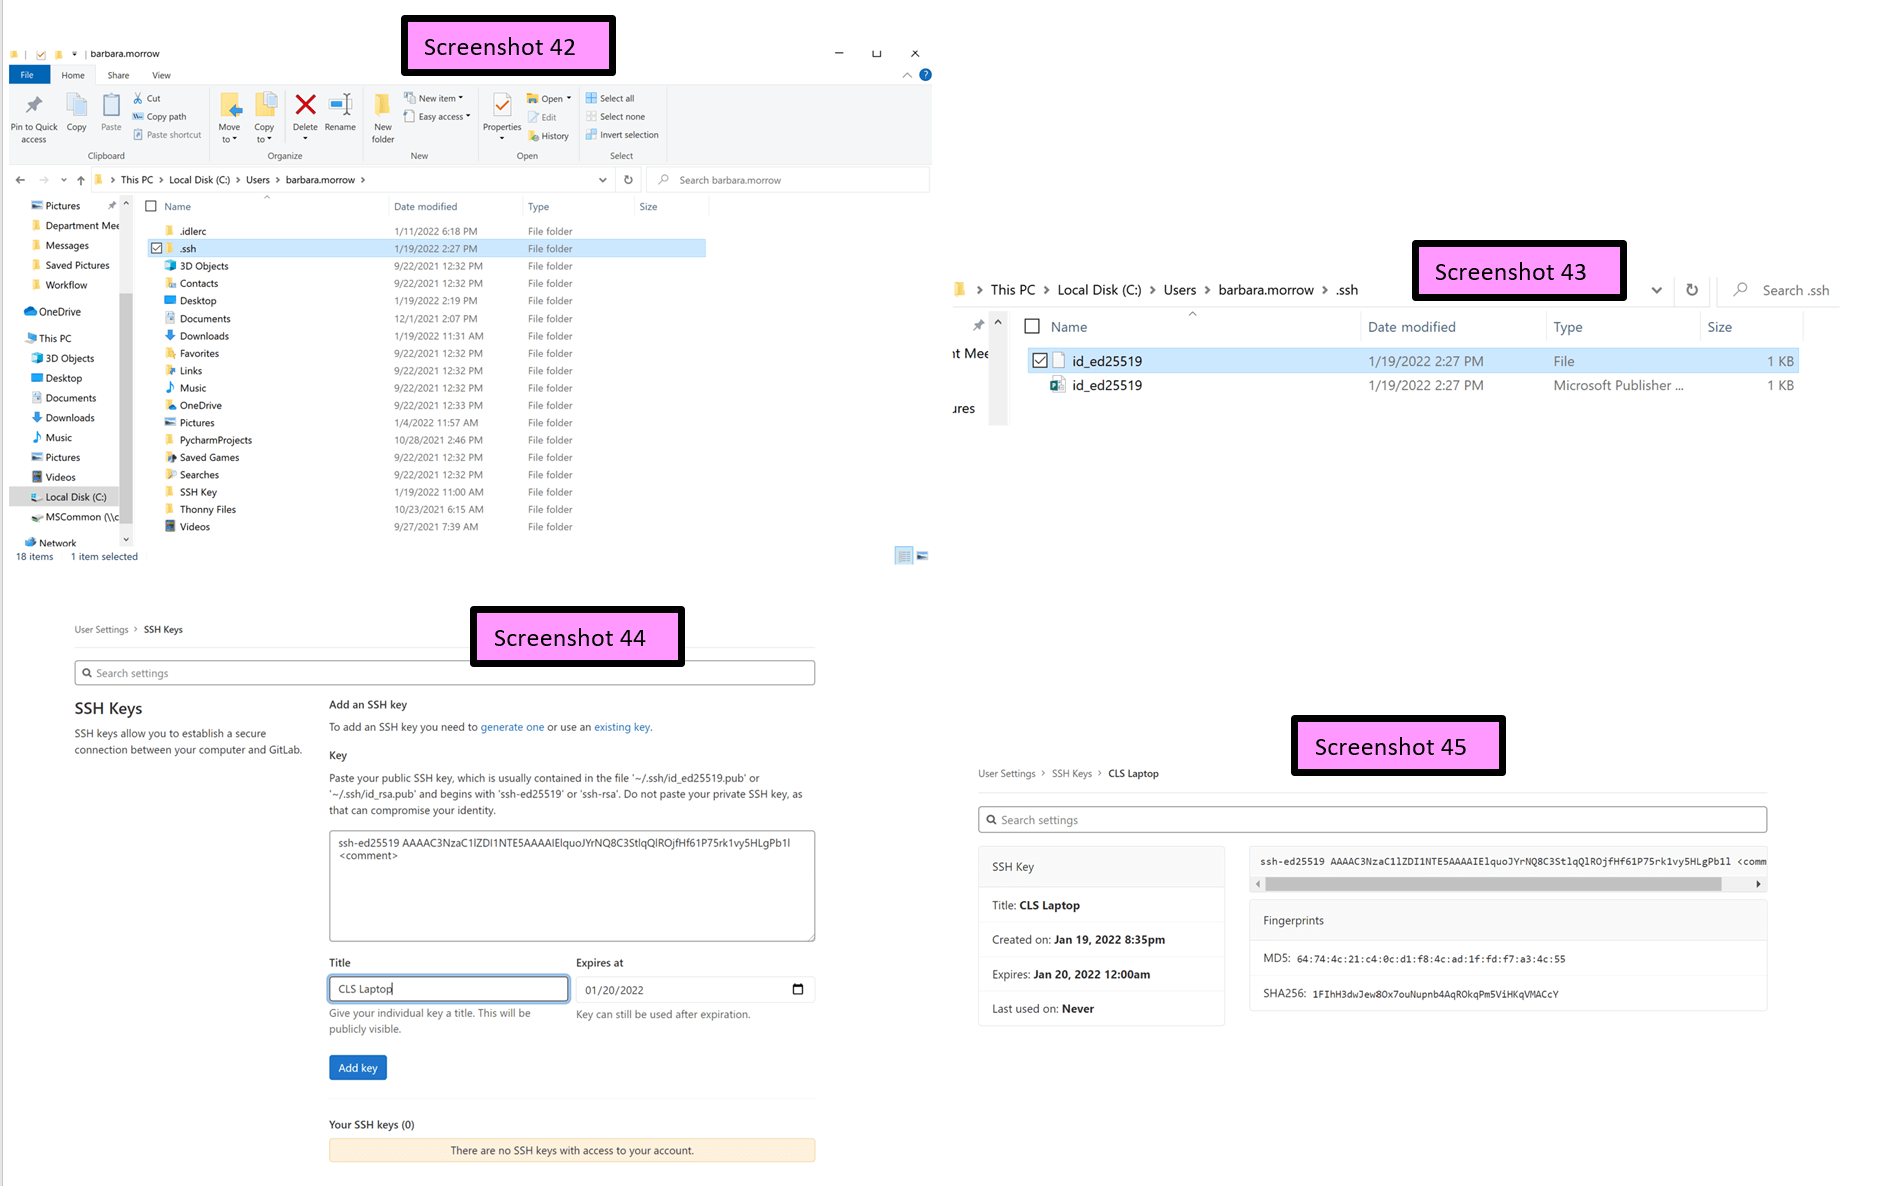
I was so excited to have had success at this point. I opened the first file in Notepad (which I had seen Raghav Pal do in his tutorial video), and Screenshot 44 above shows what resulted:
ssh-ed25519 AAAAC…gPb1l
Copying the Repository and Learning GitLab
It was at this point that Teddy Warner stepped in to help me. While covering the Honors Biology class, I was working on the final steps of setting up the repository. I know how to copy and paste using my Windows machine. (Side note: I have been using a MAC for the past ten+ years). I kept trying to open the public SSH key, and it would not “open”. I asked Teddy what I was doing wrong, and he directed me to copy it by “Right-clicking” my track pad. From there, I was aple to add the SSH key into the preferences in Gitlab.
Finally, I copied the respoitory link to the clipboard, and added it into the Command Prompt. I ran into Dr. David Taylor, and he further assisted me in correctly copying the repository. What made me most proud was that he said “you’re almost there!”. Dr. Taylor shared with me how he used Visual Studio to update his website locally. I downloaded the Visual Studio app onto my computer.
After school that day, I met with Adam Durrett again, and taught me about using the Power Shell app. He also gave me insight as to how to navigate the commands in Power Shell. As we went over all of it, Adam took notes in this document. In this “mini-tutoring” session, Adam made me navigate forward and backwards from one file location to another.
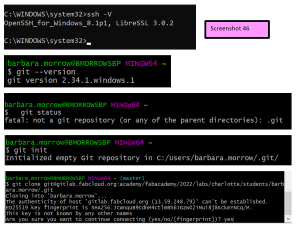
I went onto the docs on the gitlab site and read the information there. One of the prerequisites to use SSH to communicate with GitLab, I needed an SSH version 6.5 or later. To view the version of SSH installed on your system, run ssh -V. (I was double-checking all of the software was indeed up-to-date). I watched this tutorial to learn about Gitlab. The tutorial instructed me to find out what the latest version of git on my computer by typing in “git –version” into a terminal in Git Bash. When I did this, it revealed that I was using git version 2.34.1.windows.1 (shown in Screenshot 46 below).
He then suggested that I create a git repository. First, I checked the status by typing “git status” and got this; so the repository needs to be created.
I typed in “git init”, and the empty repository was created.
I then went to the gitlab.fabcloud site, and found the clone link.
I began using the Visual Studio app along wiht the PowerShell app. I was understanding how to input all of my information and images with relative ease. However, after building my website (which took a couple of days), I ran into a pronlem. I spent a long time (between 3-4 hours) inputting all of my write-ups and images, and when I went to “push” the changes out, I was getting the following error:
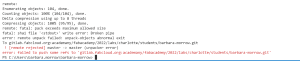
The image above shows the error message in the command terminal in the Visual Studio app. (I took this screenshot from the command terminal in Visual Studio because– in the Power Shell app– the error message was red. In contrast with the blue color, it was more difficult to visually see it/read it). I spent a lot of time trying to fix the error. At first, I thought the error was the result of my images using up too much data. I spent a couple of hours re-formatting the images. I had forty-eight screenshots for “Principles and Practice”, and I took four photos and placed them together onto one page in Microsoft Word. I added pin ID tags to each photo, and then I took a screenshot of each set of four photos.
Thinking that this would make the error message in Power Shell and Visual Studio disappear, I was disappointed to find it did not go away. So I decided to copy the error message in an Internet browser, and I found this site which seemed to have a reset command. The content on this webpage matched part of my error message exactly. So I decided to copy and paste the content and images on my web pages into a word document– to prevent me from losing them. Then I did a “Reset” of the page using the command, “git reset –hard origin/master”.
I completed the code statement in the Power Shell terminal, and that action reset my webpage. However, my images were largely deleted. So I reformatted them again, but this time, I labeled them using numbers (instead of the letter combinations I was using before). After re-creating all of my webpage contents– on all of the pages–again, I used PowerShell to “git add –a”, “git commit -m “info”“, and “git commit”. In all, the webpage work took me nearly an entire day; remediation of the error message took about seven hours. Although it took most of an entire day to get my information uploaded once, error fixed, and information added again, I learned a lot about the “flow” of information that was going on between my local directory and my respository.