15. Interface and Application Programming
Assignment definition
Group assignment
Compare as many tool options as possible.
Individual assignment
Write an application that interfaces a user with an input and/or output device that you made
Group assignment
I started by comparing different options to interface my boards in the group assignment.
Individual assignment
I decided to test 3 different interfaces:
- Web interface : creating a Web interface with the ESP32 and be able to send data over wifi.
- Desktop application talking through pyserial : https://github.com/olikraus/u8g2/wiki
- Menu on an OLED screen with a rotary encoder : I looked a lot for such projects but did not find what I was looking for until Quentin advised me to look at U8Glib now U8g2 and that I found a perfect test example
OLED screen with a rotary encoder
ESP32 Camera webserver
I found a tutorial to control the ESP 32 through a web interface.
My first goal was to use the ESP32 to control a stepper motor through another board communicating in Serial with the ESP32. I redesigned this other board, my main controller, this week because I had forgotten to put the JTAG pins properly.
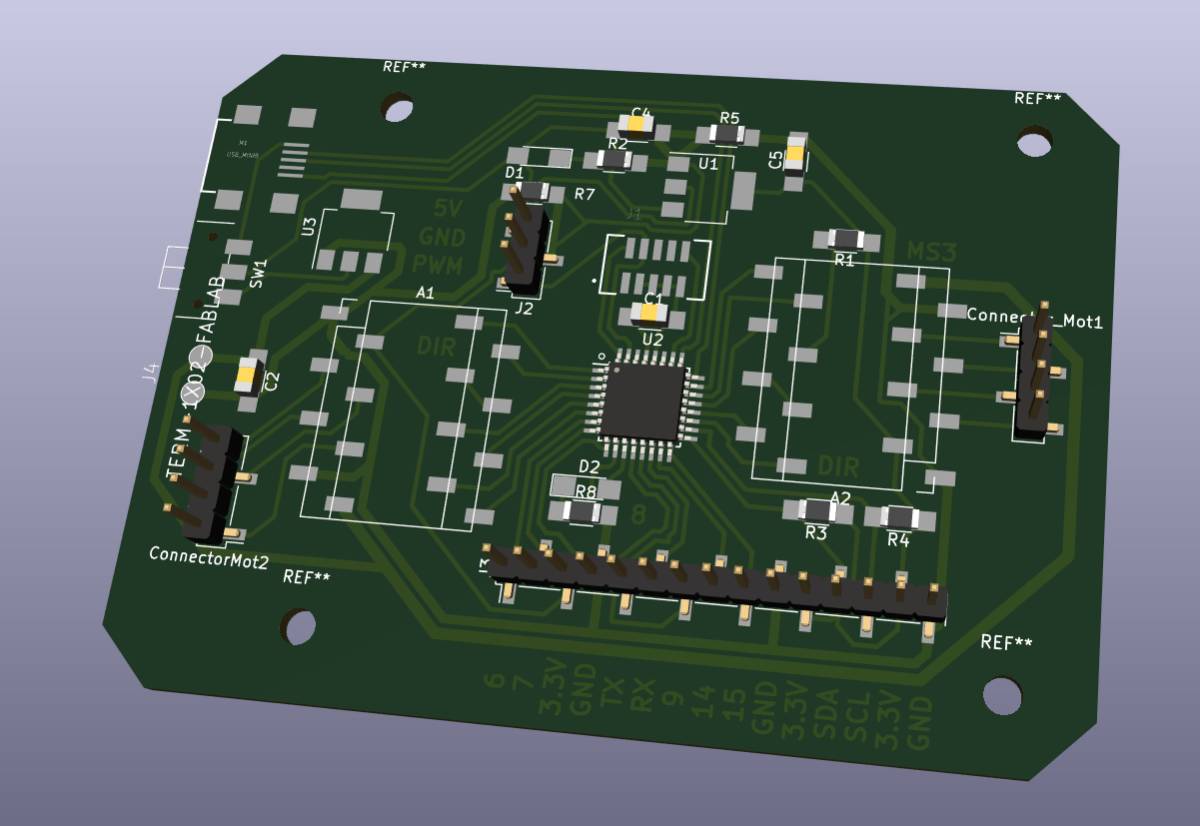
Unfortunately I had issues milling my board, the mill broke and thus I had to find another solution.
Therefore, I looked to control the motor directly with the ESP-32 available pins. I checked the pinout but not in detail enough.
The first tests driving the Motors led to weird movements because the pins were already connected but nothing was damaged as far as I have seen.
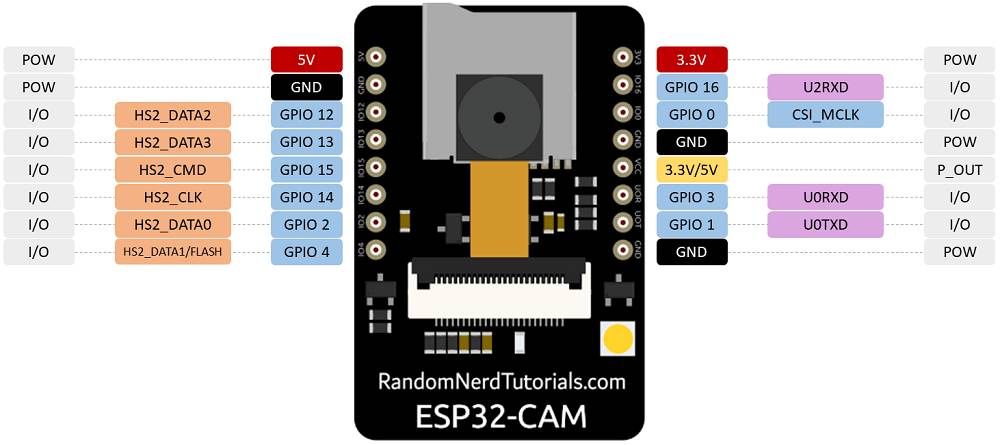
Anyway I could still check that the button was working by lighting up the internal LED, which I did. To do that I looked for the pinout of the ESP-CAM AI Thinker and I found this nice guide !
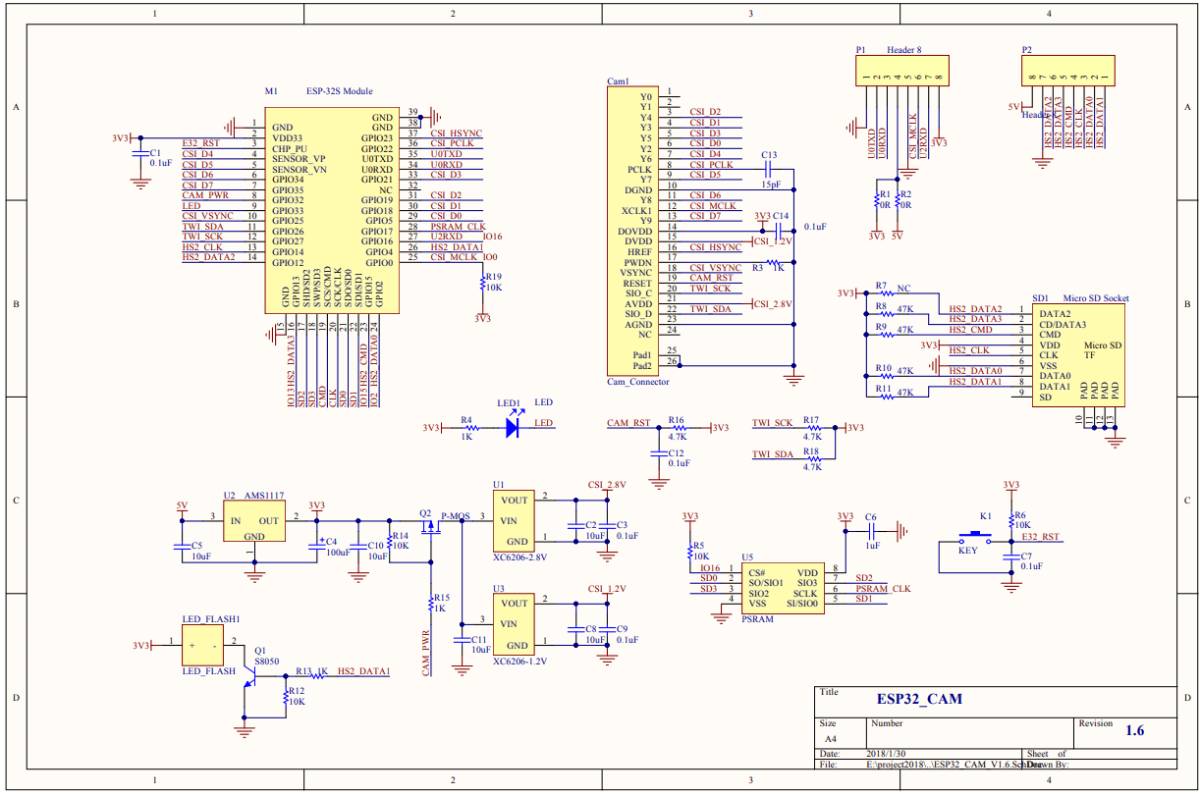
And I checked the wiring schematics.
Unfortunately because I also wanted to use the SD card to store the photo and the camera to take it, there were no more pins available. I could have limited the number of pins for SPI but I did not want to delve in that.
I switched the control of motors on the ESP32 to the control of the internal LED on pin 33 and it works fine !

Serial Monitor talking through pyserial
As a first step I looked at what I could use and got interested by two different strategies:
- Minimal dashboard in Jupyter Notebook
- Desktop application using PySimpleGui
I looked into both options and decided to prototype something in Jupyter Notebook that I could later make into an app in PySimpleGui.
I watched this nice intro video to PySimpleGui and read the docs of Jupyter Notebooks widgets.
Jupyter-Notebooks wigdets
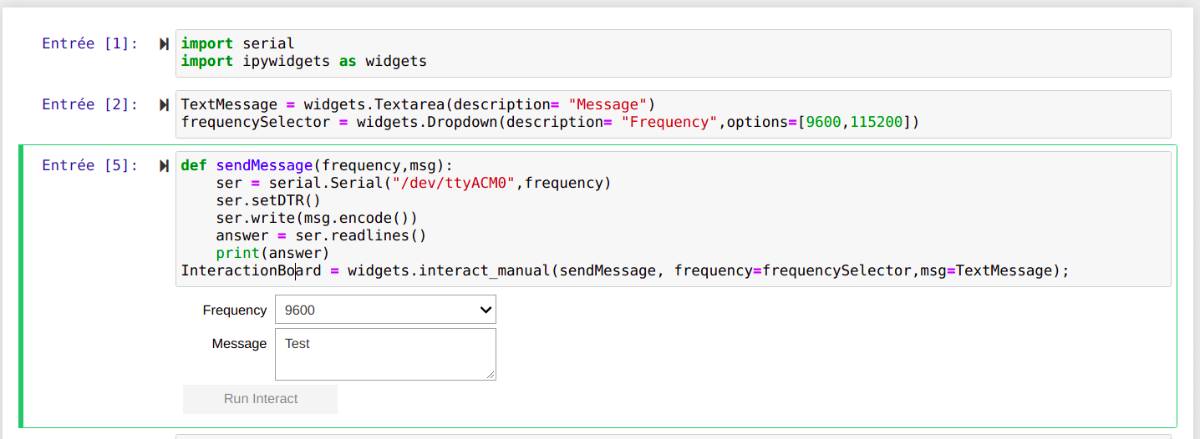
The goal was simple, send Serial data to the microcontroller and print what had been sent on my OLED screen. I made a small serial monitor emulator with Jupyter wigdets (ipywidgets).
# Create the widgets
TextMessage = widgets.Textarea(description= "Message")
frequencySelector = widgets.Dropdown(description= "Frequency",options=[9600,115200])
# Create the function using them
def sendMessage(frequency,msg):
    serialCom = serial.Serial("/dev/ttyACM0",9600)
    serialCom.setDTR()
    serialCom.baudrate = frequency
    serialCom.write(msg.encode())
    answer = serialCom.readline()
    print(answer)
    serialCom.close()
InteractionBoard = widgets.interact_manual(sendMessage, frequency=frequencySelector,msg=TextMessage)
On my first try it worked.
Then I tried to package the code and it did not work anymore.
I guessed that I should open the serial port and close it afterwards but doing multiple tests it failed to work and I kept reseting the arduino through pyserial which was very weird to me.
I looked for a beginning of an explanation on a Stackoverflow page but it did not really solve my problem.
The really weird thing is that it worked sometimes but not everytime.
So I tried to figure it out.
I finally figured out that whatever I was doing, if the serial port was opened for a first time, the Arduino was reset. I looked into the documentation of pySerial and did not find my clear answer as to how it worked but figured that the port is open and that creating a new serial.Serial instance only accesses the port and thus does not create it.
The reliable block of code is to open it and use it directly or to recreate an instance of the serial.Serial accessing the same address.
ser = serial.Serial("/dev/ttyACM0",9600,timeout=5)
ser.setDTR(1)
def sendMessageSerialInit(frequency,msg,serialCom):
    serialCom.baudrate = frequency
    serialCom.write(msg.encode())
    answer = serialCom.readline()
    print(answer)
InteractionBoard = widgets.interact_manual(sendMessageSerialInit, frequency=frequencySelector,msg=TextMessage,serialCom=widgets.fixed(ser))
That worked fine on the Arduino so I wanted to move on to one of my own boards, but I broke the UPDI track of my AVR128DB28, mismanaged the files on my circuitPython board and thus I have to reprogram it which I don’t have the right cable at home as I need a 1.27 JTAG connector.
So I decided to use my setup on small attiny 412 boards I had made but I got stuck with another issue.
I did not receive the sent message back.
I checked the arduino port to verify that I had used the right pins, and realized that I might have swapped them as that has changed in different versions of the port.
I tried with the Serial.swap() but as I expected it did not work because I had used the latest version of the port.
So Quentin told me to try simply to rewrite the data with a simple Serial.write(Serial.read()) because the Serial.readString could be unreliable and that worked.
So I did not manage to read the strings but using Serial.parseInt() I could still control the LED using my Jupyter-Notebook serial monitor.
void loop() {
    if (Serial.available() > 0) {
     serialMessage = Serial.parseInt(); // Return 0 if it is not an int

     // say what you got:
     Serial.print("I received:");
     Serial.println(serialMessage);
     if (serialMessage != 0){
       blink(serialMessage);
       }
    }
 }

 void blink(int x){
   for(int i = 0;i<x;i++){
     digitalWrite(LED,HIGH);
     delay(200);
     digitalWrite(LED,LOW);
     delay(200);
     }
   }
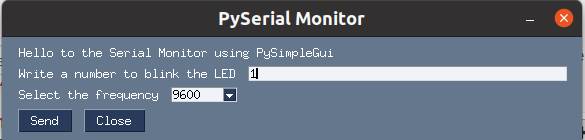
PySimpleGui Serial Monitor
Now that I had a functioning prototype I made it into an independent app using PySimpleGui.
for such a simple application, it was nearly simpler than using Jupyter-Notebook widgets.
First I create a layout for my application.
I add an input text block, dropdown menus and buttons in a matrix.
layout = [
    [sg.Text("Hello to the Serial Monitor using PySimpleGui")],
    [sg.Text("Write a number to blink the LED"),sg.InputText(key="msg")],
    [sg.Text("Select the frequency"),sg.DropDown([9600,115200],key="freq")],
    [sg.Button("Send"),sg.Button("Close")],
]
I create the window using a title and the layout I just created.
I initialize my serial port to be ready to use it and move on to the “brain” of the application.
The beauty of this is that all values are stored in a dictionnary so it is very easy to collect them to use them in my serial data sender.
window = sg.Window("PySerial Monitor",layout)
ser = serial.Serial("/dev/ttyUSB0",9600,timeout=5)
ser.setDTR(1)
while True:
    event, values = window.read()
    if event == "Send":
        sendMessageSerialInit(values["freq"],values["msg"],ser)
        print("Data sent")
    if event == "Close" or event == sg.WIN_CLOSED:
        break
window.close()
To run it I could have used python -m SerialMonitor.py but actually what I did, because I love Jupyter notebooks is !python -m SerialMonitor.py because the ! escapes python and puts you into the terminal !
Files
- ESP-Cam Webserver
- Jupyter Notebook Serial Monitor
- Attiny412 Serial to LED code
- PySimpleGui serial monitor