'The needle is made small by choice, not for lack of steel.'
African Proverbs
Molding and Casting

What is Molding and Casting?
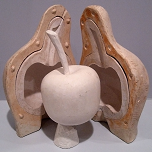
Molding is the act of creating the cavity or form that carries a negative or reverse impression of an original model. Molds can be made of a rigid material, such as plaster or plastic resin or more commonly, a flexible material such as rubber. The material to use should be chosen considering the material of the model, the material to be used to make castings, and whether there are any undercuts.
Casting is the act of pouring liquid material into the cavity of a mold. After a period of time, this liquid will cure via chemical reaction or cooling. The solidified part is also known as a casting, which is ejected or broken out of the mold to complete the process. Casting materials are usually metals or various cold setting materials that cure after mixing two or more components together; examples are epoxy, concrete, plaster and clay.
FAQs (adapted from Smooth-On)
Below are some frequency asked questions that could help you with your tasks:
How much mold rubber do I need?
The easiest way to estimate your rubber requirements (by volume) is to place the model in the containment field and pour water up and over the model. The amount of water used represents the amount of rubber you will need. However, do not forget to include a little more than needed, so as to accommodate a good job.
Some tips for sealing a Model Prior to Applying Silicone
Use an acrylic spray such as Krylon Crystal Clear®.
Use petroleum jelly thinned with mineral spirits (be careful not to leave brush strokes – rubber will pick them up and they will show on the mold surface.
Use a wax such as Sonite Wax™ (from Smooth-On) or Butcher's Wax (Home Depot). Again, be careful not to leave brush strokes on the model.
Use SuperSeal™ (from Smooth-On). Advantage: It is a soap blend that doesn't interfere with surface detail and can be completely removed from the model surface with warm water after use.
Ease Release® 200 is also effective for releasing silicone rubber from various surfaces.
Don't wipe model down with alcohol prior to applying silicone rubber.
Why didn't my mold rubber cure?
There are many factors that can contribute to mold rubber not curing.
Inadequate Mixing: The most common reason for mold rubber not curing is inadequate mixing of Parts A & B. People mixing rubber for the first time tend to under-mix the material before applying. It is especially easy to under-mix thick materials like silicone or brush-on rubber. Mixing large volumes of material also poses the risk of inadequate mixing.
Cold Material or Work Area: Our mold rubbers are room-temperature cure (or RTV), meaning that 73°F (23°C) is sufficient heat for the curing process. Often, when mold rubber does not cure, it is because the core temperature of the liquid Parts A & B is too low, the work area is too cold, or the model itself is too cold.
Cure Inhibition: Cure inhibition occurs when a surface contaminate prevents a material from curing as expected, and is typically diagnosed by having a rubber mold that cured correctly on the top or outside layer, but is gummy or uncured against the model surface.
How can I avoid bubbles in my casting?
Common Sources of Moisture that Might React with casts are:
Humidity – Casts will react with moisture in the air, especially if the plastic has a long pot life / working time. Relative humidity for storing and using urethane plastics is 50% or less.
Adding Fillers To Urethane Resins – many people will mix fillers (play sand, calcium carbonate, URE-FIL™ fillers, micro-balloons, metal powders, etc.) with urethane resins to achieve different effects, lower the cost of their castings, etc. Many fillers absorb moisture and, when mixed with the moisture sensitive urethane, cause the resin to bubble or even foam. Remedy: spread your filler out on a cookie sheet to a depth of 3/8" (1 cm) and bake in an industrial oven at 150°F/60°C for at least four hours. Let cool before using. This will allow moisture to evaporate.
Mixing sticks and mixing containers, depending on what they are made of, can introduce moisture. Stirring sticks made of wood can absorb moisture and will transfer that moisture into polyurethane rubber or plastic. Paper buckets will also absorb moisture. Remedy: A humidity-controlled environment (air-conditioned) will help minimize moisture absorption by these elements. Better yet, use only plastic or metal mixing tools and plastic or metal buckets. These do not absorb moisture that could be introduced to your mix.
Repeated Opening and Closing of Parts A and B – container can introduce moisture from the air to the unused portions, especially on humid days. Remedy: After dispensing place the lids back on the containers as soon as possible and store in a dry cool place. Also, try using Smooth-On's XTEND-IT™, a dry gas blanket designed to extend the shelf life of moisture sensitive polyurethane products by displacing the air in the container.
Layer Casting – casting in thin sections using a slow-setting liquid plastic (like Smooth-Cast™ 310) gives the plastic time to absorb ambient moisture. Remedy: Cast slow setting resins in a temperature and humidity controlled environment. Or, try using a faster setting casting compound (like Smooth-Cast 300 or 305). This way the material will cure before it has a chance to react with the moisture.
Over-applying release agent will generate what appear to be champagne bubbles or pinholes in the cured plastic. Always use the "spray-brush-spray" application method to prevent over-application of release agent for best results.
You can access the assignment HERE.
You can follow the progress of the Final project HERE.

