'A fine examination of black cotton would reveal traces of its white origin.'
African Proverbs
Interface and Application Programming
Like the last two assignments, this assignment will also be done as a building block to my Final Project. We were tasked to conduct two assignments: Group assignment, and an individual assignment. These are listed in this page.
Group Assignment
The group assignment for this phase is to 'compare as many tool options as possible'.
You can view the Group Assignment on this Link.
Individual Assignment
This week's individual assignment write an application that interfaces a user with an input and/or output device that you made.
Group Assignment
The comparison of some Interface programming tools are tabulated below:
| Software | website | Description |
|---|---|---|
| Processing | https://processing.org/ | Processing is an open-source graphical library and integrated development environment (IDE) built for the electronic arts, new media art, and visual design communities with the purpose of teaching non-programmers the fundamentals of computer programming in a visual context. Processing uses the Java language, with additional simplifications such as additional classes and aliased mathematical functions and operations. It also provides a graphical user interface for simplifying the compilation and execution stage. |
| Python | https://www.python.org/ | Python is a general-purpose, versatile and modern programming language. Python is a programming language that lets you work more quickly and integrate your systems more effectively. |
| Java | https://www.java.com/en/ | Java is a general-purpose programming language that is class-based, object-oriented, and designed to have as few implementation dependencies as possible. It is intended to let application developers write once, run anywhere (WORA), meaning that compiled Java code can run on all platforms that support Java without the need for recompilation. |
| Javascript | https://developer.mozilla.org/en-US/docs/Web/JavaScript | JavaScript (JS) is a lightweight, interpreted, or just-in-time compiled programming language with first-class functions (that is, when functions in that language are treated like any other variable). JavaScript is a prototype-based, multi-paradigm, single-threaded, dynamic language, supporting object-oriented, imperative, and declarative (e.g. functional programming) styles. |
| P5.js | https://p5js.org/ | p5.js is a JavaScript library for creative coding, with a focus on making coding accessible and inclusive for artists, designers, educators, beginners. |
| C++ | https://www.cplusplus.com/ | C++ is a object-oriented and general-purpose programming language, it was created as an extension of the C programming language. |
| App Inventor | Commercial | I could not find enough information to decipher whether it is free and how free. But in case you have time, you could visit their website by Clicking HERE. |
| APL | https://tryapl.org/ | APL is an array-oriented programming language. It lets you develop shorter programs that enable you to think more about the problem you're trying to solve rather than how to express it to a computer. |
| Scratch | https://scratch.mit.edu/ | This is a free block-based visual programming language and online community that allows you to create unique stories, games, and animations in an easily and quickly. |
Individual Assignment
Very soon the Hunter will become the hunted! While executing this week's assignment, the favourite advise of Prof Neil 'Document as you Go' was always live in my head. However, I will be lying by admitting that I adhered to it this time around. Why? Because a big part of me Melts and runs away at the sight of any programming (coding) work. However, I managed to withstand the tempest and to some extent got to a little Island called 'Confidence'.
My agenda for this week is to create a user interface for my final project. So, what I planned was to create an interface that does the following:
In case you are wondering why 38oC or 100.4oF, it is because that is the temperature that shows that the person has a Fever.
In addition, the interface above is the basic interface. I intend to create some sort of human caricature that responds to the conditions stated in the bullets above. Probably with a smiley icon that perfectly depicts the measurement. For example, a happy smiley, to depict when the reading is below the fever temperature, and a cold smiley to depict those above the threshold. Oh well, as you know, intentions are a lightyear away from reality. However, this Daniel is not about to give up. This is a perfect time to say Wakanda Forever!
Unwanted but Expected Errors
In the process of doing this, I encountered myriad of error messages. I must confess that these errors occurred due to my inadequate knowledge of Python. I will replicate all the errors and how I solved them here.
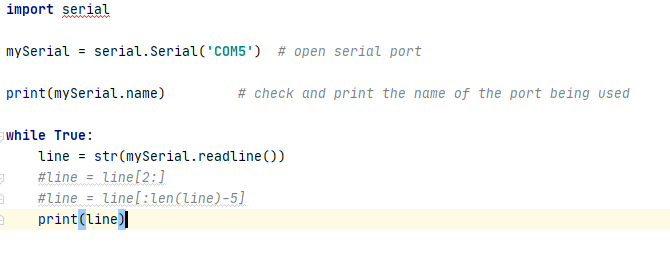
The first error I got came while trying to establish a communication between Arduino and Python.
NOTEThe Arduino Code I ran is the code I used till date for the Laser Test. However, Since the Python code I am using only display one serial output. I commented out some of the serial output in the Arduino code so as to accommodate this test. The Picture below shows the code used to establish connection between Arduino and Python.
Upon running the code above, I received the error message depicted in the picture below.

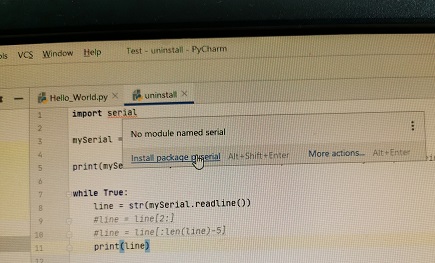
How I resolved this issue was to conduct a search online for a suitable solution. What I learnt was that I needed to install the serial package file. Which was automatically recommended by the IDE. See picture below.
After installing the package, everything should start running fine. However, there is another alternative way of installing the packaged is to go to the terminal tab of the IDE 'PyCharm'
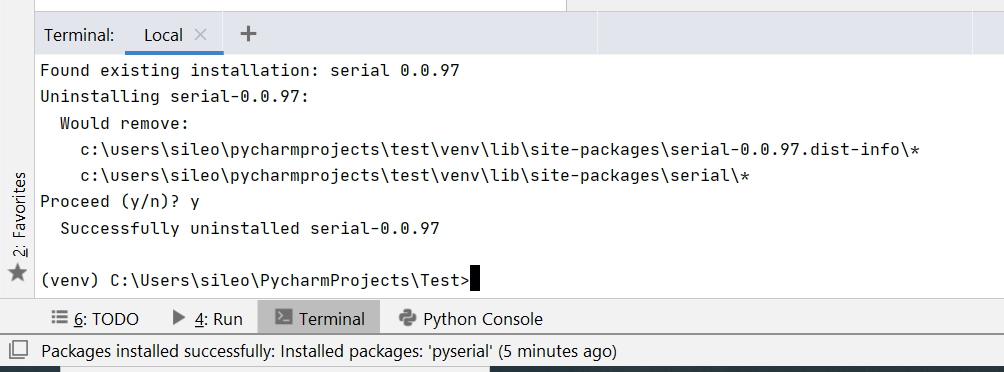
So once this tab has been selected, you should see something similar to what is depicted in the picture. All you need to do is to run the code below:
pip3 install pyserial
This will automatically install the needed package. In addition, You could also uninstall this package or any other packages using the terminal tab. For instance if you want to uninstall the serial package, just run the code below:
pip3 uninstall serial
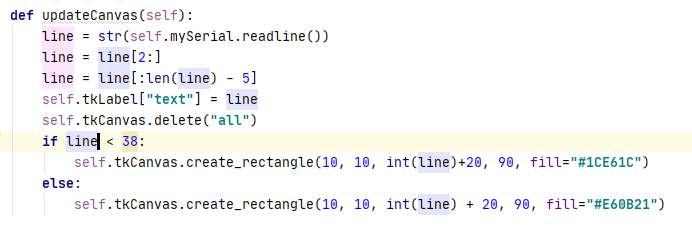
Moving on to the code itself, I encountered some issues using the 'if statement' in the updateCanvas(self) function. Like I mentioned, most of these errors were due to my insufficient knowledge of the programming language. Below are the pictures of the series of errors and how I managed to resolve them. This actually took me 4 hours to resolve. So I am proud of myself!
The error message got is below
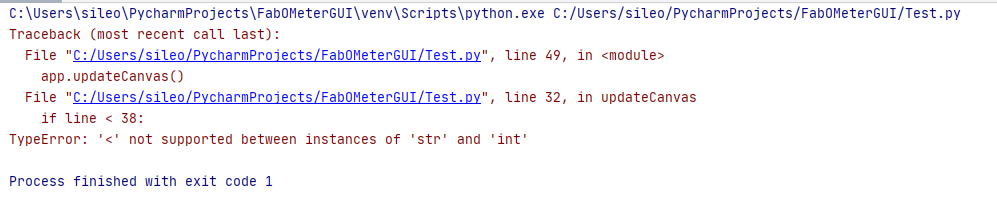
From this I learnt that, once again I was trying to do the impossible by trying to enforce an unwanted marriage between string type and integer type. This would have been similar to making a Lion marry a Zebra. So what I did was to change the if statement to the one below:
if int(line) < 38:
To be honest, this was based on guess work and also a little understanding of the error message. Just as the professionals would have expected, this did not work. You can see the error message below:
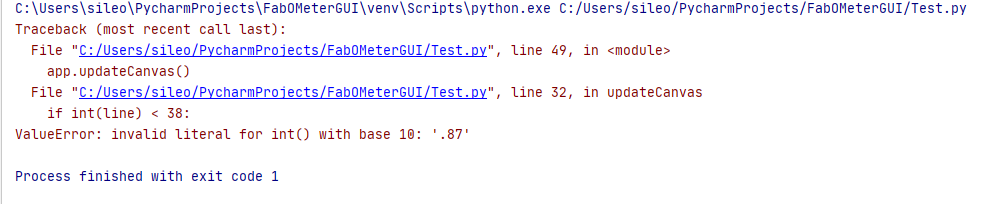
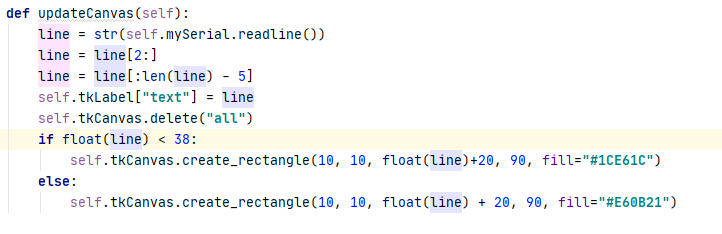
However, this produced an 'Aha!' moment! Where I was able to understand how semi-silly I have been, because the temperature readings are real numbers, not integers. So, I simply changed the int to float,
if float(line) < 38:
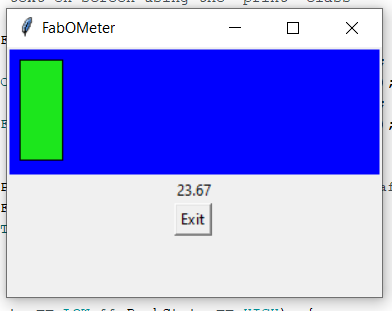
Tadaaaaa! The code is now working perfectly! However, this made me regret not roughing it out with my software engineering degree. Well, I hope to make amends for my chicken (Poulet) past through Fab Academy.
the full Python code used for this assignment is appended below:
     import tkinter as tk
     import serial


     class Application(tk.Frame):


         def __init__(self, master=None):
             super().__init__(master)
             self.pack()
             self.mySerial = serial.Serial('COM3')  # open serial port
             self.create_widgets()


         def create_widgets(self):


             self.tkCanvas = tk.Canvas(self, bg="blue", height=100, width=300)
             self.tkCanvas.pack()


             self.tkFrame = tk.Frame(self)
             self.tkFrame.pack()


             self.tkLabel = tk.Label(self.tkFrame)
             self.tkLabel.pack()


          self.tkButton1 = tk.Button(self.tkFrame, text="Exit", command=self.quit)
          self.tkButton1.pack()


          def updateCanvas(self):
          line = str(self.mySerial.readline())
          line = line[2:]
          line = line[:len(line) - 5]
          self.tkLabel["text"] = line
          self.tkCanvas.delete("all")
          if float(line) < 38:
              self.tkCanvas.create_rectangle(10, 10, float(line)+20, 90, fill="#1CE61C")
          else:
              self.tkCanvas.create_rectangle(10, 10, float(line) + 20, 90, fill="#E60B21")


          def quit(self):
          self.mySerial.close()
          self.master.destroy()


          root = tk.Tk()
          app = Application(master=root)
          app.master.title("FabOMeter")
          app.master.geometry("300x200")


          while True:
          app.updateCanvas()
          app.update_idletasks()
          app.update()
The YouTube video of the progress is shown below.
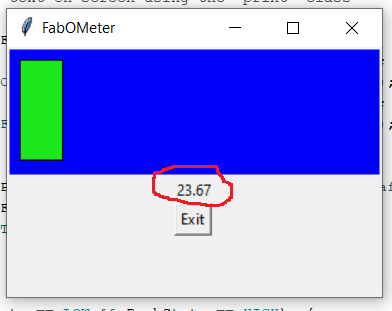
To explain what the modified Arduino code does, until the trigger is pushed, it displays the room (Ambient) temperature of the surrounding. This is the encircled value shown on the picture below.
// Library for Time of Flight
        #include "Adafruit_VL53L0X.h"
        #include

        // Library for Temperature sensor
        #include

        // Library for TFT LCD Screen
        //#include
        #include
        #include
        #include

        int PushButton = 3;
        int LaserPin = 4;
        int Trigger = 5;

        int PushState = 0;
        int TriggerState = 0;

        TFT_ST7735 tft = TFT_ST7735();  // Invoke library, pins defined in User_Setup.h

        Adafruit_MLX90614 mlx = Adafruit_MLX90614();
        Adafruit_VL53L0X lox = Adafruit_VL53L0X();

        void setup() {

        // This is used to setup the LCD
        tft.init();
        tft.setRotation(4); //You can rotate by changing from number 1 to 4

        // put your setup code here, to run once:
        Serial.begin(9600);
        Serial.println("Adafruit MLX90614 test");

        pinMode(PushButton, INPUT);
        pinMode(Trigger, INPUT);
        pinMode(LaserPin, OUTPUT);

        mlx.begin(); //Starts the Temperature sensor

        // wait until serial port opens for native USB devices
        if (!lox.begin()) {
        Serial.println(F("Failed to boot VL53L0X"));
        while (1);
        }
        delay(1);

        // power
        Serial.println(F("VL53L0X API Simple Ranging example\n\n"));

        }

        void loop() {
        // put your main code here, to run repeatedly:

        // Fill screen with black background colour
        tft.fillScreen(TFT_BLACK);

        // Set "cursor" at top left corner of display (0,0) and select font 2
        tft.setCursor(0, 0, 2);

        TriggerState = digitalRead(Trigger);
        PushState = digitalRead(PushButton);

        //Serial.println(TriggerState);
        Serial.println(PushState);

        VL53L0X_RangingMeasurementData_t measure;
        Serial.print("Reading a measurement... ");
        lox.rangingTest(&measure, false); // pass in 'true' to get debug data printout!

        if (measure.RangeStatus != 4) {  // phase failures have incorrect data
        Serial.print("Distance (mm): "); Serial.println(measure.RangeMilliMeter);
        tft.print("Distance (mm): "); tft.println(measure.RangeMilliMeter);
        }

        else {
        Serial.println(" out of range ");
        tft.println(" out of range ");
        }
        delay(100);

        if (TriggerState == HIGH && PushState == HIGH) {

        digitalWrite(LaserPin, HIGH);
        Serial.println("Initialize sensor!");
        Serial.print("Room Temperature = "); Serial.print(mlx.readAmbientTempC());
        Serial.print("*C\tObject = "); Serial.print(mlx.readObjectTempC()); Serial.println("*C");
        Serial.print("Room Temperature = "); Serial.print(mlx.readAmbientTempF());
        Serial.print("*F\tObject = "); Serial.print(mlx.readObjectTempF()); Serial.println("*F");

        // Set the font colour to be white with a black background, set text size multiplier to 1
        tft.setTextColor(TFT_WHITE, TFT_BLACK);  tft.setTextSize(1);

        //This displays the welcome message in the colour of FabLab Red, Green, Blue
        tft.setTextColor(TFT_BLUE);    tft.setTextFont(2);
        tft.print("FAB");
        tft.setTextColor(TFT_GREEN);    tft.setTextFont(2);
        tft.print("O");
        tft.setTextColor(TFT_RED);    tft.setTextFont(2);
        tft.println("METER");

        // We can now plot text on screen using the "print" class
        tft.println("Sensor Active!");
        tft.setTextColor(TFT_RED);    tft.setTextFont(2);
        tft.print("Room(C) = "); tft.println(mlx.readAmbientTempC());  // Print room temperature in Celsius
        tft.print("Object(C) = "); tft.println(mlx.readObjectTempC()); // Print temperature of the object in Celsius
        tft.print("Room(F) = "); tft.println(mlx.readAmbientTempF());  // Print room temperature in Fahrenheit
        tft.print("Object(F) = "); tft.println(mlx.readObjectTempF()); // Print temperature of the object in Fahrenheit
        delay(5000);
        digitalWrite(LaserPin, LOW); //This turns of the laser diode after 5 seconds
        tft.setTextColor(TFT_RED);    tft.setTextFont(4);
        tft.println("Push Trigger to start");

        }

        if (TriggerState == HIGH && PushState == LOW) {

        digitalWrite(LaserPin, LOW);
        Serial.println("Diode is OFF!");
        Serial.print("Room Temperature = "); Serial.print(mlx.readAmbientTempC());
        Serial.print("*C\tObject = "); Serial.print(mlx.readObjectTempC()); Serial.println("*C");
        Serial.print("Room Temperature = "); Serial.print(mlx.readAmbientTempF());
        Serial.print("*F\tObject = "); Serial.print(mlx.readObjectTempF()); Serial.println("*F");

        // Set the font colour to be white with a black background, set text size multiplier to 1
        tft.setTextColor(TFT_WHITE, TFT_BLACK);  tft.setTextSize(1);

        //This displays the welcome message in the colour of FabLab Red, Green, Blue
        tft.setTextColor(TFT_BLUE);    tft.setTextFont(2);
        tft.print("FAB");
        tft.setTextColor(TFT_GREEN);    tft.setTextFont(2);
        tft.print("O");
        tft.setTextColor(TFT_RED);    tft.setTextFont(2);
        tft.println("METER");

        // We can now plot text on screen using the "print" class
        tft.println("Diode Inactive!");
        tft.setTextColor(TFT_RED);    tft.setTextFont(2);
        tft.print("Room(C) = "); tft.println(mlx.readAmbientTempC());  // Print room temperature in Celsius
        tft.print("Object(C) = "); tft.println(mlx.readObjectTempC()); // Print temperature of the object in Celsius
        tft.print("Room(F) = "); tft.println(mlx.readAmbientTempF());  // Print room temperature in Fahrenheit
        tft.print("Object(F) = "); tft.println(mlx.readObjectTempF()); // Print temperature of the object in Fahrenheit

        delay(5000);
        digitalWrite(LaserPin, LOW); //This turns of the laser diode after 5 seconds
        tft.setTextColor(TFT_RED);    tft.setTextFont(4);
        tft.println("Push Trigger to start");

        }

        else if (TriggerState == LOW && PushState == HIGH)  {

        digitalWrite(LaserPin, HIGH);
        Serial.println("Laser diode is working!");
        tft.setTextColor(TFT_RED);    tft.setTextFont(4);
        tft.println("Push Trigger  to start");
        delay(300);

        }

        else {

        digitalWrite(LaserPin, LOW);
        Serial.println("Push button to start!");
        tft.setTextColor(TFT_RED);    tft.setTextFont(4);
        tft.println("Push Trigger  to start");
        delay(300);

        }
        }
Now the next test is to create the caricature and smiley icon for the real test, as well as figure out how to make a connection between Python and the TFT LCD display I will use for my final project. This is gonna be FUN!
Not to forget that I still have to find a suitable solution to the memory space error I had on ATMEGA328P. Which means that The interface for the Time of Flight Sensor will still be added to the project.
You can follow the progress of the Final project HERE.