Week 13. Moulding and Casting
Group Assignment
This week, during our group assignment at Fab Lab Dilijan, our instructor Mkhitar Evoyan introduced and thoroughly explained the processes of molding and casting, covering their main principles, applications, and the materials used.
He demonstrated how molds are created using different methods, including milling and 3D printing, and explained the specifics of casting with various materials such as metal, plaster, plastic, and silicone.

After the theoretical part, we moved on to the practical work, where we were assisted by Areg Khalatyan.
During the group assignment, Hrach was responsible for designing the main 3D model. The model was intended for both CNC machining and 3D printing. He created the model, generated the G-code required for 3D printing, and carried out the printing process.
The G-code for CNC machining was generated through the collaboration of Hrach and Mkhitar Evoyan. Afterward, the files were handed over to Gevorg for CNC machining and further testing. More details about Hrach’s work can be found on his page.
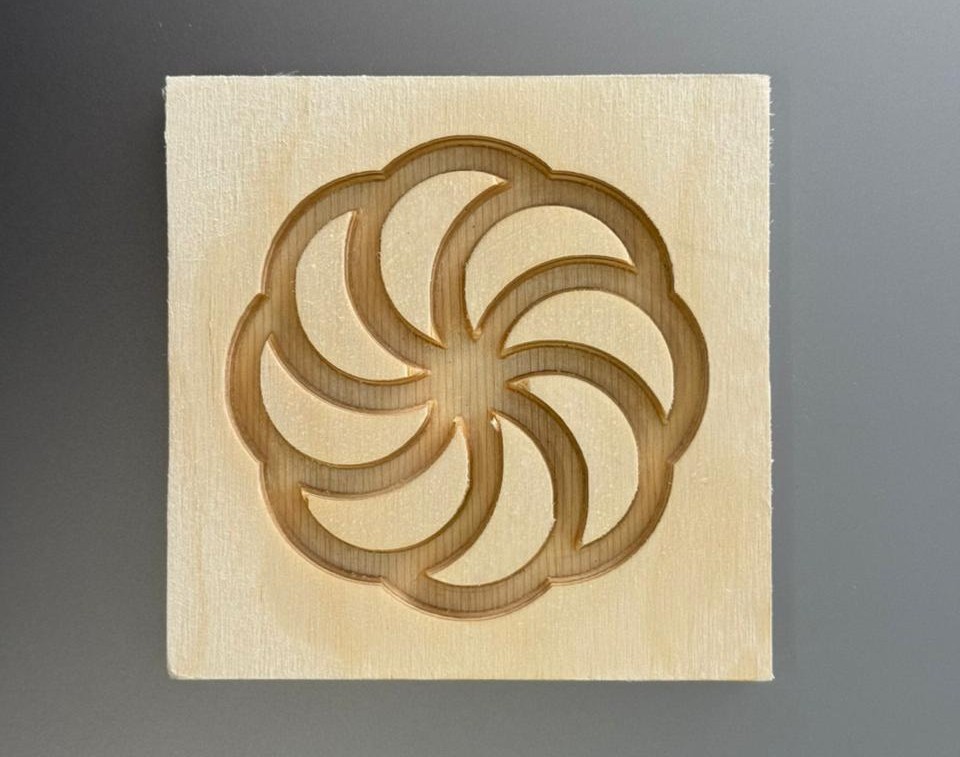
Using a CNC milling machine, Gevorg machined the plywood material and produced the required pattern.
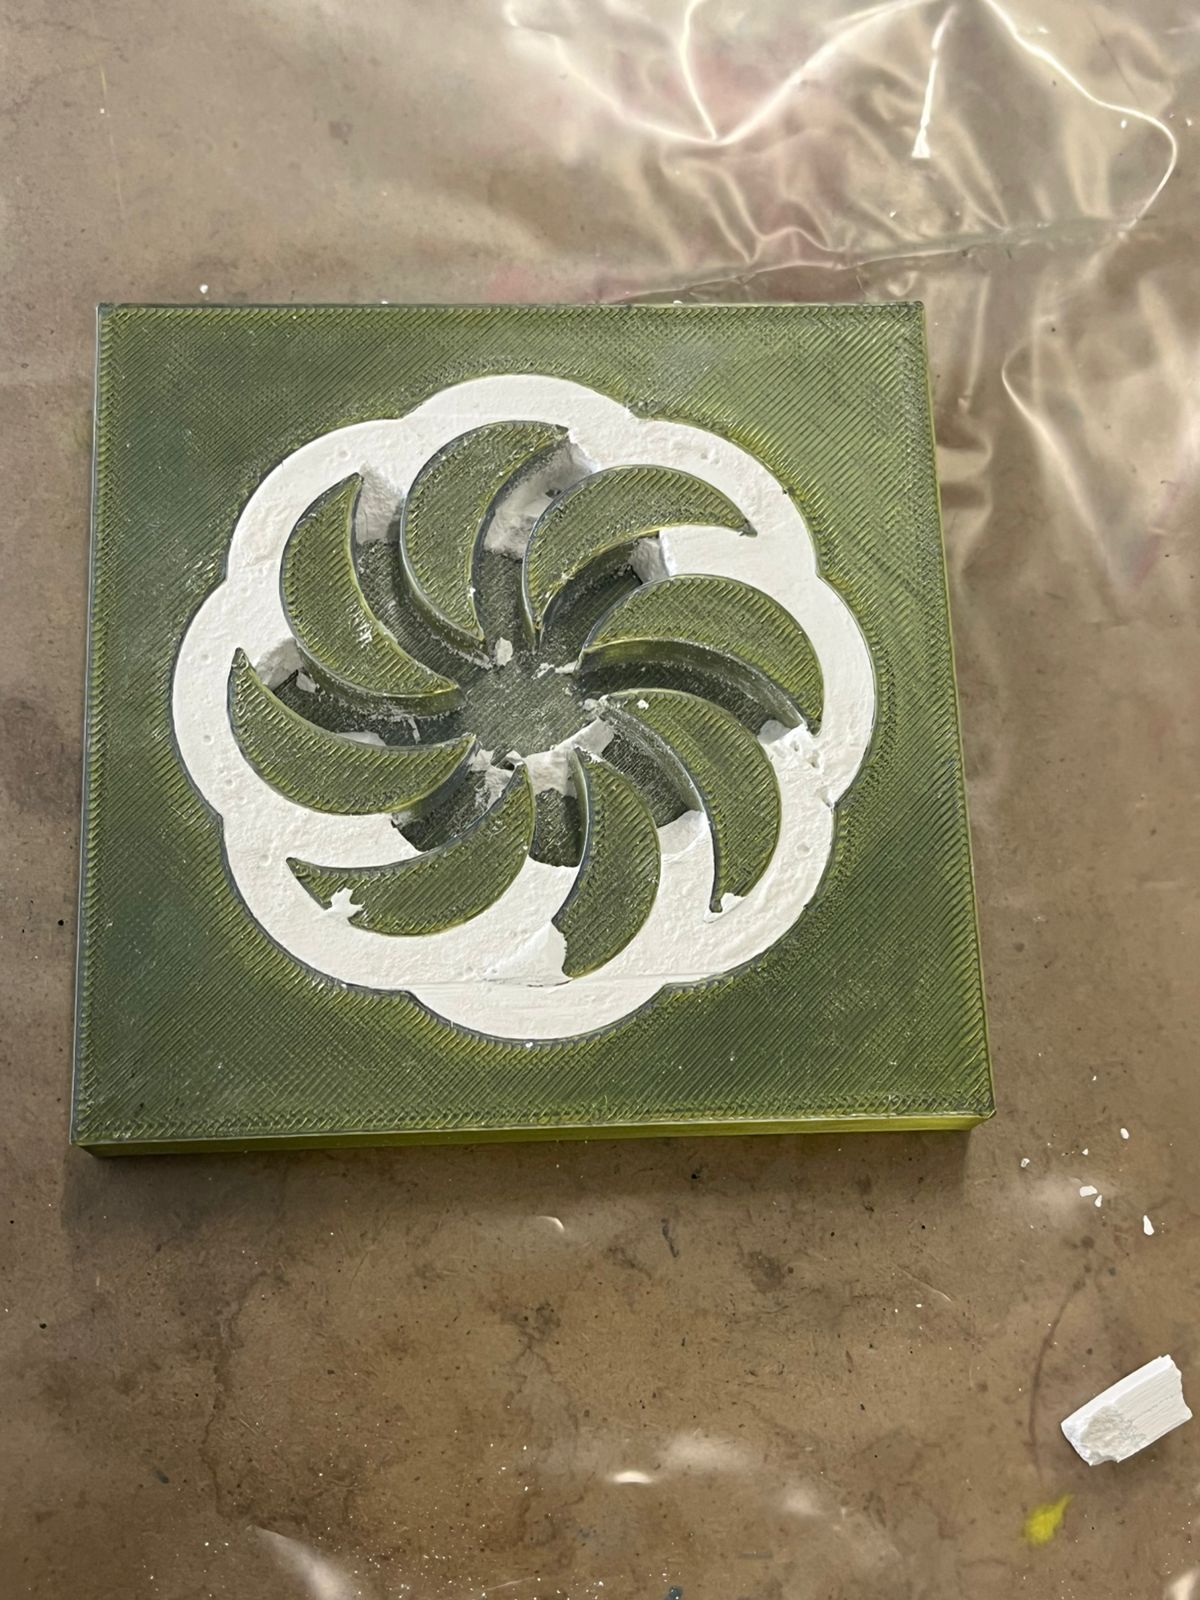
He then conducted a series of plaster casting experiments by preparing the mold, mixing the plaster, and testing the casting process. However, after the plaster had hardened, the cast was difficult to remove from the MDF mold, and it was not possible to obtain a complete casting.
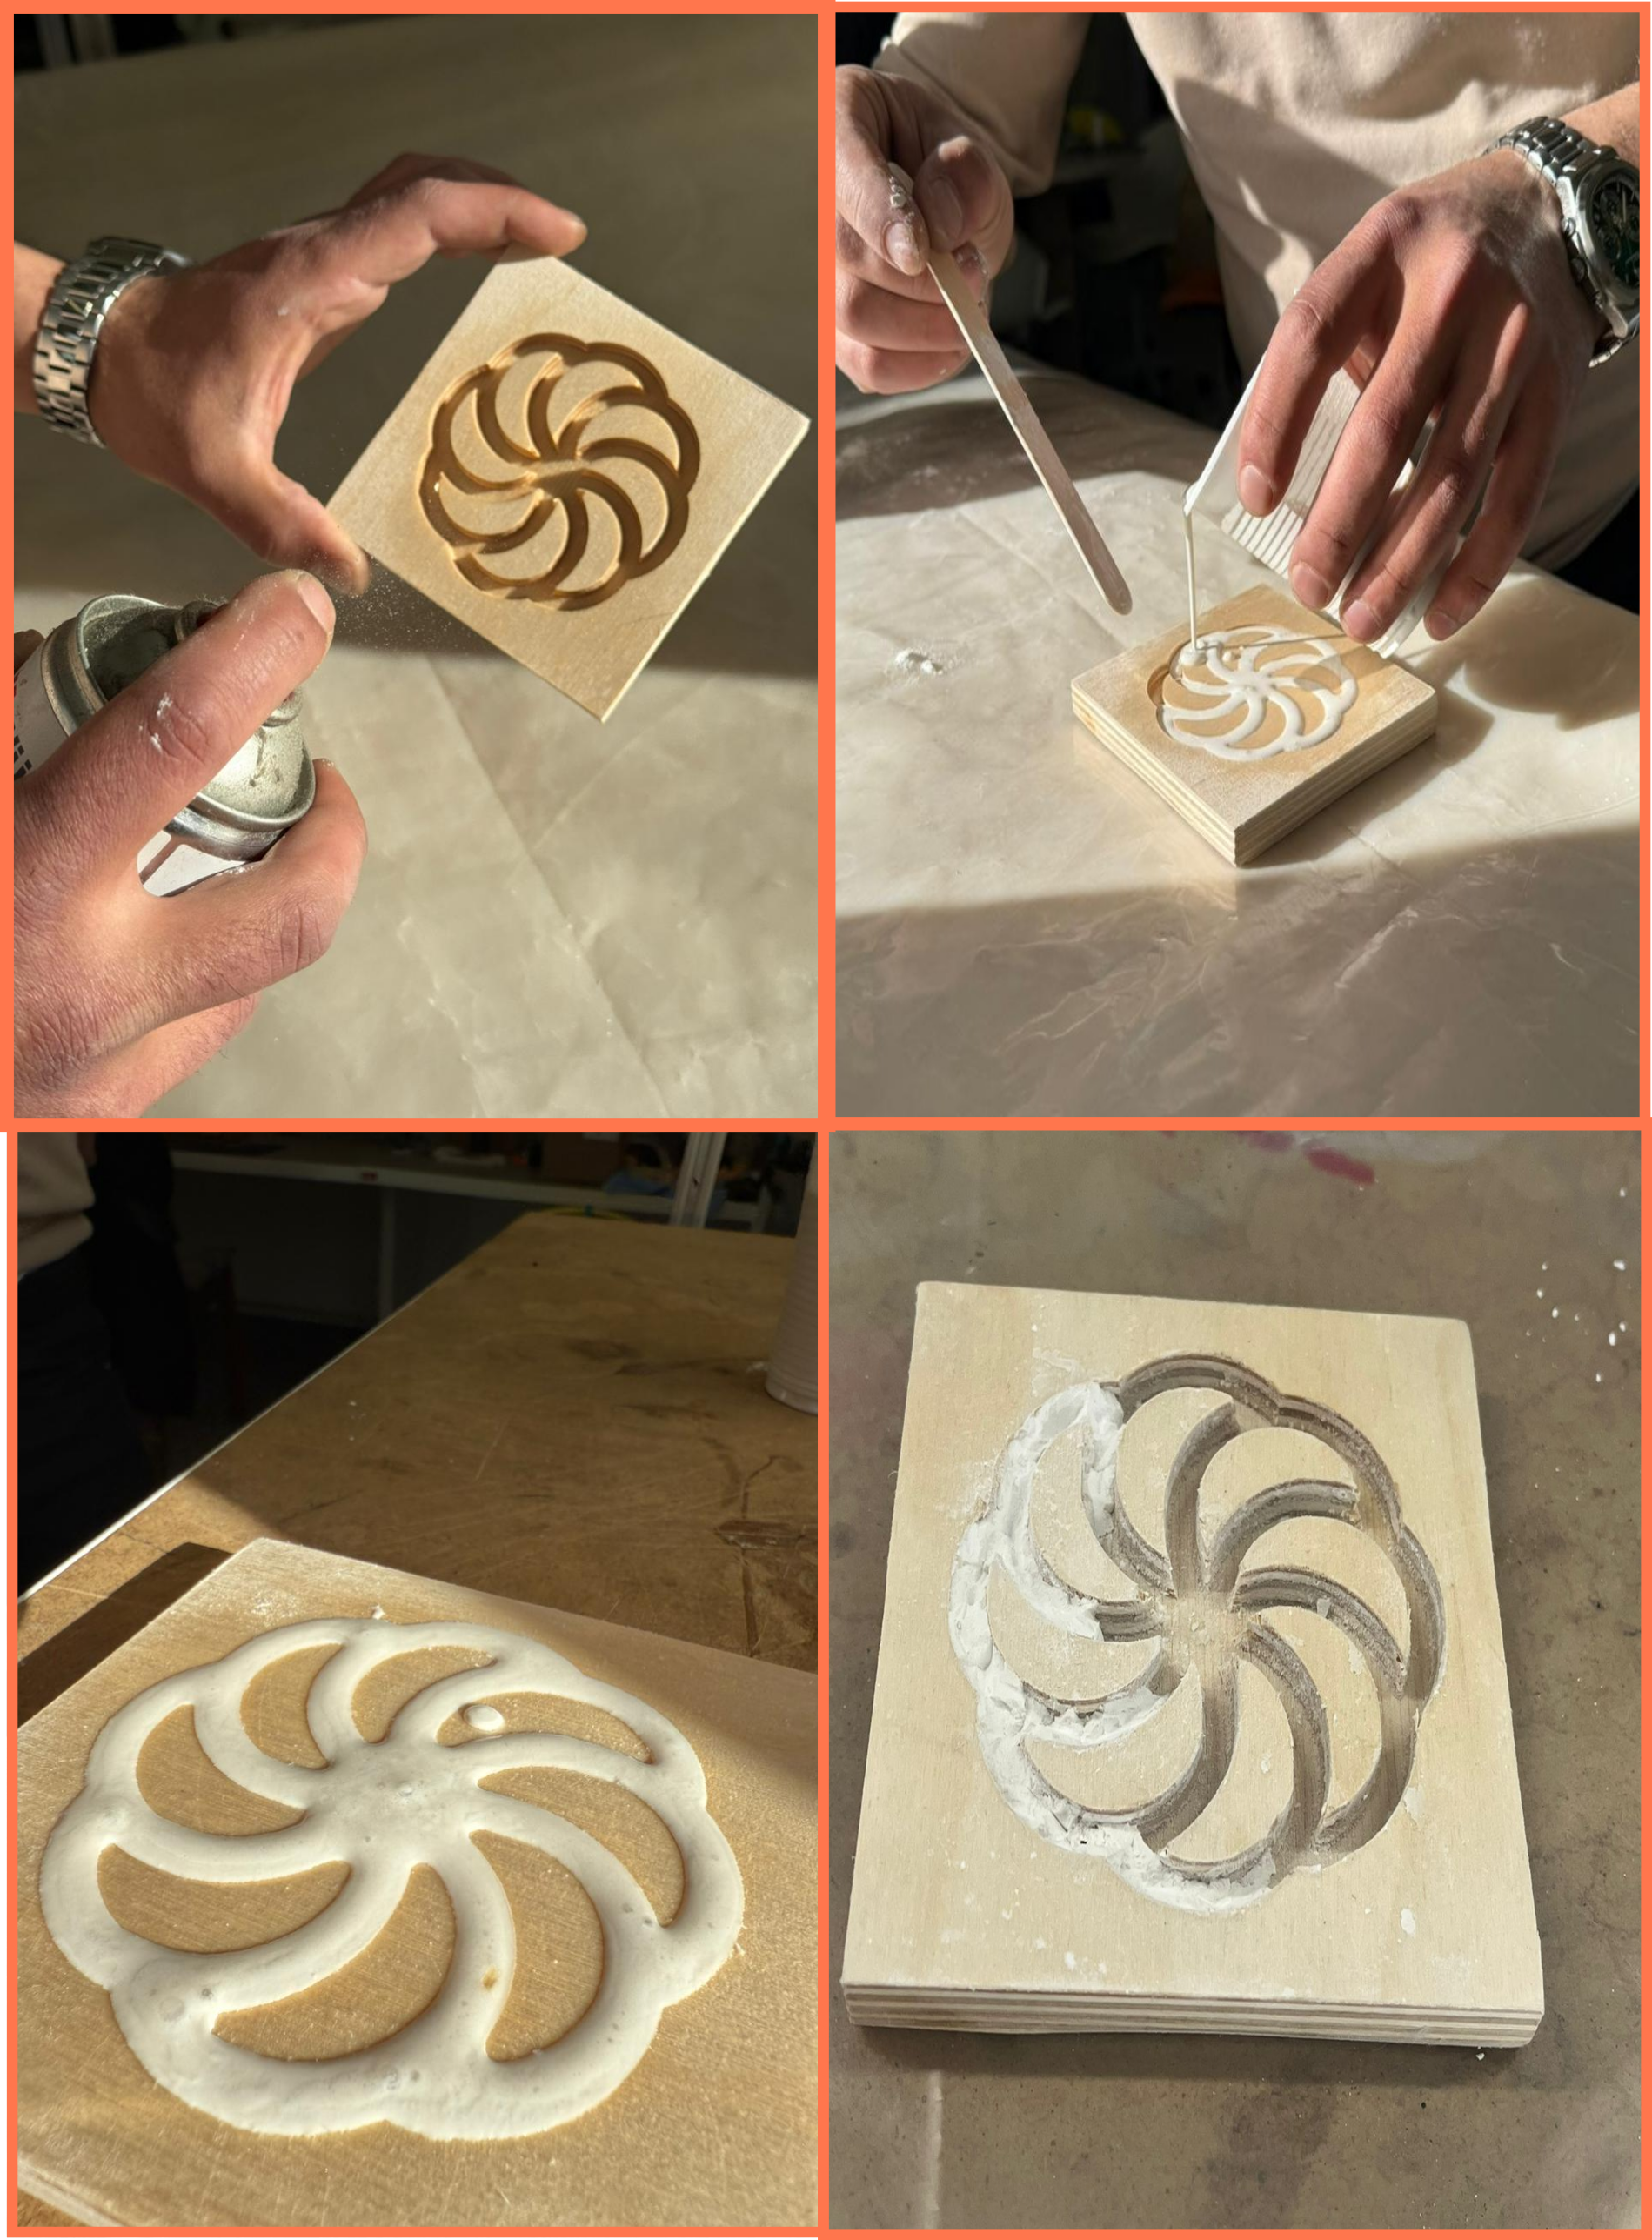
Through these experiments, the behavior of the material, its curing time, and the factors affecting the quality of the cast were investigated. More details about Gevorg’s work and experiments can be found on his page
Although each team member had their own primary area of responsibility, throughout the entire process we all actively participated in the work by observing the CNC machining process, assisting with mold preparation, mixing materials, performing casting experiments, and evaluating the results. This approach allowed us to gain hands-on experience with all stages of the molding and casting workflow.
Mariam and I were responsible for the silicone mold-making process. Before starting, we studied the technical documentation and Safety Data Sheet (SDS) of the PMC 121-30 silicone available in our lab.
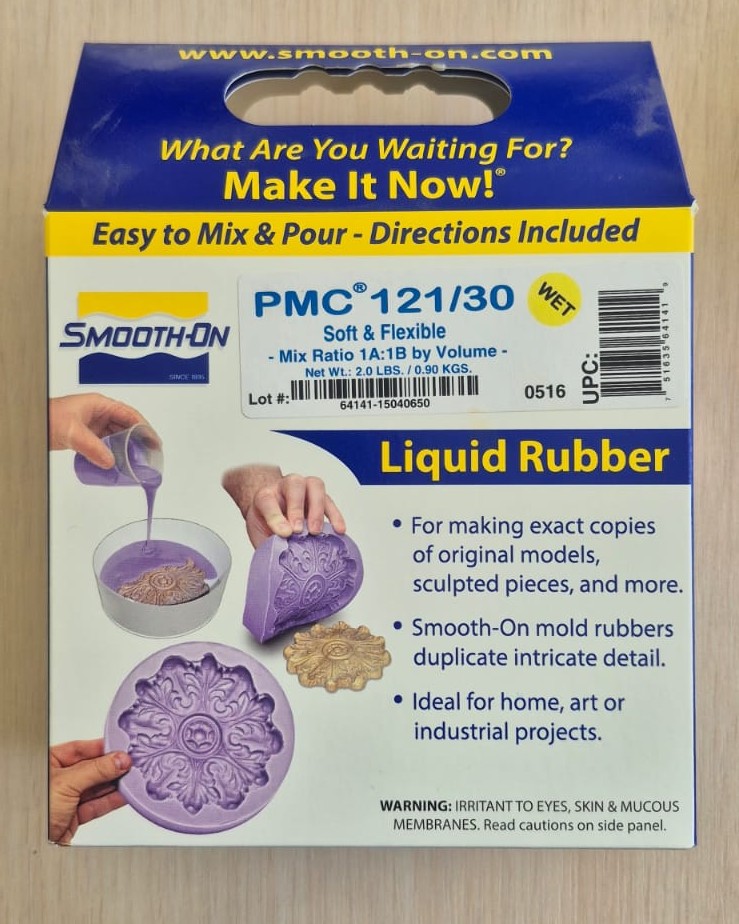
We studied the correct mixing ratio, pot life, curing time, and storage conditions of the material. According to the manufacturer’s instructions, PMC 121-30 is mixed in a 1A:1B ratio, has a working time of approximately 30 minutes, and fully cures in about 16 hours.
According to the safety guidelines, it was necessary to wear protective gloves, safety glasses, and ensure proper ventilation during the work. It was also recommended to avoid prolonged skin contact with the material and inhalation of its vapors.
We then moved on to the practical part of the assignment. After the 3D-printed model was ready, we placed it inside a plastic container that would serve as the outer wall of the mold. Following the manufacturer’s recommended ratio, we measured and mixed the silicone components, then carefully poured the mixture into the container until the 3D-printed model was completely covered.
After that, we left the mold undisturbed so that the silicone could cure and capture the full shape of the model, including all of its details. Approximately 24 hours later, once the silicone had fully cured, we removed it from the container and separated the 3D-printed model, obtaining a finished silicone mold that could be used in the next stage of the casting process.
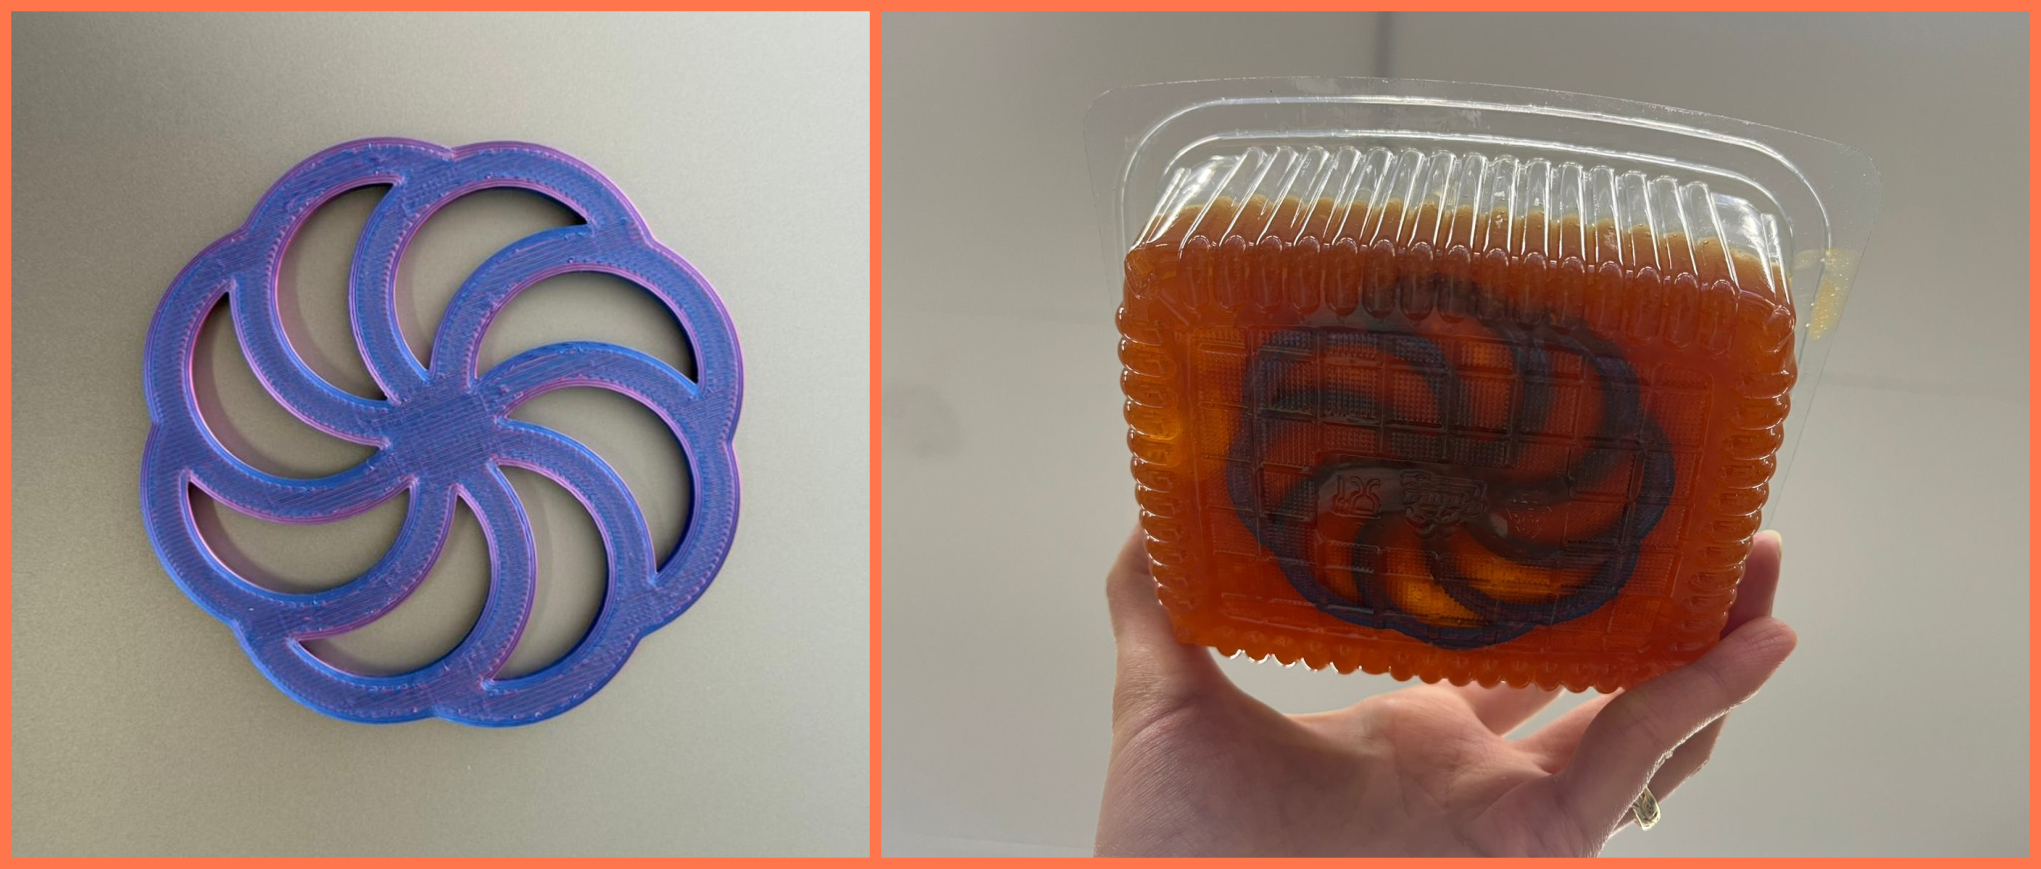
In addition, the second part of the 3D-printed model was intended for producing a master model. As an experiment, Hrach poured a plaster mixture into the 3D-printed form; however, the attempt was unsuccessful. After the plaster had hardened, it could not be completely separated from the 3D-printed form and broke during removal. As a result, we concluded that this type of 3D-printed form was not suitable for direct plaster casting.
The complete group assignment documentation can be found on our group page:
From this group assignment, I learned the complete workflow of molding and casting, from mold preparation to the final casting process. I gained practical experience in working with silicone, including reading technical documentation, understanding mixing ratios, and following safety procedures. I also learned how important mold material selection is, since different materials affect demolding and casting quality. Through the experiments, I better understood how curing time, material behavior, and mold design influence the final result.
Individual assignment
After the group assignment, I moved on to my individual work, where I tried to practically apply the knowledge gained during the group project.
At the initial stage, I was not only thinking about what kind of object to make, but also trying to connect it with the idea of my final project, so that the work would not be a separate experiment, but a continuation of the same concept. Following this logic, I decided to make a coin-shaped object, which can be viewed both as an independent piece and as a symbolic or functional part of my main project.
Design Part
I started with the main body of the coin. In FreeCAD, I drew a circle and used Pad to create volume. I chose the height so that it could later fit easily into the wax.
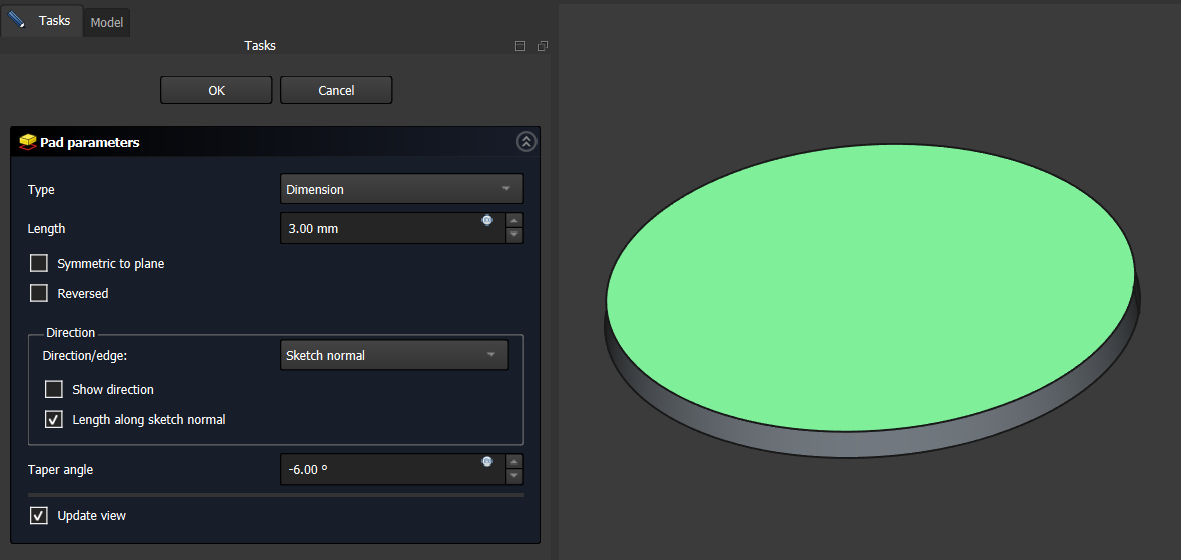
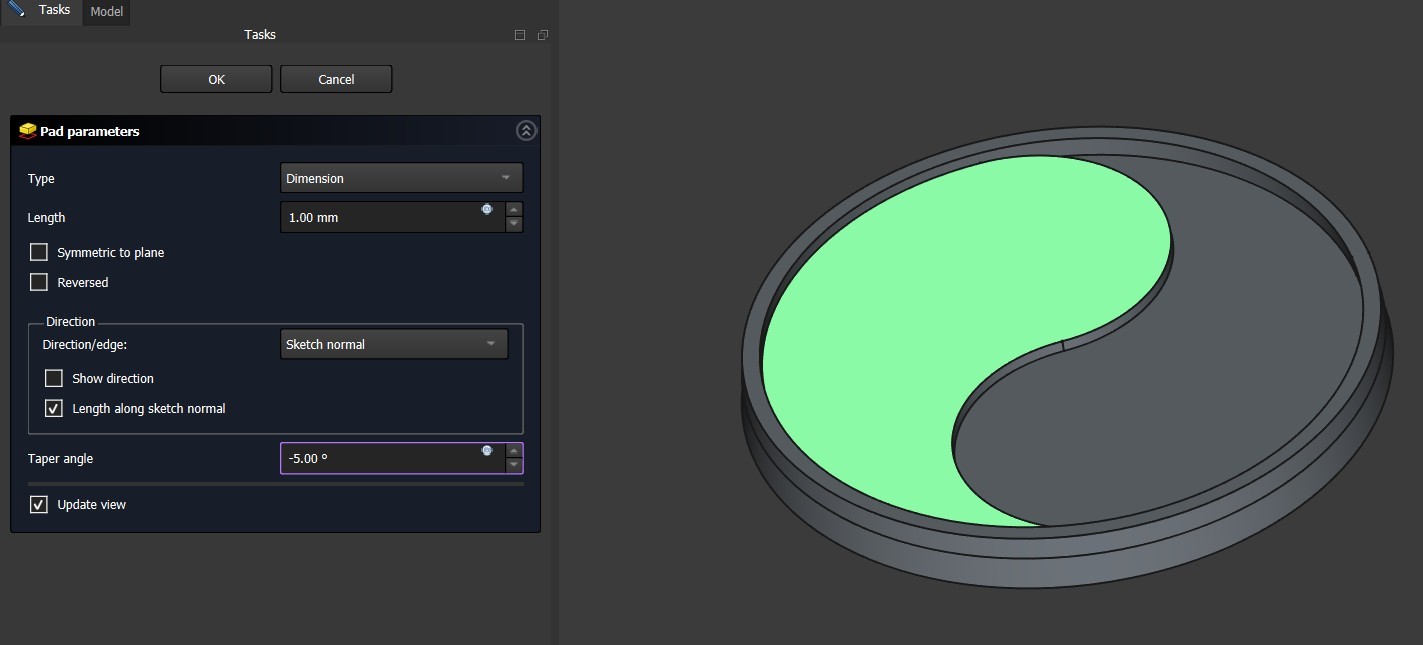
Then I added a slight taper to the sides (taper angle around -6°), so that the side surfaces would not be completely straight. This helps the part come out of the mold more easily.
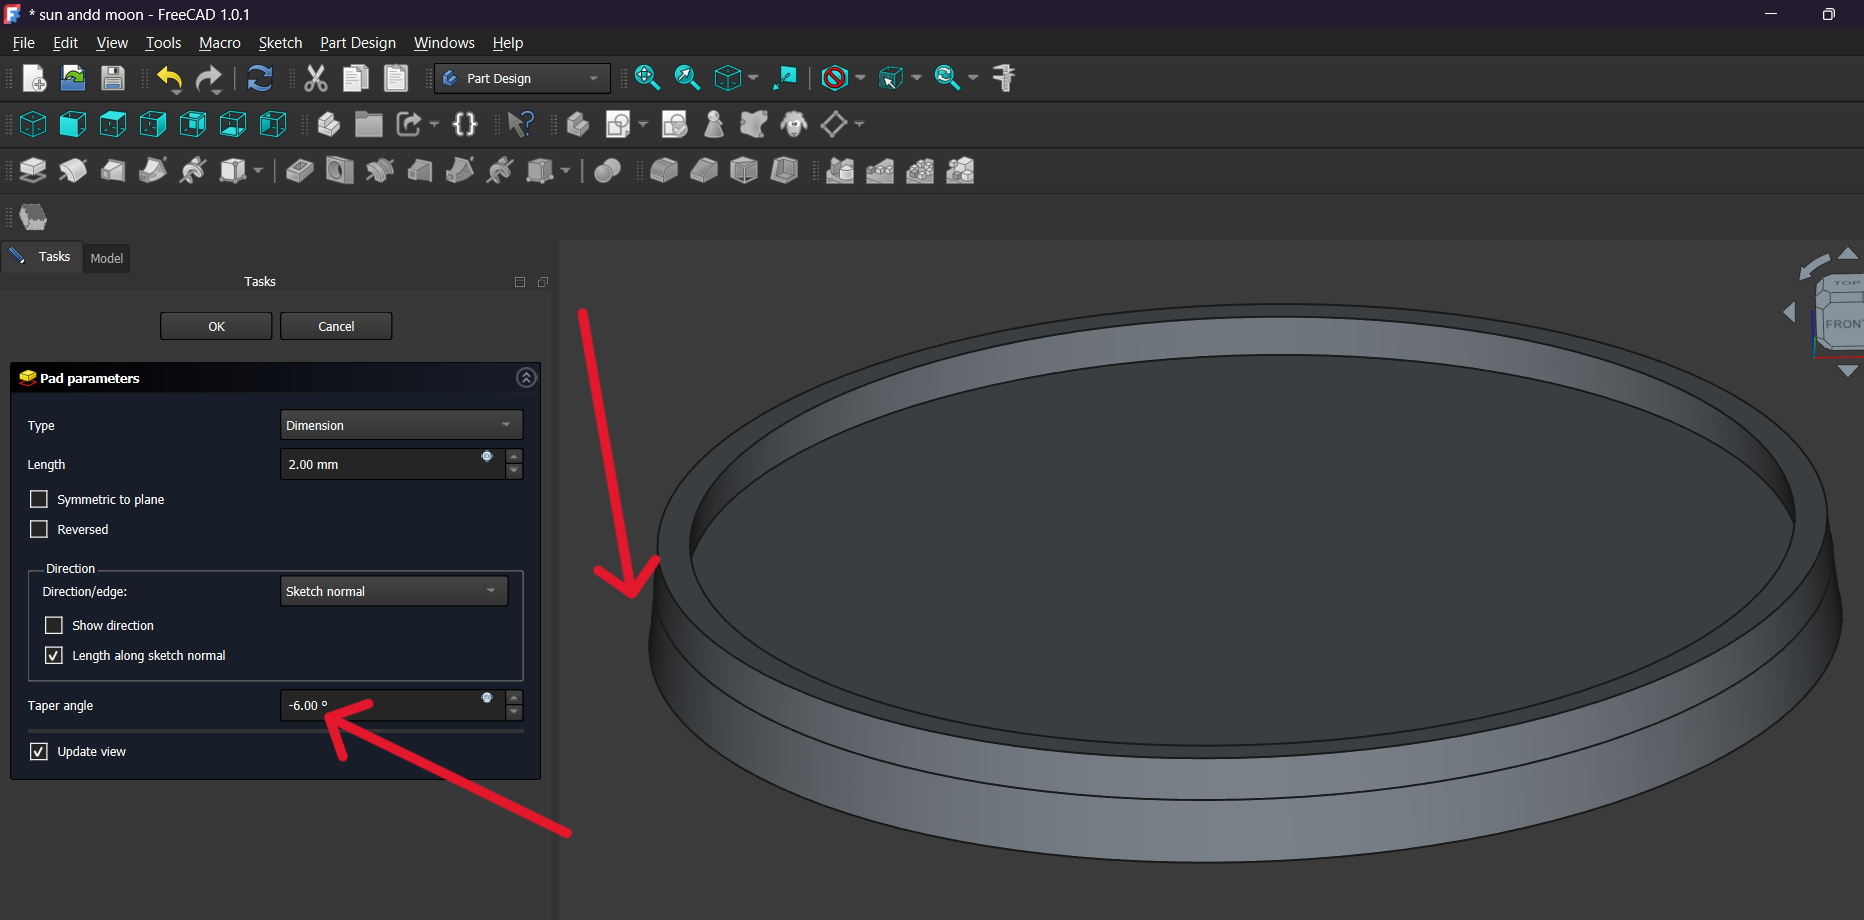
After that, on the top surface I drew concentric circles again and used them to form the characteristic outer ring of the coin. I raised that section using the Pad tool, creating a defined border. At the same time, this also helped provide sufficient wall thickness, making the part stronger and visually more complete. A small taper angle was also applied to that Pad, so the edge section could separate from the mold more easily.
Then, in the central section, I drew the main curved line of the yin-yang symbol and raised that outline using the Pad tool, so that the symbol would stand out from the main surface. This made the symbol more expressive and visible, while the raised relief gives the finished part interesting light and shadow. I chose the height carefully so that the shape would be clear while the overall structure remained balanced.
Then I added a moon shape on one side and sun rays on the other side. These were also made with separate sketches and then raised from the surface using the Pad command to the necessary height. Taper angles were also applied to these Pads, so the side surfaces would be slightly angled and the part could be removed from the mold more easily.
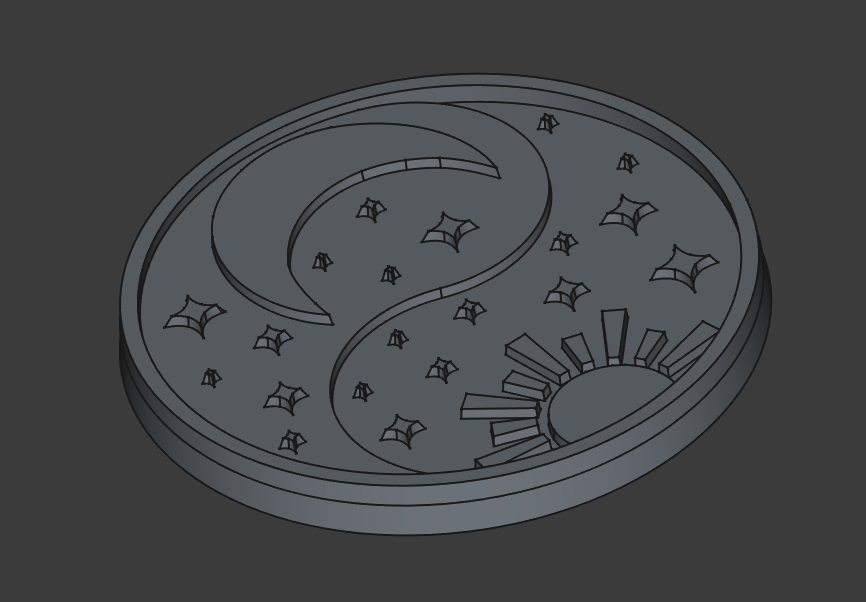
Finally, I added small stars in the empty background areas so that the surface would not remain empty and the composition would feel balanced. I placed the stars in different positions to make the design more lively and dynamic. A small taper angle was also used on them, so that all decorative elements would follow the same structural logic.
After finishing the main coin design, I realized that the shape alone was not enough, because it had to be placed into a mold in order to be machined and cast later. For that reason, I designed a square outer frame around it.
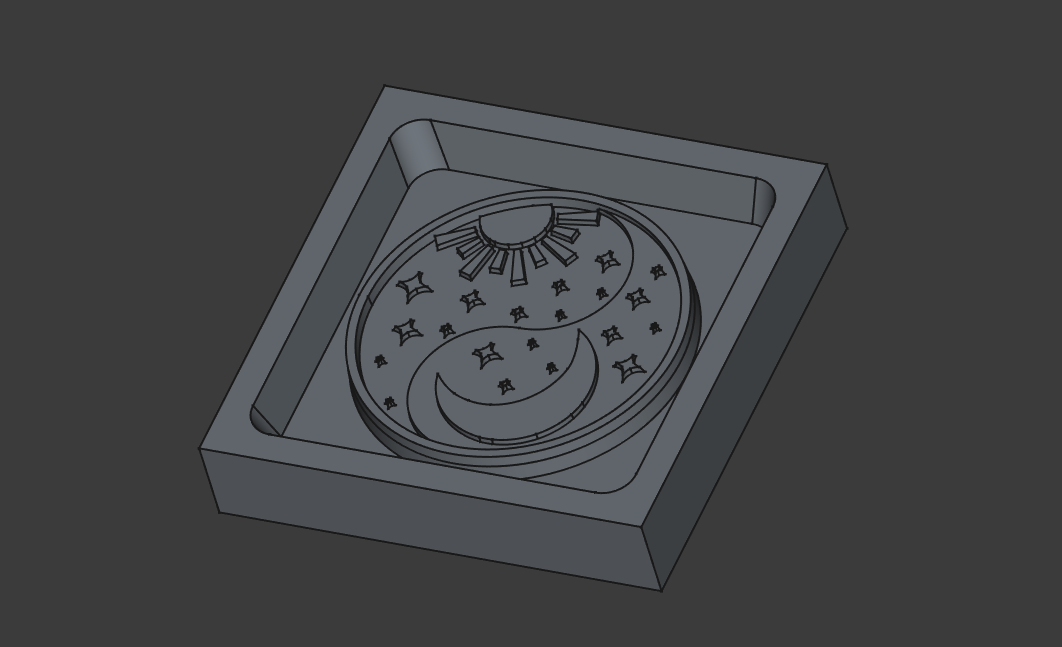
I chose the square shape so that it would be symmetrical and visually match the circular coin design in the center. I left enough surrounding space so that the walls would be strong and would not be damaged during the working process.
I deepened the inner section, creating a cavity in which the coin design remained in the center. I intentionally rounded the corners, because sharp corners are difficult to machine with a milling tool, while rounded sections also make removal from the mold easier later. I also gave the walls a slight taper angle, so that separation from the mold would be easier.
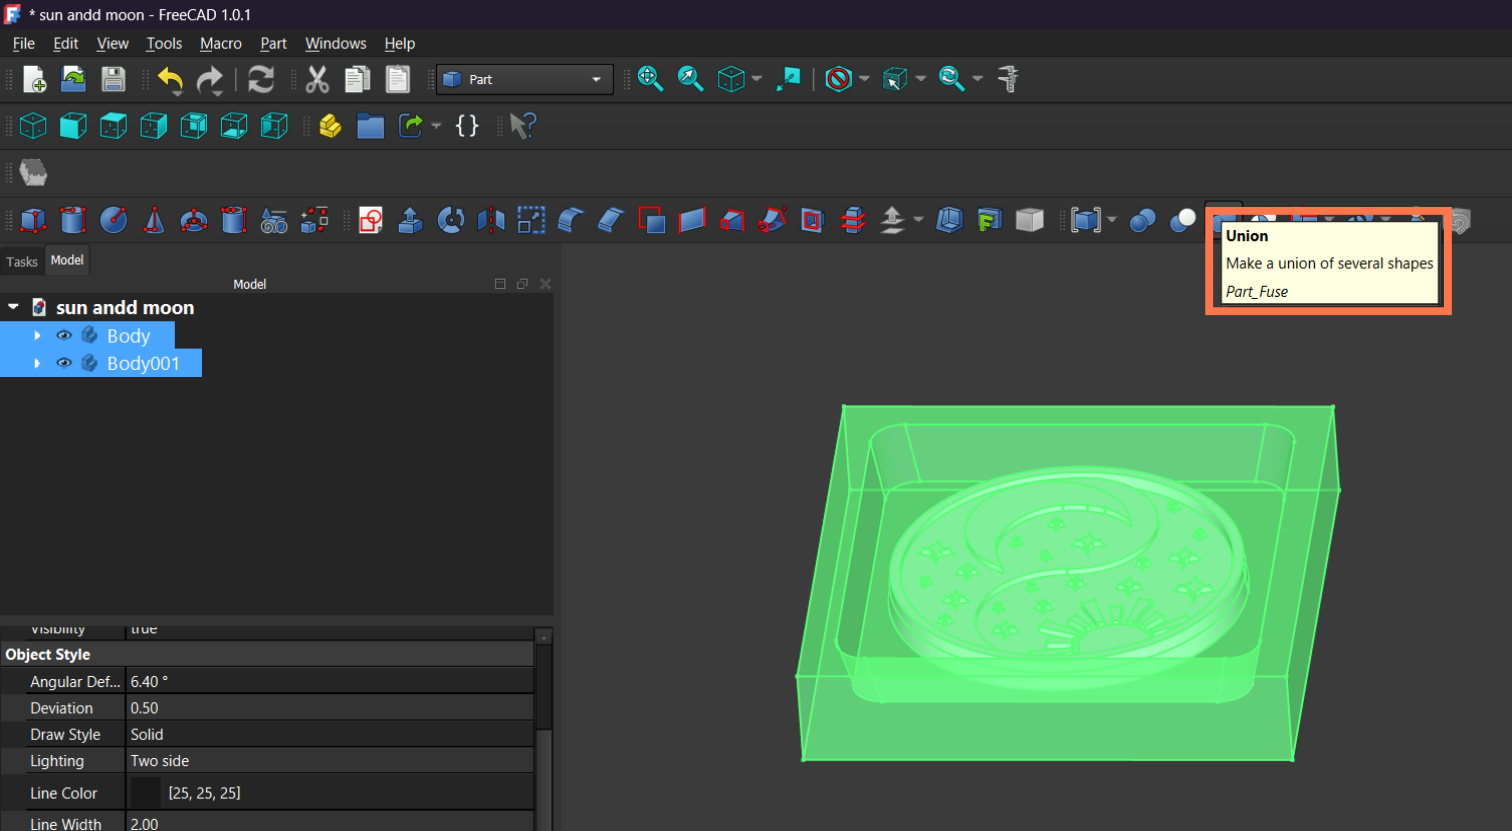
After creating both the coin design and the outer mold structure, I needed to combine them into a single object. For this step, I used the Union (Fuse) tool in FreeCAD.
First, I selected both bodies (Body and Body001) from the model tree. Then I applied the Union operation, which merges multiple shapes into one solid object.
This step was important because:
- it ensured that the model would be treated as a single piece during machining
- it removed any separation between the coin and the surrounding frame
- it made the geometry cleaner and more suitable for exporting
Milling Process
After completing the 3D model, I exported it as an STL file and imported it into the Mods Project environment.
After importing the STL file, I set the main machining parameters. The tool diameter was set to 3 mm to match the milling bit used for machining. The Offset Number parameter was set to 30 to ensure that the tool performed enough passes to completely machine the required area. The Offset Stepover value was set to 0.5, meaning that each successive pass overlapped by 50% of the tool diameter. This value provides a good balance between machining quality and processing time.
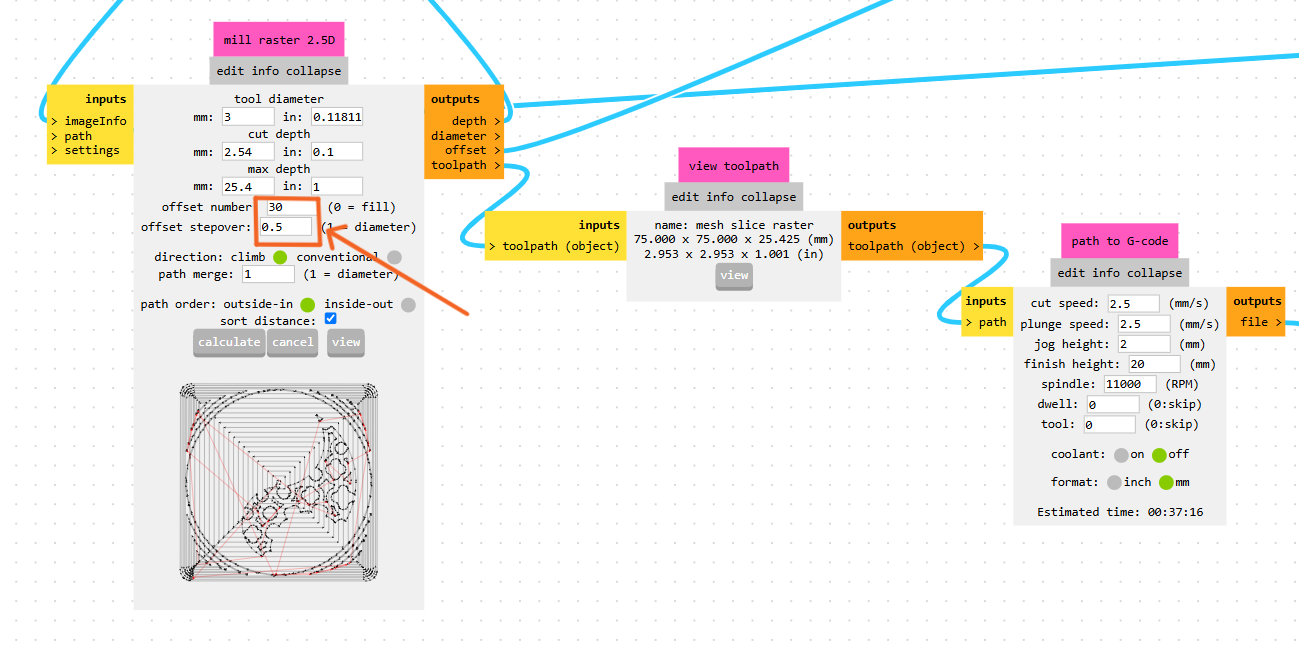
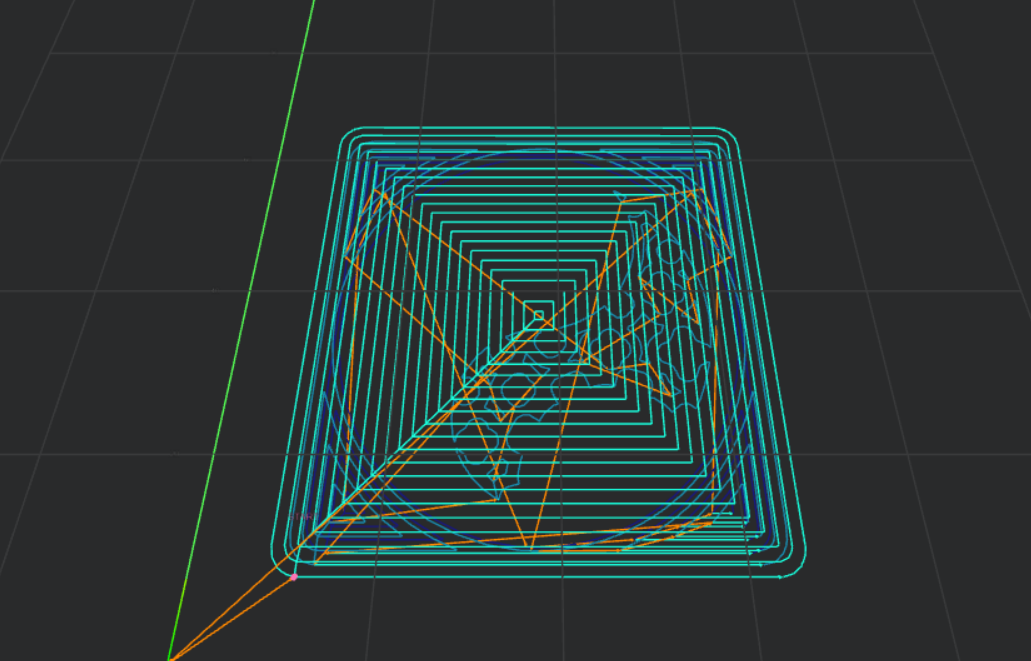
After defining the parameters, the software calculated the toolpath, which I inspected in the preview window to verify that the machining process would be performed correctly.
Finally, Mods Project generated a G-code file containing all the instructions required for the CNC milling machine, including the tool movements and machining operations.
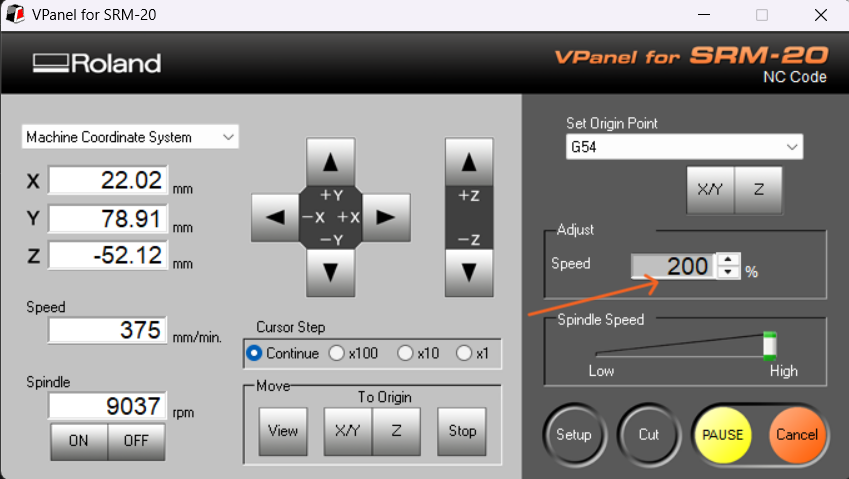
Once the G-code was ready, I loaded it into the CNC milling machine software. First, I secured the wax block onto the machine bed and made sure it was firmly fixed and would not move during machining.
Next, I set the tool’s origin points (X, Y, and Z zero positions). This was an important step because all movements defined in the G-code are calculated relative to these reference points.
Then I imported the file, gave it Cutout, and doubled the speed to 200%.
After finishing I got this result․
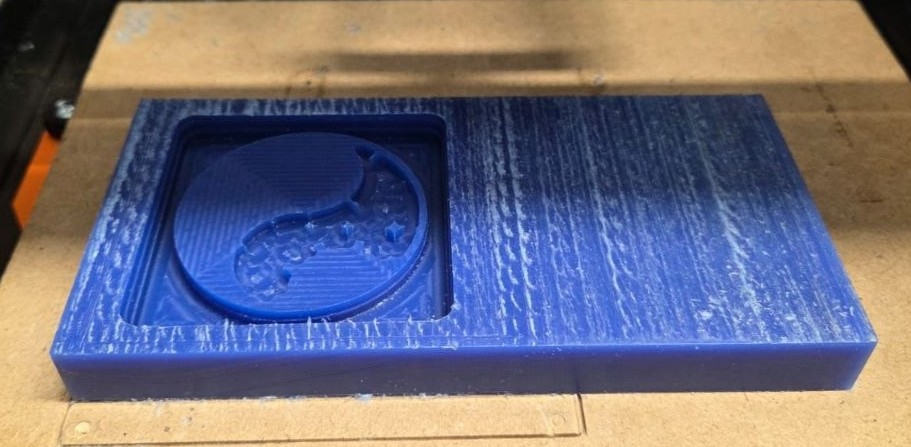
After completing the rough machining with the 3 mm end mill, I proceeded to the finishing stage for more detailed and precise milling. For this purpose, I selected a 0.75 mm flat end mill in the Mods Project environment and configured the corresponding machining parameters.
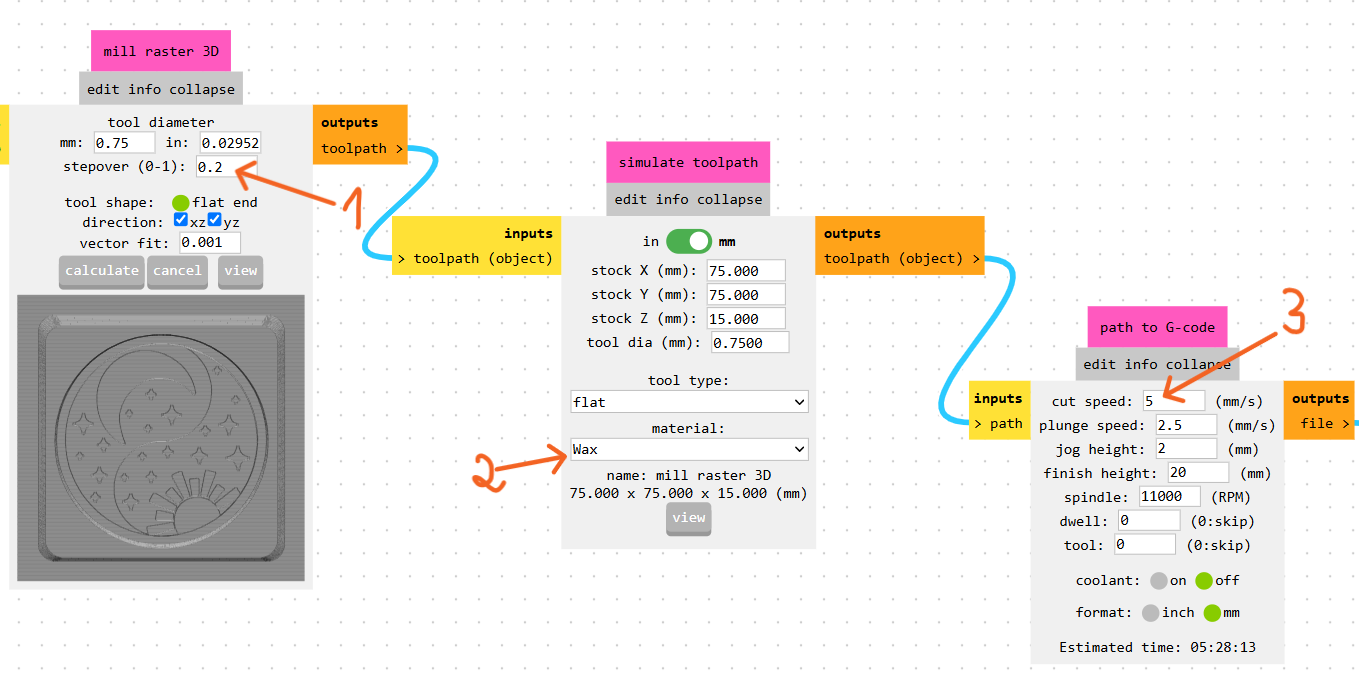
I set the Stepover value to 0.2, meaning that each successive toolpath overlapped by 20% of the tool diameter. This setting provided a smoother surface finish while preserving the fine details of the design. The Cut Speed was set to 5 mm/s, ensuring stable and high-quality machining. After verifying all the parameters, I generated the final G-code file for the finishing operation.
Next, I changed the tool on the CNC machine by installing the 0.75 mm end mill, reset the Z-axis zero position, and started the finishing process. The smaller tool made it possible to accurately machine the fine details of the design, including the yin-yang symbol, the sun rays, the moon, and the stars.
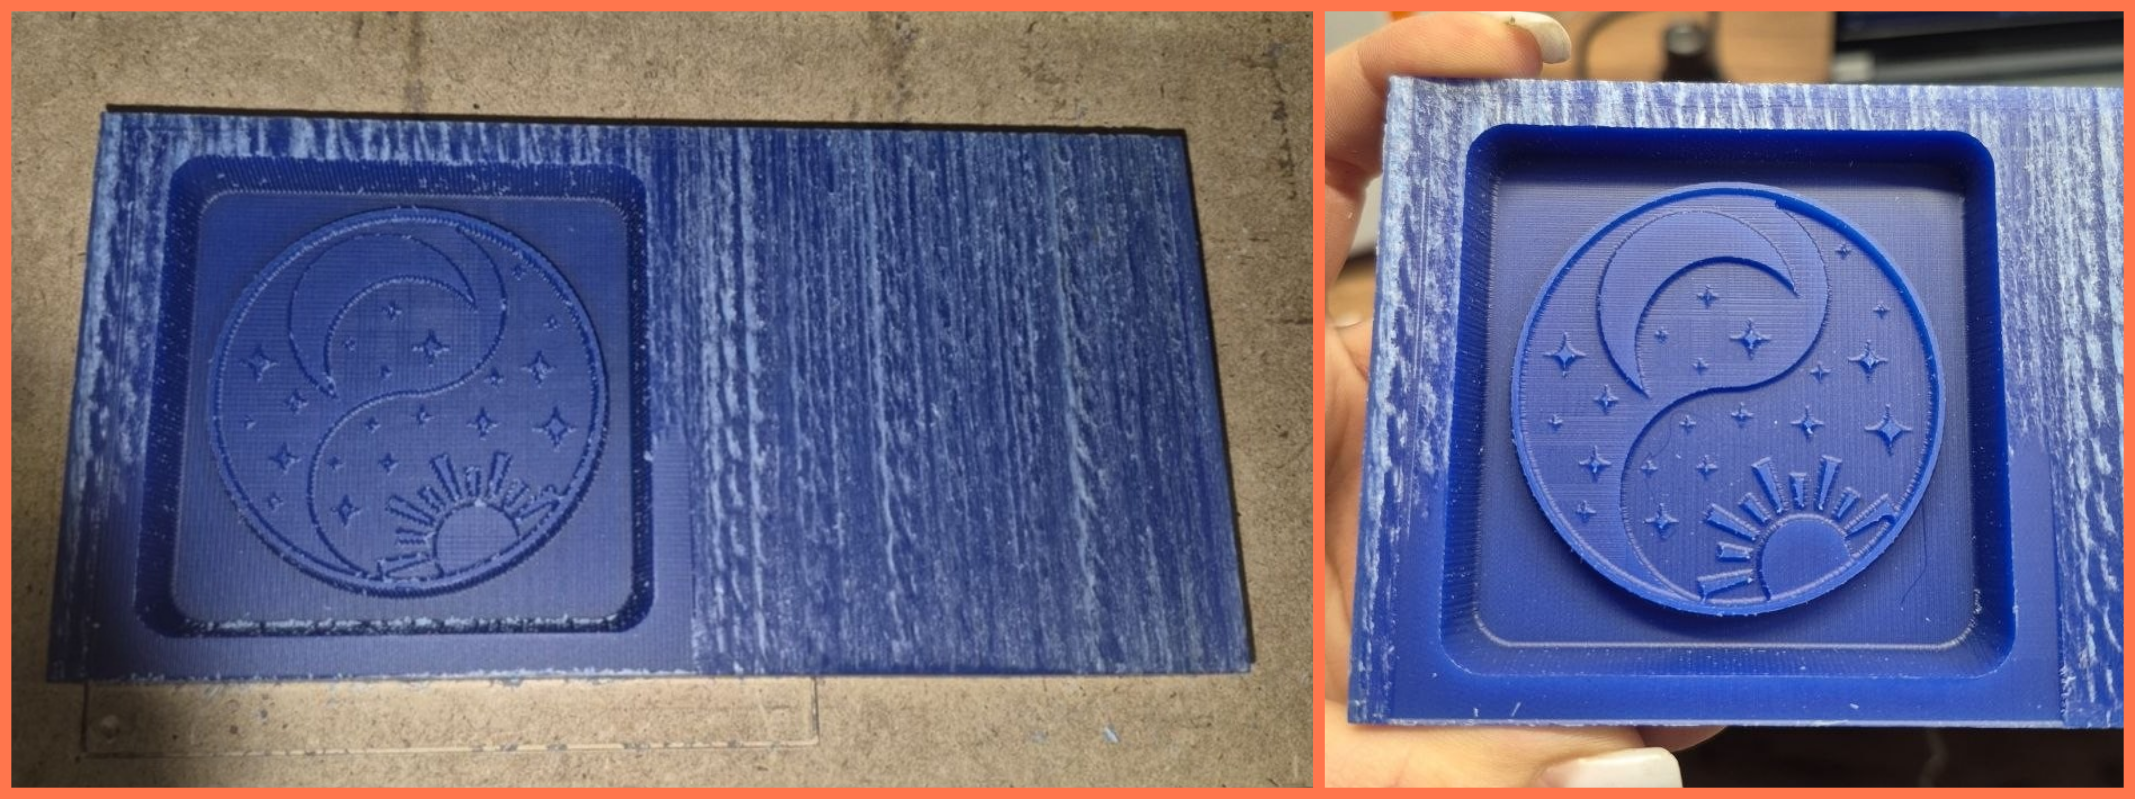
After the machining process was complete, I cleaned the wax mold to remove the remaining dust and debris. To eliminate fine dust particles and reduce the visible toolpath marks left by the milling bit, I carefully applied hot air from a construction dryer over the mold surface for a few seconds.
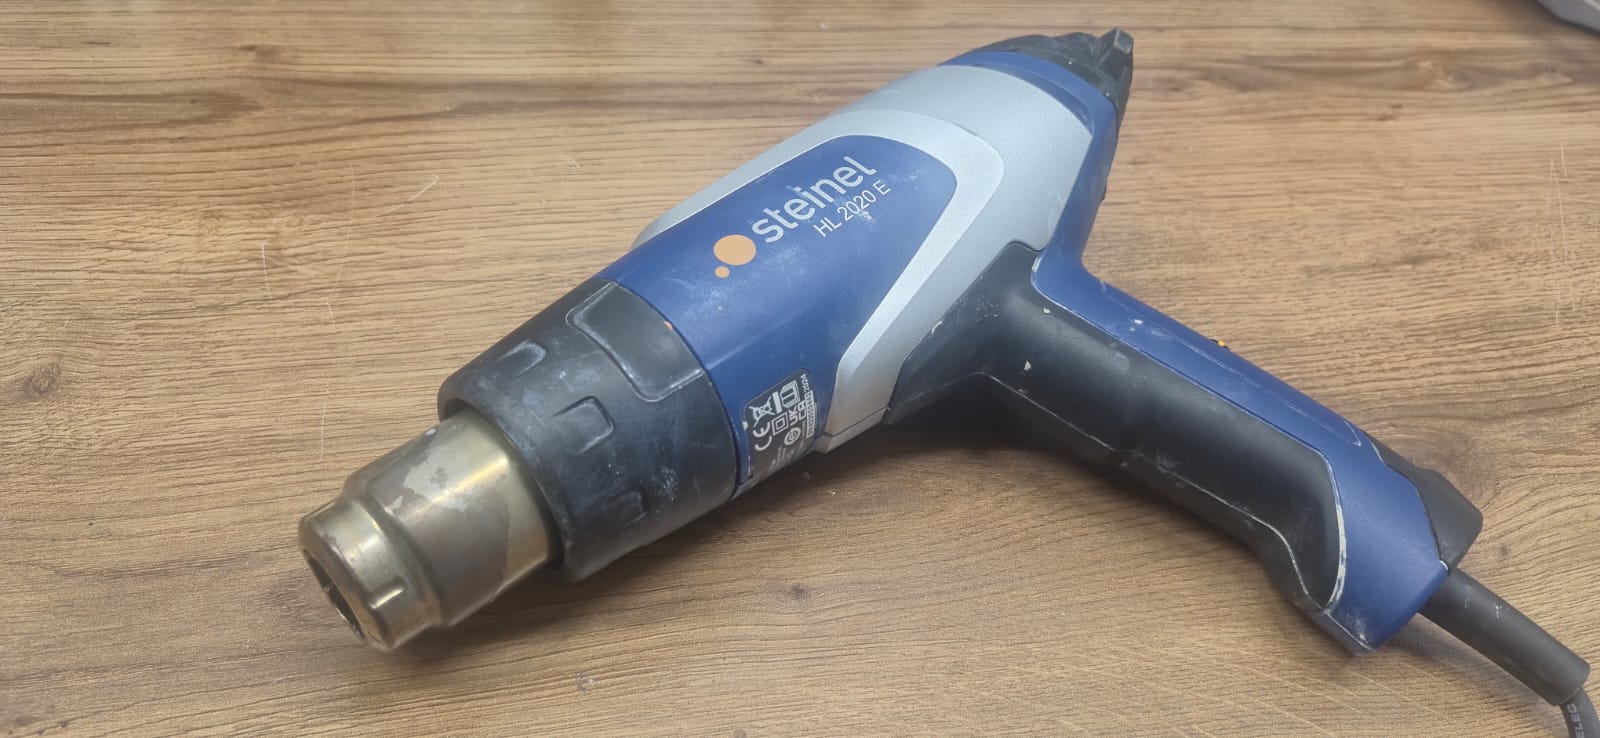
The heat slightly softened the wax surface, improving the overall surface finish. The final result was clean and satisfactory, with all the main design elements clearly visible on the mold surface.
Before starting the mold preparation process, I reviewed the technical documentation and Safety Data Sheets (SDS) of the materials I was going to use, including two types of silicone and UV epoxy resin, to better understand their properties, curing times, and safety precautions.
Safety Data Sheets (SDS)
During my individual assignment, I used two types of silicone and UV epoxy resin. Before working with these materials, I studied their technical documentation and safety guidelines.
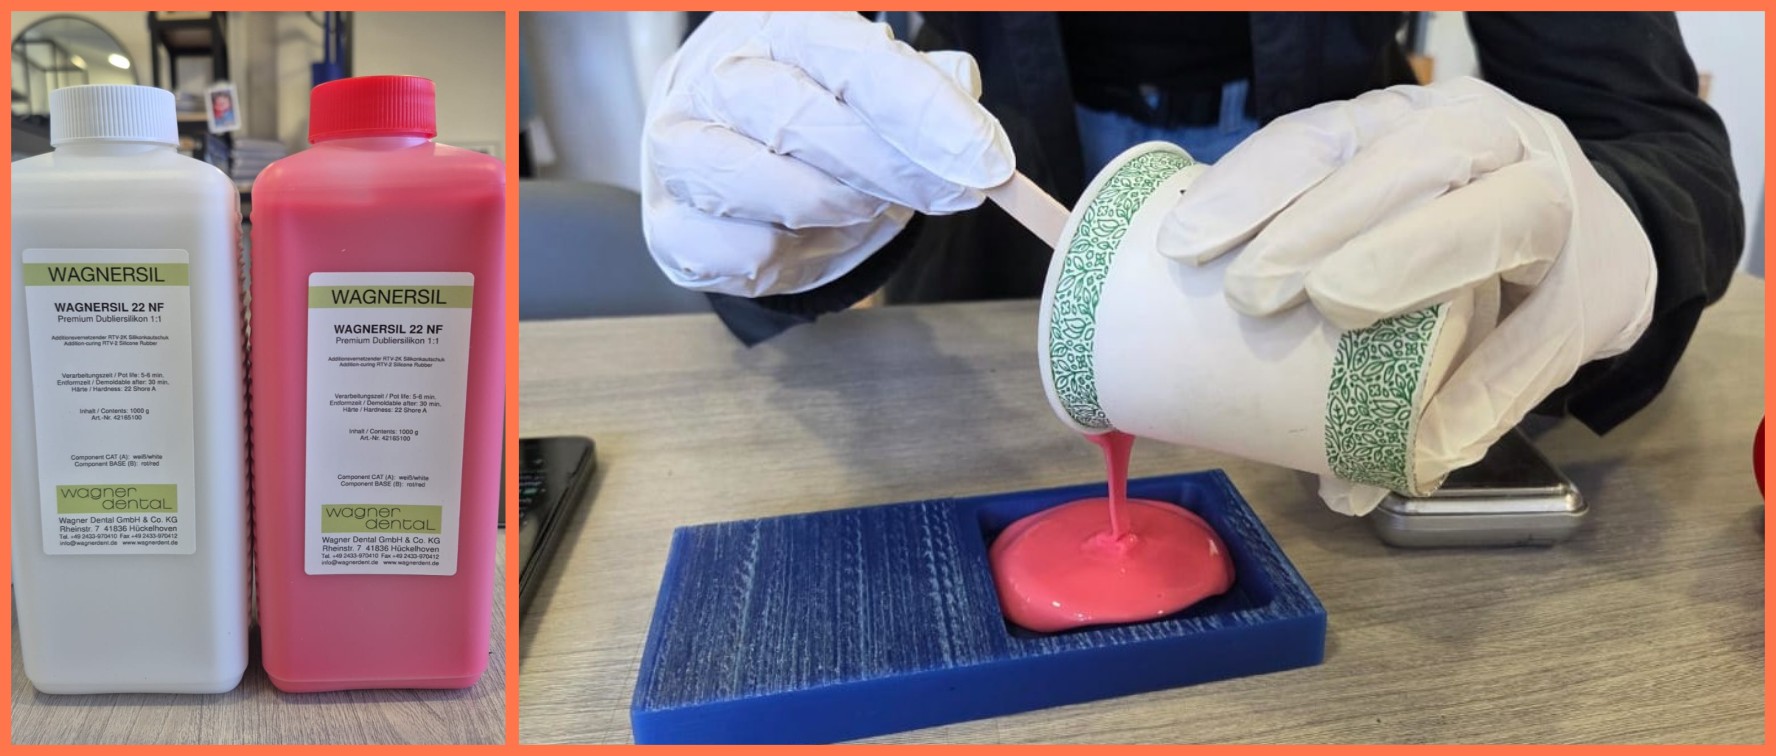
1. WAGNERSIL 22 NF Silicone SDS / Product reference: WAGNER Dental Product Page
- Mixing ratio: 1A : 1B
- Working time (Pot life): ~5–6 minutes
- Full curing time: ~20–30 minutes
Main safety precautions:
- Wear protective gloves.
- Avoid contact with skin and eyes.
- Work in a well-ventilated area.
- Wash hands after use.
2. EpoxyMaster Platinum-Based Silicone (5A) Product reference: EpoxyMaster 5A Silicone
- Mixing ratio: 1A : 1B
- Working time: approximately 30–40 minutes
- Full curing time: ~12–24 hours
Main safety precautions:
- Wear protective gloves and safety glasses while working.
- Avoid prolonged skin contact.
- Ensure proper ventilation during use.
- Store in a cool, dry place away from direct sunlight.
- Keep out of reach of children.
3. UV Epoxy Resin (UV Resin Hard) Safety reference: UV Resin Safety Guide
- Mixing ratio: Not required (single-component)
- Working time: Remains liquid until exposed to UV light
- Curing time: ~2–10 minutes under a UV lamp (depending on thickness)
Main safety precautions:
- Wear nitrile gloves while working.
- Uncured resin should not come into contact with skin.
- Ensure proper ventilation.
- Avoid direct exposure of eyes and skin to UV light during curing.
Mold Preparation
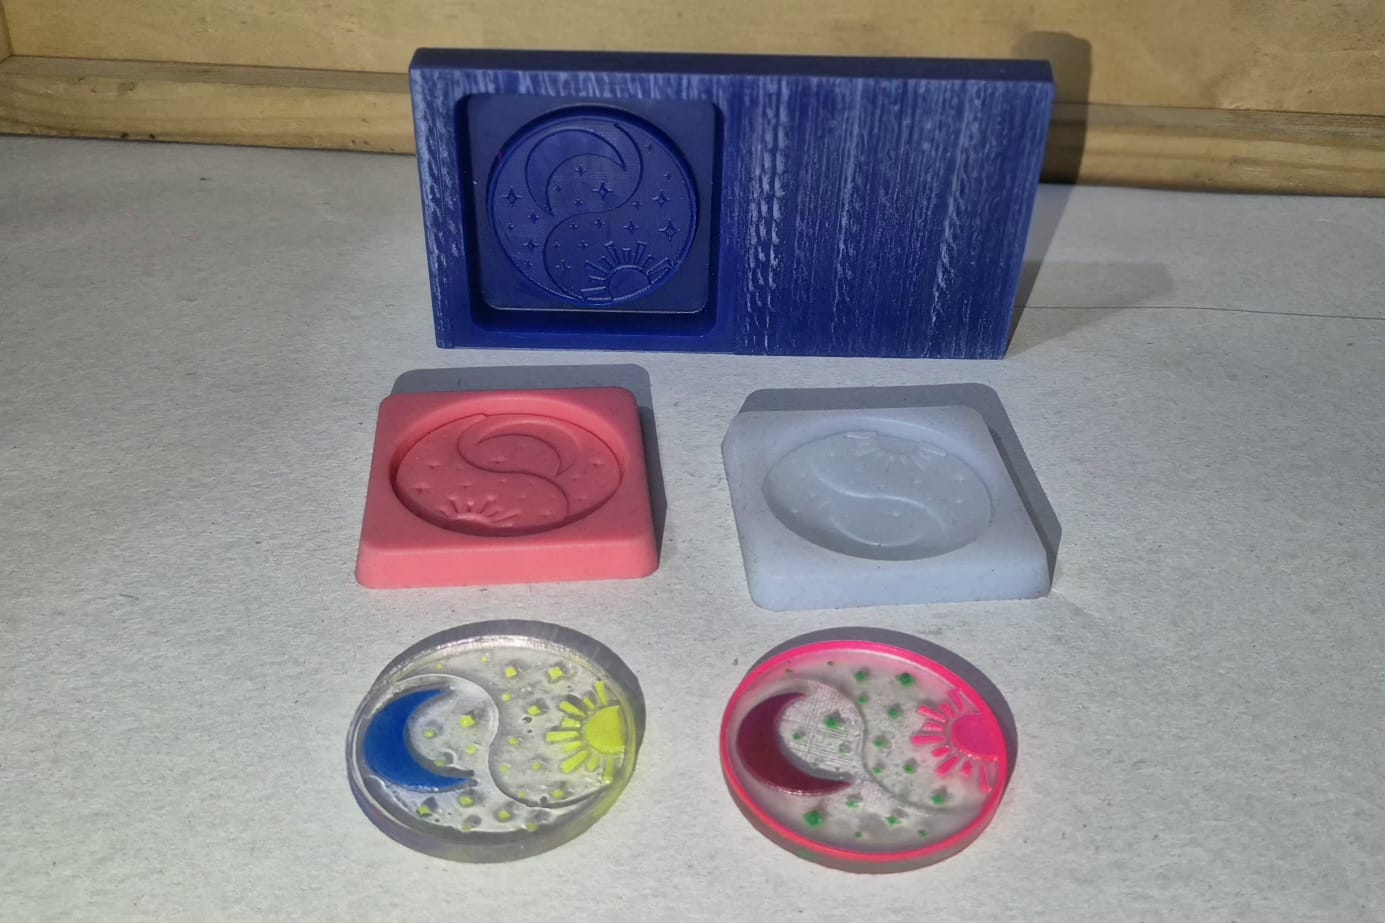
After the wax mold was completed, I moved on to the silicone mold-making stage. During this process, I used two different types of silicone in order to compare their properties and results. Both silicones consisted of two components and were mixed in a 1:1 ratio.
First, I worked with the first silicone, which started curing after approximately 30 minutes but required around 12–24 hours for complete hardening. I measured equal amounts of both components, mixed them thoroughly, and poured the mixture into the wax mold. During pouring, I tried to minimize the formation of air bubbles so that the final mold surface would be as clean and smooth as possible.
After the silicone had fully cured, I separated the mold from the wax model and inspected the result. All the main design elements were successfully transferred into the mold, including the yin-yang symbol, the sun rays, the moon, and the stars. The resulting mold allowed me to evaluate how accurately the fine details of the model had been reproduced.
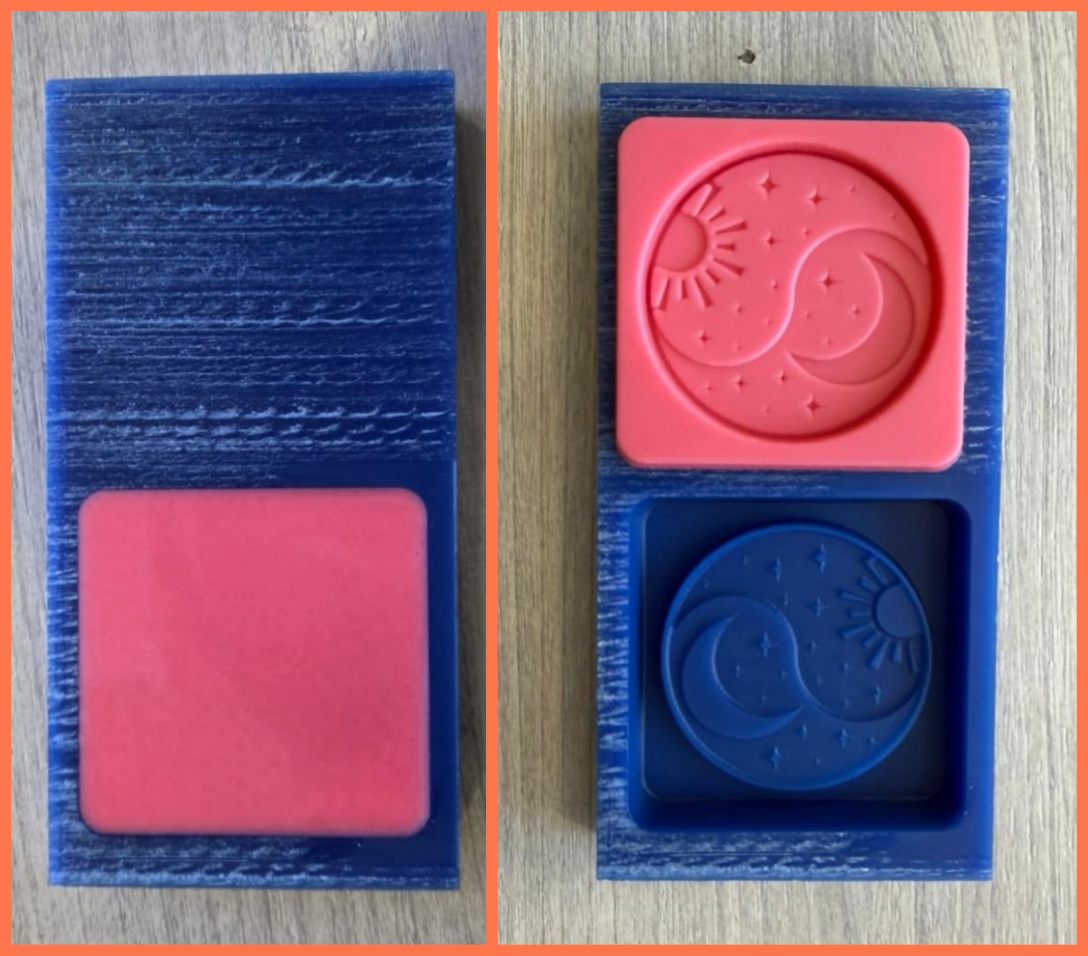
Next, I tested a second type of silicone using the same mold. It also consisted of two components mixed in a 1:1 ratio, but it had a longer curing time. After preparing the mixture, I poured it into the wax mold, again paying attention to minimizing the formation of air bubbles.
This silicone started curing after approximately 12 hours and required around 24 hours for complete hardening. Once cured, I separated the mold from the wax model and compared the results.
![]()
After comparing both molds, I found that there was almost no significant difference in the quality of the final results. Both silicones reproduced the fine details of the design equally well, and the mold surfaces were clean and clearly defined. The main difference was related to the working and curing times. Since the first silicone reached a workable state much faster, it proved to be a more time-efficient option and was more suitable when quick results were needed.
Casting with UV Epoxy Resin
The casting process consisted of three main stages: milling the negative mold from wax, creating a silicone positive mold, and producing the final casting. After successfully completing the first two stages, I proceeded to the final step by casting the coin using UV epoxy resin.
Once the silicone mold was ready, I first ensured that its surface was clean and free of dust or any other particles that could affect the quality of the final result. I also checked that there were no remaining defects or residues from the previous processes.
To give the resin a more expressive appearance, I used different pigments.
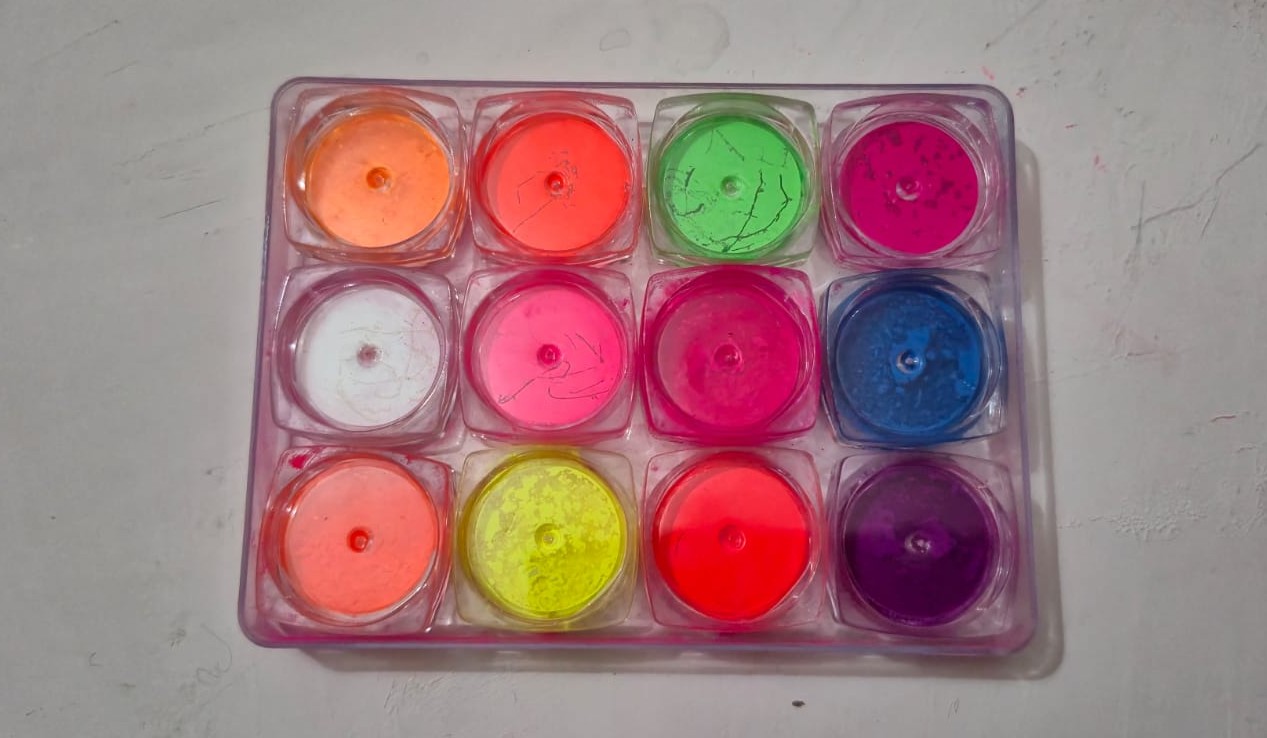
I selected colors that matched the overall concept of the project and emphasized its main design elements. I began by carefully coloring each small detail individually—the yin-yang symbol, the sun rays, the moon, and the stars—using their corresponding pigments.
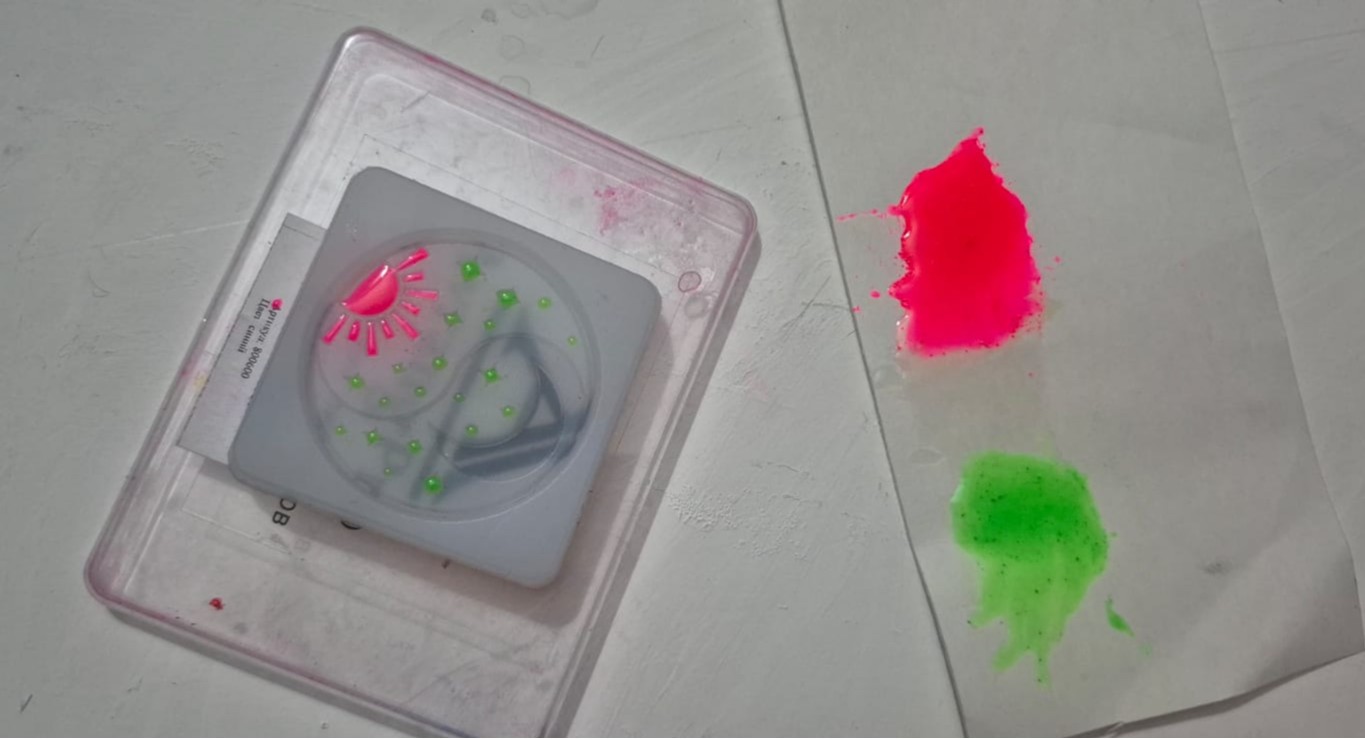
After that, I placed the mold under a UV lamp for a short time to allow these sections to partially cure, preventing the colors from mixing during the following steps.
I then carefully poured the remaining resin into the mold, ensuring that it spread evenly across the entire surface and reached even the smallest and most intricate details.
To help any trapped air bubbles rise to the surface and prevent defects, I briefly passed the flame of a small butane torch over the resin surface. This helped eliminate bubbles and produce a smoother final finish.
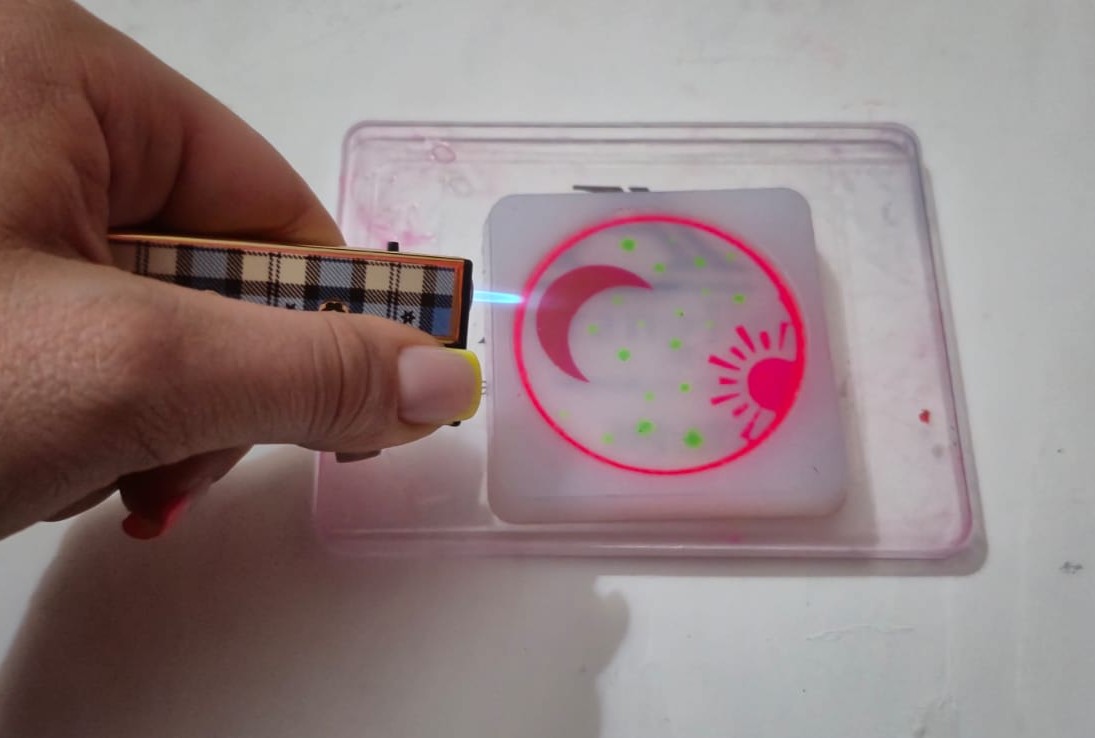
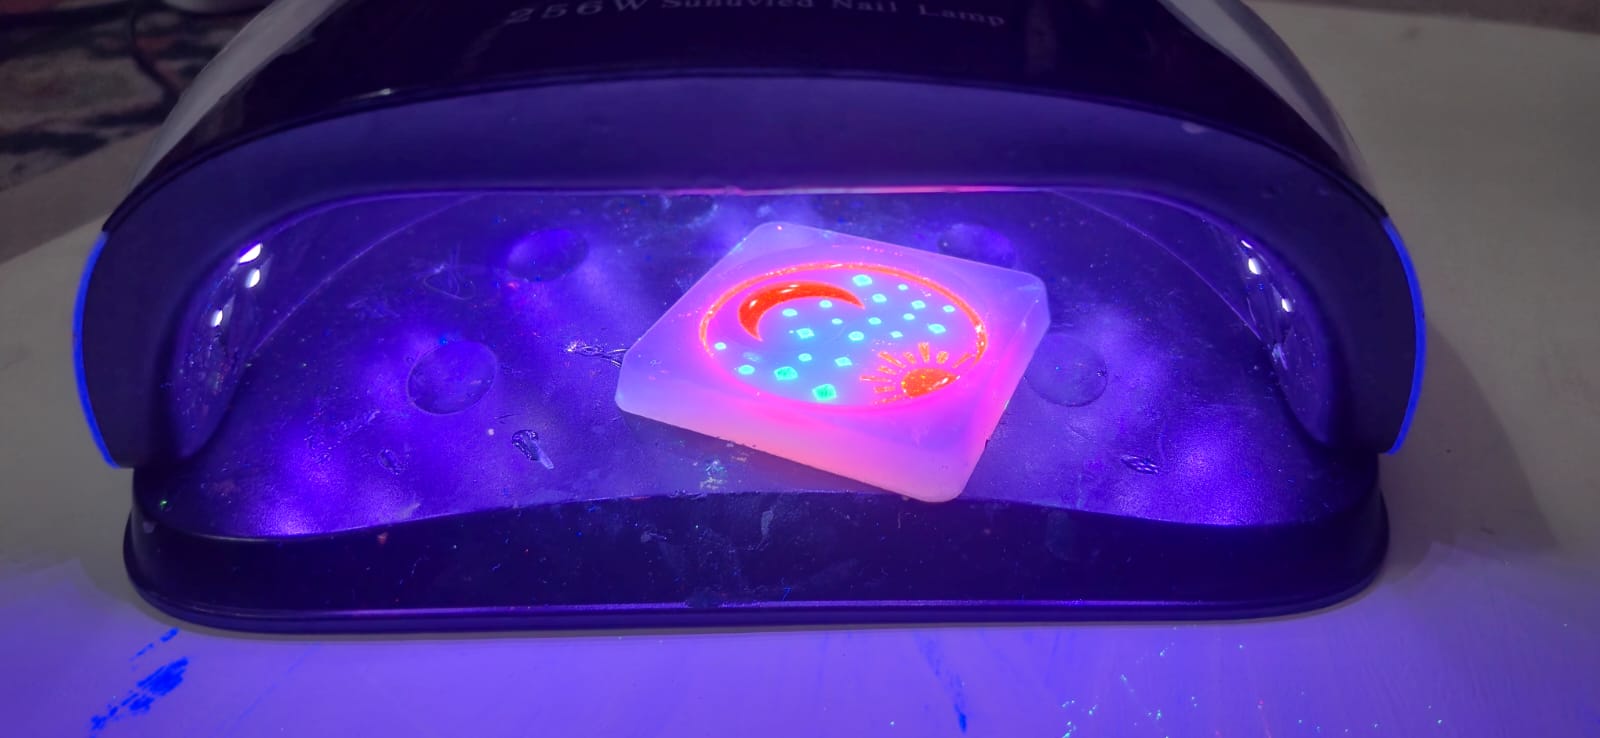
Then I placed the mold under the UV light once again.
Under ultraviolet radiation, the resin gradually cured and reached its final strength. Throughout the process, I monitored the curing to ensure that even the thinnest and most detailed areas were fully hardened.
After the curing process was complete, I carefully removed the finished piece from the silicone mold and evaluated the result.
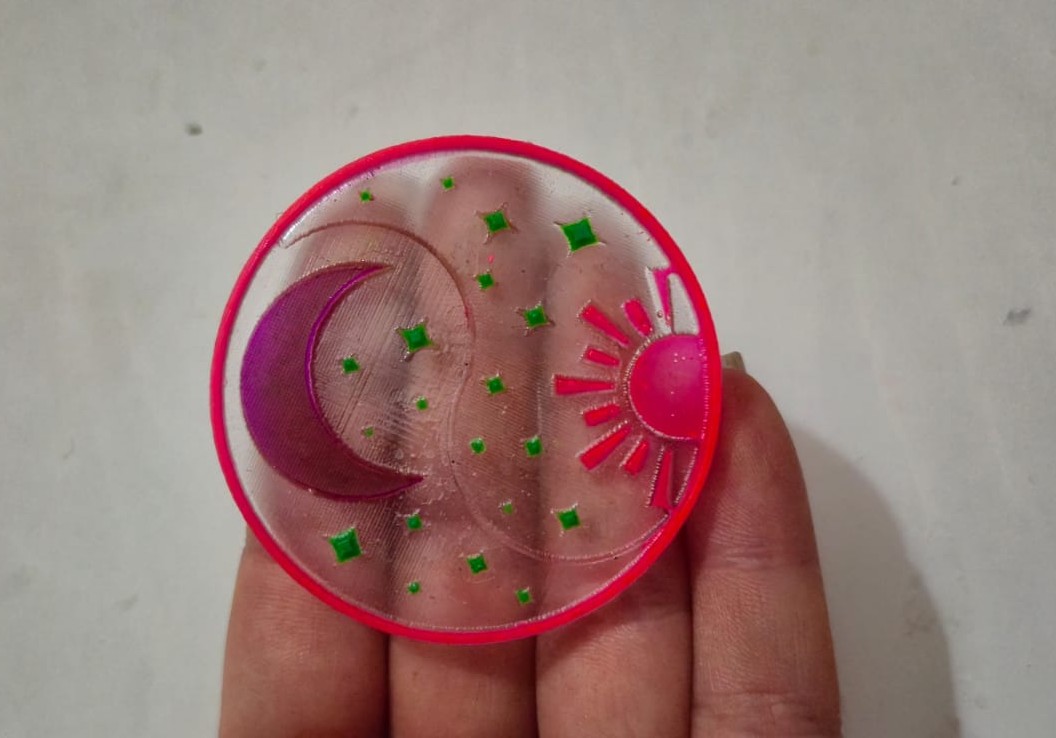
The colored resin successfully reproduced all the details of the mold, while the main design elements—the yin-yang symbol, the sun rays, the moon, and the stars—remained clearly visible. The added pigments gave the final object a more expressive and decorative appearance.
As a result, I obtained a coin-shaped object that successfully reflects the original concept and maintains a strong connection to the overall theme of my final project.
Testing a Second Silicone Mold
Since I had another silicone mold available, I decided to repeat the same casting process and compare the results.
The first mold was made using EpoxyMaster Platinum-Based Silicone, and the UV epoxy resin cured completely, producing a high-quality casting with a smooth surface and all the fine details accurately reproduced.
The second mold was made using WAGNERSIL 22 NF Silicone. Although the mold itself appeared to be successful, I noticed during the casting process that the layer of resin in contact with the bottom surface of the mold did not fully cure and remained sticky. As a result, the final casting could not achieve the same quality as the one produced with the first mold.
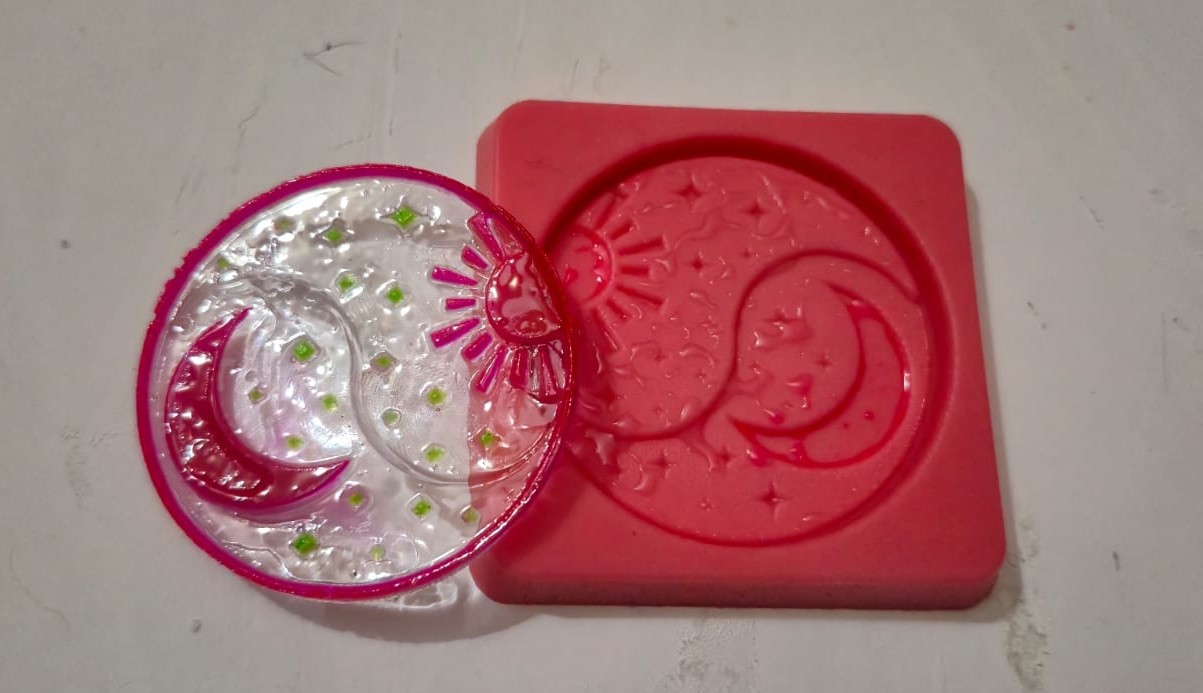
This experiment demonstrated that the type of silicone can have a significant influence on the curing behavior of UV epoxy resin. In my case, EpoxyMaster Platinum-Based Silicone was fully compatible with the resin, while WAGNERSIL 22 NF Silicone inhibited the curing process, leaving the resin layer in contact with the mold uncured.
Conclusion
This week, I went through the complete molding and casting workflow, from designing the model to producing the final object. During the process, I created a wax mold, tested two different types of silicone, and finally cast the object using UV epoxy resin.
Since I have worked with various molding and casting techniques many times during my studies at the Gyumri State Academy of Fine Arts, and have also experimented with different types of resins, this topic was already quite familiar to me. However, this assignment gave me the opportunity to combine that experience with digital design and CNC machining processes.
It was interesting to see how a model designed in FreeCAD gradually transformed into a real physical object. As a result, I successfully created a coin-shaped piece that preserved all the main elements and details of the original design.
Overall, this assignment helped me better understand the complete molding and casting workflow while gaining additional experience with CNC milling, silicone mold making, and resin casting.