Week 17. Applications and Implications, Project Development
ERKXOSUTYUN (Dialogue)
What will it do?
My Final Project, ERKXOSUTYUN (Dialogue), is an outdoor interactive light object that represents the dialogue between light and darkness, day and night.
The system will use a photoresistor (LDR) to measure ambient light levels. When the environment becomes dark, the LED lighting system will automatically turn on. When sufficient light is detected, the LEDs will turn off.
In addition to its light-responsive behavior, the object will have displays that show important environmental data such as time, air temperature, and humidity. These values will be collected using appropriate sensors and displayed in real time on the screens.
In this way, the object creates a dynamic interaction with its environment, responding to natural changes in light while also providing useful information to the user.
Who has done what beforehand?
I have studied several international and Fab Academy interactive lighting projects related to my idea.
In particular, I looked at “BruumRuum!” (Artec3 / David Torrents, Barcelona), an interactive public installation that responds to city noise and human voices using LED lighting. The light changes in color and movement depending on sound intensity, creating a dynamic and “living” urban environment.
I also studied the Fab Academy – Proximity Reactive Flower Lamp (GlowSense) project, which uses a proximity sensor and NeoPixel LEDs to respond to human presence by changing color and brightness depending on distance.
What sources will you use?
I will use the following sources:
- Fab Academy Documentation
- Arduino Documentation
- KiCad Documentation
- Processing Documentation
- Seeed Studio XIAO RP2040 Official Wiki
- RP2040 Datasheet
- DHT11 Temperature and Humidity Sensor Datasheet
- DS3231 Real-Time Clock (RTC) Datasheet
- MAX7219 LED Display Driver Datasheet
- LDR Photoresistor Datasheet
What will you design?
I will design:
- The main structure of the object
- An internal protective enclosure for electronics
- A custom PCB for LED and sensor control
- A mounting system for electronic components
What materials and components will be used?
The project will use:
- PLA / PETG for 3D printed parts
- Acrylic for light diffusion
- Custom PCB
- XIAO RP2040 microcontroller
- Photoresistor (LDR)
- 12V LED strip
- MAX 7219 display
- DHT11 temperature and humidity sensor
- DS3231 real-time clock (RTC) module
- Wires and connectors
- Power supply
- Voltage regulator
Where will they come from?
Electronic components will be purchased from online stores such as AliExpress, Temu, and other electronics suppliers, as well as from local electronics shops when available.
Fabrication materials such as PLA/PETG filament, acrylic sheets, and PCB materials will be provided by the Fab Lab or sourced from online suppliers.
Some components, such as wires, connectors, and basic electronic parts, may also be reused from the Fab Lab inventory or previous projects in order to reduce cost and promote material reuse.
How much will they cost?
| Qty | Description | Price | Link | Origin |
|---|---|---|---|---|
| 1 | MAX7219 display | 5 $ (~1,950 ֏) | temu.com | by in Temu |
| 1 | Voltage regulator | 3 $ (~1,170 ֏) | temu.com | by in Temu |
| 1 | 12V LED strip | 5 $ (~1,950 ֏) | - | Our Lab |
| 1 | DS3231 RTC module | 4–6 $ (~1,560–2,340 ֏) | temu.com | by in Temu |
| 1 | DHT11 sensor | 3 $ (~1,170 ֏) | temu.com | by in Temu |
| 1 | Photoresistor (LDR) | 2–3 $ (~780–1,170 ֏) | temu.com | by in Temu |
| 1 | Power supply | 7–8 $ (~2,730–3,120 ֏) | - | Our Lab |
| 1 | Wires and connectors | 2–3 $ (~780–1,170 ֏) | - | Our Lab |
| 1 | Metal sheet | 40 $ (~15,600 ֏) | - | Our Lab |
| 1 | Mirror | 13 $ (~5,070 ֏) | - | Our Lab |
| 1 m | Metal pipe | 1 $ (~390 ֏) | - | Our Lab |
| 1 m | Plastic film | 4 $ (~1,560 ֏) | - | Our Lab |
| 1 kg | PLA / PETG filament | 32.99 $ (~12,866 ֏) | prusa3d.com | Our Lab |
| 1 m² | Acrylic sheets | 18 $ (~7,020 ֏) | - | Our Lab |
| - | XIAO RP2040 microcontroller | 6.23 $ (~2,430 ֏) | Seeed Studio – XIAO RP2040 | Our Lab |
| 1 | PCB boards | 9.05 $ (~3,530 ֏) | aliexpress.ru | Our Lab |
| - | MOSFETs, resistors, capacitors, and other electronic components | 3 $ (~1,170 ֏) | - | Our Lab |
| Total | ~165 $ (~64,350 ֏ AMD) |
What parts and systems will be made?
The following parts and systems will be developed within the project:
- Main structural body of the object
- Internal protective enclosure for electronics
- Custom PCB for sensor and LED control
- Power distribution system
- LED lighting system
- Embedded control system integrating all sensors and outputs
- Display integration system for real-time data visualization
What processes will be used?
The project includes the following processes:
- 2D design (preparation of laser cutting files)
- 3D modeling (FreeCAD)
- Additive fabrication (3D printing)
- PCB design and milling (KiCad + CNC)
- Soldering and electronics assembly
- Embedded programming (Arduino IDE)
- Sensor integration and calibration
- System integration and testing
- Final assembly and packaging
What questions need to be answered?
During the development process, the following questions need to be addressed:
- Does the system respond correctly to changes in ambient light?
- Are the temperature, humidity, and time data accurate?
- Is the system stable during long-term operation?
- Are all electronic components properly powered and protected?
- How successfully is the concept of dialogue between light and darkness implemented?
How will it be evaluated?
The project will be evaluated based on the following criteria:
- Performance of the light-responsive system
- Accuracy of sensor data (LDR, DHT11, DS3231)
- Quality of PCB fabrication and soldering
- Structural strength and design quality
- Hardware and software integration
- Overall system stability and performance
- Clarity and successful realization of the concept
Project Development
Preparing the presentation materials
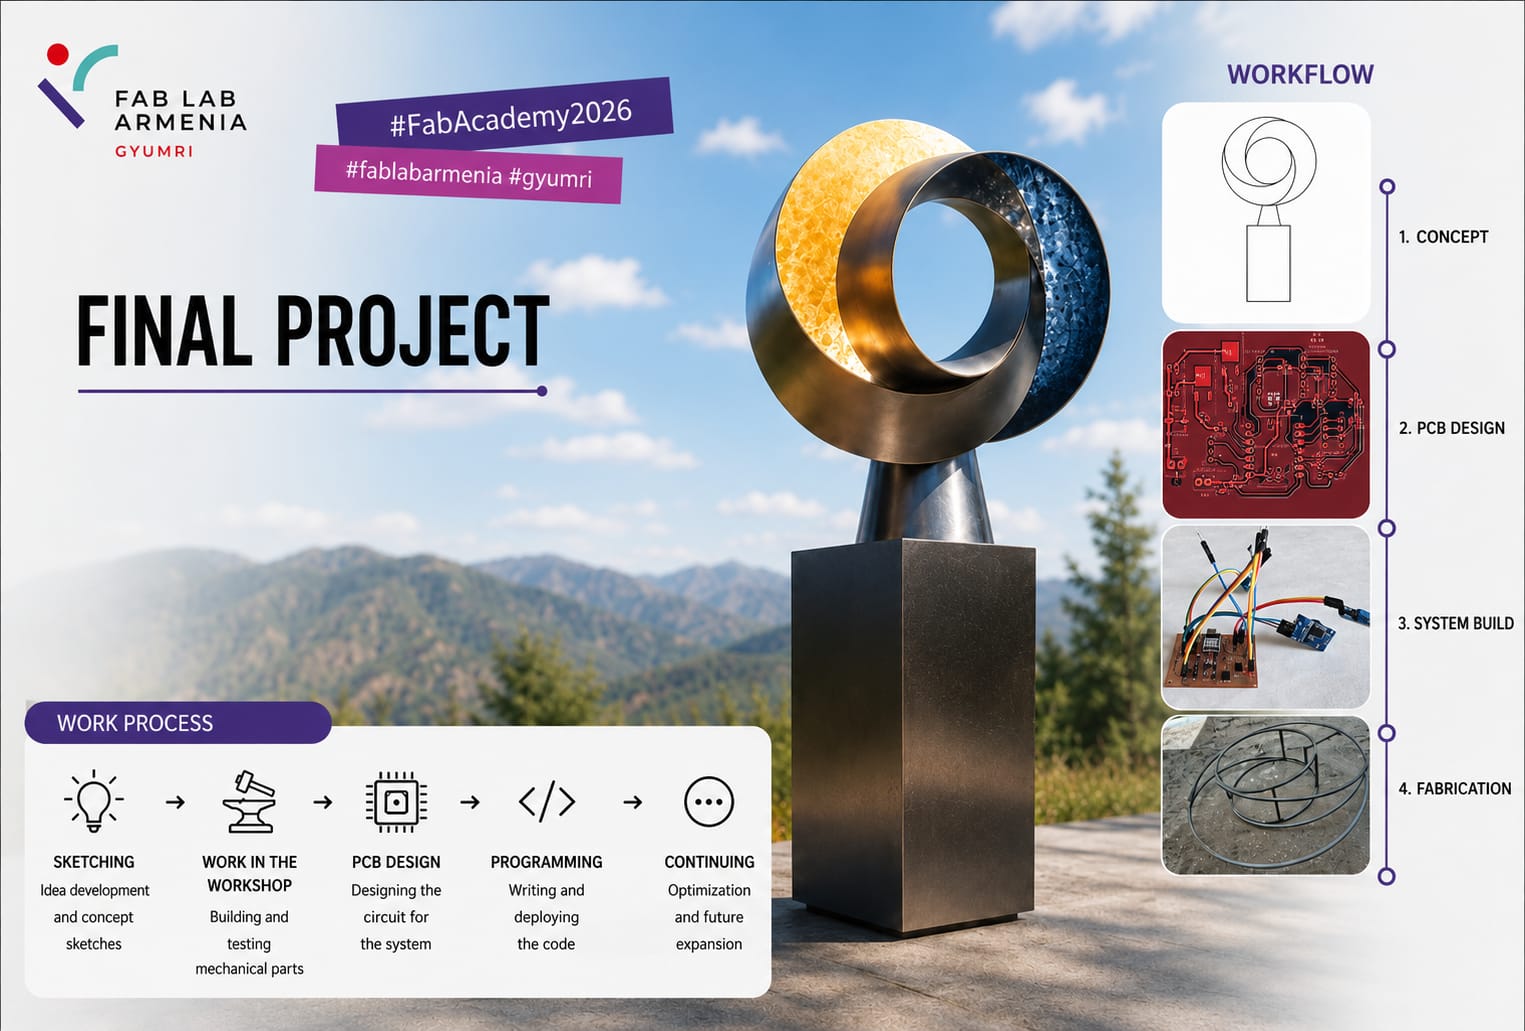
As part of this week’s assignment, I prepared placeholder versions of the required presentation files for my final project. These include a presentation slide (presentation.png, 1920 × 1080) and a presentation video (presentation.mp4, 1080p HTML5). These temporary files fulfill the weekly documentation requirements and will later be replaced with the final versions of my project presentation.
Creating placeholder files
Since my final project is still under development, I created temporary presentation materials that represent the current concept of my project. These placeholders allow me to verify that the required files are correctly recognized and will be updated once the project is completed.
Uploading the files
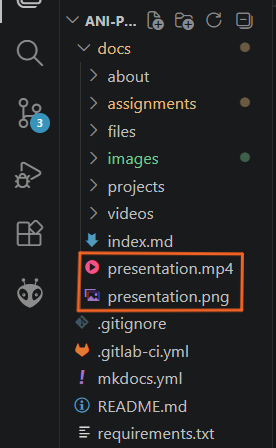
After preparing the placeholder slide and video, I uploaded them to the root directory of my website using the required filenames: presentation.png and presentation.mp4. Since my website is generated from Markdown using MkDocs, I placed the presentation files in the docs directory using the required filenames: presentation.png and presentation.mp4. This allows the Fab Academy presentation system to correctly detect and link the required files.
Verification
After pushing the updated files to my GitLab repository and waiting for the website to rebuild, I checked the Final Presentation Schedule to confirm that both placeholder files were successfully detected and correctly linked.

This verified that the required presentation files were uploaded properly and are ready to be replaced with the final versions before the end of the course.