Week 1. Principles and practices, Project management
Final project
Concept 1
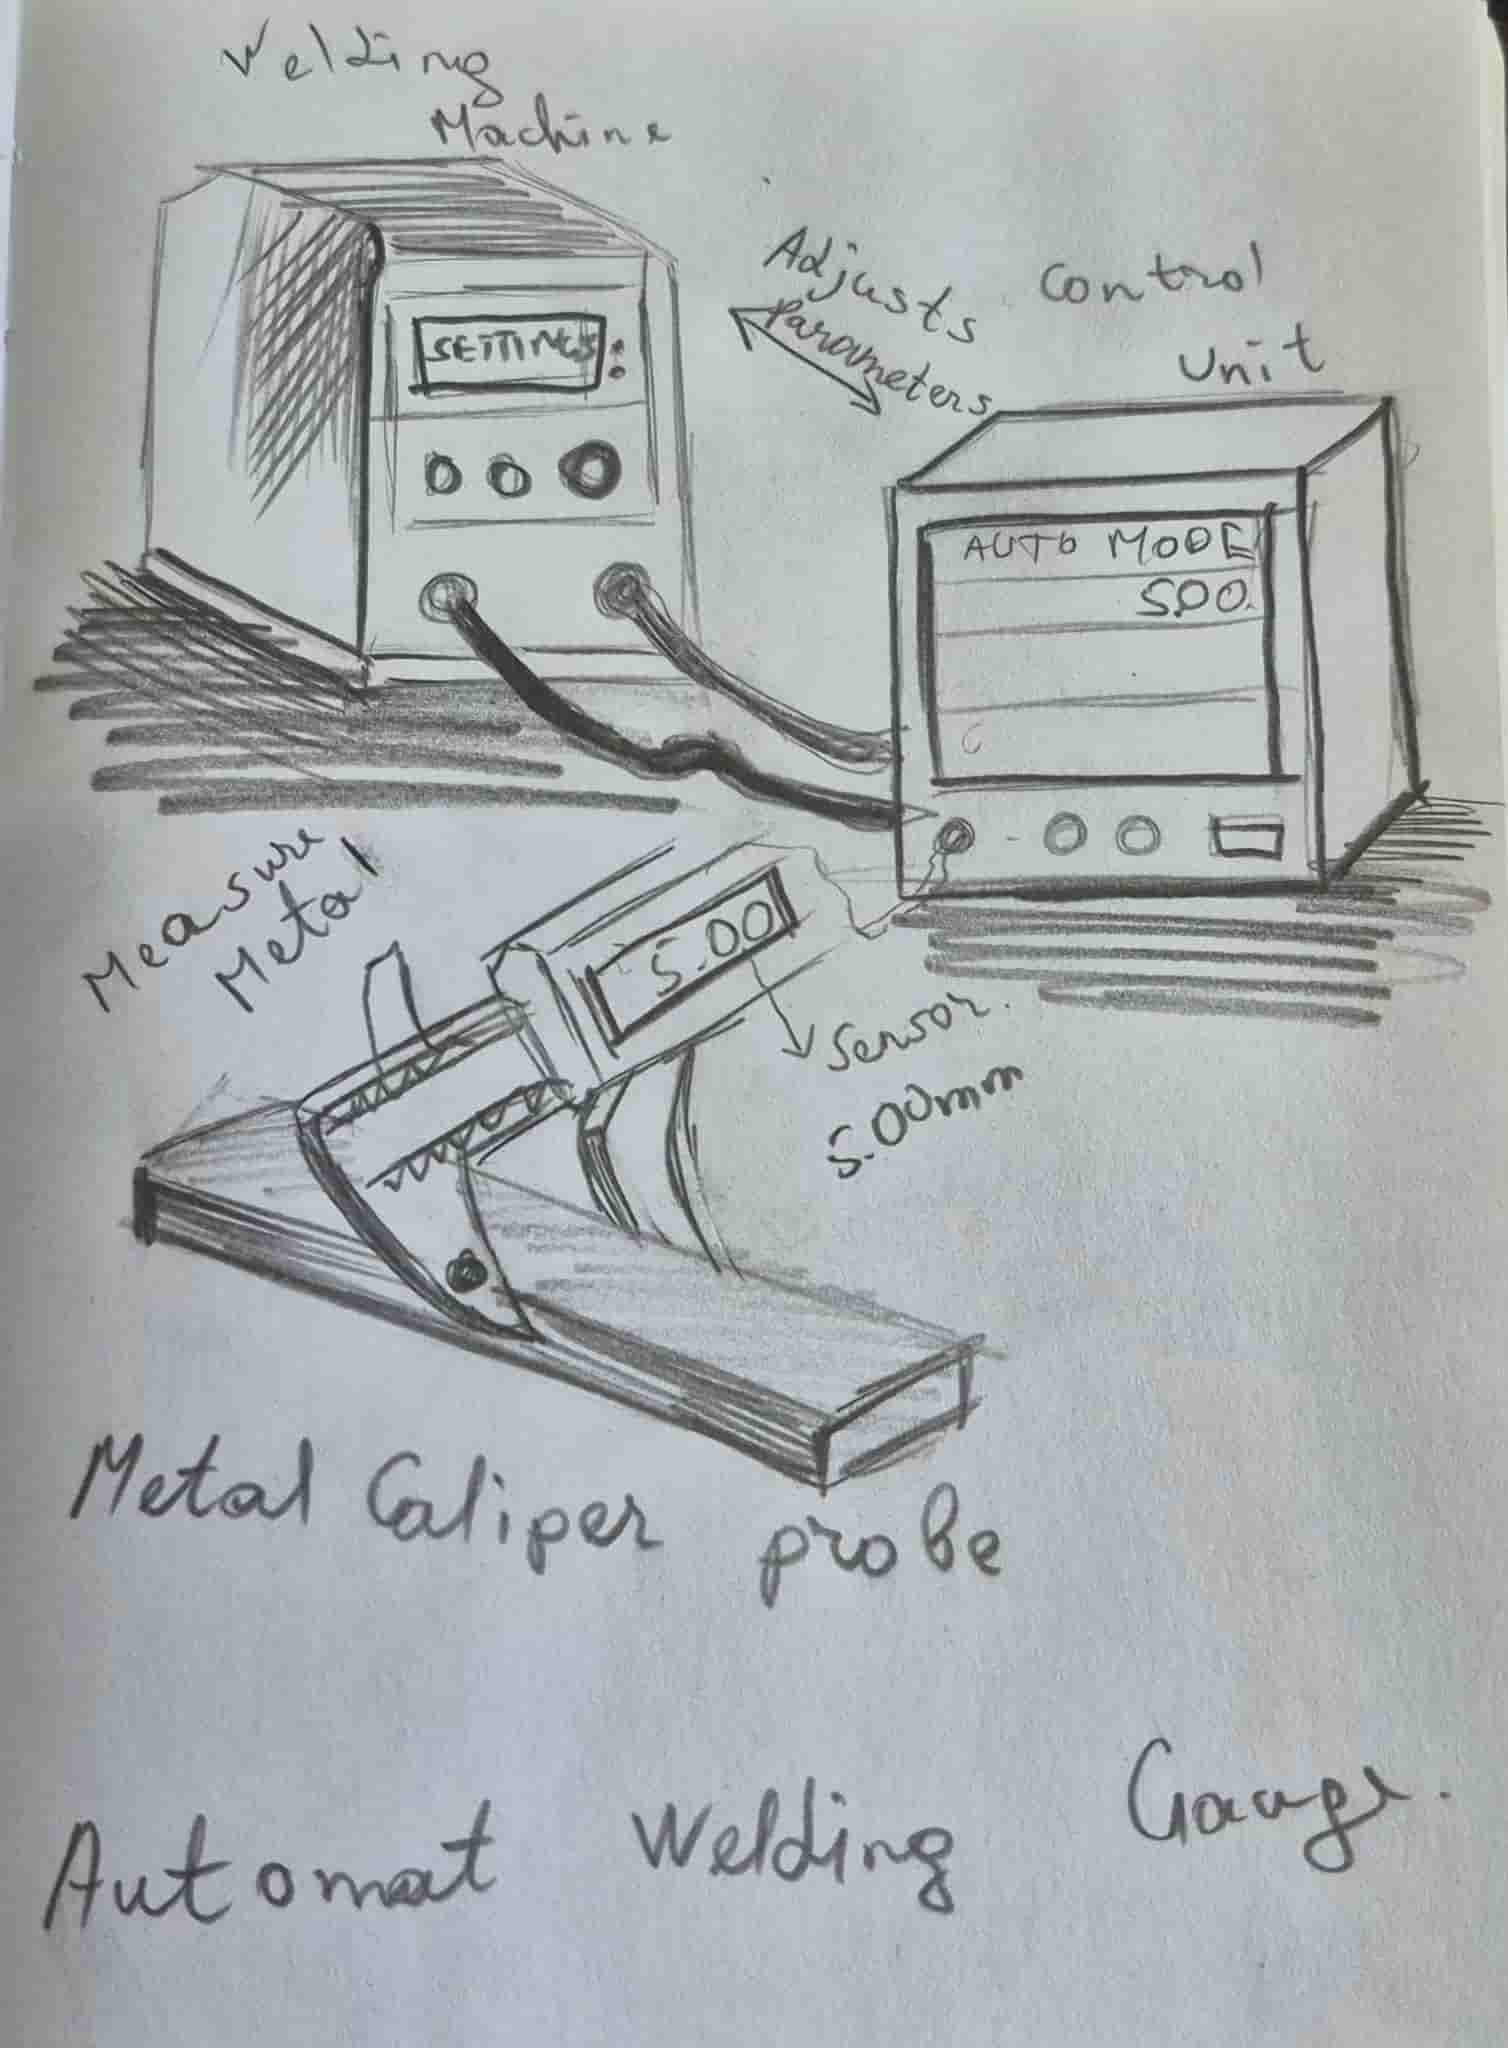
For my final project, I am trying to build an Automated Welding Gauge. This device will measure the thickness of metal and automatically adjust the welding machine parameters accordingly. The goal of this project is to simplify the welding process, reduce human error, and improve the overall quality of welds.
I am testing this device in practice because it will be very useful not only for me but also for other students at our university. It is designed to make welding more precise, efficient, and easier to perform for metal pieces of different thicknesses.
Working Principle:
-
The device includes a caliper-like probe that measures the thickness of the metal.
-
When the probe touches the metal, it reads the thickness and sends the data to the control unit.
-
The control unit processes the data and calculates the optimal welding parameters such as voltage and current.
-
These parameters are automatically sent to the welding machine, which adjusts its settings accordingly.
-
The machine performs the welding operation with the calculated settings, ensuring precise and high-quality welds.
This system is intended to be practical and helpful, improving workflow and making welding safer and more efficient.
Concept 2
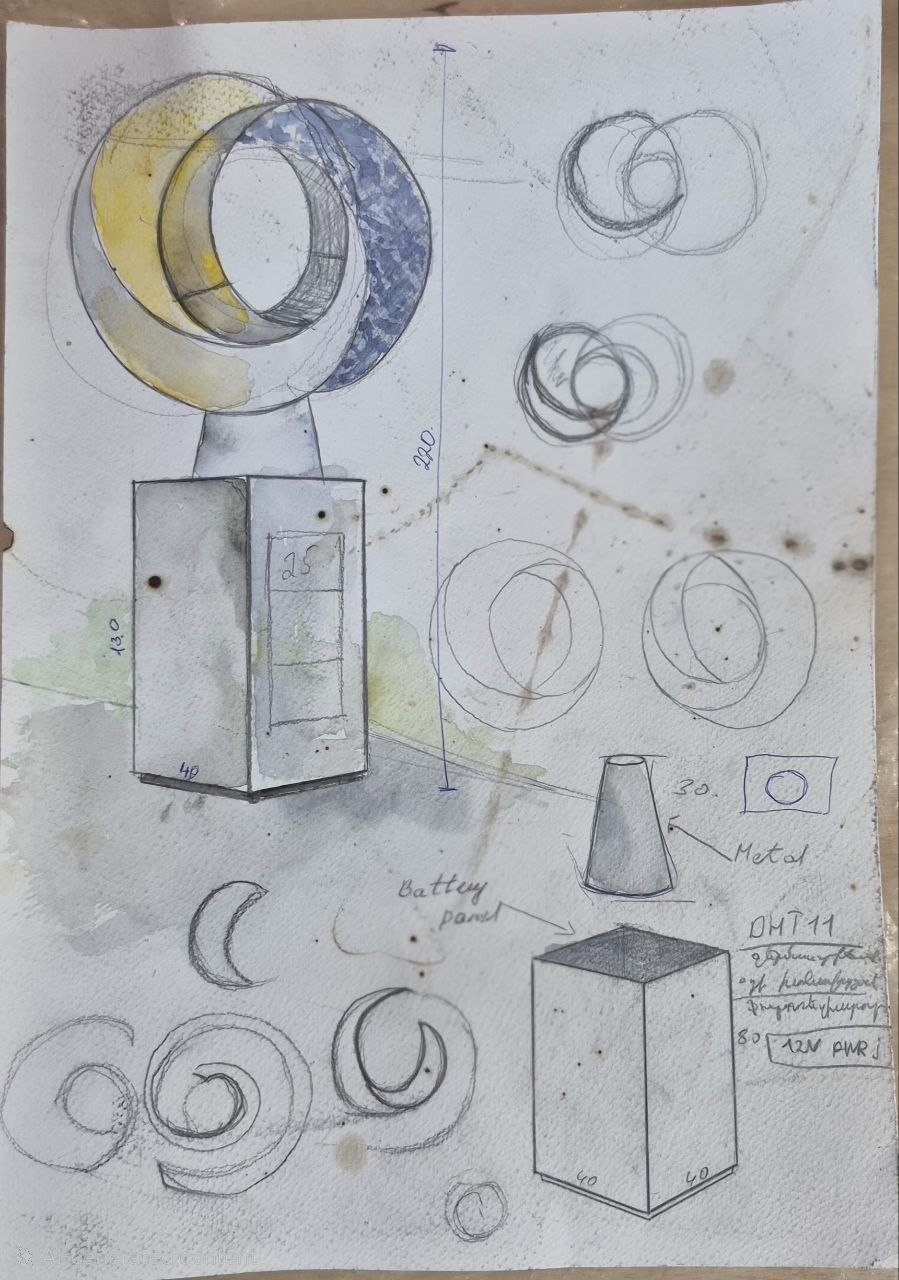
I created the sketch by hand, and after finishing it, I realized that the idea could be presented in a more vivid and realistic way. Therefore, I decided to visualize it using artificial intelligence, specifically with the help of ChatGPT. For this, I provided the system with my hand-drawn sketch and gave the following prompt:
Take my hand-drawn sketch as a basis and transform it into a high-quality, realistic 3D visualization.
Preserve the main composition, proportions, and concept of the sketch, featuring two intersecting circular/ring-shaped elements.
Depict the object as a contemporary interactive outdoor sculptural installation with a metallic base.
Use metallic and reflective materials, with one section symbolizing the sun/day using warm yellow-golden lighting, and the other section symbolizing the moon/night with cool blue lighting.
Create two different environments — daytime and nighttime — to show the object’s transformation depending on lighting conditions.
Integrate digital illuminated information screens/indicators on the base, displaying temperature, humidity, and time.
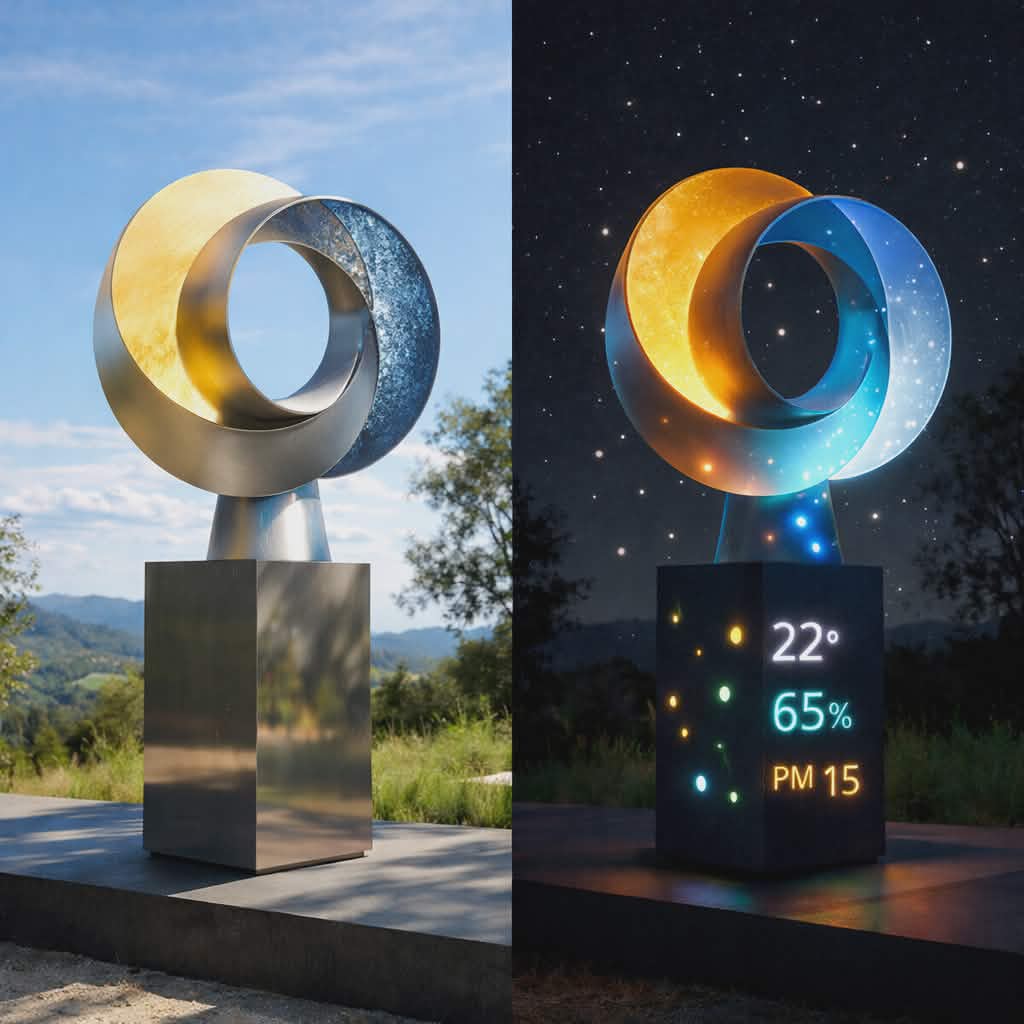
My final project is an interactive object designed for outdoor environments. The core concept is built around the contrast between light and darkness, day and night. The object is designed to have different characteristics and behavior depending on the time of day, responding both to the passage of time and to environmental conditions.
The object will be fully powered by solar energy. During daytime, it collects energy through solar panels and stores it in a battery system. At night, the stored energy is used to power the lighting and sensor systems. In this way, the object not only reacts to the transition between light and darkness but structurally depends on this natural cycle for its operation.
During the daytime, the object functions as a silent, minimal sculptural form. At this stage, the emphasis is placed on materiality, geometry, and the interaction with natural light. Sunlight passes through or around the object, creating shadows and visual effects without artificial illumination. At the same time, the system accumulates solar energy in preparation for the night phase.
At night, the object “awakens.” It becomes internally illuminated using LED lighting and begins actively responding to environmental changes. Light becomes the primary communication medium of the object, generating visual signals and atmosphere.
The object is equipped with multiple sensors that measure environmental parameters such as temperature, humidity, and ambient light levels. The light sensor distinguishes between day and night, while temperature and humidity data influence the color, intensity, and behavior of the lighting. For example, higher temperatures may result in warmer color tones, while higher humidity levels may trigger slow pulsation or variations in intensity. In this way, the object “speaks” through light, translating environmental data into visual expression.
Technically, the system may be based on an Arduino or ESP32 microcontroller, environmental sensors, LED modules, and a solar energy management system (solar panel, battery, and charge controller). Since the object is intended for outdoor installation, particular attention is given to enclosure protection and system reliability under varying weather conditions.
This project integrates art, technology, and sustainable energy principles. It is not only a functional and autonomous system, but also a conceptual object that lives in harmony with natural cycles—feeding on light and manifesting in darkness. Over time, the object changes, responds to its environment, and creates different experiences for the viewer during day and night.
Developing the Final Concept
Initially, I planned to develop an Automated Welding Gauge, a highly functional and technical device aimed at improving welding precision and reducing human error. While the concept is practical and useful, during the development process I realized that it is heavily engineering-focused and requires a high level of technical calibration, safety considerations, and integration with industrial welding systems. This makes the project complex to prototype and difficult to fully realize within the available time and resources.
In addition, I felt that this concept does not fully reflect my personal creative direction and artistic interests. My work is strongly connected to visual expression, material exploration, and the relationship between objects and their environment. The first concept, although useful, is more focused on utility than on experience or interaction.
For these reasons, I decided to transition to Concept 2. This new direction allows me to combine art, technology, and environmental awareness. It gives me the opportunity to explore light, form, and atmosphere—elements that are much closer to my creative identity.
Concept 2 is also more flexible in terms of experimentation and prototyping. It allows me to work with accessible technologies such as microcontrollers, sensors, and LED systems, while still creating a meaningful and interactive object. Moreover, it introduces a sustainable aspect through the use of solar energy, which adds both conceptual depth and real-world relevance.
Overall, this transition enables me to create a project that is not only technically engaging but also expressive, experiential, and aligned with my artistic vision.
Researching And First Steps
During the first week, I became familiar with the website development process and created my own documentation page to present my journey throughout the Fab Academy program.
Since I had no prior experience in website development, I began by exploring the documentation pages of Fab Academy participants from previous years. In particular, I studied the documentation of last year’s participant Mkhitar Evoyan, the previous year’s participant Elen Grigoryan, and Rudolf Igityan a participant from 2023.
Support During the Learning Process
Although I studied the purpose of Git and its role in the Fab Academy documentation process, during the first week I was not able to fully configure the website and upload changes using Git on my own.
As a result, I received support through a Zoom meeting, where my instructors explained the process in detail and helped me overcome the difficulties I encountered. In particular, Onik Babajanyan provided significant support by guiding me step by step through the logic of Git and the correct structure of the documentation page.
This support played an important role in my learning process and helped me confidently continue my work within the Fab Academy program.
Programs that are needed for work
Through this research, I understood that documenting work on the Fab Academy website requires working with several essential tools.
-
Git is a tool that tracks all changes made to files, stores their history, and helps manage projects in a safe and organized way. It allows users to return to previous versions, compare changes, and see what has been modified on GitLab.
-
Git Bash a command-line interface for Windows that allows users to work with Git and execute version control commands in a Unix-like environment, making it easier to manage and upload project files.
-
GitLab is used to manage the Fab Academy documentation repository and upload changes to the GitLab platform. It operates through commands and allows tracking and controlling changes made to files.
-
Visual Studio Code is used to write, edit, and manage the website code and Markdown files.
Network Security Protocols
1. HTTPS
HTTPS (HyperText Transfer Protocol Secure) is a secure communication protocol used on the internet.
In the context of Git, HTTPS allows you to connect to a repository using a standard web URL.
Advantages:
- No additional setup is required
- Easy to use
- Suitable for beginners
Disadvantages:
- Every time you run git push or git pull, you may be prompted to enter your username and password
- Slower and less convenient for long-term use
2. SSH
SSH (Secure Shell) is a secure connection method that uses public and private keys.
With SSH, authentication is done using these keys instead of a password.
Advantages:
- No need to enter a username and password each time
- Faster and more convenient workflow
- More secure connection
Disadvantages:
- Requires creating and configuring an SSH key initially
I set up and used an SSH key to connect to the Git repository.
Setting Up SSH and Cloning the Repository
After installing Git, I created a folder for all Fab Academy files and ran Git Bash.
I started by setting up my Git global user with these commands:
git config user.name "Your Name"
git config user.email "you@example.org"

This ensures that all my commits are linked to my identity.
Next, I cloned the Fab Academy repository to my computer:
git clone https://gitlab.fabcloud.org/REPOSITORY_URL
After cloning, I navigated into the repository folder:
cd REPOSITORY_NAME
With the repository cloned and the folder ready, I now have a local copy of all files and the full project history, prepared for editing, version control, and further work.
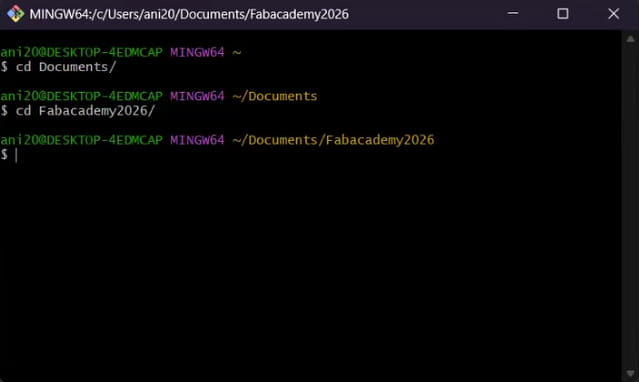
Next, I navigated to the correct working folder to ensure I was in the right location:
cd documents
cd Fabacademy2026
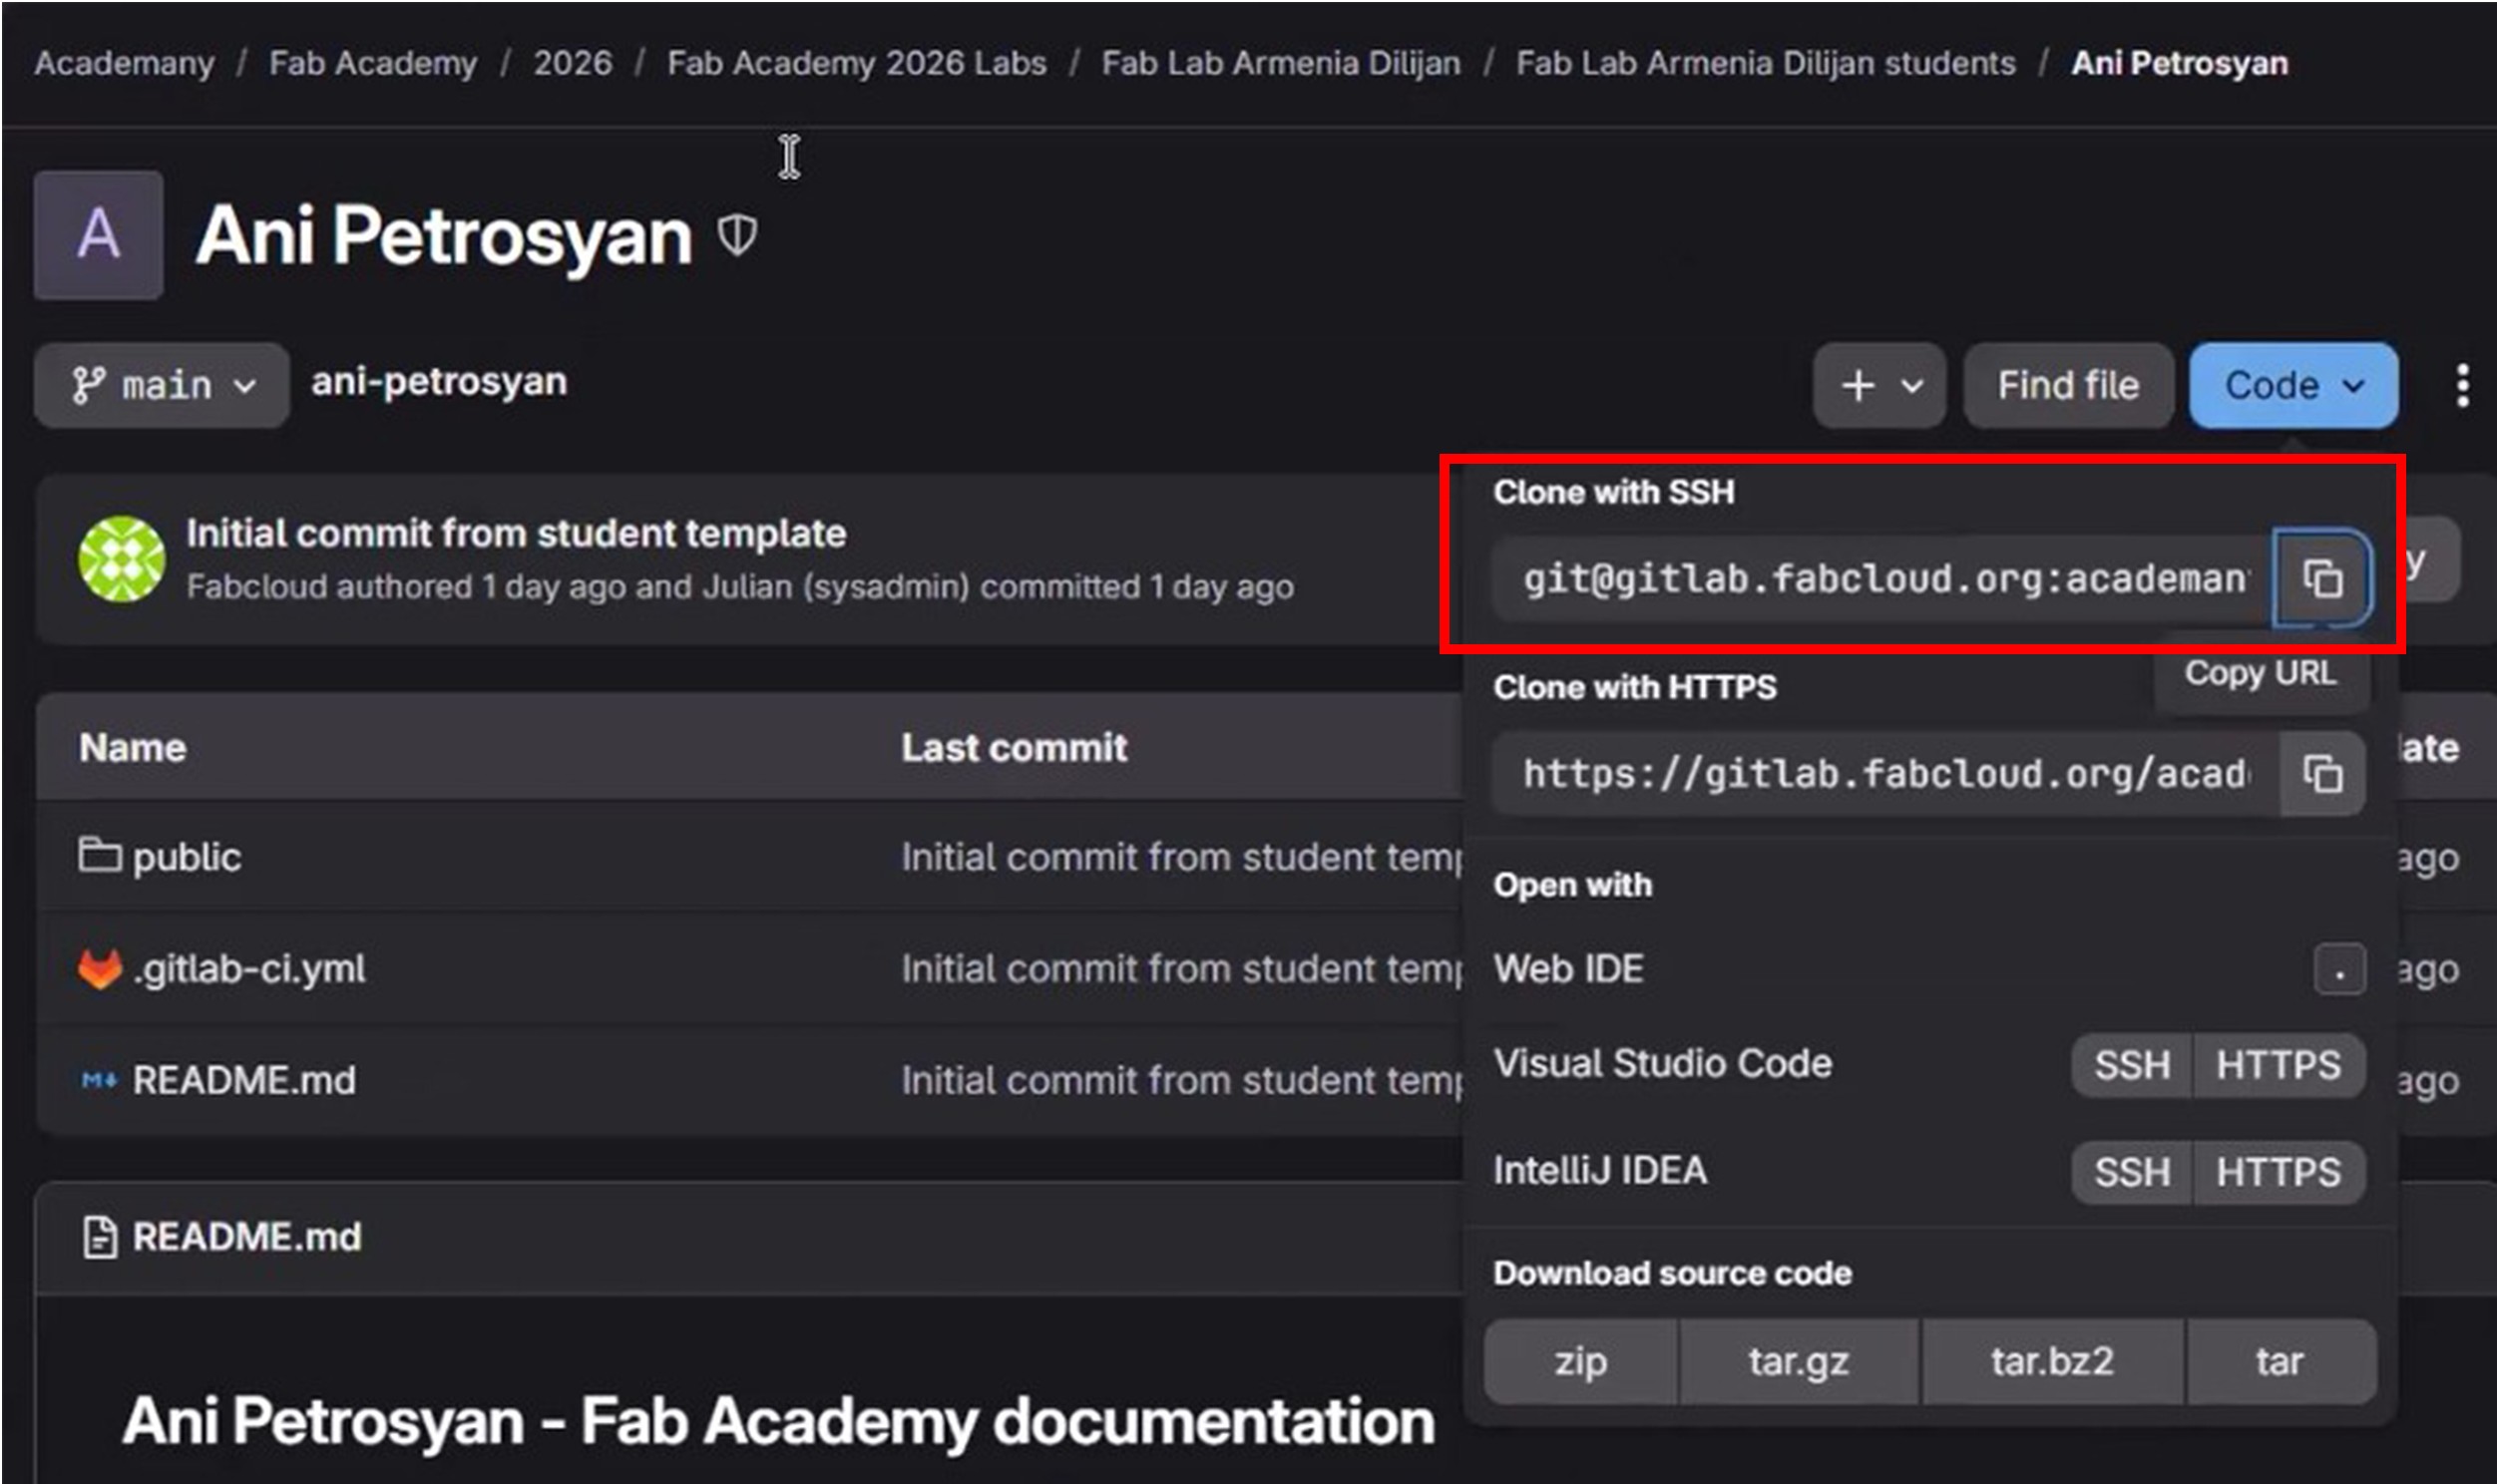
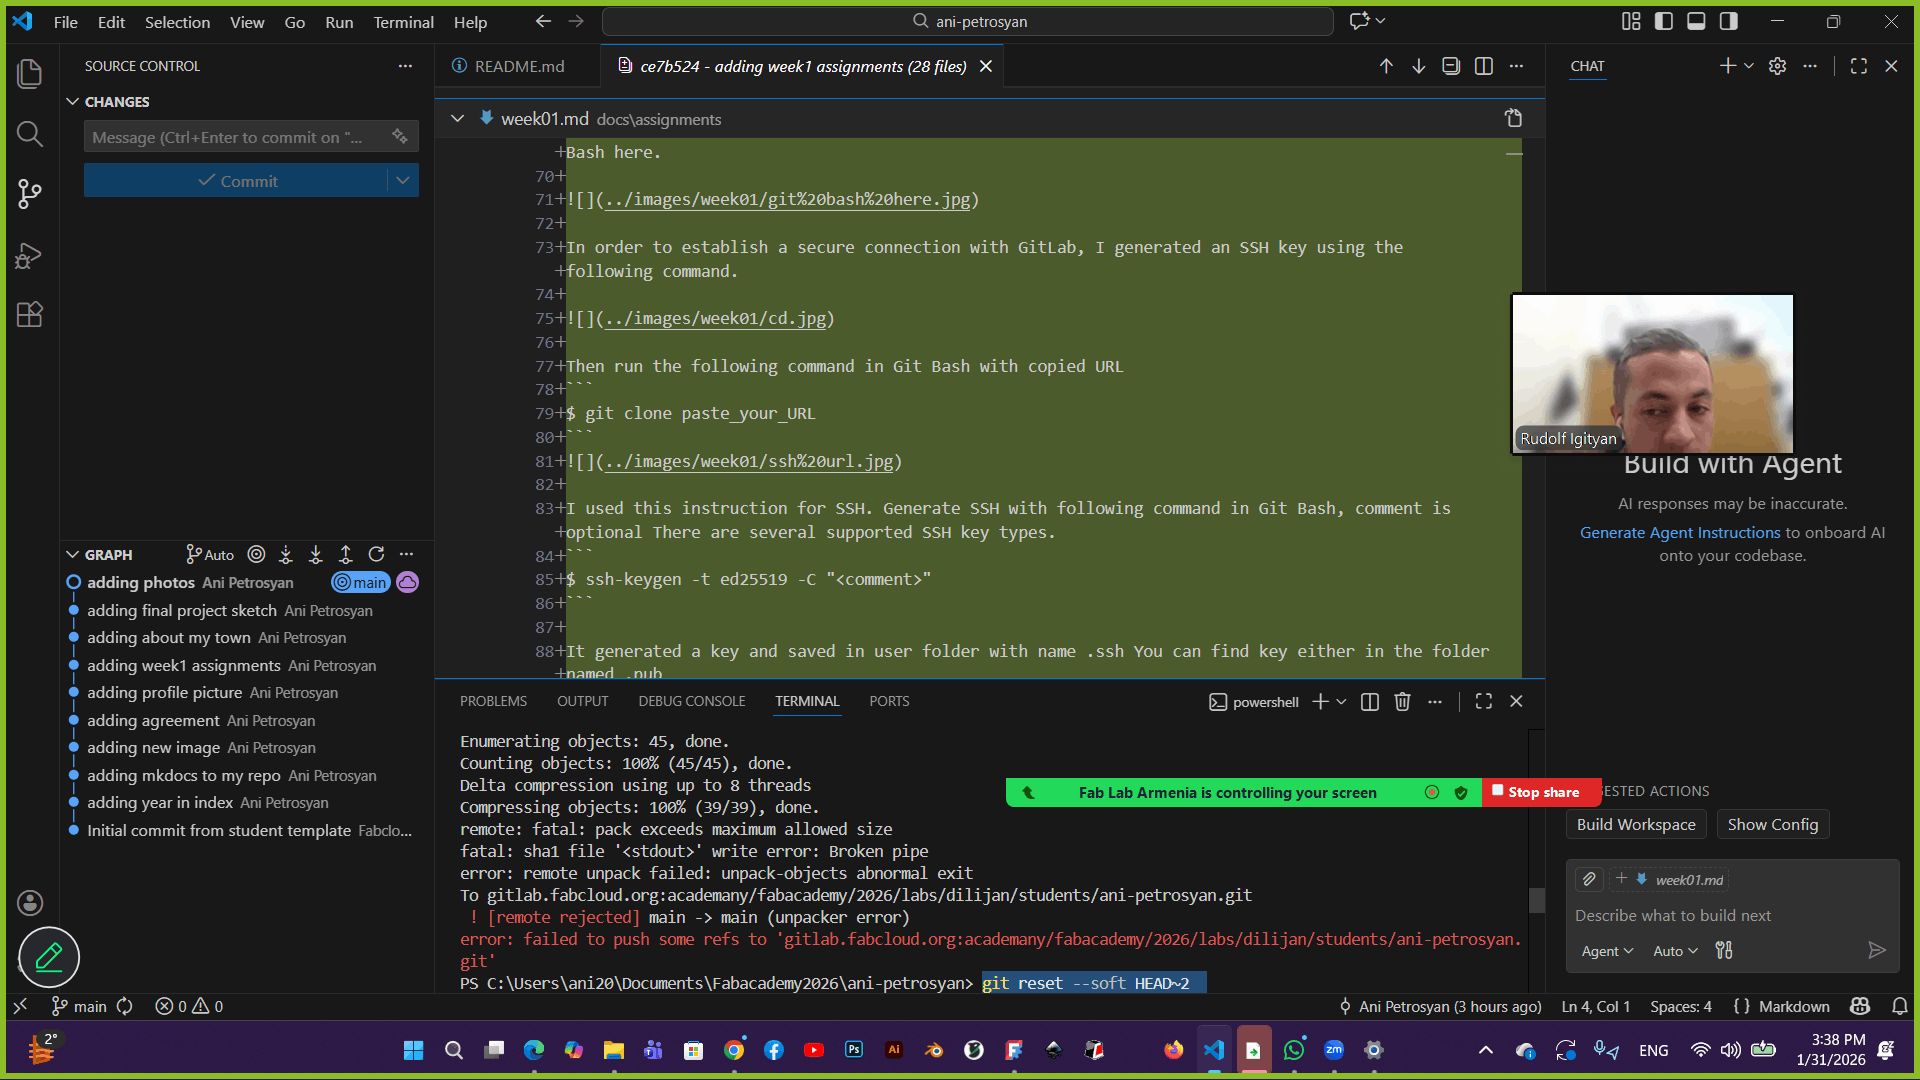
Then, I went to the Fab Academy repository on GitHub/GitLab, clicked Code, selected SSH, and copied the displayed URL.
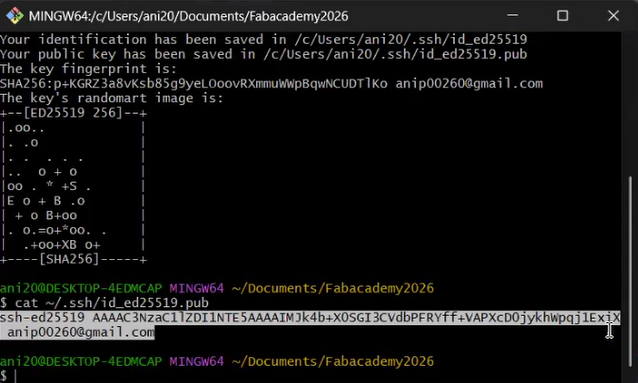
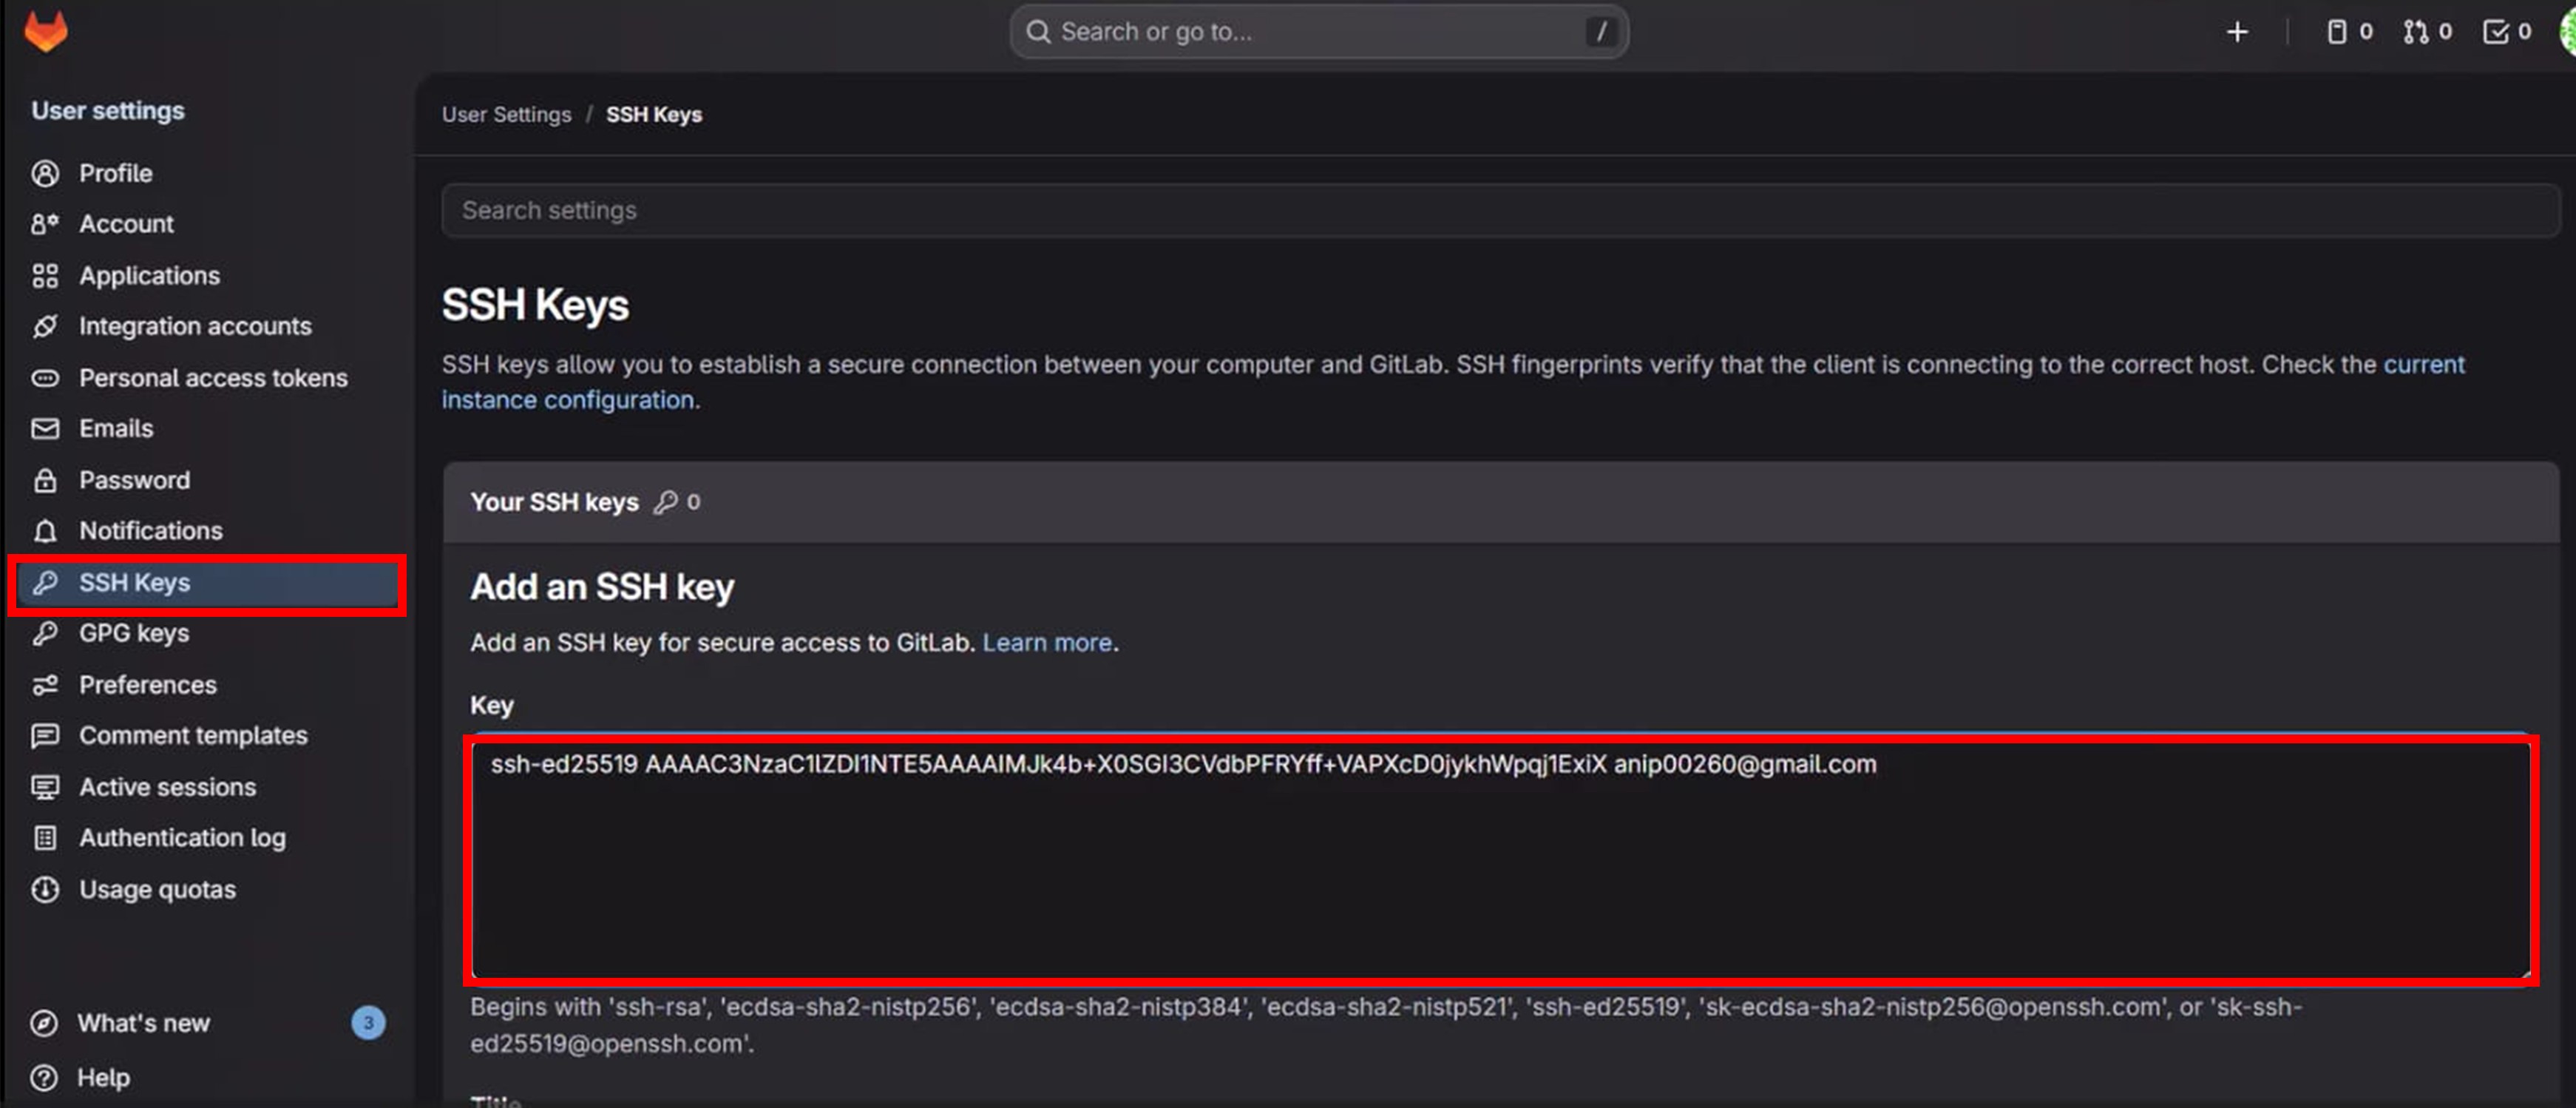
In order to establish a secure connection with GitLab, I generated an SSH key using the following command.
I used this instruction for SSH. Generate SSH with following command in Git Bash, comment is optional There are several supported SSH key types.
$ ssh-keygen -t ed25519 -C "<comment>"
To copy the public key, I used:
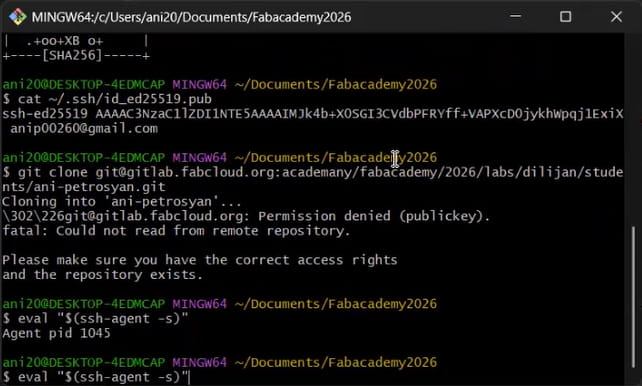
$ cat ~/.ssh/id_ed25519.pub
I added an SSH key to GitHub/GitLab
After generating the SSH key, it needs to be added to the ssh-agent so that Git knows which key to use.
First, start the ssh-agent by running the following command in Git Bash:
$ eval "$(ssh-agent -s)"
I added my SSH key to the agent.
$ ssh-add ~/.ssh/id_ed25519
$ ssh-add -l
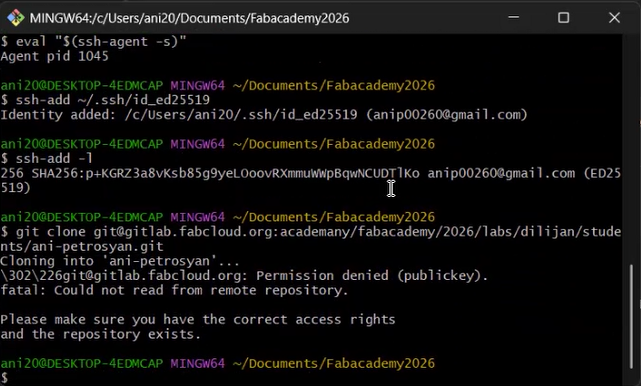
I checked that the key was loaded and ready to use.
Once my SSH key was added and the connection was established, I cloned the Fab Academy repository to my local computer. Cloning creates a complete copy of all files, folders, and the entire history of the remote repository, allowing me to work locally while keeping it in sync with the remote version.
I ran the command:
$ git clone SSH_URL
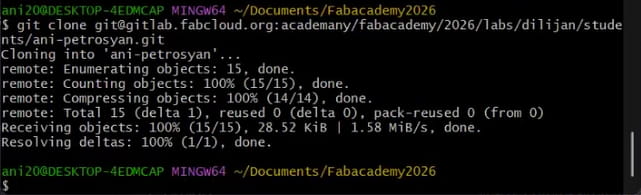
-
Git created a new folder with the repository name inside my current working directory (Fabacademy2026).
-
All files from the remote repository have been downloaded to my computer.
-
Git automatically sets up a remote called origin, which manages the connection to the remote repository. This allows me to push my changes back and pull future updates from the remote repository.
By cloning the repository, I ensured that I have the full history of the project, not just the latest files. I can now safely start working on assignments, create new files, and make changes locally before pushing them to the remote repository.
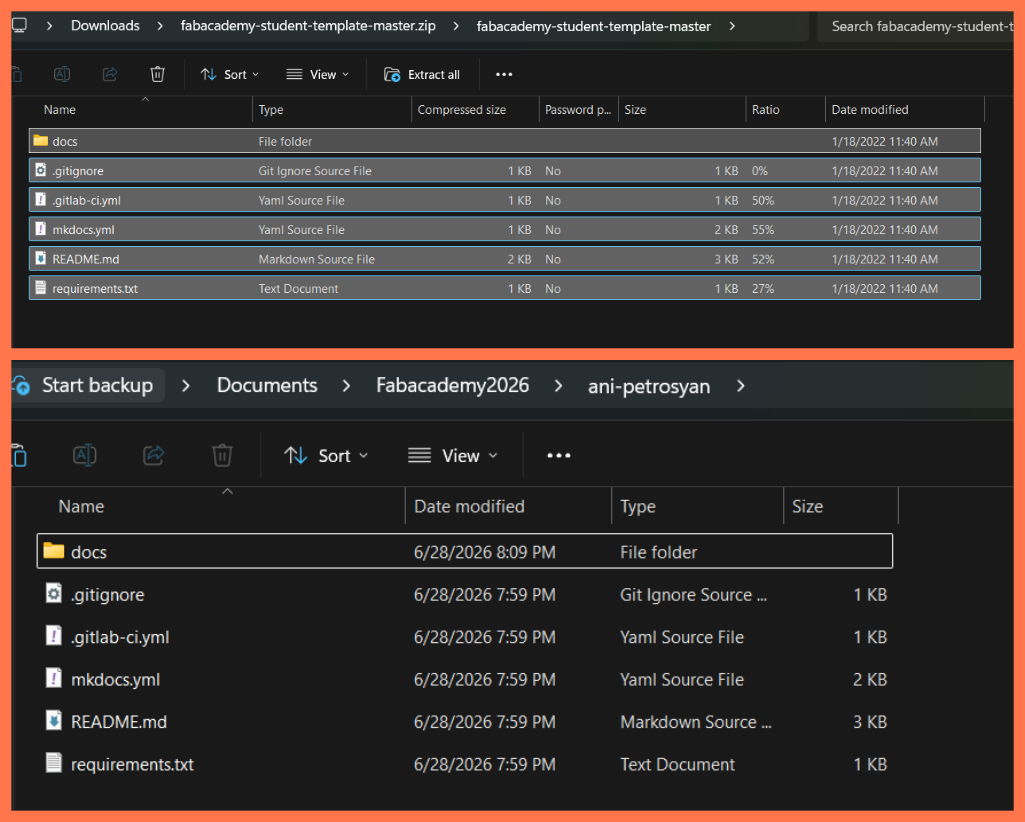
After cloning my repository, I downloaded the MkDocs Material template from the Templates section of the Fab Academy GitLab page as a ZIP file.
After extracting the ZIP archive, I copied all of the template files and folders into my ani-petrosyan repository and replaced the default Fab Academy website template with the MkDocs Material template. This provided the docs folder, the mkdocs.yml configuration file, and the required project structure for building my documentation website.
With the template in place, my repository was ready to use the MkDocs Material theme. I could then open the project in Visual Studio Code and continue customizing the website by editing the mkdocs.yml file and adding my own content.
Working in Visual Studio Code
After cloning the repository, I opened the project in Visual Studio Code to start working on my assignments and documentation. Opening the folder in VS Code allows me to edit files, manage version control, and preview changes.

Inside VS Code, I was able to easily navigate through the project structure, modify my documentation files, and keep track of all updates. The built-in terminal also allowed me to run Git commands directly, without switching between different applications.
This made my workflow more efficient, as I could write, edit, and manage my files in one place while staying connected to the repository.
Tracking Changes with Git
Before moving on to building the documentation site, it’s important to tell Git which files to track. This ensures that all my changes are prepared for version control and ready to be committed.
git add .
With the changes staged, I could now safely proceed to structure and publish my documentation.
MKDocs and MarkDown
For my documentation, I used Markdown because it is a simple, clear, and easy-to-use tool. With Markdown, I can create clean, well-organized, and readable documents, including images, links, formatted text, and code blocks, without needing to write complex HTML.
Markdown also integrates seamlessly with GitLab and GitHub, which allows me to easily manage and update my documentation, track changes, and work efficiently in both individual and team projects. This combination is especially useful when I need to follow each step of my workflow and showcase completed tasks to instructors or team members in a clear and professional way.
To build my documentation site, I used MKDocs, a tool designed for creating static websites directly from Markdown files. This process was supported by Elen Grigoryan, who guided me and shared helpful resources, including this page: link.
MKDocs allowed me to organize and present my documentation as a clean and structured website. Since it works directly with Markdown, I could focus on writing content while MKDocs automatically transformed it into a well-formatted and visually clear site.
It also provides an easy way to structure pages into sections and subsections, improving navigation and making the documentation more user-friendly. Additionally, MKDocs is lightweight and fast, allowing me to quickly update the site and immediately see the results after making changes.
Additionally, MKDocs is lightweight and fast, allowing me to quickly update the site and immediately see the results after making changes.
To improve the appearance and structure of my documentation, I made changes in the mkdocs.yml configuration file.
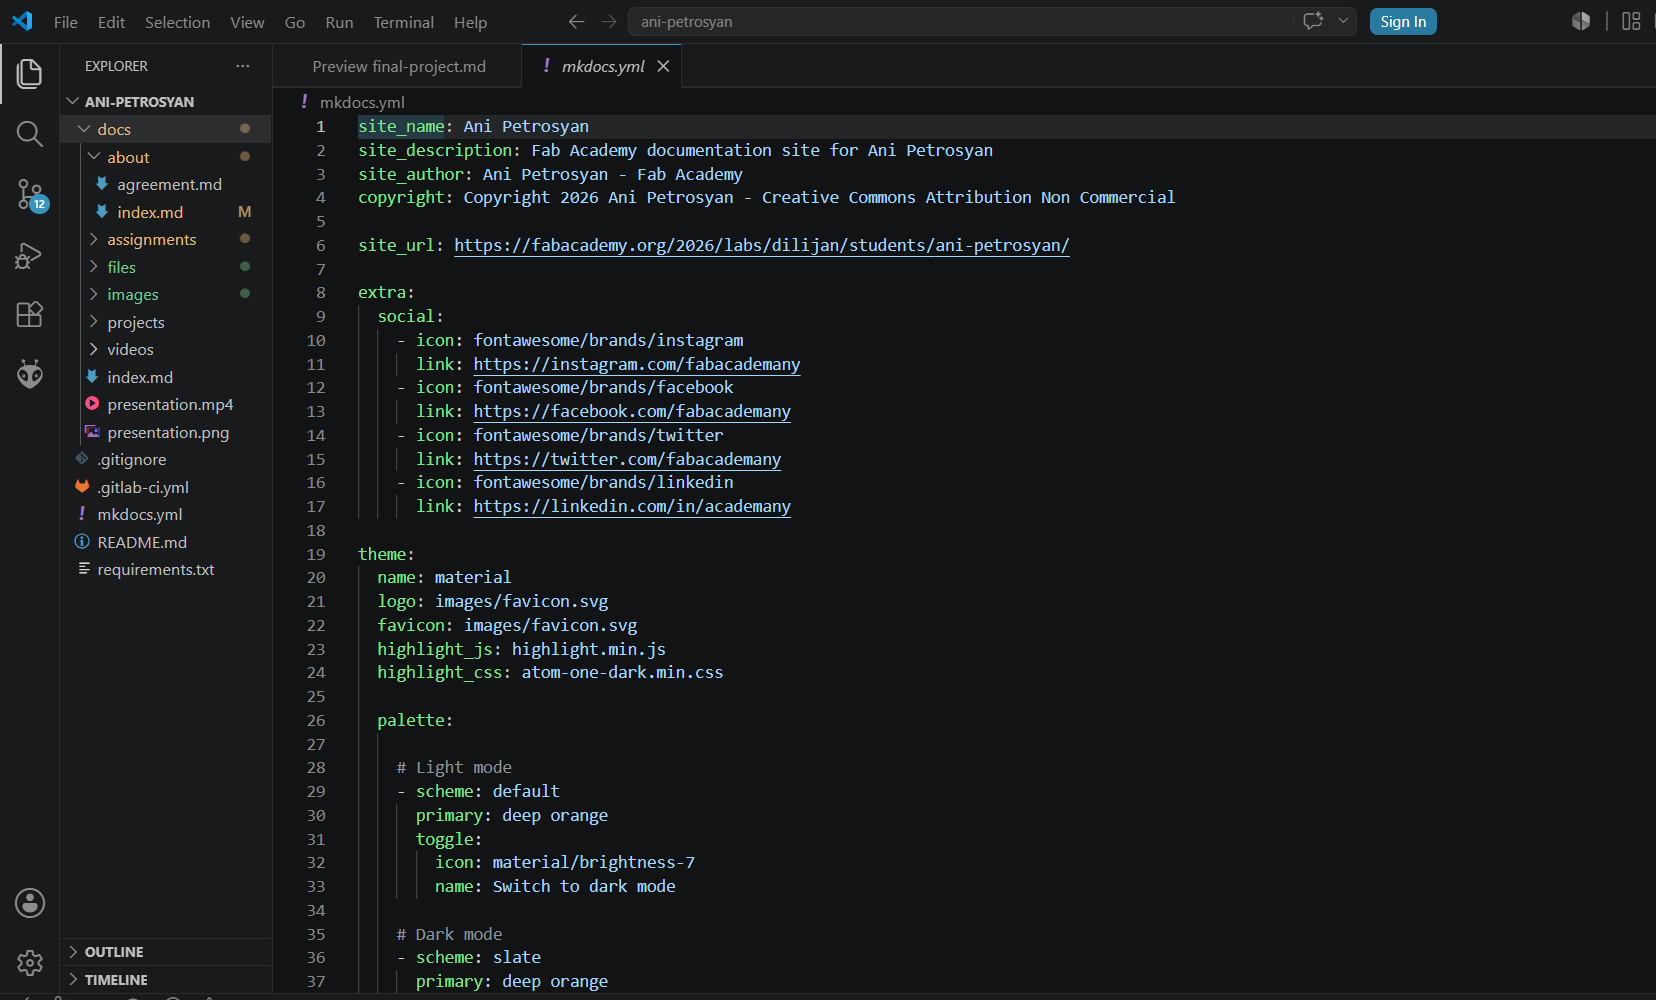
The comments included in the file were especially helpful for understanding the purpose of each section and how different visual aspects of the website could be modified.
Custom favicon
I replaced the default favicon with a custom one so that the website would have a more personal and recognizable identity. The favicon is the small icon displayed next to the page title in the browser tab.

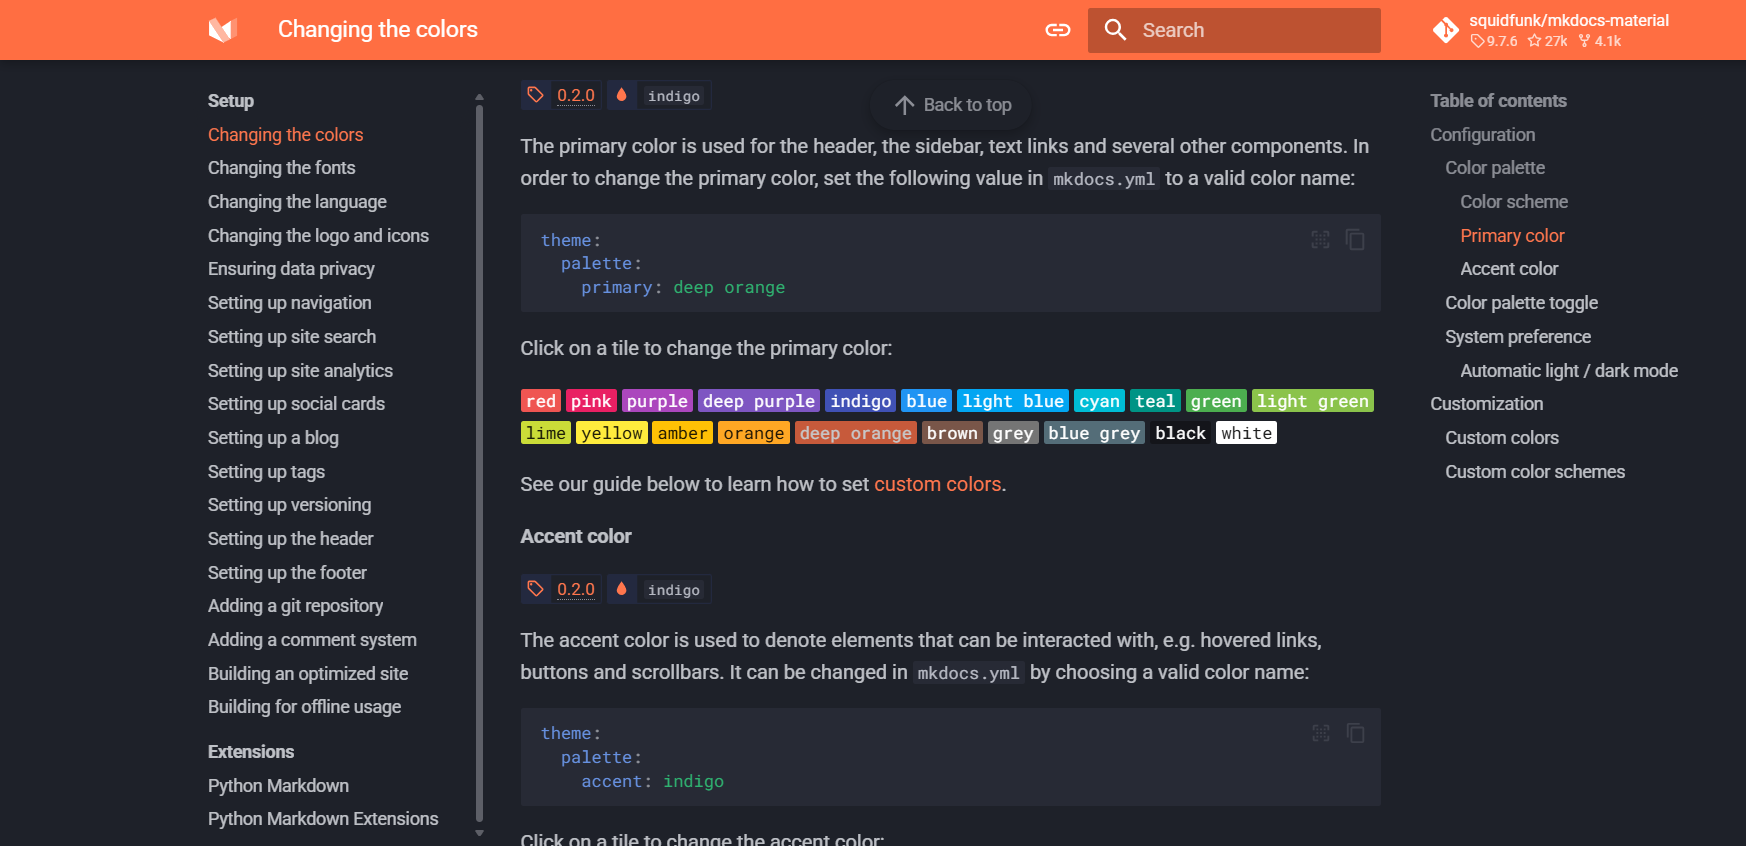
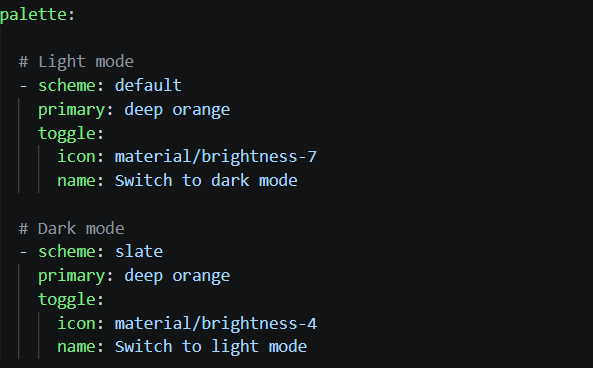
Color theme
Using the theme > palette > primary setting in the mkdocs.yml file, I changed the primary color of the header and navigation menu. I selected a color that best matched my personal style and the overall appearance I wanted for my website.
Logo
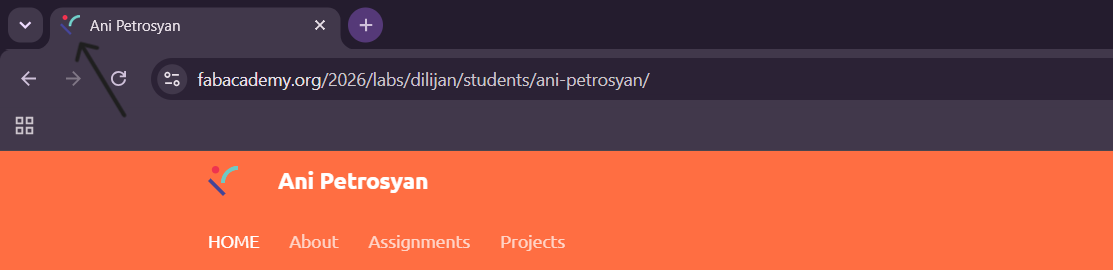
I added the Fab Lab Armenia logo to the website header. Since Fab Lab Armenia has been the place where I completed my Fab Academy journey and developed my projects, I wanted the website to reflect that connection.
![]()
Light and dark mode
I enabled the light/dark theme switch, allowing visitors to easily change between light and dark modes. This improves readability under different lighting conditions and makes browsing the documentation more comfortable during extended use.
Sending Changes to the Remote Repository
After completing all the changes in my documentation, I opened the terminal to upload my work to the remote repository using Git commands. This step is important because it allows me to save my progress, keep track of changes, and make my updates visible online.
First, I checked the current status of my files:
git status
This command shows which files have been modified, which ones are new, and which changes are ready to be committed. It helps me understand what has changed before proceeding.
Next, I added all the changes to the staging area:
git add .
This step tells Git to track all the modified and new files so they can be included in the next commit.
After that, I created a commit with a descriptive message:
git commit -m "comment"
The commit message is important because it clearly explains what changes were made. This makes it easier to track the history of the project and understand updates later.
Finally, I pushed my changes to the remote repository:
git push
After running this command, my changes are uploaded and visible in the remote repository.
While working in my folder, I noticed that a large ZIP file was present in the repository. This file was preventing me from successfully pushing my changes to the remote repository.
To fix this, I did the following steps:
Deleted the ZIP file from my local folder, because it was unnecessary for version control.
Ran the command to undo the last two commits while keeping the changes staged:
git reset --soft HEAD~2
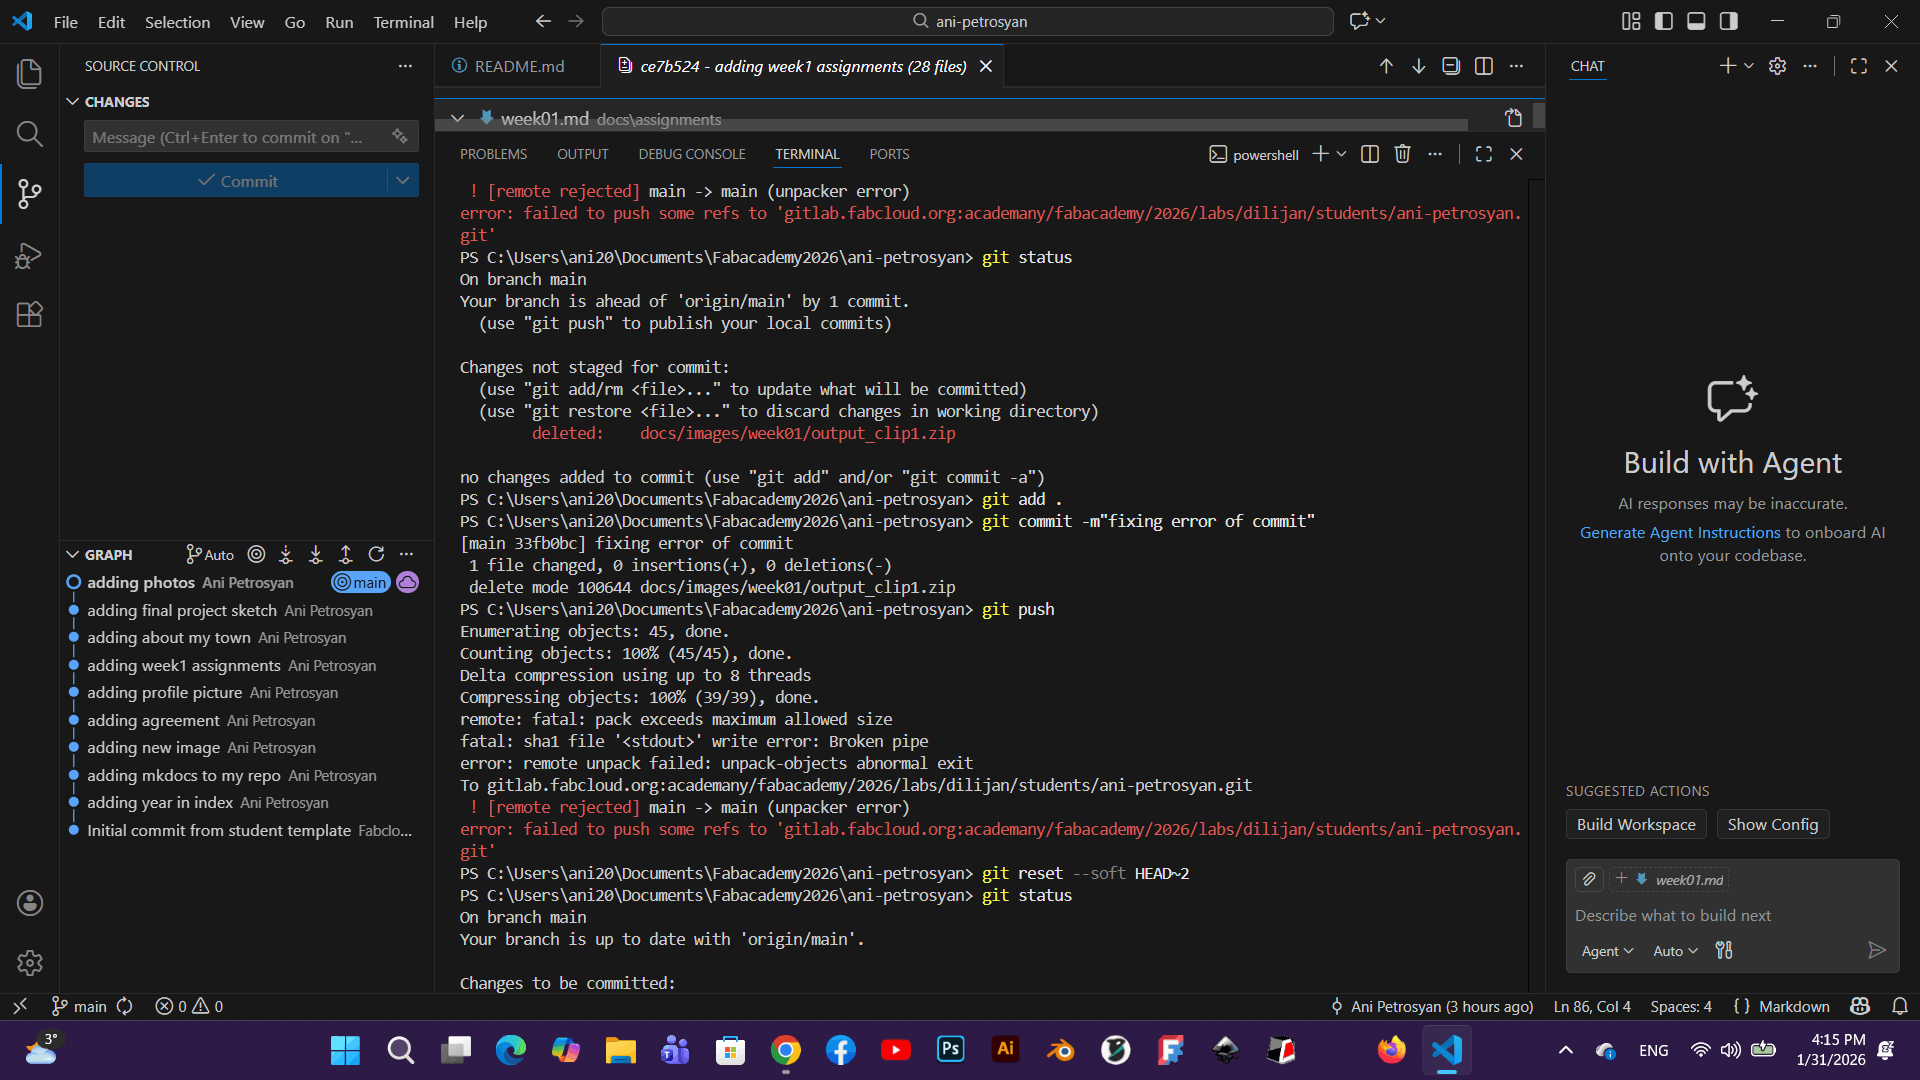
After this, I was able to recommit the changes without the ZIP file and successfully push to the remote repository:
git push
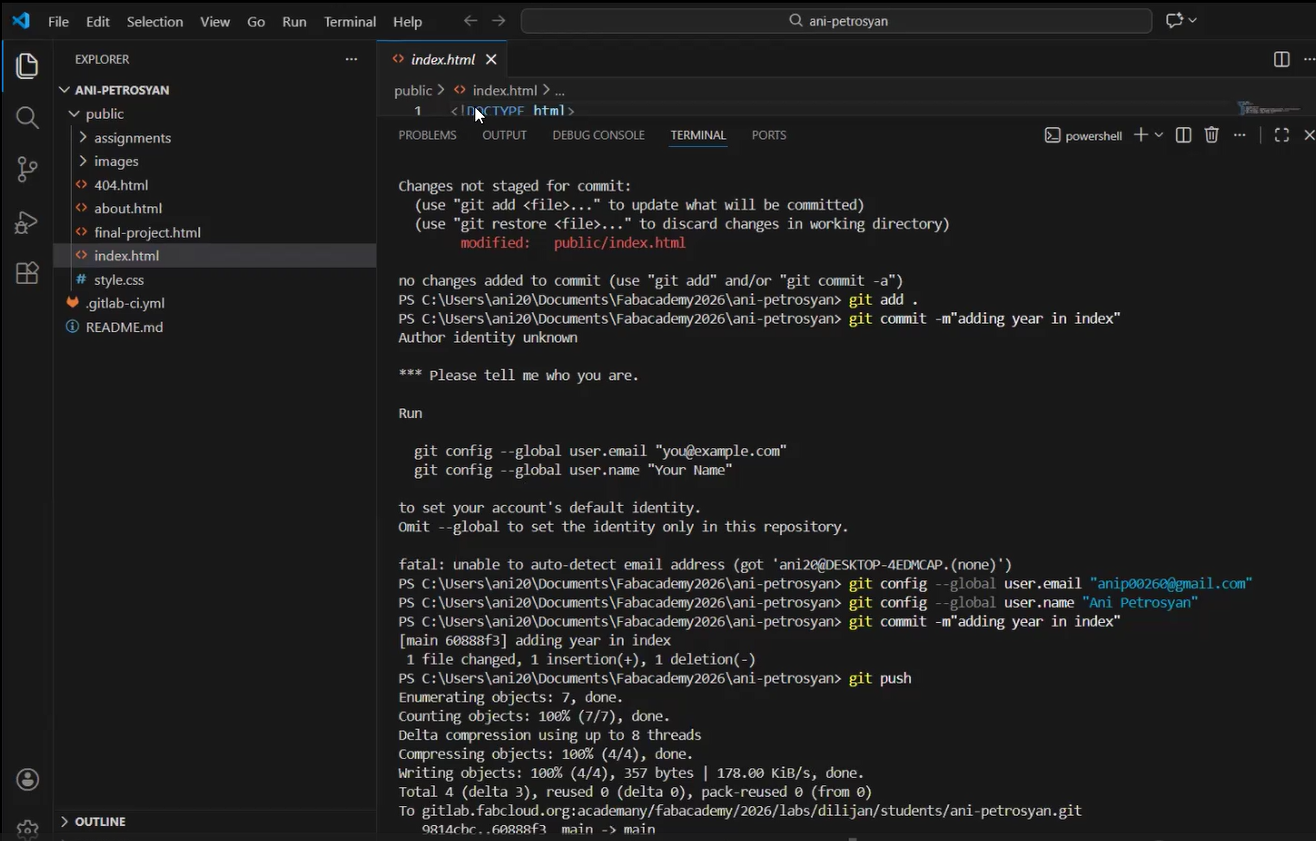
After running the git push command, all of my committed changes were uploaded to the remote GitLab repository.
To verify that the upload was successful, I opened the Commits section in GitLab. There, I was able to see each commit along with its commit message, the author, and the exact date and time when it was pushed. This provides a clear history of all updates made to the project and makes it easy to track the development process over time.
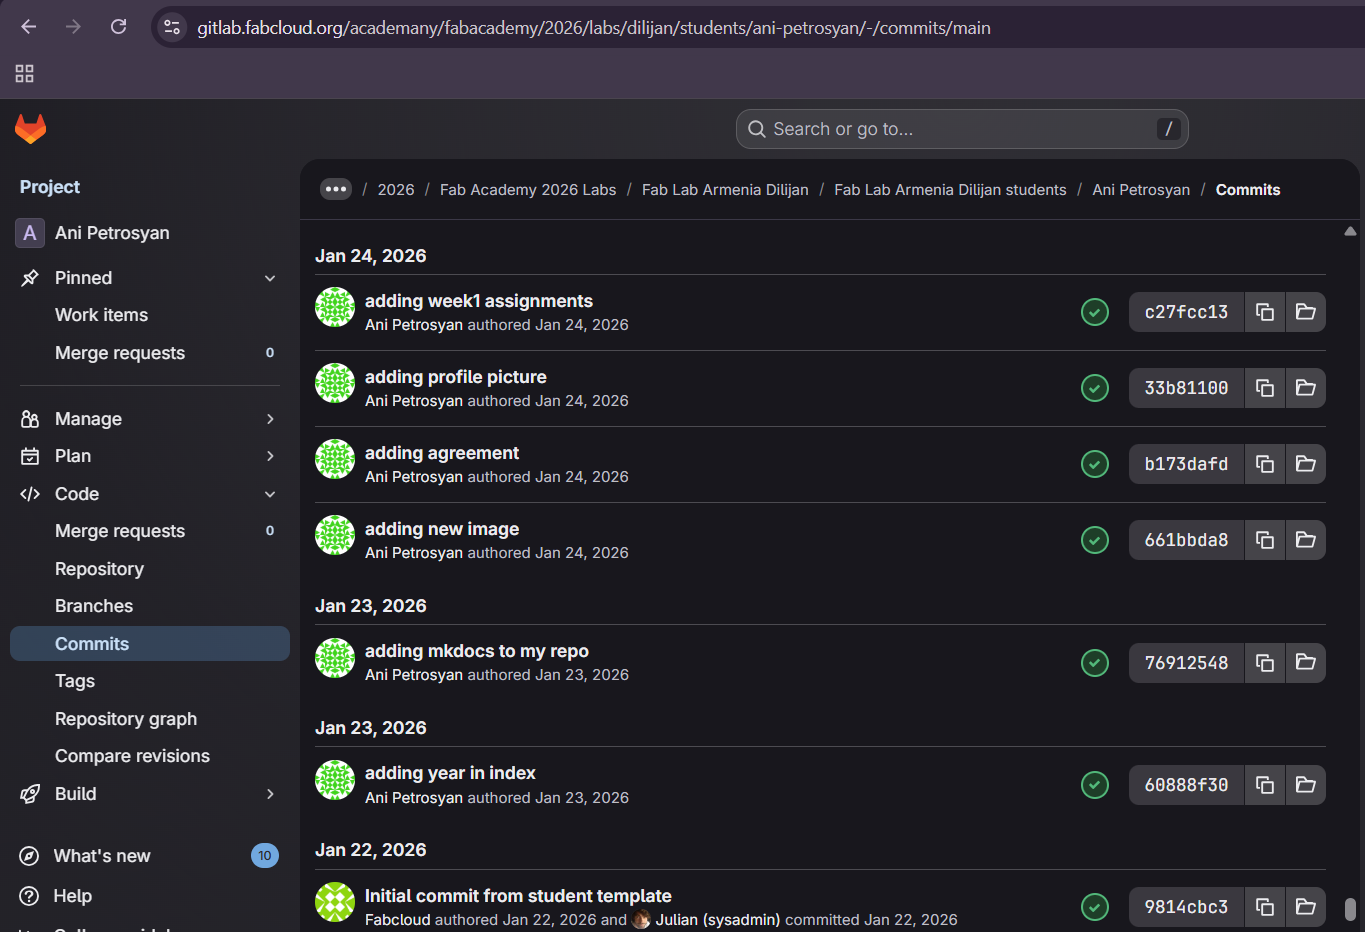
Being able to review the commit history is useful not only for monitoring progress but also for identifying when specific changes were made and, if necessary, returning to previous versions of the project.
Conclusion
This week was an interesting beginning for me in Fab Academy. Since I had no prior experience in this field, everything was new, and at first it was quite challenging—especially understanding Git.
At the beginning, I made some mistakes and felt a bit confused, but gradually I started to understand what I was doing and why. Now I feel more confident working and can navigate things more easily.
During this time, I also learned how important it is not only to do the work, but also to present it properly through documentation.