Week 16. Applications and Implications
As we are in the final stretch, we have been asked to answer the questions below. These are great questions since it will allow a reader to understand your project in much more detail and also helps oneself understand what needs to be done.
The Q&A:
What will it do?
The main focus of this drone project is the Transmitter system, so the main thing it will do is communicate with a receiver. (spiral 1)
On the drone side, It will fly using the transceiver set (spiral 2)
The drone will fly autonomously (spiral 3)
The drone will have delivery capabilities (spiral 4)
The drone will be capable of delivering
Who’s done what beforehand?
Many people obviously have made their own drones and custom transmitter-receiver sets but they all use pre-made mcu development boards (arduino nano, uno etc). My transmitter system will be based on the ATMEGA328PU chip. The transmitter will control the servos and the motor on the drone.
example of this from a wonderful youtube channel KendinYap : DIY 6 Channel
People also cut individual pieces of cardboard and put them together for he drone body, but mine will be made foldable using the zund, so less glue and adhesives, less manual work.
example of cutting single pieces before putting them together: DIY Glider
What will you design?
I will design:
-
the entire electronics of the Transmitter (fablab-able transmitter system) - KiCAD
-
the 3D printed case for the Transmitter - Fusion360
-
Laser cut Acrylic for the top of my case
-
the fixed wing drone - Fusion360
-
the 3D -> 2D workflow for making the drone cut-able in the Zund - Rhino
-
the 3D printed motor holder and landing gear holder - Fusion360
What materials and components will be used?
- Cardboard
- NRF24L01 modules
- Copper Board
- Resistors
- Capacitors
- LED
- Joysticks (2 axis potentiometers)
- Slide switch
- Voltage regulators
- 9V battery
- Battery Holder
- 4S LIPO 11.1 V
- 30 A ESC
- 1400kv Motor
- 9g Servos
- Push pull rods
- 3D print PLA
- prototyping PCB
- Arduino nano every
- Copper wires
- Jumper wires
- servo horns
- Propellor
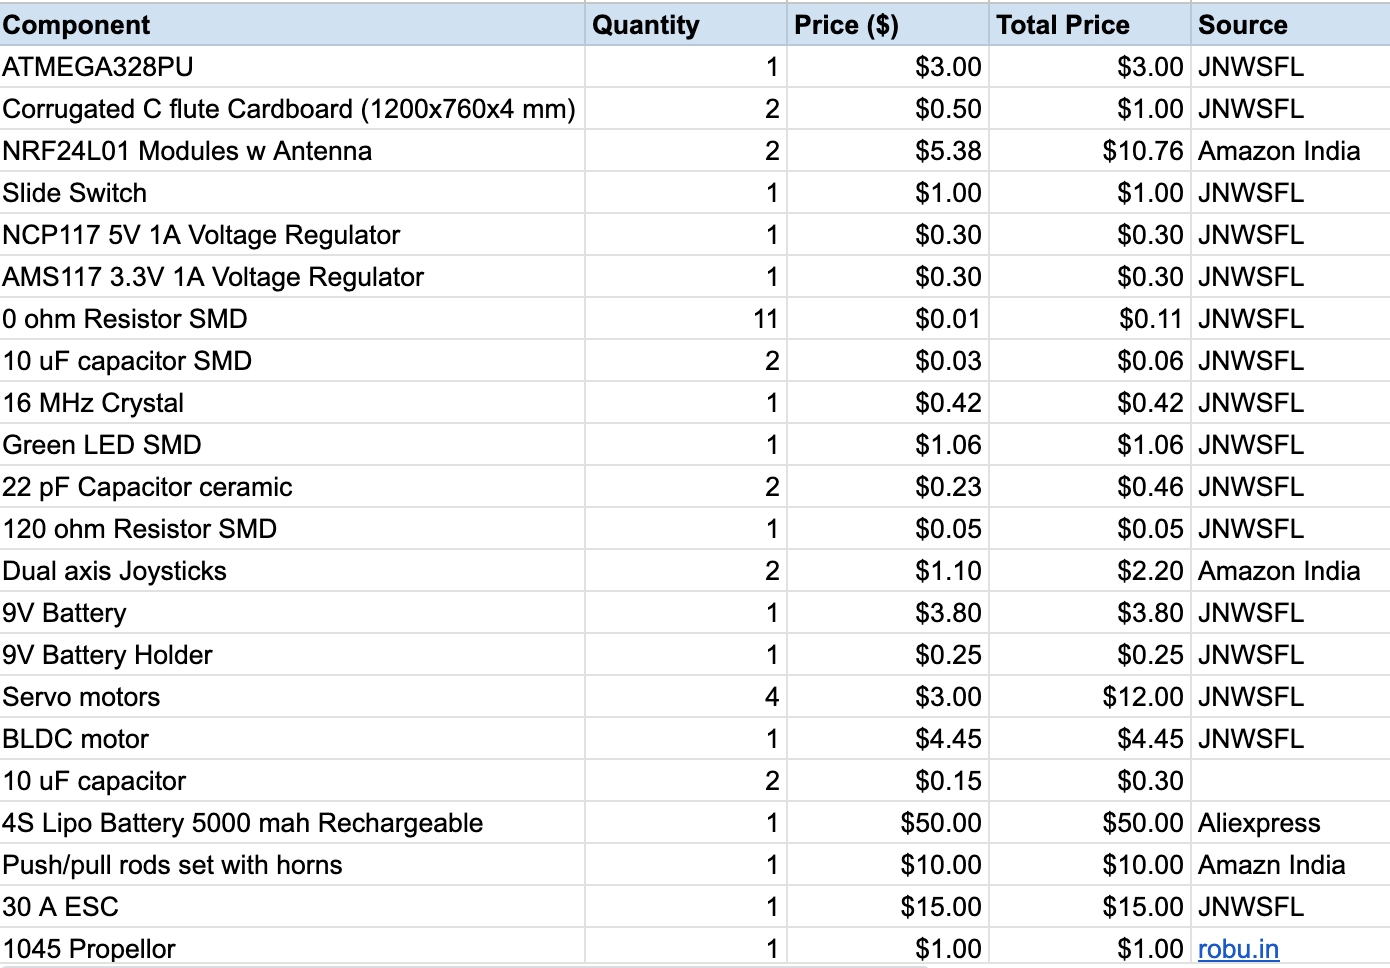
This is just the list, the full, proper BOM (in the “how much will they cost” section)will contain the exact amounts with the prices.
Where will come from?
Almost all items are available in the Super FabLab. The niche items such as the Lipo batteries and the NRF modules are purchased from a vendor in India.
How much will they cost?
Total: $118
Bill of Materials:
What parts and systems will be made?
The drone body and the Transmitter electronics (microcontroller etc) and body will be made in the lab by me.
The receiver board will be soldered and put together together by me using the items available in the lab.
Rest of the items such as the ESC, motor, LIPO etc will not be made by me but the entire system will be assembled by me.
What processes will be used?
- Subtractive manufacturing using the Zund.
- Additive manufacturing using the Prusa 3D printers
- Electronic PCB design
- electronic PCB production (milled on Roland SRM20)
What questions need to be answered?
- The exact range of the transmitter system.
- The exact weight of the drone
How will it be evaluated?
Being as I am tackling the most complex part of the drone system (as a mechanical engineer), I believe my final project can be considered a success if:
- my custom fabbed transmitter can communicate, control and move the servos and motor on the receiver side precisely,
- I design and 3D print the case for the transmitter.
- I design and cut out the body of the drone out of cardboard
Since the propulsion, aerodynamics and flight of the drone is a whole sub-system of its’ own, and a bit out of this class’s scope, unsuccessful flight will not negatively contribute or affect the successful passing of the course.