Week 10/11 Mechanical Design and Machine Design
This week brought on the most fun yet challenging two weeks of fab academy. In The super fab lab, we have a total of six participants, so in an attempt to make things interesting, our remote guru suggested that we create 2 machine making groups, one Team being the three girls and the other team consisting the three boys.
Link to the Group Assignment: Bhutan Group 1
My Contribution to the Assignment:
- The Overall Idea
- Design and modelling of the Folding mechanism in Fusion360
- Design and use of the Zund to make the folding mechanism out of cardboard and acrylic
- All the electronics
- The Coding
- The Documentation
- Shooting and editing the Video
- The Slide
T-shirt Folding Machine:
Video
Summary Slide
Final Look:
Final Design:
Manual Operation:
Final Electronics wiring:
Final Code:
#define STEP_PIN_1 54
#define DIR_PIN_1 55
#define ENABLE_PIN_1 38
#define STEP_PIN_2 60
#define DIR_PIN_2 61
#define ENABLE_PIN_2 56
#define STEP_PIN_3 46
#define DIR_PIN_3 48
#define ENABLE_PIN_3 62
#define STEP_PIN_4 26
#define DIR_PIN_4 28
#define ENABLE_PIN_4 24
#define TRIG_PIN 37
#define ECHO_PIN 35
const int stepDelay = 3000;
void setup()
{
  pinMode(STEP_PIN_1, OUTPUT);
  pinMode(DIR_PIN_1, OUTPUT);
  pinMode(ENABLE_PIN_1, OUTPUT);
  pinMode(STEP_PIN_2, OUTPUT);
  pinMode(DIR_PIN_2, OUTPUT);
  pinMode(ENABLE_PIN_2, OUTPUT);
  pinMode(STEP_PIN_3, OUTPUT);
  pinMode(DIR_PIN_3, OUTPUT);
  pinMode(ENABLE_PIN_3, OUTPUT);
  pinMode(STEP_PIN_4, OUTPUT);
  pinMode(DIR_PIN_4, OUTPUT);
  pinMode(ENABLE_PIN_4, OUTPUT);
  pinMode(TRIG_PIN, OUTPUT);
  pinMode(ECHO_PIN, INPUT);
  digitalWrite(ENABLE_PIN_1, LOW);
  digitalWrite(ENABLE_PIN_2, LOW);
  digitalWrite(ENABLE_PIN_3, LOW);
  digitalWrite(ENABLE_PIN_4, LOW);
  delay(1000);
}
void loop()
{
  digitalWrite(TRIG_PIN, LOW);
  delayMicroseconds(2);
  digitalWrite(TRIG_PIN, HIGH);
  delayMicroseconds(10);
  digitalWrite(TRIG_PIN, LOW);
  long duration = pulseIn(ECHO_PIN, HIGH);
  long distance = duration * 0.034 / 2;
  if (distance < 10)
  {
    delay(2000);
    digitalWrite(DIR_PIN_1, HIGH);
    for (int i = 0; i < 100; i++) {
      digitalWrite(STEP_PIN_1, HIGH);
      delayMicroseconds(stepDelay);
      digitalWrite(STEP_PIN_1, LOW);
      delayMicroseconds(stepDelay);
    }
    digitalWrite(DIR_PIN_1, LOW);
    for (int i = 0; i < 100; i++) {
      digitalWrite(STEP_PIN_1, HIGH);
      delayMicroseconds(stepDelay);
      digitalWrite(STEP_PIN_1, LOW);
      delayMicroseconds(stepDelay);
    }
    delay(500);
    digitalWrite(DIR_PIN_2, LOW);
    for (int i = 0; i < 100; i++) {
      digitalWrite(STEP_PIN_2, HIGH);
      delayMicroseconds(stepDelay);
      digitalWrite(STEP_PIN_2, LOW);
      delayMicroseconds(stepDelay);
    }
  digitalWrite(DIR_PIN_2, HIGH);
  for (int i = 0; i < 100; i++) {
    digitalWrite(STEP_PIN_2, HIGH);
    delayMicroseconds(stepDelay);
    digitalWrite(STEP_PIN_2, LOW);
    delayMicroseconds(stepDelay);
  }
  delay(500);
  digitalWrite(DIR_PIN_3, HIGH);
  for (int i = 0; i < 100; i++) {
    digitalWrite(STEP_PIN_3, HIGH);
    delayMicroseconds(stepDelay);
    digitalWrite(STEP_PIN_3, LOW);
    delayMicroseconds(stepDelay);
  }
  digitalWrite(DIR_PIN_3, LOW);
  for (int i = 0; i < 100; i++) {
    digitalWrite(STEP_PIN_3, HIGH);
    delayMicroseconds(stepDelay);
    digitalWrite(STEP_PIN_3, LOW);
    delayMicroseconds(stepDelay);
  }
  delay(500);
    digitalWrite(DIR_PIN_4, LOW);
    for (int i = 0; i < 100; i++) {
      digitalWrite(STEP_PIN_4, HIGH);
      delayMicroseconds(stepDelay);
      digitalWrite(STEP_PIN_4, LOW);
      delayMicroseconds(stepDelay);
    }
  digitalWrite(DIR_PIN_4, HIGH);
  for (int i = 0; i < 100; i++) {
    digitalWrite(STEP_PIN_4, HIGH);
    delayMicroseconds(stepDelay);
    digitalWrite(STEP_PIN_4, LOW);
    delayMicroseconds(stepDelay);
  }
  delay(500);
  }
}
Ideation and Planning
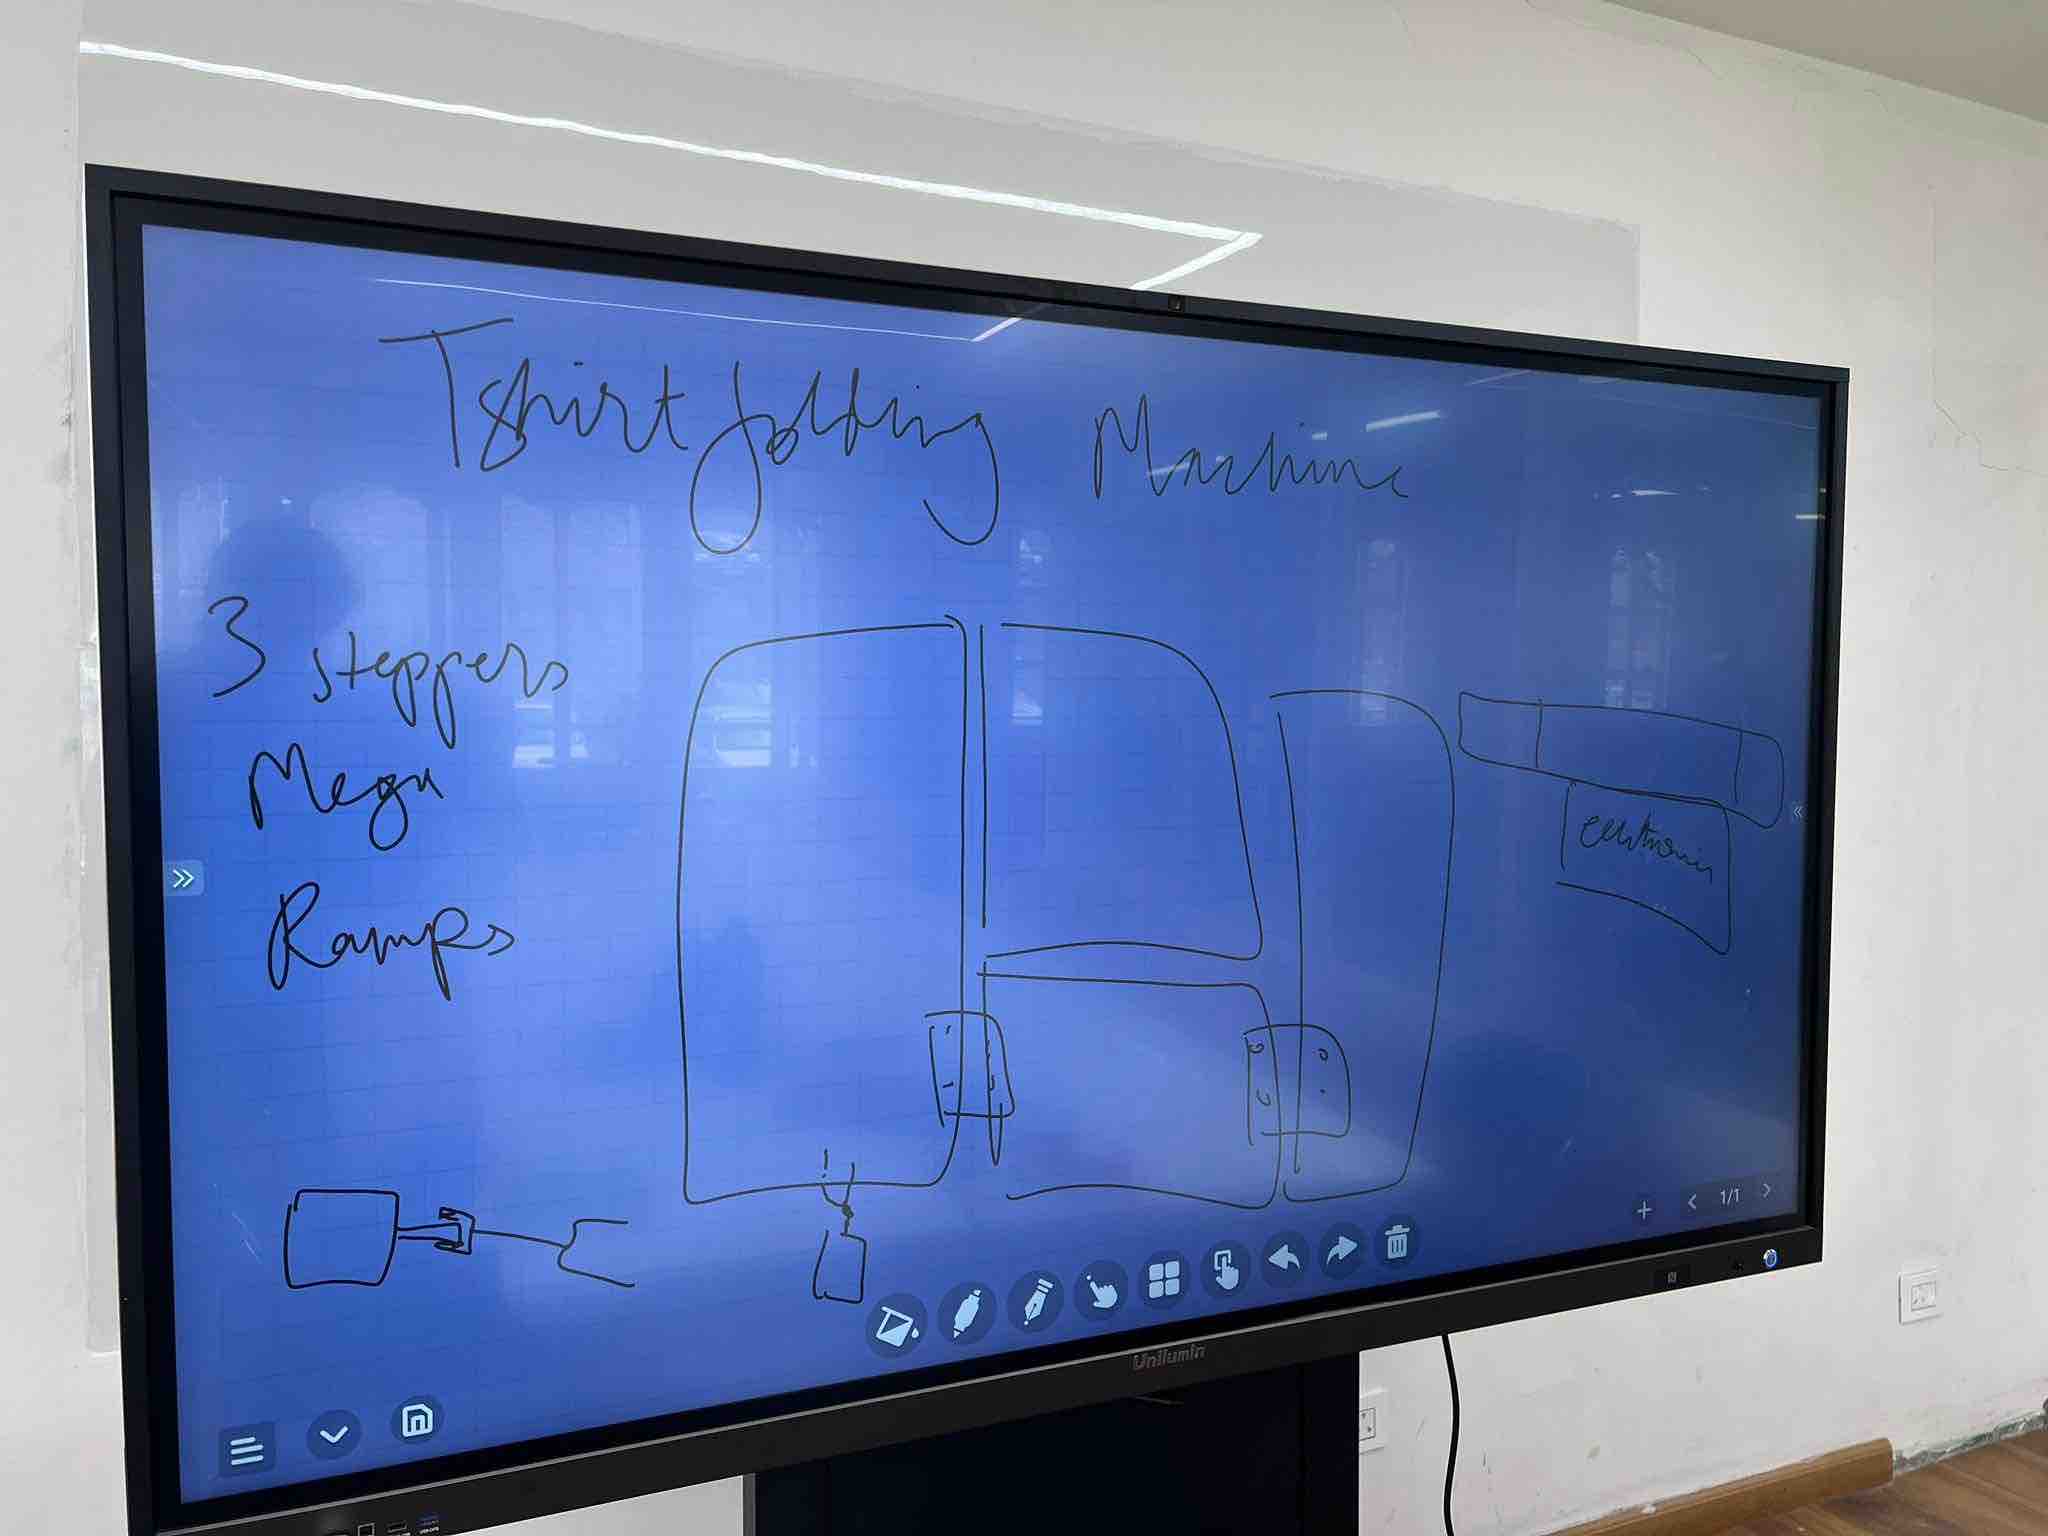
As soon as we were split into groups, we got together and I pitched my idea to the team, using the touch screen and pieces of foam board to make the idea easy to understand.

Ever since we were notified that machine making week was coming up, I started thinking about some potential ideas for machine making. Initially, I was looking down the traditional route of 3D printers and 2D painting and writing CNC machines but somehow didn’t feel very interested nor motivated to go down that path. Then, Rico showed us an example of a bubble blowing machine that previous students had done and that inspired me to thing outside the box.
I am a big fan of clothes and because of this, I have an unhealthy amount of clothes in my closet. Then the idea struck me, and I decided that I would like to work on a T-Shirt Folding Machine for the two weeks, making a machine that does as the name suggests, folds t-shirts. I started looking online and found many sources of inspiration from simple manual folding mechanisms to complex industrial folding machines and decided that it would be ideal to make an in-between personal machine. Now, it may seem like such a simple machine that does not really accomplish much, but when I typically undergo my biweekly closet clean and rearrangement, I find that my arms and lower back hurts from folding so many shirts. Since its an idea that will actually benefit me, I am more motivated and interested in making it a success.
My Messy Closet:
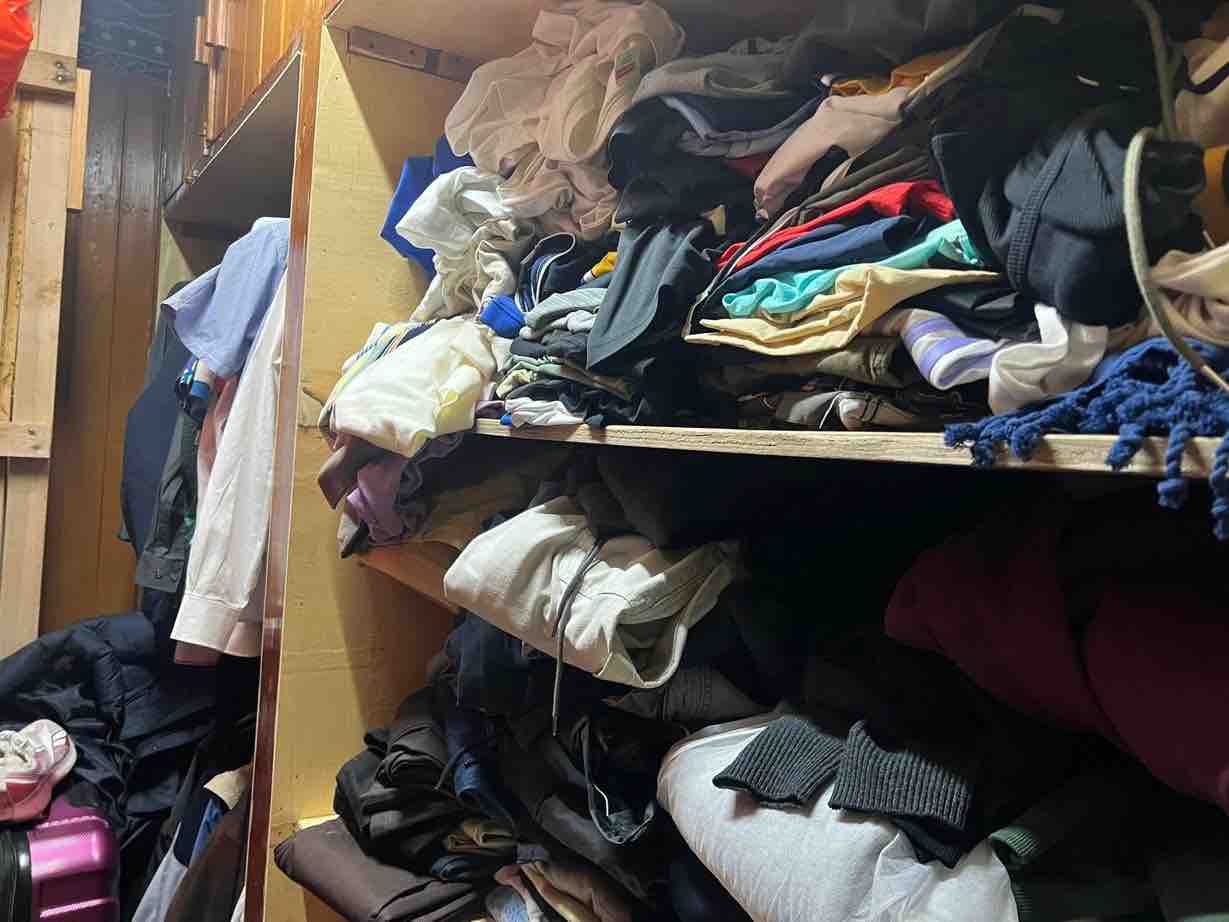
MainlyShirts:

Luckily, my teammates Rinchen and Tempa bought into my idea as soon as I presented it to them and we got right into it, brainstorming, ideating and splitting the responsibilities. I would work on the folding mechanism and the electronics, while Tempa and Rinchen worked on designing and printing the clamps, linkages and working on the base for the machine
3D Model and Design
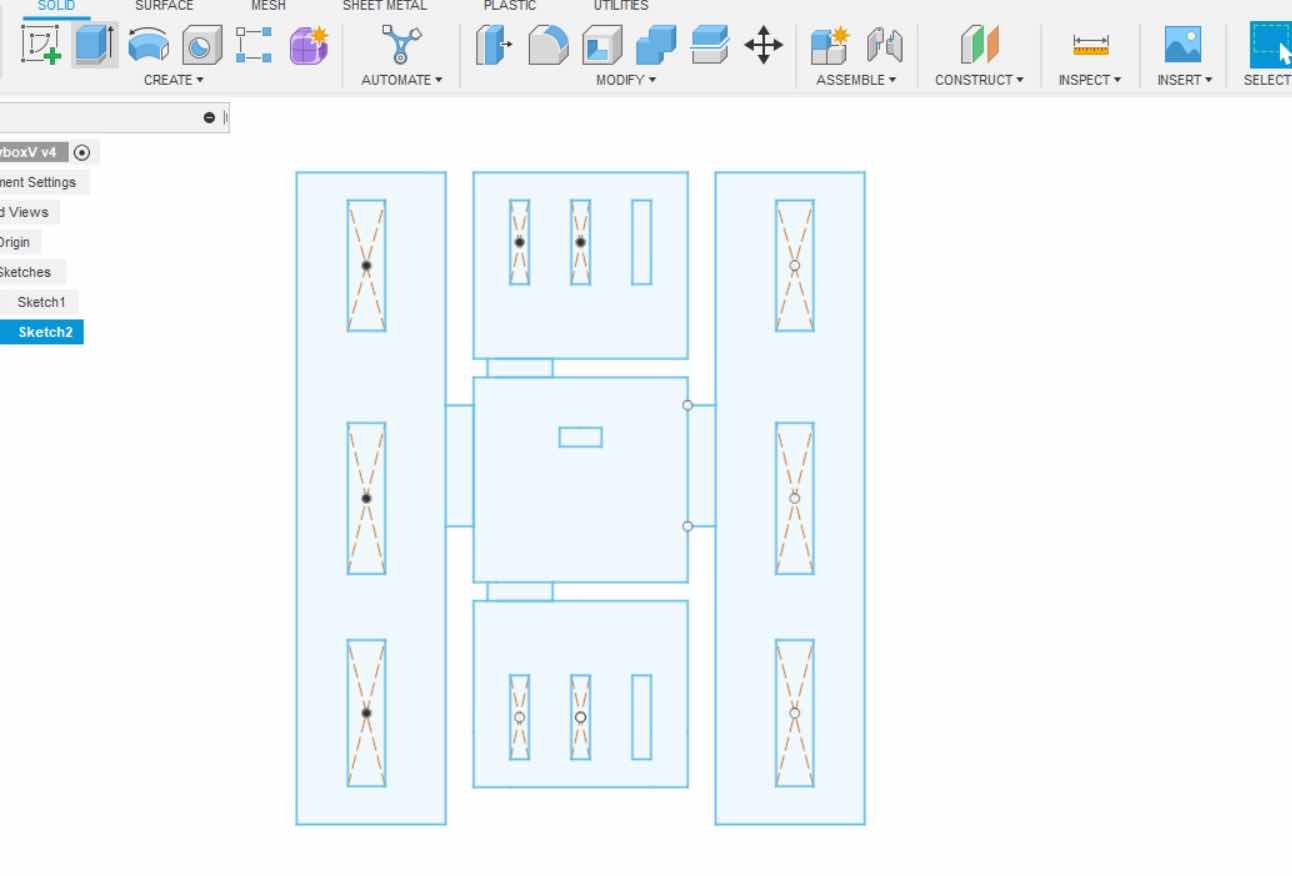
First, I went on fusion 360 and made a simple mock up model of what I wanted our machine to look like(for acrylic).
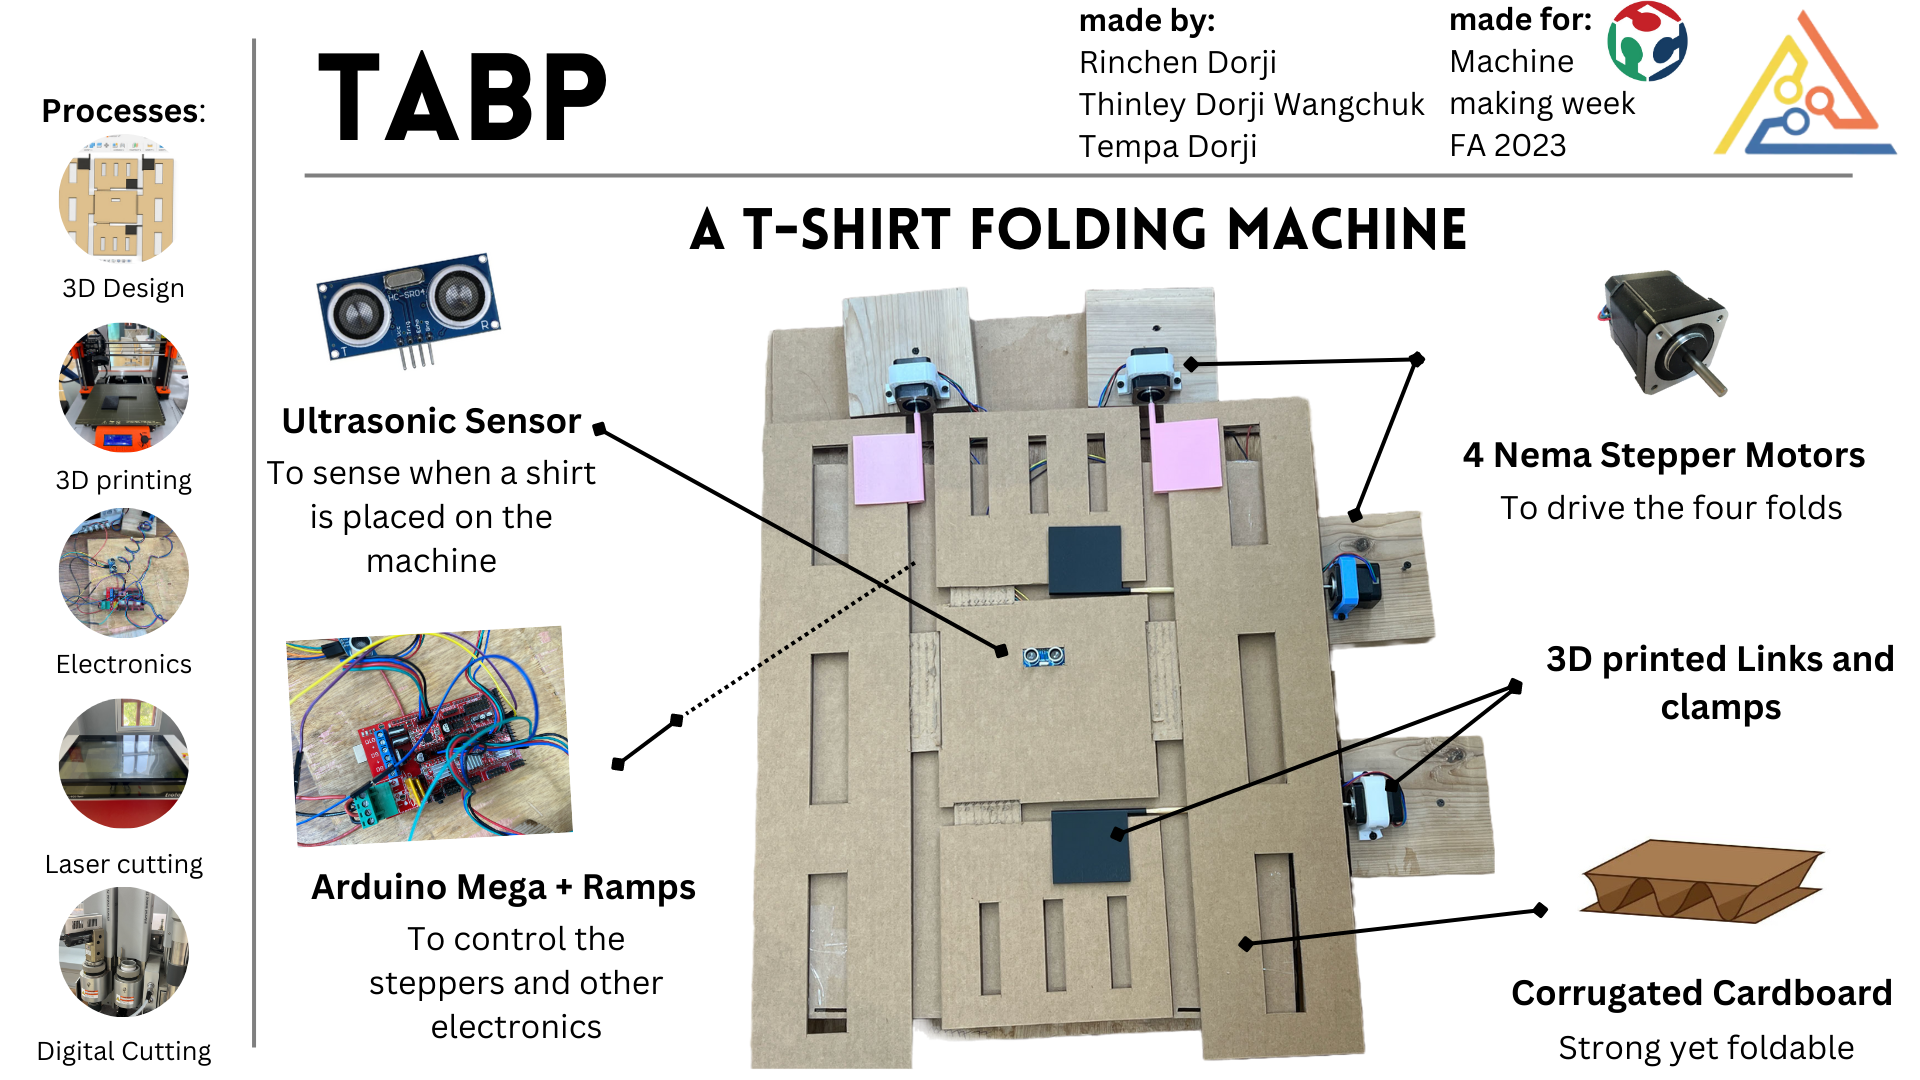
Our machine will need the following items:
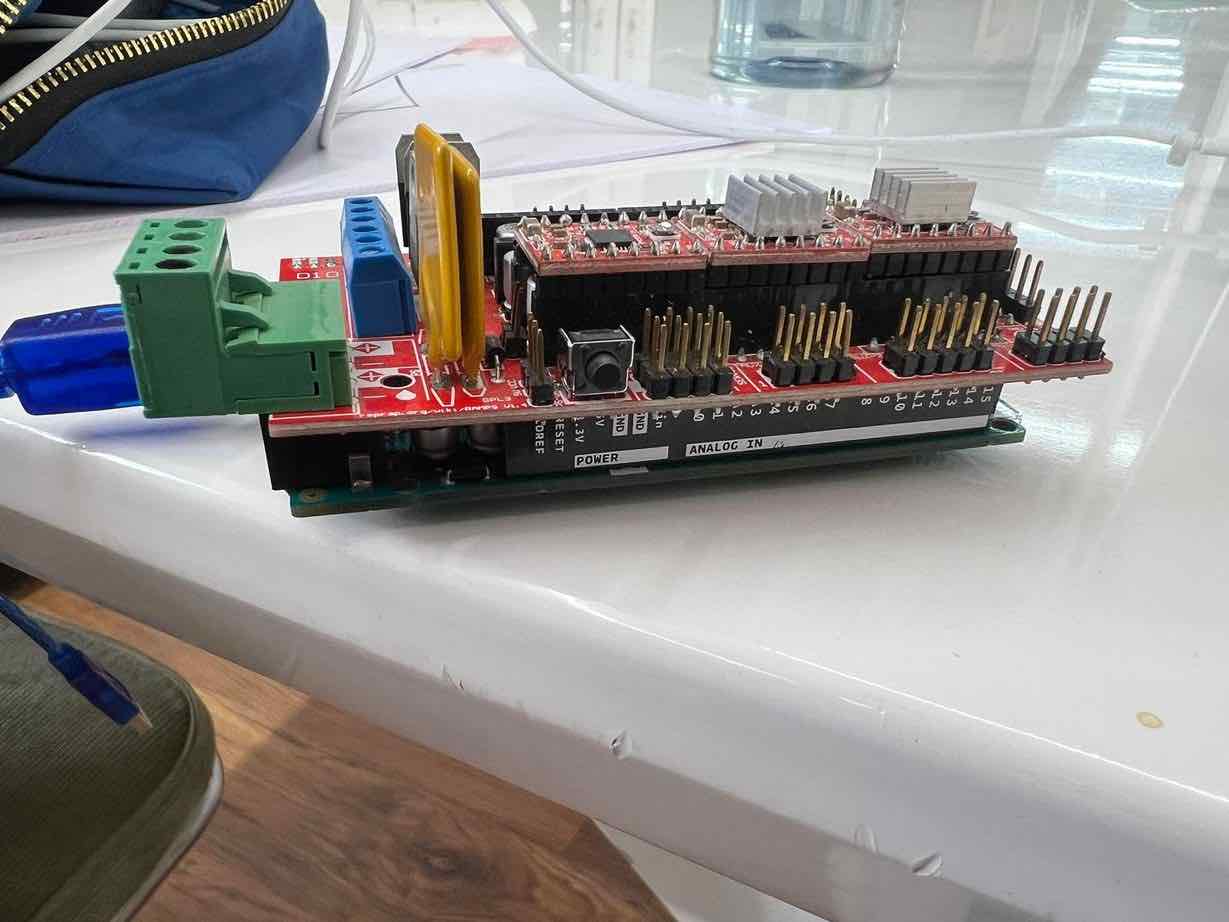
- Arduino Mega
- Ramps 1.4 Shield
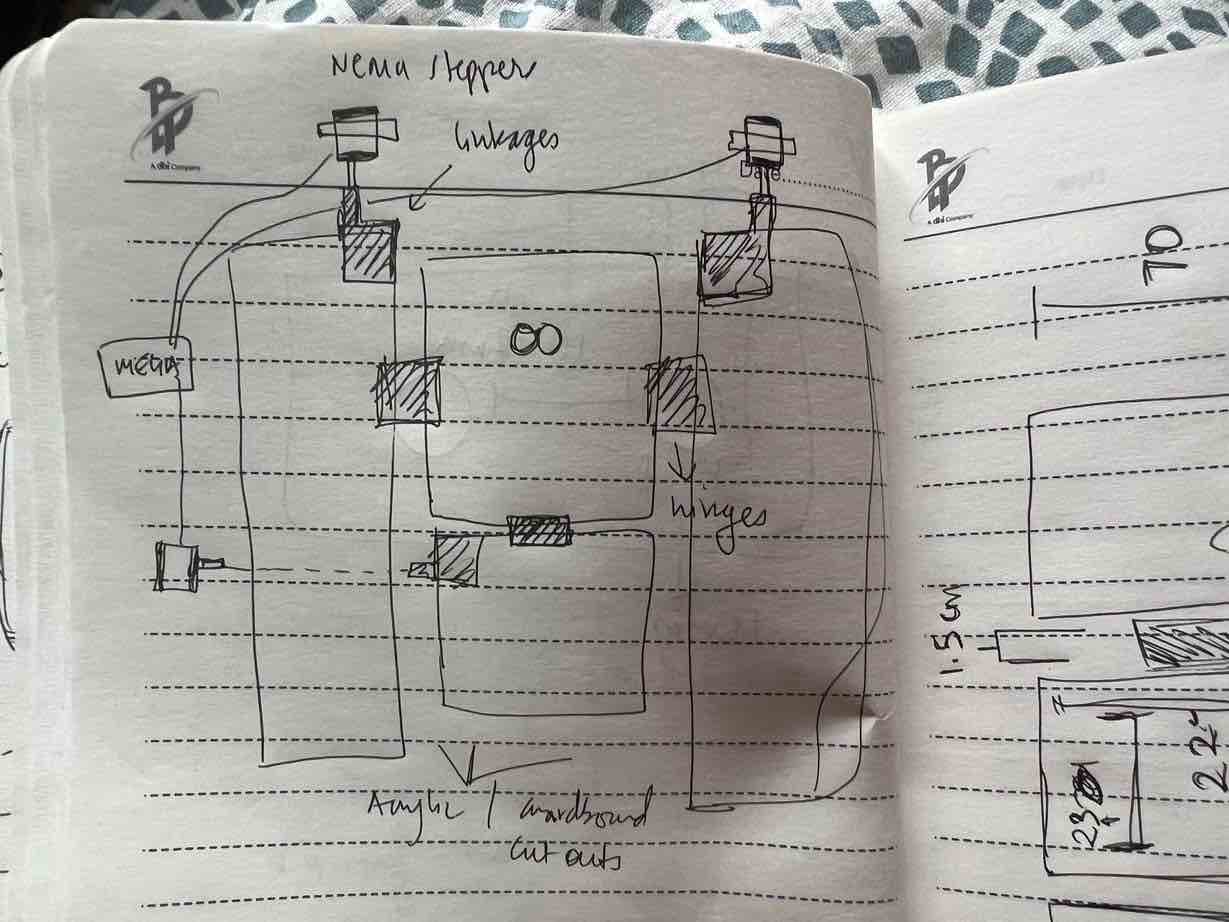
- 3 Nema Stepper Motors
- A4989 motor drivers
- Acrylic and Cardboard
- Hinges
- m4 nuts, bolts and washers
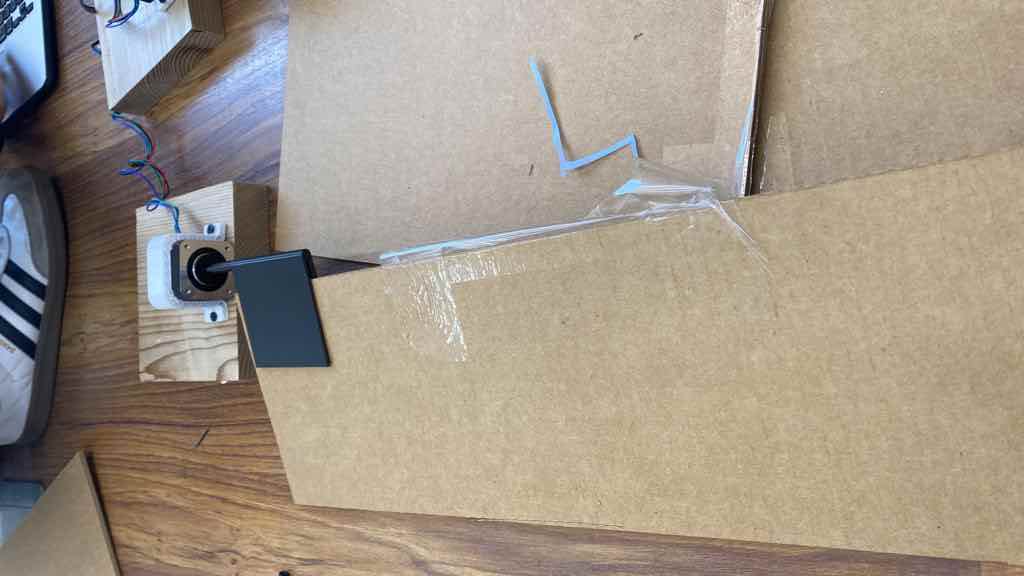
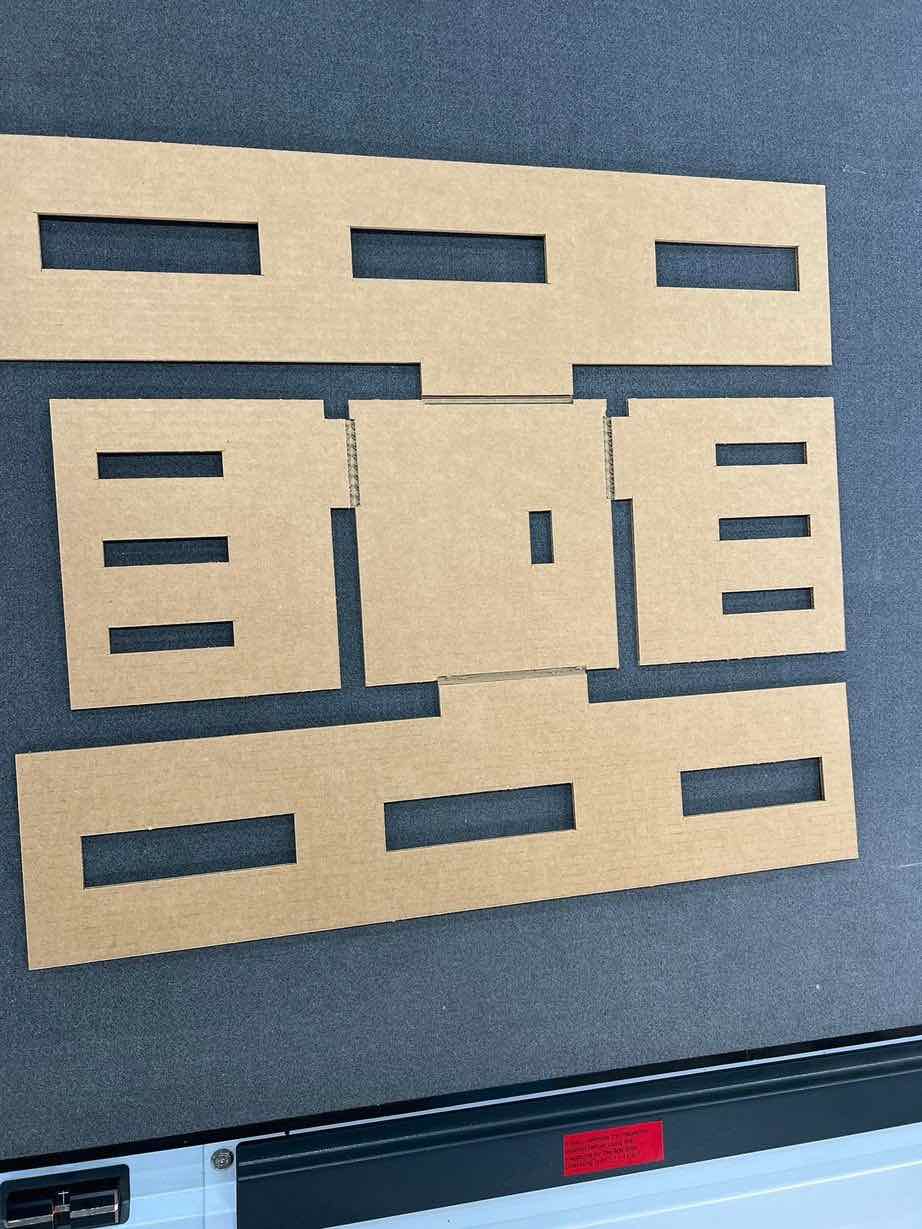
Then, I took the DXF from the sketches and used the Zund to cut out corrugated cardboard to make the first prototype. While I was doing this, Rinchen and Tempa worked on creating the linkages for the stepper motors and ideating on how to make the base of the machine. The linkages were made using a combination of bamboo wood and 3d printed Pla.
The Cardboard version came out well and we used cello-tape to act as hinges for this model.
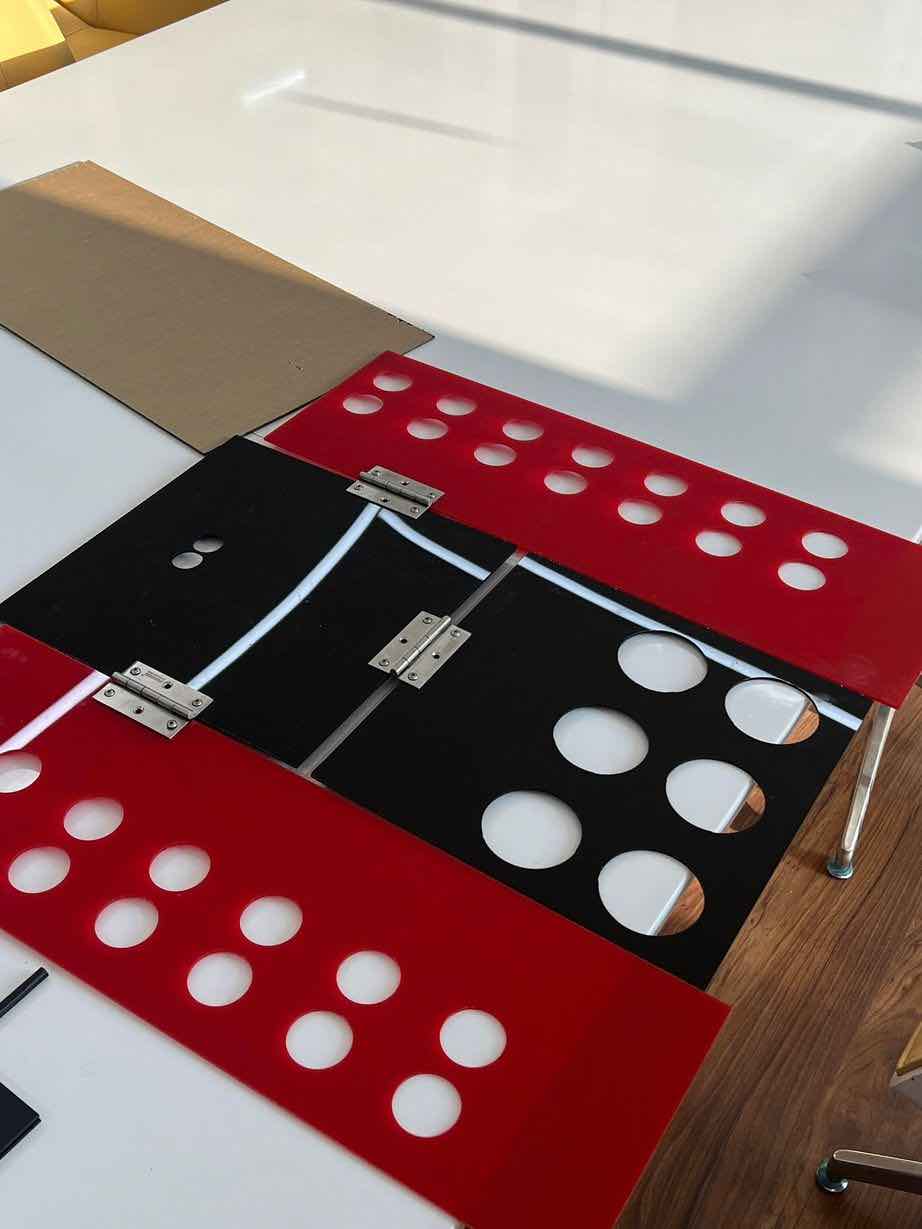
Then I used the Zund again to cut out the acrylic pieces to make the folding mechanism while Tempa and Rinchen made a mockup base of the machine using cardboard and the laser cutter. Then as a team we assembled the hinges.
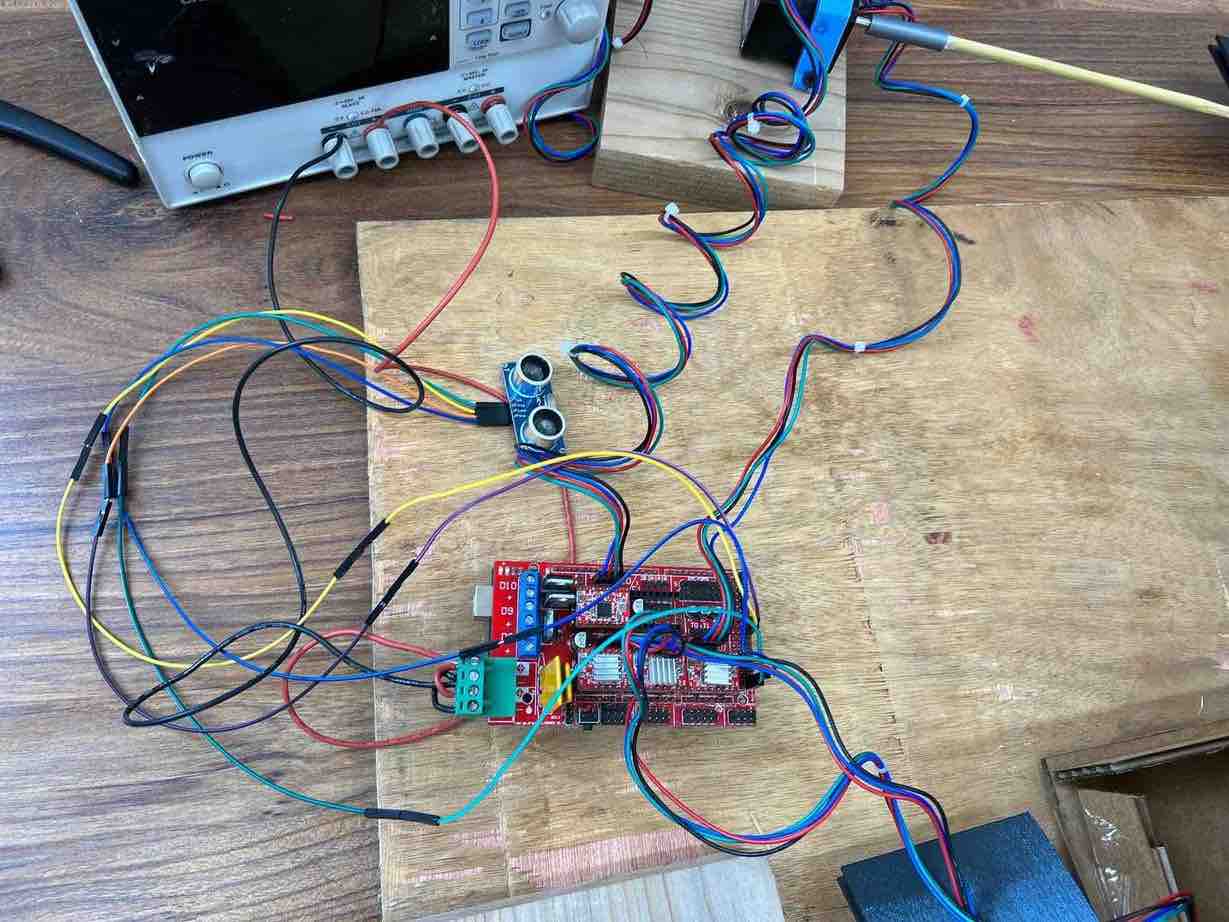
Electronics and Motors
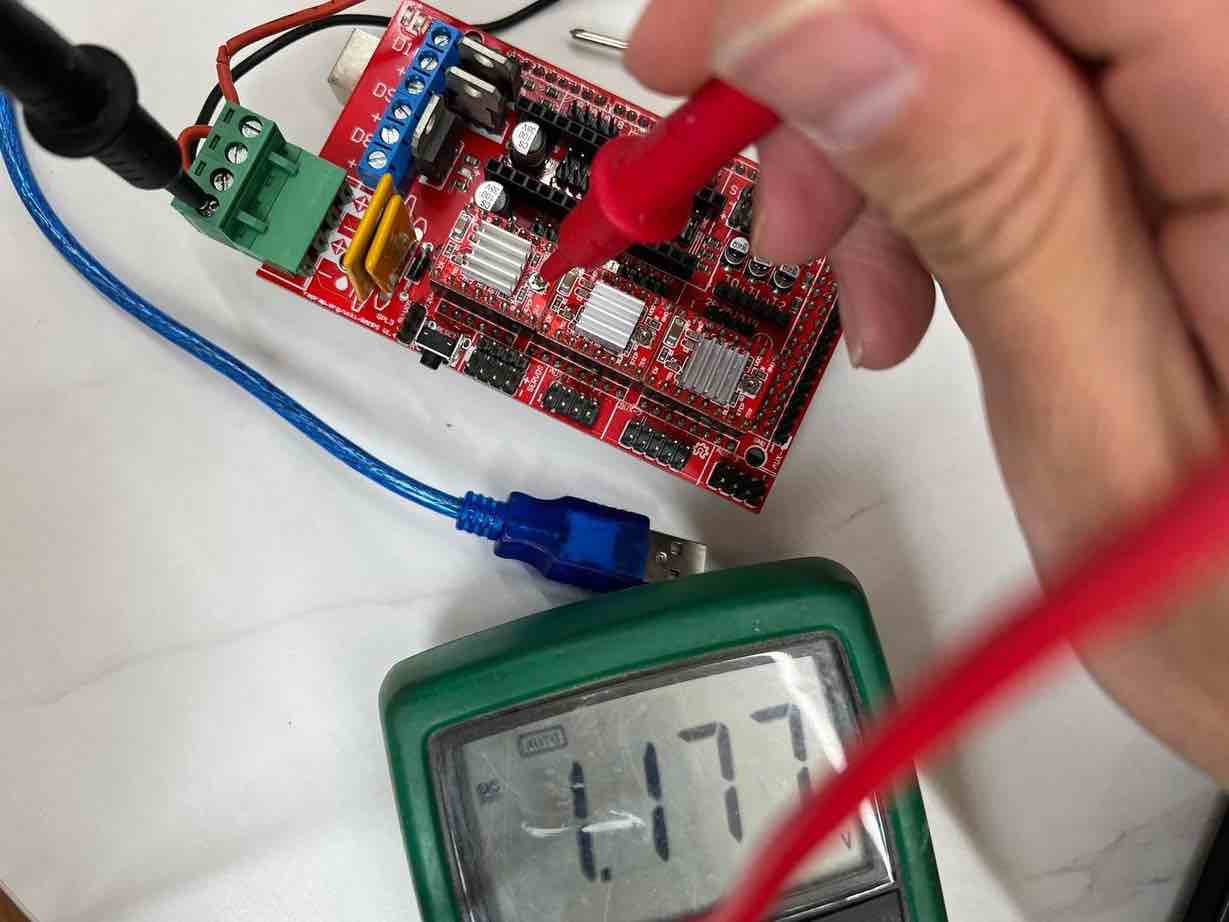
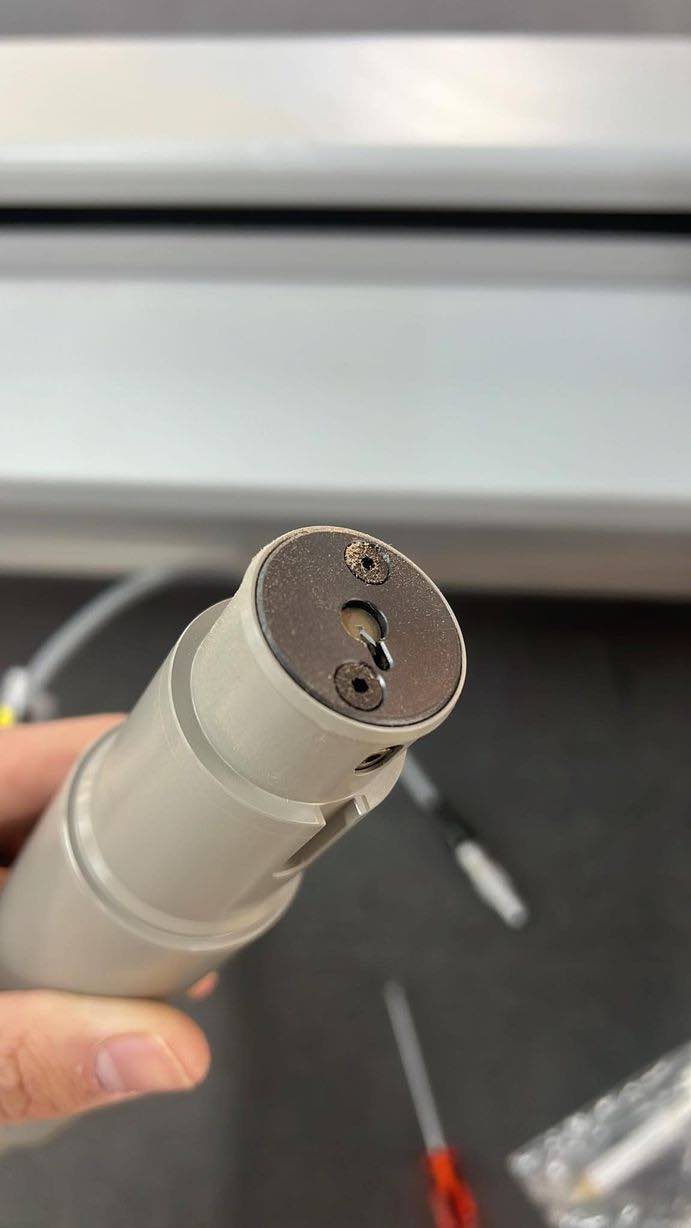
The more difficult part for us (no electrical engineering background on the team) was the motor and electronics. I was really worried about this so on the second day, I started working on this, collecting all the necessary electronics and parts for the machine. The first issue I ran into was the power supply. In the lab, we only have 24 V power supply which is too much for the ramps and the only 12V power supply that was being used by the PET bottle machine had shorted. I was aware that we had GW Instek power supplies in the lab but I was cautious about the 3.2 A max current that it could supply.
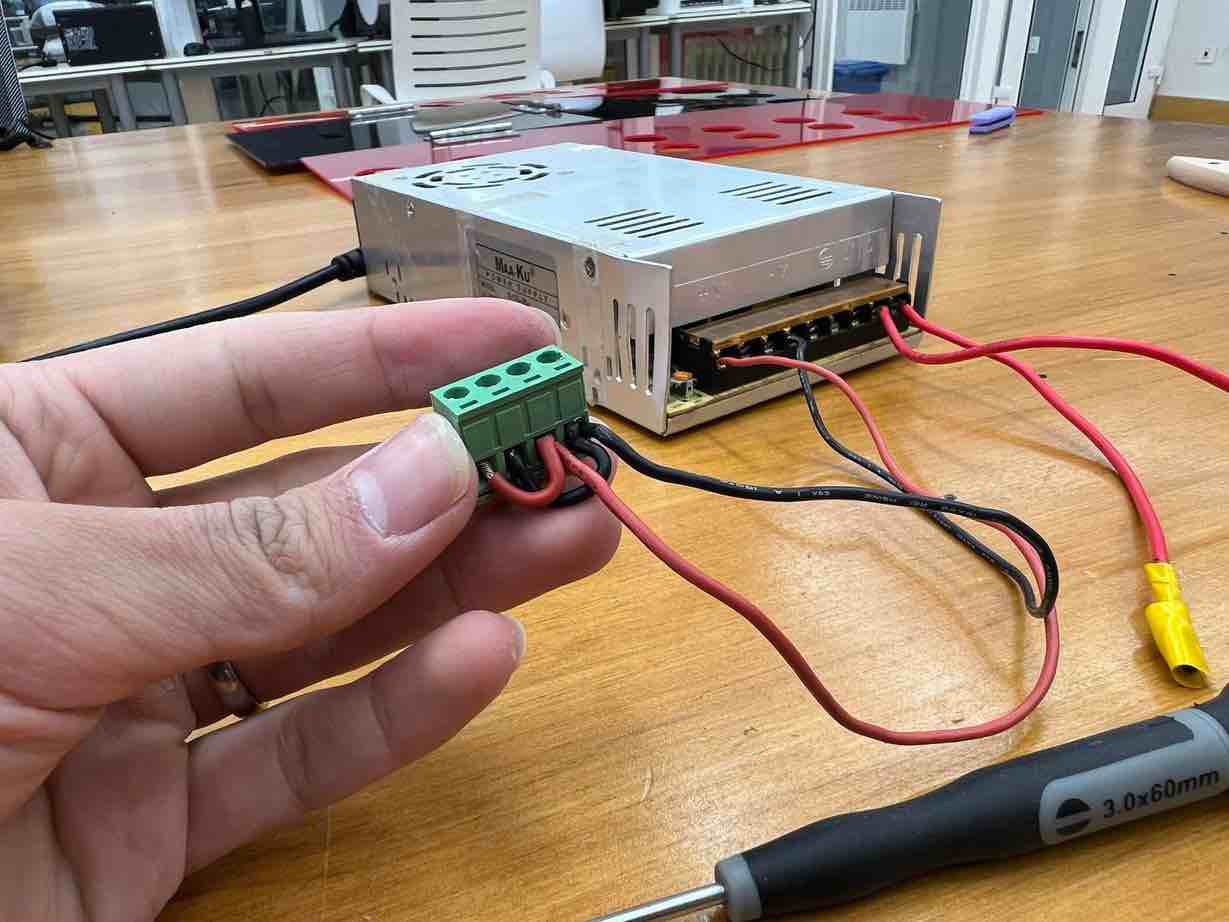
I took the Arduino mega and connected the ramps on top of it, ensuring that the pins lined up to where it needed to go. Then I looked up a ramps pin out sheet and connected the A4989 drivers to the appropriate pins accordingly. Then I looked up how properly to connect the NEMA stepper wires to the Ramps board. Once this was done, I ensured that I had my usb cable ready to program the Mega and the power supply ready to move the motors.
After some research, I was informed that I had to download the AccelStepper libraries to control the servos but (spoiler alert) I was able to control the motors without using it. Then I asked ChatGPT for a simple program just to mobilize my motors since I wanted to test the electronics and the power supply.
No matter what I tried and checked, the motors would not spin after uploading the code and providing power. Then it turns out that I had to tune my stepper drivers and conduct a VREF calculation. I followed this guide and it was very useful: Verf Calc. I calculated our necessary Vref to be VREF = I x 8 x Rsense = 1.6 A (20% of 2A) x 8 x 0.1 ohms = 1.28 V. then I went ahead and tweaked it bu turning the potentiometers on each of the stepper drivers.
After doing all this, I edited the code to not have to use AccelStepper and finally after hours the motors rotated!. I then Spent the next few hours playing around with the delays and the amount of steps the motor would need to take before finally finalizing this to be the final code to mode the steppers from its position to 180 and then back, one after another to simulate the folding mechanism.
Code:
#define STEP_PIN_1 54
#define DIR_PIN_1 55
#define ENABLE_PIN_1 38
// Define the pins for stepper motor 2
#define STEP_PIN_2 60
#define DIR_PIN_2 61
#define ENABLE_PIN_2 56
// Define the pins for stepper motor 3
#define STEP_PIN_3 46
#define DIR_PIN_3 48
#define ENABLE_PIN_3 62
// Set the step delay for the motors (in microseconds)
const int stepDelay = 1000;
void setup() {
  // Set the motor control pins as outputs
  pinMode(STEP_PIN_1, OUTPUT);
  pinMode(DIR_PIN_1, OUTPUT);
  pinMode(ENABLE_PIN_1, OUTPUT);
  pinMode(STEP_PIN_2, OUTPUT);
  pinMode(DIR_PIN_2, OUTPUT);
  pinMode(ENABLE_PIN_2, OUTPUT);
  pinMode(STEP_PIN_3, OUTPUT);
  pinMode(DIR_PIN_3, OUTPUT);
  pinMode(ENABLE_PIN_3, OUTPUT);
  // Enable all three motors
  digitalWrite(ENABLE_PIN_1, LOW);
  digitalWrite(ENABLE_PIN_2, LOW);
  digitalWrite(ENABLE_PIN_3, LOW);
}
void loop() {
  // Rotate motor 1 forward for 200 steps
  digitalWrite(DIR_PIN_1, HIGH);
  for (int i = 0; i < 100; i++) {
    digitalWrite(STEP_PIN_1, HIGH);
    delayMicroseconds(stepDelay);
    digitalWrite(STEP_PIN_1, LOW);
    delayMicroseconds(stepDelay);
  }
  // Return motor 1 to its original position
  digitalWrite(DIR_PIN_1, LOW);
  for (int i = 0; i < 100; i++) {
    digitalWrite(STEP_PIN_1, HIGH);
    delayMicroseconds(stepDelay);
    digitalWrite(STEP_PIN_1, LOW);
    delayMicroseconds(stepDelay);
  }
  // Pause before starting motor 2
  delay(500);
  // Rotate motor 2 backwards for 200 steps
  digitalWrite(DIR_PIN_2, LOW);
  for (int i = 0; i < 100; i++) {
    digitalWrite(STEP_PIN_2, HIGH);
    delayMicroseconds(stepDelay);
    digitalWrite(STEP_PIN_2, LOW);
    delayMicroseconds(stepDelay);
  }
  // Return motor 2 to its original position
  digitalWrite(DIR_PIN_2, HIGH);
  for (int i = 0; i < 100; i++) {
    digitalWrite(STEP_PIN_2, HIGH);
    delayMicroseconds(stepDelay);
    digitalWrite(STEP_PIN_2, LOW);
    delayMicroseconds(stepDelay);
  }
  // Pause before starting motor 3
  delay(500);
  // Rotate motor 3 forward for 200 steps
  digitalWrite(DIR_PIN_3, HIGH);
  for (int i = 0; i < 200; i++) {
    digitalWrite(STEP_PIN_3, HIGH);
    delayMicroseconds(stepDelay);
    digitalWrite(STEP_PIN_3, LOW);
    delayMicroseconds(stepDelay);
  }
  // Return motor 3 to its original position
  digitalWrite(DIR_PIN_3, LOW);
  for (int i = 0; i < 200; i++) {
    digitalWrite(STEP_PIN_3, HIGH);
    delayMicroseconds(stepDelay);
    digitalWrite(STEP_PIN_3, LOW);
    delayMicroseconds(stepDelay);
  }
  // Pause for 1 second before repeating the sequence
  delay(500);
}
Ultrasonic
Next I wanted to work on incorporating the ultrasonic sensor module into our system. The idea is that when the sensor is blocked (when a shirt is placed on the machine), the folding starts after a very short delay. This whole ordeal was very time consuming as any and every ramps pinout and datasheet I looked at, everyone had preset examples such as “this is for the motors”, “this for the endstops” etc so I was worried if we could even have a ultrasonic sensor on our ramps system.
After looking through a bunch of resources, it became evident to me that the pins can be used for what ever is needed, similar to arduino digital/analog pins so after I figured that out I began testing different sensor to ramps connections.
I finally settled on (all on AUX4): * Trig to Pin 37 on ramps * Echo to pin 35 * vcc to 5V * gnd to gnd
Again just like previously, I downloaded two different libraries to maybe be able to use the ultrasonic sensor but eventually the code didnt’ use either of the libraries. I used chatgpt to initialize and to test that the sensor worked.
Additional Code To Define the pins for the ultrasonic sensor:
define TRIG_PIN 37
define ECHO_PIN 35
After testing that the Ultrasonic sensor worked, then I began fine tuning the code to work as such:
- The Ultrasonic sensor senses a t-shirt
- Two second wait time to allow the user to place the shirt properly
- motor 1 spins clockwise and back
- after a short delay, motor 2 spins anti-clockwise and back
- another short delay, motor 3 spins clockwise and back
- remove shirt
- repeat
Final Clean Code:
#define STEP_PIN_1 54
#define DIR_PIN_1 55
#define ENABLE_PIN_1 38
// Define the pins for stepper motor 2
#define STEP_PIN_2 60
#define DIR_PIN_2 61
#define ENABLE_PIN_2 56
// Define the pins for stepper motor 3
#define STEP_PIN_3 46
#define DIR_PIN_3 48
#define ENABLE_PIN_3 62
// Define the pins for the ultrasonic sensor
#define TRIG_PIN 37
#define ECHO_PIN 35
// Set the step delay for the motors (in microseconds)
const int stepDelay = 3000;
void setup() {
  // Set the motor control pins as outputs
  pinMode(STEP_PIN_1, OUTPUT);
  pinMode(DIR_PIN_1, OUTPUT);
  pinMode(ENABLE_PIN_1, OUTPUT);
  pinMode(STEP_PIN_2, OUTPUT);
  pinMode(DIR_PIN_2, OUTPUT);
  pinMode(ENABLE_PIN_2, OUTPUT);
  pinMode(STEP_PIN_3, OUTPUT);
  pinMode(DIR_PIN_3, OUTPUT);
  pinMode(ENABLE_PIN_3, OUTPUT);
  // Set the ultrasonic sensor pins as inputs
  pinMode(TRIG_PIN, OUTPUT);
  pinMode(ECHO_PIN, INPUT);
// Enable all three motors
  digitalWrite(ENABLE_PIN_1, LOW);
  digitalWrite(ENABLE_PIN_2, LOW);
  digitalWrite(ENABLE_PIN_3, LOW);
  // Wait for the ultrasonic sensor to stabilize
  delay(1000);
}
void loop() {
  // Check if the ultrasonic sensor is blocked
  digitalWrite(TRIG_PIN, LOW);
  delayMicroseconds(2);
  digitalWrite(TRIG_PIN, HIGH);
  delayMicroseconds(10);
  digitalWrite(TRIG_PIN, LOW);
  long duration = pulseIn(ECHO_PIN, HIGH);
  long distance = duration * 0.034 / 2;
  if (distance < 10) { // If the distance is less than 10 cm
    // Wait for 2 seconds before starting the motors
    delay(2000);
    // Rotate motor 1 forward for 200 steps
    digitalWrite(DIR_PIN_1, HIGH);
    for (int i = 0; i < 100; i++) {
      digitalWrite(STEP_PIN_1, HIGH);
      delayMicroseconds(stepDelay);
      digitalWrite(STEP_PIN_1, LOW);
      delayMicroseconds(stepDelay);
    }
    // Return motor 1 to its original position
    digitalWrite(DIR_PIN_1, LOW);
    for (int i = 0; i < 100; i++) {
      digitalWrite(STEP_PIN_1, HIGH);
      delayMicroseconds(stepDelay);
      digitalWrite(STEP_PIN_1, LOW);
      delayMicroseconds(stepDelay);
    }
    // Pause before starting motor 2
    delay(500);
    // Rotate motor 2 backwards for 200 steps
    digitalWrite(DIR_PIN_2, LOW);
    for (int i = 0; i < 100; i++) {
      digitalWrite(STEP_PIN_2, HIGH);
      delayMicroseconds(stepDelay);
      digitalWrite(STEP_PIN_2, LOW);
      delayMicroseconds(stepDelay);
    }
    // Return motor 2 to its original position
  digitalWrite(DIR_PIN_2, HIGH);
  for (int i = 0; i < 100; i++) {
    digitalWrite(STEP_PIN_2, HIGH);
    delayMicroseconds(stepDelay);
    digitalWrite(STEP_PIN_2, LOW);
    delayMicroseconds(stepDelay);
  }
  // Pause before starting motor 3
  delay(500);
  // Rotate motor 3 forward for 200 steps
  digitalWrite(DIR_PIN_3, HIGH);
  for (int i = 0; i < 100; i++) {
    digitalWrite(STEP_PIN_3, HIGH);
    delayMicroseconds(stepDelay);
    digitalWrite(STEP_PIN_3, LOW);
    delayMicroseconds(stepDelay);
  }
  // Return motor 3 to its original position
  digitalWrite(DIR_PIN_3, LOW);
  for (int i = 0; i < 100; i++) {
    digitalWrite(STEP_PIN_3, HIGH);
    delayMicroseconds(stepDelay);
    digitalWrite(STEP_PIN_3, LOW);
    delayMicroseconds(stepDelay);
  }
  }
}
A big change that had to be made was to increase the stepDelay. Initially when I used lower values, the motor of course spun faster but wasn’t able to lift the folds. After increasing and testing different values, 3000 seems ideal for our purposes.
Failure
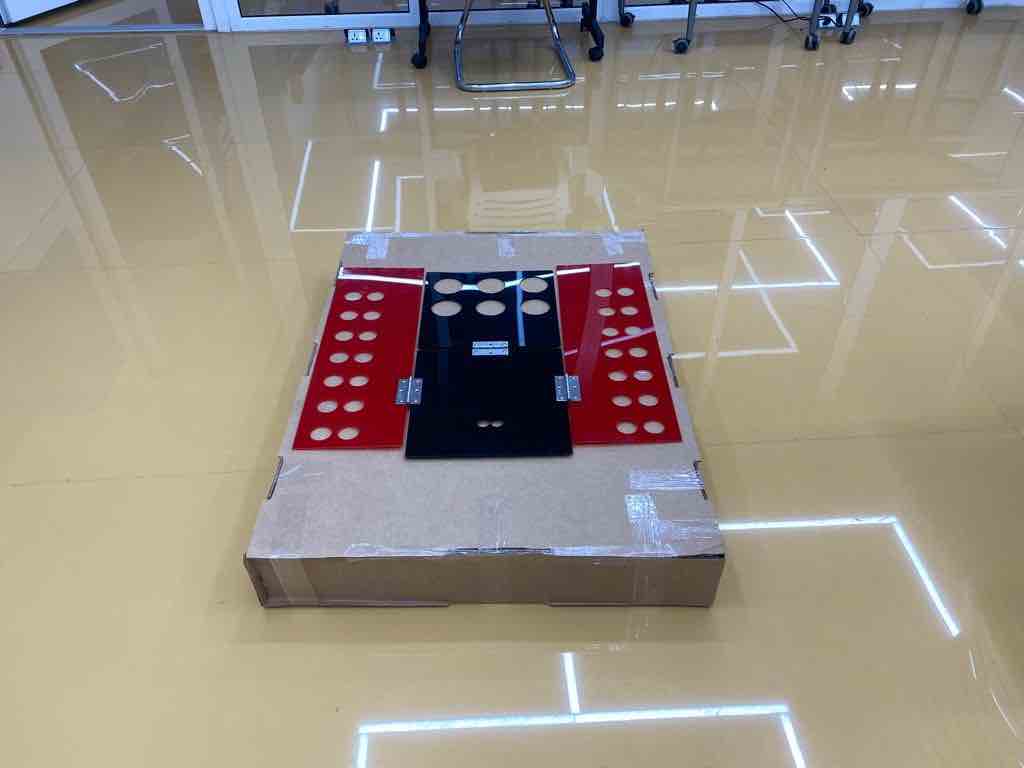
Up until I got the code to work, we tested the electronics and the code without actually attaching the linkages and the folding mechanism. Unfortunately due to the weight of the acrylic, the motors were unable to lift the folding mechanism so we decided that we should just work on the corrugated cardboard since it was stiff and strong enough yet light. Unfortunately, we were trading the aesthetics of the acrylic for the functioning of the cardboard.
Version 1:
For the first version of the machine, we first tested using cello tape to hold the parts together.
The side folds worked well however the bottom fold was a bit too heavy or the motor so we ran into that issue. This led us to ideate onto Version 2.
Version 2:
In version 2, we decided to ditch the tape and actually make it so that the cardboard would hold itself together whilst also having folding capabilities.
To achieve this, the Zund was used. For the second version we thought that the bottom folds could be split into two motors sequences for which we would need a forth motor. We also decided to add some patterns onto our cardboard,: 1. to make it look better 2. to make it lighter
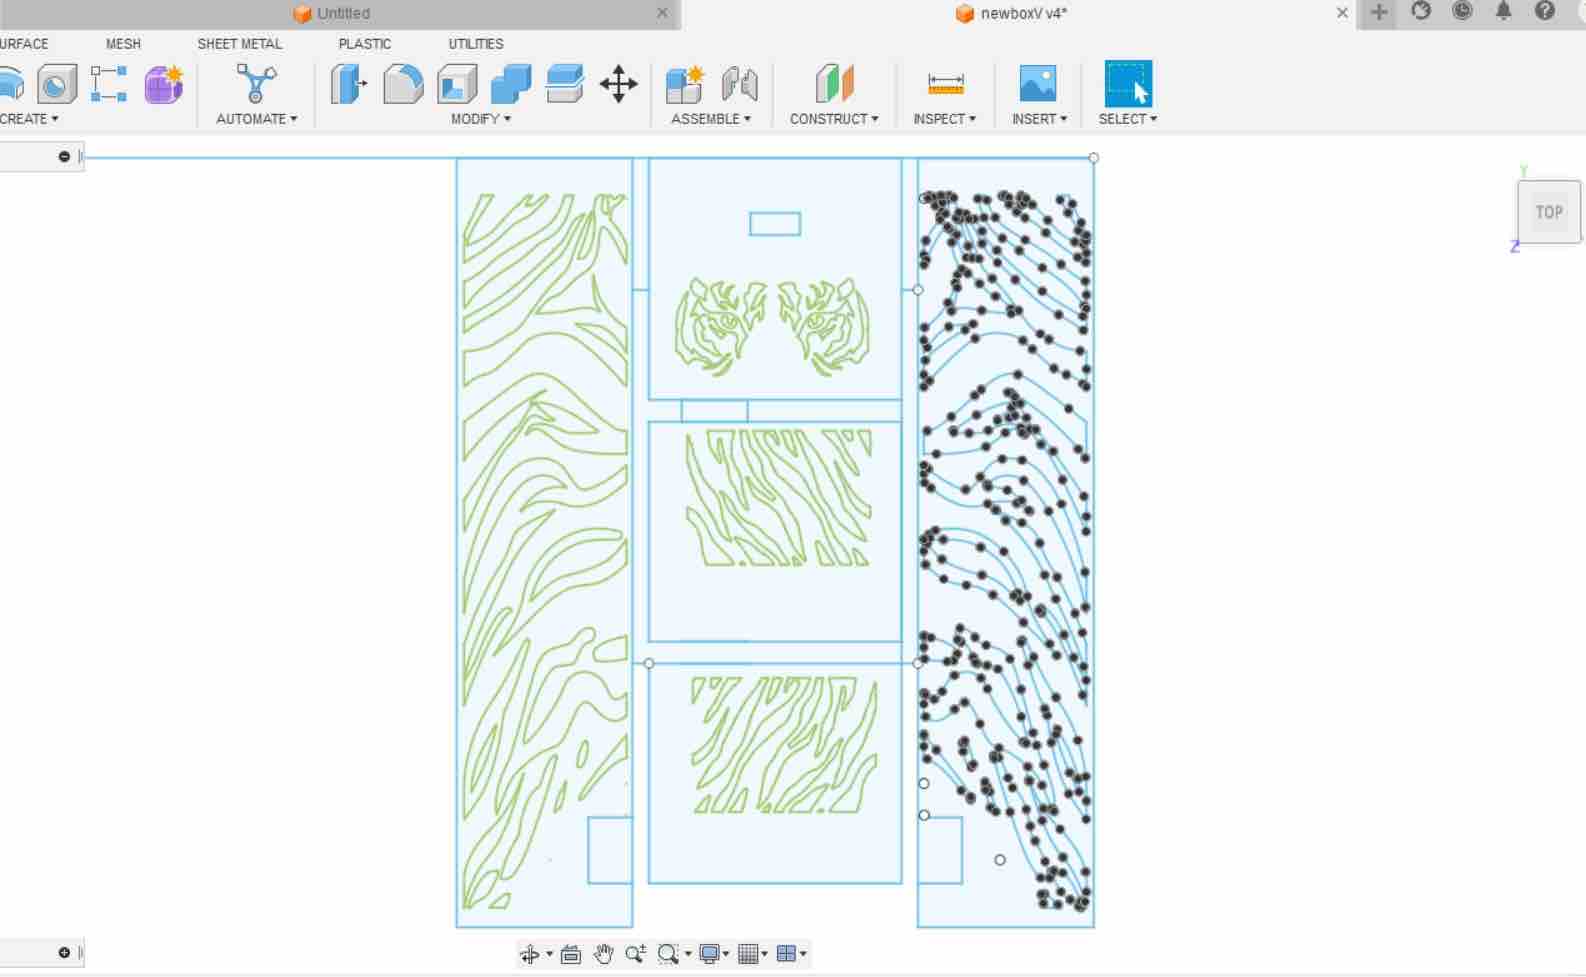
Therefore I added a tiger stripe pattern onto the design and remade the whole thing and send it to the Zund to cut.
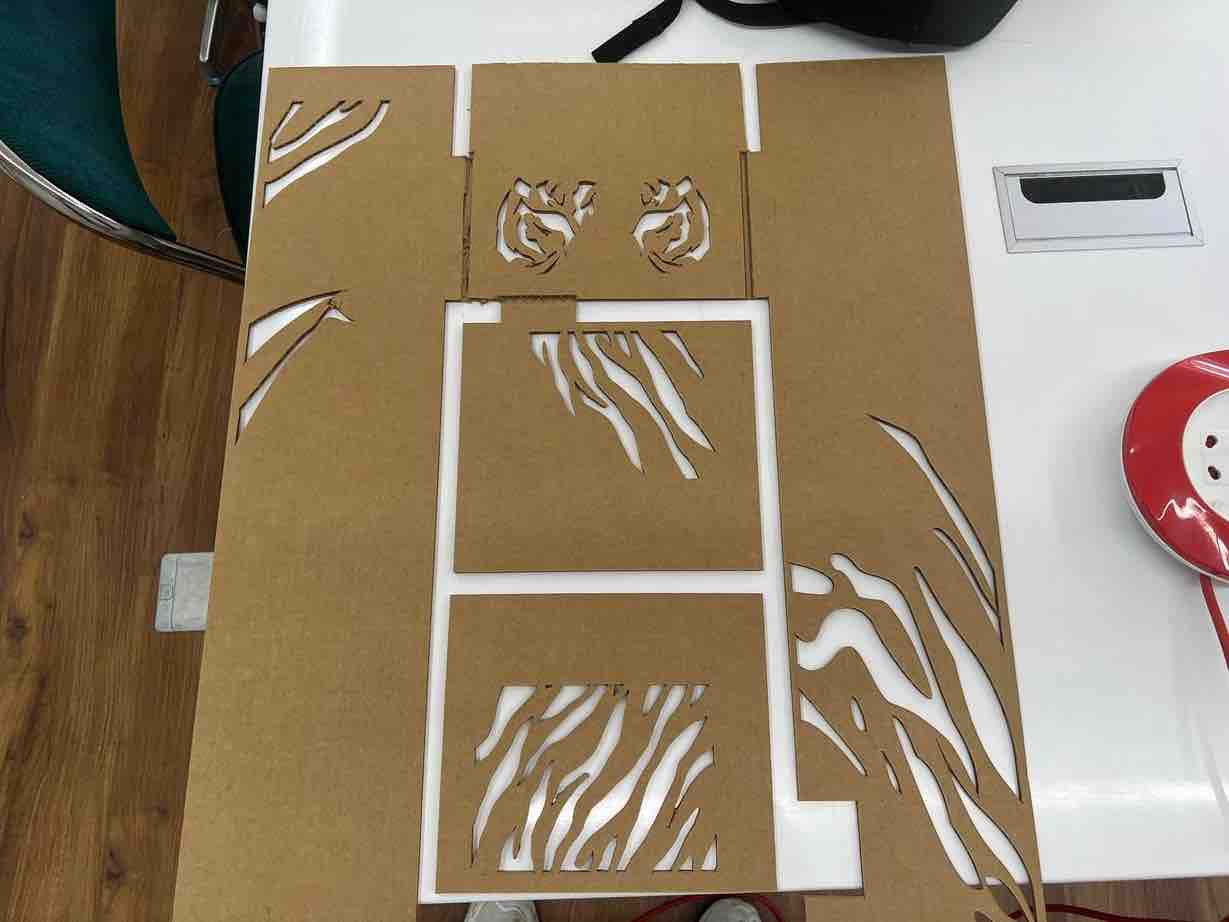
Unfortunately, while making the patterns the zund's z21 blade broke and that was the only one we had :(. Due to this, I swapped the z21 for a z16 but it has much worse precision so the designs wouldn’t come out well for the later versions.
Also, we overlooked the fact that the second middle folding mechanism would have more weight than the first fold so we learnt this the hard way when version2 successfully folded the lower half of the shirt, but the motor could not complete the second fold. It was actually capable of folding the shirt but we would’ve had to shorten the linkage which meant that the left fold would rest on top of the motors and that did not look good at all.
Version 3
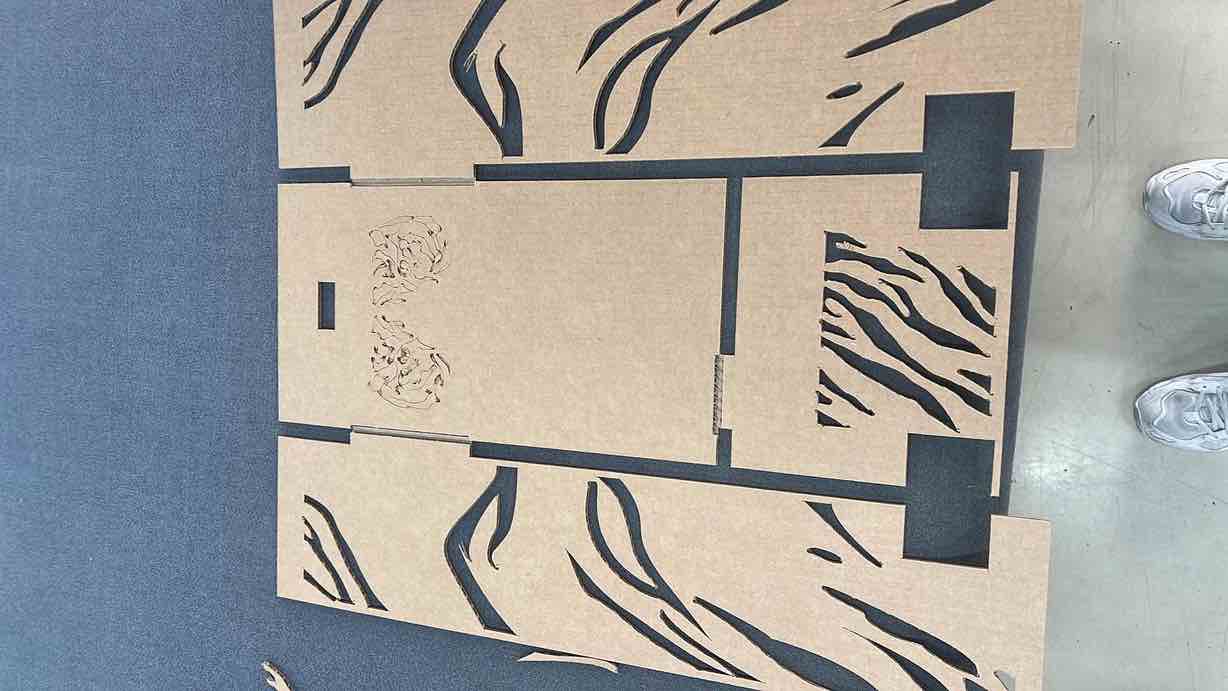
We decided to ditch the second middle fold for now and to go back to the 3 motor system while keeping the same proportions of version 2. This meant that the sides of the shirt, and the bottom would be folded easily by the machine but the final fold had to be done by hand. We also ditched the tiger design since it was hard to predict when the cardboard would fail and that was all unpredictable so we wanted to get rid of the randomness.
We were quite satisfied with this since it was still operating as we wanted it to just not optimally. We decided that this would be the final version until version 4 was successful. Rinchen then began working on the base of the machine, on which the folding machine would sit and also house the arduino + ramps and the wires.

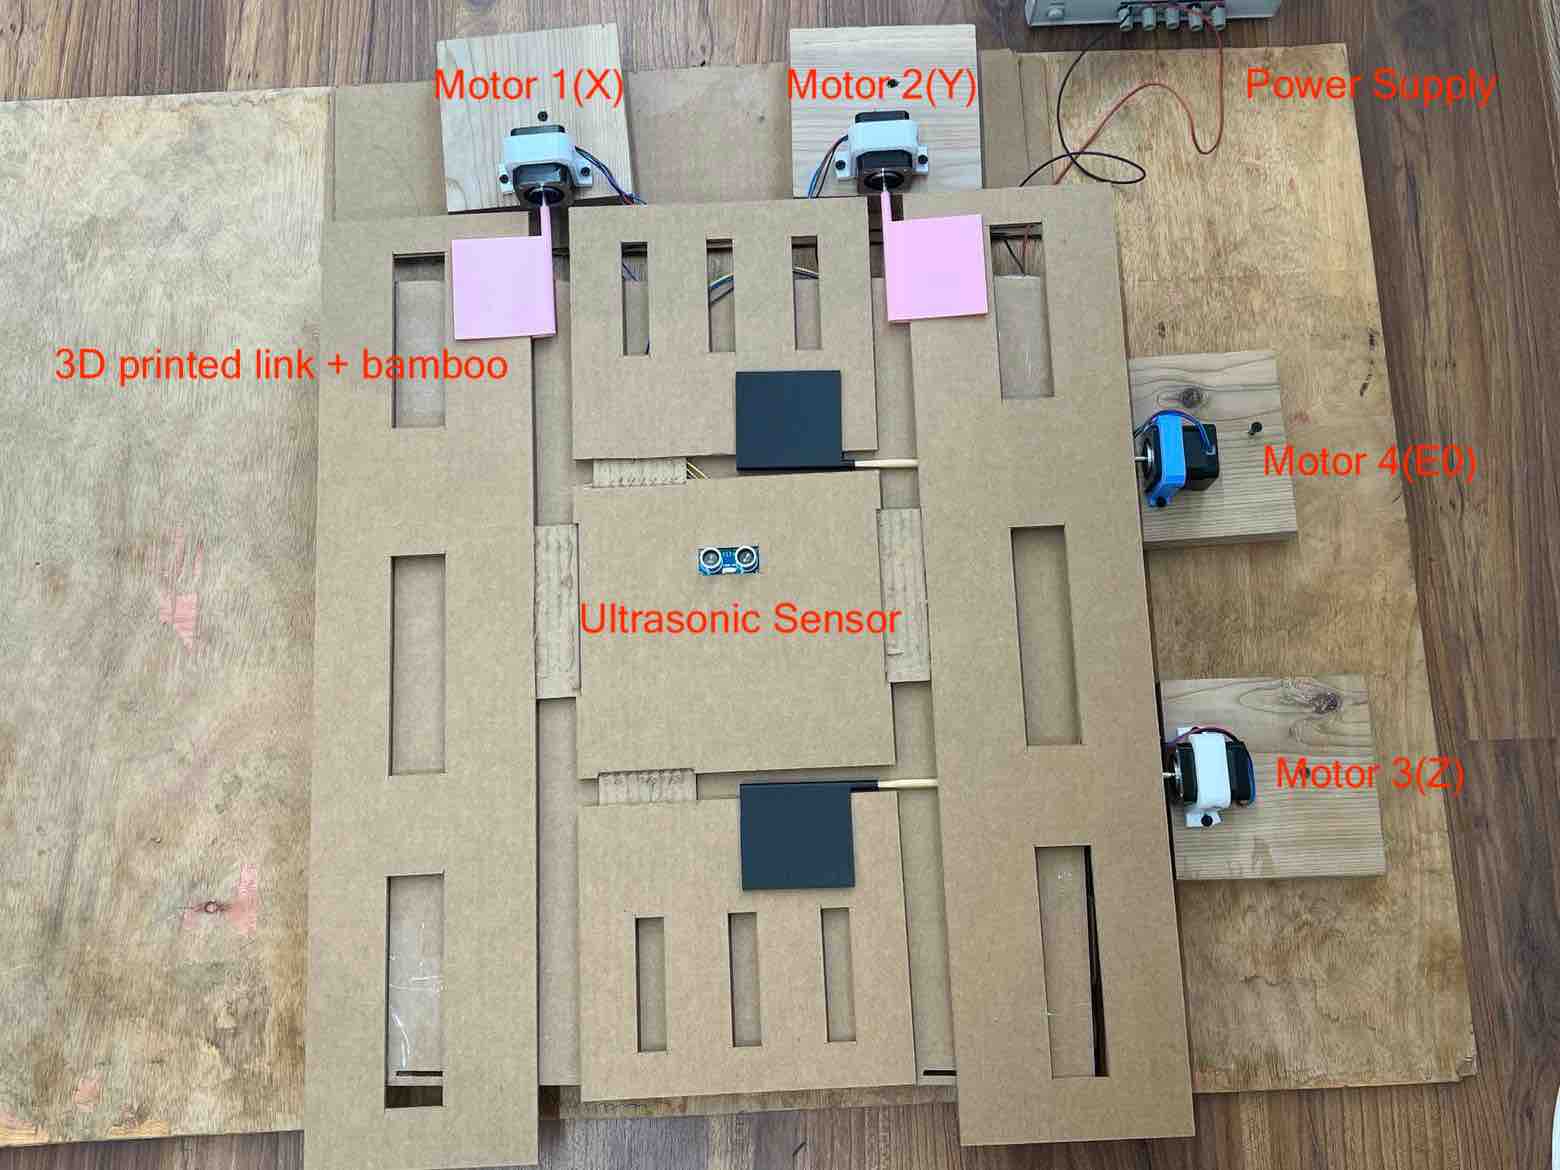
Version 4
Funnily enough, both Rinchen and I had an epiphany and thought about the same idea after a night’s sleep. To completely optimize and automate the entire folding process, we could again use a fourth motor, but this on the top fold rather than the middle. This way the weight would be light enough for both the top middle and bottom middle motors.
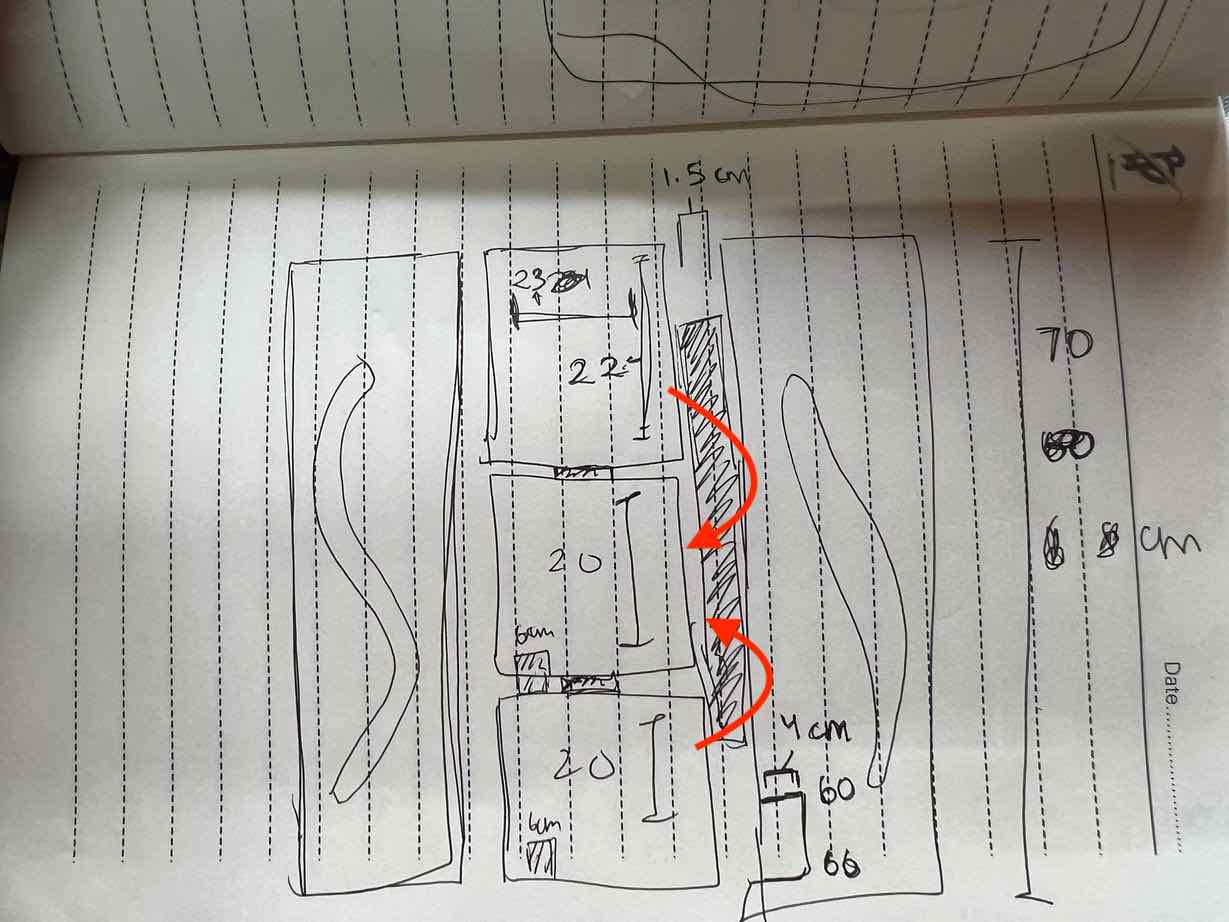
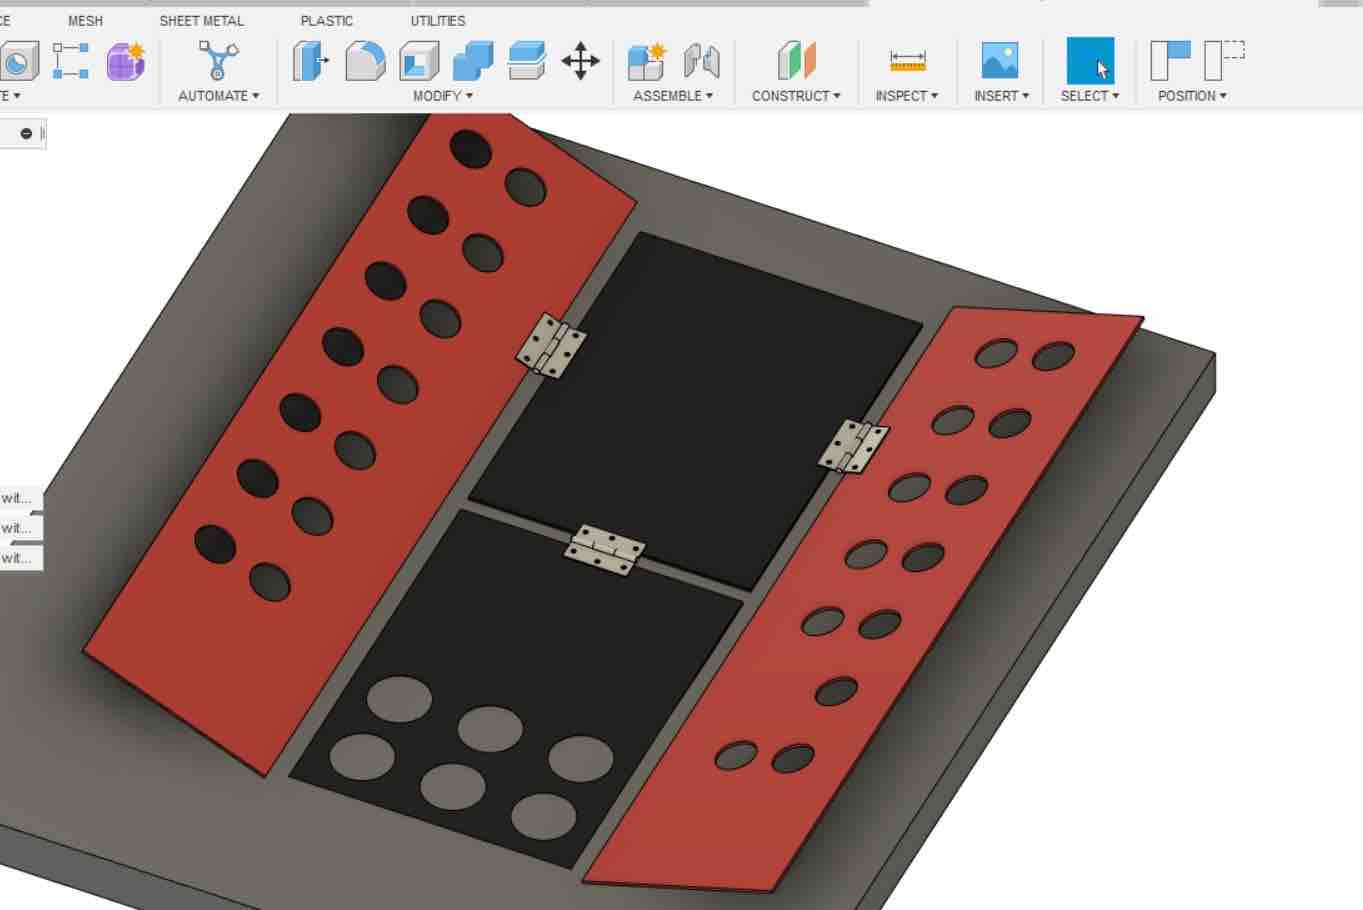
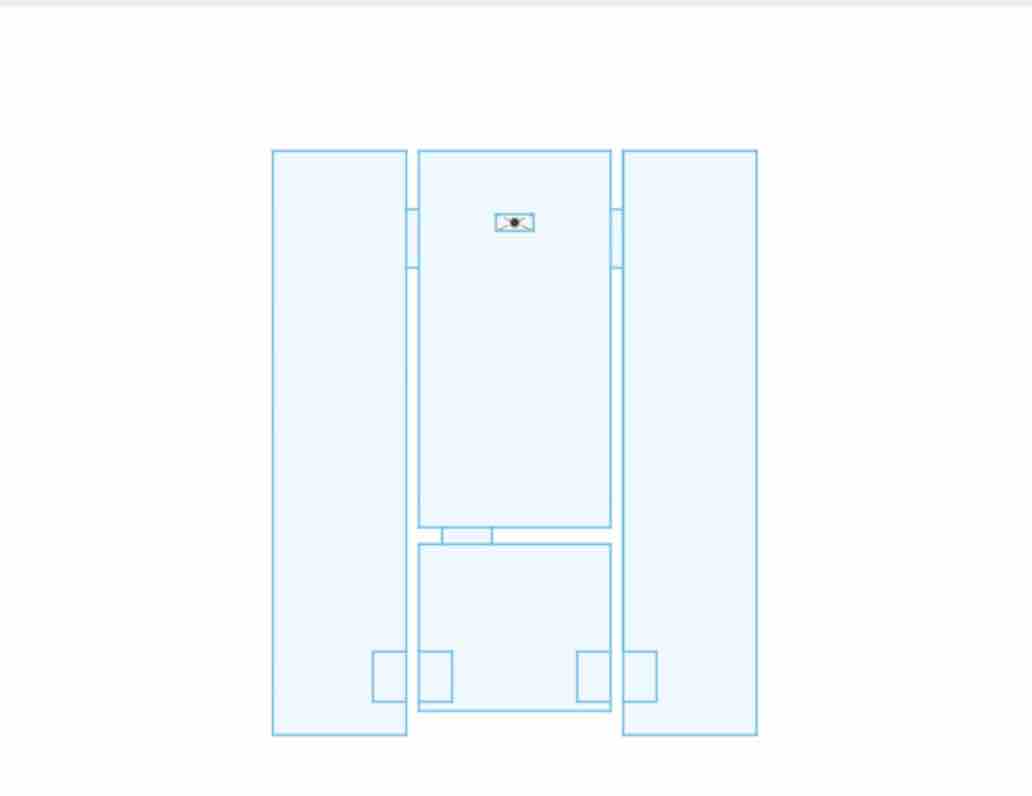
I began designing it on fusion to cut in the Zund, while Rinchen worked on designing and printing the clamps to hold the motors. This one has a few rectangle cutouts to reduce the weight without affecting the integrity of the structure
The machine’s new workflow looked like this:
- the ultrasonic sensor senses the shirt
- right fold
- left fold
- bottom middle fold
- top middle fold.
- at the end, the folded t-shirt’s final position would be in the middle.
I designed it and cut it in the Zund. and then I added motor 4 and its a4989 driver to the ramps board, changed the Vref of the potentiometer and edited the code.
NEW Code:
#define STEP_PIN_1 54
#define DIR_PIN_1 55
#define ENABLE_PIN_1 38
// Define the pins for stepper motor 2
#define STEP_PIN_2 60
#define DIR_PIN_2 61
#define ENABLE_PIN_2 56
// Define the pins for stepper motor 3
#define STEP_PIN_3 46
#define DIR_PIN_3 48
#define ENABLE_PIN_3 62
// Define the pins for stepper motor E0
#define STEP_PIN_4 26
#define DIR_PIN_4 28
#define ENABLE_PIN_4 24
// Define the pins for the ultrasonic sensor
#define TRIG_PIN 37
#define ECHO_PIN 35
// Set the step delay for the motors (in microseconds)
const int stepDelay = 3000;
void setup() {
  // Set the motor control pins as outputs
  pinMode(STEP_PIN_1, OUTPUT);
  pinMode(DIR_PIN_1, OUTPUT);
  pinMode(ENABLE_PIN_1, OUTPUT);
  pinMode(STEP_PIN_2, OUTPUT);
  pinMode(DIR_PIN_2, OUTPUT);
  pinMode(ENABLE_PIN_2, OUTPUT);
  pinMode(STEP_PIN_3, OUTPUT);
  pinMode(DIR_PIN_3, OUTPUT);
  pinMode(ENABLE_PIN_3, OUTPUT);
  pinMode(STEP_PIN_4, OUTPUT);
  pinMode(DIR_PIN_4, OUTPUT);
  pinMode(ENABLE_PIN_4, OUTPUT);
  // Set the ultrasonic sensor pins as inputs
  pinMode(TRIG_PIN, OUTPUT);
  pinMode(ECHO_PIN, INPUT);
  // Enable all three motors
  digitalWrite(ENABLE_PIN_1, LOW);
  digitalWrite(ENABLE_PIN_2, LOW);
  digitalWrite(ENABLE_PIN_3, LOW);
  digitalWrite(ENABLE_PIN_4, LOW);
  // Wait for the ultrasonic sensor to stabilize
  delay(1000);
}
void loop() {
  // Check if the ultrasonic sensor is blocked
  digitalWrite(TRIG_PIN, LOW);
  delayMicroseconds(2);
  digitalWrite(TRIG_PIN, HIGH);
  delayMicroseconds(10);
  digitalWrite(TRIG_PIN, LOW);
  long duration = pulseIn(ECHO_PIN, HIGH);
  long distance = duration * 0.034 / 2;
  if (distance < 10) { // If the distance is less than 10 cm
    // Wait for 2 seconds before starting the motors
    delay(2000);
    // Rotate motor 1 forward for 200 steps
    digitalWrite(DIR_PIN_1, HIGH);
    for (int i = 0; i < 100; i++) {
      digitalWrite(STEP_PIN_1, HIGH);
      delayMicroseconds(stepDelay);
      digitalWrite(STEP_PIN_1, LOW);
      delayMicroseconds(stepDelay);
    }
    // Return motor 1 to its original position
    digitalWrite(DIR_PIN_1, LOW);
    for (int i = 0; i < 100; i++) {
      digitalWrite(STEP_PIN_1, HIGH);
      delayMicroseconds(stepDelay);
      digitalWrite(STEP_PIN_1, LOW);
      delayMicroseconds(stepDelay);
    }
    // Pause before starting motor 2
    delay(500);
    // Rotate motor 2 backwards for 200 steps
    digitalWrite(DIR_PIN_2, LOW);
    for (int i = 0; i < 100; i++) {
      digitalWrite(STEP_PIN_2, HIGH);
      delayMicroseconds(stepDelay);
      digitalWrite(STEP_PIN_2, LOW);
      delayMicroseconds(stepDelay);
    }
    // Return motor 2 to its original position
  digitalWrite(DIR_PIN_2, HIGH);
  for (int i = 0; i < 100; i++) {
    digitalWrite(STEP_PIN_2, HIGH);
    delayMicroseconds(stepDelay);
    digitalWrite(STEP_PIN_2, LOW);
    delayMicroseconds(stepDelay);
  }
  // Pause before starting motor 3
  delay(500);
  // Rotate motor 3 forward for 200 steps
  digitalWrite(DIR_PIN_3, HIGH);
  for (int i = 0; i < 100; i++) {
    digitalWrite(STEP_PIN_3, HIGH);
    delayMicroseconds(stepDelay);
    digitalWrite(STEP_PIN_3, LOW);
    delayMicroseconds(stepDelay);
  }
  // Return motor 3 to its original position
  digitalWrite(DIR_PIN_3, LOW);
  for (int i = 0; i < 100; i++) {
    digitalWrite(STEP_PIN_3, HIGH);
    delayMicroseconds(stepDelay);
    digitalWrite(STEP_PIN_3, LOW);
    delayMicroseconds(stepDelay);
  }
  // Pause before starting motor 4
  delay(500);
  // Rotate motor 4 backwards for 200 steps
    digitalWrite(DIR_PIN_4, LOW);
    for (int i = 0; i < 100; i++) {
      digitalWrite(STEP_PIN_4, HIGH);
      delayMicroseconds(stepDelay);
      digitalWrite(STEP_PIN_4, LOW);
      delayMicroseconds(stepDelay);
    }
  // Return motor 4 to its original position
  digitalWrite(DIR_PIN_4, HIGH);
  for (int i = 0; i < 100; i++) {
    digitalWrite(STEP_PIN_4, HIGH);
    delayMicroseconds(stepDelay);
    digitalWrite(STEP_PIN_4, LOW);
    delayMicroseconds(stepDelay);
  }
  delay(500);
  }
}
Final Functioning:
Final BOM:
- Arduino Mega 2560
- Ramps 1.4 Shield
- 4x Nema Stepper Motors
- 4x A4989 motor drivers
- 4x 3D printed linkages with bamboo
- Ultrasonic Sensor Module
- 8x Long male-female wire connectors
- 12V Power Supply
- Cardboard Minimum 60x70 cm (for the folder)
- Wooden blocks to secure the motors
The Video
I wanted to make the video light hearted and fun whilst also making sure it could get the point across. Since the machine was about T-shirt folding I wanted to add some elements of Marie Kondo.
Heres my thinking process:
- I wanted to film myself depressed from working on fabacademy.
- To relieve stress, I would take a youtube break wherein I would come across Marie Kondo explaining the benefits of folding and tidying up.
- I see her say,”transform your life” and want to do the same so I go to my closet to fold my clothes, but alas, too many t-shirts.
- So we decide to make a machine
- cuts to all the processes utilized when making the machine.
- final shot of the machine working
- Inspired by Wes Andersons’ title cards in between acts/scenes and old hollywood no talking just sound effects to bring an comedic element.
- Once I had this idea down, I went ahead and started the filming part.
Conclusion
The whole project on machine building was stressful but was an amazing experience. It felt amazing for an idea of mine to come to life and I am really grateful for my teammates, who were very on board with my idea.
Given more time, the first clear improvement I would like to make is to improve the overall aesthetics of the machine. Due to time constraints, we could not dwell on the looks fo the machine so that would’ve been a key focus with more time. Another idea is that I would put an LED somewhere near the top of the machine:
1) to show when the machine is on 2) to blink when the Ultrasonic sensor senses a shirt so the user is warned to remove their hand.
Lastly, we could’ve done more work on the torque calculations since we initially underestimate the weight of the acrylic.