Week 1. Principles and Practices & Project Management
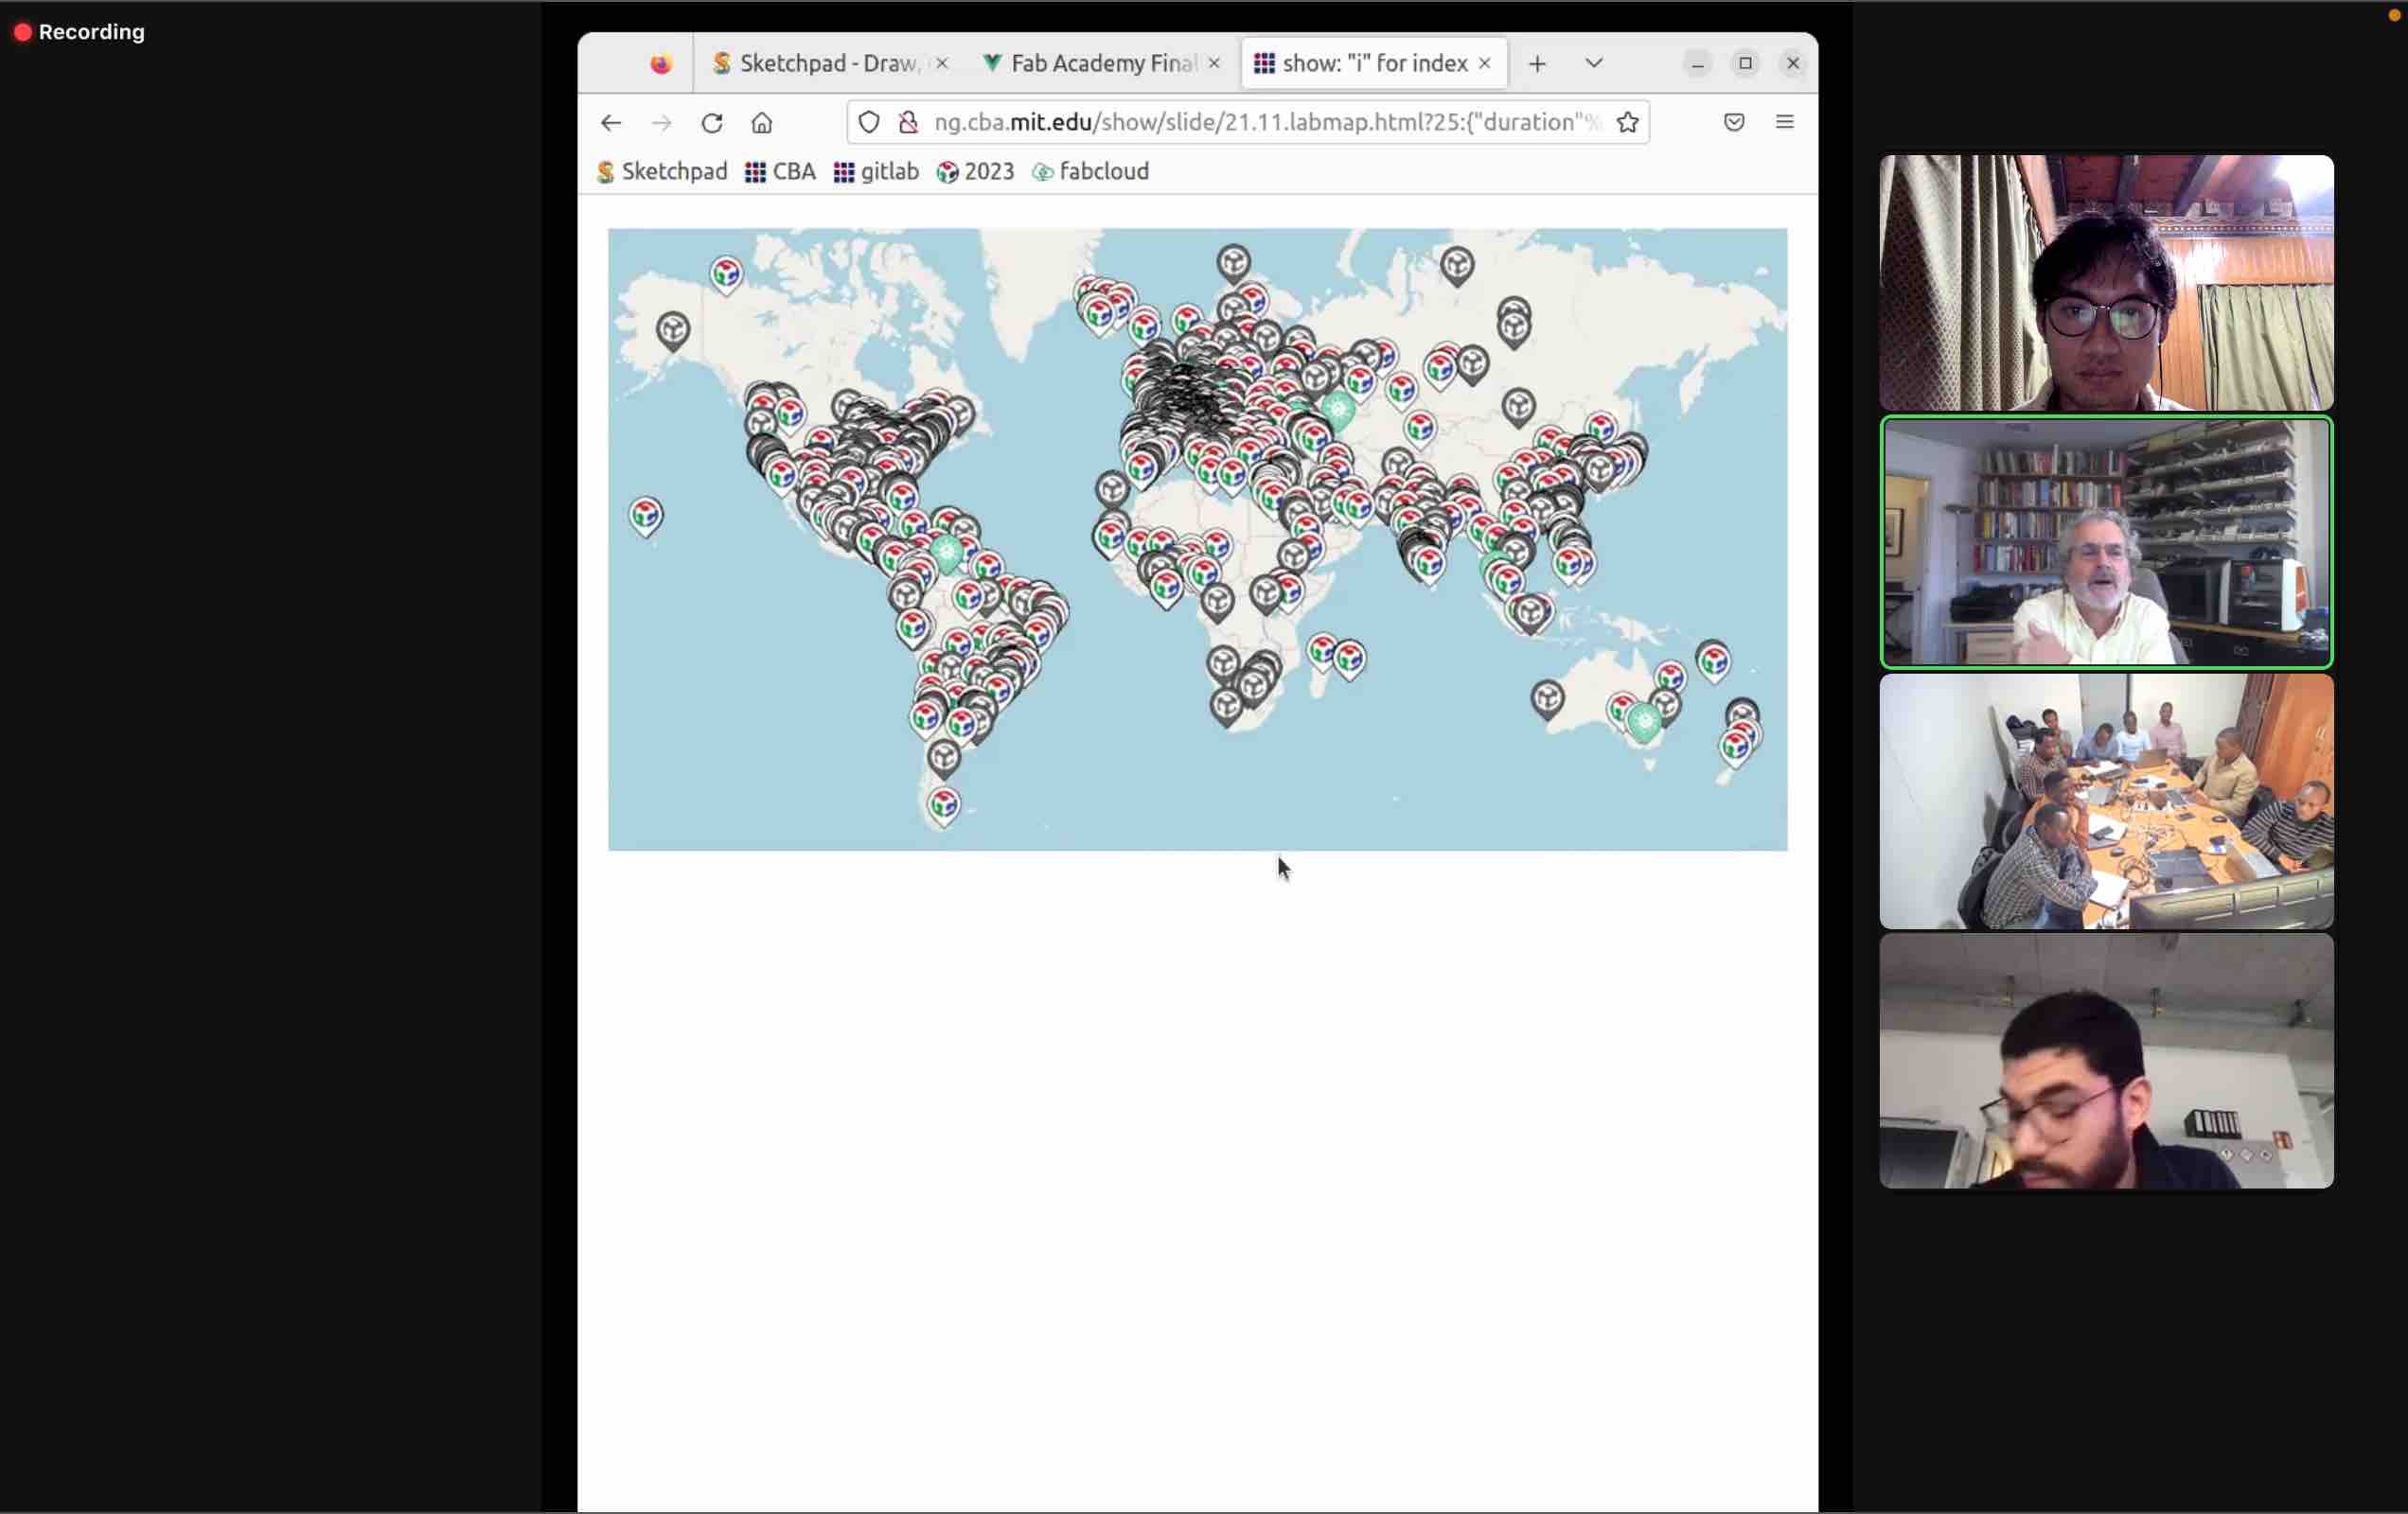
This week we had our first ever Fabacademy class for the year 2023 and I went into it feeling both excited and nervous.The class began with Prof. Neil showing us the “Fabacademy theme song music video - Document like that” which was hilarious but also very insightful. We got a brief introduction into the beginning and functioning of the Fablab universe, learning about the digital revolution in fabrication and how fablabs are growing exponentially. Its exciting to be taking part in a Globally distributed education platform which differs from both in person and online classes, merging the two, with each node having local instructors and local peers. A great example of this globally distributed education and ecosystem is how during the pandemic, fablabs could work together virtually and prototype rapidly, fixing the problems caused by the broken supply chain
Since this week was the first week, things were done a little differently. The first hour and about 15 mins was the introduction, followed by live presentations by members from the 2022 cycle, after which we took a break and the last hour was the lecture on this weeks topic. But, the regular Wednesday lecture will be structured like:
-
Hour One: Random selection of students who wil present what they worked on and learnt
-
Hour Two: Open Hour and Discussions
-
Hour Three: Lecture on topic of the week
Of the live presentations that were conducted I really enjoyed Albert’s project titled: Module PID

That was a breakdown of the Wednesday lecture. The Weekly schedule can be found below:
| Schedule | Activity |
|---|---|
| Wednesday 9am-12pm Boston time (8pm-11pm Bhutan Time) | Weekly Lecture with Prof. Neil |
| Thursday 10:30 am Bhutan Time | Local Review |
| Saturday 10am Boston Time (9pm Bhutan Time) | Global Open Time |
| Monday 9am-10am Boston Time (8pm-9pm Bhutan Time) | Recitation with a champion of the topic |
| Tuesday 12:00 or 21:00 JST | Asia Review |
The biggest takeaway was:
DOCUMENT! DOCUMENT! DOCUMENT!
We went over what GIT is and how we would use such a tool for the duration of our Fabacademy. Along with that, we went over many many different tools with different functions which could help us for our own project management during this cycle. I learnt that the Fabcloud is a git lab instance, and we will be downloading and using git to pull, push our documents from our local machine to the cloud. Git can even be used on the phone!
Website Building with HTML
For website building, we will be using HTML for our documentation and website for Fabacademy. We were all given a html template for this cycle and this is what I edited by opening the file in vscode. As a newbie in website design, I will be looking to learn everything from scratch and will be using tutorials such as: HTML Tutorial
And what can be found on this very useful tutorial page: Fabacademy Tutorials

Some tips from Prof. Neil that I thought are useful: * open html on a browser(can be down through a vscode extension) before pushing into the fabcloud * CTRL + U or on mac option + command + u to view the source of a website on a browser * Browse previous students’ website for inspiration or help
Html work flow:
- Typically, to add lines or paragraphs in html, you need to add it in between
<p> </p>. This creates a new paragraph. <h#> </h#>was used for headers, with the has signifying a number<li> </li>was used to create separate lines- I used
<pre> </pre>to create preformatted text which I typically used together with<code> </code>for a differently formatted text (for code etc) - I used
<img src="URL" width=600>to insert my images. This was great because the width was adjustable. You can also use the same but withlocal pathingrather than a URL. like so<img src="../images/week01/gitinvscode.jpg" width="45%"/> - I used
<table> </table>to insert a table,<th> </th>for the headers,<td> </td>for cells and<tr> </tr>for rows. <ul><a href="http://pub.fabcloud.io/tutorials/index.html">Fabacademy Tutorials</a></ul>was the format for linking external links<video> <source src="vid.mp4" type="video/mp4"<</video>was what I used for videos
I am a true beginner with html so thats all that I played around with.
This week I edited my About me, Week 1 Assignment (this) and the Final Project section of my website in the GIT repo (edited WEB IDE before cloning) itself as instructed by Neil. After going through the GIT tutorial, Cloned my repo ito my local machine and will be pulling and pushing my work from my local device henceforth!
Back to the lecture, After the HTML and git sections, Prof. Neil went over demand vs supply side, how to plan tasks, why parallel development is better than serial development especially for Fabacademy and most importantly, how we should utilize Spiral Development for all our tasks and mainly the final project. Spiral development is a development technique where you work in spirals, having a model at the end of every spiral, working and improving on it as you advance through more spirals. Each spiral having a model at the end of it. Modularity was also emphasized as an important aspect when deciding about the final project.
MKDocs and Markdown
After week 1, I decided to switch to using MKdocs with markdown since I am more comfortable using markdown over html. I downloaded the fab template from Julian’s Student template MKdocs Repo and recreated my entire website.
For this I had to wipe out all my old preexisting html and .yml files and I replaced all of them with the ones found in the template, which includes adding the mkdocs.yml file and requirements.txt file for configuring the materialtheme for the website
some markdown shortcuts:
Headers are defined by the ‘#’symbol. One ‘#’ for H1, two for H2, etc.
- Quotes: Quotes are defined by the ‘>’ symbol
- Bold/Italics: Add emphasis with asterisks ‘*’ and underscores ‘_’ Two before and after (no spaces) a section of texts makes it bold One before and after (no spaces) a section of texts makes it italic You can also put Bold and Italicized text inline by surrounding a group of words.
- Horizontal Break: A horizontal rule gives a visible line break. You can create one by putting three or more hyphens, asterisks, or underscores (-, *, _).
- lists: Create unordered lists using ‘-‘, ‘*’, ‘+, You can create sub-lists by indenting Create ordered lists using a number prefix
- link: Create a link with text by surrounding text with brackets, [], and link immediately following with parenthesis ()
- image: Defining an image is similar to defining a link, except you prefix it with ‘!’ Just like links, you can define images by reference in the same format.
- code: You can do inline code with backticks (``). You can do blocks of code by surround it with 3 backticks
- Tables: Tables are useful for displaying rows and columns of data. Column headers can be defined in between pipes (|)
Working through a Git Tutorial
I began this part of the assignment by first downloading and installing Homebrew and GIT. Whie I did have prior basic knowledge of GIT and Gitlab because of a fabzero training conducted by Fran and Sibu, I still decided to go through two tutorials to start from scratch, get back to speed and learn new things about git and gitlab. One of the tutorials I used was the one thats in the Tutorial and this one TheCodingTrain Git tutorial.
I then opened up my terminal (on mac, I use command+space to open my finder and then search for terminal). First I just typed in git and hit enter to check if all downloaded smoothly. Then, I configured my username and user email using the following two lines of code in the terminal one by one, first typing
git config –-global user.name “your_username”and hitting enter, followed bygit config -–global user.email “your_email”and then hitting enter.
Our project repos are all being hosted on the fabcloud instance and so while we can work on our documentation directly in the browser, it will be better to locally clone the project repo on our local machine so we can work on our local machines and then push when needed. There are two ways to clone your repo.
Cloning using https connection
This is the easier of the two. To do this we go ahead and go to your project repo page, go the clone drop down and copy the url provided in the HTTPS option. Then, go to your terminal, type cd desktop to make the current depositary your desktop and then finally type git clone pastethecopiedURLhere and hit enter. The cloning will then begin and you will be able to see the download process. Once complete, you will see a new folder in your desktop with the name of the cloned repo!
Cloning using SSH-Key Connection
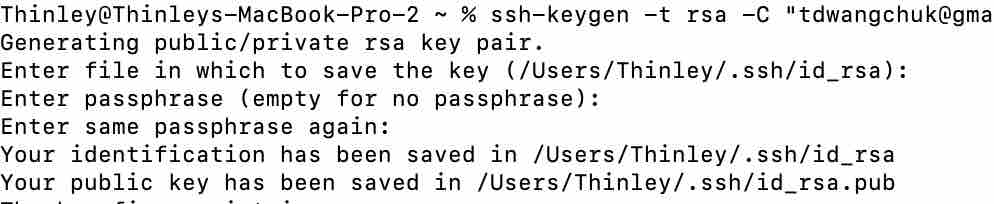
After configuring your username and email (seen earlier) you will need to check for an ssh key or generate one. for this we use the following codes:
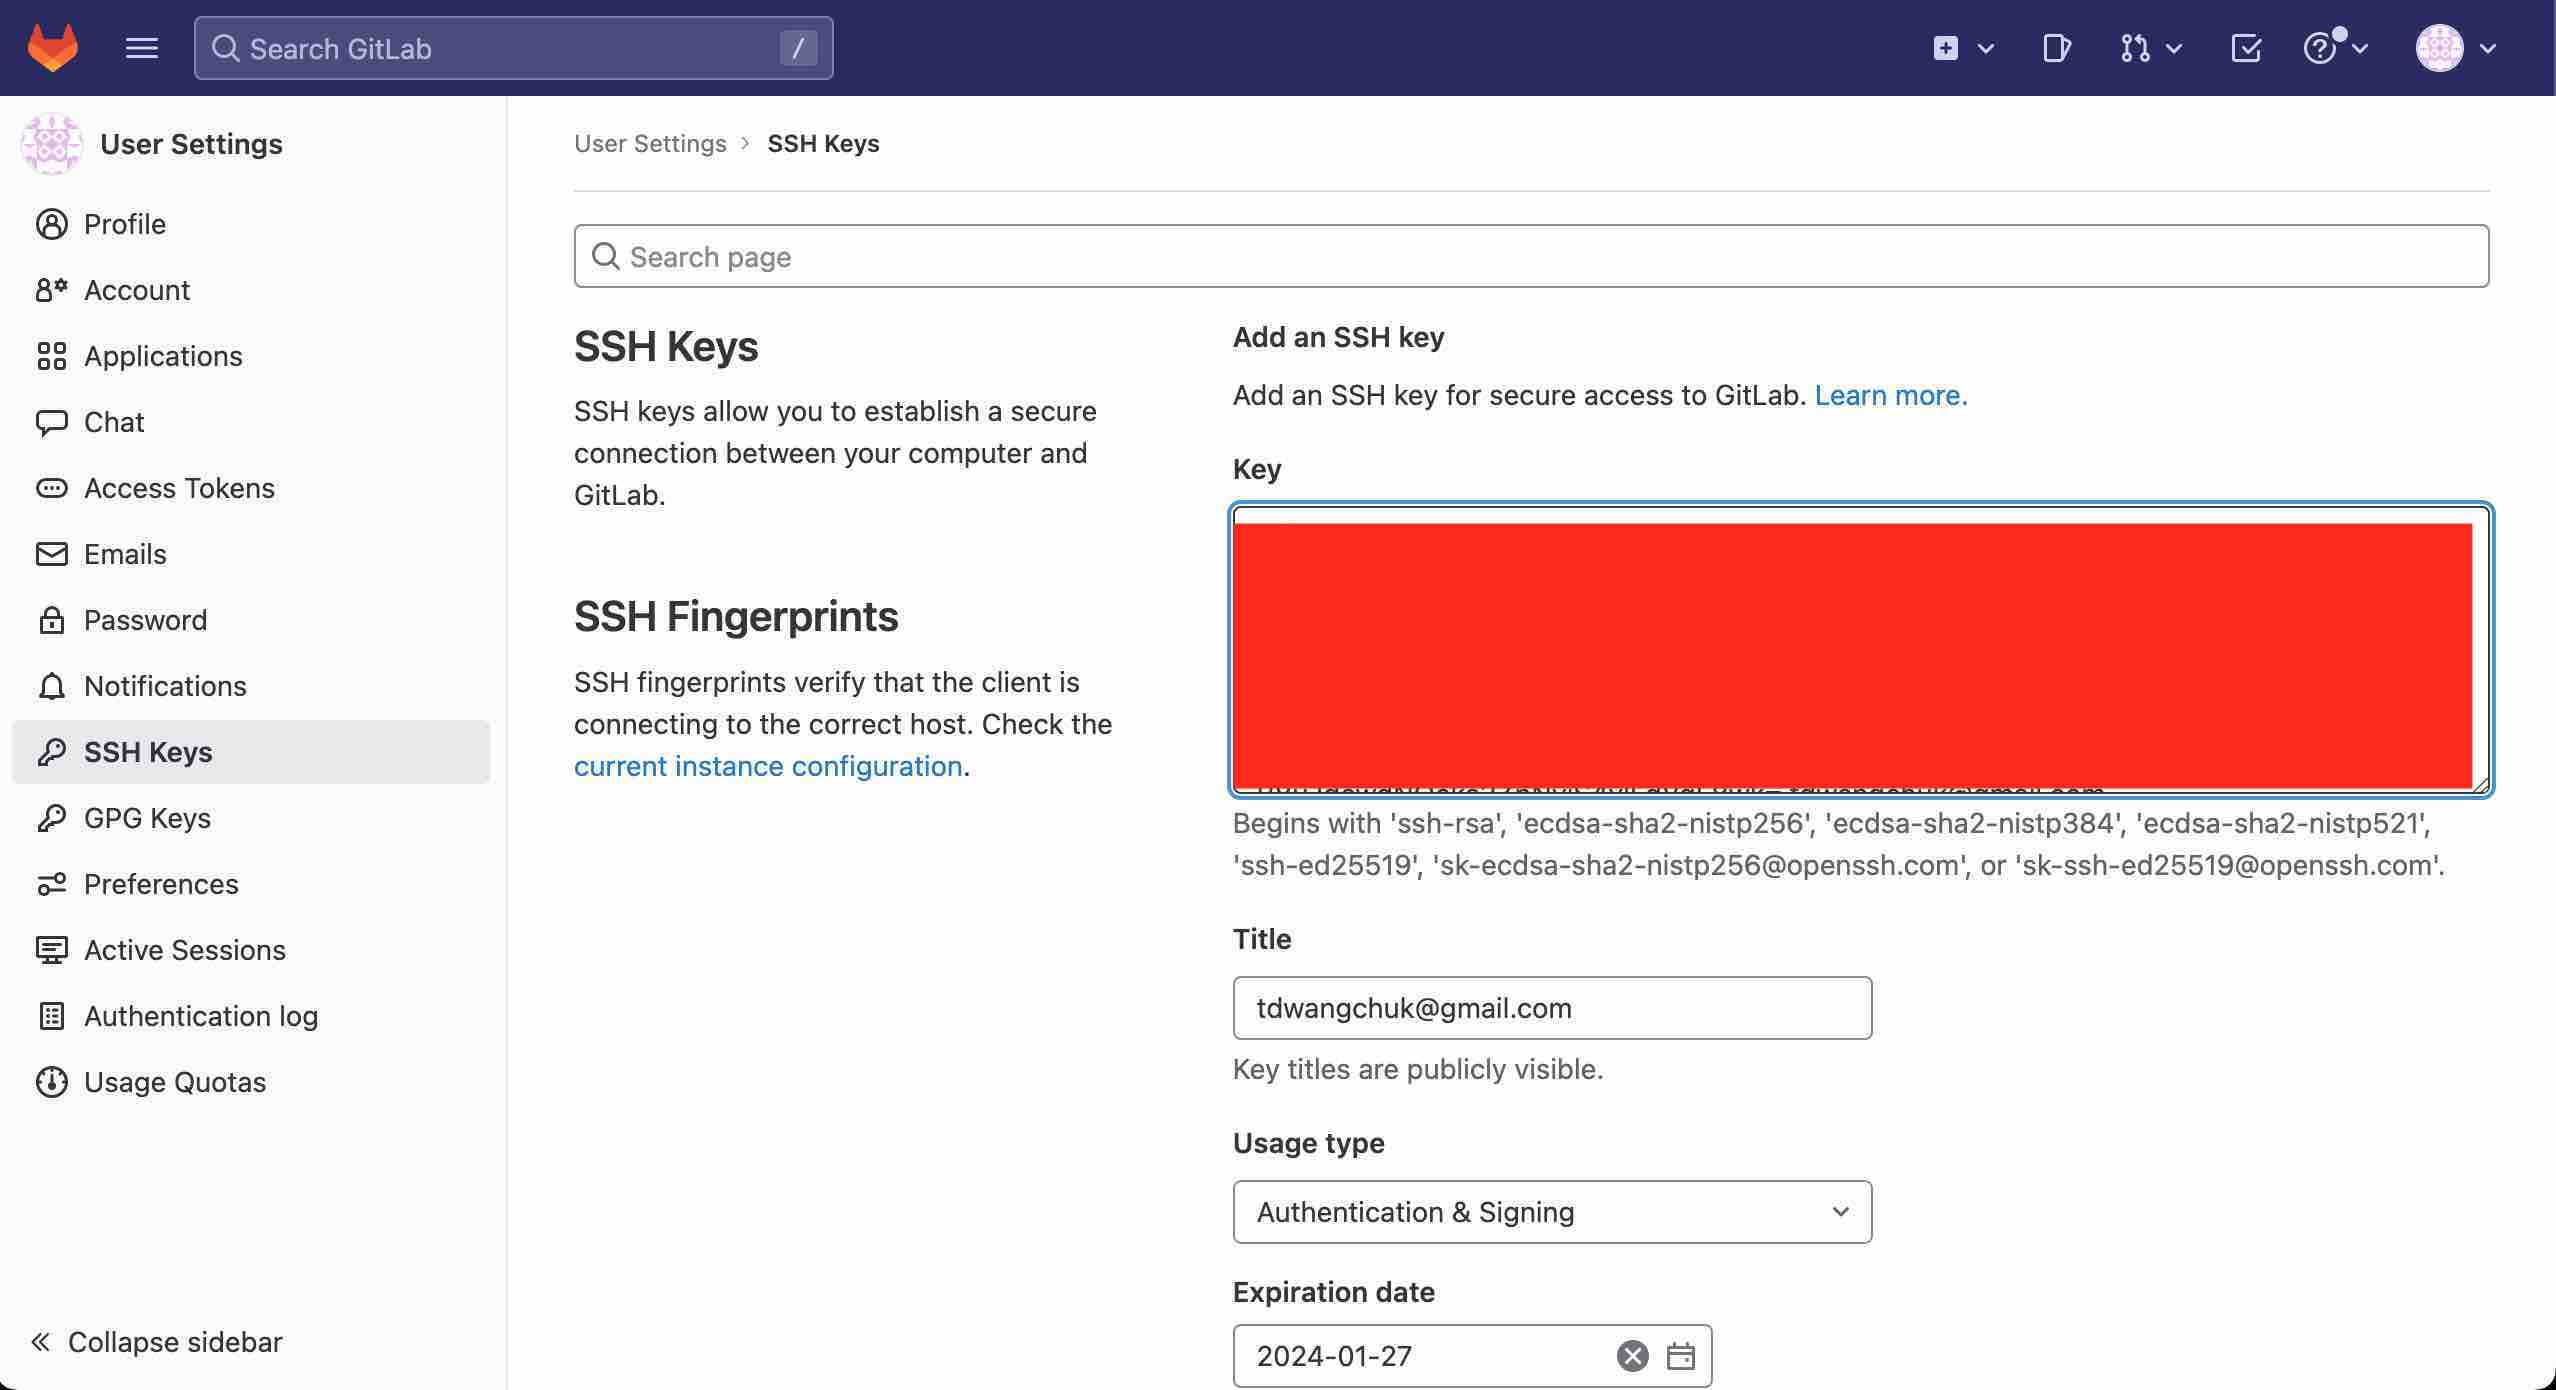
> cat ~/.ssh/id_rsa.pubto check the existence of an SSH key.ssh-keygen -t rsa -C “$your_email”to generate ssh key.cat ~/.ssh/id_rsa.pubto check the key.Windows: clip < ~/.ssh/id_rsa.pub Mac:pbcopy < ~/.ssh/id_rsa.pub Linux xclip -sel clip < ~/.ssh/id_rsa.pubto copy the key which you will need to paste in the GIT repo on the cloud.
Then just like in the HTTPS method, you go to your repo, click the clone drop down, copy the SSH url and then git clone url as seen earlier.
Someuseful git commands/tips:
git status
git pull
git clone (paste the https here)
cd
cd desktop
ls
clear
mv file.md foldername(ensure in same directory)
git add .or
git add filename.md
git commit -m "with a meaning full message''
git push
To edit files and push in VSCODE

GIT WORKFLOW
Cloning my Repo locally
"ssh-keygen -t rsa -C "YOUR_EMAIL@ADDRESS"
~/.ssh/id_rsa.pub
"pbcopy < ~/.ssh/id_rsa.pub"
git clone copiedURLpastehere
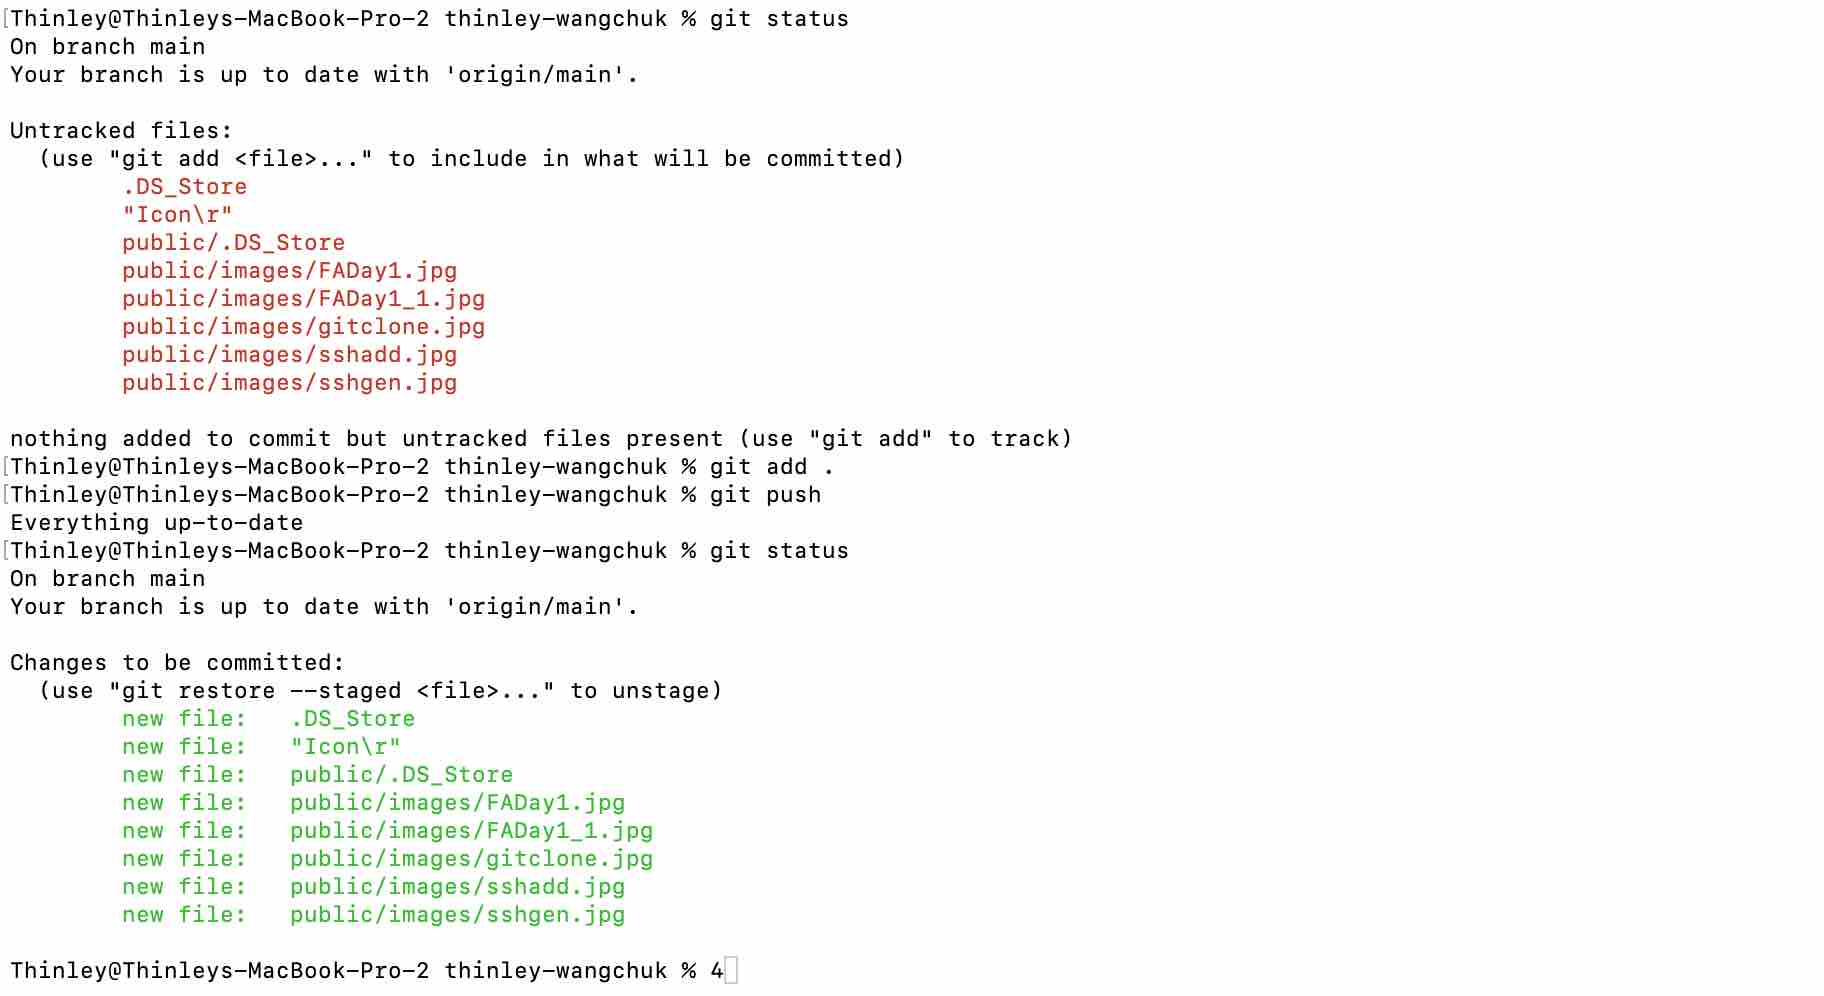
Finally, an example of me doing atypical git workflow:
Final project
We had to begin working on our final project ideas and had to make a sketch for the idea. I brainstormed and tried to come up with a few ideas that I would maybe want to work on. While I understand that it is better to decide as soon as possible, I have not been able to make up mind up just and will look to use the next few days to consult my instructors and gurus to see which one would be most feasible and which one I would actually still be interested in in a couple of days. My current four ideas are:
and just a disclaimer, I do not claim to be an artist or be good at sketching but I tried my best.
1. Heat Sensation Glove
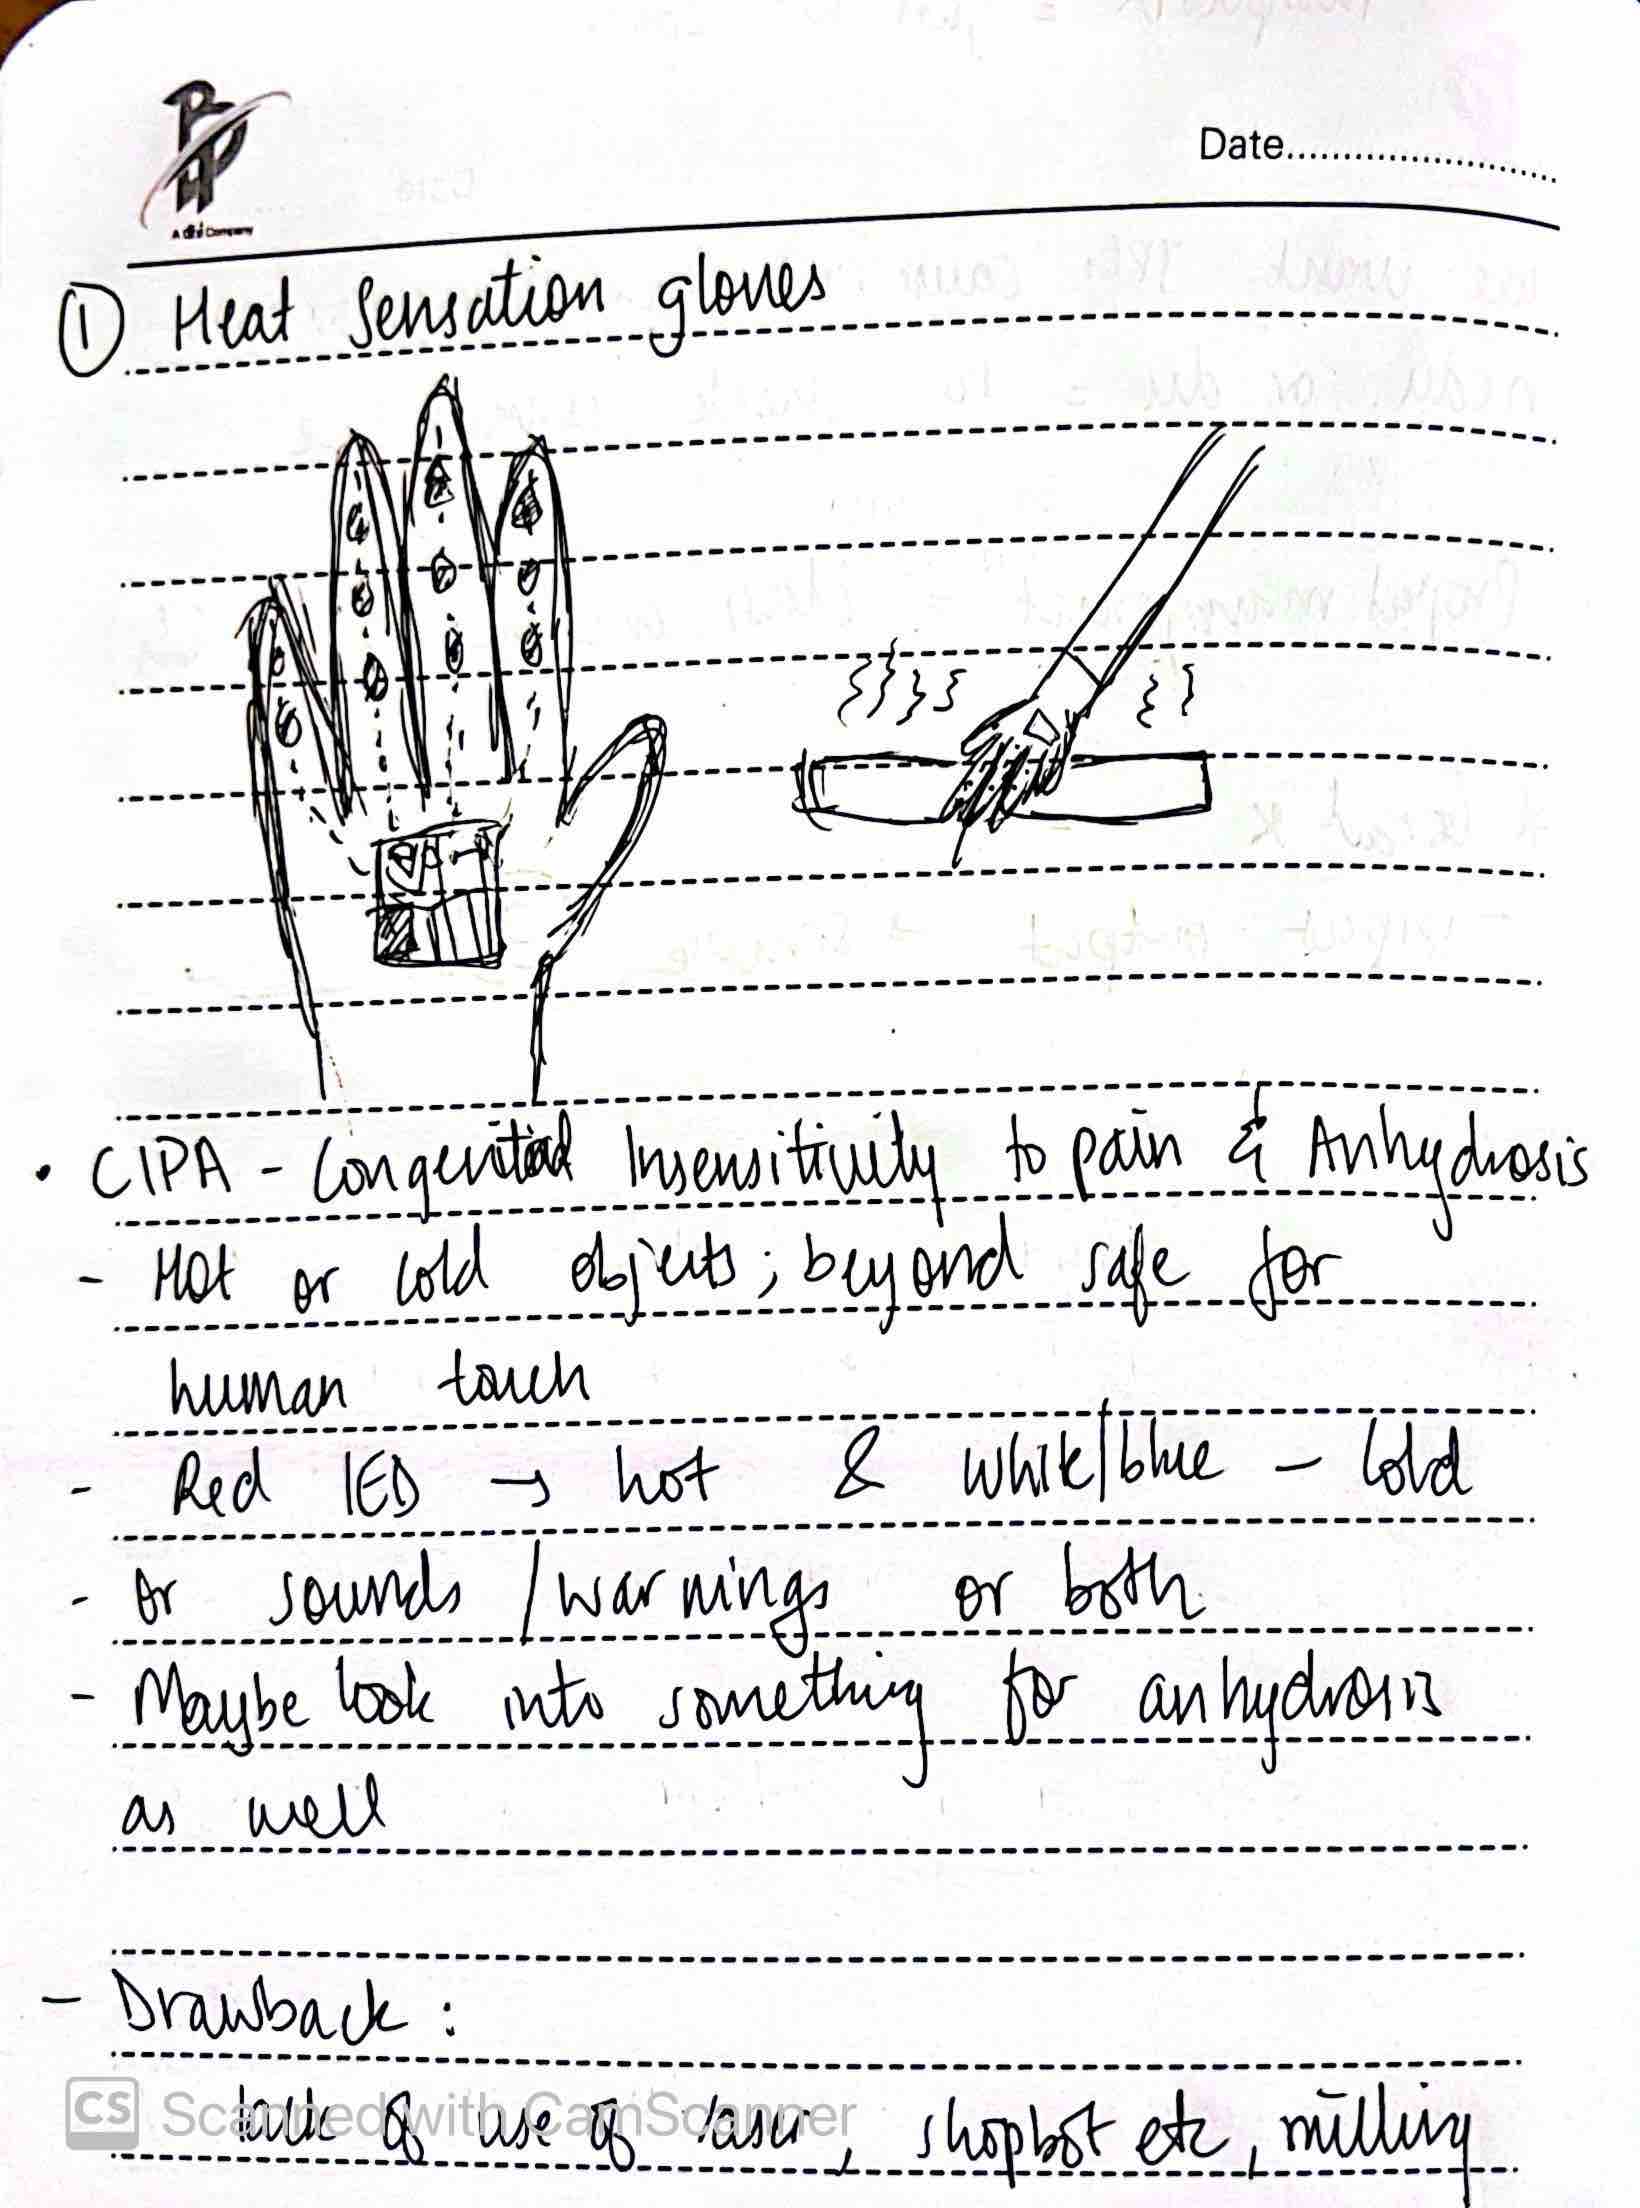
I recently read an article about how people who suffer from CIPA (Congenital Insensitivity to Pain & Anhydrosis) on average have a lifespan of only about 25 years, dying to unfelt injuries. This is what inspired this idea. The idea revolves around making a glove that instantly glows red/blue with a sound warning with the wearer touches something too hot or too cold (temperatures that can hurt a human), warning the wearer to immediately remove their hand. As the project progresses maybe I could look into something for the anhydrosis aspect of it as well. The main input for this project would be the heat sensing aspect with the output being the warning light and sound.
As for issues I foresee, I think while it could be very helpful for someone with CIPA, they would have to constantly wear the gloves so maybe I need to look into more uses cases and scenarios as to where someone with CIPA could effectively use the gloves.
2. Basketball Backboard Feedback
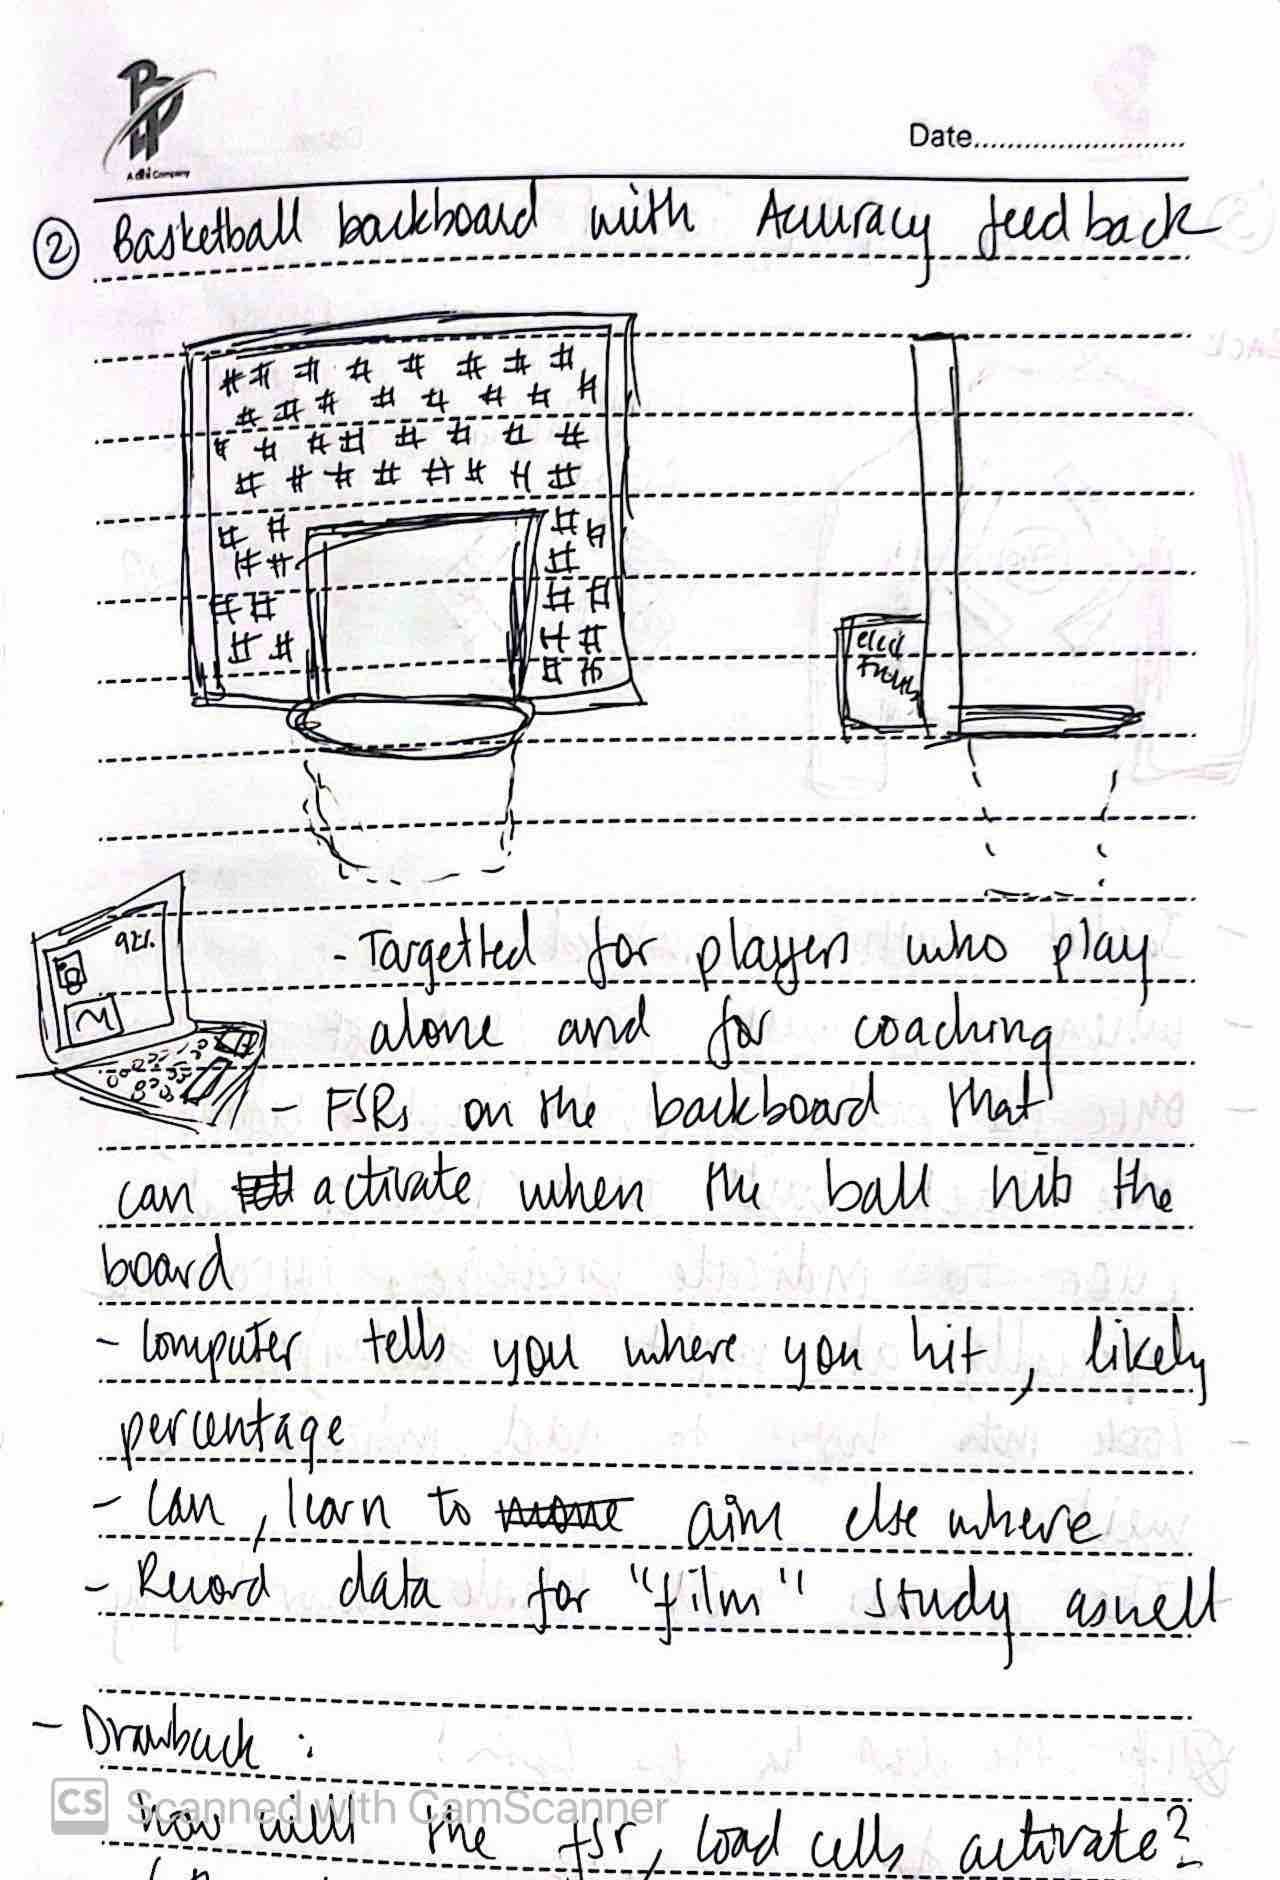
As I explained in my About Me section, I am really passionate about basketball and sports and thats where this idea stems from. Basically this project will involve me completely fabricating a basketball backboard which has Force sensitive resistors. The whole idea is that there are many areas of the backboard that you can aim at with each area having a different percentage chance of it going in. There will be a desktop/app that immediately tells you where you shot the ball,and the likely percentage of the ball going in. This allows for a real time, active feedback that will allow you to see where one should and shouldn’t aim. This will be very helpful for coaches and also for solo individuals who want to take their game to the next level.
As for drawbacks and difficulties, it will be hard to take into account all the different angles at which one can shoot the ball and this aspect requires some more thought.
3. Cycling Safety Jacket
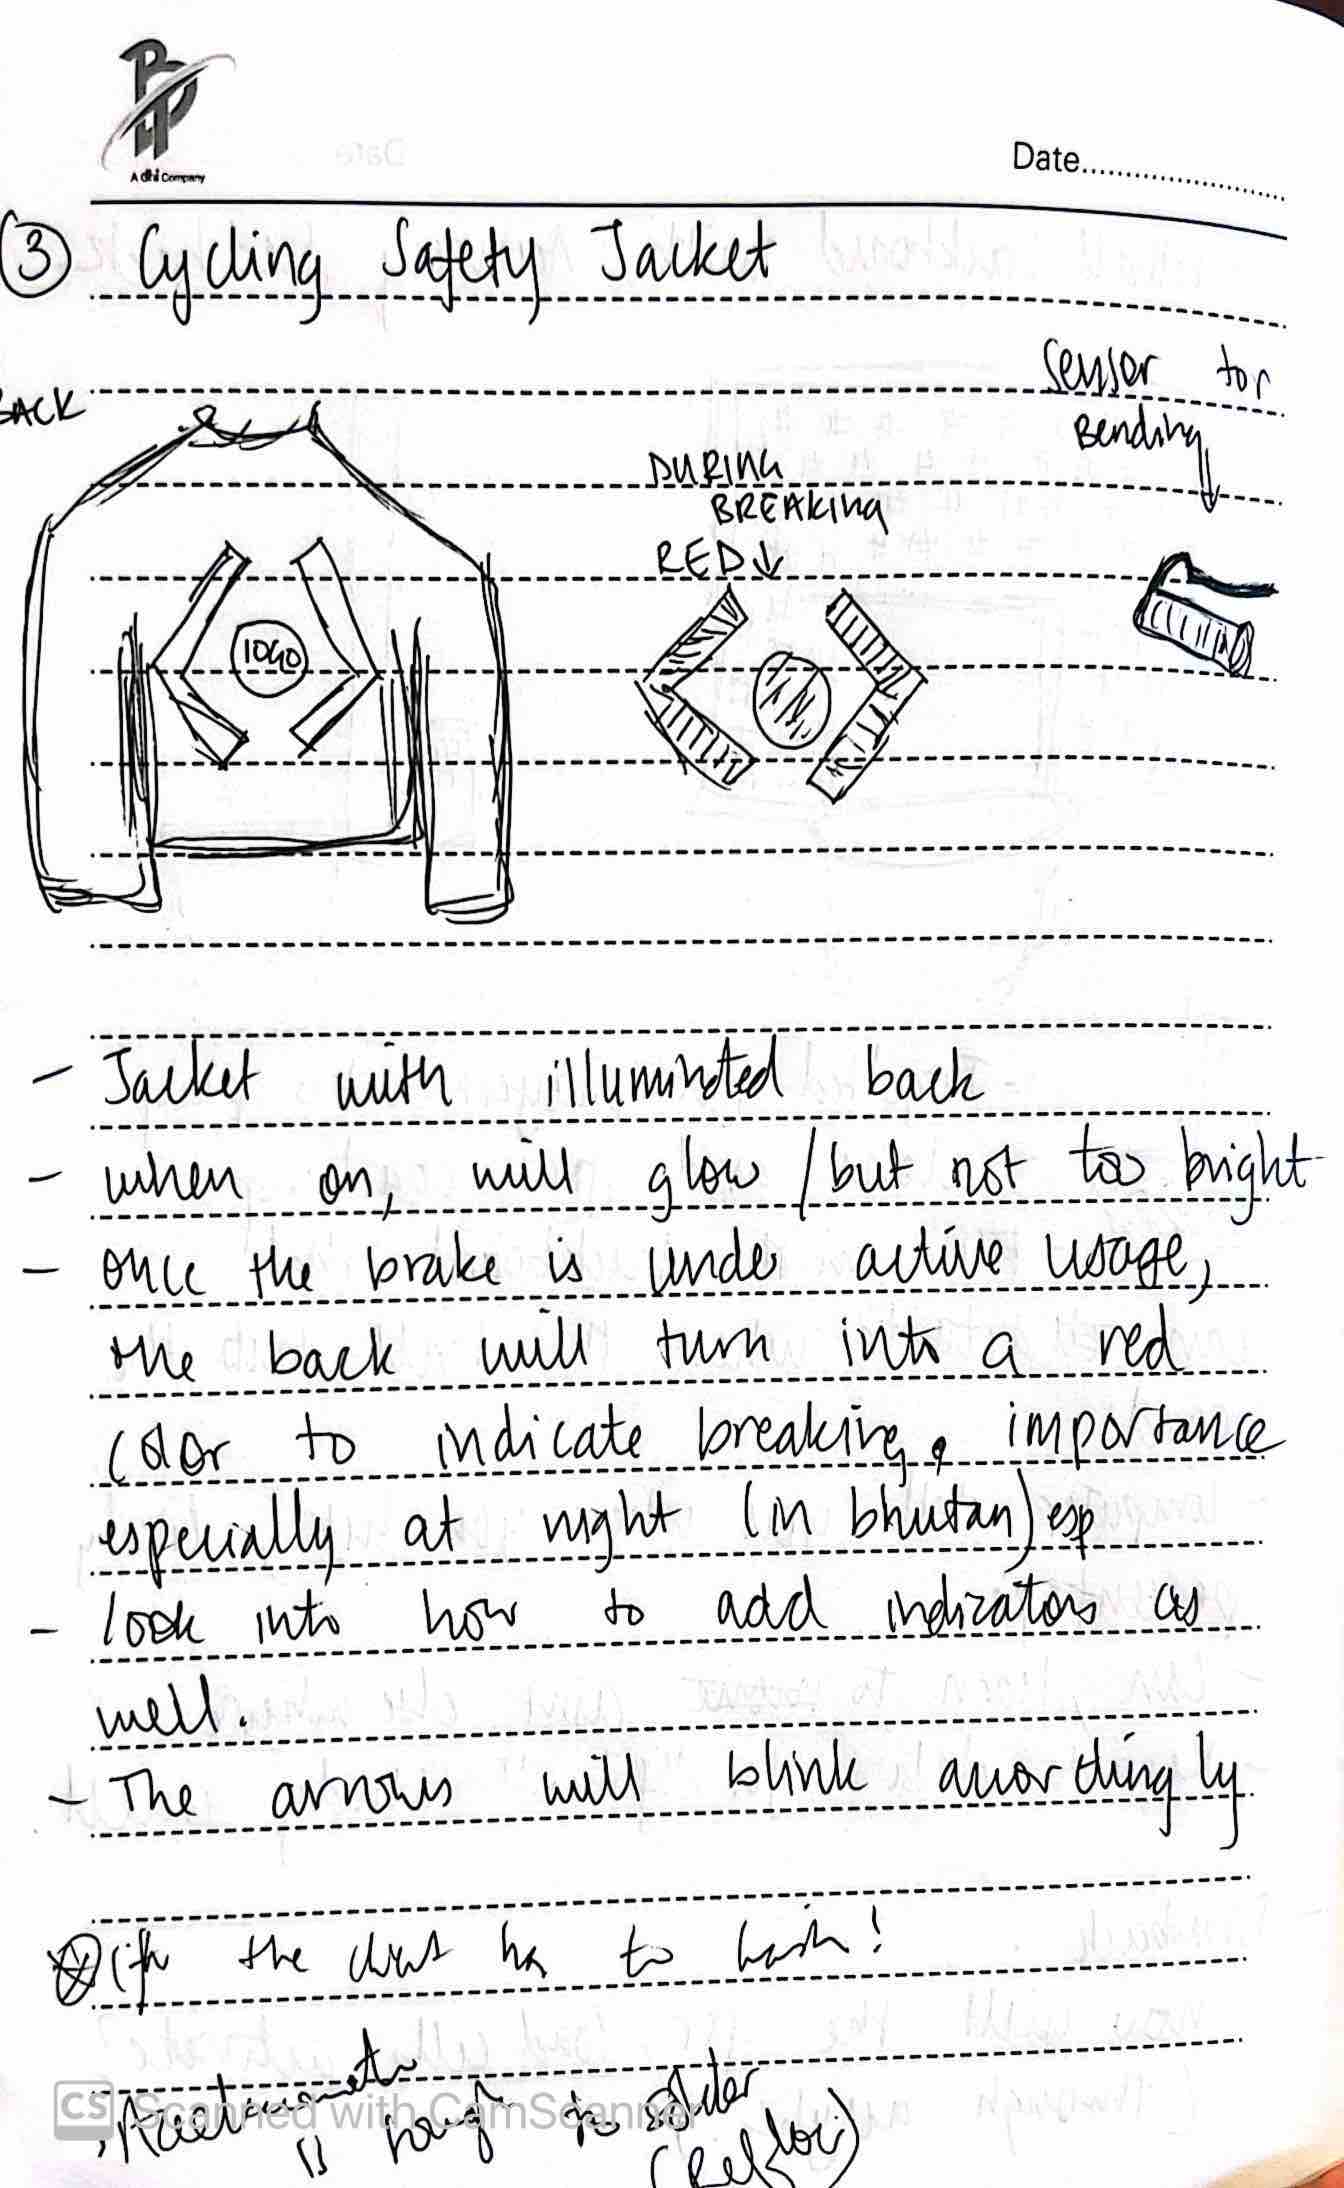
Cycling is a very common hobby and form of exercise here in Bhutan. However, unlike most countries, we do not have proper biking lanes and the street lights never work/is never turned on on time. For this idea, I want to make a jacket with illumination capabilities on the logo as seen on the sketch. The back will glow (not too intense) for proper visibility. Another feature I want to add is that when the cyclist outs pressure on the breaks, the lights on the back will turn red to indicate that they are slowing down/coming to a halt. I also want to explore adding indicators like that on cars, and the arrows on the back of the jacket will blink/illuminate accordingly.
A clear drawback that I can see right now is that typically a person biking will sweat so it would be difficult to wash the jacket so I need to think about how it would be incorporated into the jacket. Surprisingly, Rico had a very similar project so maybe I could make it a wearable accessory rather than incorporating it directly into the jacket.
4. Communibox

This project is a bit more light-hearted, inspired by the flip-able octopus plushy that has both happy and angry sides and is hilariously used to communicate with their partners regarding their mood. The project will be either in a box or in a frame and will have an app connected to it, so the user can easily pick their mood from the app and the box will have a cute emoji/animation to display how that person is feeling.
Issues Faced this week
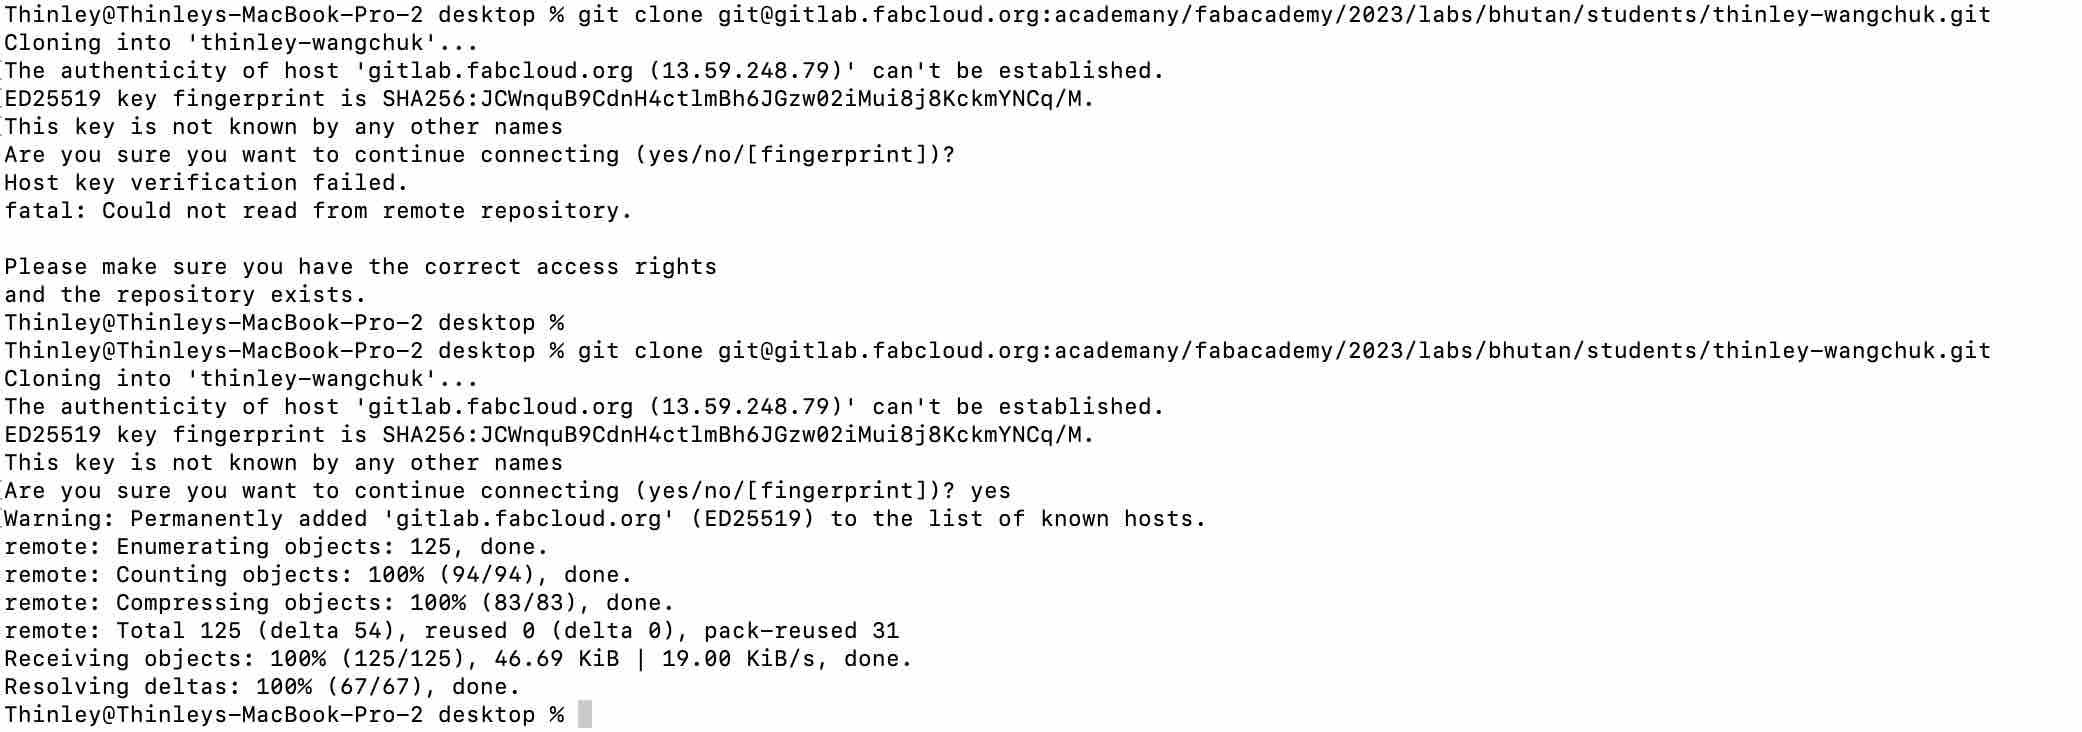
After installing git and after the cloning process, I was pushing and pulling just fine until suddenly I had a branching issue so early on! Somehow my repo had split into the origin and main branches and I was not able to push and pull because of this. I naturally panicked since I have always heard about branching issues and how that can be a big headache while using gitlab if you were not careful.
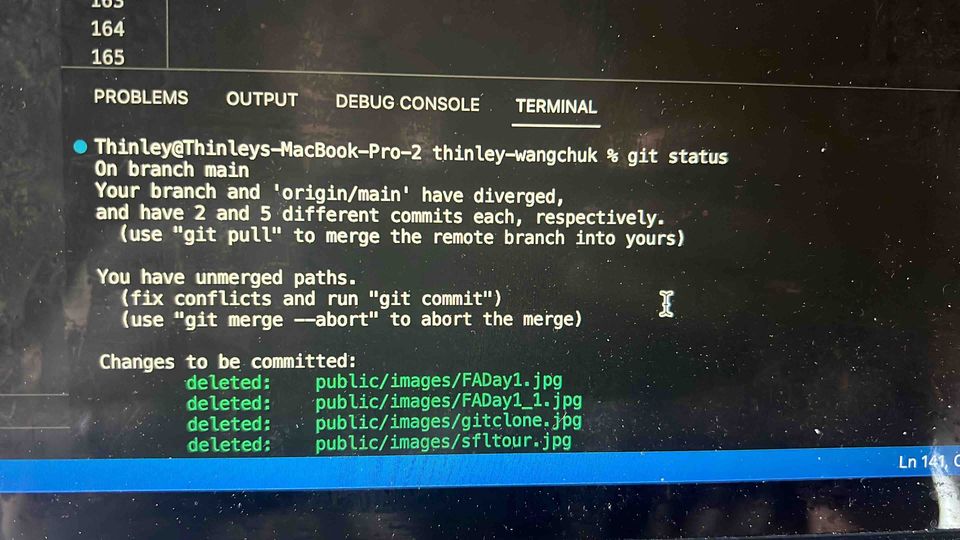
To fix this issue I used the following command in my terminal:
git reset –hard origin/main
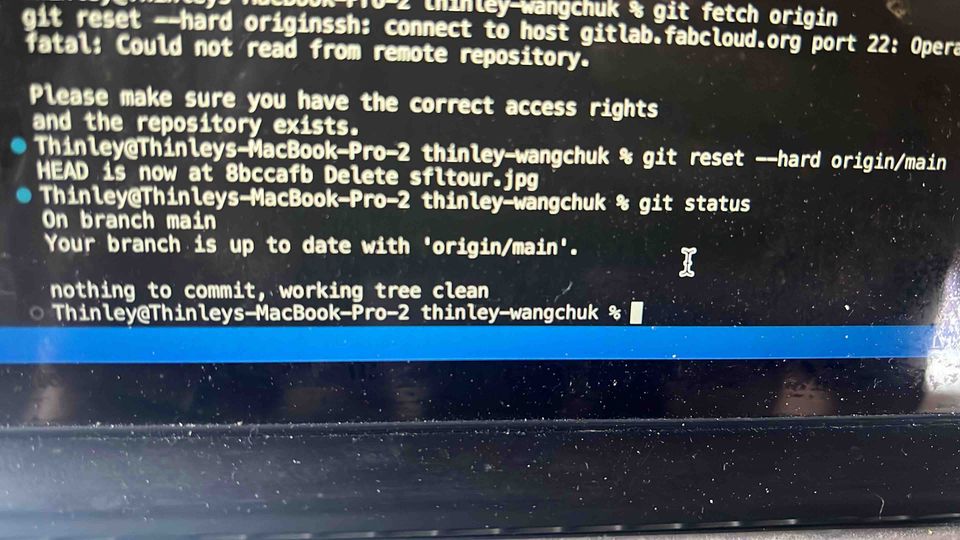
In hindsight, I was able to figure out why I ran ito such an error. Basically, I accidentally pushed some changes using the Web IDE while also pushing some changes that I made on vscode on my local machine. Please do not edit on the web IDE once you have your clone repo set up and follow the basic git workflow always!
Another smaller issue was that, at least here in Bhutan, when I tried working on a cafe’s wifi, I was not able to pull or push into my git due to security issues. Therefore, I had to use my hot-spot and it worked!