Week 7. Computer-controlled Cutting
This week we jumped into working with the big machines to make big things! The ShopBot was the star of the week, with all 6 of us here in Bhutan using it to make something big.
Group Assignment
Takeaways:
- Conduct an air cut (to check the dimensions of the cut, etc)
- Restart the pc if the software hangs
- Keep the shopbot’s remote on hand at almost all times
Individual Assignment
For this week, we each got 18 mm thick plywood workpiece that was 8 ft long and 4 ft wide which was exactly the size of working area of the ShopBot. I brainstormed a bit, did some research and found some really cool things that I could’ve designed and made but while doing this, my dad saw me and asked me what I was up to and when I told him, he asked if I could make him a minimal modern TV stand for his new TV which could’nt fit on our current tv stand.
Since he really wanted it, I decided thats what I wanted to make for this week so I began showing him some sample pictures and we settled on a few ideas.
The first design that I made was this:
But it could’nt fit in the workpiece so I had to redesign my model.
Fusion360
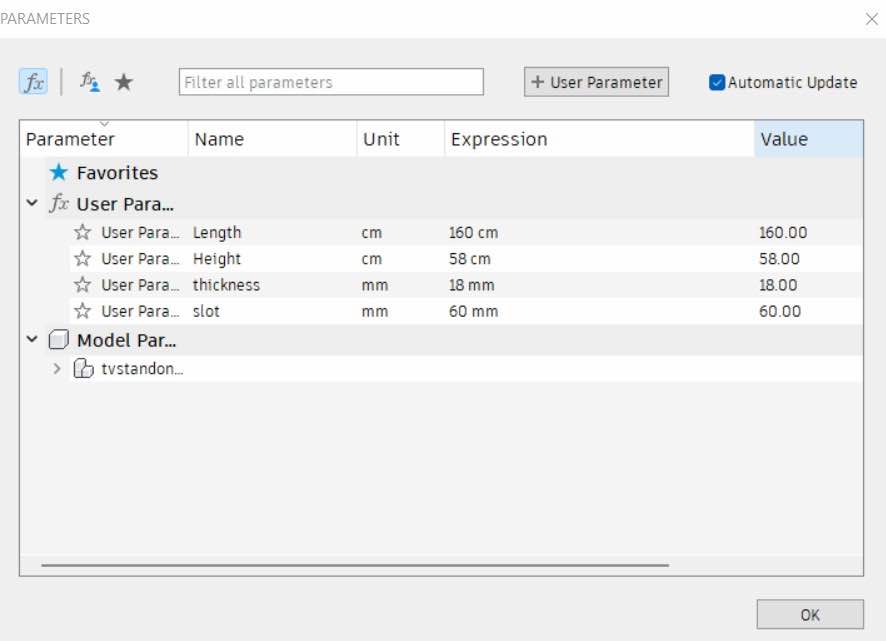
Keeping his design in mind, I went over to Fusion360 to begin working on the design. I first created user parameters to match with the workpiece.
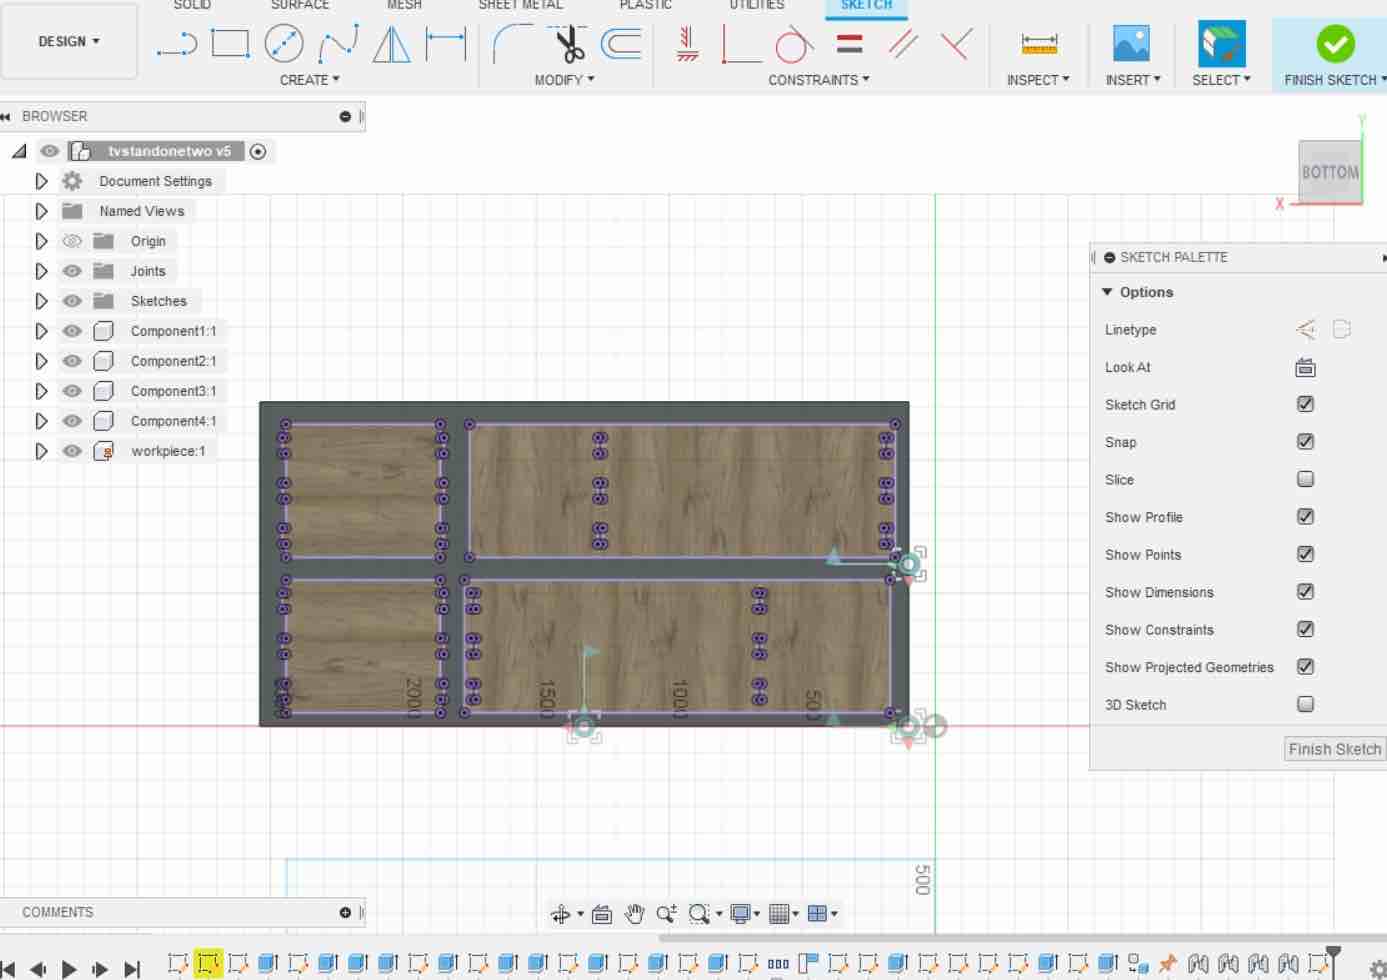
Then I began sketching in 2D:
And extruded the parts, keeping in mind to create new bodies every time to avoid them from joining. I then changed the appearance to a wood like look to keep in line with our plywood job piece.
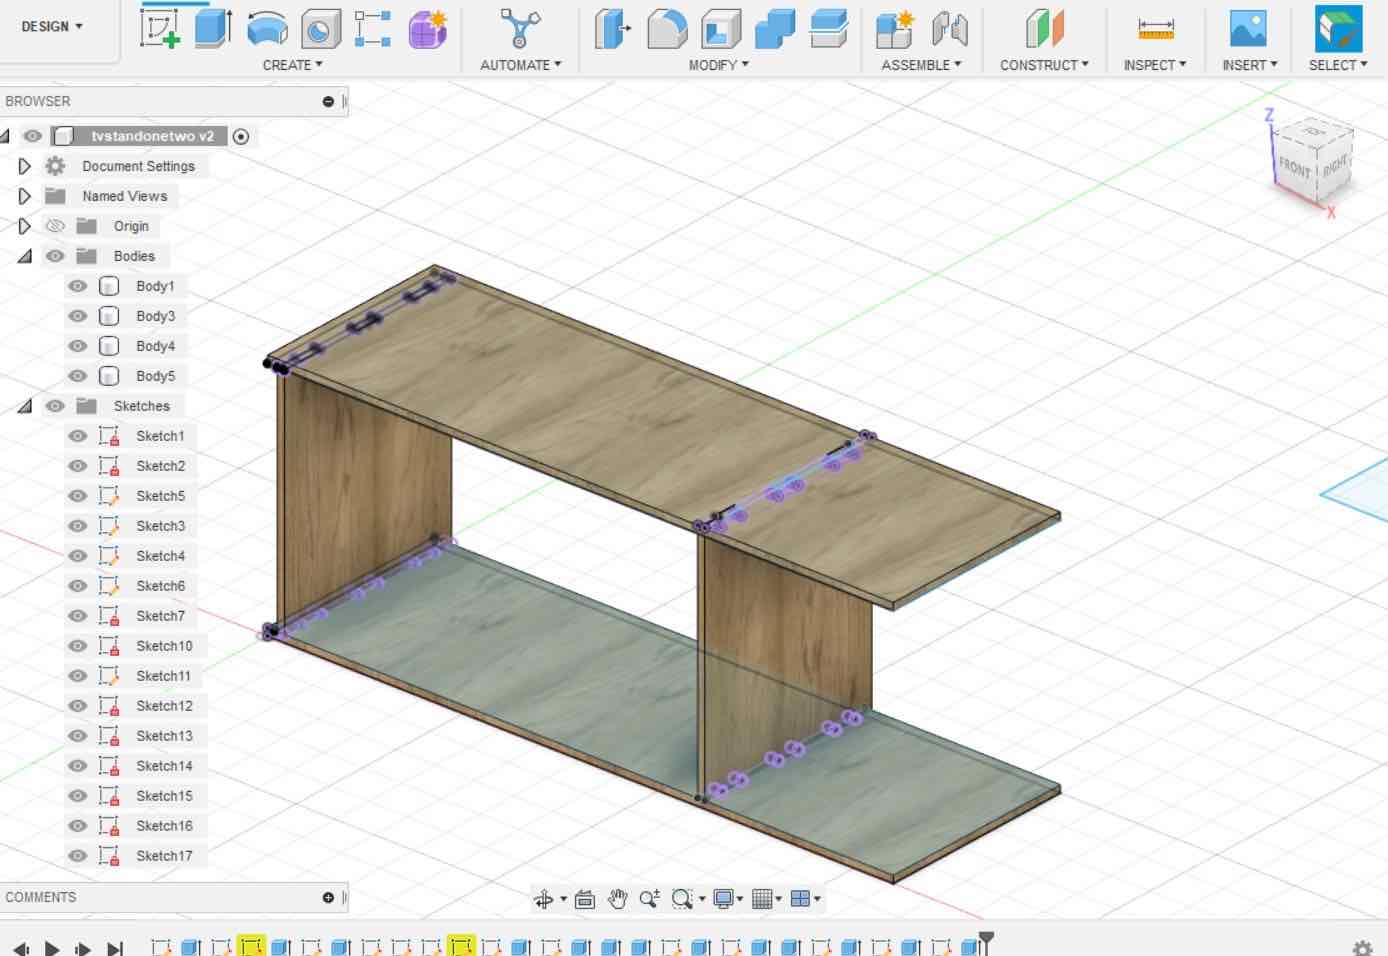
I would have liked to have made it look a lot nice with more designs, but I followed my dad’s size requirements so this was all that could fit in the workpiece.
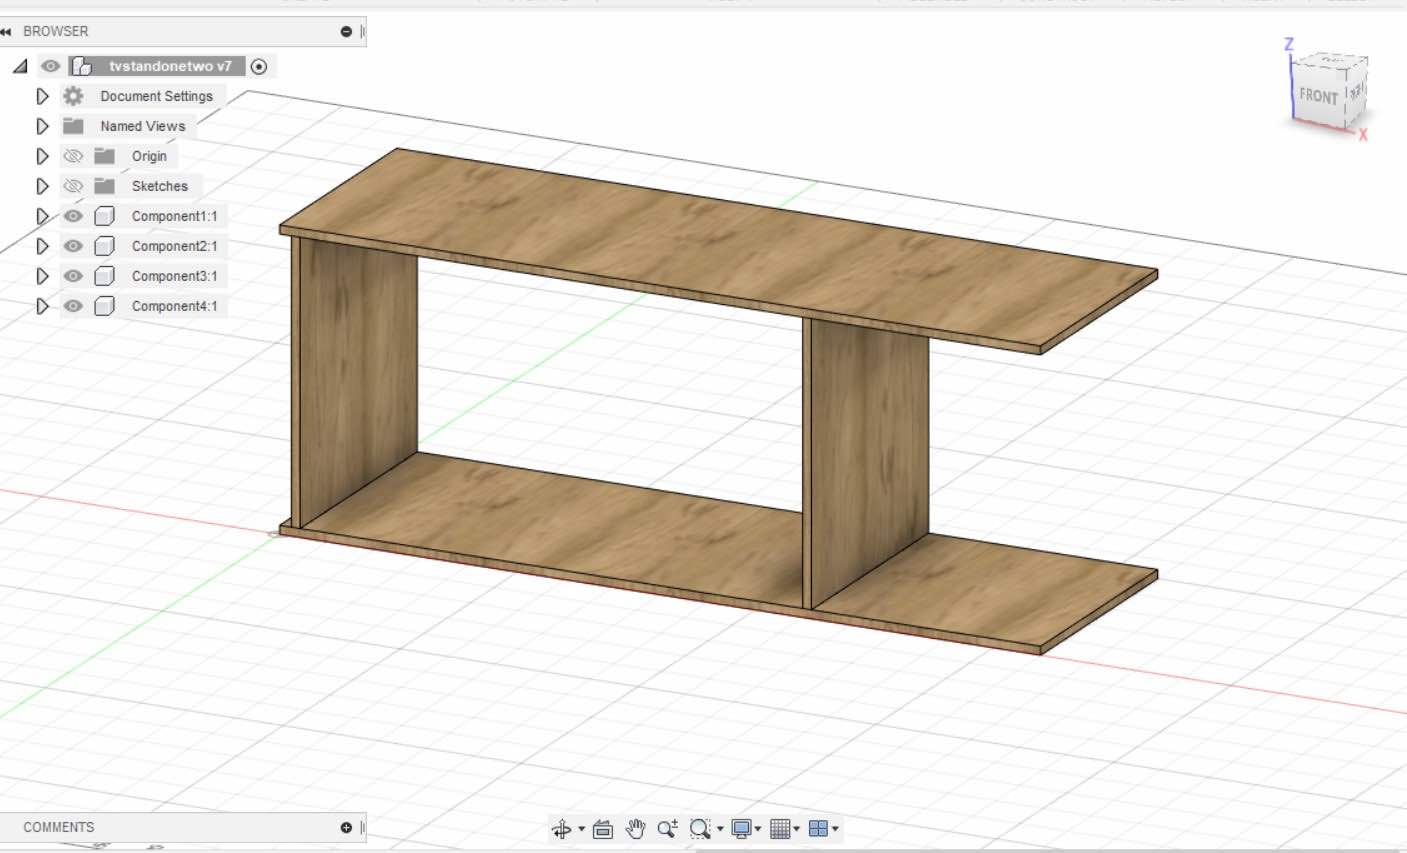
Final Look:
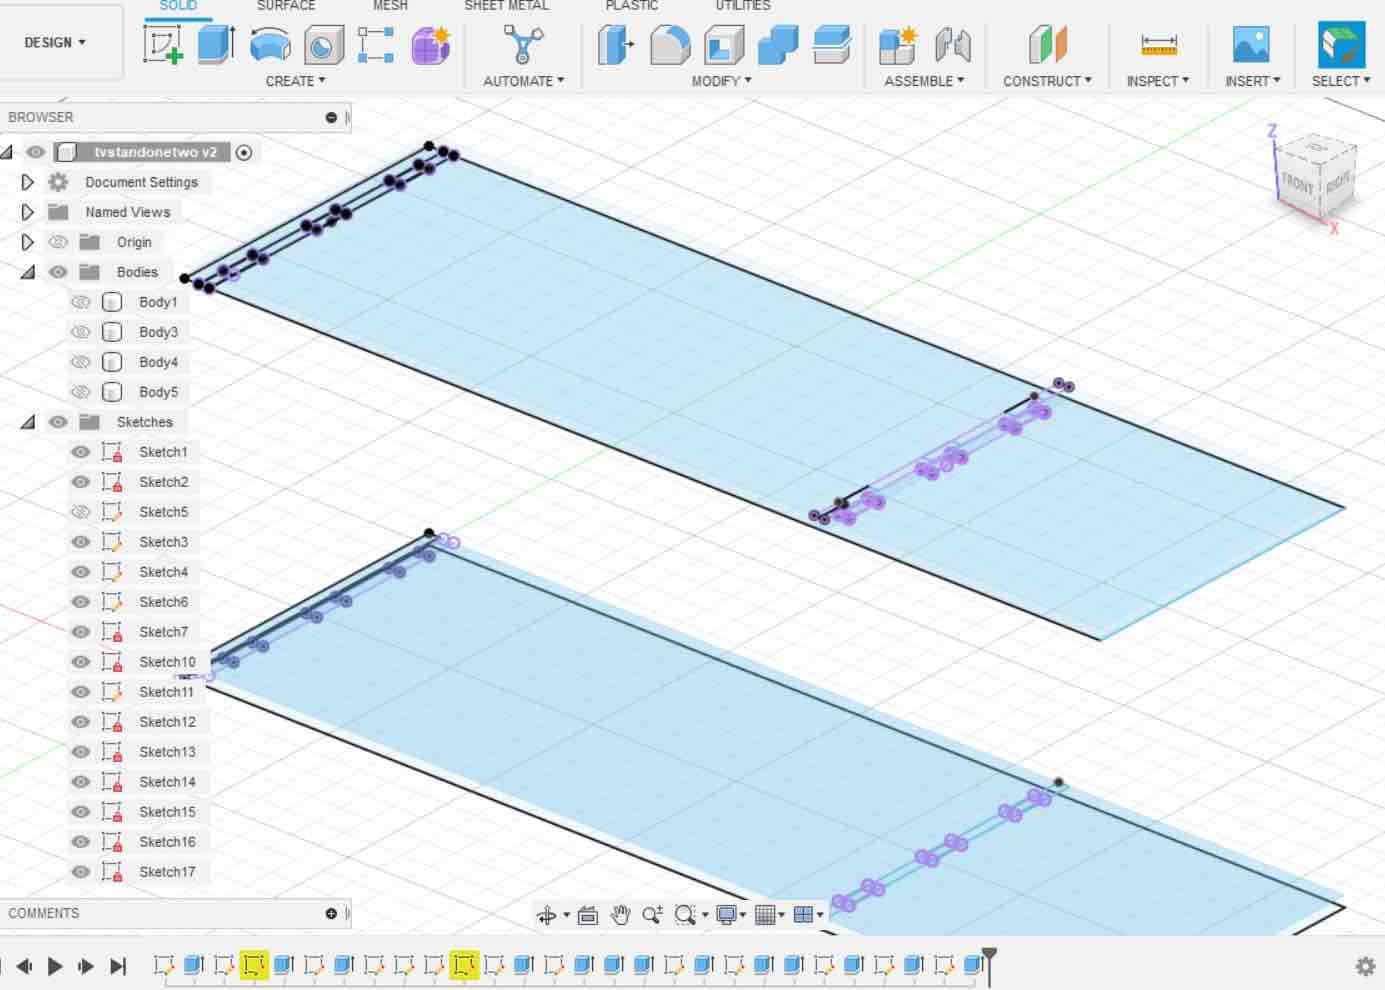
Then, I created a sketch of the workpiece (8ftx4ft) and extruded it to the thickness of the job piece. I ensured to create components from bodies by right clicking on the Bodies tab.
I then assembled my components on the new workpiece. To do this, I went to Assemble - > Joints - > selected the component - > selected the workpiece - > Chose PLANAR joint - > adjusted its position on the workpiece. I did this for all four of my components.
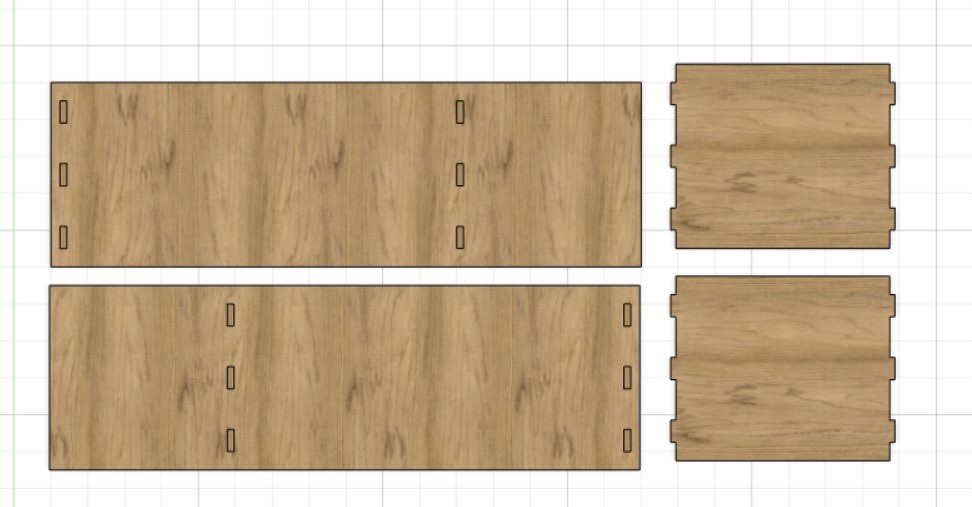
Luckily all fit well. Then I Created a New sketch on the workpiece and Projected or P all my components on that sketch. Finally, I wen to the new sketch, right-clicked, and hit Save as DXF
Vcarve
To go from sketch to production, we go from Fusion360 to Vcarve. Vcarve is used to calculate the tool paths to send to the ShopBot.
Vcarve Workflow (for my design at least):
- Open
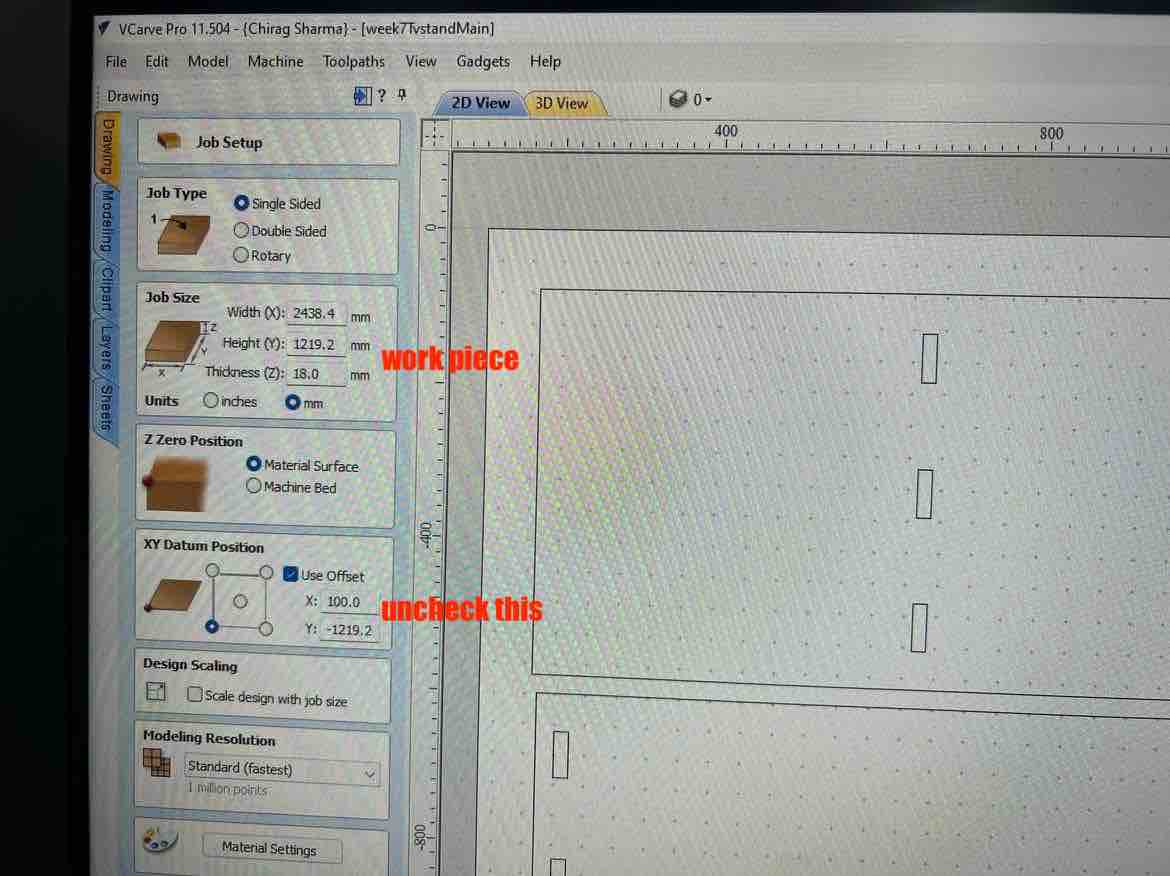
Vcarve New FileImporttheDXFfrom Fusion360- On the left, ensure to put the dimensions of the workpiece, uncheck offset, and set the Z zero position to be on material surface. Save and close.
- The holes in the design need to have
dog bone filletsto allow for proper fit of the slot pieces so I added dog bone fillets to my design. Typically one can do this in Fusion360 itself, but that requires a plugin so I figured to do it in Vcarve itself since that would be faster. Select thefilletoption from the left, select thedog bone fillet, ensure to change thetool radius(I used 1/4 inch bit) and then select the corners where you want to have the fillets.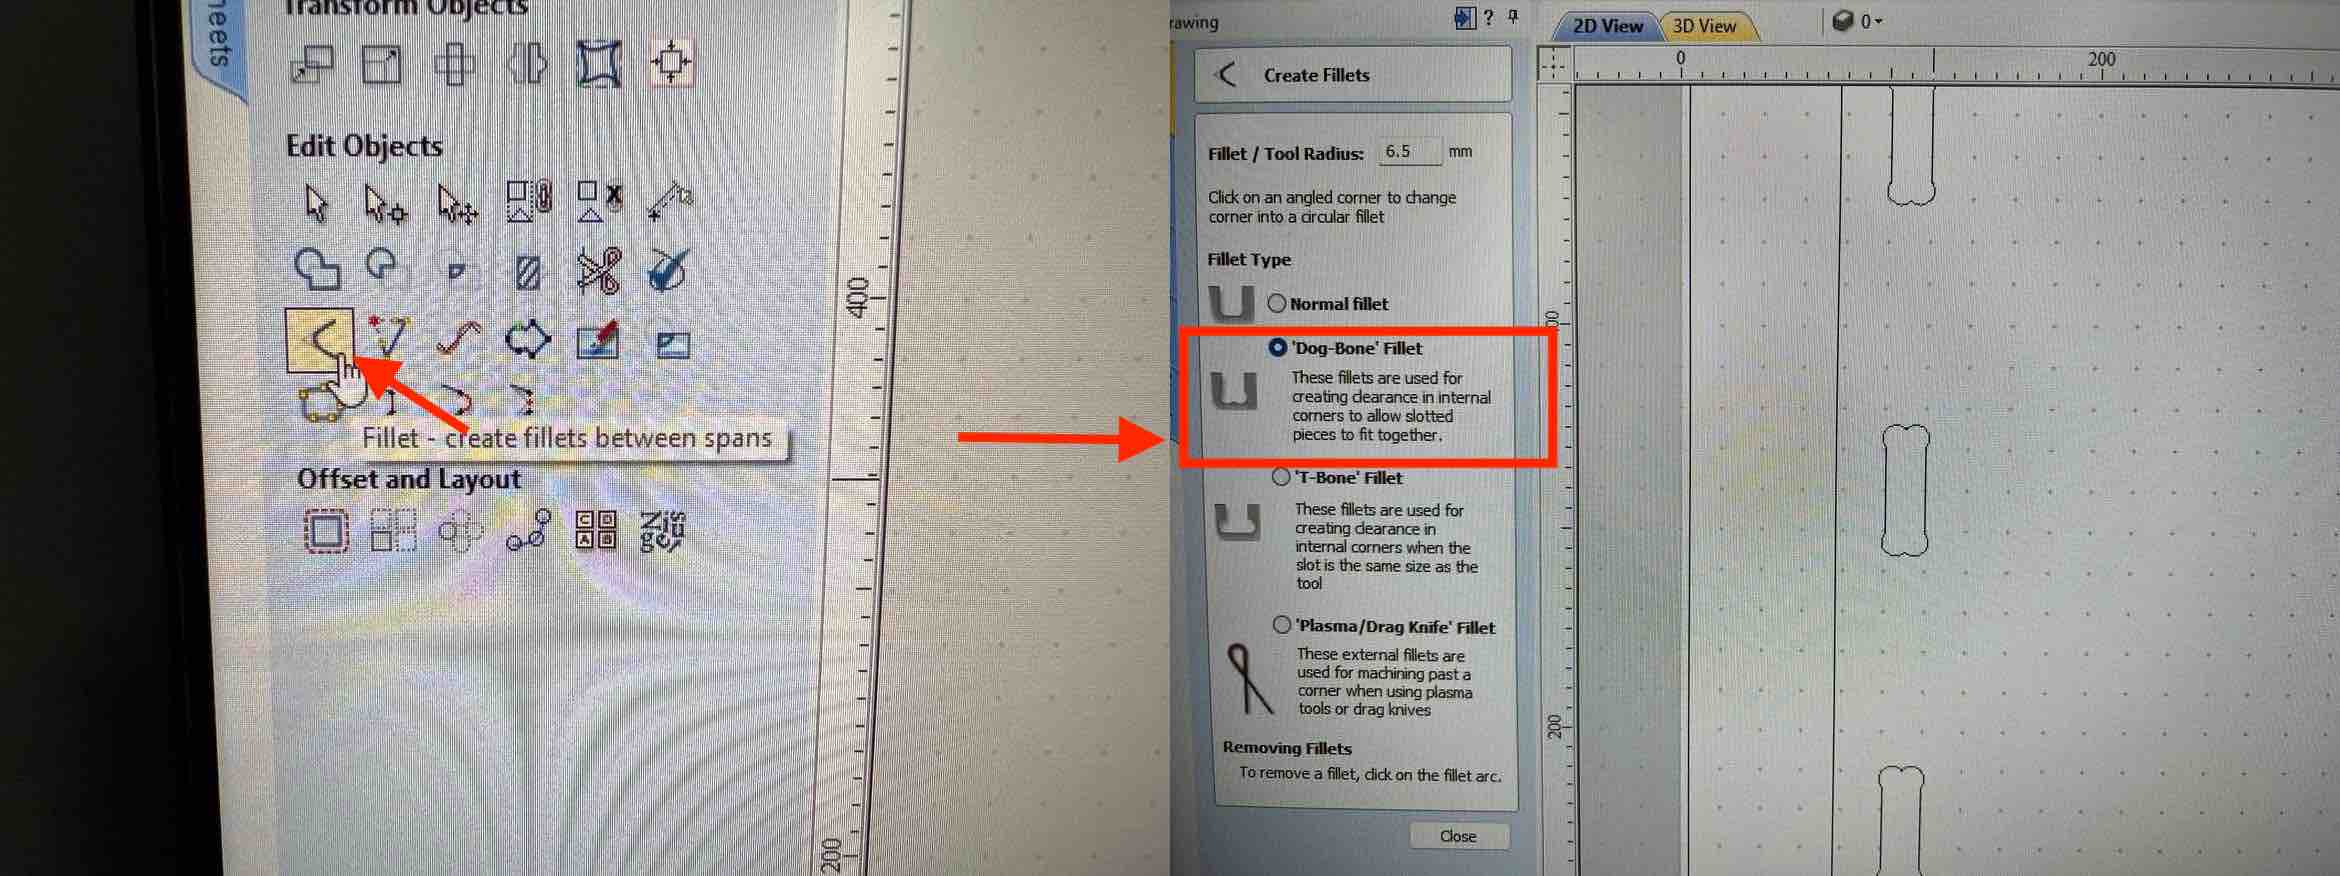
- First, lets make the
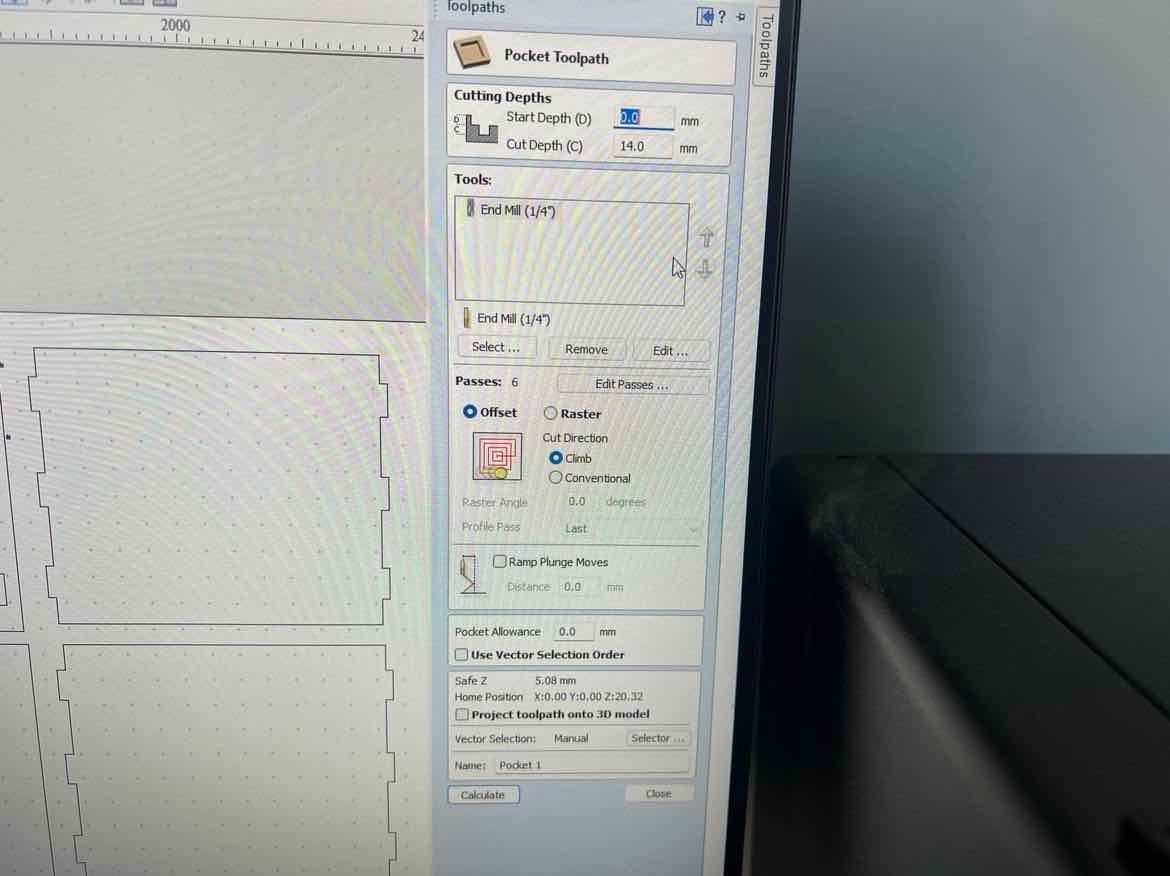
pocket cuts. I used profile cuts since I didn’t want my slots to be cut all the way through. I accessed thetool pathmenu which is on the right hand side or can be opened fromview. Then I selected my slots - > selected thepocket cut.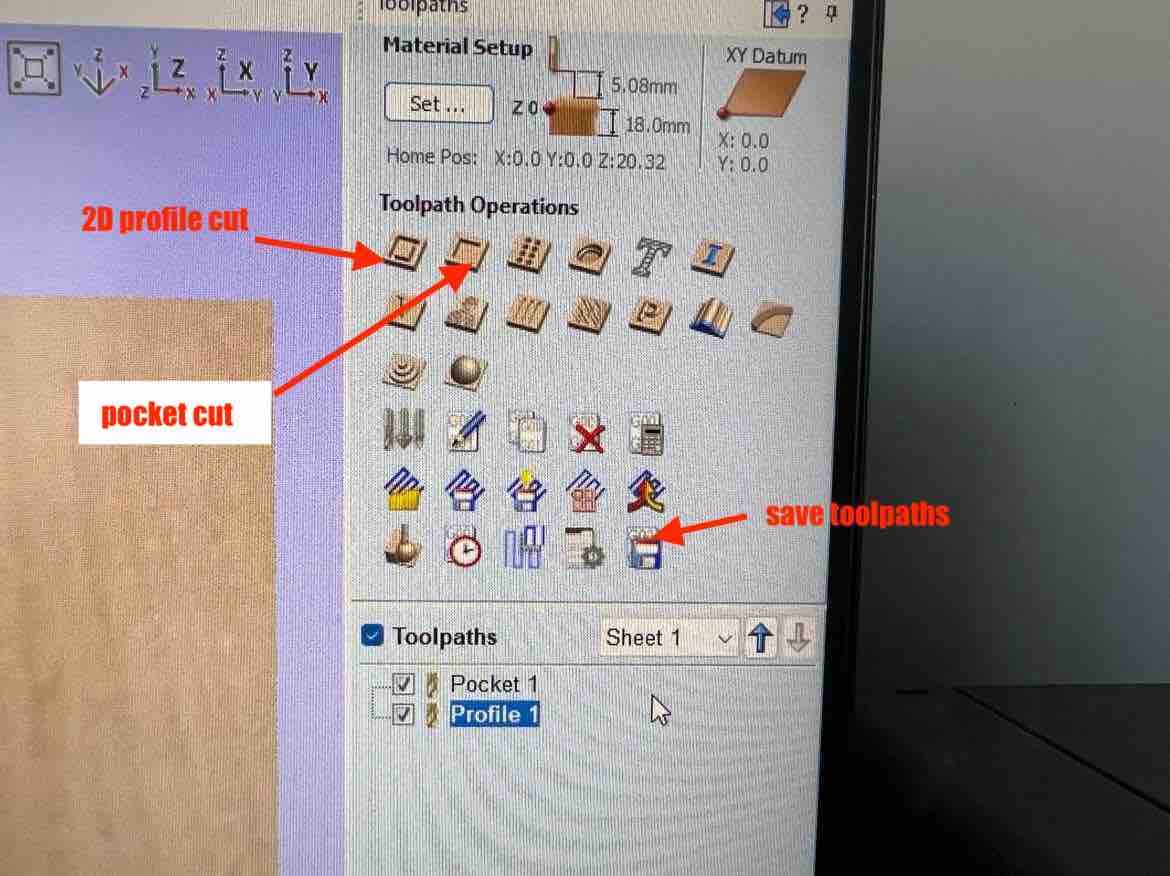
- The pocket tool path opens up and there you select your depth and other parameters. I selected a cutting depth of 14 mm since the workpiece was 18 mm.
- Once done hit calculate and the tool path preview will show up. A good habit is to always
reset previewto get rid of older previews.
 A new tool path will be created. hit close.
 - Then for the other pieces, I selected them and hit
2D profile cuts I selected
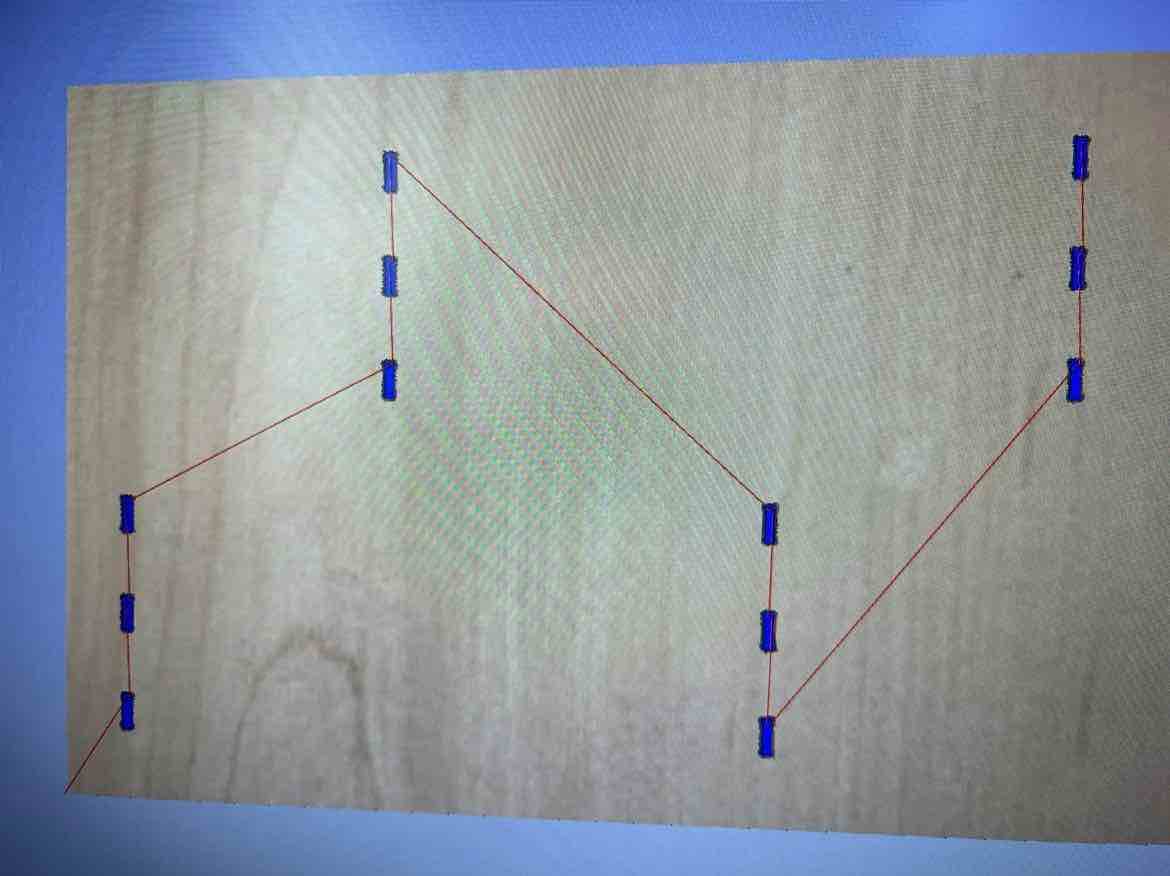
 outsidesince I wanted the exact measurements for a tight fit through the slot. - I previewed my entire tool path:
- then I hit the
save tool pathsicon in the tool path menu, hitall visible tool paths to one fileso all can be done in one cut.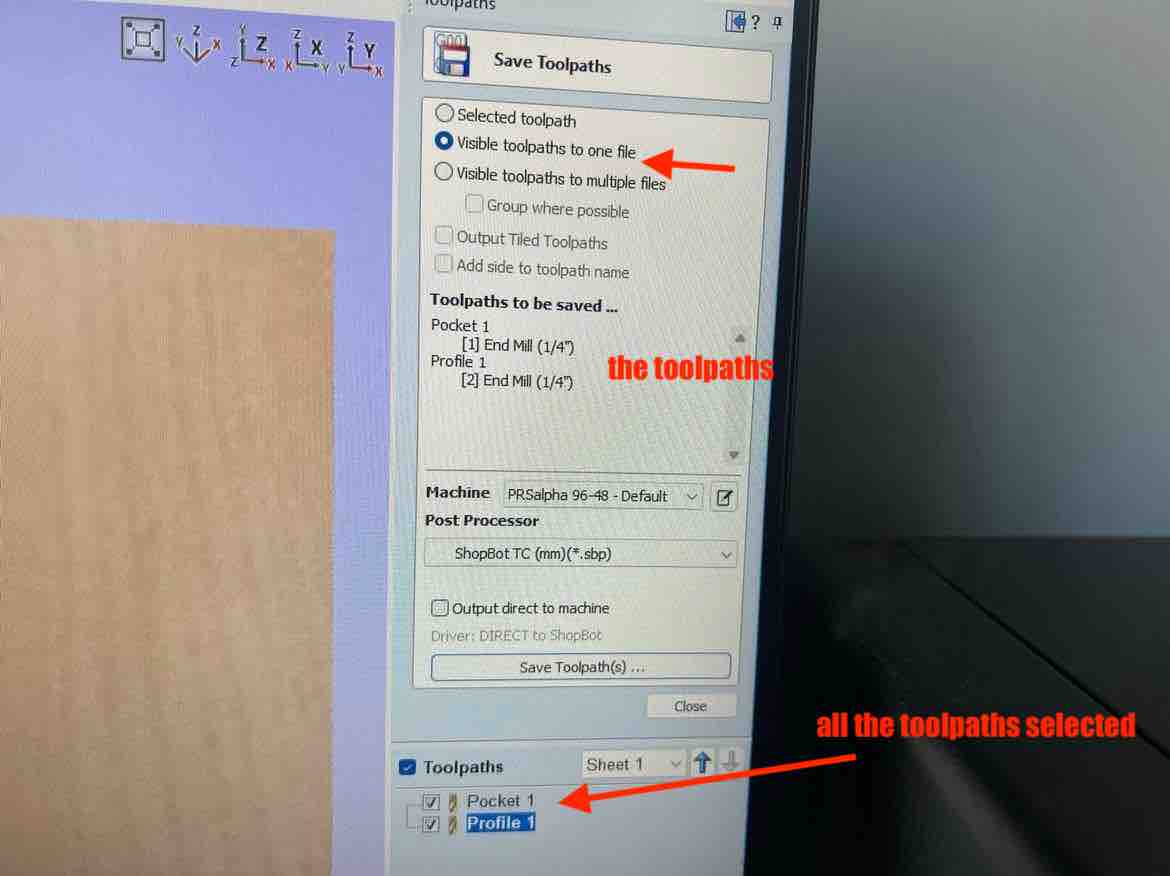
- Ensure that all the paths are selected and then finally hit
Save.
ShopBot
Now to actually cut the job piece.
- Insert your workpiece, ensuring the clamp the piece to stabilize it.
- Turn on the machine by turning the key and the red switch. Ensure that all emergency buttons are released before this. and Hit the
reseton the remote. - The machine will come to (x,y) = (0,0) Position.
- Open the ShopBot Job center app on the computer
- hit the
yellow icon keypadto activate the keypad to move the machine. - In the
KeyPad, you can move the x and y axis by inputting the coordinates and hittinggo toor by simply using the directional keys. hit the blueZero Axesto set the new location as the zero for the x and y axes.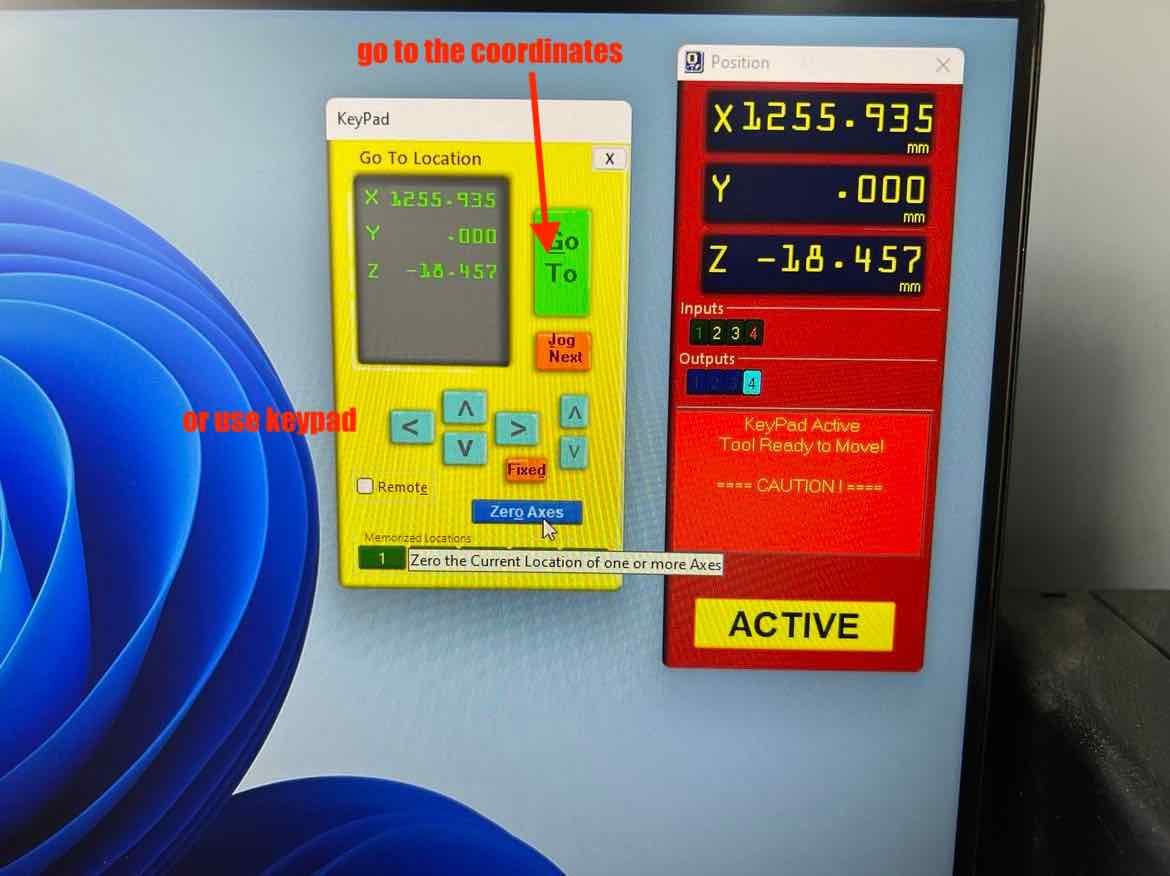
- Once thats done, go ahead and set the “z axis”. To do this, hi the z axis button:
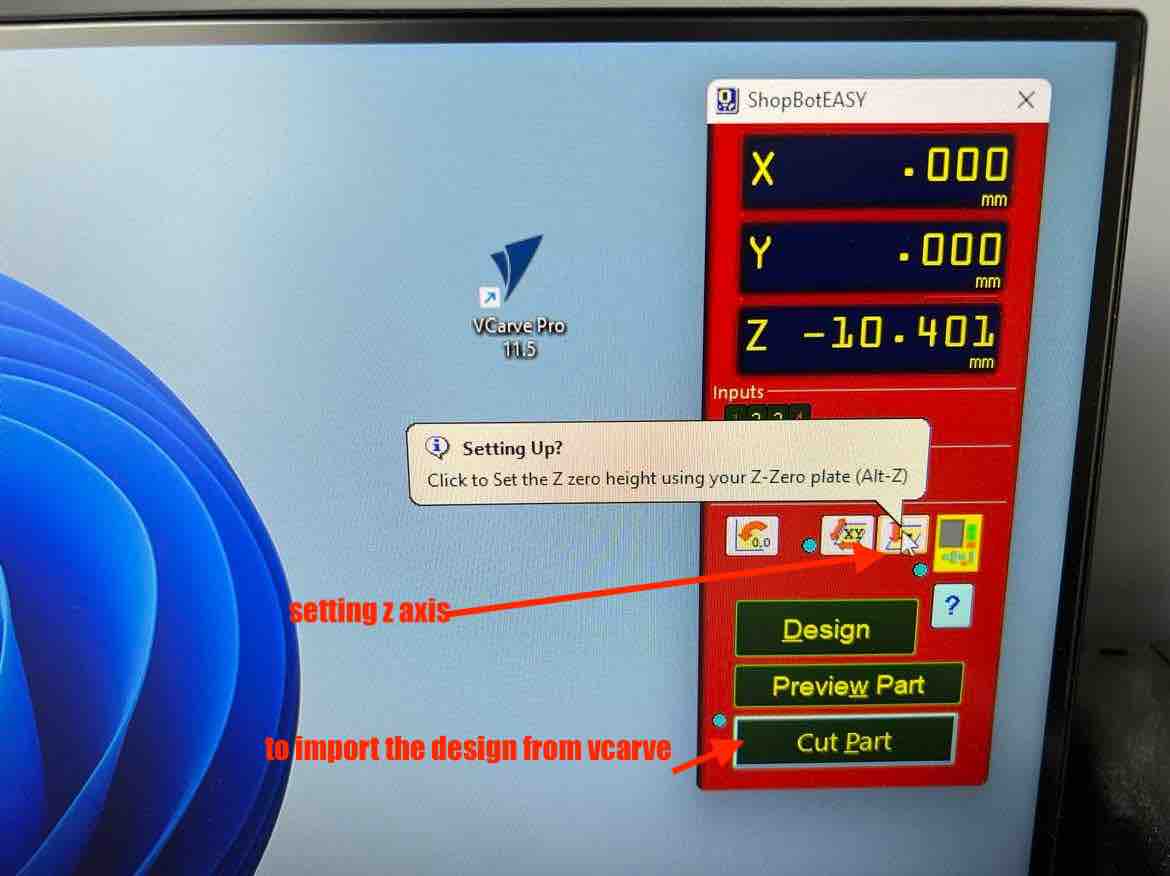
- The machine will tell you that z axis height calibration is going to start and will give you precise instructions.
remove the clip and clip it on the metal piece above where the z tool sat initially. take the z axis calibration tool and place it exactly under the tool bit. After doing this, hit OK on the computer and the bit will lower twice to calibrate the z axis height. Once done, hit okay and place the clip and the tool back to its original locations.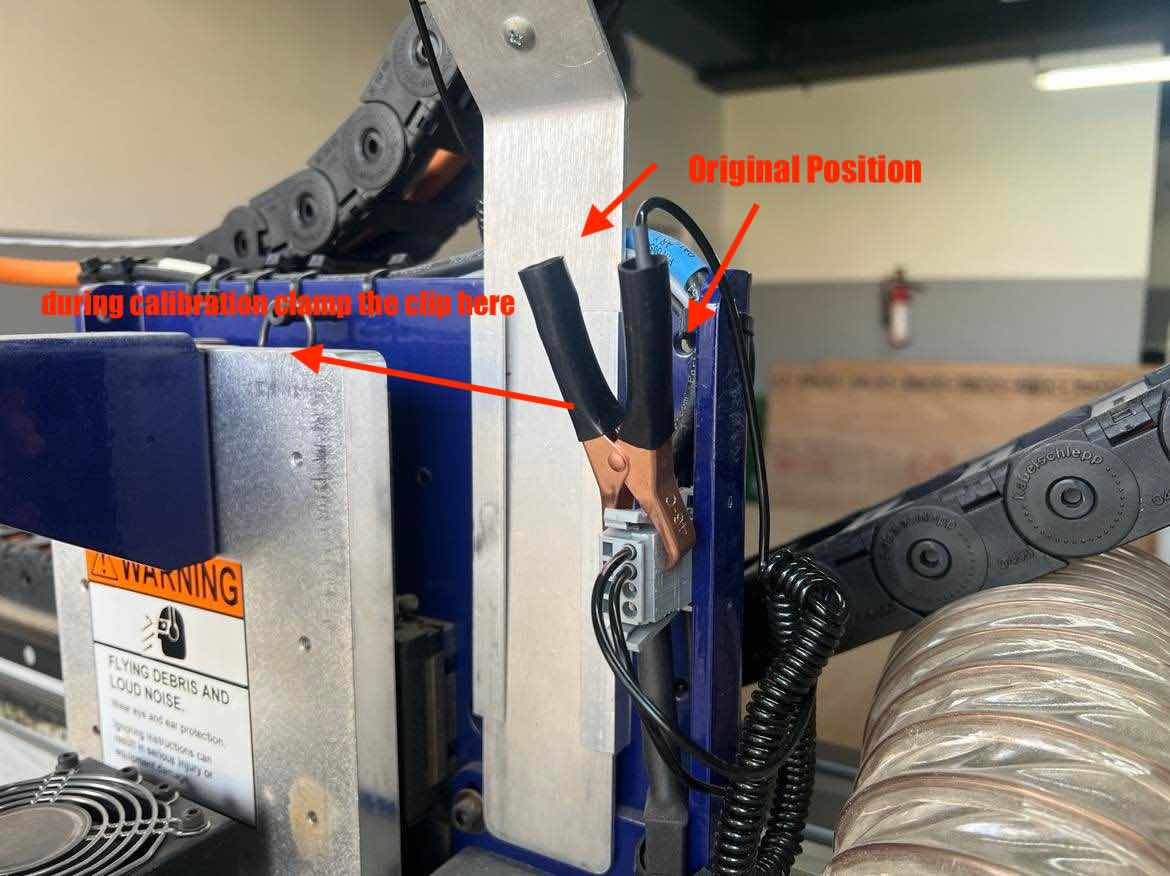
- Now setting the axes is done.
- Next hit
Cut Partand select the tool path that was saved from Vcarve. Once you do this the bit will initialize and the computer will tell you that you need to activate the spindle. to start the spindle, hit START on the remote.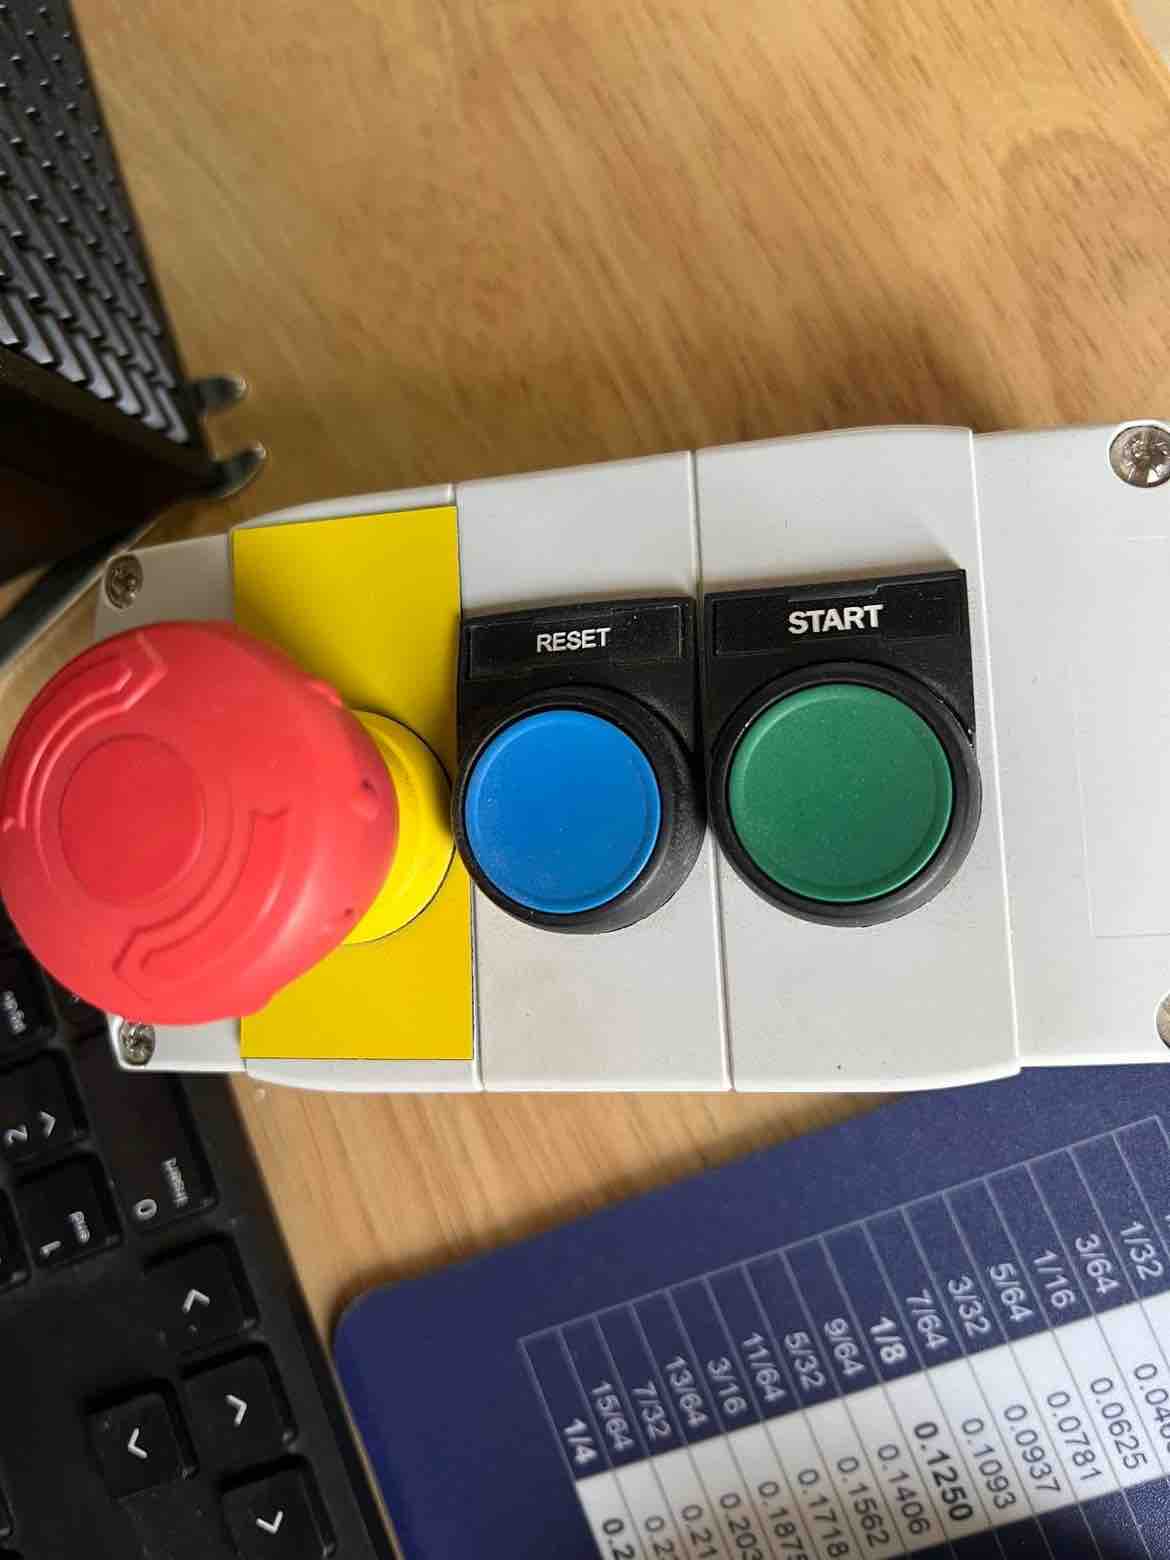
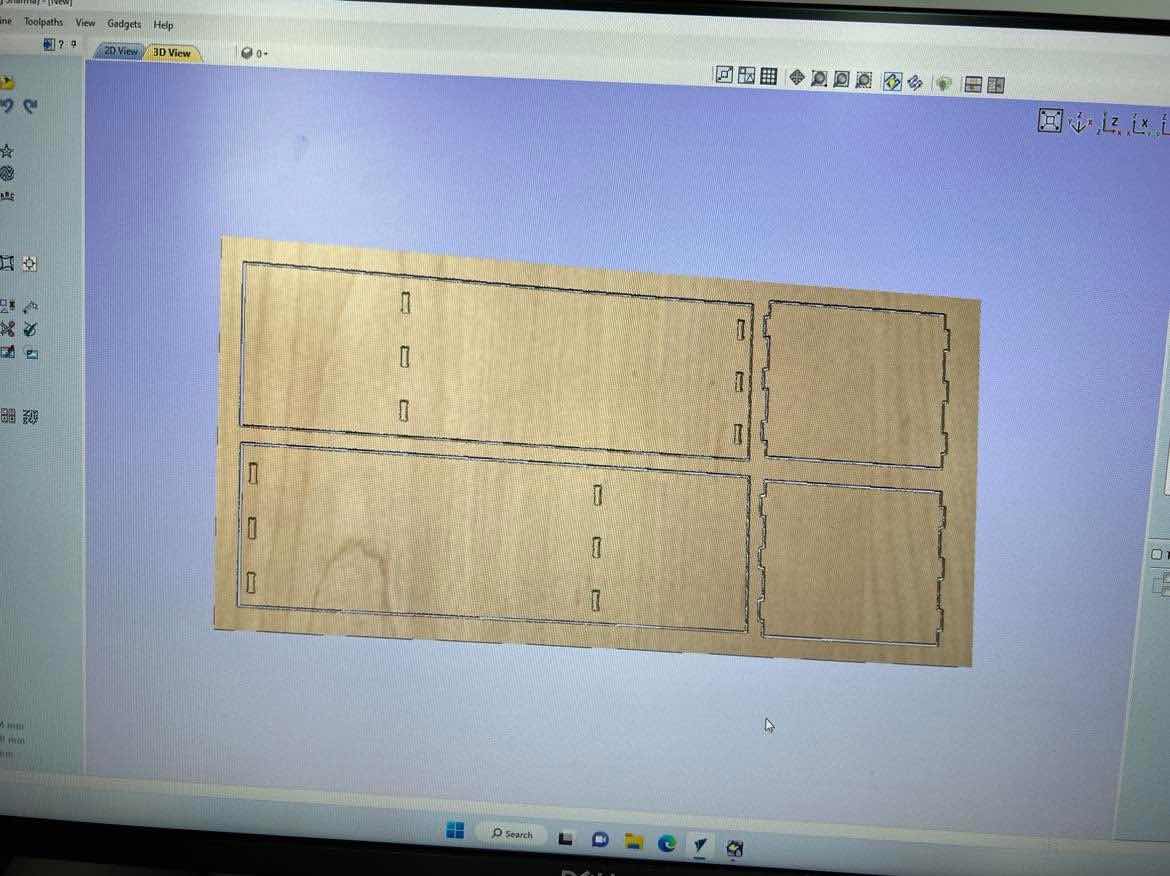
- Then hit “OK” and the cut will begin. Turn on the Vacuum and exhaust. My cut after removing two pieces:
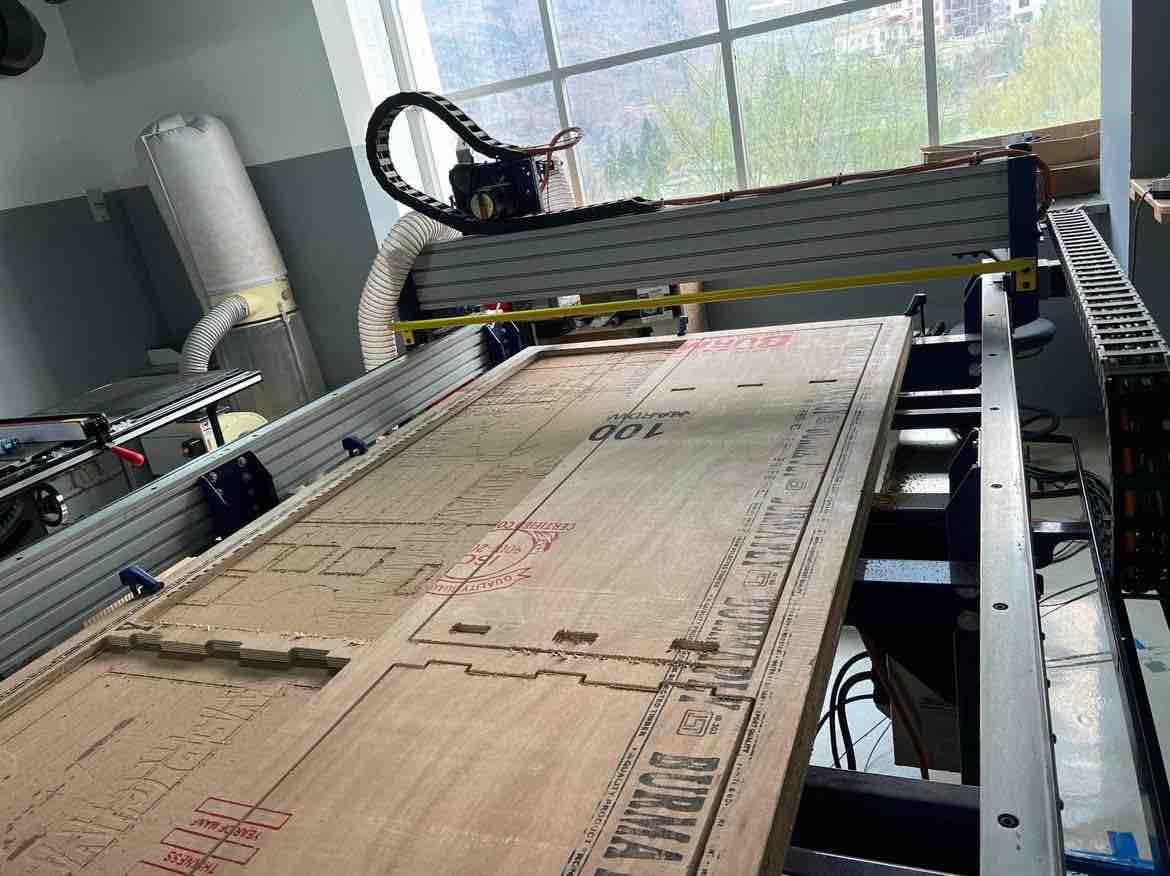
After the cut I removed my cut parts, and cleaned the work area. Then I sanded my parts since it was a bit rough.
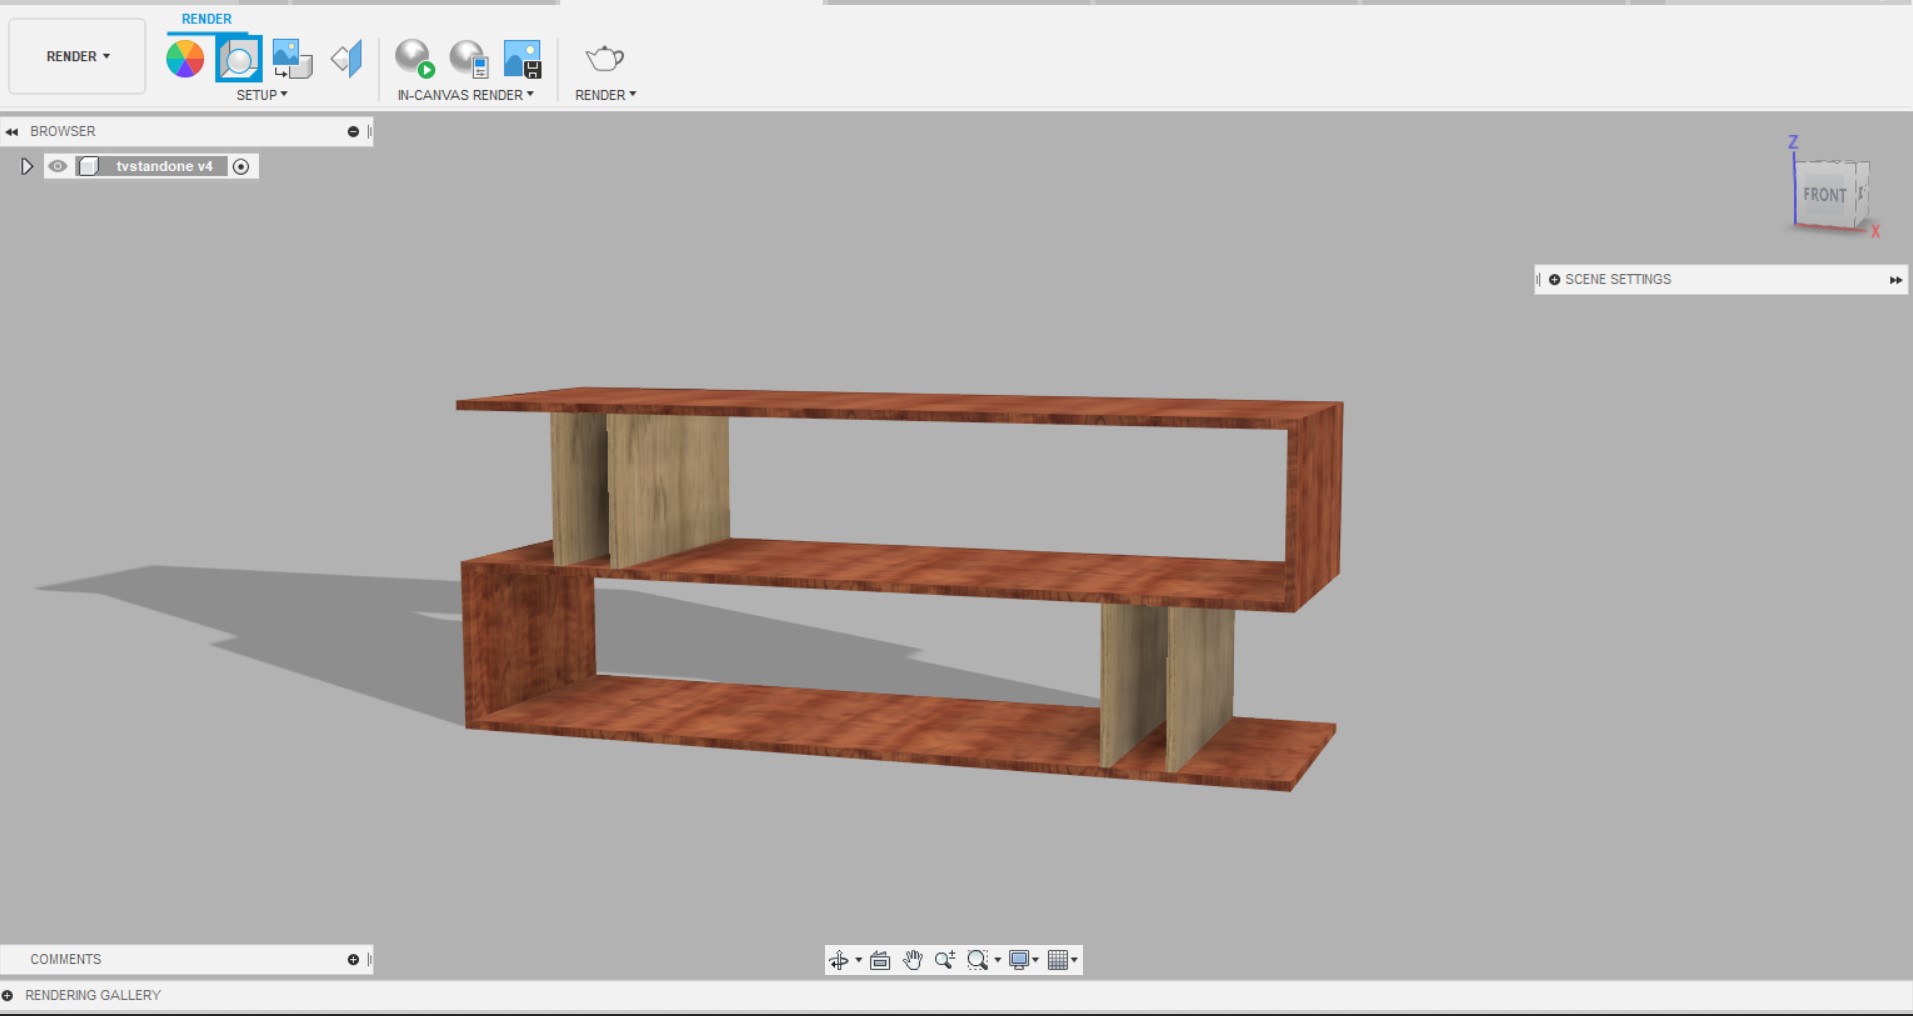
Then I assembled my TV stand and it fit perfectly! and stands firm without the use of Glue or Screws:

This is my stand before post processing. I will go ahead and sand it more and then paint it!
Extra Fusion360 Simulation.
I was interested in conducting a simulation for my stand in Fusion360. After completing the design, I went ahead and reassembled my TV stand with rigid joints. Then I opened up the Simulation section in Fusion and started a new Static stress study
Under the study materials, you can see what material is going to be studied. By default, my model had metal assigned to it. I Obviously wanted to change it to plywood so I double clicked on study materials and tried changing the material to plywood, but all the woods had an exclamation point on them and were locked.
On further investigation, it turns out that Fusion360 simulation does not support orthographic materials and only supports isotropic materials. Unfortunately wood is orthographic. After reading some more, it turns out that one could edit preexisting metal or create a new material to make isotropic wood so I went ahead and edited all the properties of the metal to that of plywood. and I was able to go ahead with saving that.
I added tworemote loads from under loads to the top fo the TV stand to simulate the weight of the TV on its stand. I looked up the weight of a 65 inch TV and distributed the weight. Then I added fixed constraints to the other three components which weren’t supposed to move.
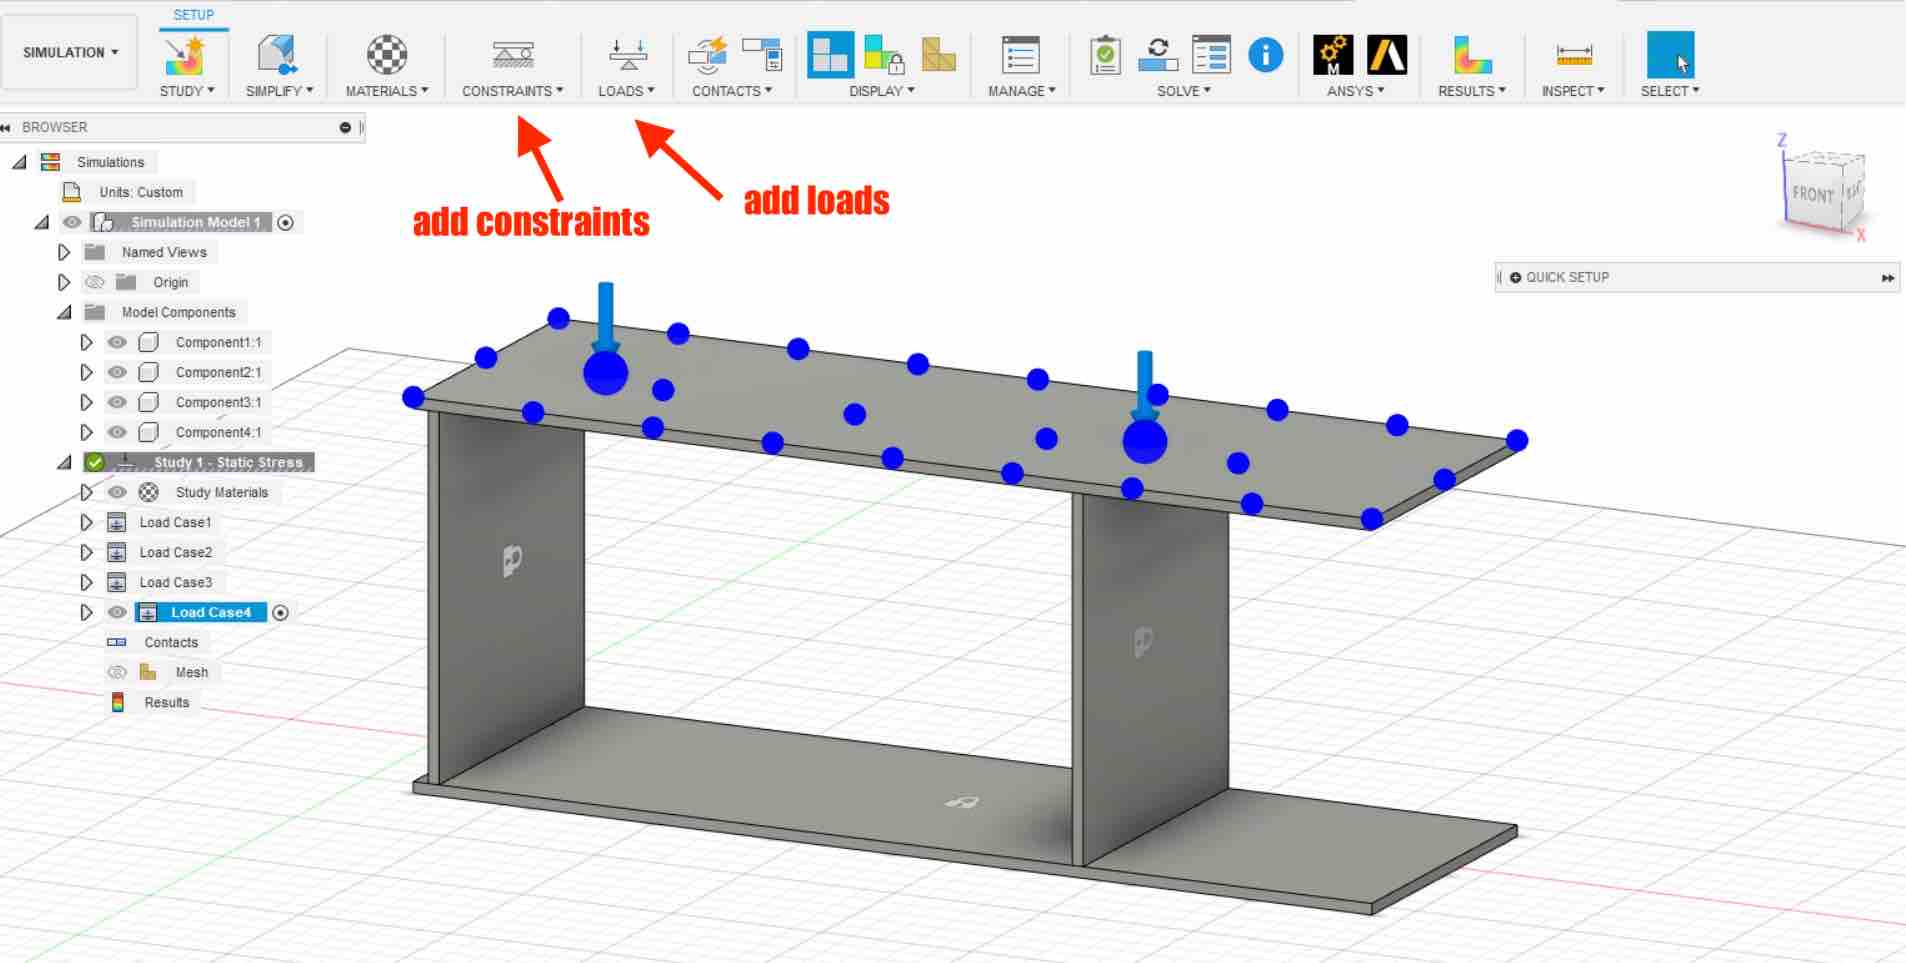
Then I hit solve and got my simulation results.
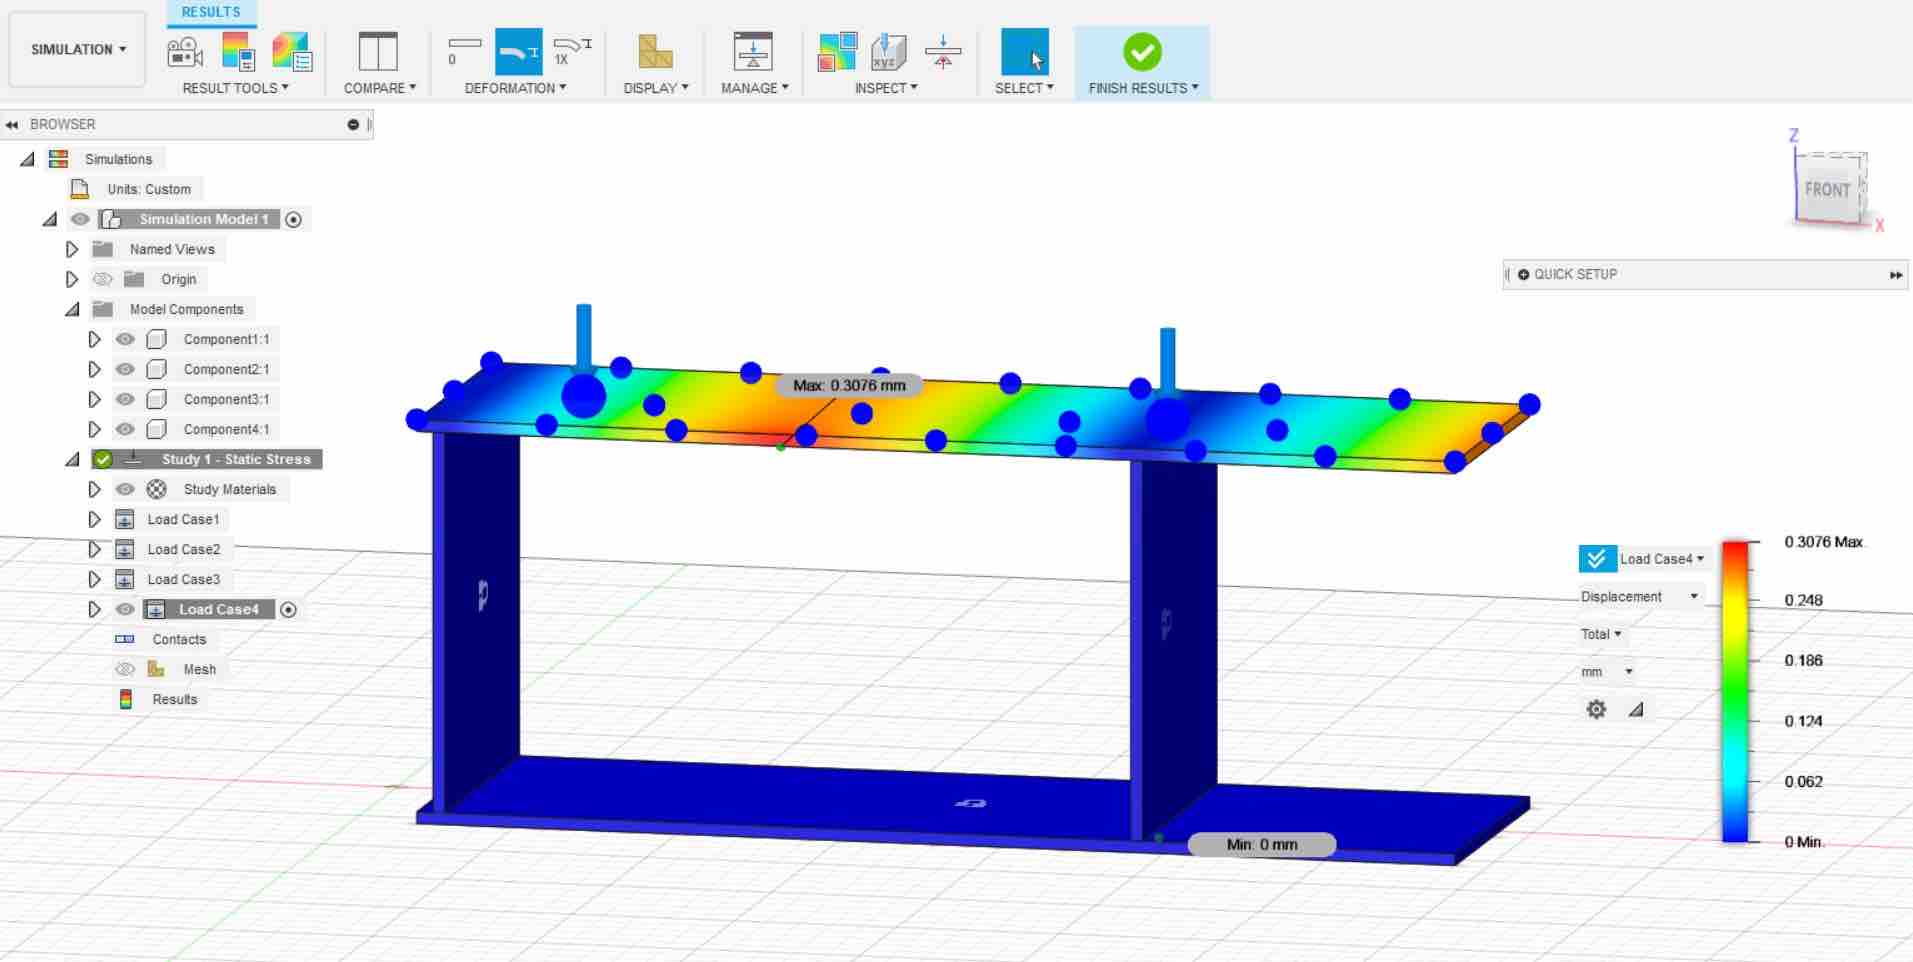
As you can see the, displacement looks correct and when I look at the stresses, it looks correct however I am a bit worried as to how correct the simulation study is due to the fact that I edited the metal to have plywood properties.
ShopBot Safety:
- Wear hard toed shoes. I started carrying my work boots in my car ever since this week.
- Wear Eye protection goggles
- Wear a N95 mask
- Wear noise cancelling ear muffs
- Tie up long hair
- Always have someone else with you during operation.
- always be near a emergency stop button or even better carry the remote with the emergency stop with you.