3D Printing
Tasks
group assignment:
- test the design rules for your 3D printer(s)
individual assignment:
- Design and 3D print an object (small, few cm3, limited by printer time) that could not be made subtractively ✅
Building a Stargate
This week I had a lot less time to work on my FabAcademy activies, but I decided to embrace the challenge and design something that could be printed “in place”
The “print in place” term is something I learned a couple of days ago from Adai. It can be basically described as a piece/set of pieces that are built and assembled as they are printed, in a way that, once they are printed, they can no longer be un-assembled.
There are lots of examples on Thingiverse, which were a great source of inspiration.
I initially liked the idea of creating pieces that could be articulated or could move inside/around each other, just like a fidget spinner, but after some thinking, a ray of inspiration transported me to the Stargate SG-1 universe, and I thought of building a small-scale Stargate Device.

As you can see, the profile of the two concentric disks makes them be able to spin freely inside each other, but impossible to take apart or disassemble.

Slicing and preparing the print
I will be using Cura Ultimaker as the model slicer that will convert the 3D model to GCode instructions that the printer can understand.
The first issue when opening the design in Cura Ultimaker was that the size is too large for the printer I wanted to use.
After a quick panic (I really didn’t have time to go back home to adjust and edit the design). Fortunately, a quick and well-time hint from Adai saved the day (once again!).
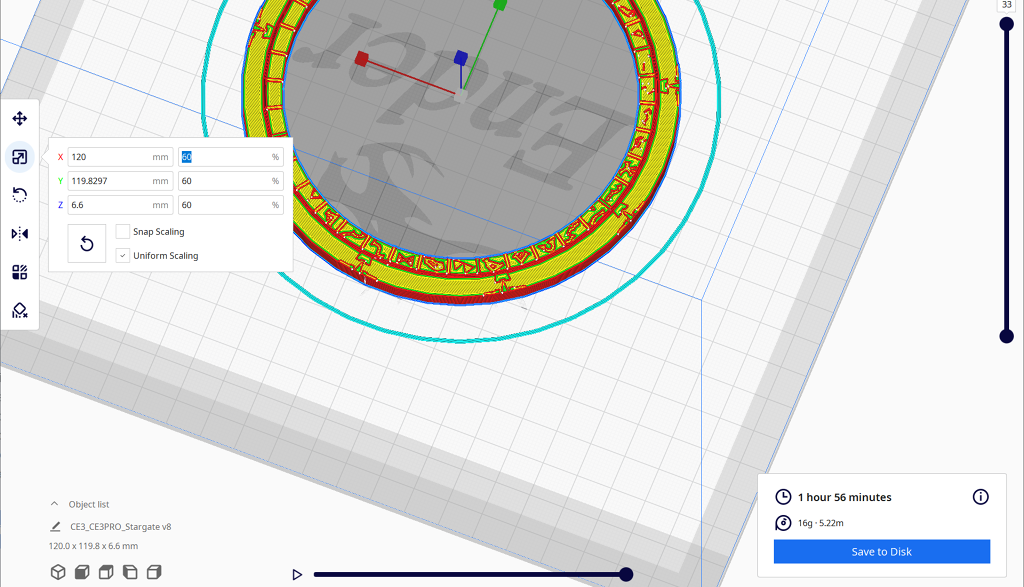
Ultimaker has a “scale” feature that lets you reduce the size of the printed piece. Not ideal for mechanical parts that need to be adjusted and fit into a real world object, but for our model, which has no sizing requirements, it is exactly what we needed.

Changing the scale fixed the issue!

The next issue appeared when we tried to slice the model: 5h of printing time was not feasible for the timeline I had to work under.

Another quick scale down, and we are in business.
The last question in my head at that moment was:
If this shrinks the design 60%, it will also make the gap between the rotating pieces 60% smaller…
Are the two pieces going to stick to each other?

The slicing shows the separation clear, but with thermal/plastic expansion of the material, the possibility was becoming real.
Fortunately, the piece was designed with pessimistic separations so this 60% reduction did not cause any problems, as you will see below.
The printed piece
Ta-daaa!!!
This is the printed piece, the first ever 3d printed object I have created.
I am so happy that it came out so well.

Initially, during the printing process, it seemed that the 2 concentric circles would get stuck together, but once the piece came out of the printer it was quite obvious that it was just an optical illusion. 1mm separation is definitely more than enough to make sure 2 parts don’t get stuck!
In the video below, you can observe how the concentric circles can move freely, and how they do not come apart, something that would have been impossible using standard subtractive manufacturing techniques.
Sure, a milling maxine that works on 800 axis, might have been able to carve-out the middle separation from both rings, but that would require, a lot more preparation when it comes to designing the toolpath, a much more expensive machine than a simple 3-axis miller, and probably would also require a more complex workflow (chaning milling bits between different parts of the manufacturing, etc…)
With a 3D printer, this was as easy as making a model, passing it through the slicer, and waiting for a couple of hours.
Hints and tips
While I was waiting for the 3d printer to complete my piece, I joined the rest of the group for the group-challenge.
There were some lessons learned during that exercise as well:
- When it comes to 3d printing pieces, avoid fillet and rounded surfaces, and prefer to use chamfers with a high angle
of attack. This will give you 2 advantages:
- Since you don’t use fillets, you don’t have almost-horizontal features and wide overhangs.
- Since you are using a chamfer (flat) with a high angle, if it’s less than 30 degrees (from the vertical axis), you will probably get away without having to use supporting structures as well.
- Eduardo, the local instructor also shared some interesting tools and pages:
- The 3D printer’s Ultimate Troubleshooting Guide for
- Very visual an easy to navigate. This guide covers lots of common mistakes, and explains how to detect them, what is the root cause of the issue, and how to fix it.
- The Ultimate tuning and calibration tool for your
3D printer.
- Have you ever wanted to test, calibrate, or learn the impact that a specific printer setting can have on your overhangs/quality/speed?
- This tool can be used to generate GCode files that help you test, assess and investigate the myriad of settings and properties of your 3D printer.
- Steps:
- You can choose which setting you want to test, eg. I want to know how the temperature of my filament extruder will impact overhangs.
- You configure the temperature ranges for each of the different passes.
- You download your customized piece of code
- Send it to the printer
- Analyse the results
- The 3D printer’s Ultimate Troubleshooting Guide for
Closing thoughts
Over the past few weeks, I have consistently had this recurring thought over and over: The FabAcademy’s curriculum, syllabus and their timing, is really well thought out.
It seems that as the weeks go by, the machines and processes increase in complexity and require more and more crafting tact and gentleness.
3D printers are fantastic and fun, but they don’t have too many configuration parameters: it’s “just” a beam of light. You can’t really change its properties other than, how strong it is, or how you move it around.
With CNC milling machines, you get exposed to the more delicate side of things, and you start to appreciate how this is not just “sending a PDF to an ink-jet printer”: the milling bit is terribly small and fragile, and needs delicate handling; the soldering irons are blunt and aggressive (you can get yourself hurt, easily), but they also demand tactful handling.
This week with 3D printers, you get overwhelmed with so many parameters that, in order to be great at it, you need to be familiar with a wide variety of things:
- The material that you are extruding
- Its properties, its strengths and weaknesses
- It’s applications, risks, health hazards
- The consequences of its use: how the environment got impacted when the filament was created, and how it will inevitably be impacted when the piece ends its lifecicle (can you recicle it? is it biodegradable? is it biocompostable?)
- You also need to be familiar with the printer that you have
- Not only the brand, or the model, but your specific printer that you’ll use. Is it using an old and used-up component that requires tender care?
- You need to be familiar with the settings that you got from your initial tests, and figure out not only the optimal temperature for overhangs, but WHY is that value the right one? and what this number tells you about the nature of your tools.
- You need to be familiar with a variety of design processes and tools that allow you to get the most out of these tools
and their inherent constraints.
- And, the critical golden nugget: you must design, from the beginning, for these specific settings in mind!
- If any of these settings change you might have to adjust your model accordingly.
This is the hidden and inherent complexity of fabrication, and every week, so far has been a consistent reminder of that.
I can’t wait to see what’s next.
If I may be so bold, allow me to recite famous last words:
Surely this is as messy as it gets, right? It cannot be getting any more complex, than this!
References
Stargate Glyphs extracted from Wikimedia: Stargate Glyphs