A Tic Tac Toe machine to defeat all humans (Team Project)

This week’s objectives
- Mechanical Design
- design a machine that includes mechanism+actuation+automation+application ✅
- build the mechanical parts and operate it manually ✅
- Machine Design
- actuate and automate your machine ✅
- Document the group project and your individual contribution (this page!) ✅
Machine
Application
Application a device designed to help the user to perform specific tasks
The application for our machine is to play tic-tac-toe against a human adversary, using an aggressive play-to-win AI.
Automation
Automation describes a wide range of technologies that reduce human intervention in processes.
Our machine provides full end-to-end automation for the entire game of tic-tac-toe.

See below for a detailed list of features.
Actuation
Actuation. An actuator is a component of a machine that is responsible for moving and controlling a mechanism or system, for example by opening a valve. In simple terms, it is a “mover”.
From the point of view of machine design, Actuators are the parts of the machine that operate in its environments ( to affect it/change it, in some way), while the sensors are the parts that receive information from its environment.
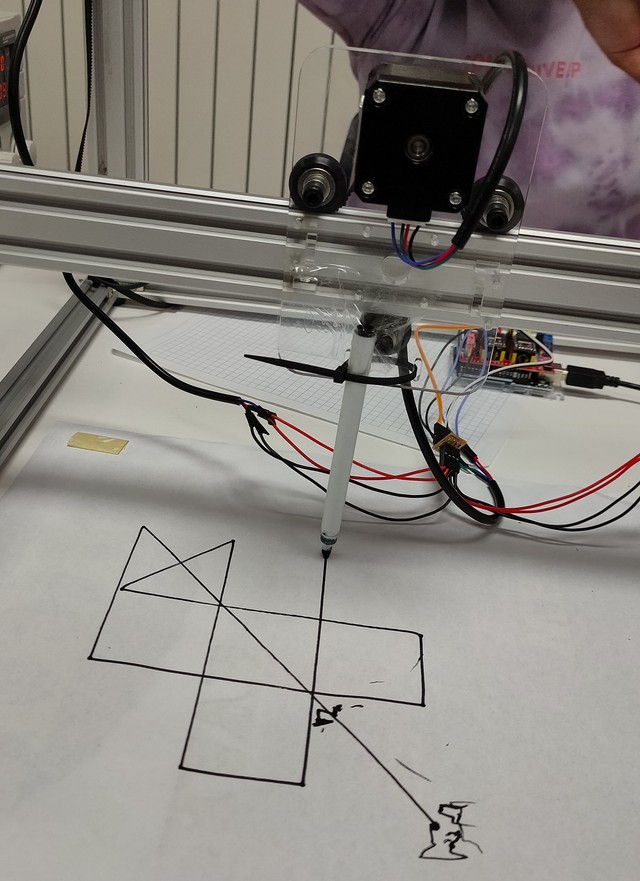
In terms of actuation, our machine has a moving pen, whose tip can be arbitrarily positioned in any position in the operating space/volume.
For all intents and purposes, however the pen will only occupy 2 planes in space:
- the paper plane: when the tip of the pen is touching the surface below the machine. This setting can be used to paint, draw on it or mark it in some way.
- the hover plane: when the tip of the pen is held away from the floor/paper/whiteboard. This position allows us to freely move the pen without leaving marks or painting anything.
private static final int SERVO_HOVER=550;
private static final int SERVO_PAPER=400;

public void hover(){
  arduinoClient.sendCommand("M3 S"+SERVO_HOVER);
}

public void paper(){
  arduinoClient.sendCommand("M3 S"+SERVO_PAPER);
}
Mechanism
Mechanism (engineering), rigid bodies connected by joints in order to accomplish a desired force and/or motion transmission
The machine that we have built has various mechanisms to operate and perform action in all 3 spacial dimensions:
- 1 mechanism to operate on the X axis (1 degree of freedom) using dual stepper motors
- 1 mechanism to operate on the Y axis (1 degree of freedom) using a single stepper motor
- 1 mechanism to operate on the Z axis (1 degree of freedom) using a single servo motor
The combination of these mechanisms allow the machine to have an operating space/volume of approx:
412 mm x 420 mm x 18 mm = 3,114,720 mm3 = 3114 cm3
Here’s a short excerpt of the code used to control the machine over the operating space.
private static final int FEED_RATE_FAST = 150;

/**     0   1   2
 * 0  ( 1 | 2 | 3 )
 * 1  ( 4 | 5 | 6 )
 * 2  ( 7 | 8 | 9 )
 */
public void goToPosition(int row, int col){
  switch(""+row+col){
    case"00"->fastTo(1.5,7.5); // (Position for Cell 1)
    case"01"->fastTo(4.5,7.5); // (Position for Cell 2)
    case"02"->fastTo(7.5,7.5); // (Position for Cell 3)
    case"10"->fastTo(1.5,4.5); // (Position for Cell 4)
    case"11"->fastTo(4.5,4.5); // (Position for Cell 5)
    case"12"->fastTo(7.5,4.5); // (Position for Cell 6)
    case"20"->fastTo(1.5,1.5); // (Position for Cell 7)
    case"21"->fastTo(4.5,1.5); // (Position for Cell 8)
    case"22"->fastTo(7.5,1.5); // (Position for Cell 9)
  }
}

private void fastTo(double x,double y){
  arduinoClient.sendCommand("G00 X" + x + "Y" + y + " F" + FEED_RATE_FAST);
}
My Individual Contribution
Research
- Learned about GCode syntax, commands, flavours and features
- Research on tic-tac-toe algorithms and 3rd party A.I. engines
- Learned about Svelte for creating frontends using typescript
- Investigating grblHAL-sim to see if it could be useful as a GRBL Simulator, so I would not be blocked/waiting while the team was designing/building the machine/calibrating the drivers/shield.
Implementation

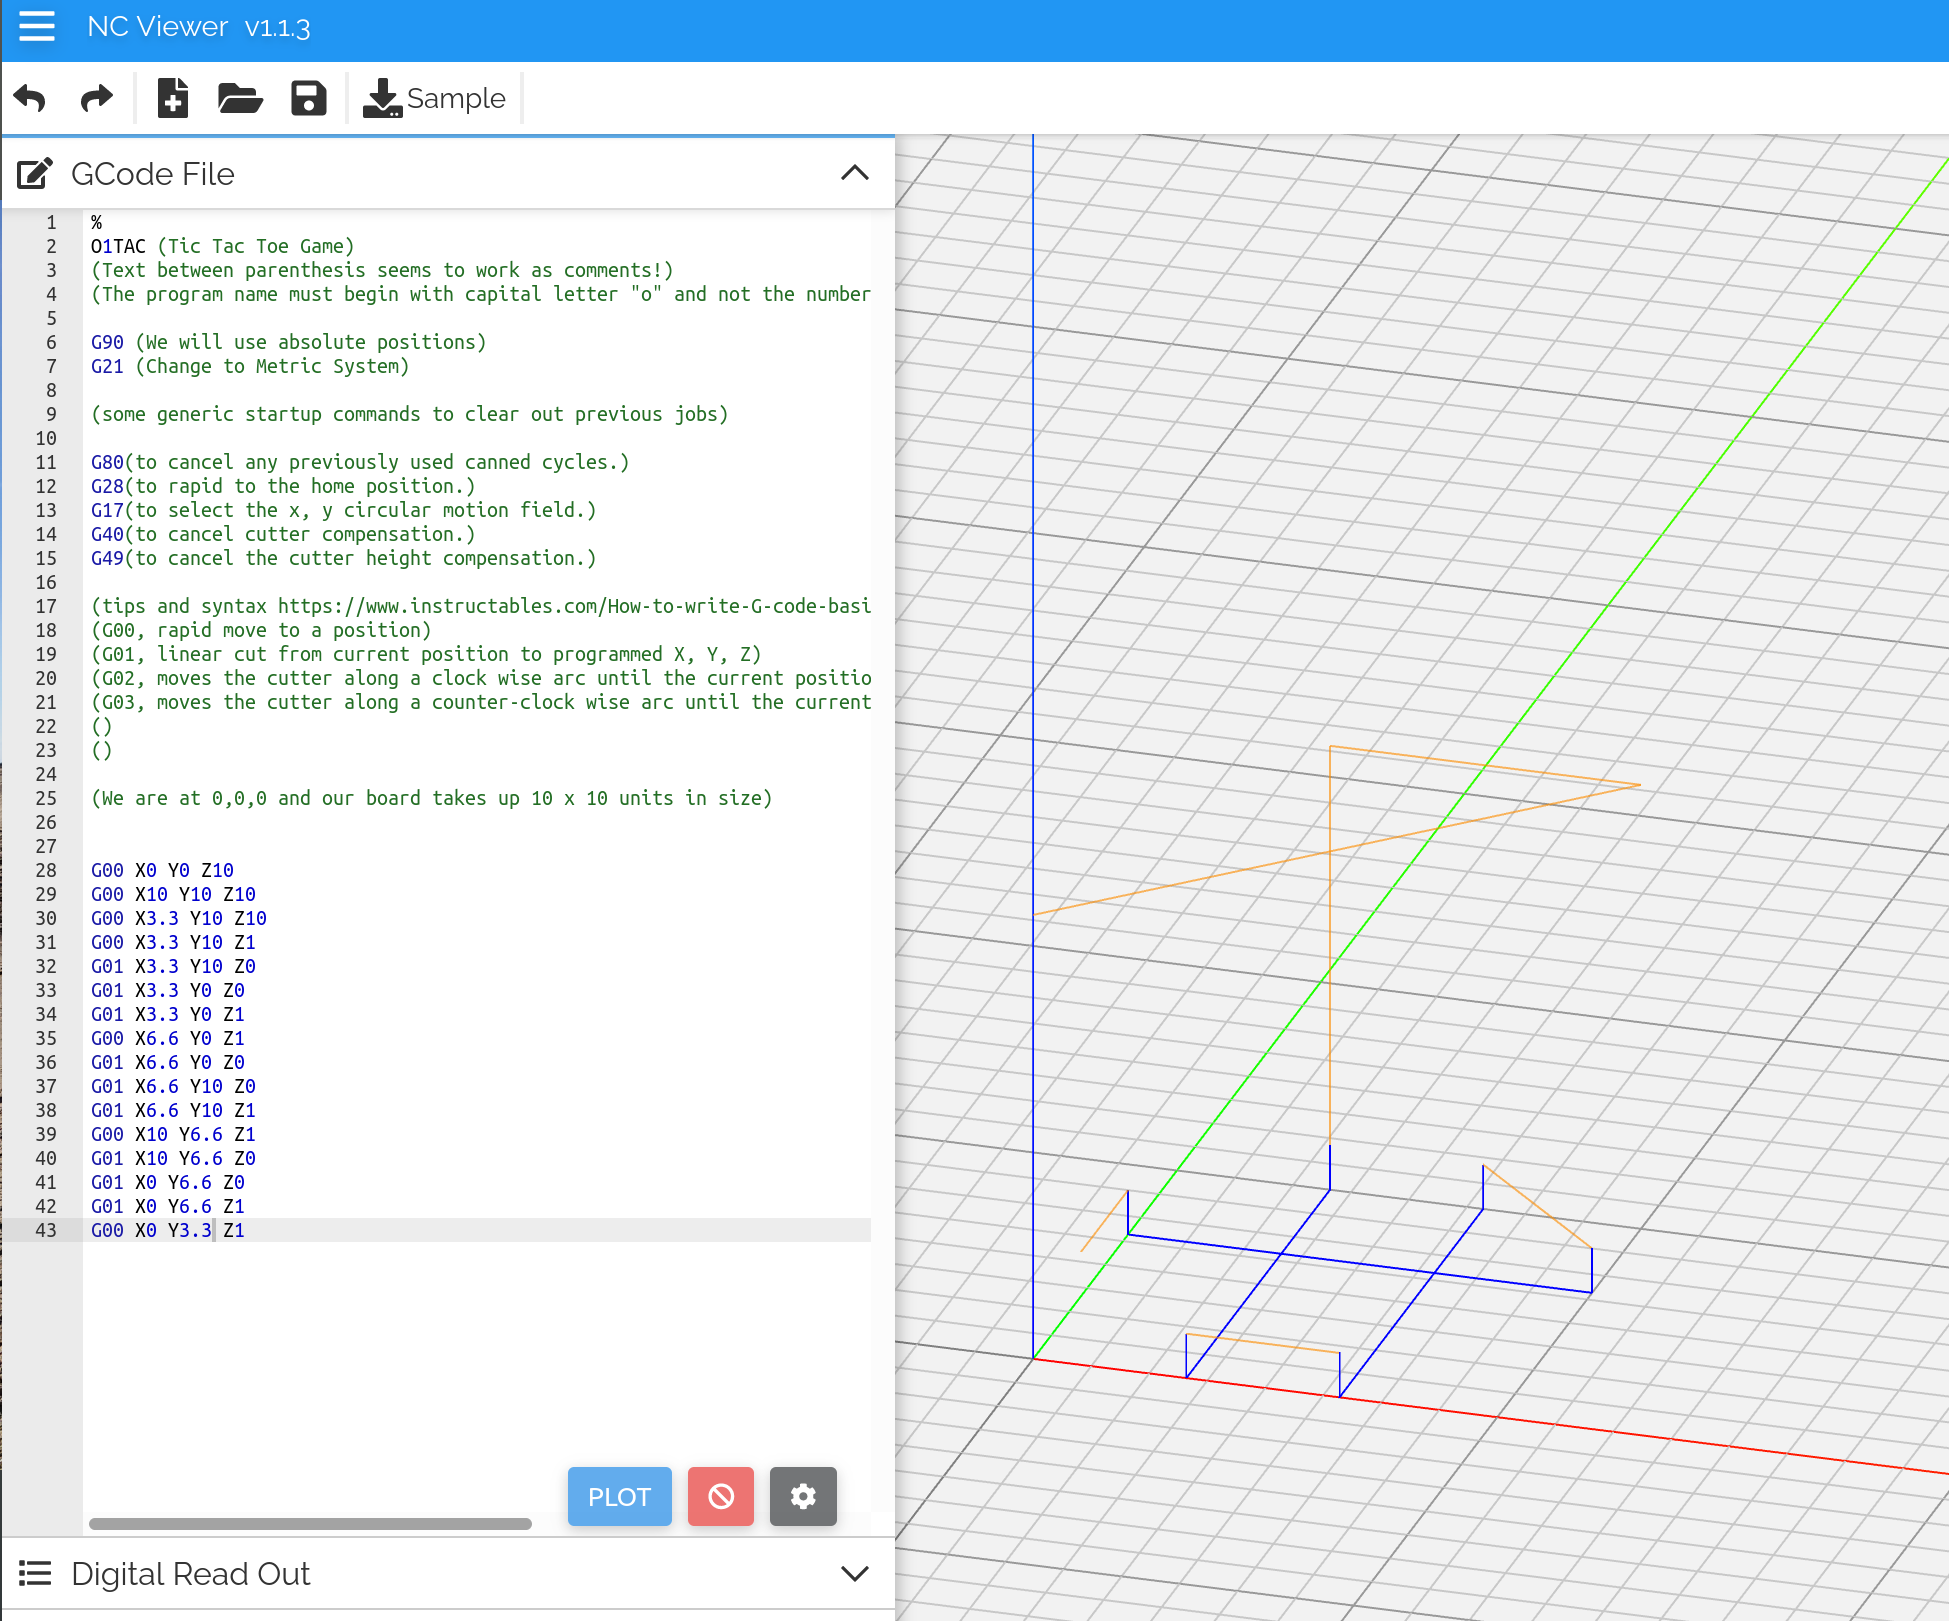
- Implementing the GCODE needed to draw on the board via Arduino/GRBL through a serial interface (tested in NCViewer)
- Creating the control application and logic:
- Backend that receives user input and coordinates with 3rd party A.I. engine
- Java 17 OpenJDK
- Spring Framework 5.3.18
- Spring Boot 2.6.6
- jSerialComm Library, used to abstract raw serial communications
- JavaArduinoLibrary used to abstract basic arduino commands.
- Frontend used for the user to enter moves and view game state
- First iteration using Bootstrap 5.13 and JQuery 3.6.0
- Second iteration using Svelte, Typescript language, and RollupJs as a bundler
- Minimal changes in 3rd party AI algorithm to make it easy-to-interface-with, since it was not initially designed to be used as a standalone library.
- Backend that receives user input and coordinates with 3rd party A.I. engine
- Collaboration with the rest of the team on making sure all the pieces work well together.
- For example, our machine does not require precise mm/inch calibration. It assumes that the board is 9x9 units in size, and it draws in that imaginary grid.
- It was critical to communicate these core assumptions with the rest of the team so that the driver/arduino/shield calibration was done as expected by the controlling logic.
Machine Features

The diagram above highlights in lime green the components that I have implemented and in green-gray the component that I have adapted from existing code.
- Serial Interface - The Computer-Robot Interface composed of 2 layers
- Low level interface
- Sends raw GCode to the machine via Arduino/Serial interface
- Stores robot’s calibration configuration so any arduino can be programmed with 1 click from the web interface.
- High level interface
- Fully autonomous control of the pen on all 3 axis, which allows us to:
- Draw the 3x3 tic-tac-toe board/grid
- Draw the user’s moves
- Draw the AI’s moves
- Fully autonomous control of the pen on all 3 axis, which allows us to:
- Low level interface
- Web Frontend - The Computer-User Interface
- Allowing the human player to enter their next game move via a website frontend accessible from a browser/mobile device.
- Providing user feedback on the website on the computer’s move.
- Has hidden HTTP management endpoints that allow low-level arbitrary GCODE execution for debugging purposes.
- Useful to interface with GRBL directly to set/read config values, or execute anything.
- Java Backend
- A simple web-enabled backend that handles HTTP requests
- Tic-Tac-Toe Game Engine
- A simple game engine that controls:
- User/Computer turn management
- An agnostic translation layer between AI domain and the Machine domain.
- A simple game engine that controls:
- Gameplay AI
- Calculating an optimal response move from the A.I. using
an AlphaBeta Pruning algorithm
- This is an improvement on the Minimax algorithm but it improves performance by removing branches that do not need to be evaluated, resulting in faster compute performance without sacrificing effectiveness
- The specific algorithm used has an additional performance improvement that takes into account the search space (depth) to play in a way that results more human.
- Without this advanced improvement, the algorithm would achieve the same results (# of wins), but will sometimes play in ways that may seem confusing at first sight. For example, the machine might go down a path that guarantees a victory, but will go for the not-so-fast win. The improved algorithm gives a better score to moves that result in a faster victory for the AI, thereby playing more aggressive and focused-to-win movements.
- BONUS: This does not change the success rate, but it does intimidate its human adversary.
- The algorithm never loses against any adversary. It provides ‘best-play’ performance and guarantees a win (if the human user is inexperienced), or a tie (if the adversary is experienced).
- IMPORTANT: This specific algorithm was not implemented by me, it was taken
from LazoCoder/Tic-Tac-Toe
, a public GPL3.0 project. My contribution in this part of the project was in:
- Researching algorithms alternatives
- Codebase Analysis
- Integration of the algorithm into our application.
- See the Licensing section for more information on the algorithm used for the TicTacToe AI
- Calculating an optimal response move from the A.I. using
an AlphaBeta Pruning algorithm
Exploration and Useful Resources
These are some interesting resources that were helpful during my research
Controlling Arduino from a computer/website
- Ethernet Shield
- Discarded because there are no Ethernet shields available in the BCN lab
- More importantly, definitely discarded because if we wanted to have all the goodies (a fully featured machine, and aggressive AI algorithm, an easy to debug backend, an easy to compose frontend, etc…) having a laptop as a backend would make our work much easier. Most of the shield examples end up with pretty ugly/basic/1990s web interfaces (no shade!)
- GCode4J
- Very useful to get a general idea, but far from easy to be integrated.
- RSTEP Project
- I checked this out as an alternative to GCode4J. Discarded: Too low level. This project is a GCode interpreter. We already have this. We’re looking for a GCode Sender.
- UGS Universal Gcode Sender 1.A fully featured java application. Overkill and probably hard to integrate with custom control logic. We’re not interested in building a plugin for UGS.
- Chrome GCode Sender for ChromeOS
- Interesting project for ChromeOS. Discarded because we don’t have plans to run our machine from ChromeOS. Hard to integrate with custom control logic
- Java Arduino Library
- Tiny and to the point! a winner. We ended up using this in our project! ✨
- simpleJavaGrblStreamer
- I came across when I was having issues sending GCode via Serial interface.
- While we did not use any code from this resource, seeing such a simple that (presumably) works was the final straw that proved that the issues we were having were caused by something in our code, not in the intermediary libraries, etc…
- In hindsight, line 151 should have given me the CLICK! needed to fix, but in the end, it was Josep (one of our local instructions) who gave us the hint we needed!
TicTacToe Algorithms
These are some algorithms I checked out while looking for something we could readily use in our backend laptop.
- MixiMax Algorithm
- Very promising! We would have implemented this, if we hadn’t found an already implemented algorithm.
- Simple Tic Tac Toe
- Very simple algorithm that has no intelligence and plays an “O” on the first available spot on the board.
- Lacks intelligence and aggressiveness
- Detect a winner
- Does not place any tokens, just checks if the board is in a “win” position for either player. Not what we were looking for
- Another example using MinMax
- Another simple example on Minimax
- Another example using Alpha Beta Pruning
- Another nice example on Alpha-Beta Pruning.
- Unbeatable using Alpha Beta Pruning with performance Improvements, by LazoCoder
- The algorithm we ended up using. It uses Alpha-Beta Pruning, but it includes the “fold depth” as a factor to score movements, giving better scores that end up in a winning position in fewer movements.
- Without this optimization, the basic Alpha-Beta Pruning algorithm would still reach a victory, but it would win after needlessly torturing the human adversary. We have no time for nonsense.
- I selected this specific implementation because I liked the consistency that this algorithm displayed, and the total absence of confusing moves it makes. It searches for the fastest win and goes for it.
Problems encountered
GRBL and Relative coordinates
During our initial iterations, we were having issues when we tried to get the steppers to draw figures on our board, but not when we were trying to move around the board (hovering).
Our initial hypothesis was that maybe GRBL did not support relative coordinates.
- After a bit of research we came across specific documentation (Pg. 3) for GRBL 1.1.2 that clearly indicates that it supports G91 for relative positioning.
- Something else I learned is that “Relative positioning” is called “Incremental” in some environments. This proved useful when googling around, as we found many more hits and useful results.
- A third thing I learned is that there is specific syntax that allows relative coordinates to be used while GRBL is in absolute mode. This syntax uses UVW Commands instead of XYZ, although it seems to be unsupported by GRBL 1.1.
This avenue of research did not help us resolve the issue we were having, and at the end, the problem was fixed by re-tightening all the belts used by the steppers, and doing a soft reset of the shield.
We accidentally burned one arduino board
So, full disclosure… We don’t actually know what happened, but we believe it burned/died because it is no longer working in any capacity.
Context: While we were using an Arduino UNO Board, it suddenly stopped working. In front of all of us. And no one was moving around/touching it.
That’s not the worst part. The worst part is that we have not been able to find out the root cause of this unexpected event.
Everything worked as normal when we place a new arduino board and reloaded the GRBL config settings, so it’s clearly something wrong with the Arduino UNO board, and trying to flash it with the GRBL firmware/library was not possible once it died.
We need to do a bit more research to figure out what happened! A 20$ damage is a huge piece of the budget. We better find answers.
Desperation to fix a GRBL problem almost ended with my laptop infected with suspicious virus
Pro Tip: when developing for GRBL/Arduino, on a Linux machine, with custom software, always click on any “Download Windows Registry Fix.exe” links that may appear in front of you!

😒 Don’t trust all links!
Inconsistent command execution & GRBL randomly dropping instructions without errors
Alright! So this was one of the most confusing problems, and one of the most celebrated once it got fixed.
Imagine that Arduino is receiving commands correctly when you send them via the Arduino IDE / Serial Monitor:
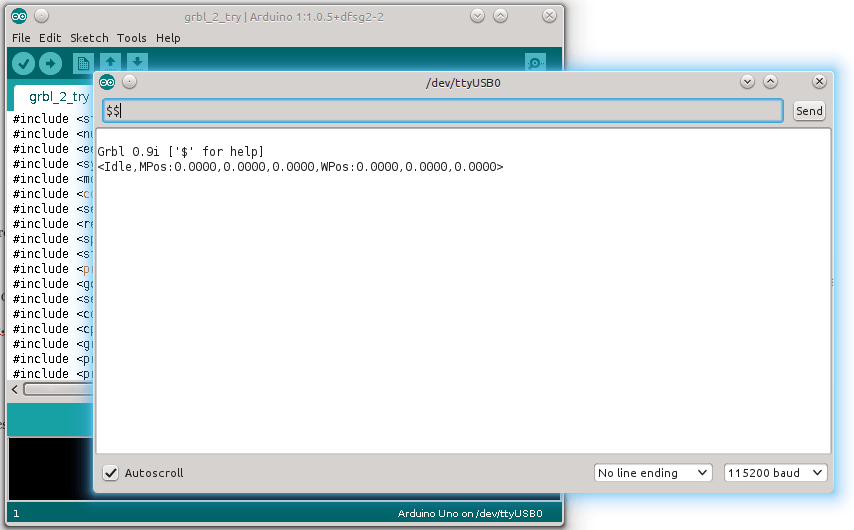
But that the exact same commands Sometimes fail when you send them via your custom program:
This problem has all ingredients for the perfect frustration 🥴🤯 storm 🌩:
- The command (any command!) works perfectly on a known platform (Arduino IDE): so it’s not hardware issue
- We tested different cables: so it’s not a comms issue
- It sometimes works correctly from our program: so it’s not an obvious error in our code/library
- All the examples we are finding online have code that looks extremely similar to our custom code (open port, handshake, etc…): so we have not missed anything obvious
- What is it?!
- The answer came to us after a quick question to one of our local instructors (Thanks Josep! 💝):
- It turns out, we had forgotten to send out the “new line” character at the end of our command.
- The new line command is normally generated when we press
ReturnorEnterkey on our keyboards. - The same key we press on the Arduino Serial Monitor to “send” the command.
- The answer came to us after a quick question to one of our local instructors (Thanks Josep! 💝):
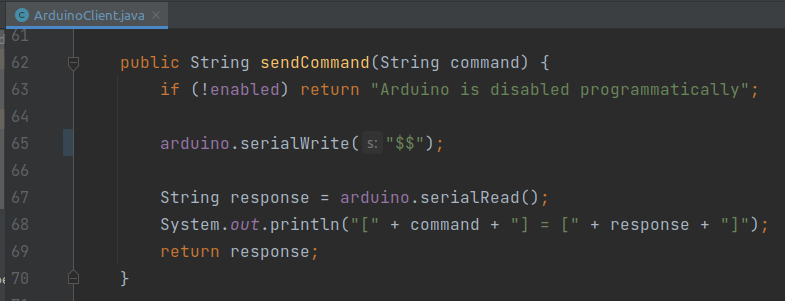
The fix was easy and swift: We just had to add a \n new line character at the end of each command we wanted to
send arduino.serialWrite(command); for a arduino.serialWrite(command + "\n");
It was so obvious, and yet so invisible, until it got fixed.
✨ What a difference 1 byte makes✨, when implementing low-level protocols!
Life lesson:
- Sometimes you might be in a pit of darkness and divine bliss is just 2 minutes away from you.
- Ask for help sooner: We should have asked for help sooner! After the 1st hour of research, I already had enough answers to ask fully-informed questions. The determination to trying to figure it out without bothering others did not prove particularly useful.
Video - Real Life demo of a full game
This is one of the sample games we played before we had a fully functioning pen holder.
Spoiler alert: 😎 I lose because I was more focused on recording the video than on playing! 🤦
Video - Sample demo with pen
One of the first iteration with a pen attached
This showed us that we had to find a most consistent way to hold the pen:
- Pressed too tightly against the whiteboard, and the pen does not slide smoothly.
- Pressed too loosely and the pen does not draw and flies above the surface.
- This difficulty was exacerbated by a small detail: we cannot “flatten” a whiteboard in the same way we could do with the sacrificial board of a CNC, so we had to find a firm-but-not-too-tight way to hold the pen.
Video - Blooper: A Fail Game
And the mandatory “Fail” Video that shows our glorious successes during the build process.
That’s how you know this machine was built by us! We have the evidence to prove it 😉
Summary
Anyway, these are my lessons learned and my contributions to the team project. Jump on to the group documentation page for a more detailed explanation of all the work we did, as a team, to get this project off the ground and into glorious success.
Source code and Licensing
- The actual algorithm incorporated into the machine game engine is taken from LazoCoder/Tic-Tac-Toe under GPL3 licensing (GNU General Public License v3.0)
- In accordance with GPL 3.0, the entire source code for our machine is also released under GPL3.0 and can be found in the fabacademy gitlab
- Thanks to @LazoCoder for the implementation of this algo in Java and for its documentation.