CAD 2D
WHAT:
- model (raster, vector, 2D, 3D, render, animate, simulate, …) a possible final project,
- compress your images and videos,
- and post a description with your design files on your class page
WHY:
- So that we are familar with basic design tools and its language (vocabulary, grammar, etc.)
- To keep Neil happy, sure…
- and the gitlab server admins off our backs.
- but most importantly, so our readers can have a nice experience while browsing our docs. Not everyone is privileged enough to be able to participate in fabacademy “live” and get exposed to all the content we consume/generate. Making our documentation available to as many people as possible, and with a low barrier of entry is a collective service we can do to everyone in our communities.
- So others can learn from our mistake, but -more realistically- so that we can reference stuff 3 weeks from now, when we forget that command that was oh-so-useful!
Intro
This week we started exploring Computer-aided Design tools (CAD) to get familiar with them and their capabilities.
The skills we develop this week will help us model, sketch, visualize and designs the components we will develop during the upcoming weeks. These basic skills and literacy will be used for all types of fabrication processes (laser cutting, vinyl cutting, 3d printing, milling, CNC, etc.)
I still have not settled on a final project idea, so I decided to focus on replicating a simple design in various tools.
Since I am very new to 3D and modelling I wanted to optimise my limited time to do a breadth-first exploration in order to cover multiple tools, instead of spending a lot of time on a single tool trying to replicate a very detailed and complex design.
The driving principle is to learn the basics of the language, the grammar and the syntax that all these tools have in common so I know how to start thinking like a designer and not like a developer (Why would I ever want to “Chamfer” something? I am a decent person!)
Target object
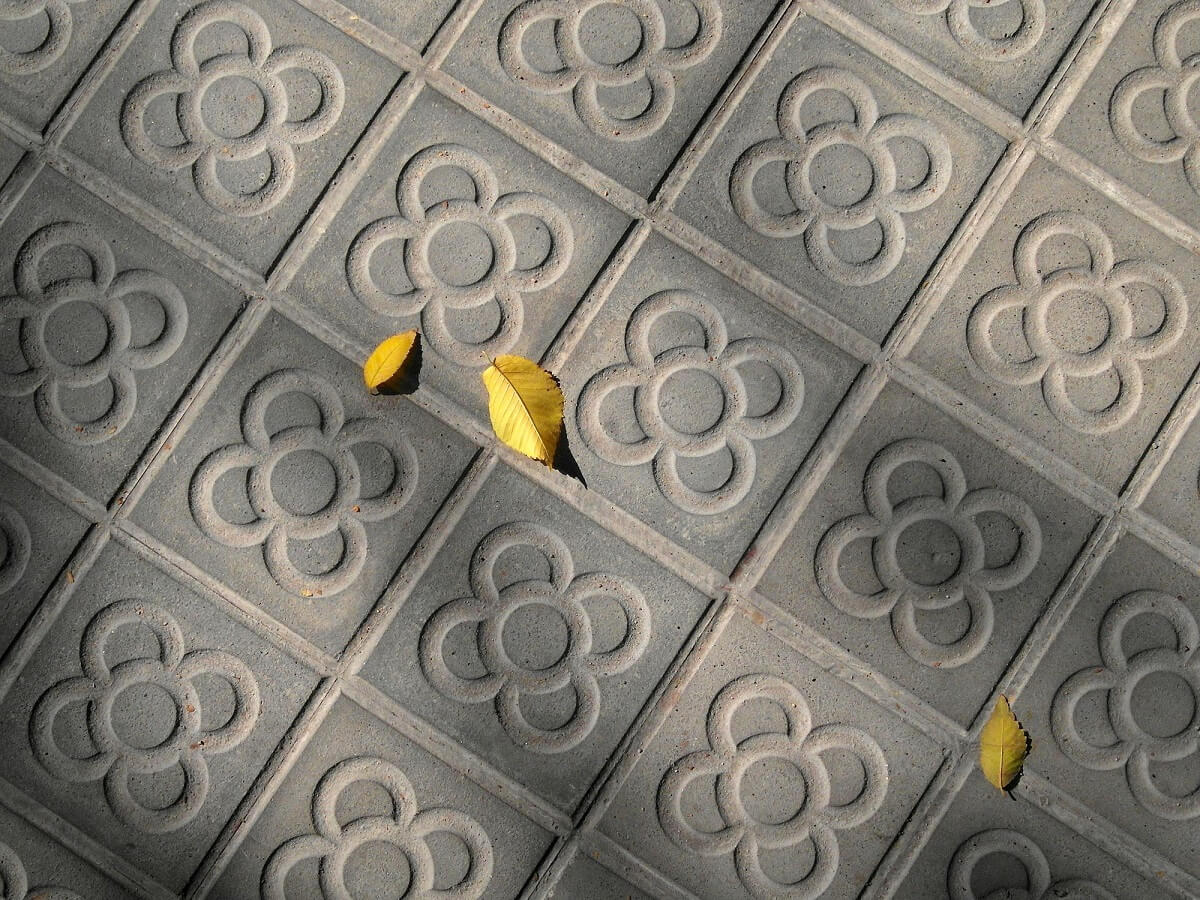
Considering that I am living in Barcelona, I wanted to model something simple, unambitious and local.
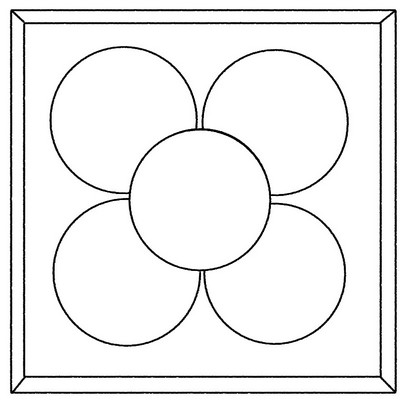
I quickly settled on trying to replicate and unassuming everyday object like the “Panot” or “Flor de Barcelona”, an iconic tile that covers hundreds of streets around the city. Famous enough to have its own set of souvenirs and collectible items.
Simple 2D drawings
Raster (using simple shapes)
For 2D drawings I decide to try out Krita, since it was recommended a couple of times during the week (Eduardo C. seems to like it a lot!), and I had never used it.
Krita seems to be a general purpose tool, but with lots of focus on drawing, illustration and digital painting.
If you are a good-looking individual with an eagle eye and a taste for the high arts, you might have noticed that the edges and lines are not particularly clean or sharp. Even on straight lines and figures drawn with the built-in tools (circle, square, line, etc.)
This is because I used one of the many natural-looking brushes that come out-of-the-box with Krita.

Raster (hand-drawn)
The next thing I tried was drawing by hand the same shape and also saving it as a raster file.

In order to get to a close approximation of the original figure, I decided to create different layers for each of the styles, so I could trace them, and guarantee a similar look.
Here you can see a layer-by-layer animation:

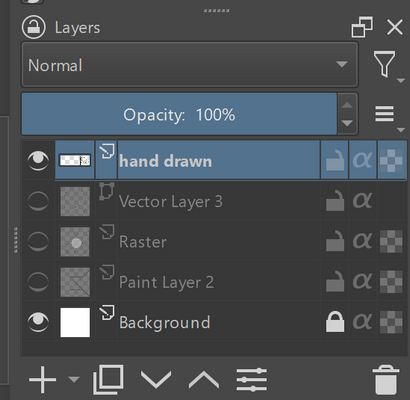
The layer “Paint Layer 2” just right above the background was used as a construction layer to ensure positions and proportions.
Check out Layering for a layer-by-layer build-up
Problems with Raster Files
So, the drawing we can see above has a problem. It is designed and stored as a collection of coloured dots, and it cannot be enlarged infinitely.
If you check out this video you will see 2 issues.
- It is hard to scale up (because it’s a raster file)
- It is full of digital artifacts, very visible once you zoom in (because it’s a JPEG file)
These formats are great for the web (because of their small size), but they are really hard to work with when we need clean designs that we can scale up and down without losing information.
Vector files can help us with this.
✨ Colouring
I also decided to paint in the original sketch to see how easy or hard it would be.
This is something I’ve seen done several times on youtube videos, but I had never done myself.
It felt amazing! You should try it out, if you have not done this before. I ended up with an ear-to-ear grin 😁 when I saw the final sped-up video for the first time.
✨ There’s really something magical about being able to compress a 15-minute-long video into 30 seconds:
- It looks all fancy when played at x30 speed.
- You suddenly believe that you are ready to abandon FabAcademy and become a mindfulness instructor.
- It lets you hide in plain sight all the minor imperfections you did while painting.
- You get an “artsy” feel-good sensation that doesn’t go away for a while ✌🏻😎
💡 In the future, if I were to do it again:
- I would actually spend a bit more time and focus on the details (not leave blank spaces)
- I might actually try to find some tricks to better match the actual photographic colours
- maybe something a la Tim’s Vermeer
Vector
Ok.. let’s come back to the real world and talk about the wonders and magic capabilities that vector files grant us.
As you can see, Krita also supports drawing using vectors.
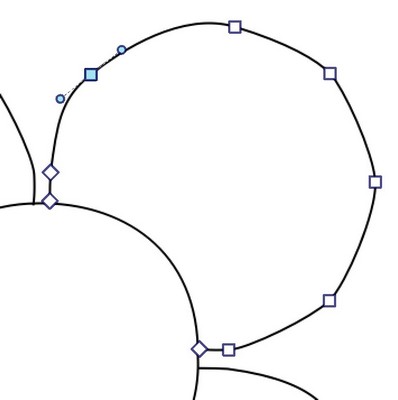
These vectors/curves are created and modified by dragging their control points around the canvas. These control points define the positions and orientations or the curves in space.
In Krita, you need to create a new vector layer, that is purpose built for vector drawing. Drawing vectors in non-vector layers won’t work!

The main advantage of using vector formats for designs is that they produce models/drawings that are infinitely up-scalable, because they are described by mathematical proportions and formulae, instead of by an array of colored dots.
In this video, you can see what happens when we zoom in on a raster file from Krita, even if we open it in another program (e.g. Inkscape)
Meta work
Continue to 3D ➡ to see the rest of the work done
Assets
- week02.zip - Rhino/Grashopper + Krita
- FlorBarcelona.f3d - Fusion360