Wildcard week
Assignment
- Design and produce something with a digital fabrication process (incorporating computer-aided design and manufacturing) not covered in another assignment ✅
- documenting the requirements that your assignment meets ✅
- and including everything necessary to reproduce it ✅
- Possibilities include (but are not limited to): machines, welding, molding and casting, folding, robotics, electronics, embedded programming, food, biotechnology, textiles, composites
Options
This week, we had the opportunity to learn about various topics in the Barcelona Lab:
- controlling multi-axis robotic arms (beyond the 3 axis of movement)
- creating composites using glass fiber, burlap, and various materials from molding and casting week
- paste 3D printing using clay and custom-made materials, using hacked 3D printers, from 3D printing week
Light-painting using 6-axis robotic arms
This week, we were able to use one of the ABB IRB-120 robots that BcnFabLab has in its workshops.
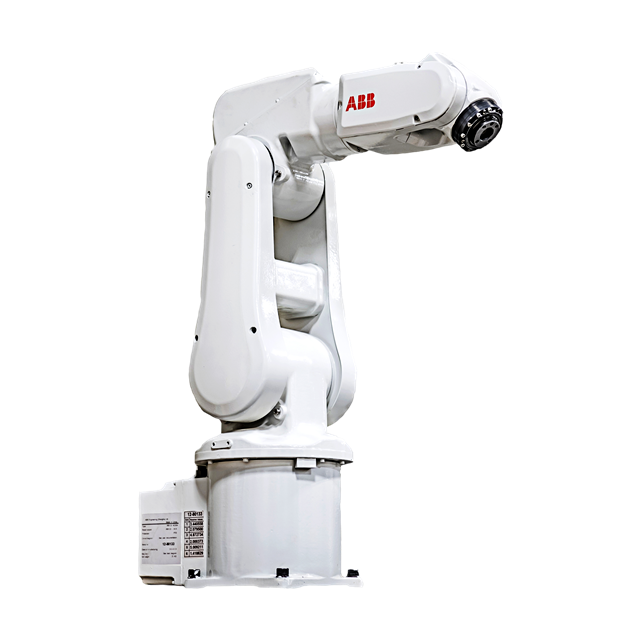
Controlling a 6 Axis Robotic arm

The main difference when understanding how to program a 6-axis machine is that we have to start thinking beyond points in a 3D space, and we need to start thinking about points in an N-dimensions space, where each point has 3 coordinates for the actual contact point, and the rest of the coordinates indicate additional information (eg. the tip of the tool is touching (1,1,2), but where is it the arm approaching it from? from right above it? from its side, etc..)
Up until now, we’ve had to think about 2D and 3D points in space in laser cutting and 3D printing/CNC machining respectively, but with robotic arms that have more degrees of freedom, we can approach the same point in space from various “directions”.
So we can start thinking about “2D planes in space” instead of “points in space”. This gives us:
- the 3 coordinates for the position of the specific point in space
- 3 additional coordinates for the rotation of such plane in 3D space.
Programming the robot’s movements
For this assignment, I used Rhino + Grasshopper, as well as a custom-made plugin used for this very purpose.

Understanding the grasshopper script that does most of the magic
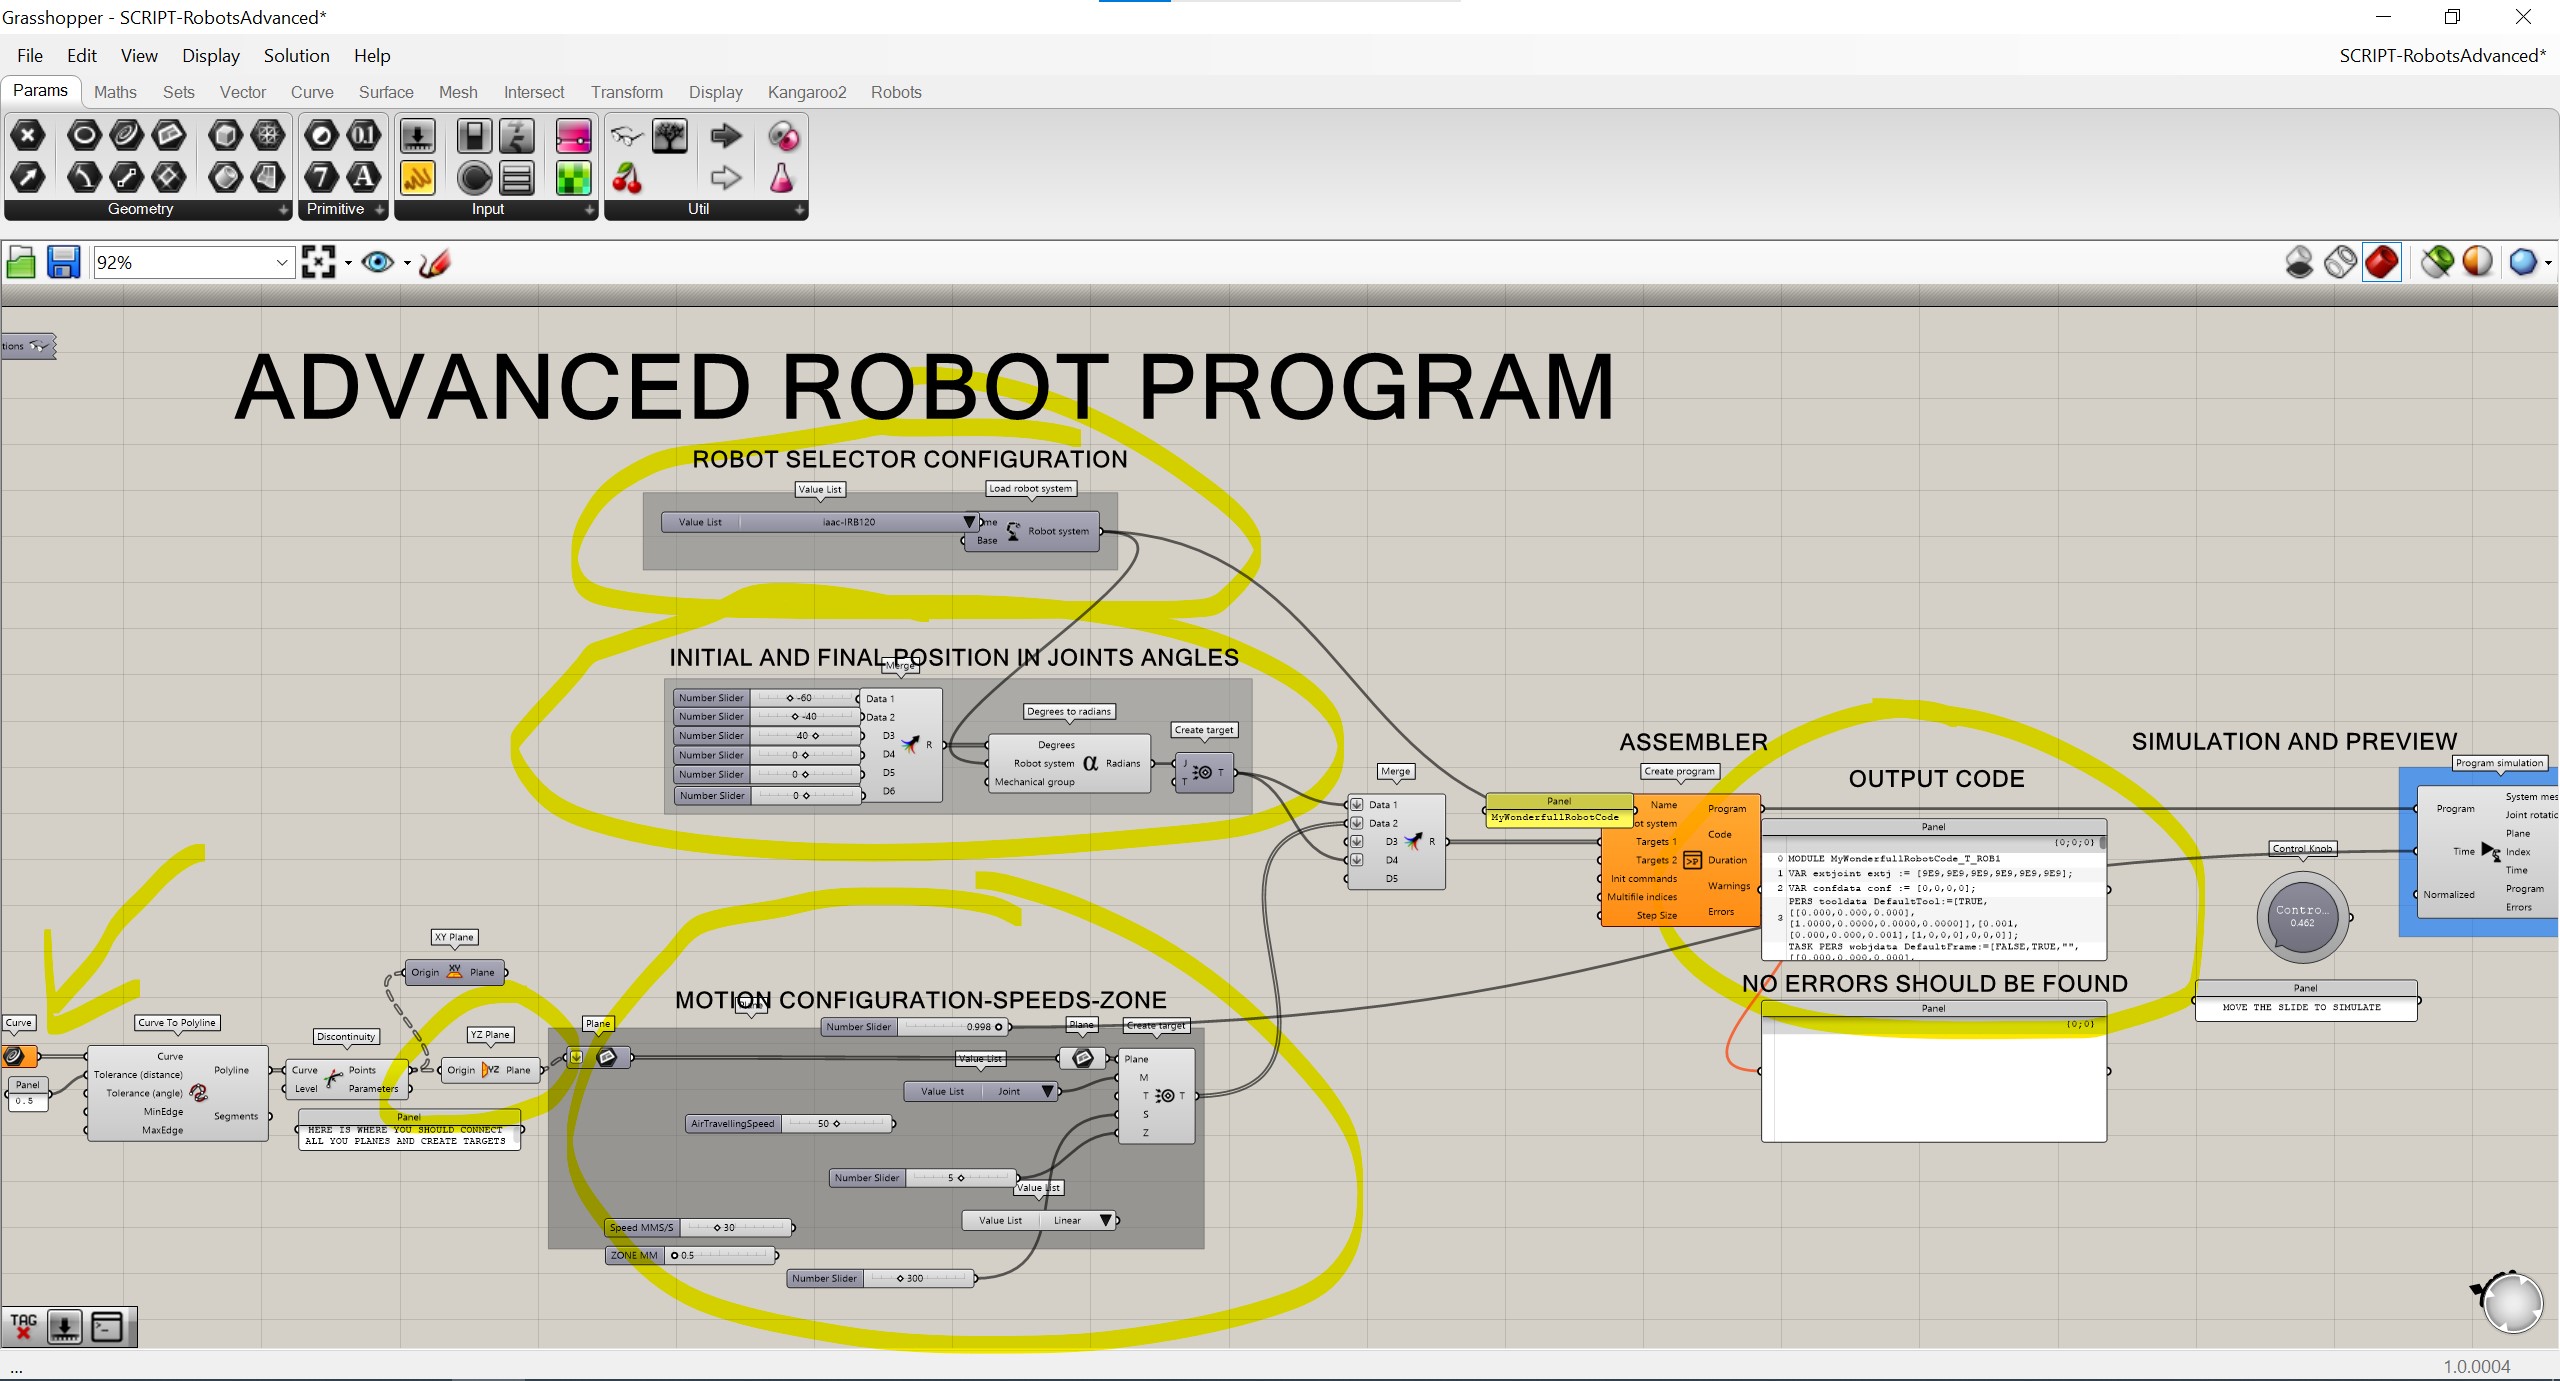
Click on the image to see the original-size image, without compression, so you can read the text.
From left to right, and from top to bottom:
- Curve node (in orange):
- This curve node is used to select an already existing curve or polyline that we have created in Rhino. In our case, this is the text “FabAcademy” converted to polyline.
- Origin Plane:
- This is the plane that the robot arm will use to hold the tool. In our case, an LED that will change colour rapidly. Since we want the LED to be facing the camera during the entire travelling of the arm, we pick the YZ-Plane.
- Robot Selector Configuration:
- This setting lets us select the model of robot that we will be using. Different robots will have different configurations, dimensions, initialization commands and syntax.
- Initial and Final Positions:
- This custom grasshopper script allows us to configure the initial and final positions of the robot arm.
- Just like we do for all other fabrication processes, these resting positions ensure that the robotic arm is out of the way (away from the working area/workpiece). It also serves as a visual aid, indicating to the robot operator that the robot has fully finished the program and will not move further.
- Motion Configuration-Speeds-Zone:
- This panel allows us to configure various parameters for the robot: its speed, the number of points to use to calculate motion across all the points, and if even allows us to run a simulation of the actual movement that the robot will do.
- By scrolling the number slider that indicates “0.998” in the picture, back and forth, we can visualize how the robot will look like when it reaches that position of the script. Right now, the Rhino window shows where the robot will be when 99.8% of the script has been executed.
- Output Code:
- This panel displays the final version of the generated code.
- This can be exported to a text file, stored into a USB drive, and plugged into the robot, for immediate execution without any further post-processing.
Simulating the robot’s movement
Before running code generated through algorithms, and without human supervision, it’s worth inspecting the output to make sure there are no surprises.
The simulated movement can be seen in the video below.
You will appreciate how the arm moves exactly as we programmed it:
- Tracing the outline of letters
- Always facing the YZ plane, so the blinking LED is visible to the camera
Controlling actuators and end-effectors through the robot’s control panel
Controlling the robot arm to move in the way we want, with precision, covers most (but not all) of the requirements we had.

We also needed a way to control the LED to turn it on at the right moment, but we don’t want to get our hands next to the robotic arm as it’s moving around, so we needed a way to trigger the LED to turn on, from a safe distance.
The Flex-pendant
The robot’s flex-pendant allows us to:
- manually control the robotic arm on all its axis (3 at a time)
- plug in USB drives with programs to run
- step through the program, play, pause and stop it
- actuate up to 4 arbitrary additional controls
This last feature is what we used to control the blinking LED.
By connecting the board to the actuator linked to “special function #2” button, which appears in the picture below like 2 horizontal lines, at the top right-hand side of the panel, we were able to turn on the light at the right moment, and not before.

Final result

the blooper or “Artistic take”
Here’s one of the failed attempts.
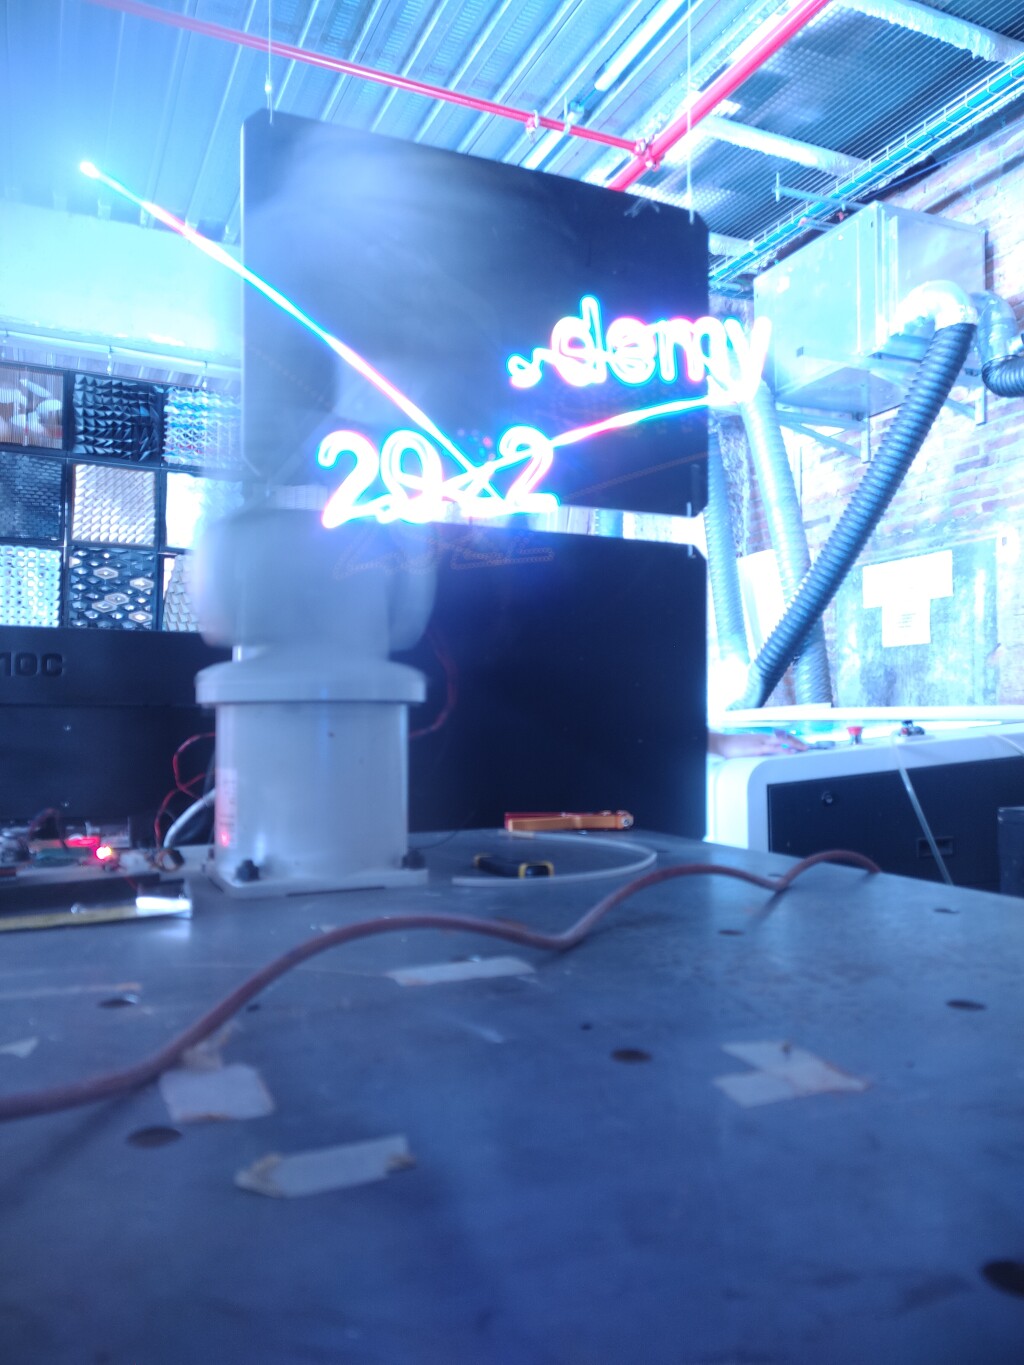
The reason why this didn’t work out are that the text was too long, and our phone cameras did not have a BULB option to capture images for longer than 30 seconds.
This would not be a problem if we had a DSLR and an ND filter that could reduce our light by a few stops: the more stops the ND filter reduces, the longer the text could be, and the darker the background would have been.
Without this filter, we were only able to use a pair of polarised sunglasses. Not ideal, but better than nothing.
The video recording
Unfortunately, while we were so busy with @EduardoChamorro, calibrating the camera settings on our phones to capture the long exposure image, I completely forgot to record the actual robot moving and drawing.
Assets
- Rhino and Grasshopper plugins:
- Custom made scripts and content:
- fabacademy2020.prg
- fabacademy-small.prg - a smaller version created to see if the robot could finish the movements in less than 30 seconds
- Rhino Design files
- FabAcademyABB-6-axis-robot.3dm - Rhino design file
- FabAcademyABB-6-axis-robot.3dm.gh - the Grasshopper script