10. Mechanical & Machine Design
Week Assignment
- Design a machine incorporating mechanisms, actuation, and automation.
- Build the mechanical parts and operate them manually.
- Document both the group project and individual contributions.
The Organization
Over the course of two weeks, with only 3 or 4 days of laboratory access, our task was to develop machines designed to press the button of another machine.
The core project work was done collaboratively by the entire group from FabLab Barcelona. We then split into smaller teams of three, each responsible for designing a tool, getting their motors running, and assembling their machine.
- I created and managed the machine group page, which is updated here. We opted for HTML over MkDocs for easier collaboration among the team.
The Concept

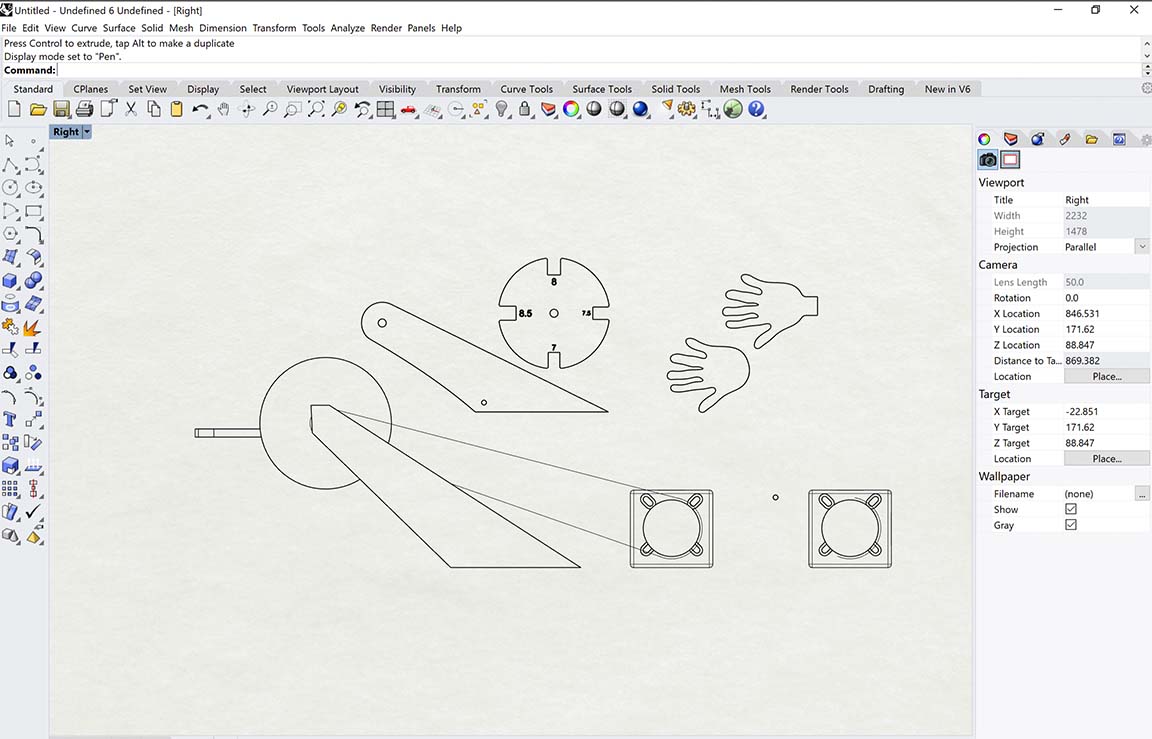
Diego proposed using a pulley and belt mechanism to trigger a hand that would press the opponent’s button.
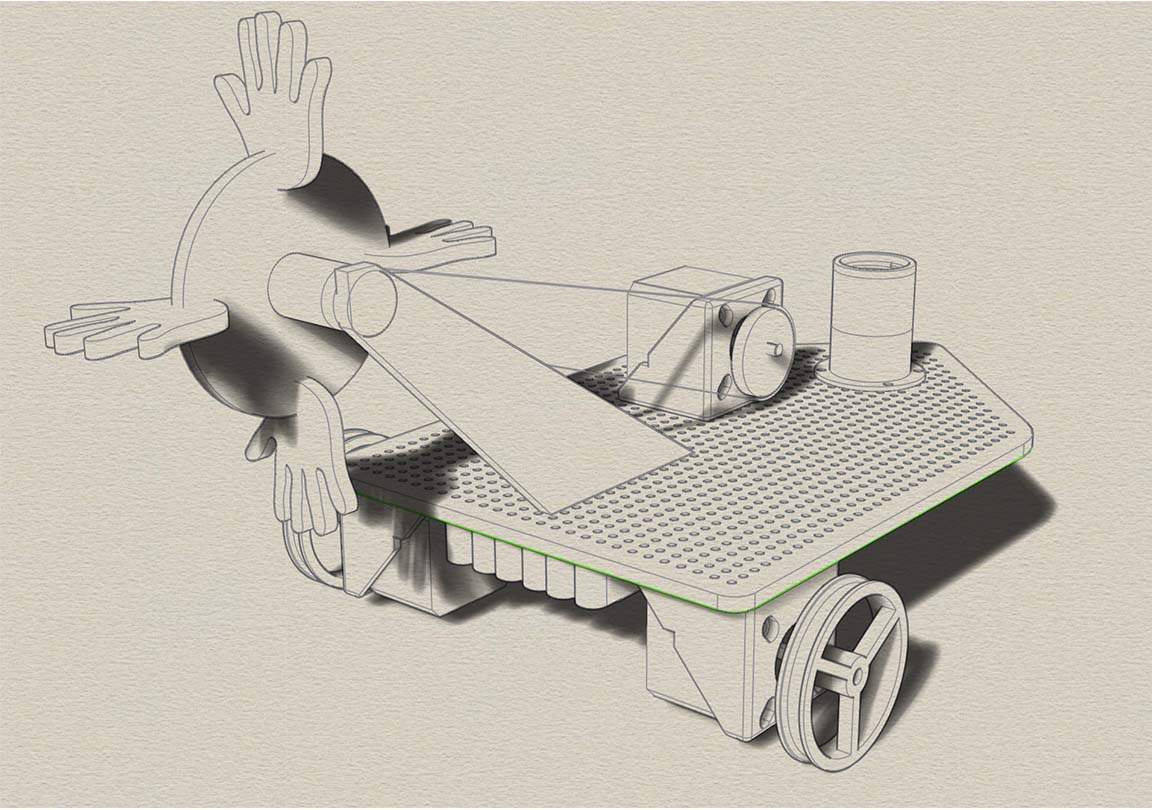
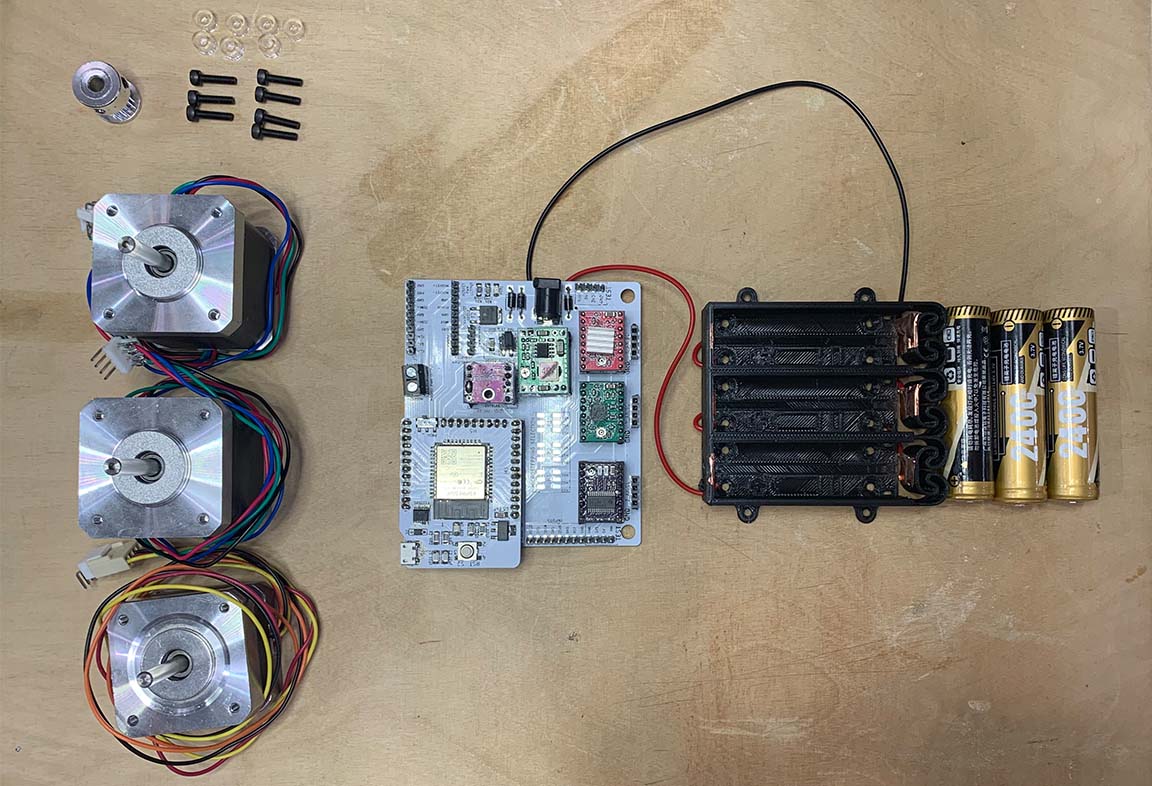
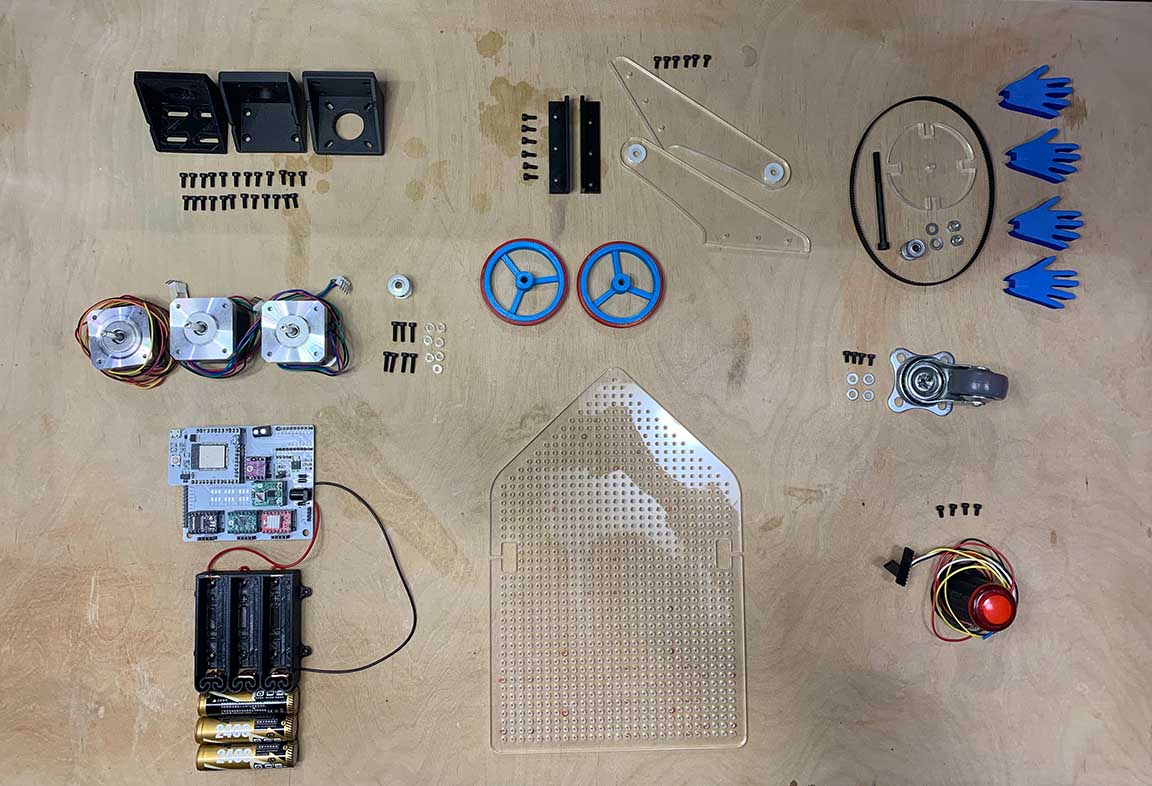
Gerardo focused on designing and 3D printing the wheels and the battery case. I created an initial prototype to test the mechanism and determine our requirements.
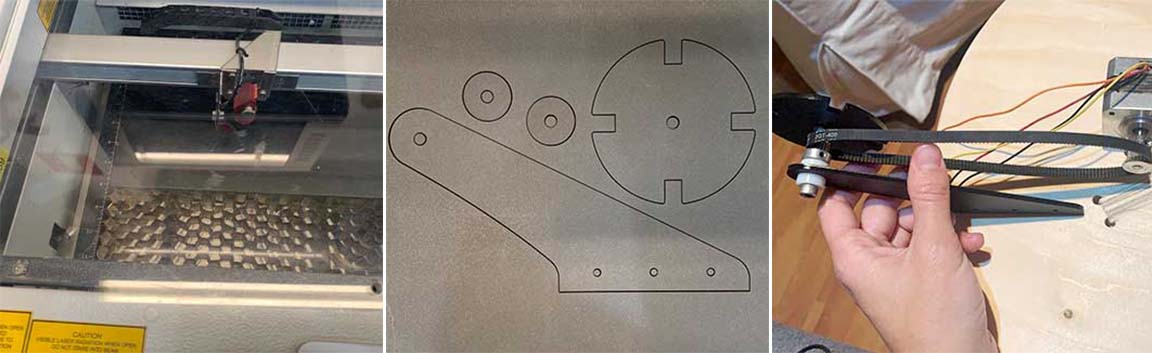
We decided to cut the tool from acrylic and use EVA rubber for the hands. We encountered issues with the wheel’s rotation and realized we needed a closed belt for proper operation. I sourced the belt, and Diego obtained bearings to improve friction.
Since our board was not yet flashed and lacked the operational code, I manually ran the motors while Diego worked on refining the tool.
The Code
I initially struggled with programming the stepper motors and using the Barduino. Thankfully, Carla wrote a comprehensive guide, which I documented here.
The first issue was that the board was poorly soldered, requiring manual pressure on the micro USB connector to flash it.
Upon uploading the code and setting the drivers, I found that the white driver was malfunctioning. Despite the monitor indicating it was sending commands, the motor did not respond.
After confirming that the X and Y motors were operational, I proceeded to code for the Z motor. The goal was for the tool to function both when the machine was moving forward and on demand when stationary.
// == FRONT
    if(action == "front"){
      Serial.println("front_while");
      digitalWrite(MOTOR_DIRECTION_RIGHT_DIR, LOW);
      digitalWrite(MOTOR_DIRECTION_LEFT_DIR, HIGH);
      digitalWrite(MOTOR_DIRECTION_RIGHT_STEP, HIGH);
      digitalWrite(MOTOR_DIRECTION_LEFT_STEP, HIGH);
      digitalWrite(MOTOR_TOOL_DIR, HIGH);
      digitalWrite(MOTOR_TOOL_STEP, HIGH);

      currenttime = millis();
      while(millis()-currenttime < 0.1){

      }
      digitalWrite(MOTOR_DIRECTION_RIGHT_STEP, LOW);
      digitalWrite(MOTOR_DIRECTION_LEFT_STEP, LOW);
      digitalWrite(MOTOR_TOOL_STEP, LOW);
      currenttime = millis();
      while(millis()-currenttime < 0.1){

      }
    }

    // == ACTION
    if(action == "action"){
      Serial.println("action");
      digitalWrite(MOTOR_TOOL_DIR, HIGH);
      digitalWrite(MOTOR_TOOL_STEP, HIGH);
      currenttime = millis();
      while(millis()-currenttime < 0.1){

      }
      digitalWrite(MOTOR_TOOL_STEP, LOW);
      currenttime = millis();
      while(millis()-currenttime < 0.1){

      }
    }
index.h file: actionStop was written instead of ActionStop. This error affected the tool’s stopping functionality with the FRONT command but was not related to the ACTION command issue.
The problem with the ACTION command was resolved in the lab with Edu’s assistance. Edu identified that a critical line of code was missing, which was necessary for the ACTION command to work properly.
 server.on("/action", []() {
    Serial.println("action");
    server.send(200, "text/plain", "action");
  });
 server.on("/action", []() {
    Serial.println("action");
  action = "action";
    server.send(200, "text/plain", "action");
  });
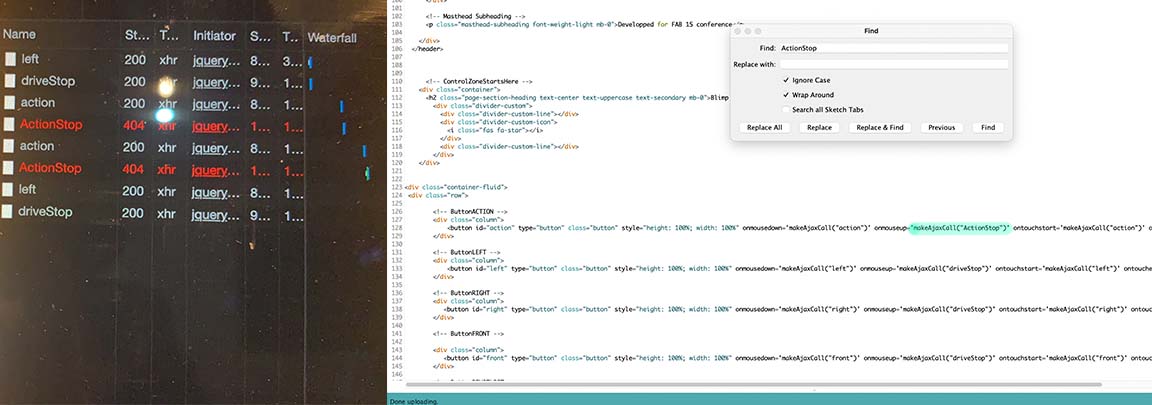
The third problem occurred during engine testing when my phone was plugged into the computer, providing internet access and allowing the page to download the required libraries. For some reason, I decided to unplug my phone, which left me connected only to the board’s Wi-Fi. As a result, the page stopped working, and I began receiving the following error messages:
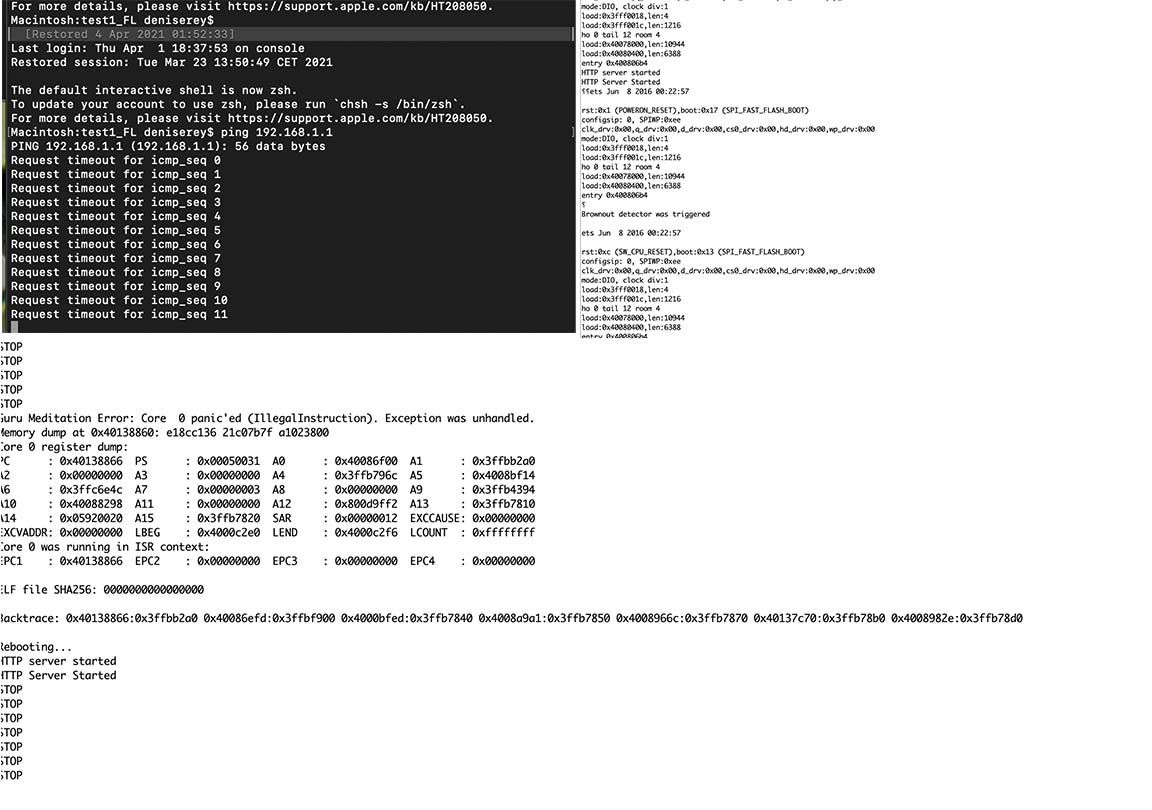
One issue was related to the Barduino’s poor soldering, causing intermittent contact problems. At the lab, Edu provided substantial help with both fixing the board and troubleshooting the code. Consequently, the Barduino was able to connect to the internet, and library requests were no longer problematic.
The fourth problem was insufficient motor power to drive the machine. During the assembly test, while the motors functioned perfectly without any load, they failed to move the machine when it was fully assembled and bearing its weight.
A stepper drive is a driver circuit that manages the operation of a stepper motor. It controls the motor by sending current through different phases in pulses. Because stepper drives are highly sensitive and prone to damage, I had initially set them to a very low current with high speed to avoid burning them.
To address this, we adjusted both the voltage on the drivers and the speed in the code.
We changed the speed from
while(millis()-currenttime < 0.1){
while(millis()-currenttime < 0.3){
The machine
Find all thefiles here:
Code
3D parts
Some Improvement Ideas
The Arduino initializes a web server that handles various web addresses. When you enter addresses like FRONT or LEFT, it continuously activates the motor. Conversely, addresses such as DRIVESTOP simply stop the motor.
When you click a button (mouse down), it calls the URL assigned to that button. Releasing the button (mouse up) triggers a stop command. This means if the connection is lost, the robot will continue executing the last command it received.
Due to the current code structure, the robot cannot perform multiple actions simultaneously. For instance, pressing the FRONT button activates the weapon, but prevents movement and attacking at the same time.
To enhance functionality, the code and user interface (UI) could be improved. The UI is very basic, lacking affordances and clear indications of button functionality. For example, buttons should reflect different states. It should be clear when a button is pressed and when an action is ongoing, like moving forward. The button should remain in the focused state until another button is clicked.