3. Computer Aided Design
Week Assignment
- Model my possible Final Project in different 2D and 3D CAD software.
Project Steps for Animation and 3D Modeling
This week I worked on refining my final project idea and started exploring some tools. There are a few things I needed to take into consideration:
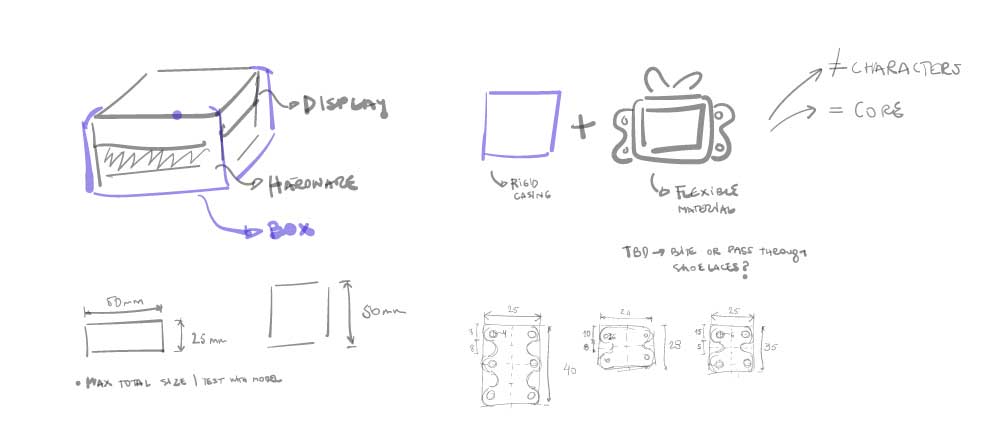
- My device is going to contain electronics and probably a display. So, I must define some approximate sizes for these components to fit in.
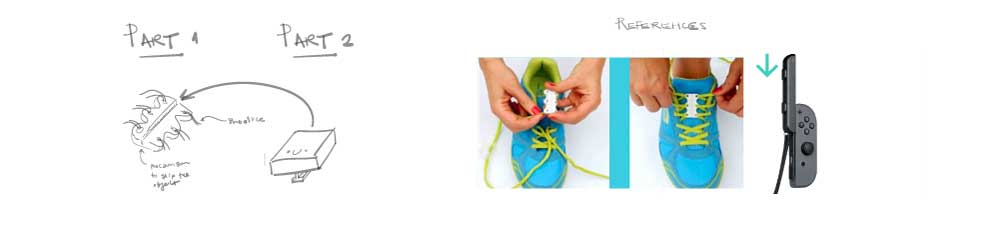
- This is a wearable device for kids, so it must fit on the top of a small shoe.
- I might have to define some mechanism for this to attach to the shoelaces.
- I need to divide my time modeling a 3D character for animation and a 3D printable case.
- The character is going to be part of a game, so I need to start defining basic assets to create the game environment.
For the 3D printed case, I tried modeling it in Rhino, which is a program I already know how to use. I used this as a “control” to understand the benefits and difficulties I experienced using Fusion 360 and Grasshopper.
To create the assets and characters for the game, I wanted to use Blender. As it’s a super complex program to learn, I focused on getting the most out of it instead of trying different software.
Some references I used for the device and the character:
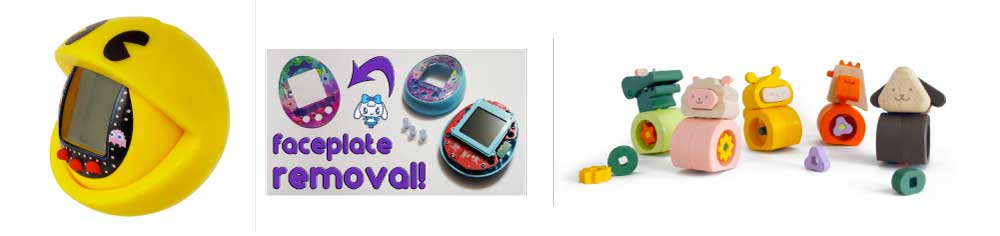
Tomata
Tamagotchi
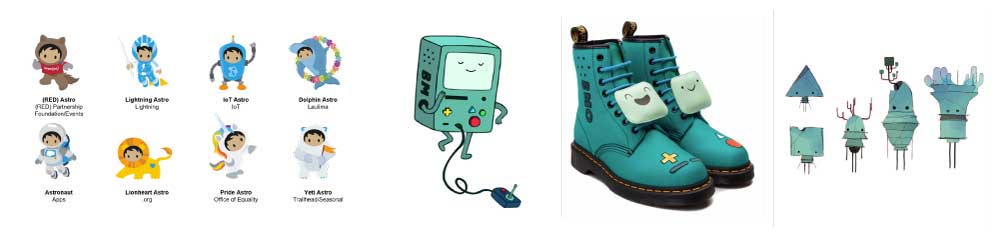
BIMO from Adventure Time. Recently, Dr. Martens released a BIMO shoe model.
Codey, Salesforce’s mascot.
Rhino as Control Version
I created these quick 3D models just to see how much this could take me in Rhino. I knew that Rhino was not the best option for the character, so I used these models just to understand the complexity of other software and to be able to compare them.
Quick 3D Sketch of the Wearable Device:
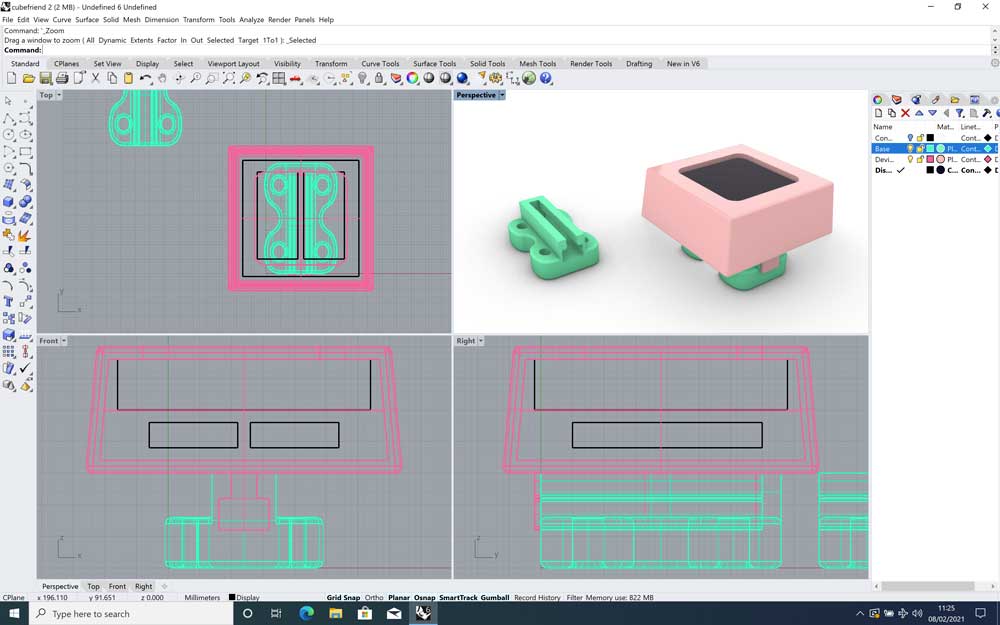
Quick 3D Sketch of the Character:
HOW TO ADD .STL FILES IN MARKDOWN
Follow this documentation to preview STL files in Markdown
It’s super easy! I just created a new repo on GitHub. Then I uploaded my .stl files and added this code line to the Markdown.
The last /cubefriend%20character.stl you can get by opening the file that you uploaded to GitHub and copying the last part of the URL.
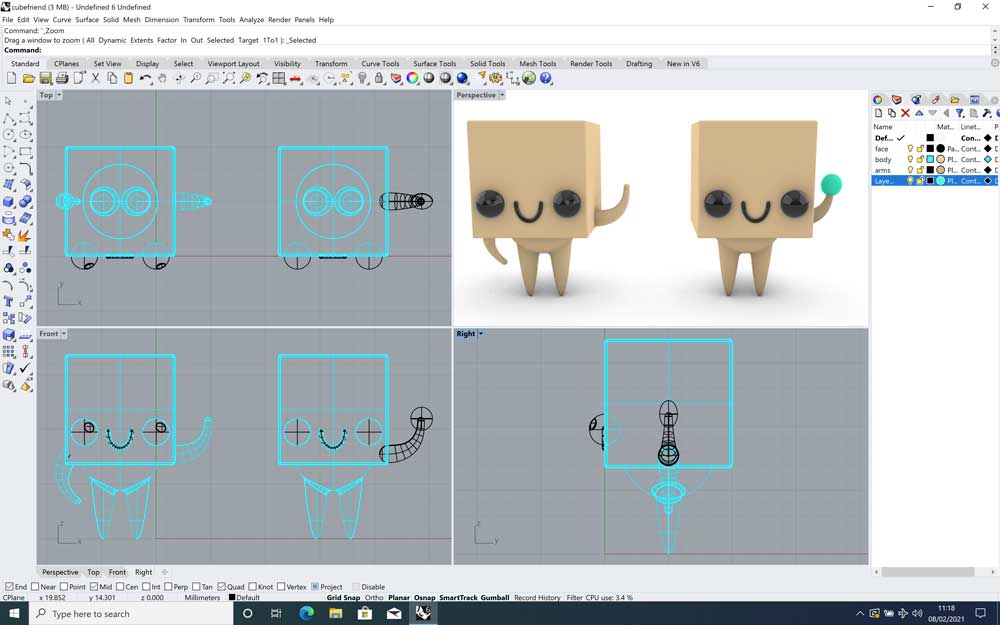
My Experience Using Blender
As I was interested in creating an animated character, I started with Blender. Also, I knew that this would be the most challenging part for me.
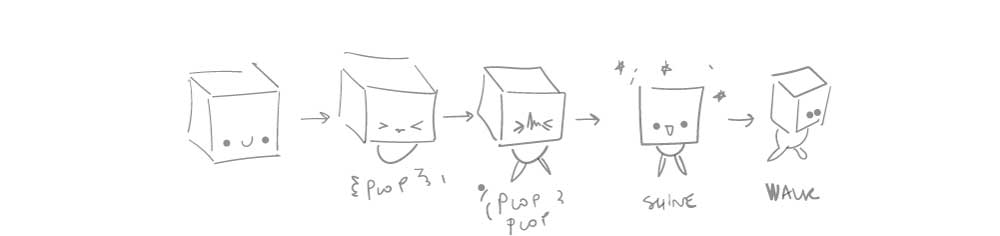
This was my first draft idea for the animation. But I knew that Blender’s learning curve is complex.
I used these tutorials to understand how to create the things I wanted to do. I knew that one software I wanted to try was Blender as one major part of my project is to create an animated character. However, I’ve never used Blender before nor designed a 3D animation, so I started browsing for basic tutorials.
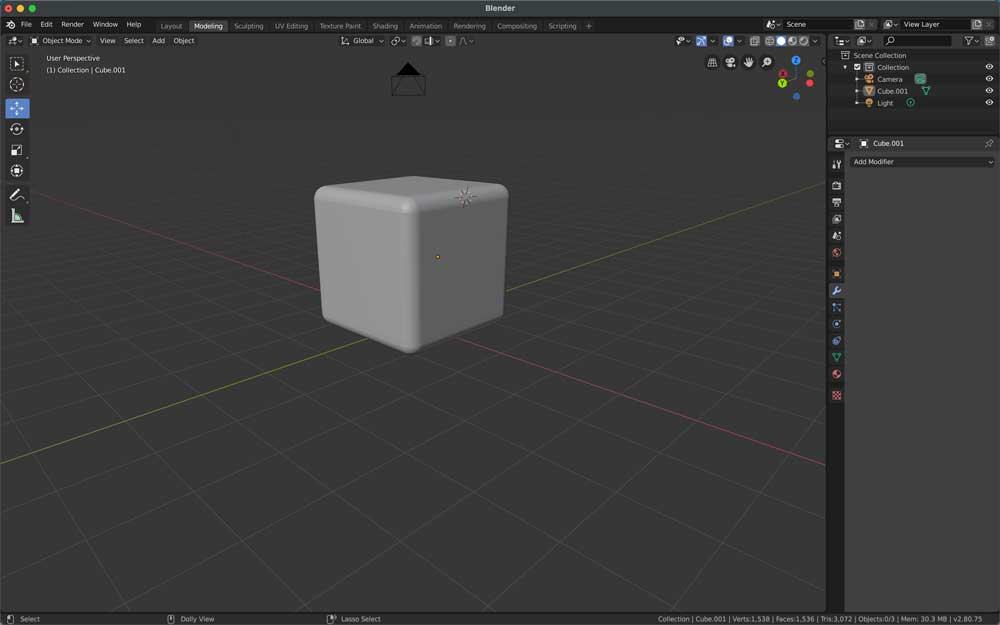
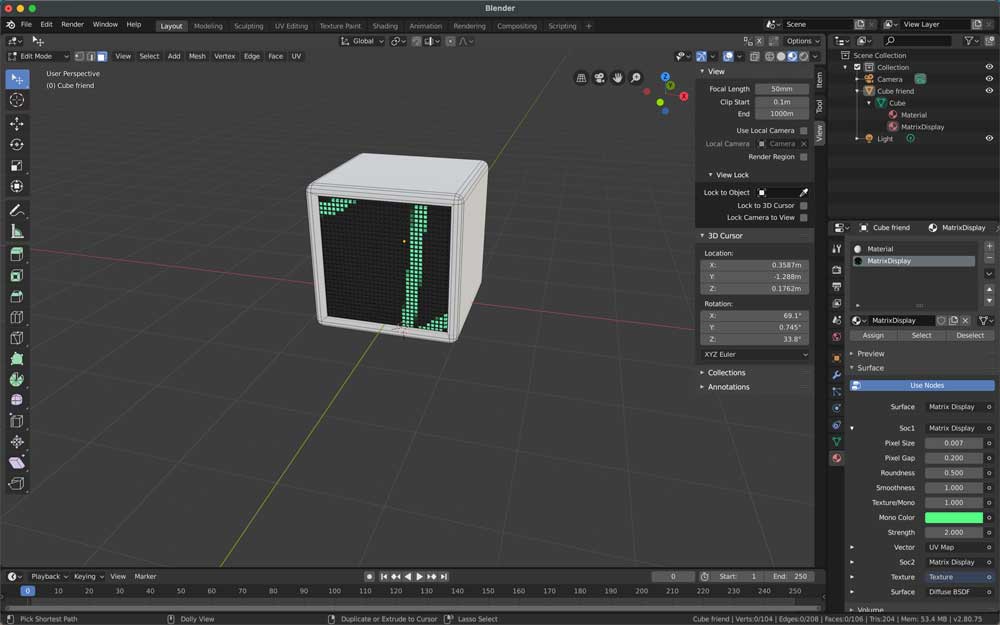
I needed my character to have rounded edges, but I couldn’t find how to do it. So, I watched this tutorial and got my cube.
Rounded Edges Tutorial
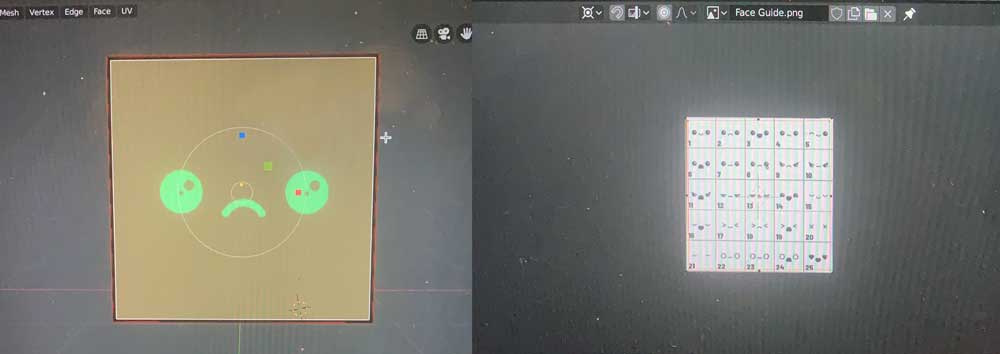
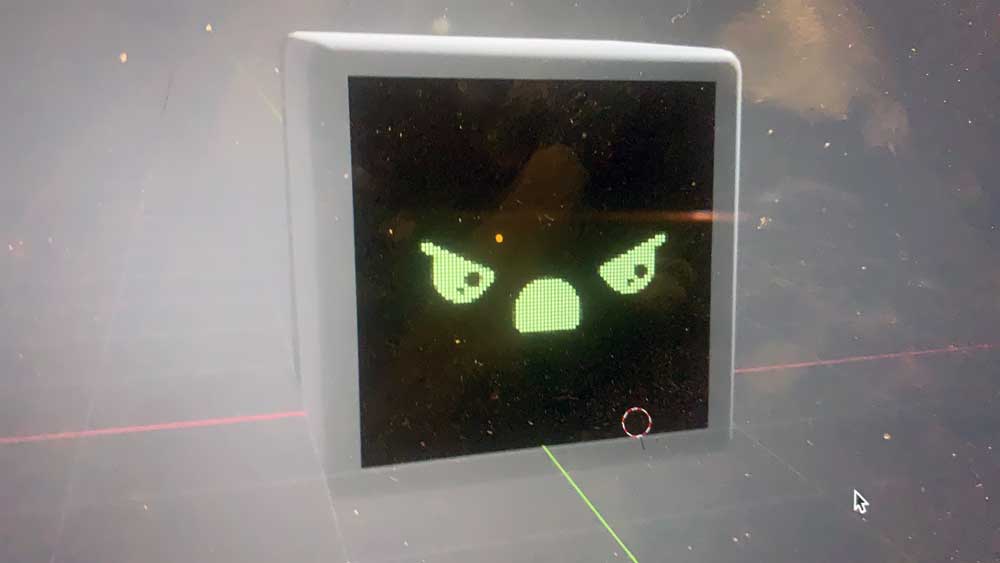
I was not sure about using 3D or 2D facial expressions. I decided to start with 2D as I felt it would match better with the type of character I wanted to create.
2D Facial Expressions Tutorial
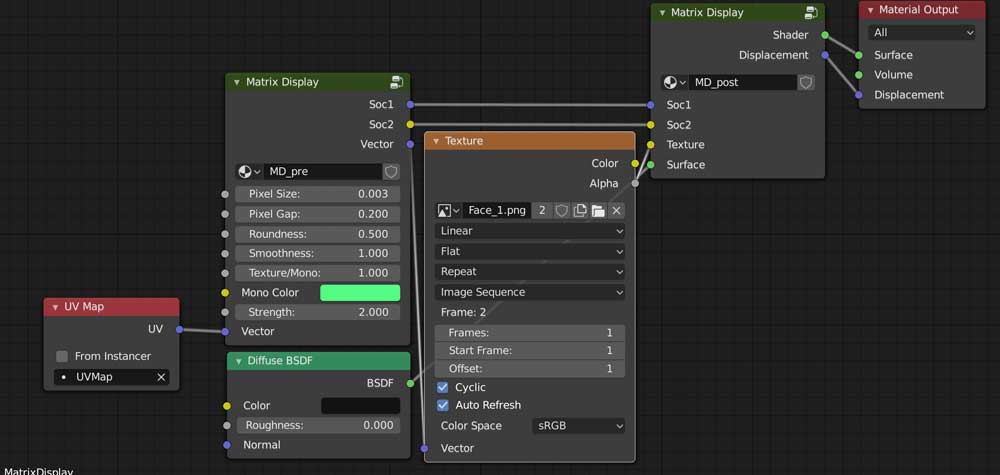
I spent at least 2 hours trying to solve this issue. When I was about to give up, I read the comments on this tutorial and found this fix:
ToxicFX_ Nuhaad 10 months ago (edited)
“Till 26:07 everything worked fine but then I imported the faces, they don’t show up, just the matrix display is there :( P.S I tried everything. I did a render, turned on cyclic and auto-refresh, and when I change the color node to alpha it only shows a white face :( EDIT: I FOUND A FIX!!! Whoever has the same problem as me, just connect ‘alpha’ to ‘texture’ instead of ‘color’ to ‘texture’ then click Shift+A and put in a Color Ramp node in between. Now the faces will appear and you can change them to any color you wish :) Thank me later.”
So, I went back to the Shader editor and connected Alpha to Texture and it worked.
8 hours later, my relationship with Blender:
I wanted my character to be able to walk. So, I looked for a new tutorial on how to create a character.
Character Animation Tutorial
The first difference I found with Rhino was that instead of using boolean operations to develop a more complex solid, I used a geometrical figure as a base and then modified it, like a sculpture.
10 hours later, I was able to build this simple character. Now, I needed to add the animation.
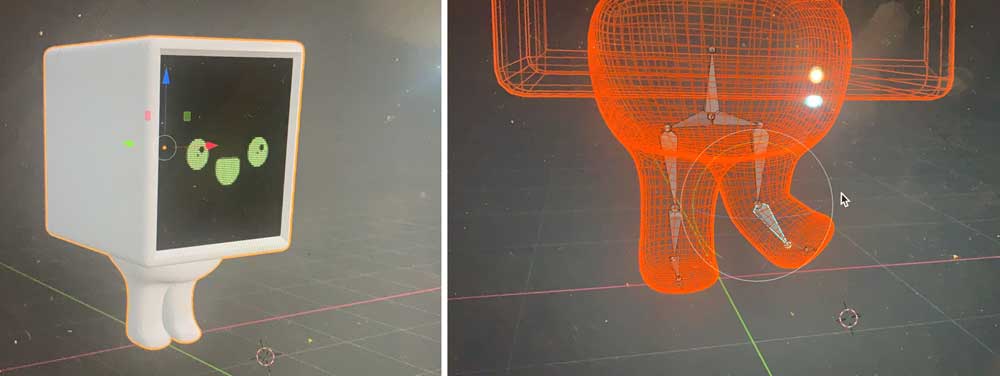
I used a basic human armature and deleted all the bones that I was not going to use.
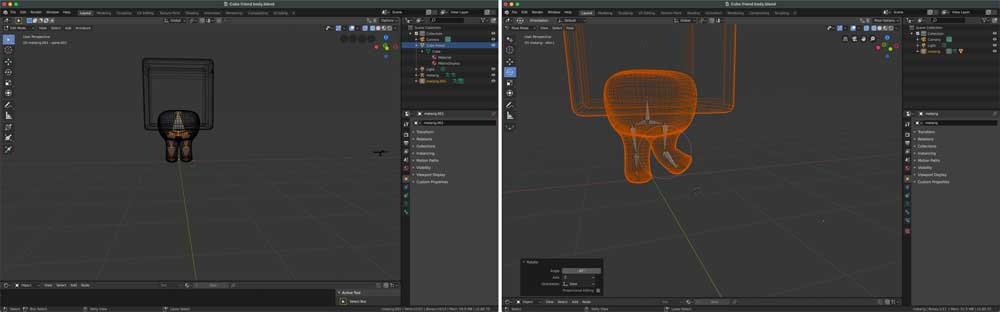
After getting all the shading done, I was ready to start my animation. I was going to follow the tutorial to create a running and a jump animation. So, I started by limiting my timeline to 30 seconds.
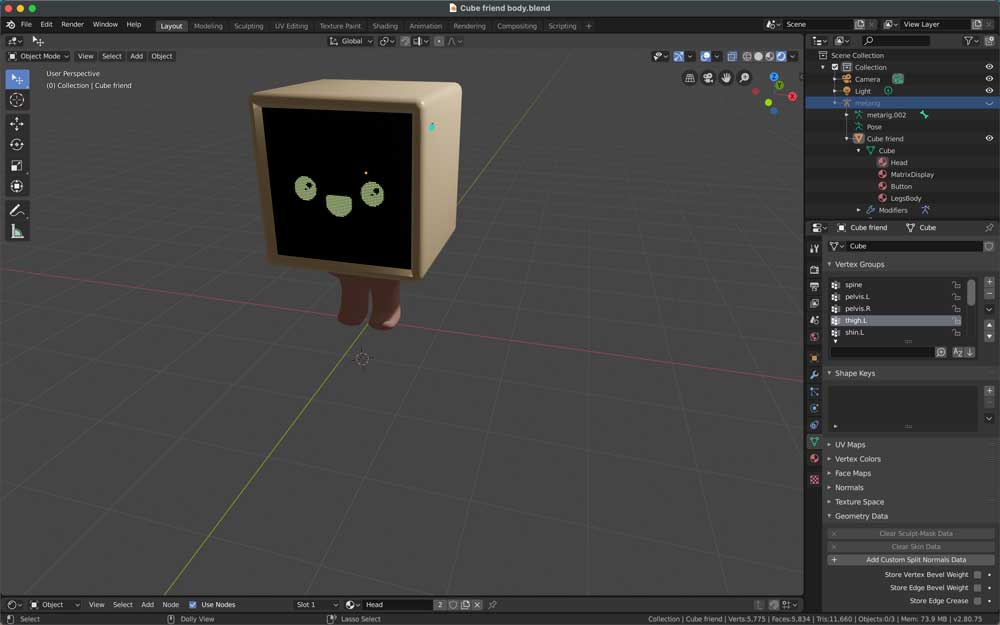
After 1 hour of editing my animation, trying to understand how to position the camera, how to render it, and how to save it, I ended up recording a video. I made many mistakes when creating the character, and it ended up having this color overlay. I think it’s because I did not create the volumes correctly. Anyway, after a long day, almost 15 hours, I think I’ll be able to create some basic assets to develop a simple game in Unity 3D.
Some Thoughts About Blender
- This tool is not very intuitive; it works completely differently from all the other tools I know.
- The learning curve might be long, so I’ll probably have to plan how to approach it.
- After getting a basic idea of how it works, it seems to be a super powerful tool, and I’m motivated to learn more.
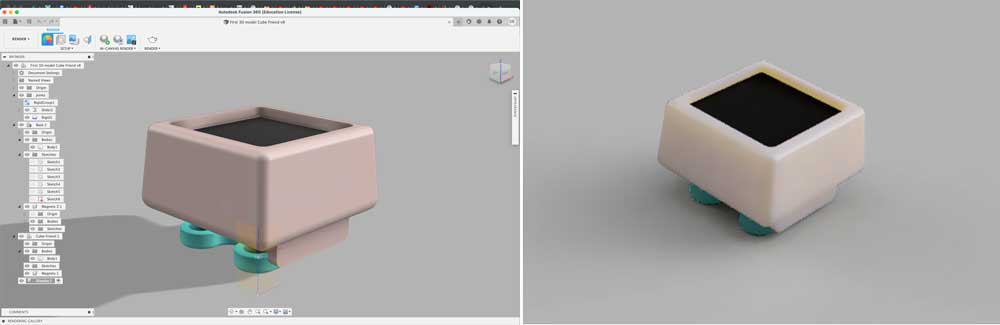
Fusion 360
As soon as I started working on Fusion 360, I felt instant relief. Beyond the painful experience, I liked Blender but interacting with an interface that you understand it’s a blessing.
After around 2 hours, I was able to get a pretty decent 3D model compared to what I did in Blender in 15 hours.
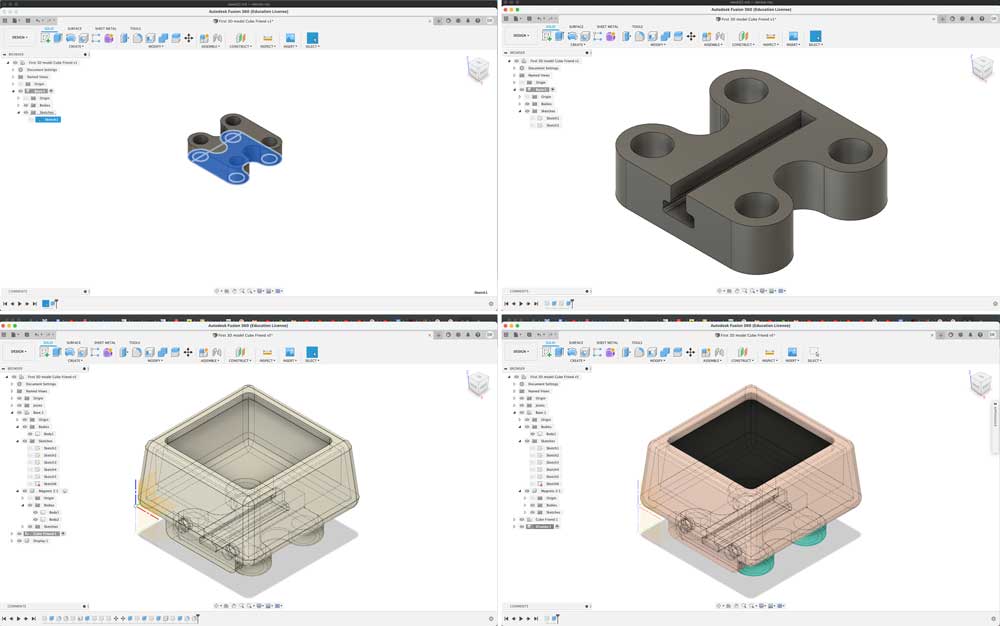
I then added some boxes to simulate the electronic components and some magnets. I was interested in trying how a magnetic lock could look like.
After I finished with this first design, I wanted to do some simulations. I started with some basic renders to understand how to use the tool.
Then, I used this tutorial to understand how to create a joint simulation.
This was the result.
This is my .stl file from my 3D model in Fusion 360
Some thoughts about Fusion 360
- I missed the command line. I kept typing stuff and expecting something to happen.
- I liked construction lines.
- I found it much easier than Blender but I felt it was a little bit slower than Rhino. My perception of Blender was more related to the fact that I was not understanding the logic behind each flow and I was not able to solve the problems that popped up because my logic is completely different from the logic of the program. In Fusion 360, the way to develop a figure is similar to Rhino and to the way I learned to think 3D objects but the interface is slowing me down as I have to click too many things to get something done.
- I like creating sketches; I found this useful. For me, working on Rhino has always been super messy. I like it because I can sketch super fast, I don’t need to know all the measures, and if something does not exactly match it’s fine. As long as you don’t try to 3D print it. So, I feel that Fusion 360 is more organized than Rhino and more flexible than Solid Works.
- I liked the house to get back to the initial perspective.
- Working with components and sketches was very straightforward and it was super easy to edit my models.
Find all the 3D files here:
Raster and vector software
In general, I use Illustrator, Figma, and Photoshop for my work. But I also have experience using Sketch, Framer X, and some quick interface prototyping software like Invision and Principle. In the past, I experimented using Gimp and Inkscape to be able to share things with people who did not have licenses for Illustrator or Photoshop.
So, for most of the things I did so far for this documentation, I used Illustrator and Photoshop. I don’t think that these are the most amazing software on earth but they do solve a lot of issues and I’m so used to the interface that I found most of the other interfaces annoying.
About Illustrator
Illustrator and Figma work off vectors, these are points used to create lines. Vectors are scalable images that can be sized as small or as large as you need them to be, but look the same when it comes to clarity and resolution.
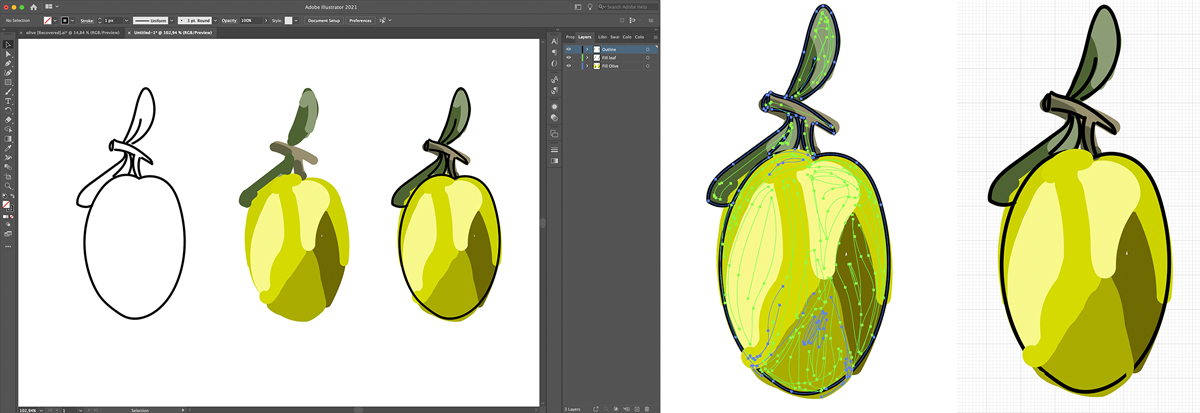
I’m not an illustrator myself so there are a lot of things I don’t know how to use, but I love brushes and I love the fact that you can easily create patterns and textures. For this example, I decided to draw a simple olive just using the mouse pad. So, brushes that are pressure sensitive don’t make much sense here.
I always use layers to organize my work. So, I created a layer for the outlines and then I created one for the fill of the olive and one more for the leaves. In this case, I used a 3pt uniform round brush and I just changed the stroke. A thinner brush (1px) for the outlines and a thick one (5px) for filling the inside. This means that the appearance will be the same but the diameter of the stroke will be different. If we take a closer look, we can see that these are still vectors. And I can interact with the nodes to change the direction of these vectors impacting the shape. Something that we cannot do in Photoshop.
If we go to View and select grid we’ll see the grid that we can use as the structure of the canvas. In preferences, we can set the size of this grid. In this case, each square represents 1 pixel and each subdivision contains 10px.
About Photoshop
The main difference is that Photoshop is based on pixels while Illustrator works using vectors. This means that Photoshop is raster-based and uses pixels to create images.
I use Photoshop for editing photos and creating some raster-based art. While I use Illustrator to design icons and graphics. Figma is awesome for UI design. So, there are a lot of tools thought specifically to create mockups and wireframes for different devices.
So, in this case, I took the same olive I drew in Illustrator and again created my layers to organize the workspace. Then I used the magic wand to quickly select and erase all the white parts left.
I decided to use only the fill of my olive layers and decided to add a more realistic background.
Clicking Ctrl+T and then right-clicking over an image we can access a more advanced panel where it’s possible to select options like free transform and distort. These give us the flexibility to move the different nodes on the border of the image. Then it’s easy to erase the borders and make the texture match any shape. I also selected the option multiply which helps the texture blend with the background.
So, after applying the texture to the olives I added a filter called Gaussian blur. This blurs a little bit the image, you can control how much, and makes it a little bit more realistic.
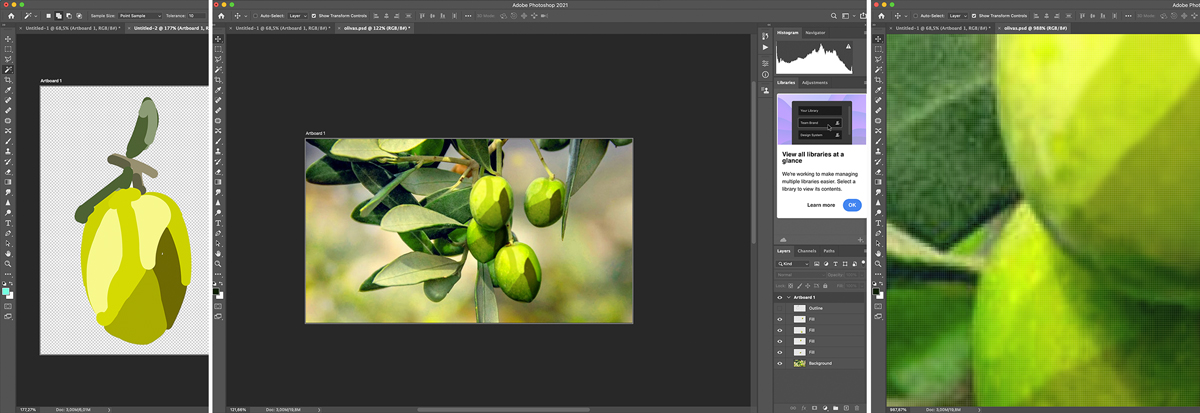
If we zoom in, we can see that the image that was created with vectors is now composed of pixels.
About Figma
I use Figma for my daily work because it consolidates many features from various software tools into one platform. Previously, I relied on multiple tools for similar tasks:
- Sketch for vector-based UI design.
- Invision and Principle for UI prototyping.
- Zeplin for generating CSS and sharing design specifications with developers.
These tools often worked as plugins for Sketch, which I liked, but had limitations in collaboration and license management. For effective team collaboration, Sketch required Abstract, which added complexity and cost.
Figma addresses these issues by providing robust collaboration features and simplifying file sharing, making it a powerful all-in-one tool for design and teamwork.
Illustrator vs. Figma
- Illustrator and Figma are both vector-based, meaning they use points to create scalable images without loss of quality.
- I appreciate Illustrator’s brushes and pattern creation, although I rely on layers for organization. Here’s an example of an olive illustration created in Illustrator:
Photoshop vs. Figma
- Photoshop is raster-based, using pixels to create images, which is ideal for photo editing and raster art.
- In Photoshop, I used the magic wand tool to clean up an olive illustration, applied a background texture, and added a Gaussian blur for realism:
Figma vs. Other Tools
- Figma combines features from Sketch, Invision, Principle, and Zeplin, and is designed to work well with developer workflows.
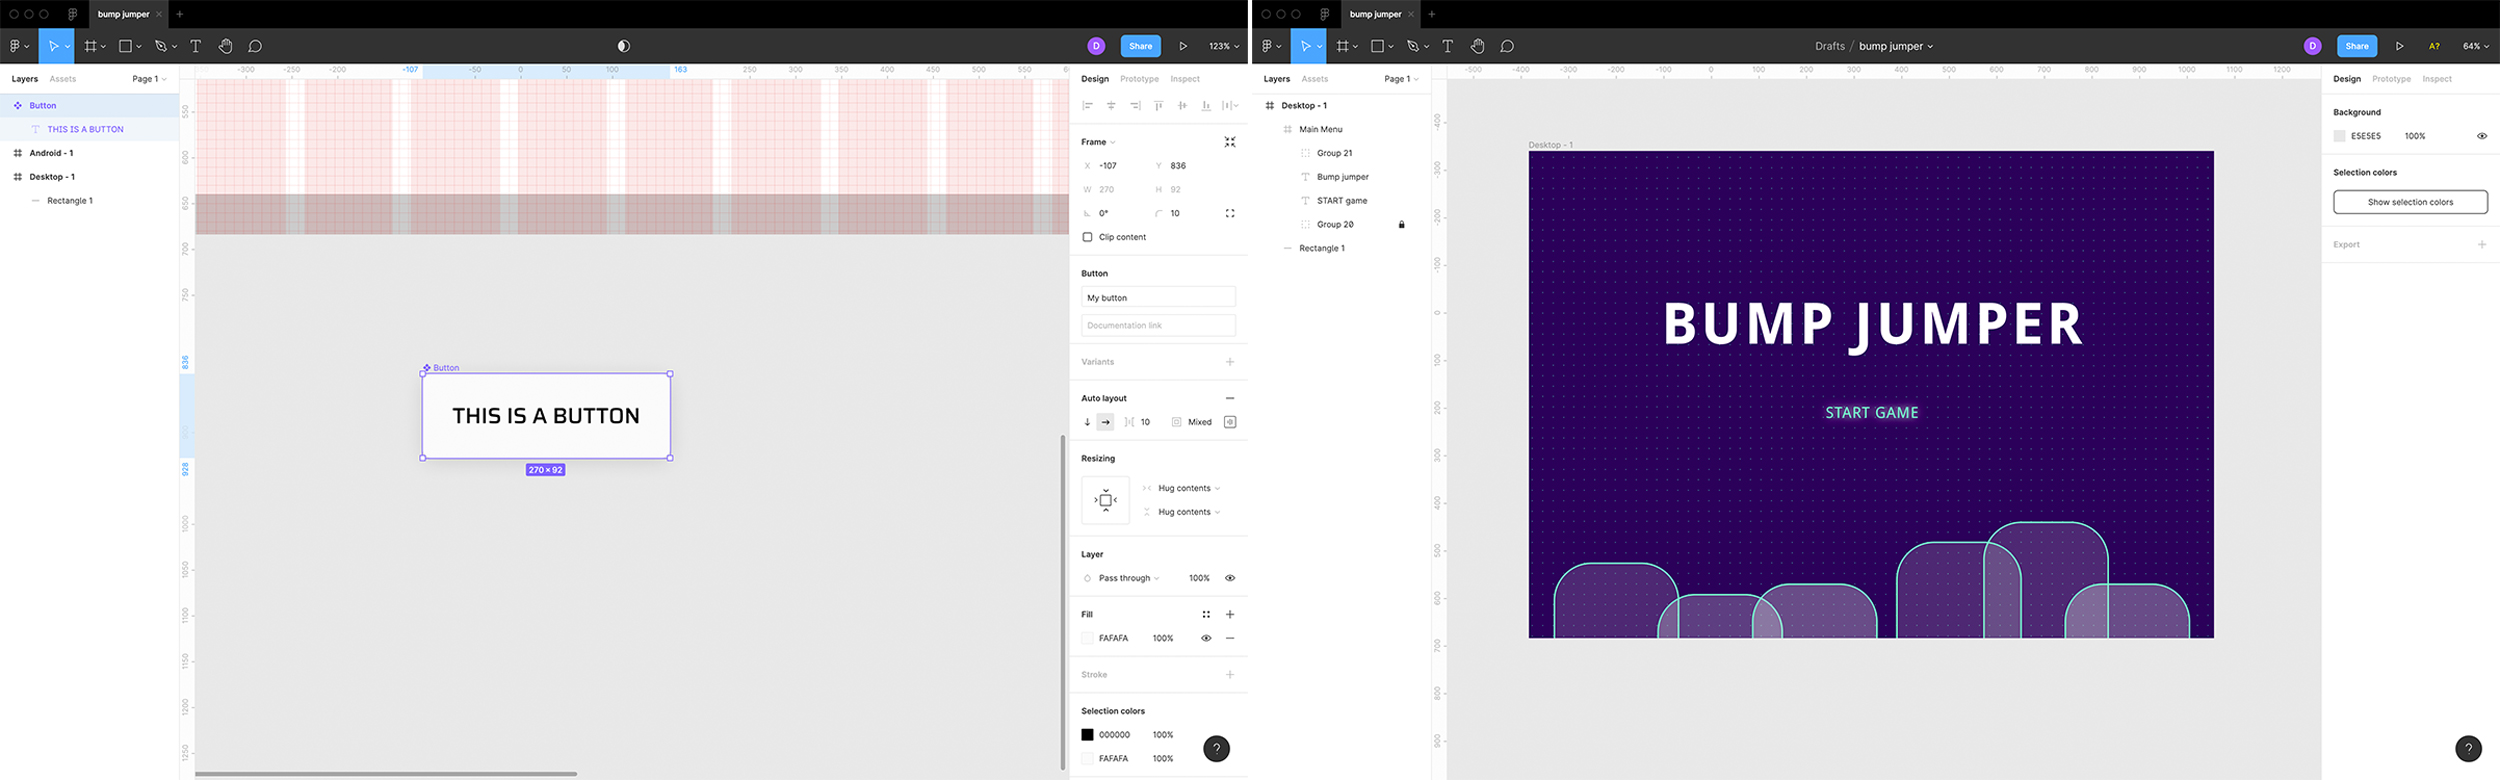
- Figma’s flexibility allows for multiple pages and frame sizes, facilitating both desktop and mobile design. Here’s how you can set up a screen layout in Figma:
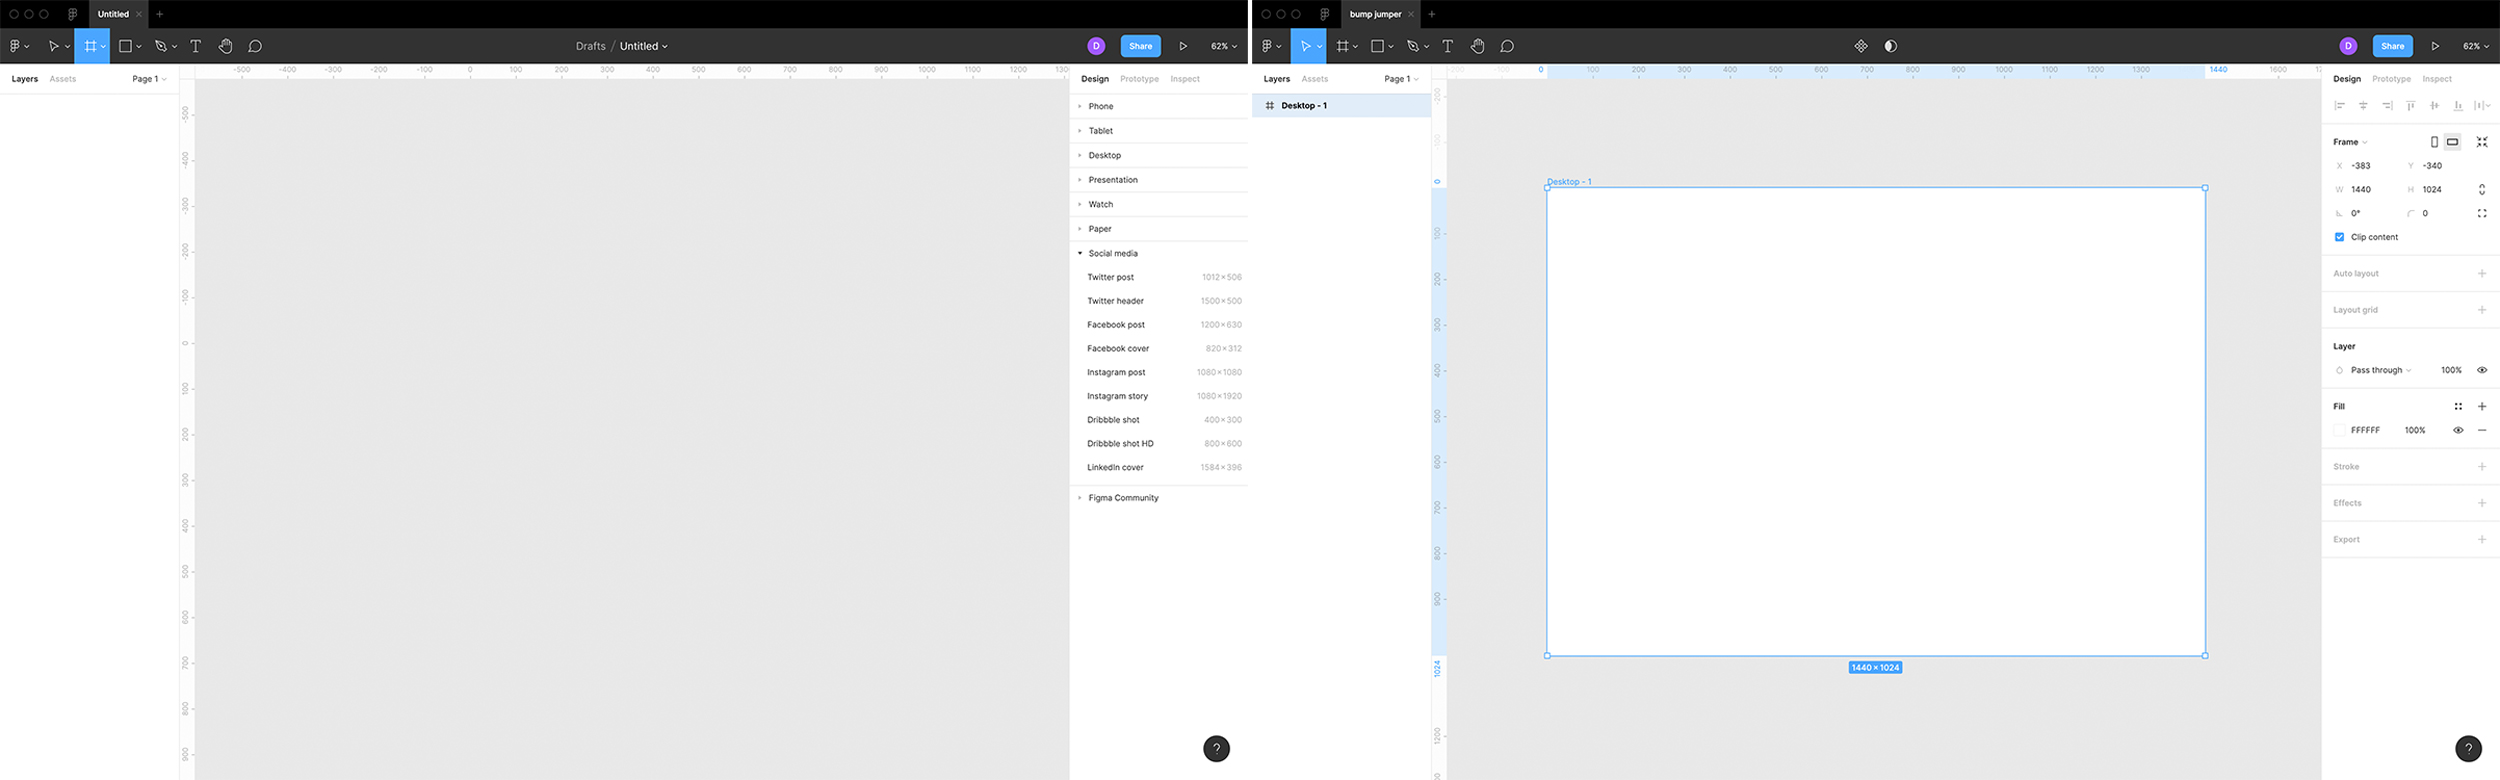
- You can choose grid systems and create designs that adapt to different screen sizes, making it easier to organize components:
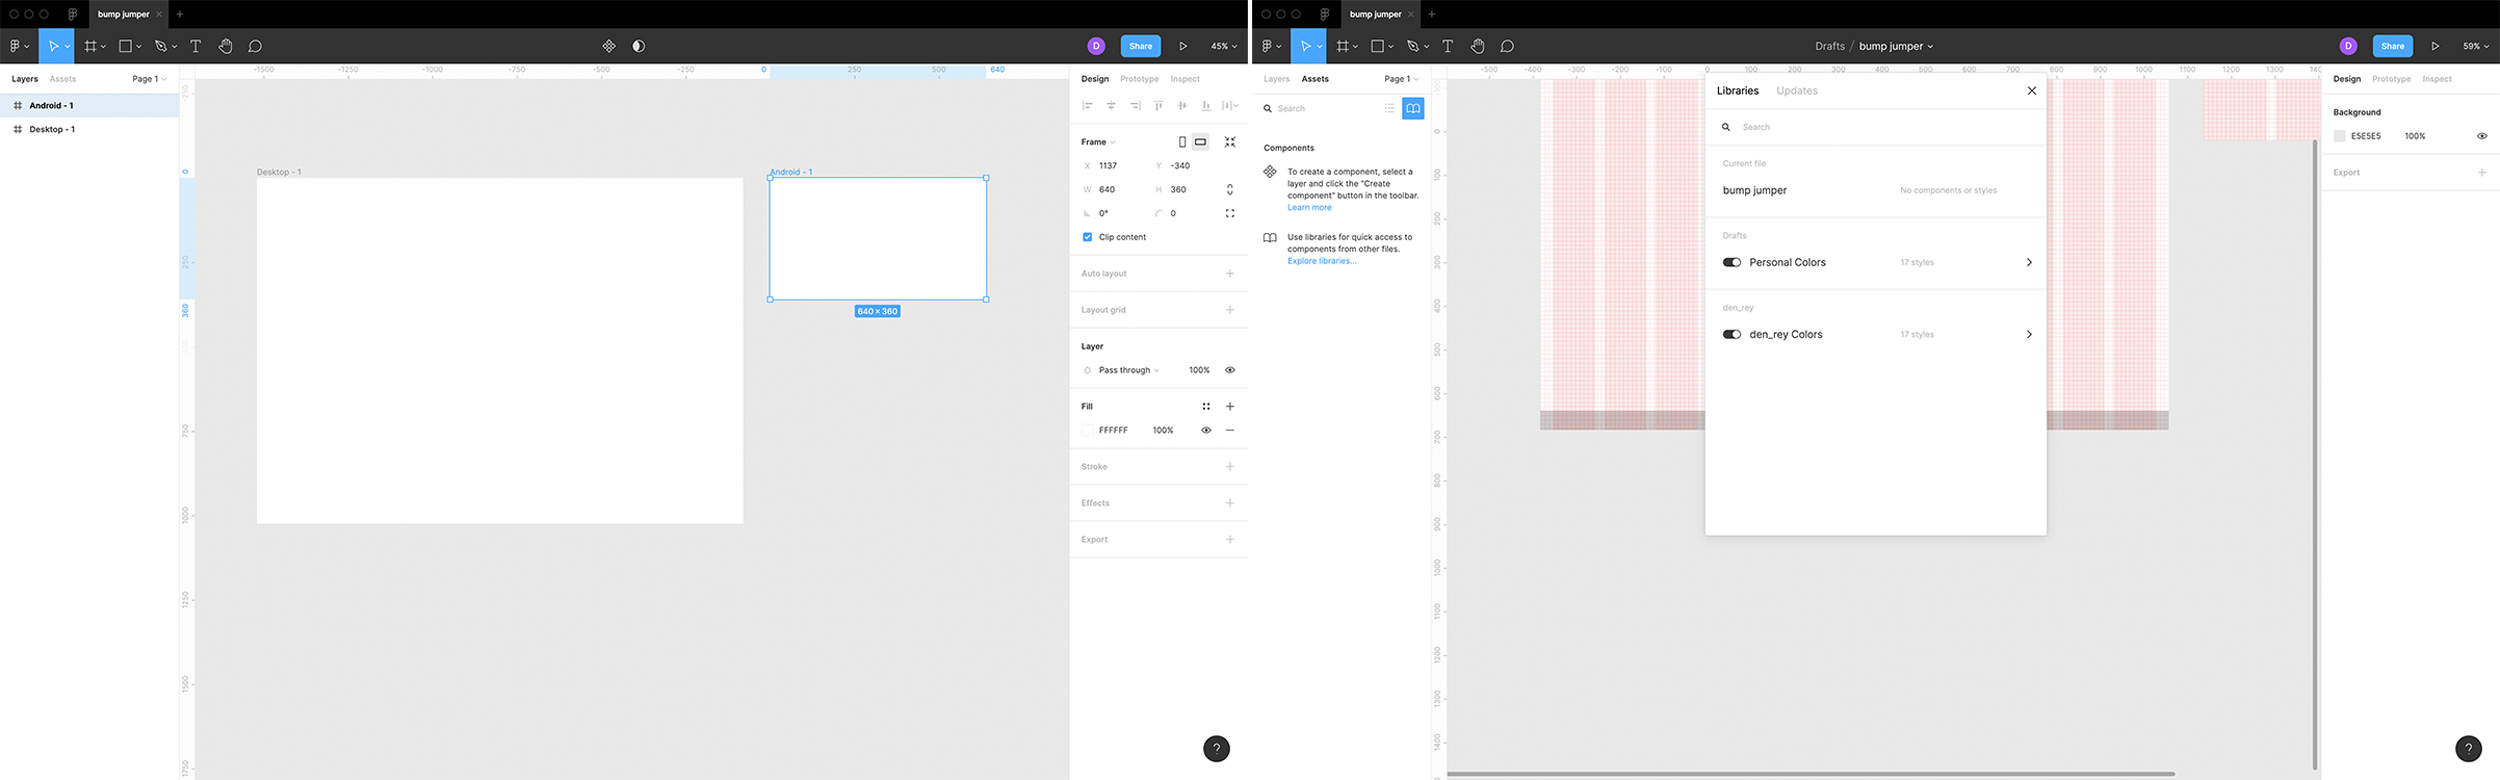
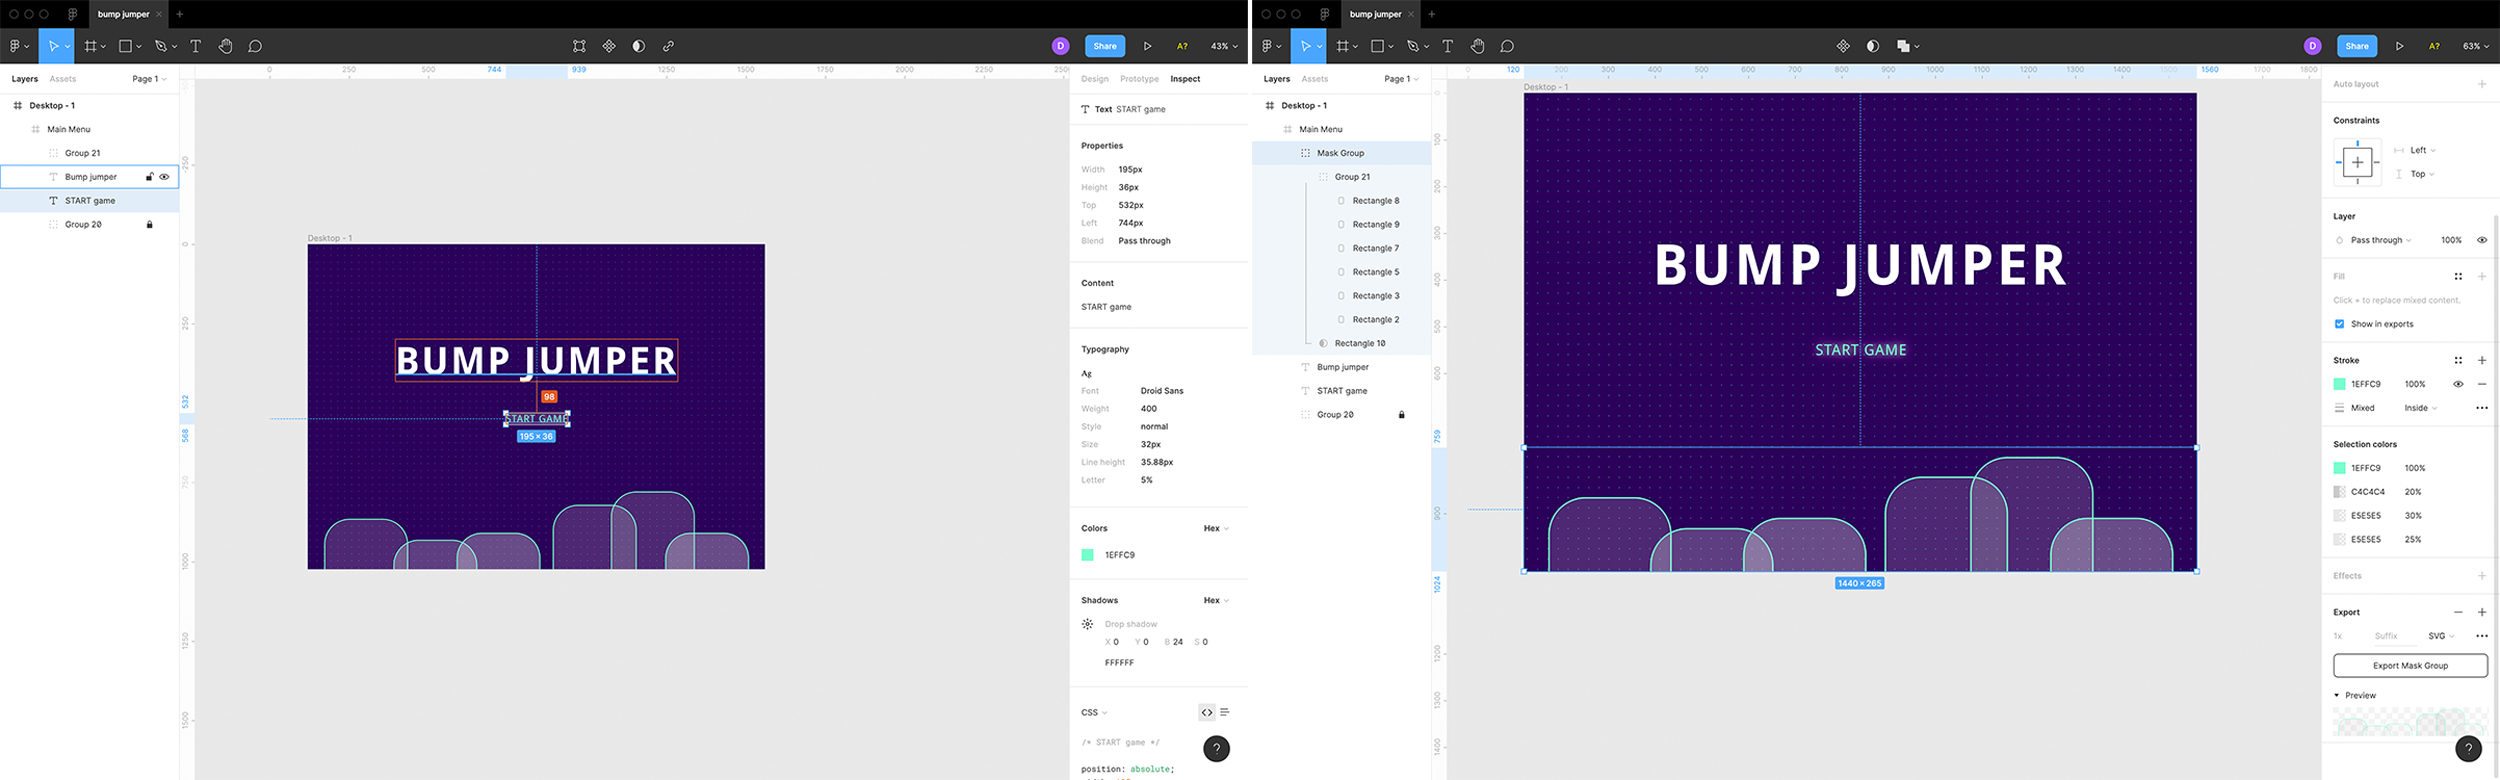
- Figma supports libraries and asset management, and its component system is designed to align with developer needs. Here’s an example of a basic MVP design:
- You can inspect designs and export assets directly from Figma. For instance, exporting an SVG file is straightforward:
Inkscape vs. Illustrator
- Inkscape’s interface, though similar to Illustrator’s, has different arrangements and icons, which can be confusing. I find Illustrator more intuitive for my needs.
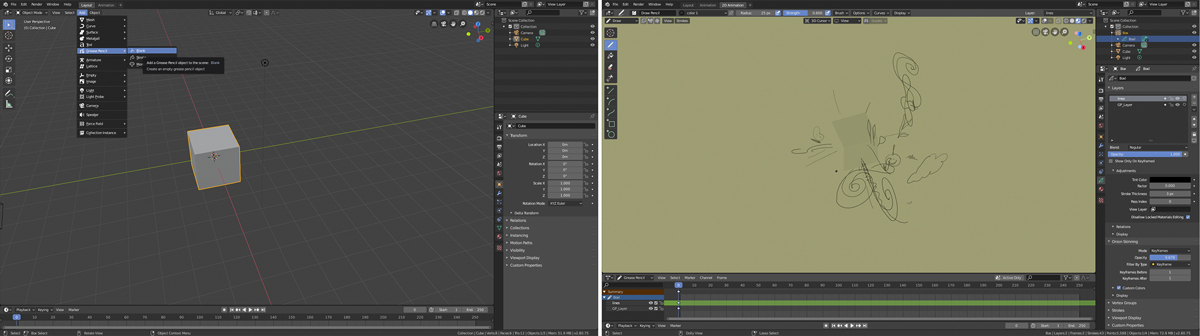
Blender’s Grease Pencil
- I explored Blender’s Grease Pencil for 2D animation. Here’s a tutorial that helped me get started:
- After setting up preferences for my Wacom tablet, I added a Grease Pencil object in Blender, experimented with 2D and 3D drawing, and found it to be a promising tool despite its learning curve: