Flashing a SAMD11 with a Raspberry pi and OpenOCD
Let’s say that you want to program a SAMD target, but you don’t have any SWD programmers at hand. In this tutorial, we’ll bootstrap a SWD programmer by flashing its firmware with a raspberry pi first.
Raspberry pi setup
flashing the OS
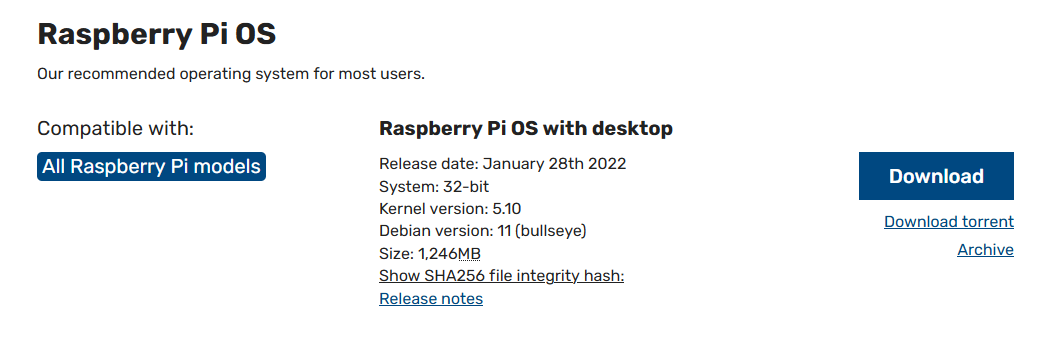
You can download the latest OS for you pi here. I use an older Raspberry pi 2B so I have to settle for the 32 bit version.
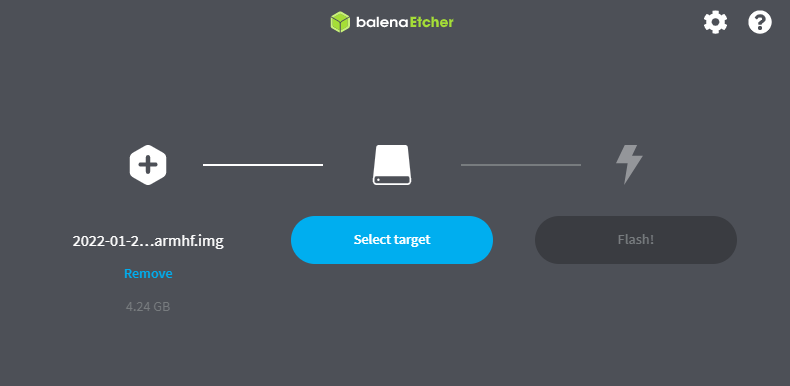
Pick a micro SDHC card with at least 8Gb on it, and burn the image file on it. A good burner is balena etcher.
After this, you could just use the raspberry pi with a screen and keyboard. But if you’re anything like me, you’ll be perfectly happy connecting to the pi remotely with SSH. In that case, you can follow the next section.
Headless setup (optional)
If you want to connect remotely, you need to enable ssh before your first boot. There’s a special trick for that: create a blank file named ssh (no file extension) at the root of the boot partition on the SD card.
You can either connect the pi to ethernet or WiFi. If using WiFi, create a file named wpa_supplicant.conf in the boot partition containing:
country=us
update_config=1
ctrl_interface=/var/run/wpa_supplicant

network={
 scan_ssid=1
 ssid="MyNetworkSSID"
 psk="Pa55w0rd1234"
}
where you need to change the country code, your network’s name (SSID) and password (psk).
You can now insert the SD card and boot the pi. There is no built-in WiFi on my Raspberry pi 2B so I’m using a dongle:

Wait a few seconds, your pi should appear on the network. If you’re not sure what’s the IP address, nmap is a good tool for snooping around a network. Let’s scan for an opened SSH port (22) on my 192.168.0.0 subnet:
quentin@desktop:~$ nmap -p 22 --open 192.168.0.*

Starting Nmap 7.60 ( https://nmap.org ) at 2022-03-19 00:46 CET
Nmap scan report for 192.168.0.10
Host is up (0.0012s latency).

PORT   STATE SERVICE
22/tcp open  ssh

Nmap scan report for 192.168.0.30
Host is up (0.0025s latency).

PORT   STATE SERVICE
22/tcp open  ssh

Nmap done: 256 IP addresses (11 hosts up) scanned in 16.62 seconds
That 192.168.0.30 address is new to me so it must be the pi. I can connect with ssh or putty on windows:
ssh pi@192.168.0.30
The password is raspberry by default, you should change this with the passwd command.
Install OpenOCD
We’ll now follow this guide for installing OpenOCD on the pi. Let’s start with the dependencies:
sudo apt-get install autoconf libtool libusb-dev
Let’s now pull openocd’s git repo:
git clone --recursive git://git.code.sf.net/p/openocd/code openocd-code
Enter the directory and launch ./bootstrap:
cd openocd-code/
./bootstrap
Then configure with raspberry pi GPIO:
./configure --enable-bcm2835gpio
Build, and install (it can take a while):
make
sudo make install
OpenOCD is now installed, and on the path so we can run it from any folder. You can now delete the openocd-code folder if you wish.
Configure OpenOCD
We now need two configuration files:
- Configuration of the protocol and the pins on the pi.
- Description of the target and procedure to upload the file.
Let’s create a folder and the first file, called raspberrypi-custom.cfg:
cd ~
mkdir swd
cd swd
nano raspberrypi-custom.cfg
Write the following in the file, and uncomment the correct speed configuration for your pi model:
#
# Custom configuration for Raspberry pi's 1/2/3 GPIO
#

adapter driver bcm2835gpio

bcm2835gpio peripheral_base 0x3F000000

transport select swd

# SPEED CONFIG (uncomment one)
# ----------------------------

# Raspi1 BCM2835: (700Mhz)
# bcm2835gpio speed_coeffs 113714 28

# Raspi2 BCM2836 (900Mhz):
bcm2835gpio speed_coeffs 146203 36

# Raspi3 BCM2837 (1200Mhz):
# bcm2835gpio speed_coeffs 194938 48

# GPIO CONFIG
# -----------

# SWD GPIO set: swclk swdio
bcm2835gpio swd_nums 25 24

# SWD GPIO set: reset
bcm2835gpio srst_num 18
reset_config srst_only srst_push_pull
We can now create a file specific to our use case, named openocd.cfg:
nano openocd.cfg
Write the following:
source raspberrypi-custom.cfg
set transport swd

set CHIPNAME at91samd11c14
source [find target/at91samdXX.cfg]

init
targets
reset halt
at91samd bootloader 0
program free_dap_d11c_mini.bin verify
at91samd bootloader 4096
reset
shutdown
Note the reference to raspberrypi-custom.cfg, and another file specific to the SAMD family, included somewhere in openocd’s internal files. The list of commands tell openocd to do the following:
- Reset the chip
- Start writing the bootloader at postion 0 in the flash
- Write and verify the file named
free_dap_d11c_mini.bin - Finish at position 4096
- Reset and exit
You should download free_dap_d11c_mini.bin and place it next to openocd.cfg:
wget http://academy.cba.mit.edu/classes/embedded_programming/SWD/free_dap_d11c_mini.bin
Let’s check that everything is in place:
pi@raspberrypi:~/swd $ ls -l
total 16
-rw-r--r-- 1 pi pi 6536 Feb 25  2020 free_dap_d11c_mini.bin
-rw-r--r-- 1 pi pi  251 Mar 18 22:46 openocd.cfg
-rw-r--r-- 1 pi pi  605 Mar 18 22:51 raspberrypi-custom.cfg
Connect the target
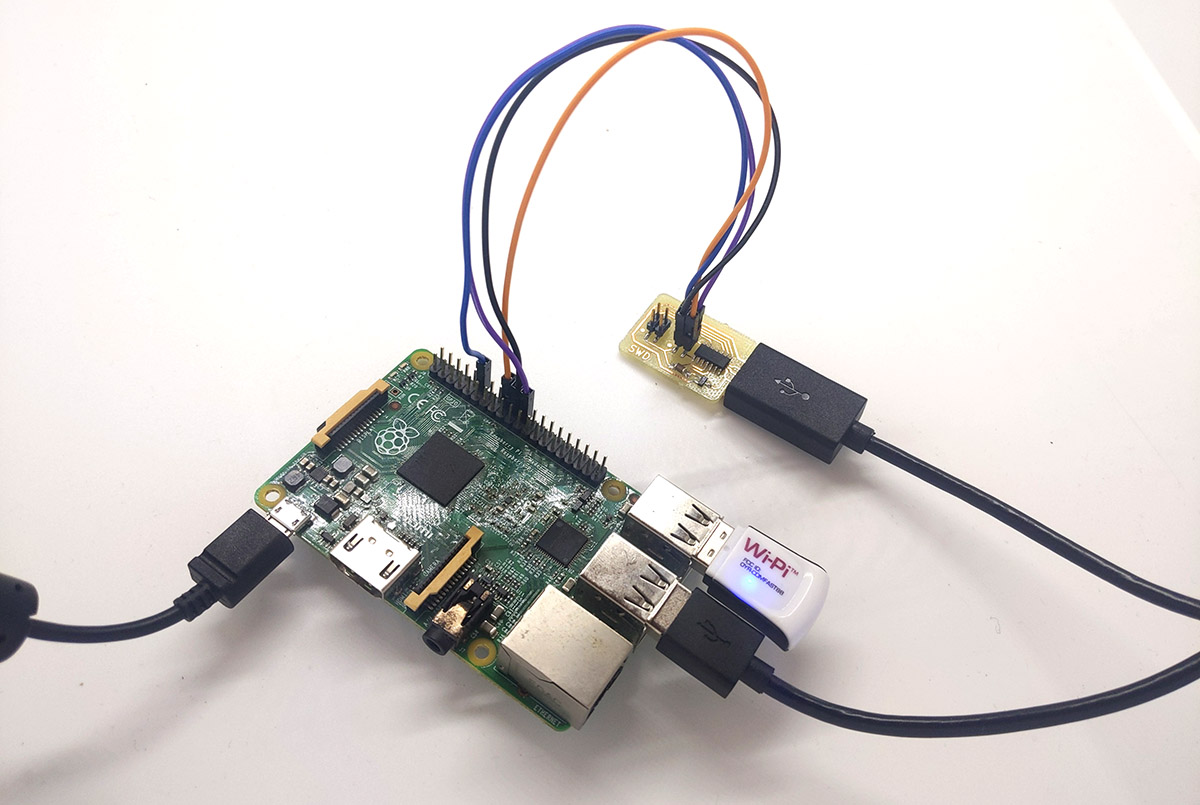
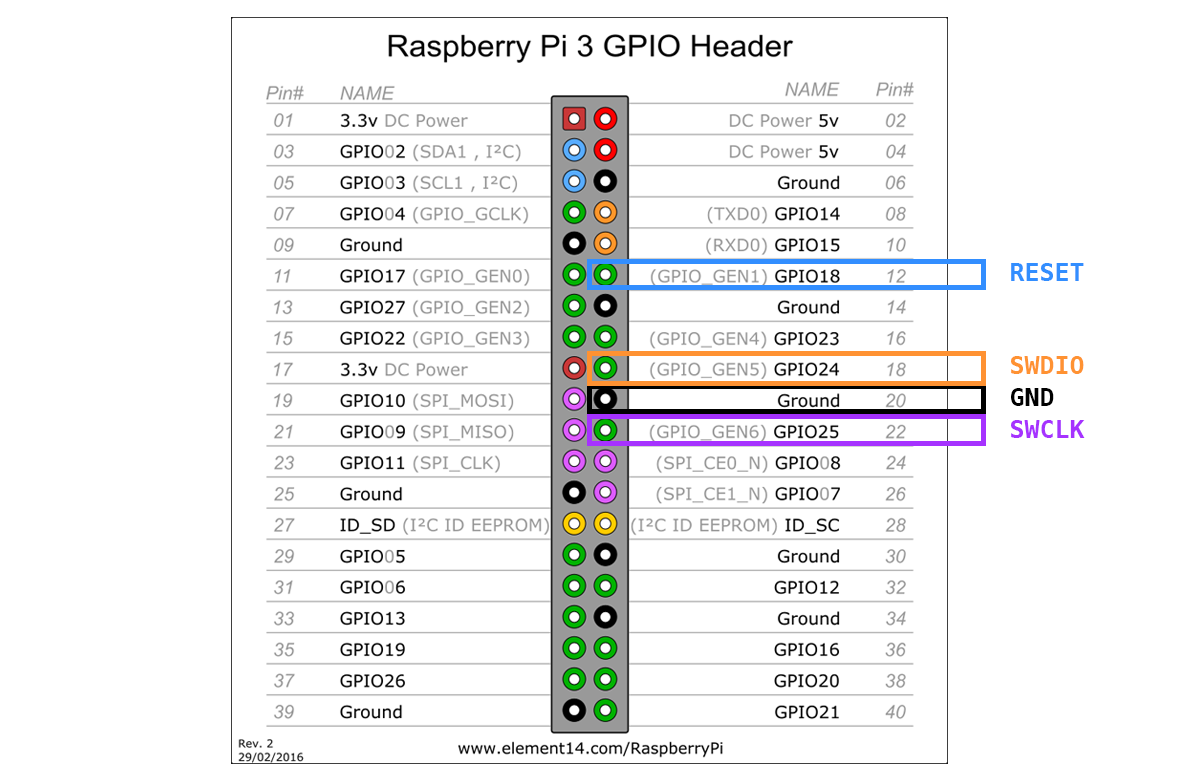
As you saw in the raspberrypi-custom.cfg file, the following pins are used for implementing SWD:
- SWDIO: 24
- SWCLK: 25
- nRESET: 18
Note that those are GPIO numbers, not physical pin numbers on the header. Here’s where to connect your cables (source: element14):
I milled and soldered a SWD programmer based on this project. You can power the target board with a USB extension cable, and connect every pin like mentioned. The color code of the cables is the same as in the diagram:
Run OpenOCD
We now simply need to run openocd in the folder we previously created:
pi@raspberrypi:~/swd $ openocd
Open On-Chip Debugger 0.11.0+dev-00615-gbe0d68eb6 (2022-03-18-22:01)
Licensed under GNU GPL v2
For bug reports, read
        http://openocd.org/doc/doxygen/bugs.html
Info : BCM2835 GPIO JTAG/SWD bitbang driver
Info : clock speed 400 kHz
Info : SWD DPIDR 0x0bc11477
Info : [at91samd11c14.cpu] Cortex-M0+ r0p1 processor detected
Info : [at91samd11c14.cpu] target has 4 breakpoints, 2 watchpoints
Info : [at91samd11c14.cpu] external reset detected
Info : starting gdb server for at91samd11c14.cpu on 3333
Info : Listening on port 3333 for gdb connections
Info : SWD DPIDR 0x0bc11477
target halted due to debug-request, current mode: Thread
xPSR: 0x21000000 pc: 0x00000ba8 msp: 0x20000fd8
Info : SWD DPIDR 0x0bc11477
target halted due to debug-request, current mode: Thread
xPSR: 0x21000000 pc: 0x00000ba8 msp: 0x20000fd8
** Programming Started **
Info : SAMD MCU: SAMD11C14A (16KB Flash, 4KB RAM)
** Programming Finished **
** Verify Started **
** Verified OK **
Info : SWD DPIDR 0x0bc11477
shutdown command invoked
Info : Listening on port 6666 for tcl connections
Info : Listening on port 4444 for telnet connections
After a successful programming, our board should now show up as a USB device named “CMSIS-DAP Adapter”. You can check this with lsusb:
pi@raspberrypi:~/bootloader $ lsusb
Bus 001 Device 013: ID 148f:5370 Ralink Technology, Corp. RT5370 Wireless Adapter
Bus 001 Device 019: ID 6666:6666 Prototype product Vendor ID Generic CMSIS-DAP Adapter
Bus 001 Device 003: ID 0424:ec00 Microchip Technology, Inc. (formerly SMSC) SMSC9512/9514 Fast Ethernet Adapter
Bus 001 Device 002: ID 0424:9514 Microchip Technology, Inc. (formerly SMSC) SMC9514 Hub
Bus 001 Device 001: ID 1d6b:0002 Linux Foundation 2.0 root hub
The programmer can now be used as described here.
Troubleshooting
You might get the following error message when running openocd:
Error: Error connecting DP: cannot read IDR
This means that no communication could be established with the target board. Triple check the cable connections and your board’s design/execution.