Group assignment
The lab’s group assignment page should redirect here, since I’m the single student in the lab.
Intro
I investigated a bit, and picked a few libraries or frameworks to compare.
My criteria was:
- to have the simplest possible code to have a minimal functional UI
- avoid using over bloated frameworks (like React)
- be multi platform, if possible, or at least work on Linux 🐧
- require the least dependencies possible
- avoid using sudo for new dependencies
Also, I don’t care much about having a polished UI. I care about having a working one.
Regarding this exploration, since I only wanted to get an overview of each, I targeted the servo endpoints that I provided in my individual assignment, and just wanted to have an initial query to the endpoint, the slider, and actuate on the slider. One detail that I left out for simplicity, was to not actuate the servo as you drag the slider.
Graphical approaches
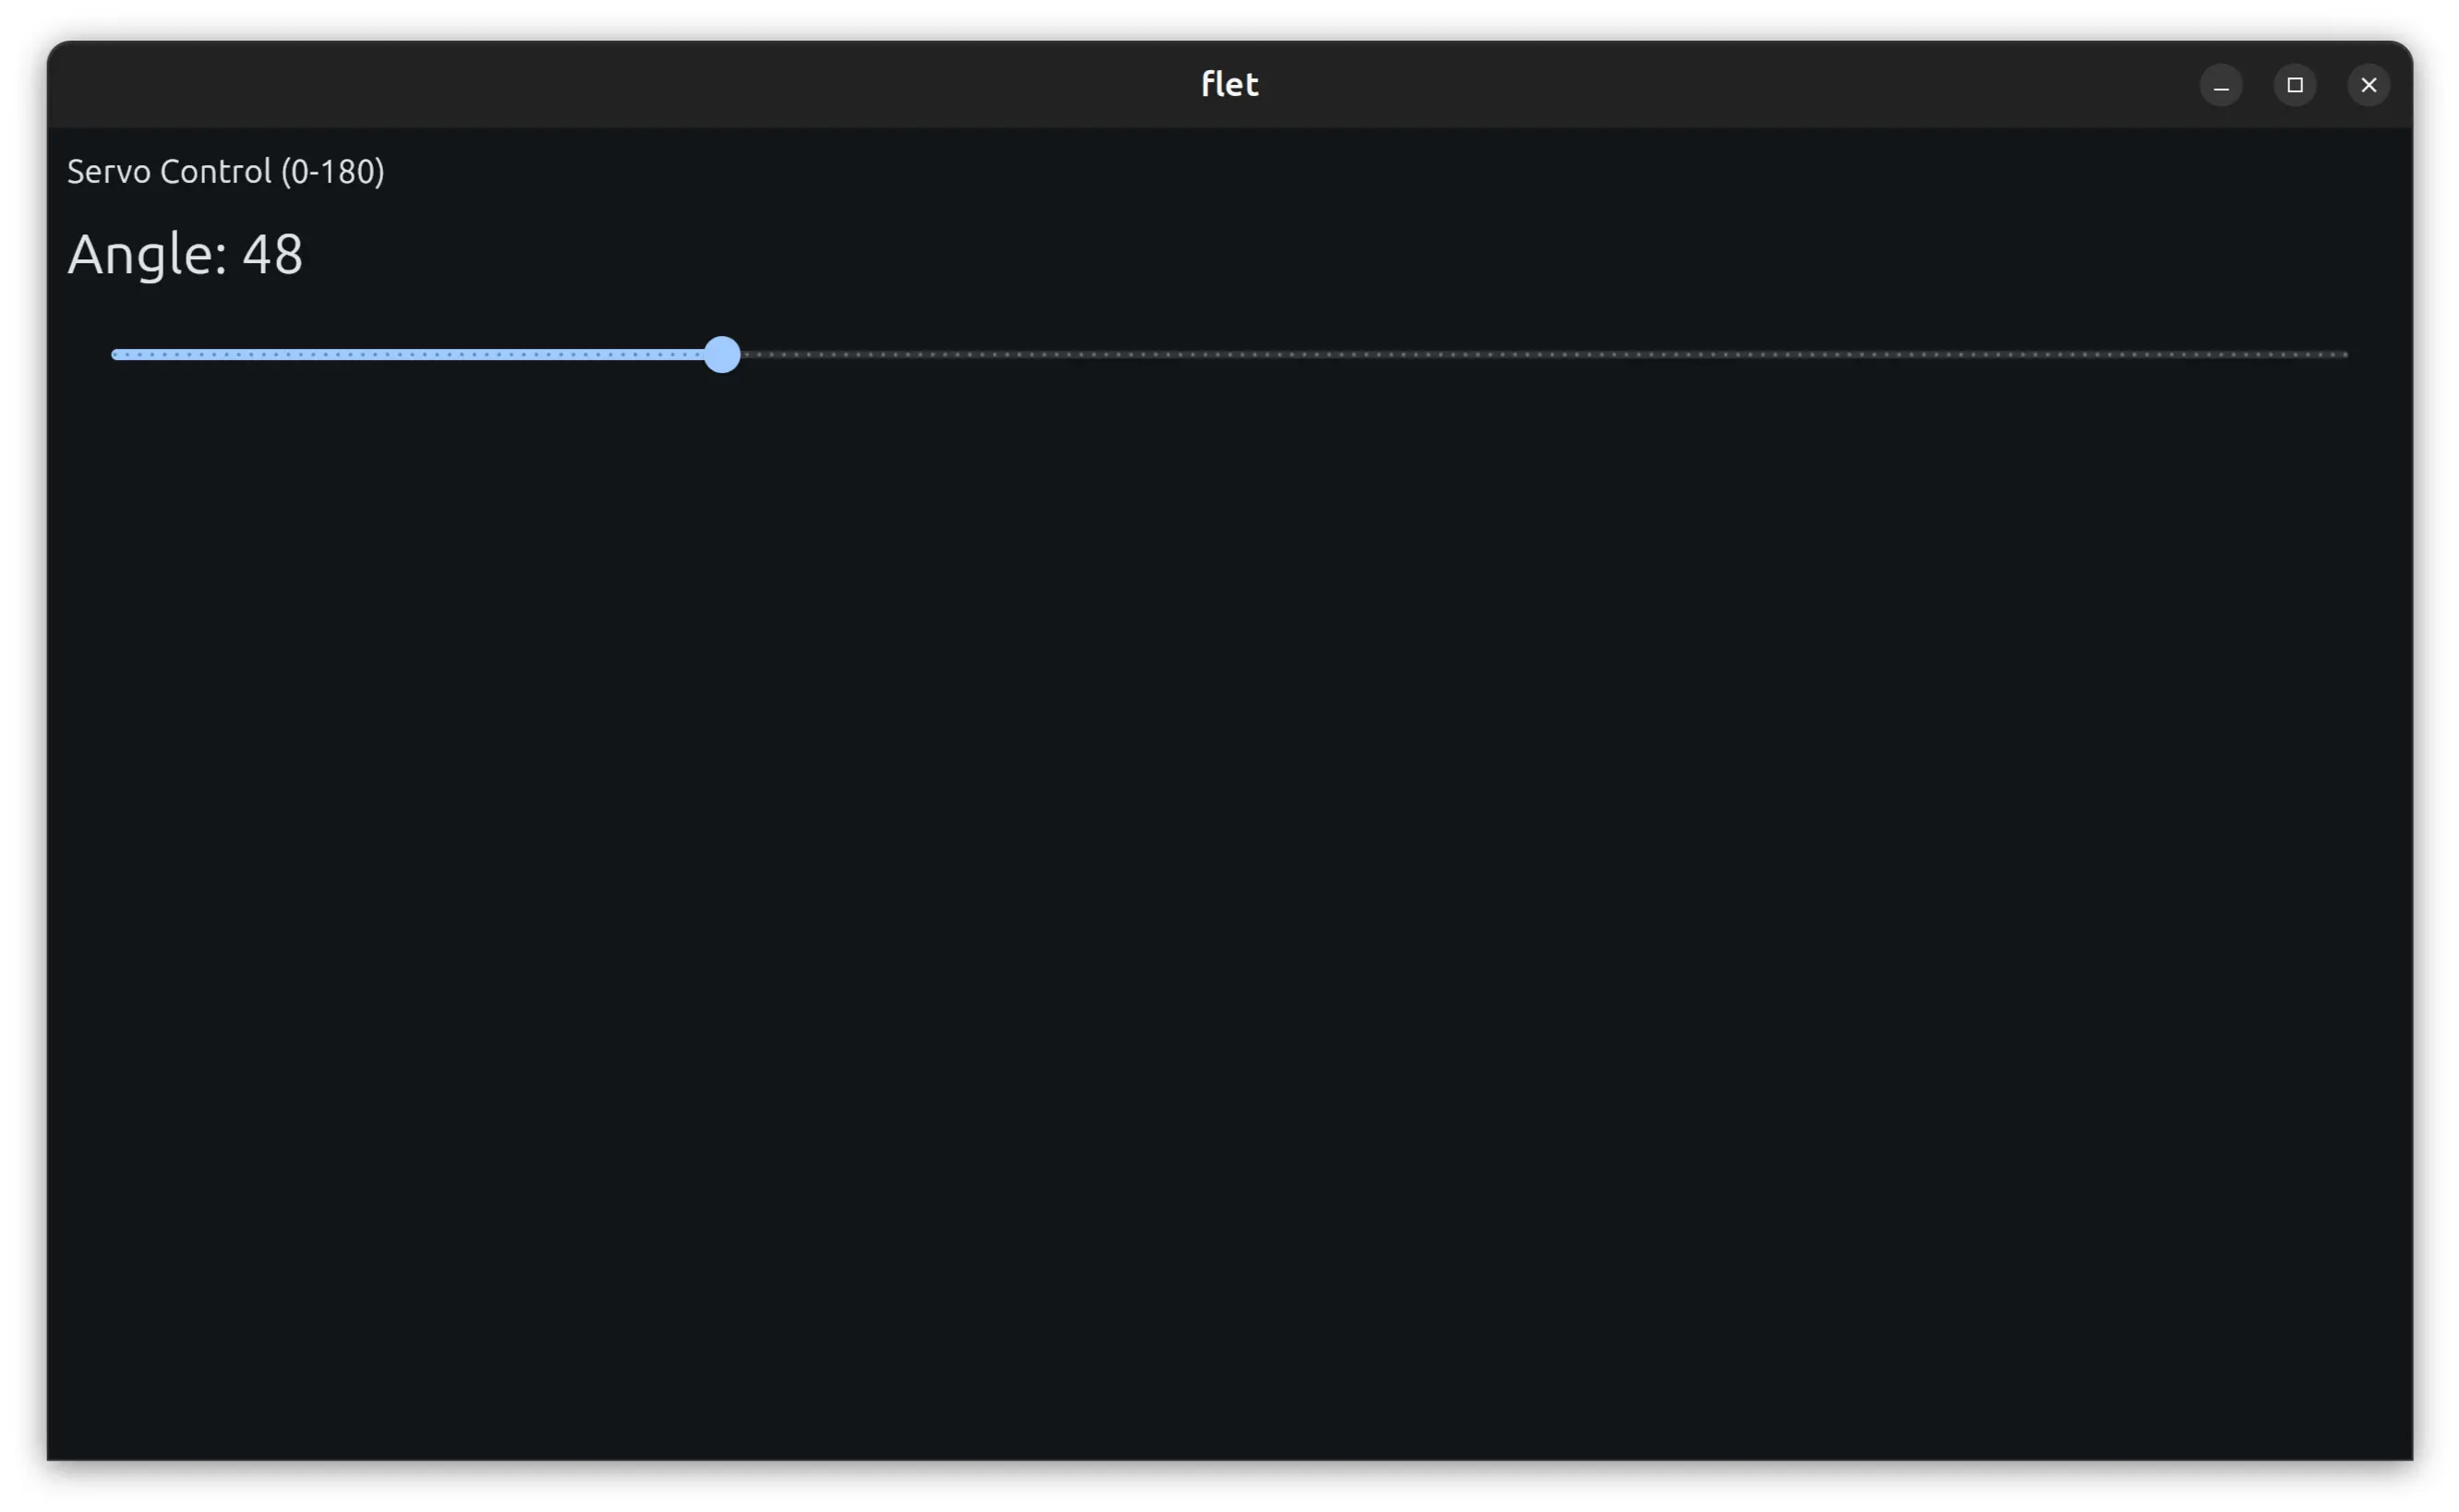
Flet
With multiplatform in mind, Gemini suggested using flet and offered a small script.
The script, however, was missing installed dependencies and was not querying the initial angle.
Having worked with AI previously to do my own personal scripts and knowing how quickly this could turn into a back and forth with missing dependencies and other problems, where the human in the loop is just a copy-paste operator feeding errors to the AI chat, and manually fixing problems, I changed my workflow to opencode-cli, and asked it :
AI prompt
I’m missing some dependencies in the script in this dir. please install everything needed without requiring sudo and as isolated as possible. If you can install with uv or uvx I would prefer it
And after asking it to add the initial query, got this code:
# /// script
# requires-python = ">=3.10"
# dependencies = ["flet", "requests"]
# ///

import flet as ft
import requests


def main(page: ft.Page):
    try:
        initial_value = int(requests.get("http://servo-bot.local/get").text)
    except Exception:
        initial_value = 0

    angle_text = ft.Text(f"Angle: {initial_value}", size=24)

    def slider_changed(e):
        val = int(e.control.value)
        angle_text.value = f"Angle: {val}"
        angle_text.update()
        requests.get(f"http://servo-bot.local/set?angle={val}")

    slider = ft.Slider(
        min=0,
        max=180,
        divisions=180,
        label="{value}",
        value=initial_value,
        on_change=slider_changed,
    )

    page.add(
        ft.Text("Servo Control (0-180)"),
        angle_text,
        slider,
    )

ft.app(target=main)
I execute this (and the following scripts) like this:
uv run fletslider.py
Uv takes care about downloading all needed dependencies, and in a isolated way, without polluting the rest of my system.
Finally we see the result and it works.
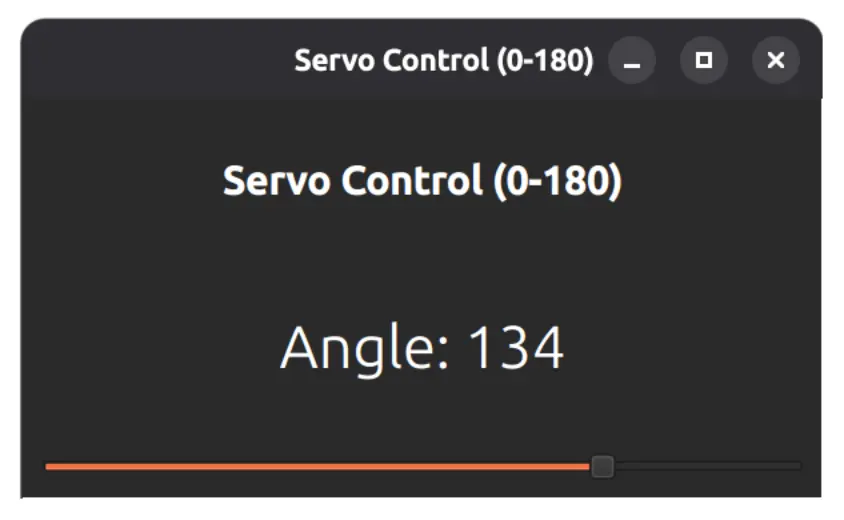
Pyside6 and PyQt
PySide6 is the official Python module from the Qt for Python project, which provides access to the complete Qt 6.0+ framework.
PyQt is a set of Python bindings for the Qt application framework.
PyQt6 supports Qt6 and runs on Windows (Intel and ARM), macOS (Intel and Apple Silicon) and Linux (Intel and ARM), which could be interesting for cross-platform.
Both scripts came out identical with identical GUI. For PyQt the only difference is importing PyQt6 instead of PySide6. I would say that PySide6 is probably preferrable because it’s the official one.
Here’s the OpenCode version of the script
# /// script
# requires-python = ">=3.10"
# dependencies = ["PySide6", "requests"]
# ///

import sys
import threading
import requests
from PySide6.QtWidgets import (
    QApplication,
    QMainWindow,
    QVBoxLayout,
    QWidget,
    QLabel,
    QSlider,
)
from PySide6.QtCore import Qt

SERVER = "http://servo-bot.local"


def get_current_angle():
    try:
        return int(requests.get(f"{SERVER}/get").text)
    except Exception:
        return 0


def send_angle(val):
    try:
        requests.get(f"{SERVER}/set?angle={val}")
    except Exception:
        pass


class ServoWindow(QMainWindow):
    def __init__(self):
        super().__init__()
        self.setWindowTitle("Servo Control (0-180)")
        self.setFixedSize(400, 200)

        central = QWidget()
        self.setCentralWidget(central)
        layout = QVBoxLayout(central)
        layout.setSpacing(20)

        title = QLabel("Servo Control (0-180)")
        title.setAlignment(Qt.AlignmentFlag.AlignCenter)
        title.setStyleSheet("font-size: 20px; font-weight: bold;")
        layout.addWidget(title)

        self.angle_label = QLabel("Angle: 0")
        self.angle_label.setAlignment(Qt.AlignmentFlag.AlignCenter)
        self.angle_label.setStyleSheet("font-size: 30px;")
        layout.addWidget(self.angle_label)

        self.slider = QSlider(Qt.Orientation.Horizontal)
        self.slider.setRange(0, 180)
        self.slider.setSingleStep(1)
        self.slider.setPageStep(10)
        self.slider.setValue(0)
        self.slider.valueChanged.connect(self.on_change)
        layout.addWidget(self.slider)

        initial = get_current_angle()
        self.last_sent = initial
        self.slider.setValue(initial)
        self.angle_label.setText(f"Angle: {initial}")
        send_angle(initial)

    def on_change(self, val):
        self.angle_label.setText(f"Angle: {val}")
        if val != self.last_sent:
            self.last_sent = val
            threading.Thread(target=send_angle, args=(val,), daemon=True).start()


app = QApplication(sys.argv)
win = ServoWindow()
win.show()
sys.exit(app.exec())
We can see that we are deep into Qt’s way of defining interfaces, but with python bindings.
So, one will likely need to go deeper into Qt itself in order to do something more advanced.
Here’s what it looks like:
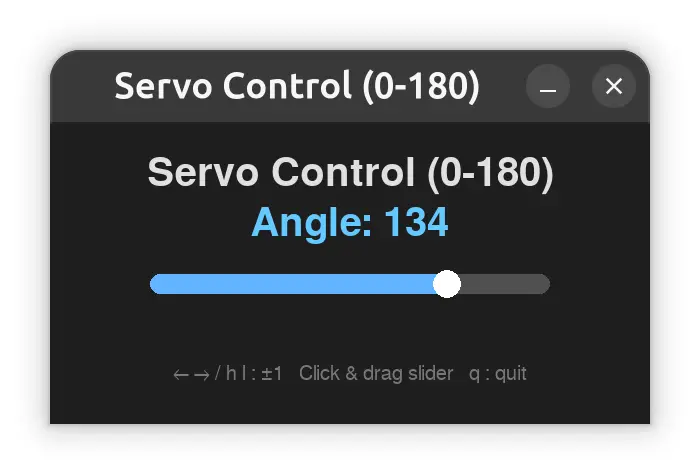
pygame
Next, I try the pygame . Gaming frameworks usually have the greatest flexibility regarding graphics freedom, but with some cost with more complex code.
This is what I got from OpenCode:
# /// script
# requires-python = ">=3.10"
# dependencies = ["pygame", "requests"]
# ///

import pygame
import requests

SERVER = "http://servo-bot.local"


def get_current_angle():
    try:
        return int(requests.get(f"{SERVER}/get").text)
    except Exception:
        return 0


def send_angle(val):
    try:
        requests.get(f"{SERVER}/set?angle={val}")
    except Exception:
        pass


def main():
    pygame.init()
    screen = pygame.display.set_mode((600, 300))
    pygame.display.set_caption("Servo Control (0-180)")

    font_big = pygame.font.SysFont("Arial", 40, bold=True)
    font_small = pygame.font.SysFont("Arial", 20)

    angle = get_current_angle()
    last_sent = angle
    send_angle(angle)

    slider_rect = pygame.Rect(100, 150, 400, 20)
    knob_radius = 14
    dragging = False

    running = True
    while running:
        for event in pygame.event.get():
            if event.type == pygame.QUIT:
                running = False
            elif event.type == pygame.KEYDOWN:
                if event.key == pygame.K_q:
                    running = False
                elif event.key == pygame.K_LEFT or event.key == pygame.K_h:
                    angle = max(0, angle - 1)
                elif event.key == pygame.K_RIGHT or event.key == pygame.K_l:
                    angle = min(180, angle + 1)
            elif event.type == pygame.MOUSEBUTTONDOWN and event.button == 1:
                knob_x = slider_rect.x + (angle / 180) * slider_rect.width
                if abs(event.pos[0] - knob_x) < knob_radius * 1.5:
                    dragging = True
                elif slider_rect.collidepoint(event.pos):
                    dragging = True
            elif event.type == pygame.MOUSEBUTTONUP and event.button == 1:
                dragging = False
            elif event.type == pygame.MOUSEMOTION and dragging:
                ratio = (event.pos[0] - slider_rect.x) / slider_rect.width
                angle = max(0, min(180, int(ratio * 180)))

        if angle != last_sent:
            send_angle(angle)
            last_sent = angle

        screen.fill((30, 30, 30))

        title_surf = font_big.render("Servo Control (0-180)", True, (224, 224, 224))
        title_rect = title_surf.get_rect(center=(300, 50))
        screen.blit(title_surf, title_rect)

        angle_surf = font_big.render(f"Angle: {angle}", True, (100, 200, 255))
        angle_rect = angle_surf.get_rect(center=(300, 100))
        screen.blit(angle_surf, angle_rect)

        pygame.draw.rect(screen, (80, 80, 80), slider_rect, border_radius=10)
        filled = (angle / 180) * slider_rect.width
        filled_rect = pygame.Rect(
            slider_rect.x, slider_rect.y, filled, slider_rect.height
        )
        pygame.draw.rect(screen, (100, 180, 255), filled_rect, border_radius=10)

        knob_x = slider_rect.x + (angle / 180) * slider_rect.width
        knob_y = slider_rect.centery
        pygame.draw.circle(screen, (255, 255, 255), (int(knob_x), knob_y), knob_radius)

        hint_surf = font_small.render(
            "← → / h l : ±1   Click & drag slider   q : quit", True, (120, 120, 120)
        )
        hint_rect = hint_surf.get_rect(center=(300, 250))
        screen.blit(hint_surf, hint_rect)

        pygame.display.flip()

    pygame.quit()


if __name__ == "__main__":
    main()
We can see that apparently there’s no slider component, and everything’s is drawn though basic shapes, like rectangles and circles, as I suspected.
But it doesn’t look bad:
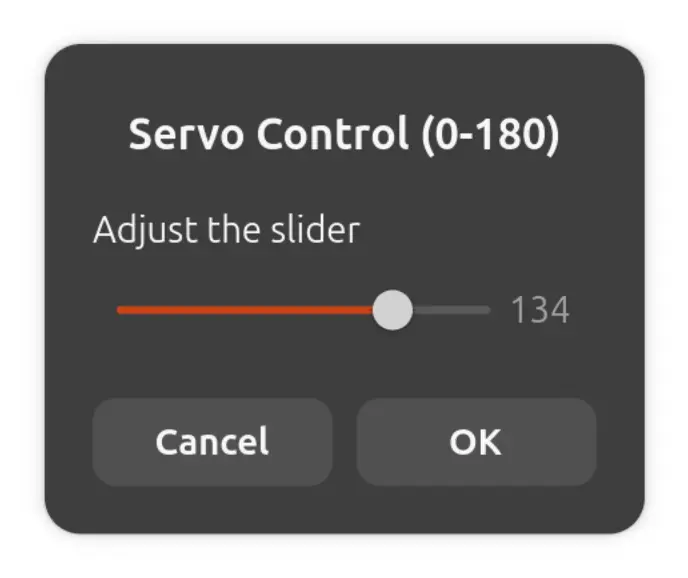
Zenity
Departing from python land there’s Zenity.
Zenity in itself is just a dialog maker with single action, but for single dialogs, or at least, individual dialogs in a sequence. One can interface this with shell scripts (or even python) to create individual prompts.
Here’s the shell script:
#!/bin/bash

SERVER="http://servo-bot.local"

get_angle() {
    curl -s "$SERVER/get" 2>/dev/null || echo 0
}

send_angle() {
    curl -s "$SERVER/set?angle=$1" >/dev/null 2>&1
}

initial=$(get_angle)
send_angle "$initial"

zenity --scale \
    --title="Servo Control (0-180)" \
    --text="Adjust the slider" \
    --min-value=0 \
    --max-value=180 \
    --step=1 \
    --value="$initial" \
    --print-partial | while read -r angle; do
    send_angle "$angle" &
done
It’s cool how the slider dialog pipes the values to a function that updates the servo (through curl).
I think this wins the simplicity contest 😁
Here’s what it looks like:
Terminal based approaches
While graphical approaches are what one would initially when thinking of a GUI, one should not disregard console alternatives, as they don’t require a graphical interface and can run over ssh, for example.
Curses
I then moved to a terminal approach using curses
I asked OpenCode to rewrite the script using curses, and got this:
# /// script
# requires-python = ">=3.10"
# dependencies = ["requests"]
# ///

import curses
import requests

SERVER = "http://servo-bot.local"


def get_current_angle():
    try:
        return int(requests.get(f"{SERVER}/get").text)
    except Exception:
        return 0


def send_angle(val):
    try:
        requests.get(f"{SERVER}/set?angle={val}")
    except Exception:
        pass


def main(stdscr):
    curses.curs_set(0)
    stdscr.nodelay(False)

    angle = get_current_angle()
    slider_width = 40
    last_sent = angle

    send_angle(angle)

    while True:
        stdscr.clear()
        h, w = stdscr.getmaxyx()

        title = "Servo Control (0-180)"
        stdscr.addstr(max(0, h // 2 - 3), (w - len(title)) // 2, title, curses.A_BOLD)

        label = f"Angle: {angle}"
        stdscr.addstr(max(0, h // 2 - 1), (w - len(label)) // 2, label)

        bar_x = (w - slider_width) // 2
        bar_y = h // 2

        filled = round((angle / 180) * (slider_width - 2))
        bar = "┃" + "█" * filled + "░" * (slider_width - 2 - filled) + "┃"
        stdscr.addstr(bar_y, bar_x, bar)

        knob_y = bar_y + 2
        knob_x = bar_x + 1 + filled
        stdscr.addstr(knob_y, knob_x, "▼", curses.A_BOLD)

        ticks = " 0" + " " * (slider_width - 4) + "180"
        stdscr.addstr(knob_y + 1, bar_x, ticks, curses.A_DIM)

        hint = "← → or h/l to adjust | q to quit"
        stdscr.addstr(h - 2, (w - len(hint)) // 2, hint, curses.A_DIM)

        stdscr.refresh()

        key = stdscr.getch()

        if key in (ord("q"), ord("Q")):
            break
        elif key in (curses.KEY_LEFT, ord("h")):
            angle = max(0, angle - 1)
        elif key in (curses.KEY_RIGHT, ord("l")):
            angle = min(180, angle + 1)
        elif key in (curses.KEY_PPAGE, ord("H")):
            angle = max(0, angle - 10)
        elif key in (curses.KEY_NPAGE, ord("L")):
            angle = min(180, angle + 10)

        if angle != last_sent:
            send_angle(angle)
            last_sent = angle


if __name__ == "__main__":
    curses.wrapper(main)
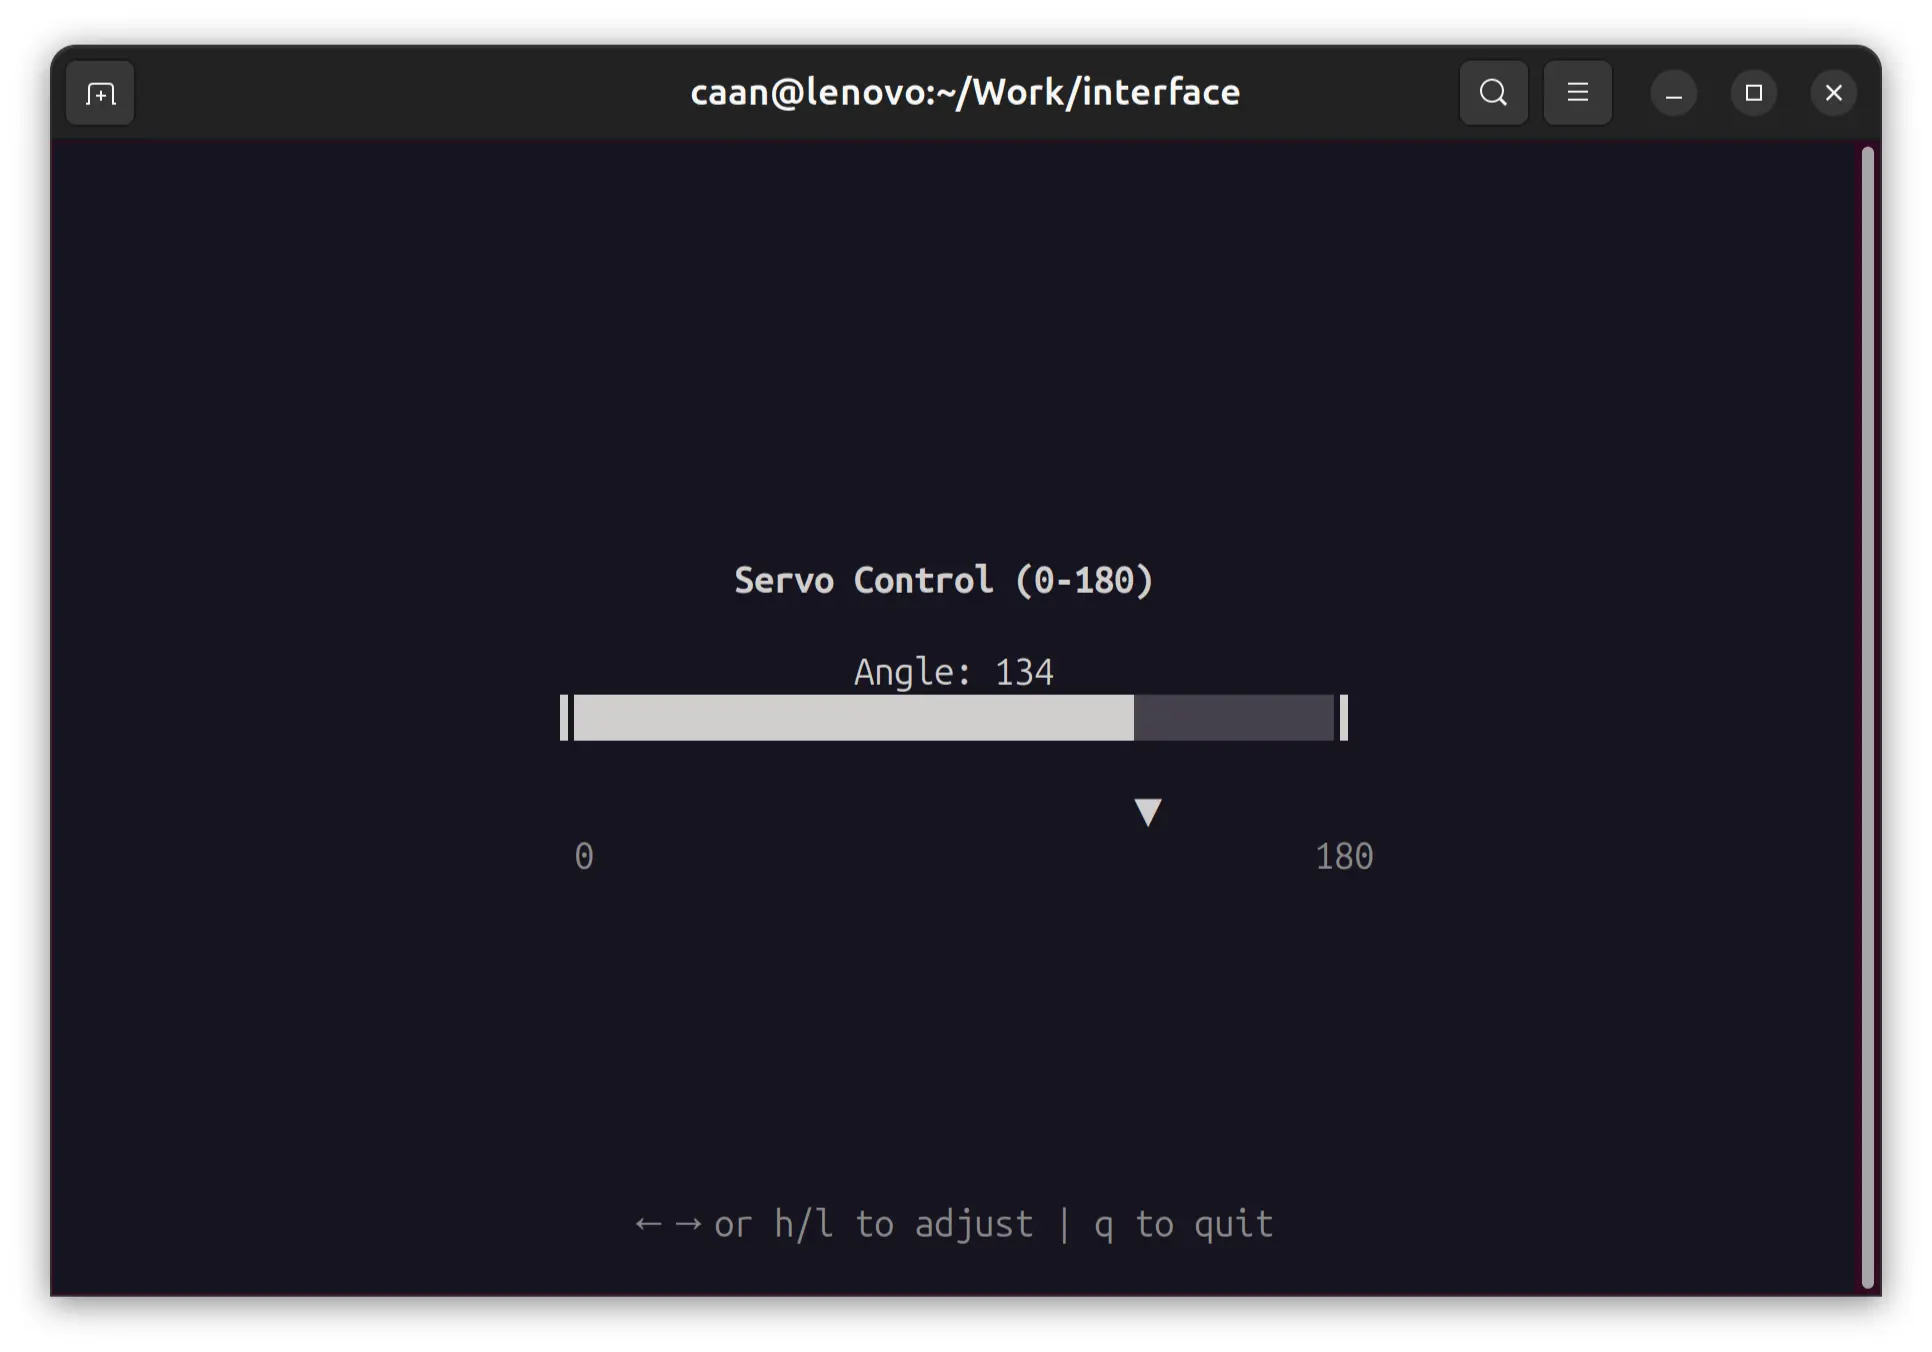
It’s fun running this in the terminal, but lacking mouse input, a lot more code is needed to handle keystrokes.
I run it uv as usual and get this:
Textual
Gemini then suggests using Textual for better cross-platform support. This framework also supports making web browser apps.
I ask OpenCode to rewrite the script using Textual and get this:
# /// script
# requires-python = ">=3.10"
# dependencies = ["requests", "textual"]
# ///

import requests
from textual.app import App, ComposeResult
from textual.widgets import Static
from textual.containers import Container
from textual.binding import Binding

SERVER = "http://servo-bot.local"


def get_current_angle():
    try:
        return int(requests.get(f"{SERVER}/get").text)
    except Exception:
        return 0


def send_angle(val):
    try:
        requests.get(f"{SERVER}/set?angle={val}")
    except Exception:
        pass


class AngleDisplay(Static):
    def __init__(self, angle: int):
        super().__init__(f"Angle: {angle}")
        self.angle = angle

    def update_angle(self, angle: int):
        self.angle = angle
        self.update(f"Angle: {angle}")


class SliderBar(Static):
    def __init__(self, angle: int):
        super().__init__(self._render_bar(angle))
        self.angle = angle

    def _render_bar(self, angle: int) -> str:
        width = 40
        filled = round((angle / 180) * (width - 2))
        bar = "┃" + "█" * filled + "░" * (width - 2 - filled) + "┃"
        knob = " " * filled + "▼"
        return f"{bar}\n{knob}"

    def update_angle(self, angle: int):
        self.angle = angle
        self.update(self._render_bar(angle))


class ServoApp(App):
    BINDINGS = [
        Binding("left", "left", "Decrease by 1"),
        Binding("right", "right", "Increase by 1"),
        Binding("h", "h", "Decrease by 1"),
        Binding("l", "l", "Increase by 1"),
        Binding("pageup", "pageup", "Decrease by 10"),
        Binding("pagedown", "pagedown", "Increase by 10"),
        Binding("H", "H", "Decrease by 10"),
        Binding("L", "L", "Increase by 10"),
    ]

    def __init__(self):
        super().__init__()
        self.angle = get_current_angle()
        self._last_sent = self.angle

    def on_mount(self):
        send_angle(self.angle)

    def compose(self) -> ComposeResult:
        self._angle_display = AngleDisplay(self.angle)
        self._slider_bar = SliderBar(self.angle)
        with Container():
            yield Static("Servo Control (0-180)", classes="title")
            yield self._angle_display
            yield self._slider_bar
            yield Static(
                "← → / h l : ±1   PageUp/Down / H/L : ±10   q : quit", classes="hint"
            )

    def action_left(self):
        self._set_angle(self.angle - 1)

    def action_right(self):
        self._set_angle(self.angle + 1)

    def action_h(self):
        self._set_angle(self.angle - 1)

    def action_l(self):
        self._set_angle(self.angle + 1)

    def action_pageup(self):
        self._set_angle(self.angle - 10)

    def action_pagedown(self):
        self._set_angle(self.angle + 10)

    def action_H(self):
        self._set_angle(self.angle - 10)

    def action_L(self):
        self._set_angle(self.angle + 10)

    def action_quit(self):
        self.exit()

    def _set_angle(self, angle: int):
        self.angle = max(0, min(180, angle))
        self._angle_display.update_angle(self.angle)
        self._slider_bar.update_angle(self.angle)
        if self.angle != self._last_sent:
            send_angle(self.angle)
            self._last_sent = self.angle


if __name__ == "__main__":
    app = ServoApp()
    app.run()
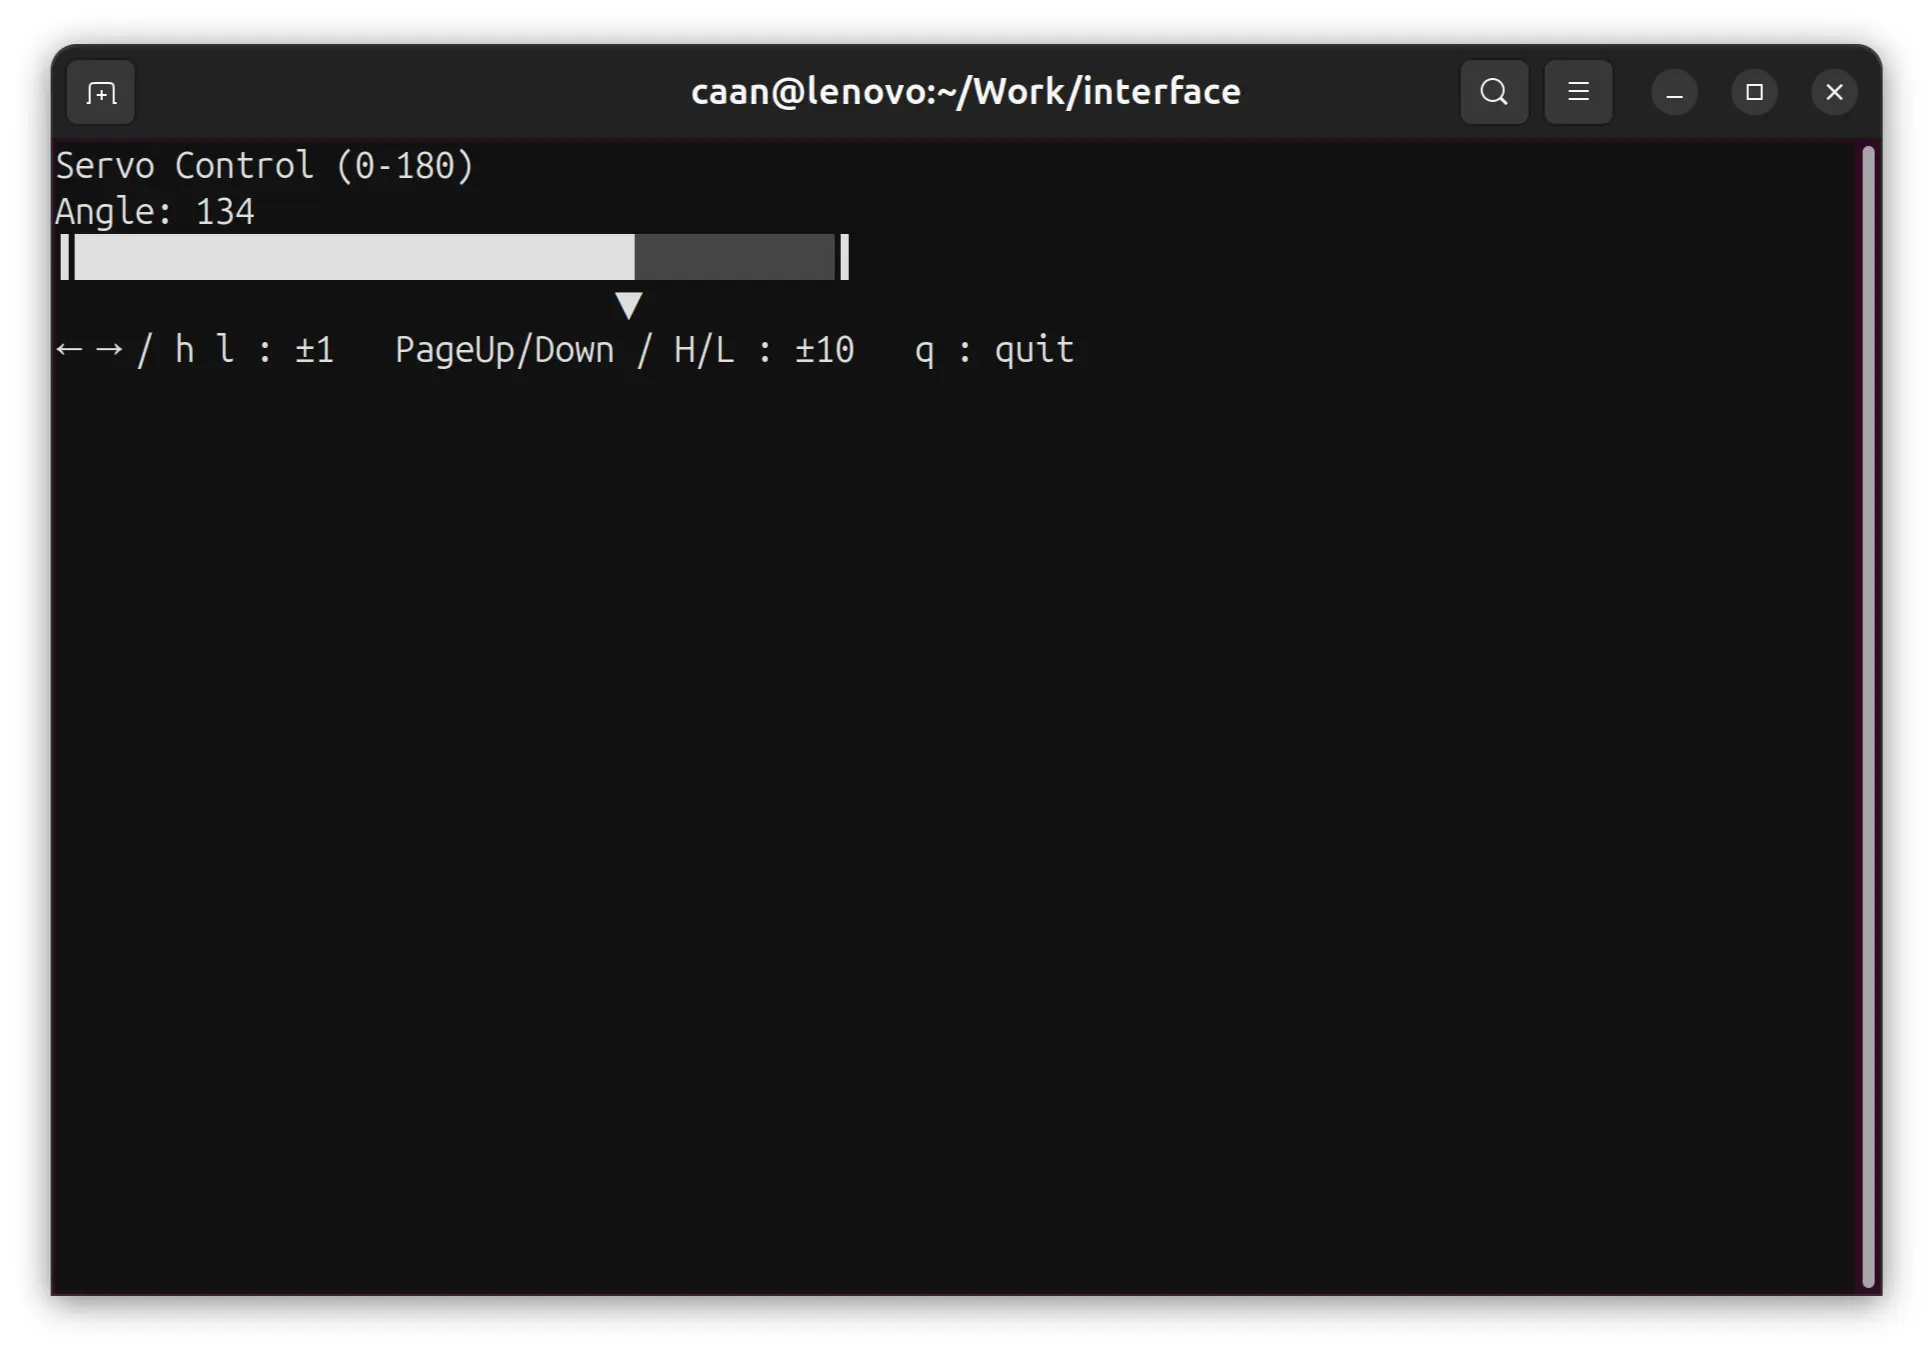
There’s a bit more code than with the curses version, but I guess with more flexibility also comes more overhead.
When running, I get this:
Web based approaches
Web based approaches are also very interesting as browsers are universal GUIs interpreting a GUI language which is HTML. Thus, an app could just launch a web server or an embedded webview and the GUI part be described in web technologies which are pretty cross-platform.
nicegui
Next I tried a web approach with nicegui package.
Here’s the code by OpenCode:
# /// script
# requires-python = ">=3.10"
# dependencies = ["nicegui", "requests"]
# ///

import requests
from nicegui import ui

SERVER = "http://servo-bot.local"


def get_current_angle():
    try:
        return int(requests.get(f"{SERVER}/get").text)
    except Exception:
        return 0


def send_angle(val):
    try:
        requests.get(f"{SERVER}/set?angle={val}")
    except Exception:
        pass


initial = get_current_angle()
send_angle(initial)

ui.label("Servo Control (0-180)").classes("text-h4")
angle_label = ui.label(f"Angle: {initial}").classes("text-h5")

slider = ui.slider(min=0, max=180, step=1, value=initial).props("label label-always")


def on_change(e):
    val = int(e.value)
    angle_label.set_text(f"Angle: {val}")
    send_angle(val)


slider.on_value_change(on_change)

ui.run(title="Servo Control", reload=False, port=8080, show=False)
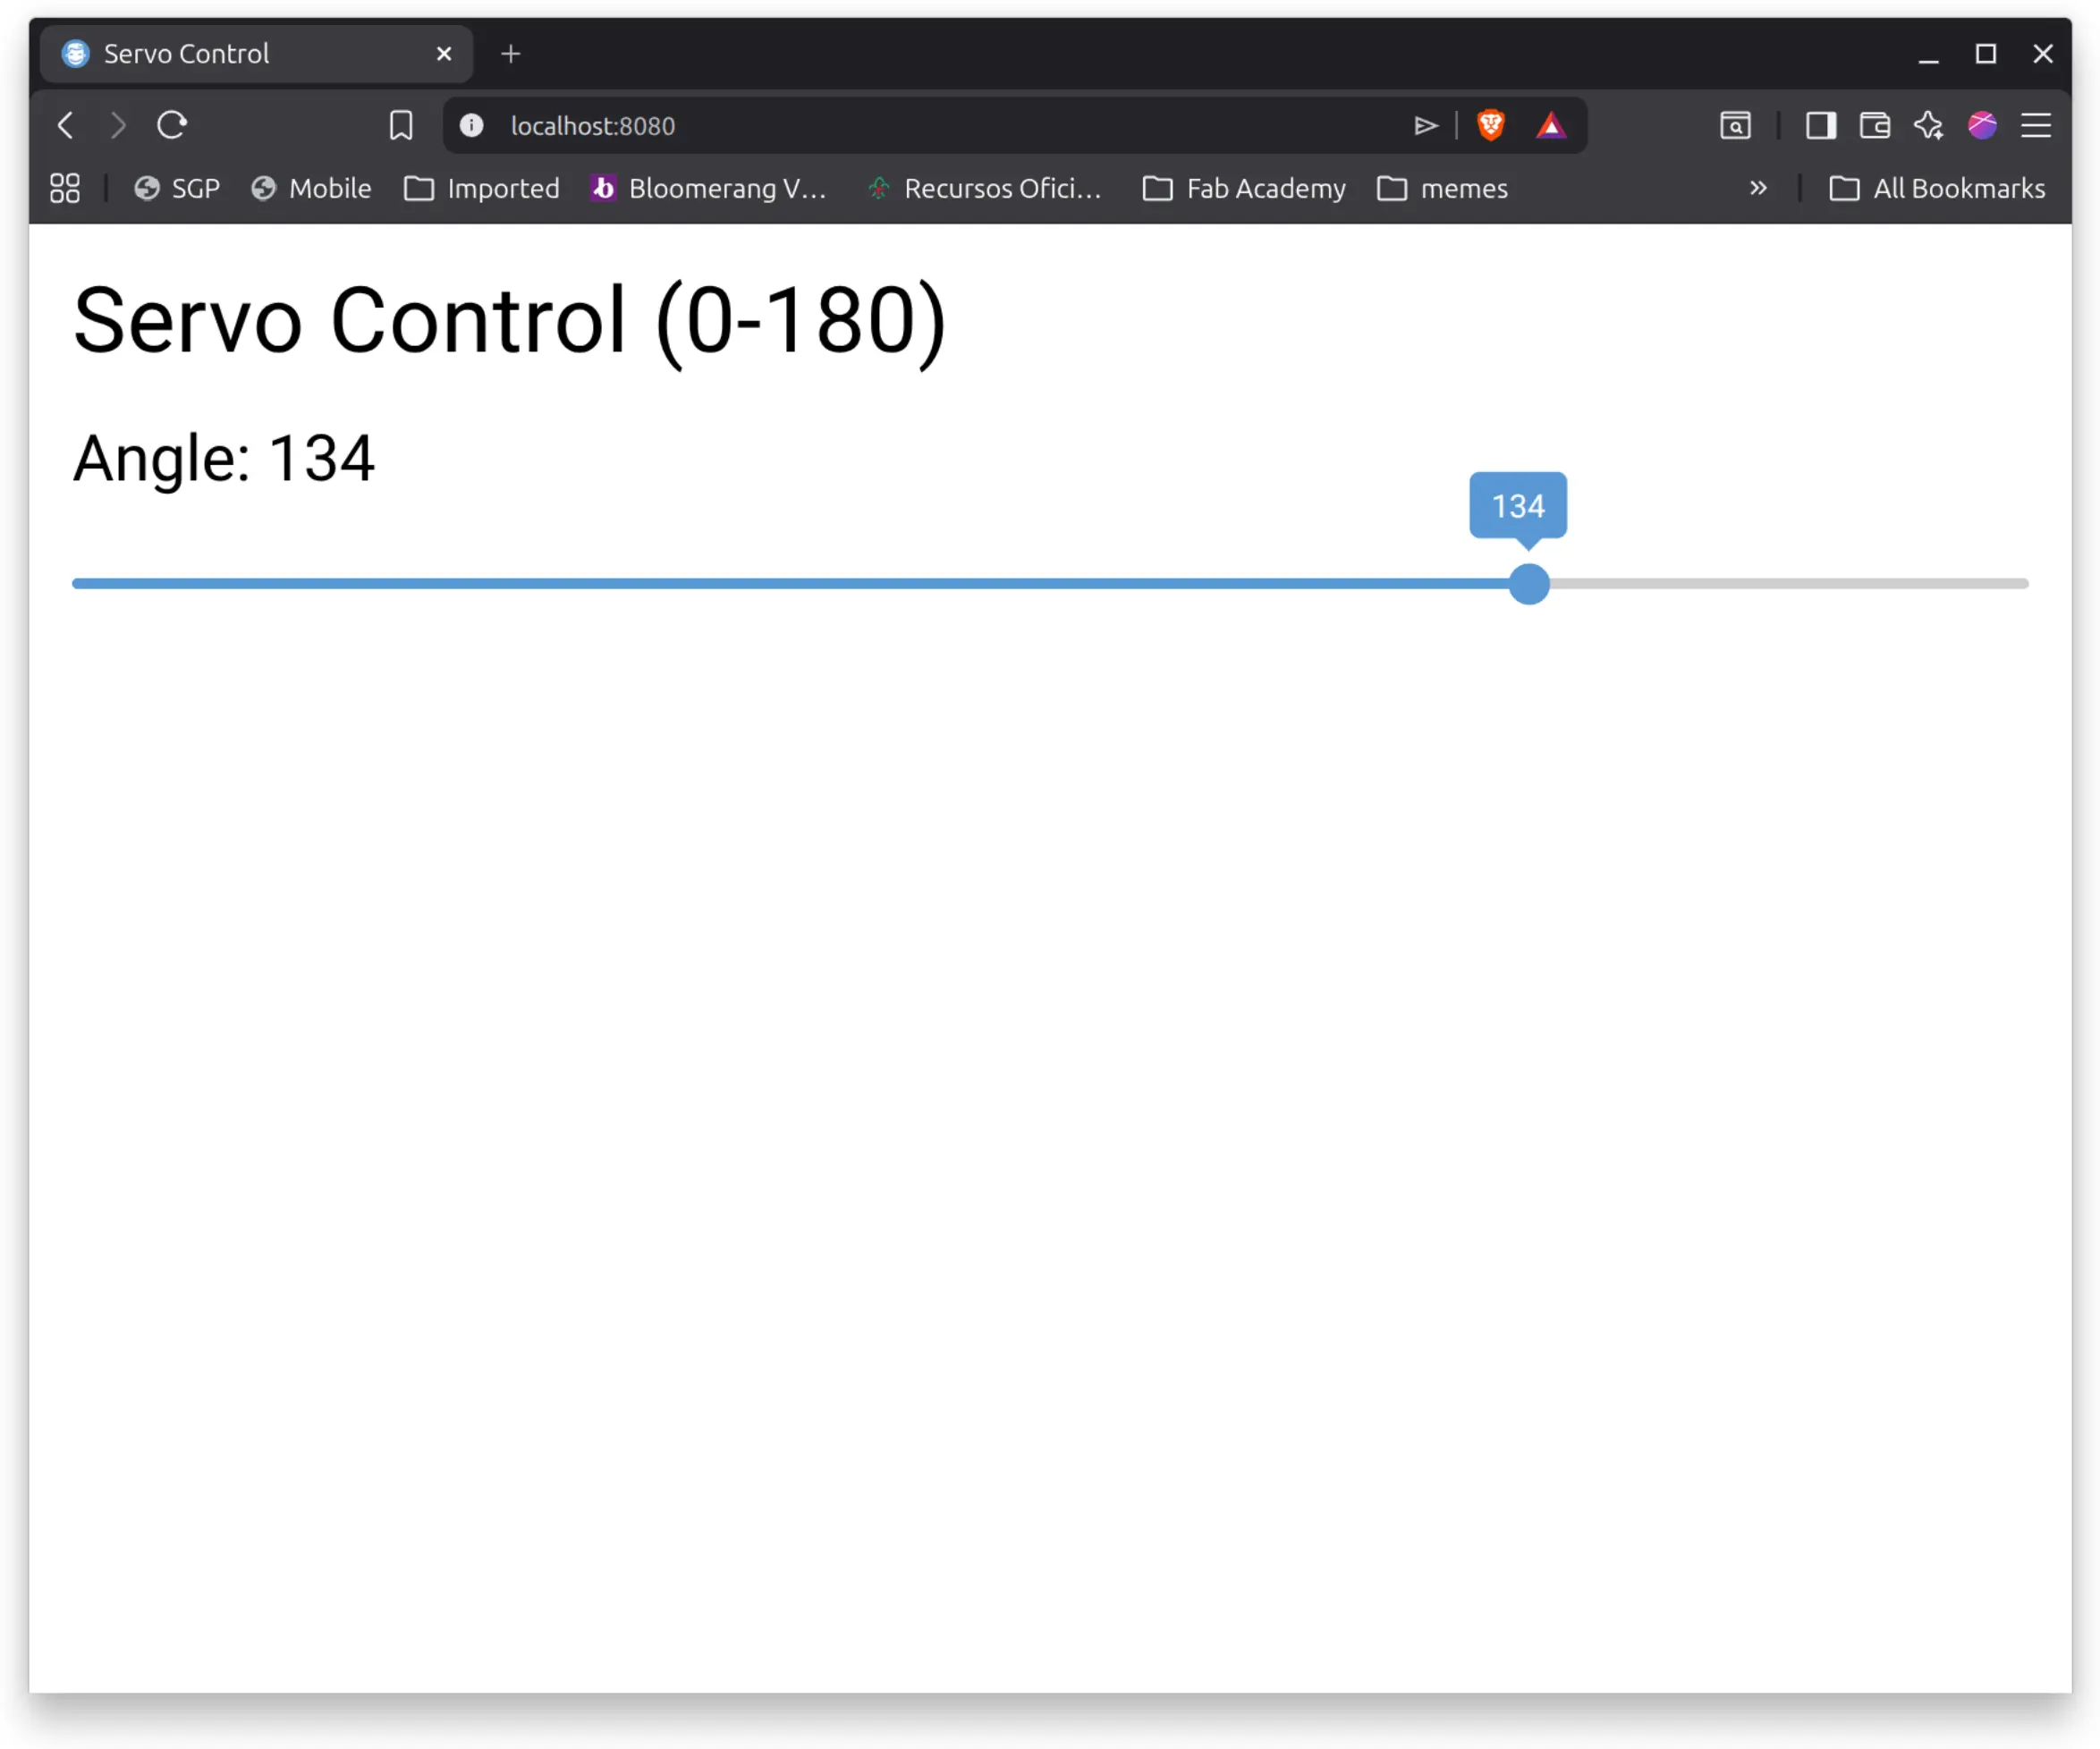
It’s pretty straightforward and it’s using web components mapped to a python library.
When I launch it with uv, it responds with:
NiceGUI ready to go on http://localhost:8080, http://172.17.0.1:8080, and http://192.168.1.209:8080
So, pointing the browser there, and we get:
gradio
Another popular web based framework is gradio.
Here’s the code by OpenCode:
# /// script
# requires-python = ">=3.10"
# dependencies = ["gradio", "requests"]
# ///

import requests
import gradio as gr

SERVER = "http://servo-bot.local"


def get_current_angle():
    try:
        return int(requests.get(f"{SERVER}/get").text)
    except Exception:
        return 0


def send_angle(val):
    try:
        requests.get(f"{SERVER}/set?angle={val}")
    except Exception:
        pass


send_angle(get_current_angle())


def on_slider_change(val):
    send_angle(int(val))
    return f"Angle: {int(val)}"


def on_page_load():
    angle = get_current_angle()
    return gr.Slider(value=angle), f"Angle: {angle}"


with gr.Blocks() as app:
    gr.Markdown("# Servo Control (0-180)")
    slider = gr.Slider(0, 180, value=0, step=1, label="Angle")
    label = gr.Textbox(value="", label="", interactive=False)

    app.load(on_page_load, outputs=[slider, label])
    slider.change(on_slider_change, slider, label)

app.launch()
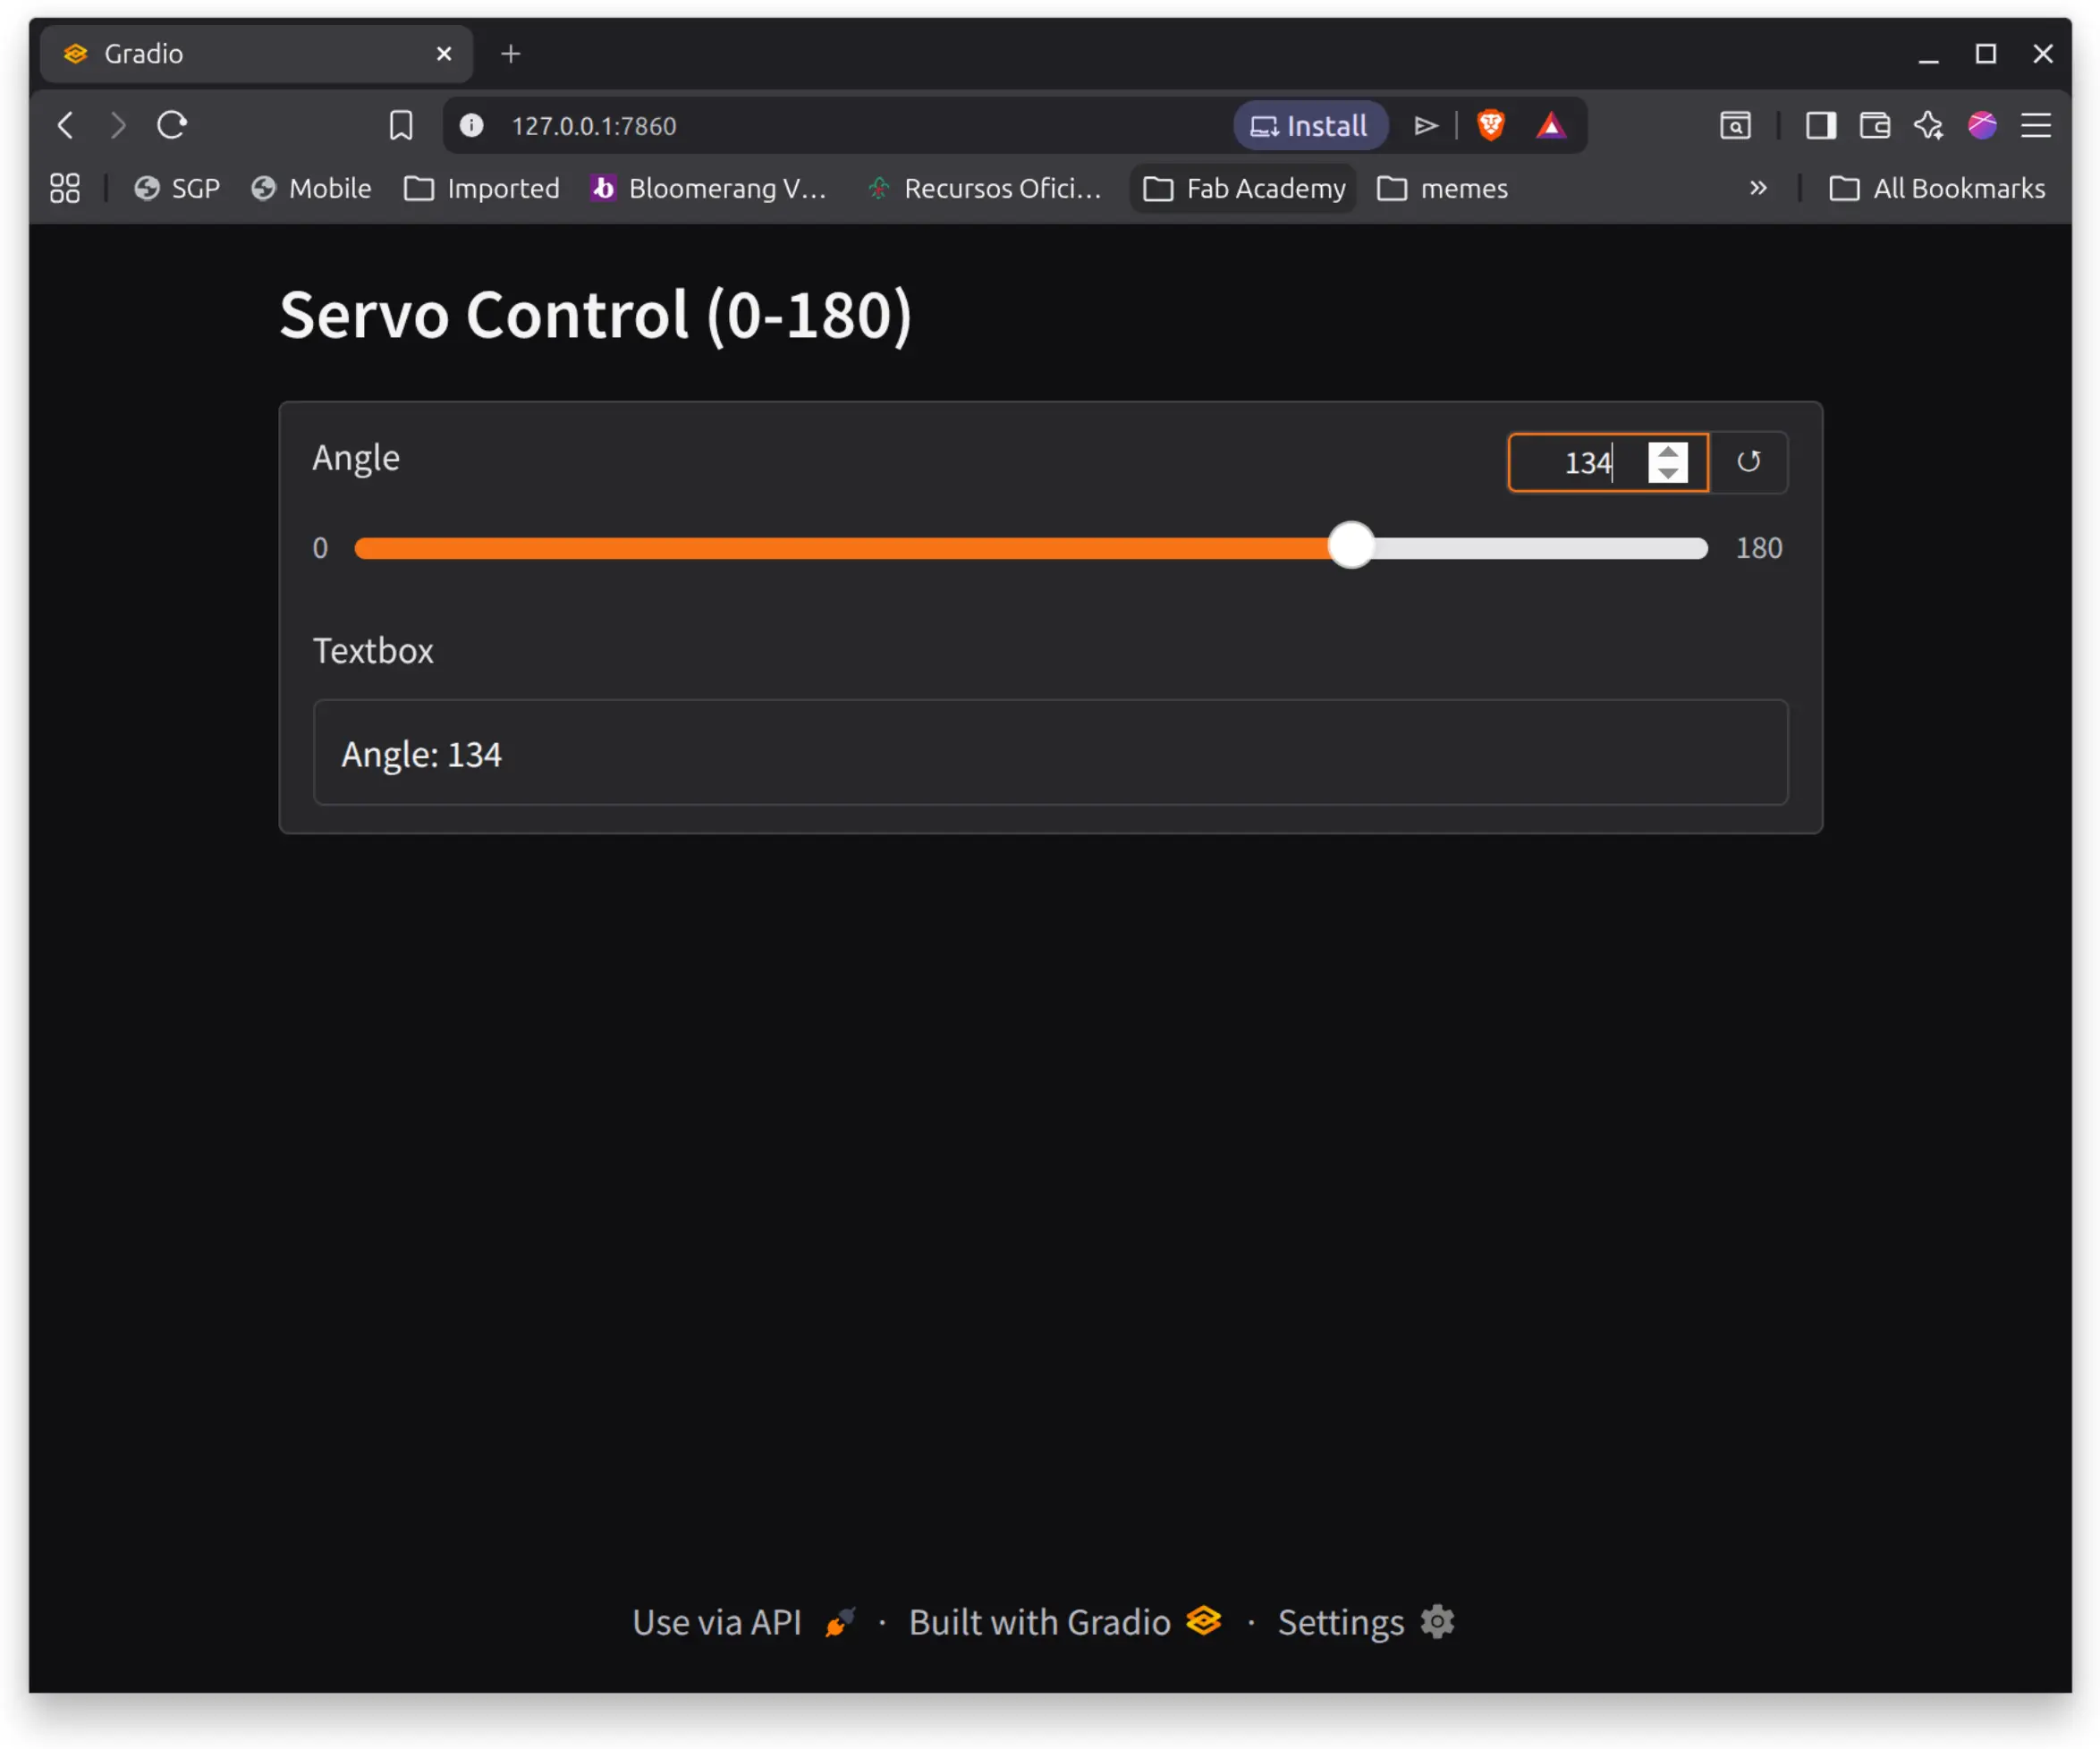
It looks a bit less concerned with web specifics, even though it renders to the web.
It’s nice that markdown syntax is available.
We point the browser to http://127.0.0.1:7860 and this what we get:
Python notebooks
In class, Neil mentioned how he’d like to upgrade fab academy’s pages to Python notebooks to make them interactive, so I also gave it a go.
I asked OpenCode to translate the script to a python notebook, which I ran with:
uv run --with jupyter --with ipywidgets --with requests jupyter notebook servocontrol.ipynb
The source code is just a json blob, so I’ll make it available in the files at the end.
Here’s what it looks like:
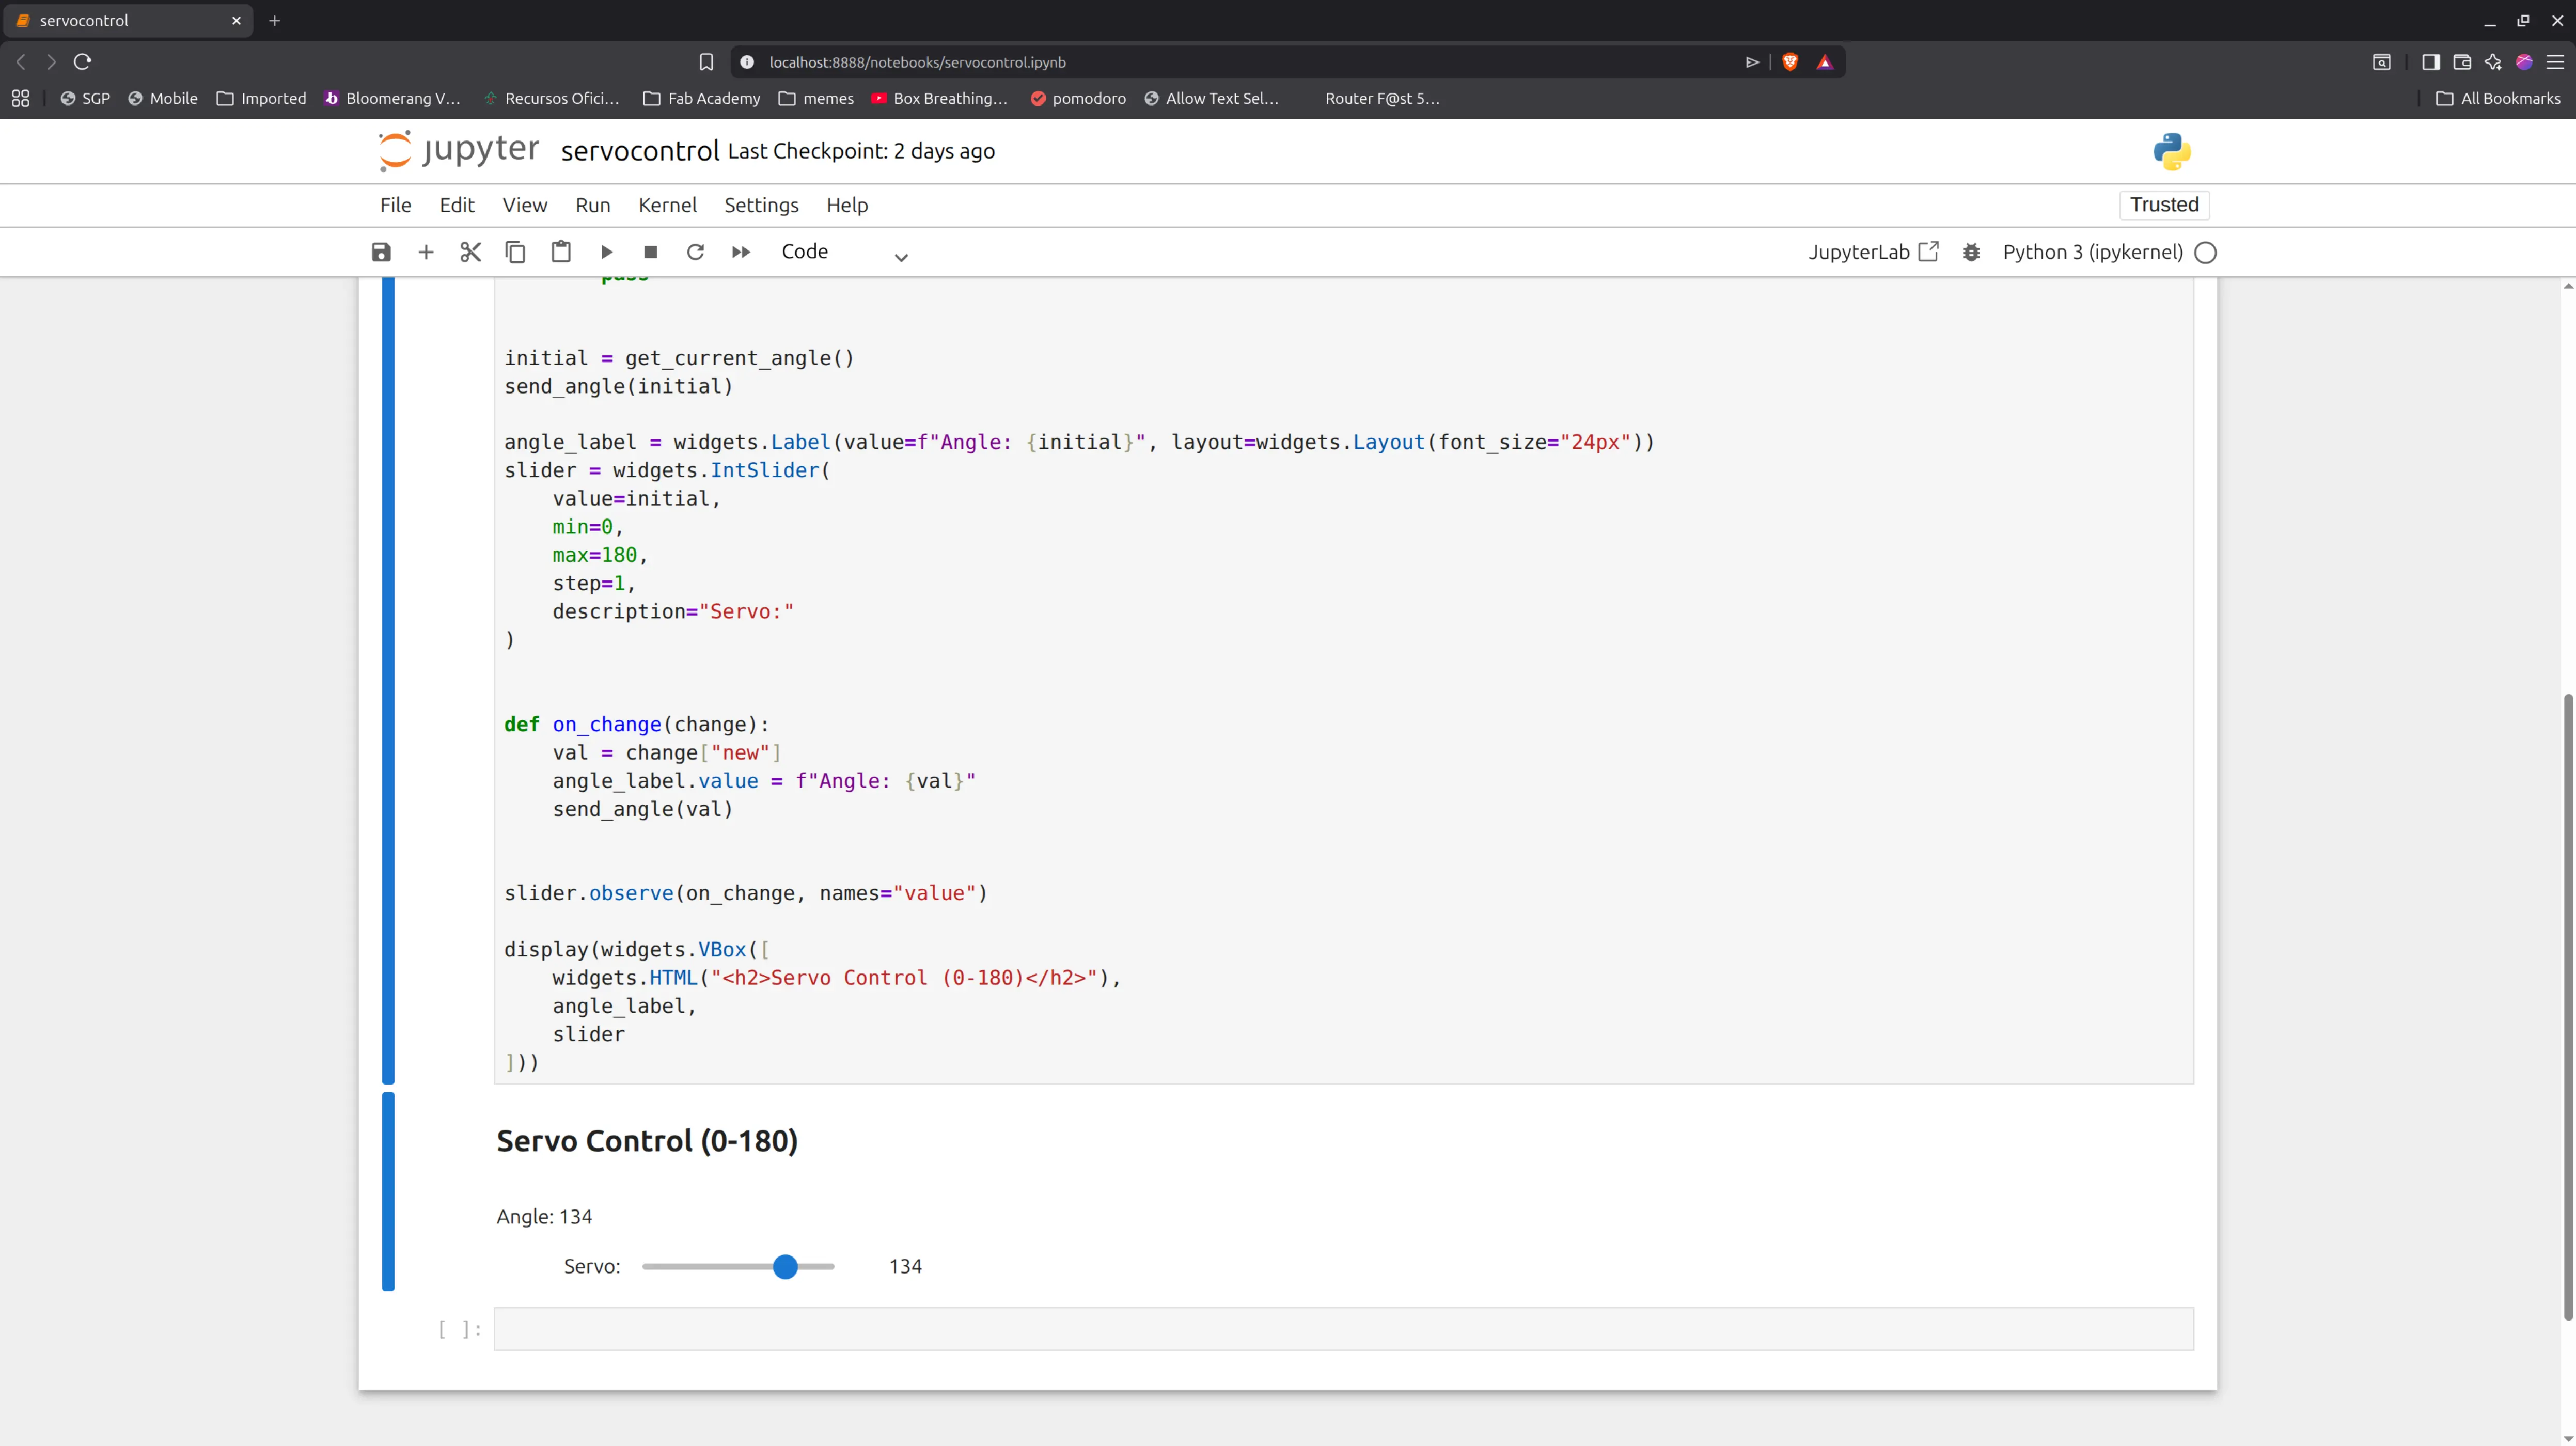
The code is simple and somewhat similar to the other simple python approaches I tried earlier, except this one runs in the browser and all the python code is interactive and can be changed in the browser.
Dataflow approaches
Node red
I also wanted try one of those dataflow frameworks Neil mentioned and node-red seems to be popular, so I picked this one.
I already had nodejs and npm installed on my system, and keeping up with the desire not to install anything globally, I installed node-red locally with:
npm install node-red
and ran it with:
npx node-red
I head up to http://127.0.0.1:1880/ and
Add the Dashboard Nodes
By default, Node-RED is just the “engine.” You need the “face” (Dashboard 2.0).
- Click the Menu (three horizontal lines, top right) > Manage palette.
- Go to the Install tab.
- Search for @flowfuse/node-red-dashboard.
- Click Install. ( the old node-red-dashboard; it’s deprecated).
There’s now more components I can use on the left palette under the dashboard 2 tab.
Create the Slider Interface
I now create the main visual component:
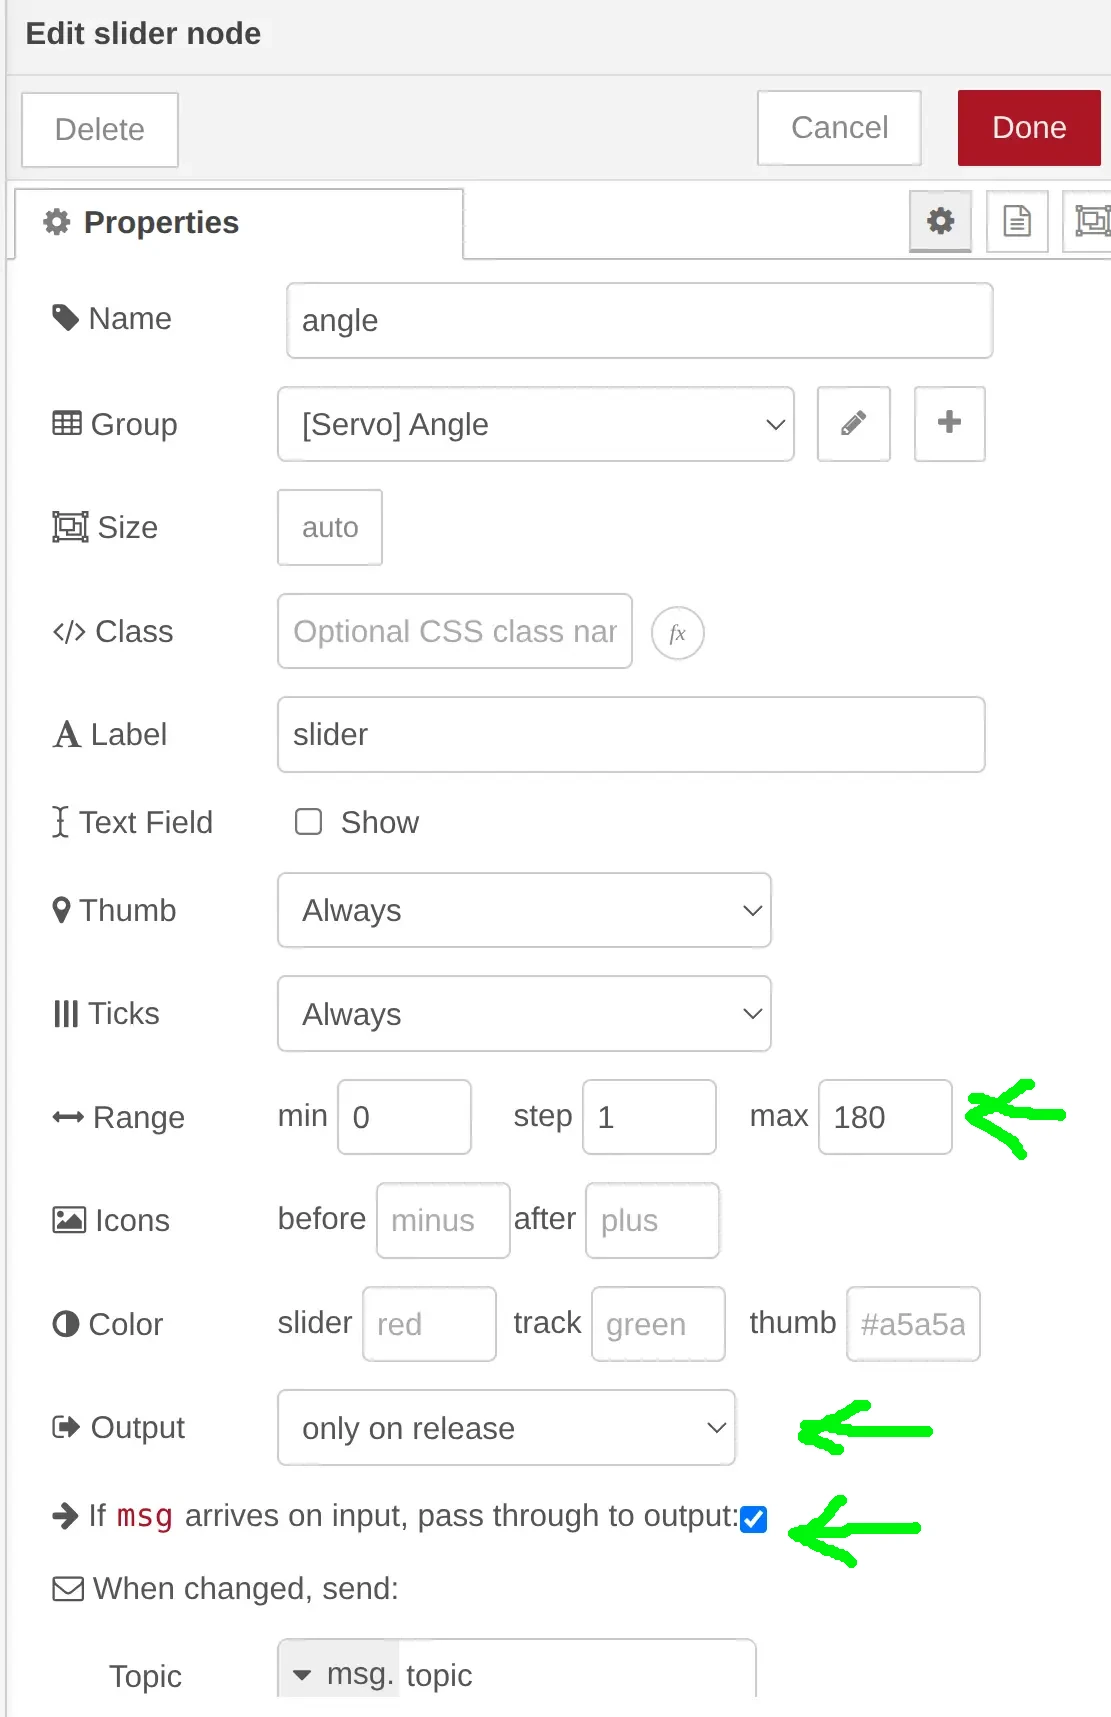
The Slider: I Drag a ui-slider node onto the canvas.
- Double-click it.
- Set Min to 0 and Max to 180.
- Under “Group,” click Add new ui-group. This creates a container for the slider.
- I also switch the output to “only on release” so it does not send requests while dragging the slider.
- and check “If msg arrives on input, pass through to output” so that getting an update to the slider value does not create a loop of changes, but just updates the slider
Then I add the action
The action
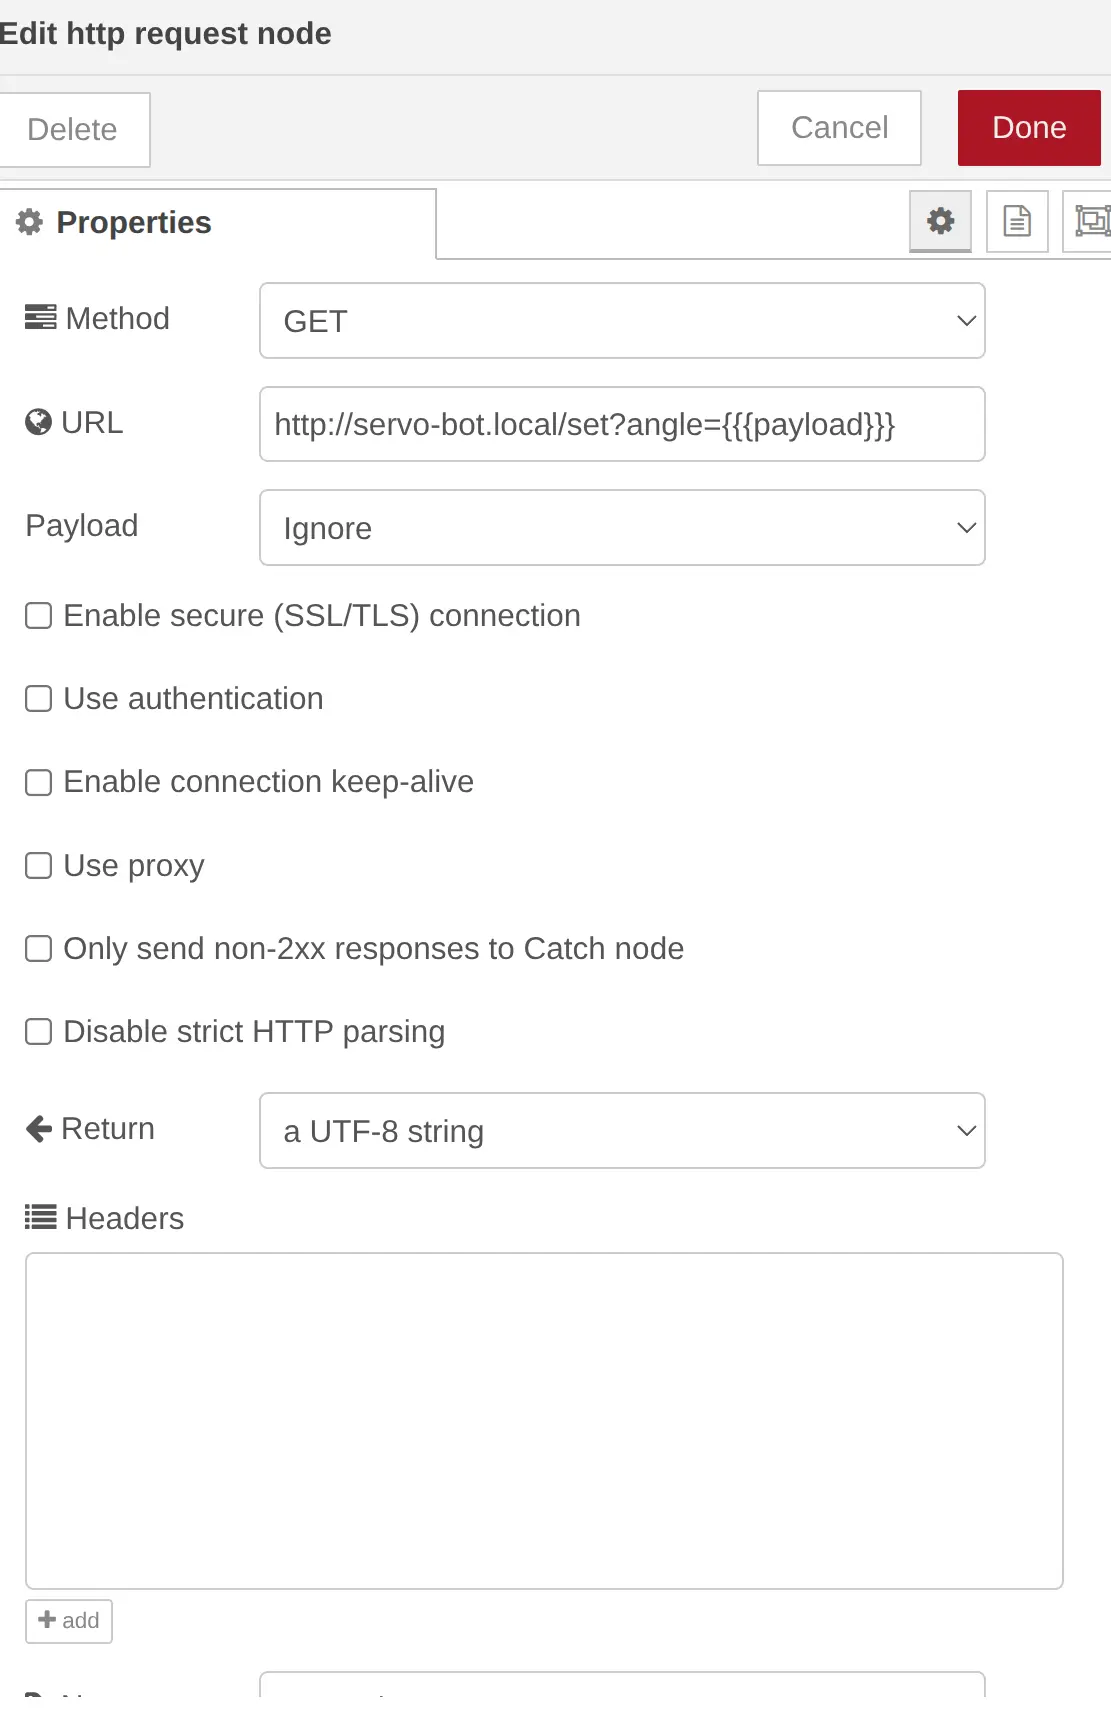
The Action: I Drag an http request node (found in the “network” section) onto the canvas.
- Double-click it
- Set Method to GET.
- In the URL field, I update the url of the servo-bot setter method:
Then I wire them together.
I’m still missing the initial check of the current angle, so I add another HTTP request like before, but update it to the getter method, and once configured, I wire it to the input of the slider.
The trigger
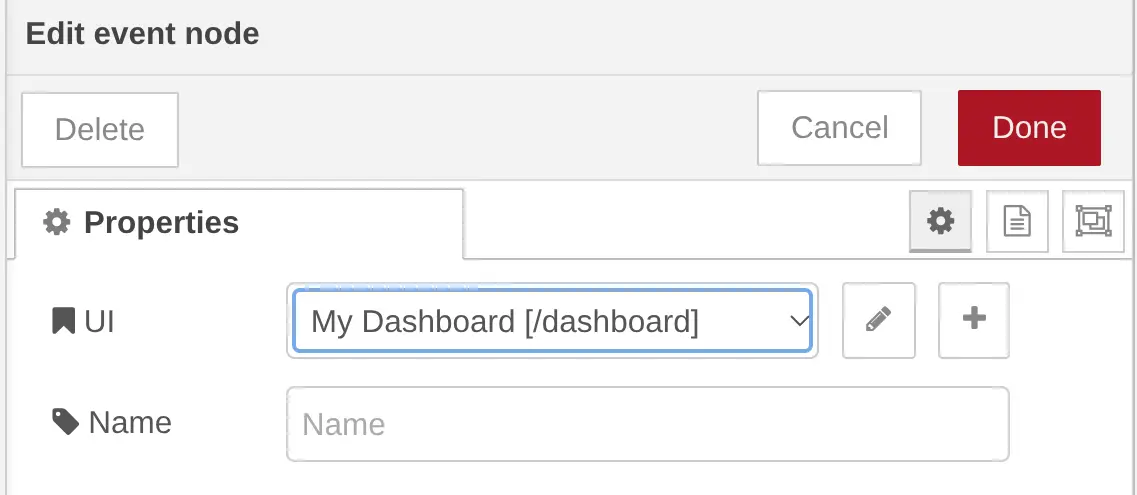
The only thing remaining is the trigger for the initial query. There are multiple ways to do this, like polling, but for me it would suffice that any new connection to the dashboard or refresh of the page triggers an update.
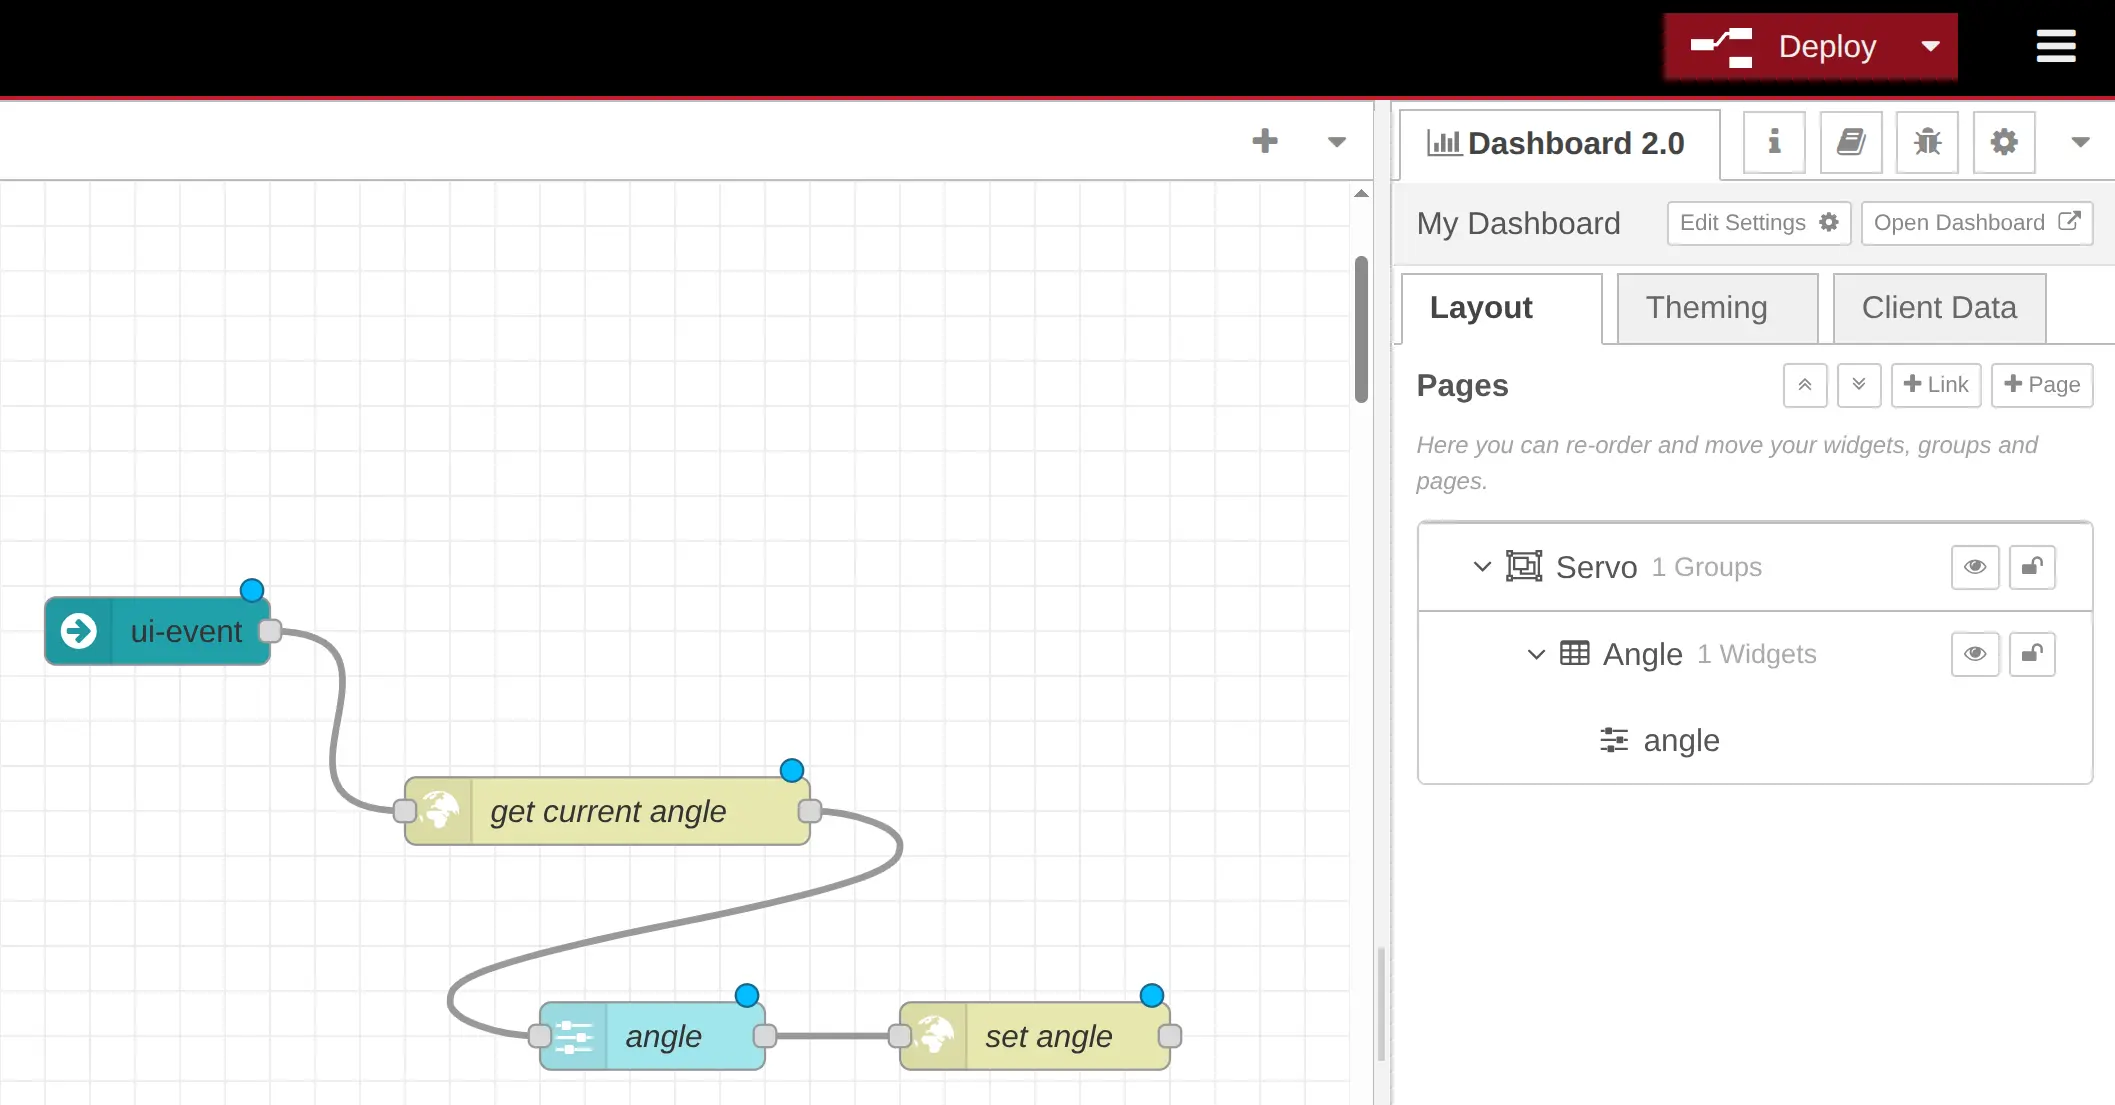
So I add a ui-event node, and make sure it points to this dashboard (as there could be others)
This node emits an event whenever a user loads or leaves the page, and I could have filtered on the page load only, but I don’t really mind laving it like this as it’s only a query
Finally I wire this component to the getter request.
I can further tweak the generic names of the page and sections so I click on the top right drop down, select dashboard 2 and update the names.
Here’s what the flow looks like:
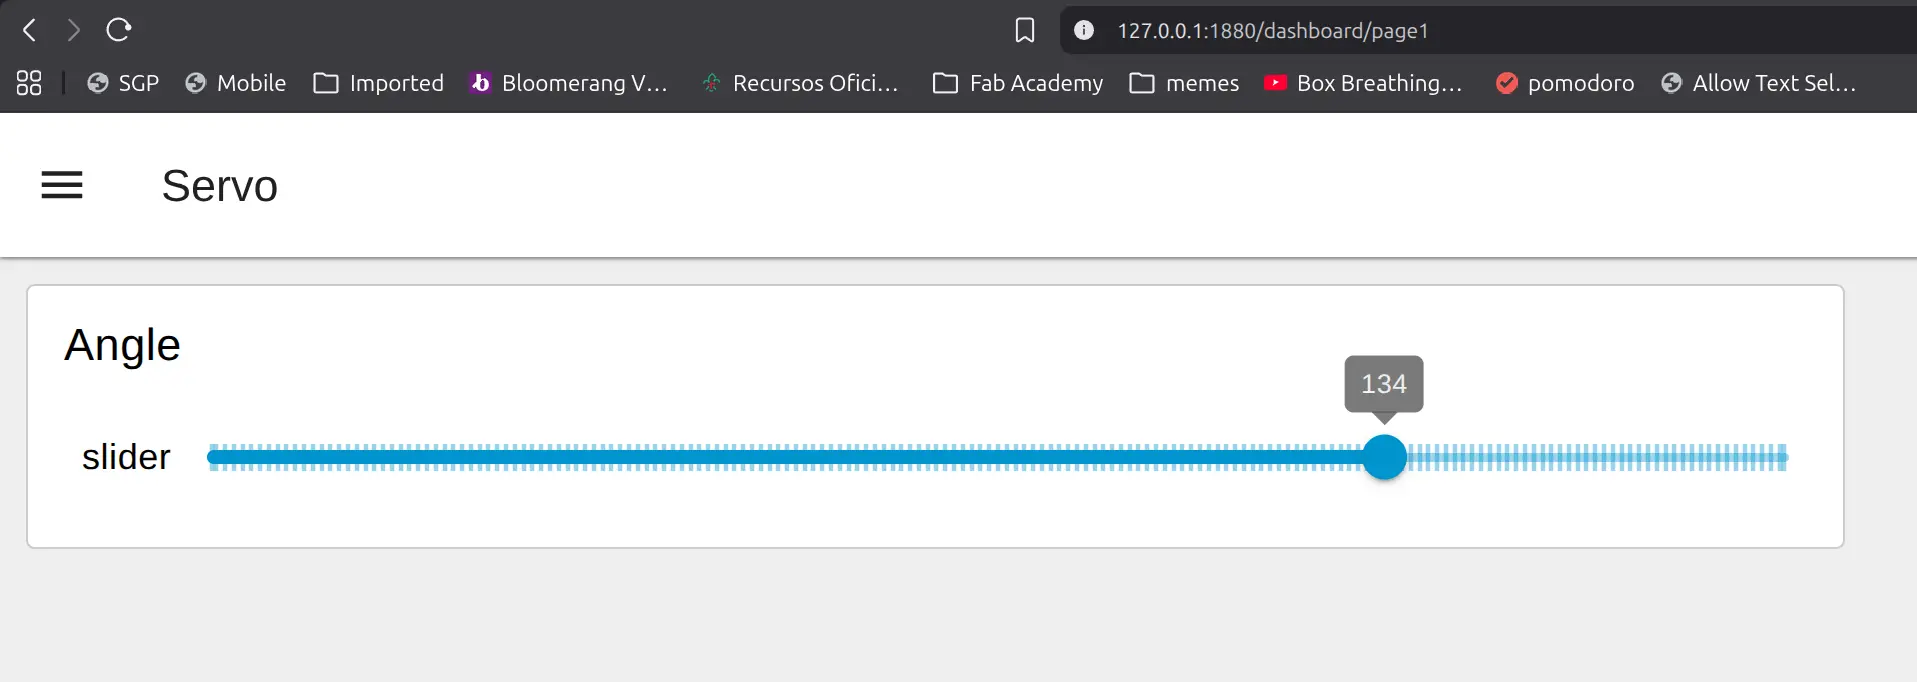
I finally click the big red Deploy button and head off to http://127.0.0.1:1880/dashboard/page1
and here’s what it looks like:
LabView
Finally I had used LabView back in my college days, and wanted to see how it compared nowadays.
It’s been a while, so I ask for a detailed step by step:
AI Prompt
I need very detailed instructions to set up the following:
I need a slider from 0 to 180 that performs a HTTP GET request to http://servo-bot.local/set?angle=myvalue . The initial value for the slider should come from another HTTP GET request to http://servo-bot.local/get that returns a single value between 0 and 180 as plain text as is only ran once at the start of the program.
While running, the program should just listen to slider changes and perform the GET with the angle.
The initial GET to get the current angle should not trigger another GET to set it.
I copied the instructions bellow and documented as I went along.
Open LabVIEW, then click File → New VI
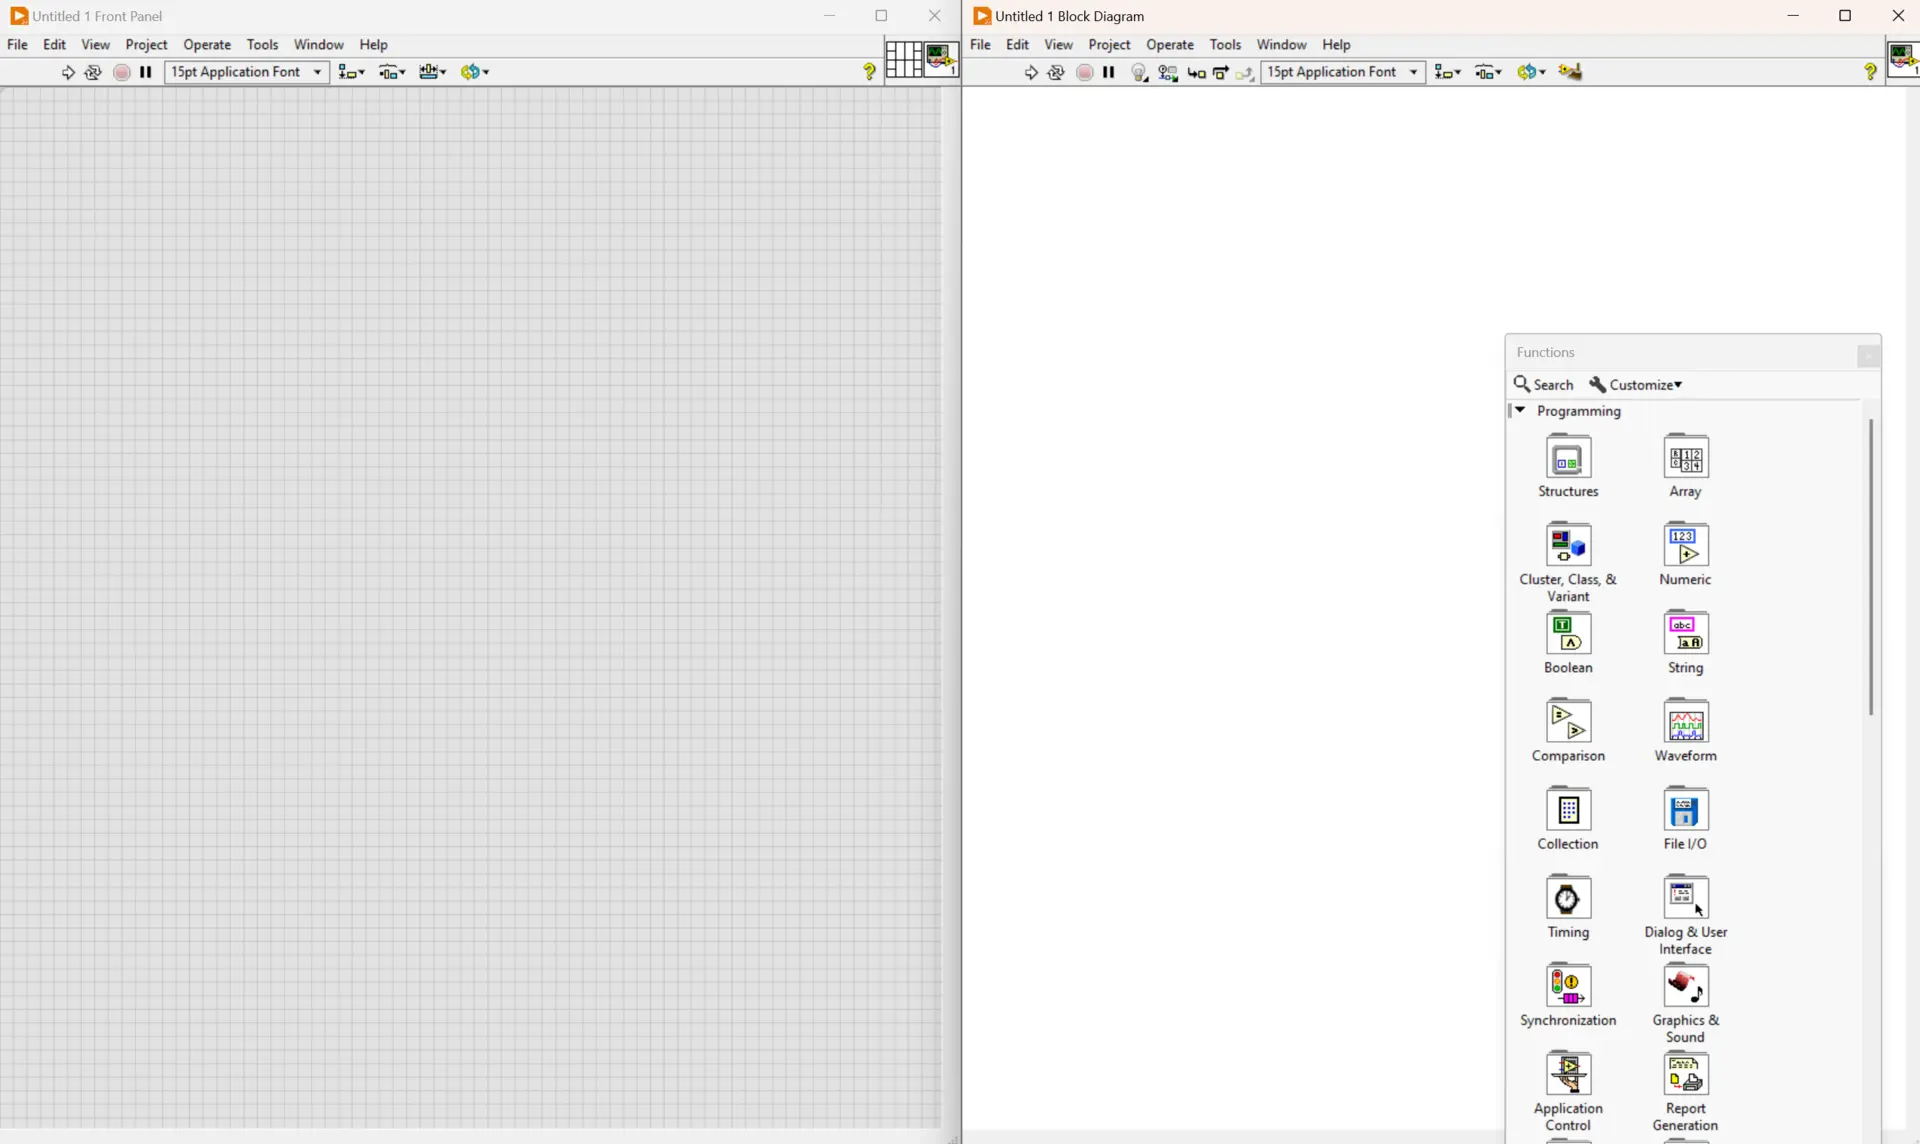
Step 1: Front Panel Setup (The UI)
- Right-click to open the Controls Palette and go to Numeric.
- Select and place a Horizontal Pointer Slide (or Vertical Pointer Slide).

- Double-click its label and rename it to
Servo Angle. -
Click on the text numbers of the slider scale and change the minimum to
0and the maximum to180.
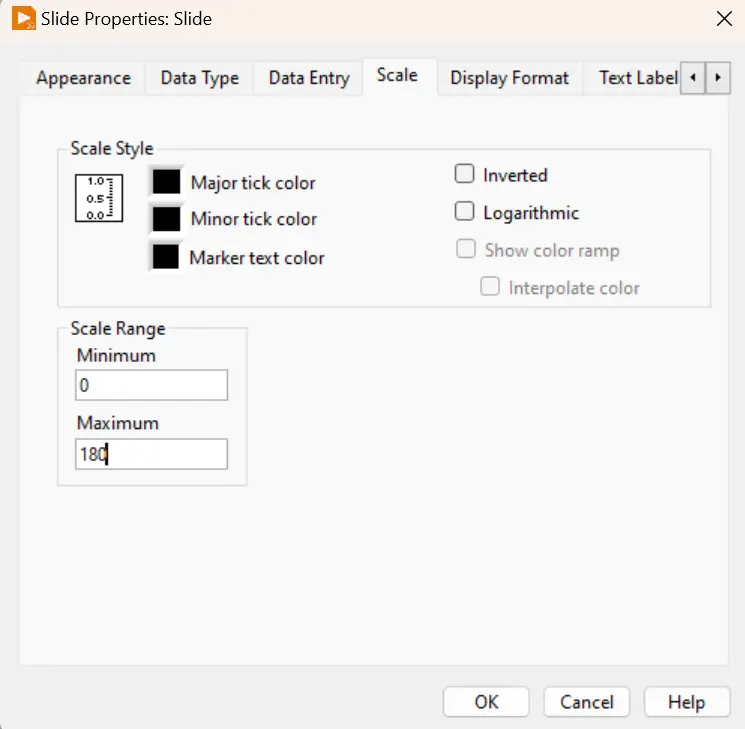
-
Right-click the slider, select Properties, go to the Data Type tab, and change it to an Integer type (like I32) so it only sends whole numbers.
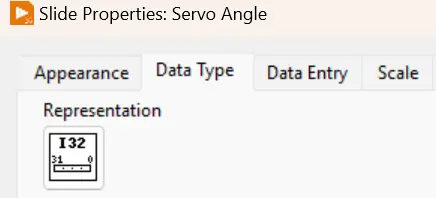
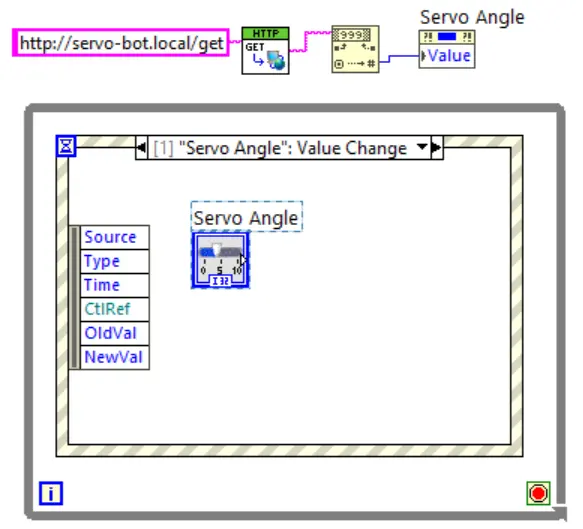
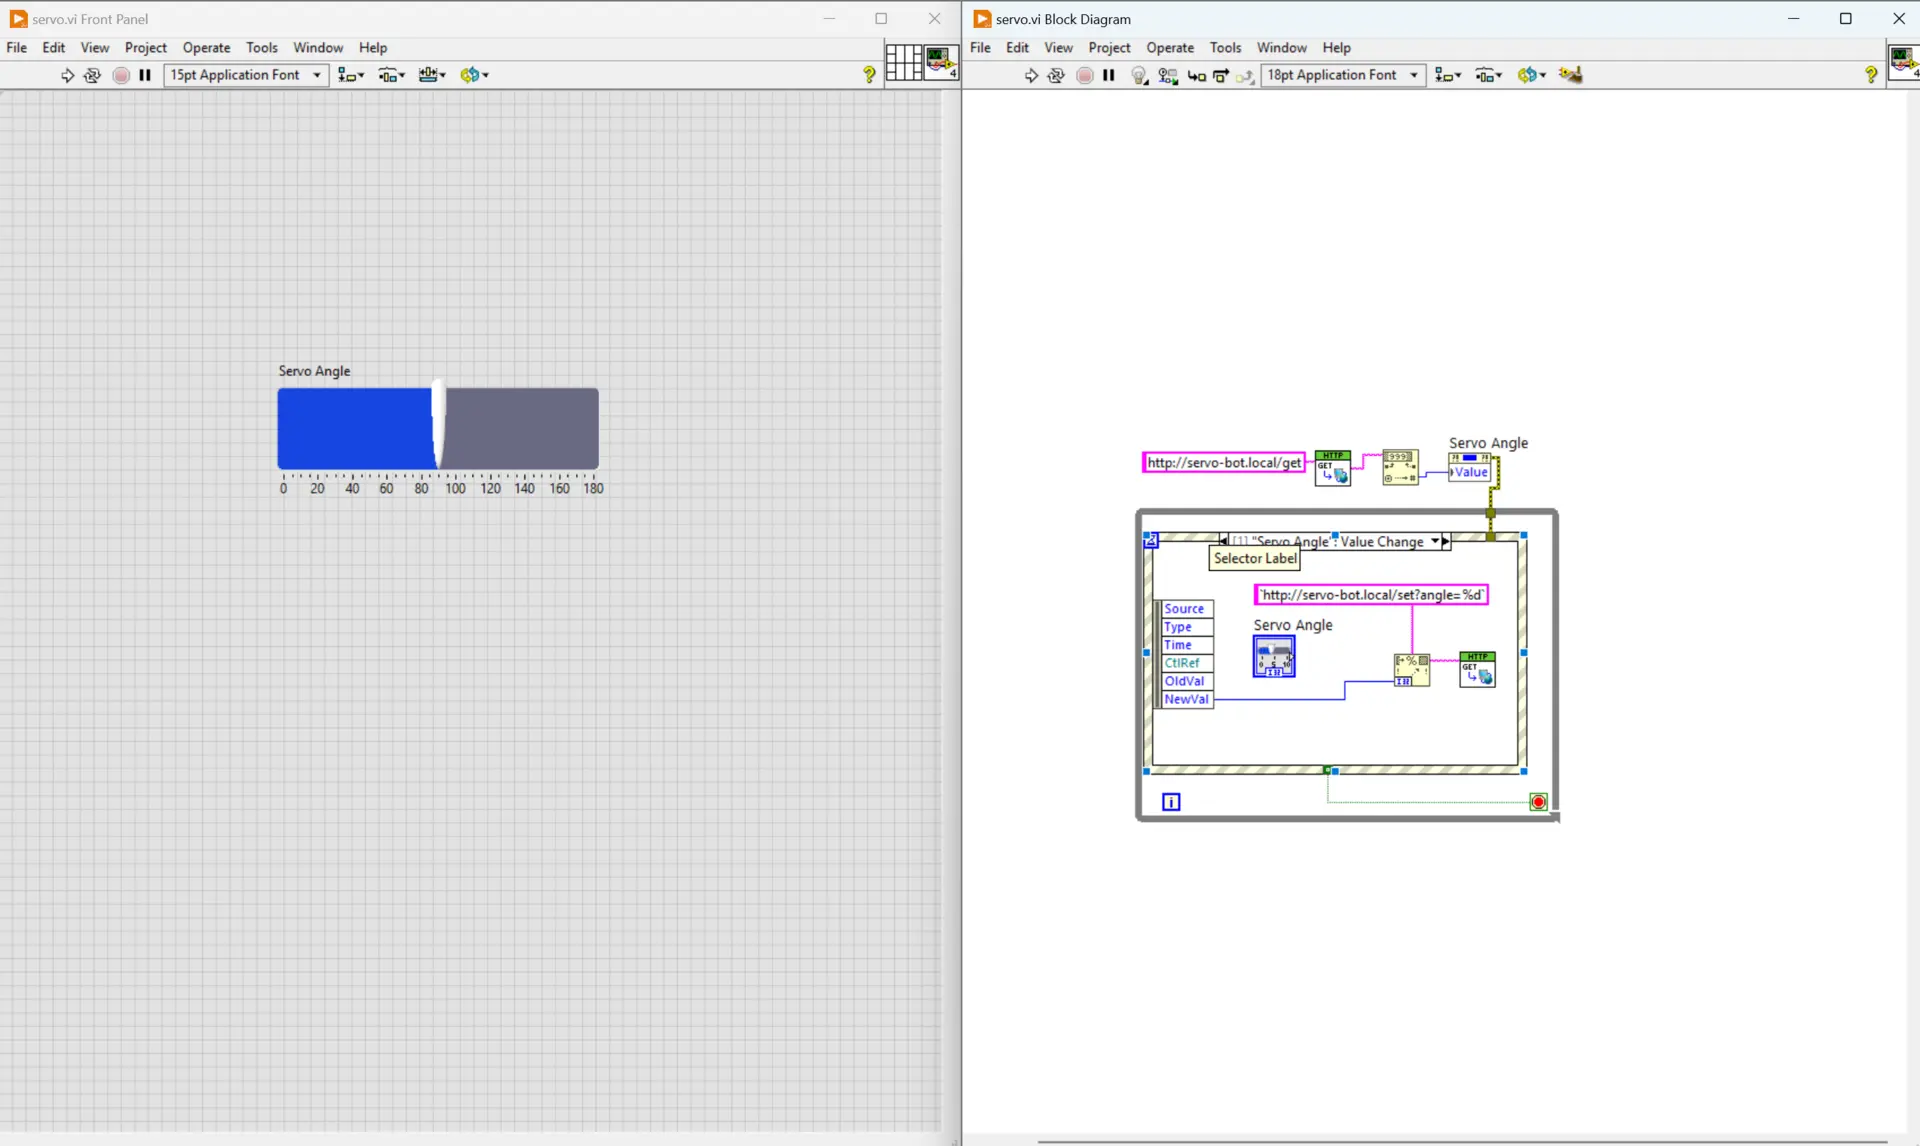
We get this (after resizing):

Step 2: The Initialization Path (Run Once at Startup)
Switch to the Block Diagram (Ctrl + E). We will build the “Run Once” logic entirely to the left of your main execution loop.
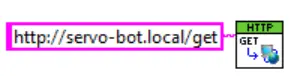
- Place the HTTP GET VI: Right-click the diagram, go to Data Communication -> Protocols -> HTTP Client, and select GET.vi. Place it on the far left.

- Set the URL: Right-click the URL input pin (top left of the GET VI), select Create -> Constant, and type:
http://servo-bot.local/get
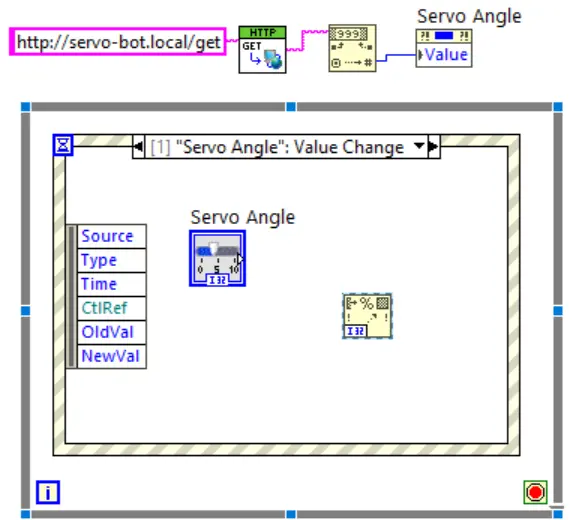
- Convert Plain Text to a Number: * Go to Programming -> String -> String/Number Conversion and select Decimal String To Number.vi.
- Wire the body text output pin (bottom right of the HTTP GET VI) into the string input pin of this conversion VI.

- Wire the body text output pin (bottom right of the HTTP GET VI) into the string input pin of this conversion VI.
- Initialize the Slider:
- Right-click your
Servo Angleterminal on the block diagram, go to Create -> Property Node -> Value. - Right-click the newly created Property Node and select Change to Write.
- Wire the integer value output from your conversion VI into the input of this Property Node.

- Right-click your
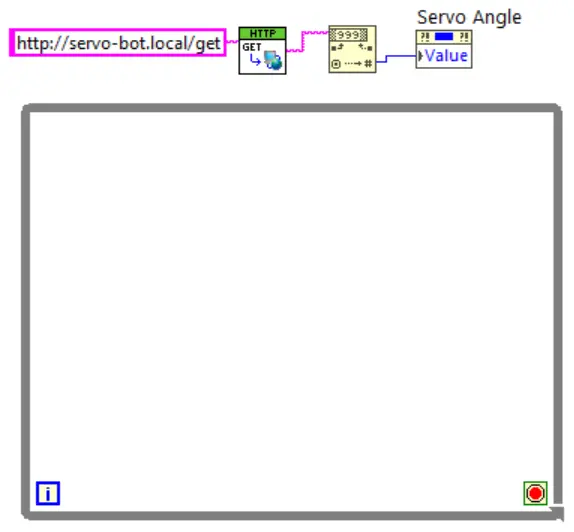
Because this sits completely detached outside of any loops, LabVIEW will execute this chain exactly once when you press the Run arrow.
Step 3: The Event-Driven Loop (Listen to Changes)
Now we build the loop that idles silently until you move the slider.
- Create the Loop: Go to Programming -> Structures and select While Loop. Draw a large box to the right of your initialization code.
-
Create the Event Structure: Go to Programming -> Structures and select Event Structure. Place it inside the While Loop.
-
Configure the Trigger: * Right-click the border of the Event Structure and select Add Event Case…
- In the dialog box, look under Event Sources, click on
Servo Angle. - Under Events, select Value Change. Click OK.

- In the dialog box, look under Event Sources, click on
-
Move the Control: Drag your green
Servo Angleterminal from the block diagram and place it physically inside this new event case window.
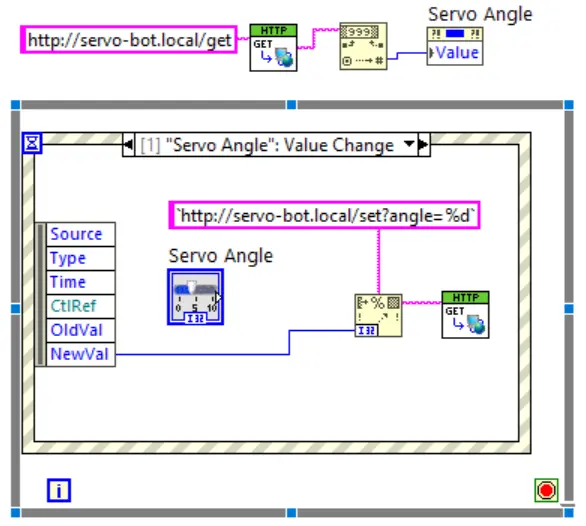
Step 4: The Command Path (Send the Angle)
Inside that Servo Angle: Value Change event window, we will build the outgoing URL dynamically.
- Build the String: Go to Programming -> String and select Format Into String.vi. Place it inside the event case.
- Configure the Format: Right-click the format string pin (top input) of that VI, select Create -> Constant, and type:
http://servo-bot.local/set?angle=%d(The%dtells LabVIEW to drop an integer here).
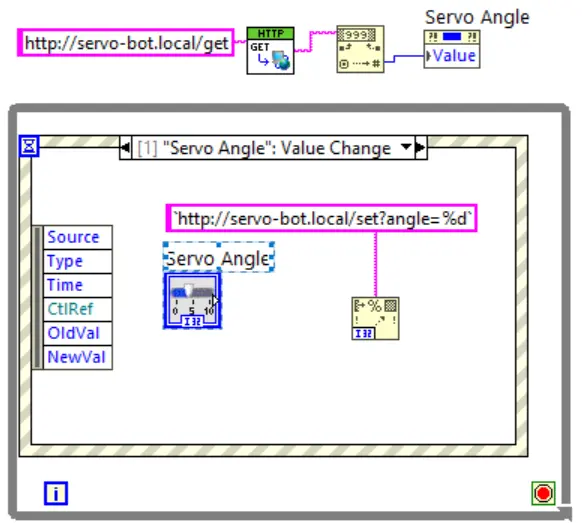
- Wire the Value: Look at the left border of your Event Structure case. You will see a data node labeled NewValue. Wire that node directly into the input 1 pin of the Format Into String VI.
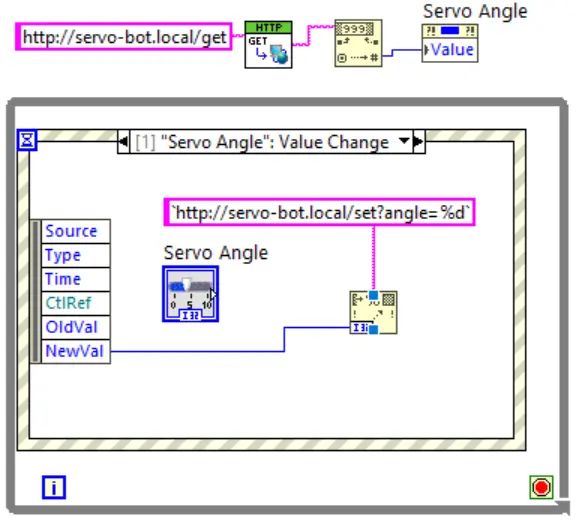
- Send the HTTP Request:
- Go back to Data Communication -> Protocols -> HTTP Client and grab another GET.vi. Place it inside the event case.
- Wire the output resulting string from your format VI directly into the URL input pin of this new HTTP GET VI.
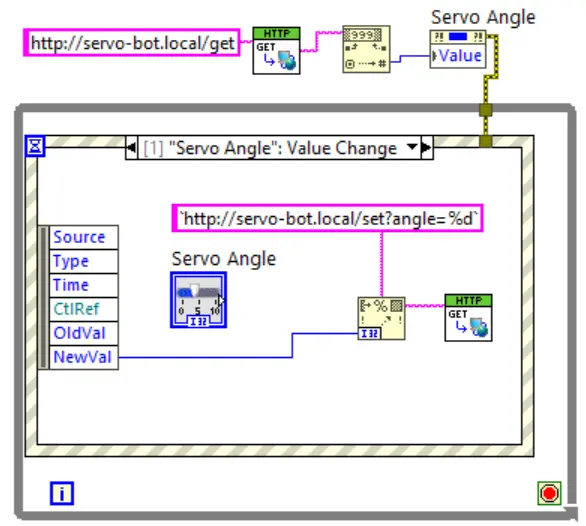
Step 5: Enforce Execution Order & Loop Control
To guarantee that the initialization finishes before the loop starts listening, we pass an error wire through them.
- Wire the error out cluster pin from your startup Property Node directly into the error in pin on the border of the While Loop, and connect it through to the inside components. This forces LabVIEW to wait for the startup sequence to finish before entering the loop.
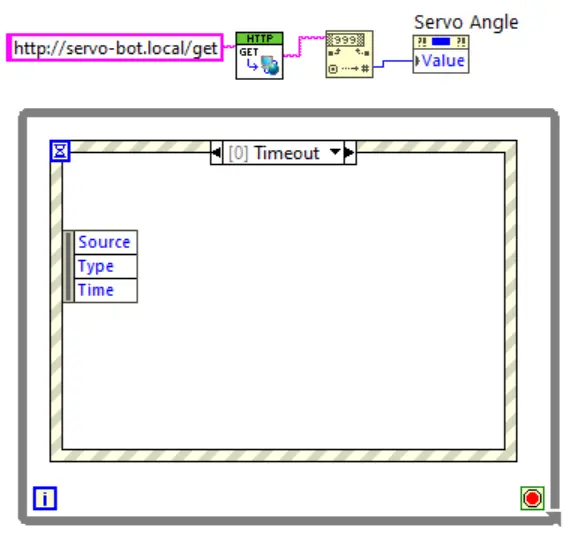
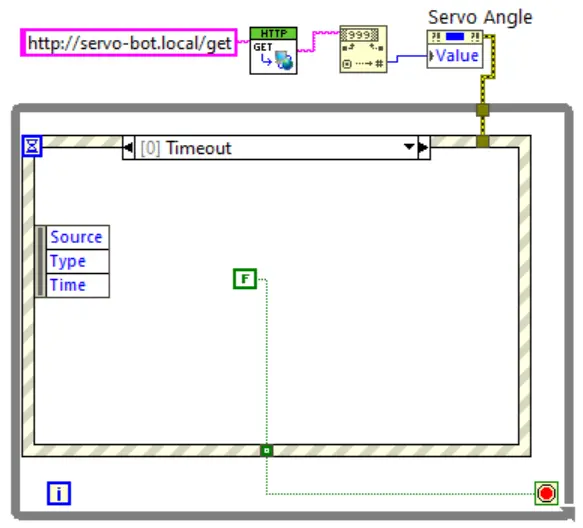
- Right-click the Timeout case of the Event Structure, create a
FalseBoolean constant, and wire it to the Loop Condition terminal (the red stop icon in the bottom right of the While Loop) so the loop runs indefinitely.
Everything put together:
Conclusions
There’s a range of options, from terminal to native to web based.
And there’s a range of languages, even though I mostly used only python for this exploration, but one can use just about any language that provides bindings to a specific UI toolkit.
The choice, I would say, depends mostly on familiarity with the language and framework.
If one needs really low level access or the ultimate customization, maybe a game engine based one.
The need for speed can also play a part in the choice of language or frameworks as python, for example, is interpreted and a compiled language like C++ will be faster.
The python notebook is interesting if one wants to provide other code with it for the purpose of being changed and played with it.
Node-red was also interesting if one wants to build in a more visual way, or wants to integrate something with other dashboards as it is a full ecosystem.
LabView has a comprehensive set of Virtual Instruments (UI, blocks, programming, etc) but I found several drawbacks: It’s not as intuitive or simple as node red, it’s a native, closed source system, and the UI looks seem to be decades old. Finally, even though it runs on Linux the support for higher screed DPIs was pretty bad and made everything unreadable until I had to lower he resolution.
Personally I prefer the simpler web based ones as HTML is pervasive and even if you have advanced graphics, there’s a lot that can be done with canvas or WebGL.