#11 Networking and Communications
This week I learned how to communicate between devices.
Assignment
Group assignment
- Send a message between two projects
Individual assignment
Outcomes
What did I do this week: 1. Group Assignment
The group assignment page - week11
Send a message between two projects
We tried communicating between a PC and a smartphone terminal using Bluetooth.
For details, please see the group page: The group assignment page - week11
What did I do this week: 2. Individual assignment
design, build and connect wired or wireless node(s) with network or bus addresses and a local input and/or output devices
Contents List
- Basics
- Practice - What I did
Wireless - wifi communication with xiao server
1-1.LED brink (test code)
1-2.NeoPixel (On/off with browser)
1-3.MPR121 (Click detection displayed in browser)
2.Wired - I2C(M: Master, S: Slave)
2-1.xiaoESP32C3(M)-xiaoRP2040(S)
2-2.xiaoESP32C3(M)-xiaoRP2040-MPR121(S)
2-3.Raspberry Pi(M)-ESP32C3(S) - Set up for RaspberryPi
Installing the Raspberry Pi OS
How to control it remotely
How to set up WiFi
How to send files
How to enable I2C
Testing video processing capabilities by version
Basics
Common communications for Fab beginners
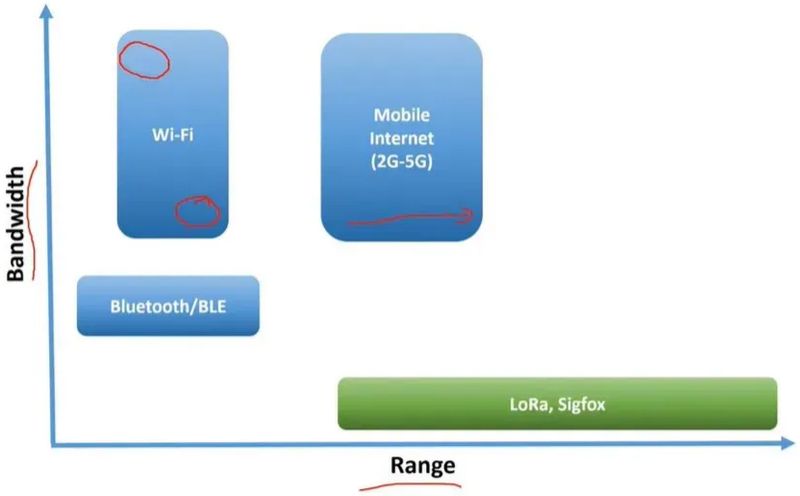
Wired Communication - Serial (send bit 1 by 1, Shorter- more data)
Asynchronous serial: No clock
UART: 2 wire(Tx, Rx),20kbps, 15m
Synchronous serial: clock - time agreement like conductor
I2C: 2 wire(SCL/SDA), 1Mbps, 1m
SPI: 4+ Wires(MISO, MOSI, etc), 25Mbps, 20cm, Lower power, use for USB
 (image from Rico-san’s notion)andYoutube
Wireless Communication
Bluetooth classic
BLE(Bluetooth Low Energy) : Energy efficient
Wifi: WebSocket, make Hotspot, ESP-NOW, etc
 (image from Rico-san’s notion)
What I confused:
BUS = a common pathway through which information flows from one component to many others (from Rico-san’s notion)
I2C protocol
SCL: clock line for synchronize the timing of sending data
SDA: data line for send data
*Need pullup resister to keep the voltage constant (voltage is not stable when there is no input)
Protocol configuration for I2C:
start bit (When SCL is high, SDA goes from high to low) + control byte(8 bit) + ACK(Acknowledge) bit (for communication agreement) + Data byte(8-16 bit) + NACK + Stop bit(When SCL goes high, and SDA goes high)
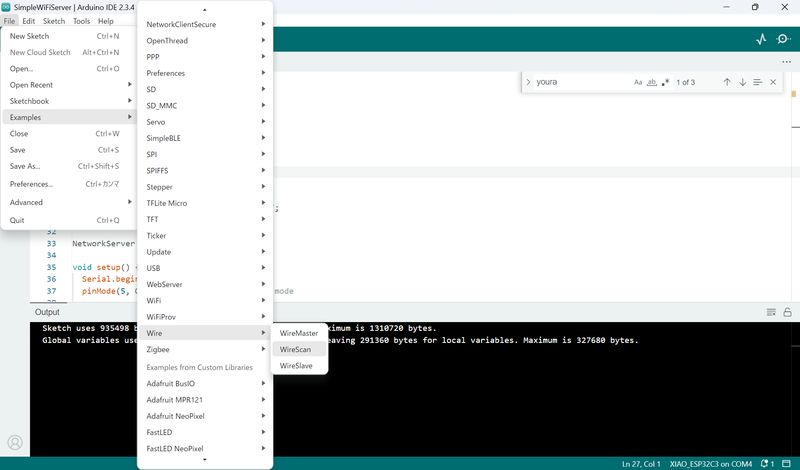
For Wired Communication, you have to use “Wire.h" library on Arduino IDE.
WireScan: the test code to find a device address.
*The back of the I2C device has a unique address, 0x something.
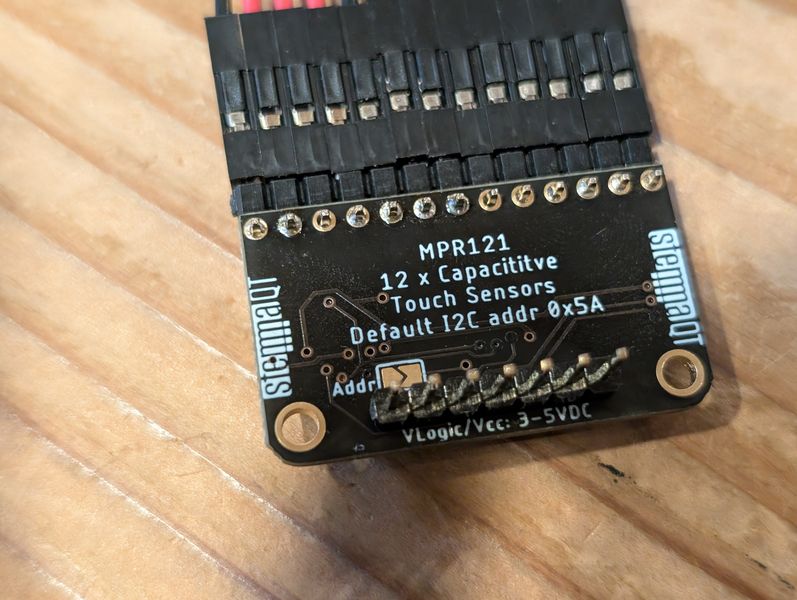
WireSlave: Load it into the child device and declare the address
WireMaster: Load it on the parent device and send commands to the child
*In the case of the MPR121 sensor, the address is already determined, so there is no need to declare a slave-like address.
*MPR121 addresses by the connection destination of the ADDR pin (addressing is done by hardware, not software)
Practice - What I did
I tried various communications that I might use for Final Project.
WIreless - wifi communication with xiao server
1-1.LED brink (test code)
1-2.NeoPixel (On/off with browser)
1-3.MPR121 (Click detection displayed in browser)
2.Wired - I2C(M: Master, S: Slave)
2-1.xiaoESP32C3(M)-xiaoRP2040(S)
2-2.xiaoESP32C3(M)-xiaoRP2040-MPR121(S)
2-3.Raspberry Pi(M)-ESP32C3(S)
*Set up for RaspberryPi (homework from Output week)
Note for adjusting touch sensitivity for MPR121(homework from input week)
WIreless - wifi communication with xiao server
1-1.LED brink (test code)
Firstly, I tried the test code ”SimpleWiFiServer” from “WiFi.h” library.
Reference:
Document by Georg-san
https://fabacademy.org/2021/labs/kamakura/students/georg-tremmel/weekly/w8/
First, I couldn’t connect at all.
I tried to change server with Nagano-san’s recommendation as below.
This is because other member also connect with same wifi and to avoid conflicts.
NetworkServer server(8060);
However, finally, I found that I mistyped ssid…
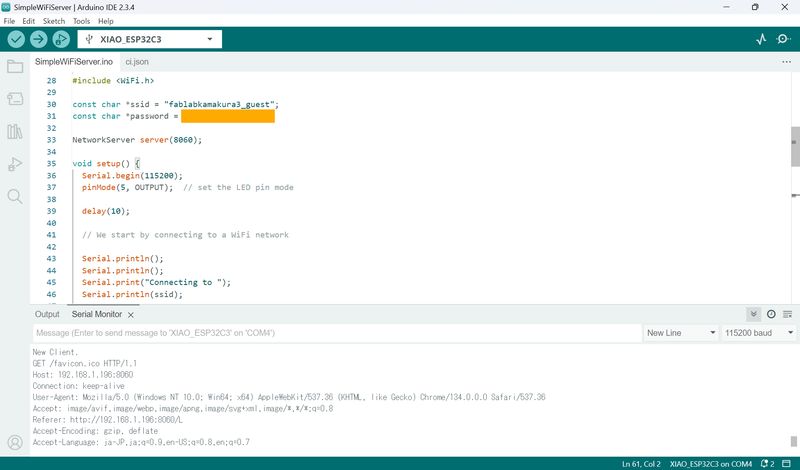
It shows the address on the serial monitor, so I tried to connect the address from the browser.
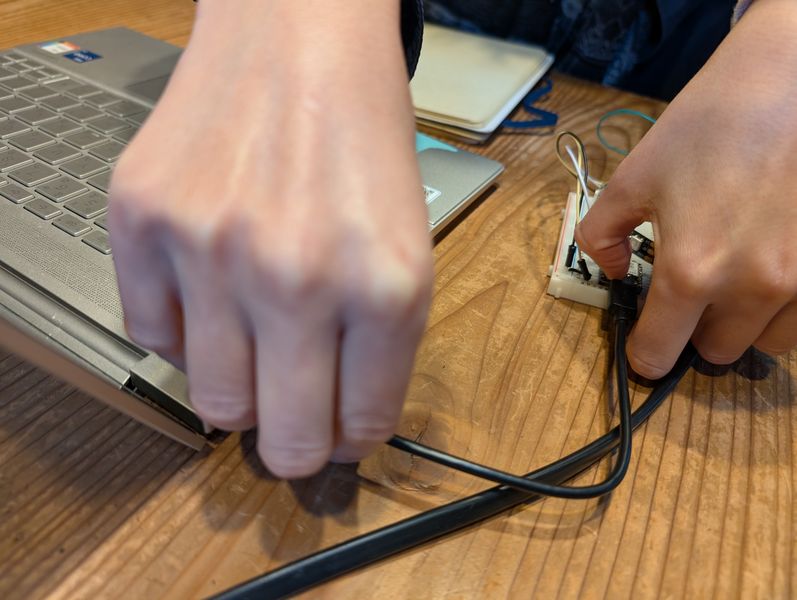
I also had problem that xiao doesn’t recognized….
- Check if it connected from device manager
- To reboot it, press boot button and connect to USB port
Then, it is recognized!!
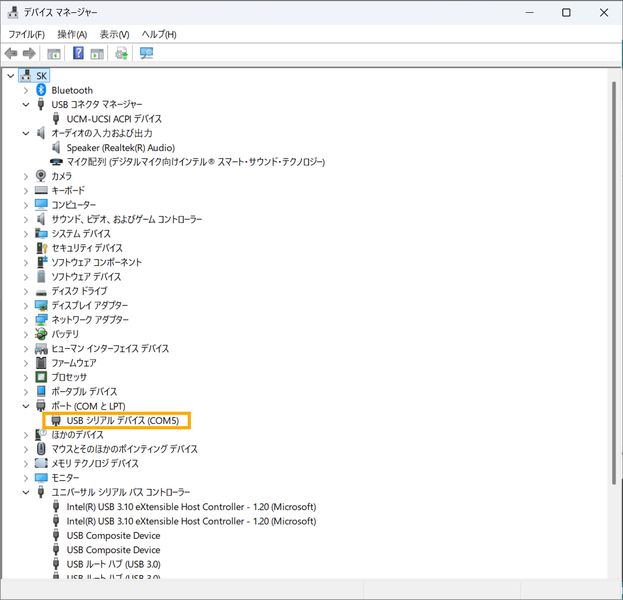
Debugging Check List:
Check Wifi ID!!
Press boot button and connect xiao!!
Check if it connected from device manager
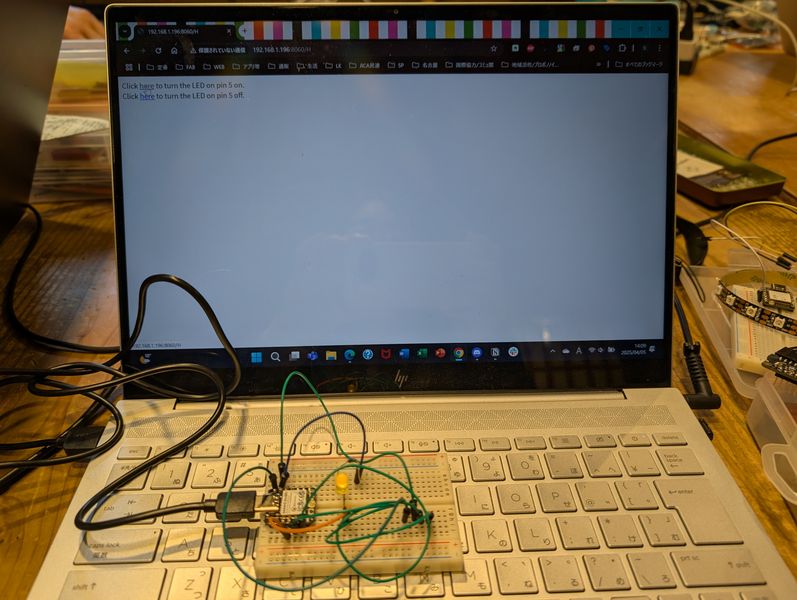
1-2.NeoPixel (On/off with browser)
I tried to turn on and off NeoPixel from the browser. I made it from ”SimpleWiFiServer” test code and the code I made last week for NeoPixel.
The code is below:
/*
 WiFi Web Server Neopixel Blink
 */
#include <WiFi.h>
#include <Adafruit_NeoPixel.h>
   #ifdef __AVR__
     #include <avr/power.h>
   #endif

#define PIN 8
#define NUMPIXELS 19 // Popular NeoPixel ring size

Adafruit_NeoPixel strip = Adafruit_NeoPixel(20, PIN, NEO_BGR + NEO_KHZ800);

const char *ssid = "Pixel_5581";
const char *password = "ziqc6fxvzgpsjjp";

NetworkServer server(8070);

void setup() {
  Serial.begin(115200);
  pinMode(4, OUTPUT);  // set the LED pin mode
  strip.begin();
  strip.setBrightness(10); // set brightness
  strip.show(); // Initialize all pixels to 'off'

  delay(10);

  // We start by connecting to a WiFi network

  Serial.println();
  Serial.println();
  Serial.print("Connecting to ");
  Serial.println(ssid);

  WiFi.begin(ssid, password);

  while (WiFi.status() != WL_CONNECTED) {
    delay(500);
    Serial.print(".");
  }

  Serial.println("");
  Serial.println("WiFi connected.");
  Serial.println("IP address: ");
  Serial.println(WiFi.localIP());

  server.begin();
}

void loop() {
  NetworkClient client = server.accept();  // listen for incoming clients

  if (client) {                     // if you get a client,
    Serial.println("New Client.");  // print a message out the serial port
    String currentLine = "";        // make a String to hold incoming data from the client
    while (client.connected()) {    // loop while the client's connected
      if (client.available()) {     // if there's bytes to read from the client,
        char c = client.read();     // read a byte, then
        Serial.write(c);            // print it out the serial monitor
        if (c == '\n') {            // if the byte is a newline character

          // if the current line is blank, you got two newline characters in a row.
          // that's the end of the client HTTP request, so send a response:
          if (currentLine.length() == 0) {
            // HTTP headers always start with a response code (e.g. HTTP/1.1 200 OK)
            // and a content-type so the client knows what's coming, then a blank line:
            client.println("HTTP/1.1 200 OK");
            client.println("Content-type:text/html");
            client.println();

            // the content of the HTTP response follows the header:
            client.print("Click <a href=\"/H\">here</a> to turn the LED on pin 5 on.<br>");
            client.print("Click <a href=\"/L\">here</a> to turn the LED on pin 5 off.<br>");

            // The HTTP response ends with another blank line:
            client.println();
            // break out of the while loop:
            break;
          } else {  // if you got a newline, then clear currentLine:
            currentLine = "";
          }
        } else if (c != '\r') {  // if you got anything else but a carriage return character,
          currentLine += c;      // add it to the end of the currentLine
        }

        // Check to see if the client request was "GET /H" or "GET /L":
        if (currentLine.endsWith("GET /H")) {
          digitalWrite(5, HIGH);  // GET /H turns the LED on
          rainbow(100);
        }
        if (currentLine.endsWith("GET /L")) {
          digitalWrite(5, LOW);  // GET /L turns the LED off
          colorWipe(strip.Color( 0, 0, 0), 50);
        }
      }
    }
    // close the connection:
    client.stop();
    Serial.println("Client Disconnected.");
  }
}

   void rainbow(uint8_t wait) {
     uint16_t i, j;

     for(j=0; j<256; j++) {
       for(i=0; i<strip.numPixels(); i++) {
         strip.setPixelColor(i, Wheel((i+j) & 255));
       }
       strip.show();
       delay(wait);
     }
   }

   uint32_t Wheel(byte WheelPos) {
     WheelPos = 255 - WheelPos;
     if(WheelPos < 85) {
       return strip.Color(255 - WheelPos * 3, 0, WheelPos * 3);
     }
     if(WheelPos < 170) {
       WheelPos -= 85;
       return strip.Color(0, WheelPos * 3, 255 - WheelPos * 3);
     }
     WheelPos -= 170;
     return strip.Color(WheelPos * 3, 255 - WheelPos * 3, 0);
   }

   void colorWipe(uint32_t color, int wait) {
  for(int i=0; i<strip.numPixels(); i++) { // For each pixel in strip...
    strip.setPixelColor(i, color);         //  Set pixel's color (in RAM)
    strip.show();                          //  Update strip to match
    delay(wait);                           //  Pause for a moment
  }
}
It worked!
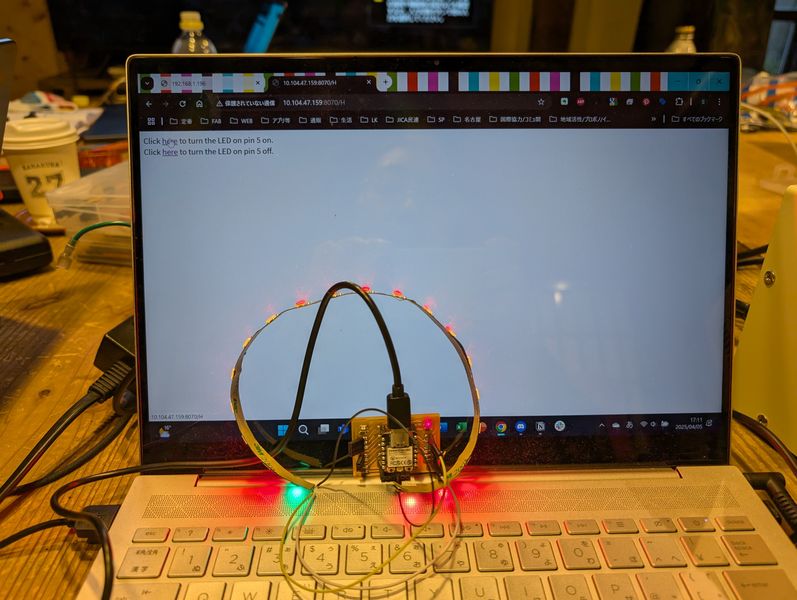
However, the NeoPixel were lighting up a little strangely. This will need to be adjusted if I use this in the Final Project.
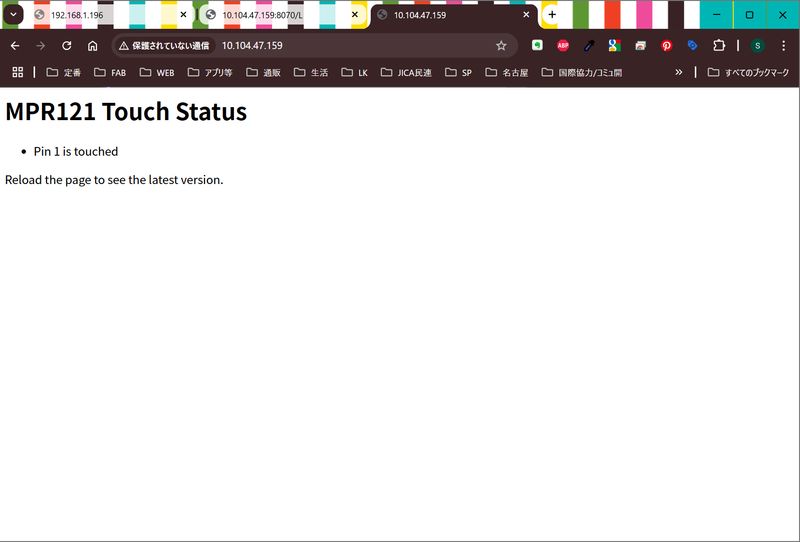
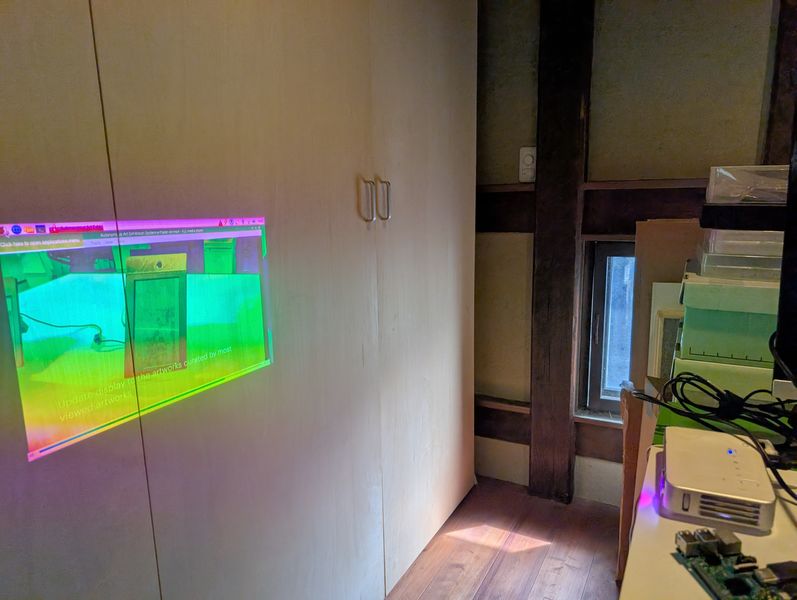
1-3.MPR121 (Click detection displayed in browser)
I wrote a code that combined “WifiServer” and “MPR121”sample codes, but I didn't know how to reflect the HTML, so I asked ChatGPT about that.
I just put my code and asked what should I fix.
      client.println("<html><body>");
      client.println("<h1>MPR121 Touch Status</h1>");
      client.println("<ul>");
      for (uint8_t i = 0; i < 12; i++) {
        if (currtouched & _BV(i)) {
          client.print("<li>Pin ");
          client.print(i);
          client.println(" is touched</li>");
        }
      }
      client.println("</ul>");
      client.println("<p>Reload the page to see the latest version.</p>");
      client.println("</body></html>");
I also add
delay(10);
However, it didn’t work.
I asked ChatGPT again with the same way. The answer is:
✅ Things to try first
1.Delete while (!Serial)
2.Change NetworkServer to WiFiServer
3.Check the wiring and I2C address (0x5A) of the MPR121
And it works!
Final code is as shown:
#include <WiFi.h>
#include <Wire.h>
#include "Adafruit_MPR121.h"

#ifndef _BV
#define _BV(bit) (1 << (bit))
#endif

const char *ssid = "Pixel_5581";
const char *password = "ziqc6fxvzgpsjjp";

WiFiServer server(80);
WiFiClient client = server.available();
Adafruit_MPR121 cap = Adafruit_MPR121();

// Keeps track of the last pins touched
// so we know when buttons are 'released'
uint16_t lasttouched = 0;
uint16_t currtouched = 0;

void setup() {
  Serial.begin(9600);

   if (!cap.begin(0x5A)) {
    Serial.println("MPR121 not found, check wiring?");
    while (1);
  }
  Serial.println("MPR121 found!");

  Serial.println();
  Serial.println();
  Serial.print("Connecting to ");
  Serial.println(ssid);

  WiFi.begin(ssid, password);

  while (WiFi.status() != WL_CONNECTED) {
    delay(500);
    Serial.print(".");
  }

  Serial.println("");
  Serial.println("WiFi connected.");
  Serial.println("IP address: ");
  Serial.println(WiFi.localIP());

  server.begin();

}

void loop() {
  currtouched = cap.touched();  // Get the currently touched pads
  NetworkClient client = server.accept();  // listen for incoming clients

  if (client) {                     // if you get a client,
    Serial.println("New Client.");  // print a message out the serial port
    String currentLine = "";        // make a String to hold incoming data from the client
    while (client.connected()) {    // loop while the client's connected
      if (client.available()) {     // if there's bytes to read from the client,
        char c = client.read();     // read a byte, then
        Serial.write(c);            // print it out the serial monitor
        if (c == '\n') {            // if the byte is a newline character
          if (currentLine.length() == 0) {
            client.println("HTTP/1.1 200 OK");
            client.println("Content-type:text/html");
            client.println();

            // the content of the HTTP response follows the header:
      client.println("<h1>MPR121 Touch Status</h1>");
      client.println("<ul>");
      for (uint8_t i = 0; i < 12; i++) {
        if (currtouched & _BV(i)) {
          client.print("<li>Pin ");
          client.print(i);
          client.println(" is touched</li>");
        }
      }
      client.println("</ul>");
      client.println("<p>Reload the page to see the latest version.</p>");

            client.println();
            break;
          } else {  // if you got a newline, then clear currentLine:
            currentLine = "";
          }
        } else if (c != '\r') {  // if you got anything else but a carriage return character,
          currentLine += c;      // add it to the end of the currentLine
        }
      }
    }
    // close the connection:
    delay(10);
    client.stop();
    Serial.println("Client Disconnected.");
  }

  // reset our state
  lasttouched = currtouched;

  // comment out this line for detailed data from the sensor!
  return;

  // put a delay so it isn't overwhelming
  delay(100);
}
Result:
2.Wired - I2C(M: Master, S: Slave)
2-1.xiaoESP32C3(M)-xiaoRP2040(S)
I tried the code from Maki-san.
■Master
#include "Wire.h"

//define the address
#define SLAVE_ADDR 9
#define SLAVE_ADDR2 8

#define ANSWERSIZE 5

void setup() {
// put your setup code here, to run once:
Wire.begin();
Serial.begin(9600);

Serial.println("I2C Master");

}

void loop() {
// put your main code here, to run repeatedly:
delay(50);

Serial.println("Write data to Slave");
/*
Wire.beginTransmission(SLAVE_ADDR);
Wire.write(0);
Wire.endTransmission();
Serial.println("Receive Data");
Wire.requestFrom(SLAVE_ADDR, ANSWERSIZE);
*/
String resp = " ";
transData(SLAVE_ADDR, resp);
Serial.println(resp);

transData(SLAVE_ADDR2, resp);
Serial.println(resp);
}

void transData(int s_addr, String response){
Wire.beginTransmission(s_addr);
Wire.write(0);
Wire.endTransmission();

Serial.print("Receive Data from");
Serial.println(s_addr);
Wire.requestFrom(s_addr, ANSWERSIZE);

// String response = " ";
response = " ";
while(Wire.available()){
char b = Wire.read();
Serial.print(b);
response += b;
}
}
■Slave
#include "Wire.h"

//define the address
#define SLAVE_ADDR 9

#define ANSWERSIZE 5

String answer = "Hello";

void setup() {
  // put your setup code here, to run once:
  Wire.begin(SLAVE_ADDR);

  Wire.onRequest(requestEvent);

  Wire.onReceive(receiveEvent);

  Serial.begin(9600);
  Serial.println("I2C Slave Demonstration");

}

void receiveEvent(int howbyte){
  while(0 < Wire.available()){
    byte x = Wire.read();
  }

  Serial.println("Receive Event");
}

void requestEvent(){
  byte response[ANSWERSIZE];

  for(byte i=0;i<ANSWERSIZE; i++){
    response[i] = (byte)answer.charAt(i);
  }
    Wire.write(response, sizeof(response));
    Serial.println("Request Event");

}

void loop() {
  // put your main code here, to run repeatedly:
  delay(50);

}
It worked correctly!
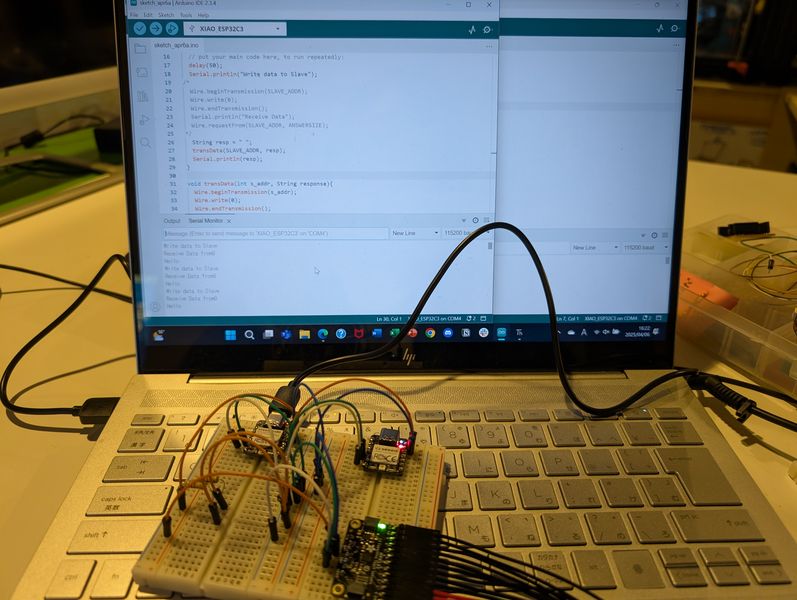
I also wanted to brink LED, but finally no time to do that.
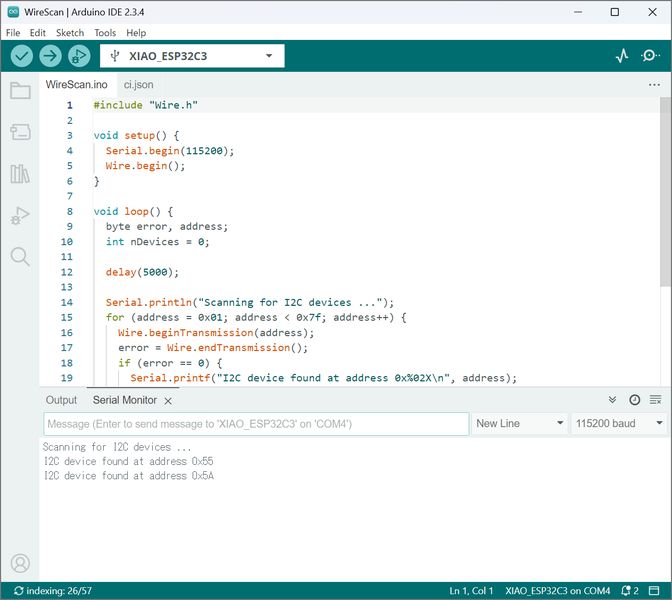
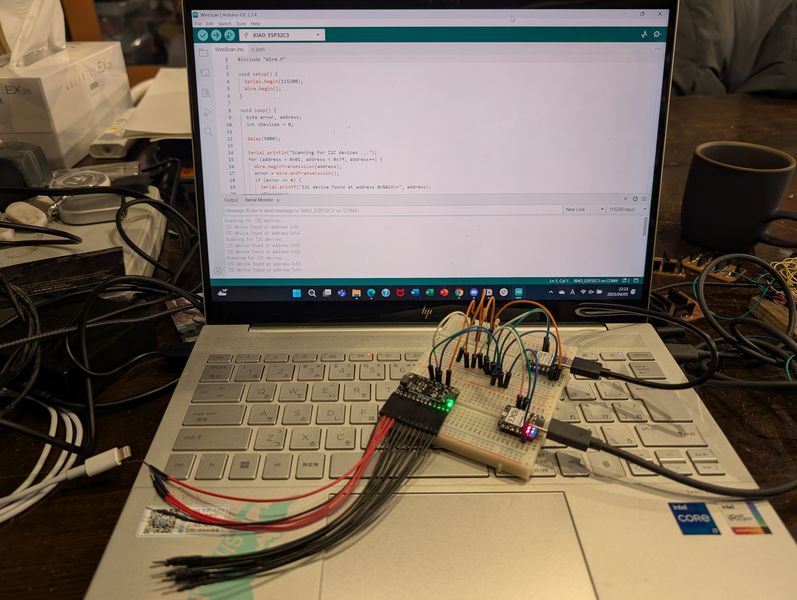
2-2.xiaoESP32C3(M)-xiaoRP2040-MPR121(S)
I tried “WireScan” test code for these 3 devices.
I also wanted to try touch and turn on LED on RP2040, but this has not yet been realized.
2-3.Raspberry Pi(M)-ESP32C3(S)
In the Final Project, I want to use a Raspberry Pi for projection, so I also tried communicating with Raspberry Pi.
Load the slave code into Xiao. I used the code provided by Maki-san above.
Check the connection with “i2c detect” command
Make master code into python (helped by Tsuchiya-san). The behavior differed slightly depending on the library, and it was difficult to get it to respond properly, but after adjusting various things, I was able to get it to work well with the following code.
  import smbus

  bus = smbus.SMBus(1)  # I2C-1
  address = 0x09

  data = bus.read_i2c_block_data(address, 0, 5)
  print("Raw bytes:", data)
  message = ''.join([chr(byte) for byte in data])
  print("Received:", message)
Set up for Raspberry Pi
- Installing the Raspberry Pi OS
- How to control it remotely
- How to set up WiFi
- How to send files
- How to enable I2C
Testing video processing capabilities by version
I worked on these with the help of Tsuchiya-san
Installing the Raspberry Pi OS
Download OS from here: https://www.raspberrypi.com/software/Install OS to SD card
Reference:
https://pages.switch-science.com/Pi400GS/3_installing_raspberry_pi_os.html
https://raspi-school.com/getting-started-with-raspberrypi/
https://raspi-school.com/getting-started-with-raspberrypi/
Settings: Choose OS (filtered by device), and select SD card as strage
How to control it remotely
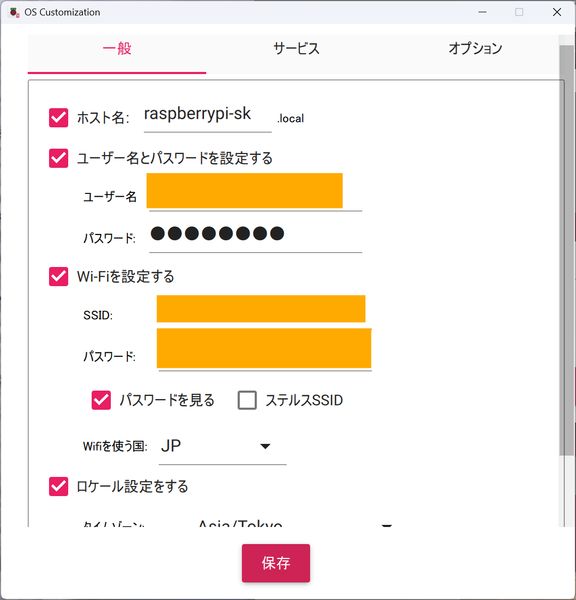
To connect remotely, the following Wi-Fi settings are required during the OS installation phase.- set host name, user name and password
- set Wi-Fi
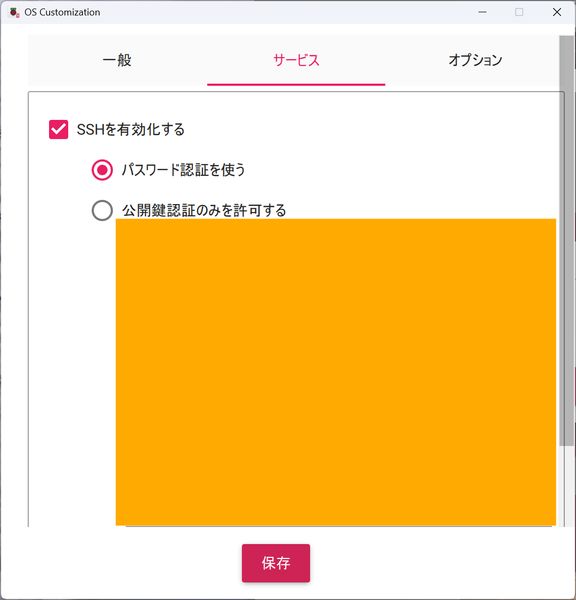
- Enable SSH
Remotely connect to the Raspberry Pi from the terminal (you can connect with a username and IP address)
VNC settings (allow remote access)
Open the VNC viewer and enter the IP address to access
*Do not disconnect the WiFi connection when you want to connect remotely!!!
You can also add new WiFi
*You should download VNC viewer for remote desktop:

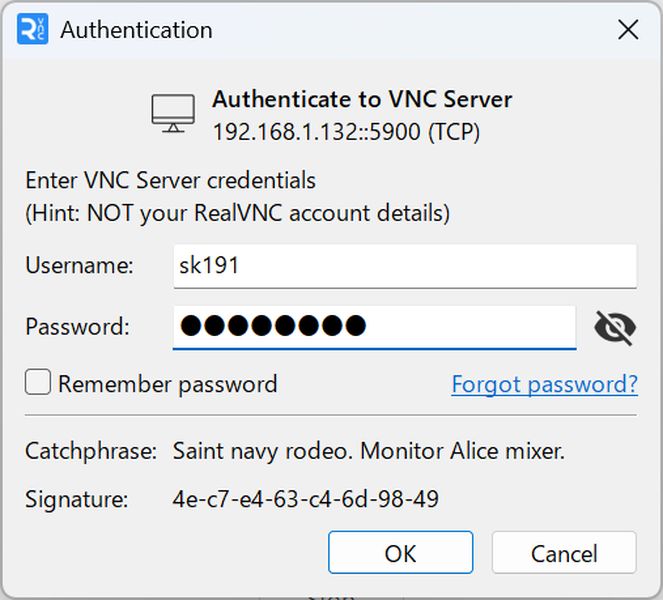
Open VNC Viewer, and set Username and pass
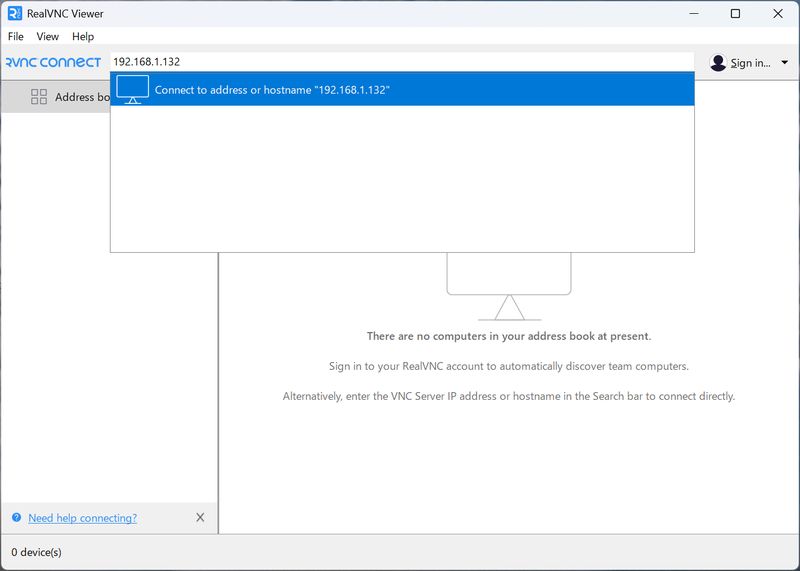
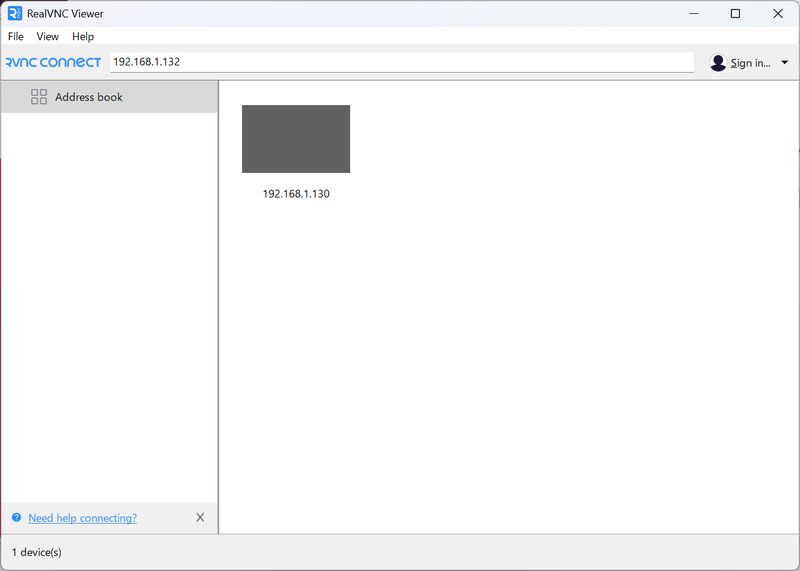
Choose address, and you can operate Raspberry Pi remotely
*Above is GUI, but you can also control it with CUI
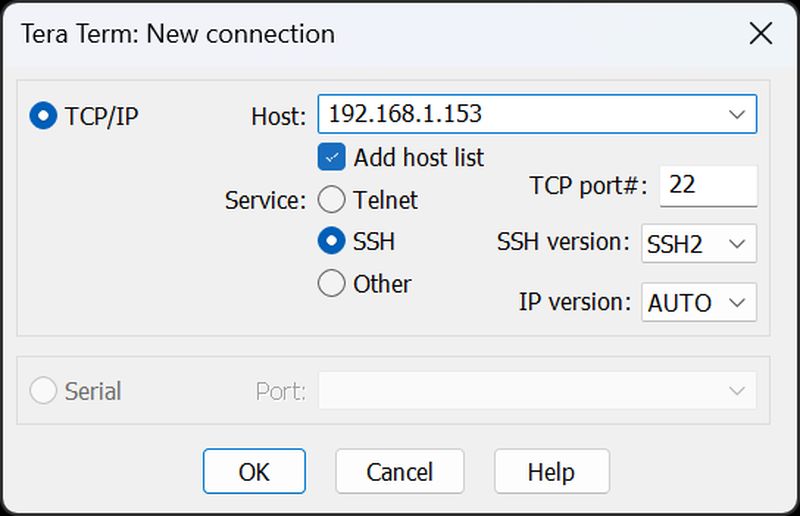
I used Tera Term
https://teratermproject.github.io/
https://github.com/TeraTermProject/teraterm/releases
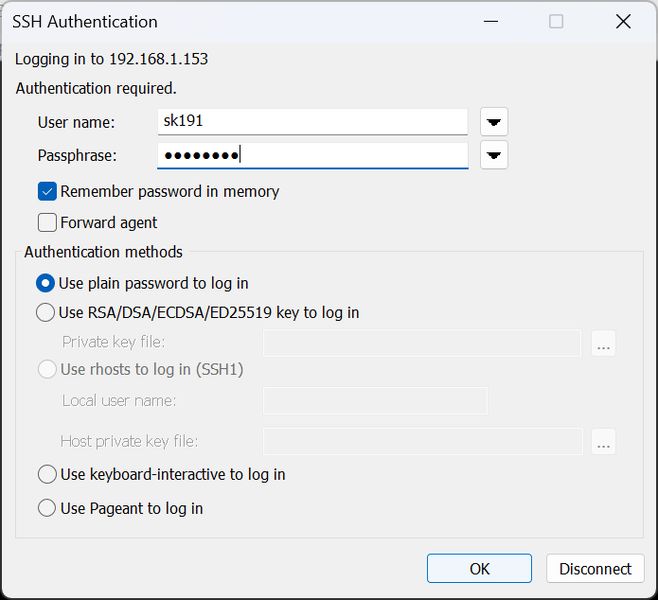
Choose TCP/IP, set Host as Raspberry Pi address, select SSH and connect
How to set up WiFi
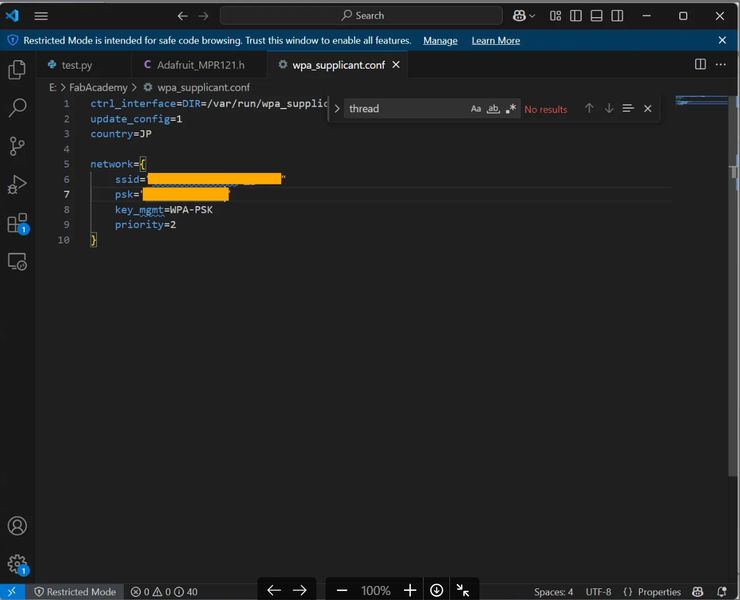
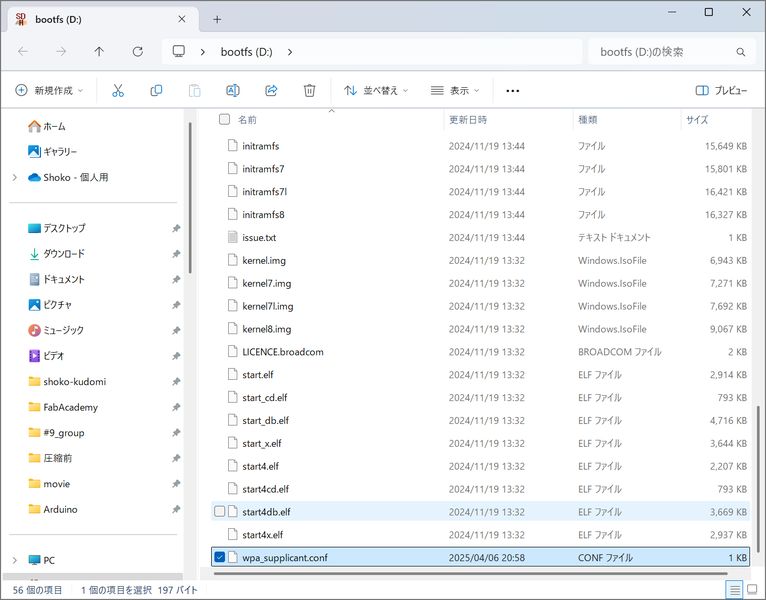
- Create “wpa_supplicant.conf” file.
- Load the created file onto the SD card with the OS.
- Connections are made in order from the top. List the primary at the top.
- The file will disappear after being loaded once. It is loaded into the system.
- When new connection destinations are added, the file will be recreated and loaded again.
Reference: https://qiita.com/otibosi/items/115d4b85d386fa670a58
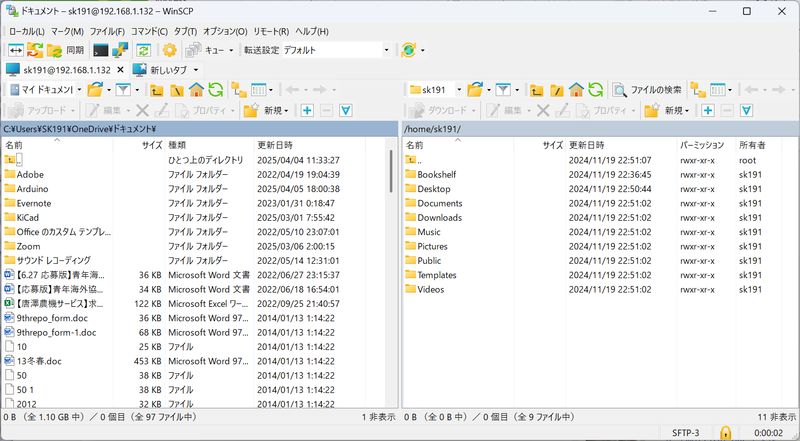
How to send files
Put files into Raspberry Pi via SFTP connection
Install FTP software (winSCP)
https://forest.watch.impress.co.jp/library/software/winscp/download_10950.html
login and connect to the address with SFTP
You can now send and receive files between your PC and Raspberry Pi.
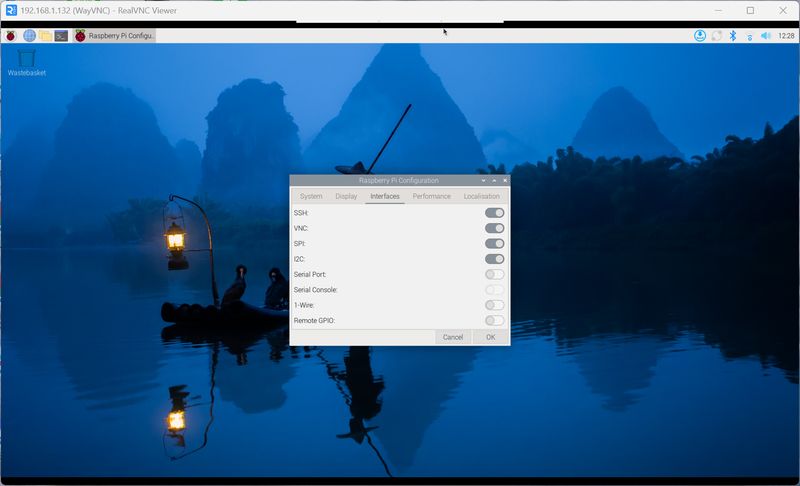
How to enable I2C
Open Raspberry Pi Config and enable I2c.
Testing video processing capabilities by version
I sent video data to Raspberry Pi and did a playback test.
Raspberry Pi Zero → Not smooth
Raspberry Pi 3 → Somewhat not smooth
Raspberry Pi 4 → OK
Raspberry Pi 5 → Super smooth
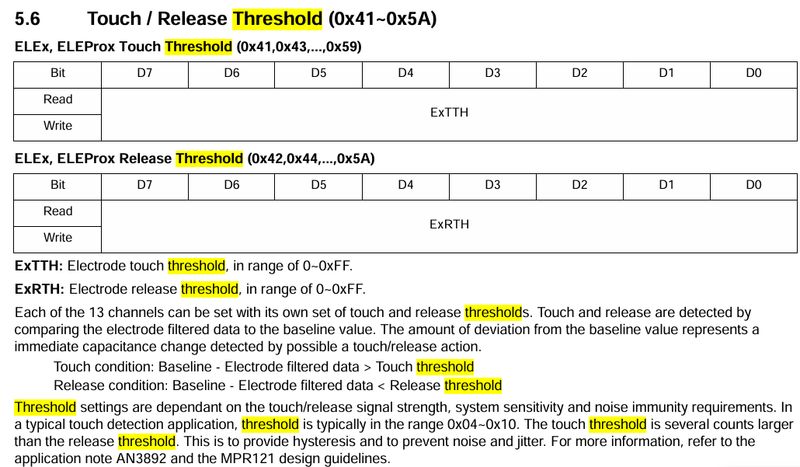
*Note for adjusting touch sensitivity for MPR121(homework from input week)
The thresholds for each of the 13 channels can be set to determine how much reaction is required to be considered a touch, and how much it drops.
https://cdn-shop.adafruit.com/datasheets/MPR121.pdf
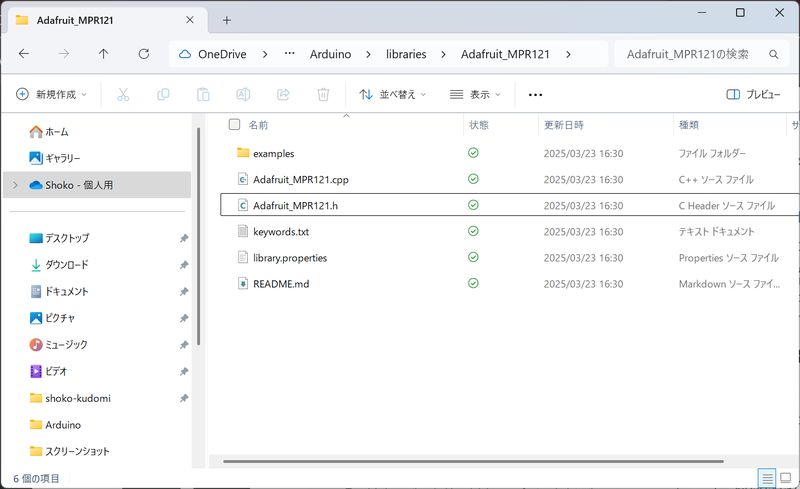
The Adafluit library needs to be rewritten.
Open the “Adafluit_MPR121.h” file in MSCode and edit it.
// The default I2C address
#define MPR121_I2CADDR_DEFAULT 0x5A        ///< default I2C address
#define MPR121_TOUCH_THRESHOLD_DEFAULT 12  ///< default touch threshold value
#define MPR121_RELEASE_THRESHOLD_DEFAULT 6 ///< default relese threshold value
Outcomes
This week was very productive as I was able to try out various connections and Raspberry Pi things that I wanted to try. Now I have to start putting it all together for the Final Project.
Remaining issues - things to check
Adjusting the touch sensor strength of the MPR121
Considering SAMD touch
Which Raspberry Pi should I use?
Why are pull-up and pull-down resistors necessary and how do they work?