- probe an input device's analog levels and digital signals
- measure something: add a sensor to a microcontroller board that you have designed and read it
FABACADEMY
FABACADEMY

More cat content, you can see why he needs the cat feeder ;p
The RFID reader and servo are working perfectly, and I am happy with the progress I have made so far. However the RFID range is around 2cm, which is not ideal, so I will have to find a way to increase the range. I have started looking at solutions for this and I will be documenting this as I go.
Another thing I want to work on, is to design and lasercut a prototype door and door frame, to see how the servo and RFID will work in a real-life scenario.
Here is a link to the group assignment page.
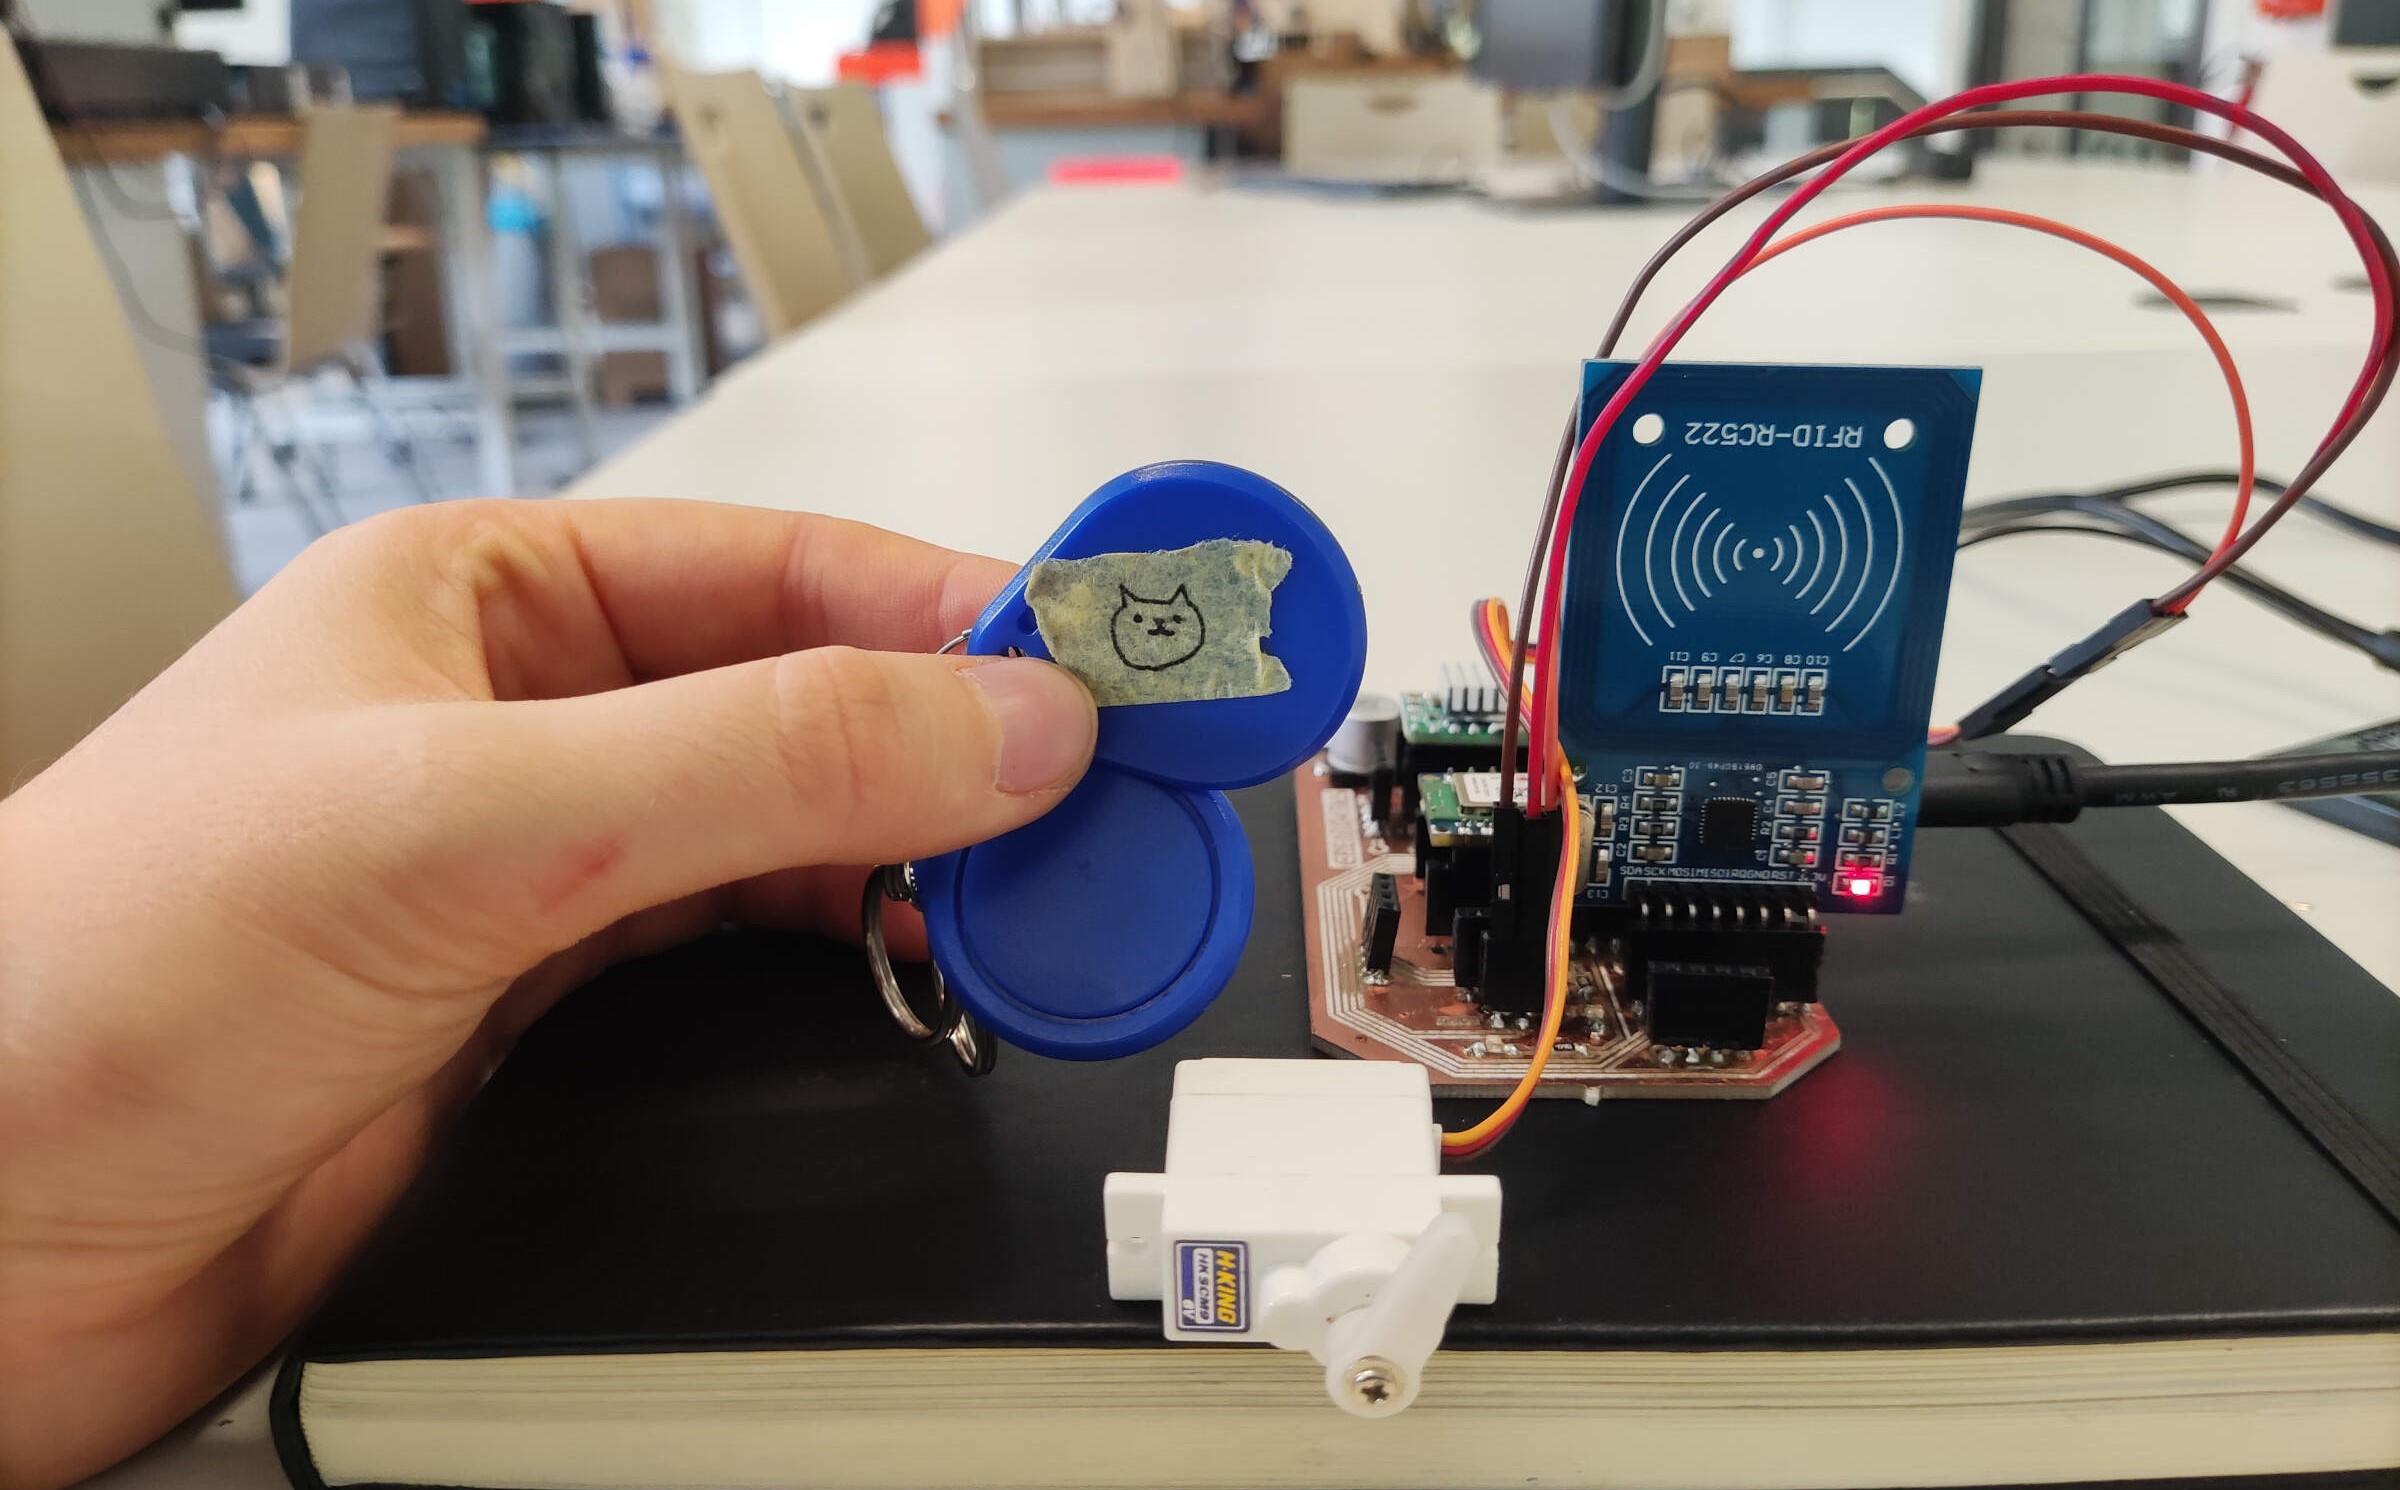
This week’s focus is on input devices, and as part of our individual assignment, we were tasked with integrating a sensor into our microcontroller board. The goal was to successfully read data from this sensor. For a part of my final project: I’ll be using an RFID (Radio Frequency Identification) reader to control a servo motor. The concept is to associate specific RFID tags with servo movements. When an authorized RFID tag is detected, the servo will respond accordingly.
With the board I designed, all I have to do is plug the RFID reader directly into the board without any additional wiring. This setup, however, is temporary because the board will be inside the main base of the project, while the RFID reader and servo will be in the cat pods to control the doors.
To start out the programming for the RFID, I used the MFRC522 library, which is a library for interfacing with RFID readers. At first, I just wanted the RFID reader to recognize the tags, so I used the example code that comes with the library and simplified it, and changed the pin numbers to match the ones on my board.
	#include <SPI.h>
	#include <MFRC522.h>

	#define SS_PIN 10
	#define RST_PIN 9

	MFRC522 rfid(SS_PIN, RST_PIN);

	void  setup() {
	  Serial.begin(9600);
	  SPI.begin();
	  rfid.PCD_Init();
	  Serial.println("Tap an RFID/NFC tag to read its UID");
	}

	void loop () {
		if (rfid.PICC_IsNewCardPresent() && rfid.PICC_ReadCardSerial()) {
		Serial.print("UID: ");
		for (byte i = 0; i < rfid.uid.size; i++) {
		  Serial.print(rfid.uid.uidByte[i] < 0x10 ? " 0" : " ");
		  Serial.print(rfid.uid.uidByte[i], HEX);
		}
		Serial.print();
		rfid.PICC_HaltA();
		rfid.PCD_StopCrypto1();
	  }
	}
this code reads the UID of the RFID tag and prints it to the serial monitor allong with the time it was read. The next step was set one tag as a key and when it read the key tag, it would print "Access Granted" to the serial monitor and when it read any other tag it would print "Access Denied".
byte authorizedUID[4];
Here I declared an array to store the authorized UID, this array will hold the unique identifier (UID) of the authorized RFID/NFC tag.
bool isUIDSet = false;
This boolean variable will be used to check if the authorized UID has been set.
Serial.println("Tap an RFID/NFC tag to set it as the authorized UID");
A new message will be displayed on the serial monitor
for (byte i = 0; i < 4; i++) {
	authorizedUID[i] = rfid.uid.uidByte[i];
  }
This is if a new card is present and its serial number is read, and the UID has not yet been set, then the UID is stored in the "authorizedUID" array, and if "isUTDset" flag is set "true", then a message is printed
Serial.println("Authorized UID set!");
    Serial.print("UID:");
	for (byte i = 0; i < rfid.uid.size; i++) {
	  Serial.print(rfid.uid.uidByte[i] < 0x10 ? " 0" : " ");
	  Serial.print(rfid.uid.uidByte[i], HEX);
	}
	Serial.println();
If the read UID matches the authorizied UID, it´ll print "Access granted". Otherwise it´ll print “Access denied.”
byte authorizedUID[4];
Lastly, the communication with the RFID reader is stopped and the crypto1 is stopped.
        #include <SPI.h>
        #include <MFRC522.h>

        #define SS_PIN  A4
        #define RST_PIN D5

        MFRC522 rfid(SS_PIN, RST_PIN);
        byte authorizedUID[4];
        bool isUIDSet = false;

        void setup() {
          Serial.begin(9600);
          SPI.begin();
          rfid.PCD_Init();
          // Set Rx Gain to maximum (0x07 << 4)
          rfid.PCD_WriteRegister(rfid.RFCfgReg, (0x07 << 4));
          Serial.println("Tap an RFID/NFC tag to set it as the authorized UID");
        }

        void loop() {
          if (rfid.PICC_IsNewCardPresent() && rfid.PICC_ReadCardSerial()) {
            if (!isUIDSet) {
              for (byte i = 0; i < 4; i++) {
                authorizedUID[i] = rfid.uid.uidByte[i];
              }
              isUIDSet = true;
              Serial.println("Authorized UID set!");
            } else {
              if (memcmp(rfid.uid.uidByte, authorizedUID, 4) == 0) {
                Serial.println("Access granted.");
              } else {
                Serial.println("Access denied.");
              }
            }
            // Print the UID in the Serial Monitor in hex format
            Serial.print("UID:");
            for (byte i = 0; i < rfid.uid.size; i++) {
              Serial.print(rfid.uid.uidByte[i] < 0x10 ? " 0" : " ");
              Serial.print(rfid.uid.uidByte[i], HEX);
            }
            Serial.println();
            rfid.PICC_HaltA(); // halt PICC
            rfid.PCD_StopCrypto1(); // stop encryption on PCD
          }
        }
the message displayed in this video is different but, the code it the same as the one above.
In the new PCB I designed during the electronics design week, I added a few more components to the board, including two LEDs, for the sole purpose of testing and also for programming along with the RFID reader. So in this next code, I added one of the LEDs to the code to light up when the access is granted, and to turn off when the access is denied.
        #include <SPI.h>
        #include <MFRC522.h>

        #define SS_PIN  A4 // GPIO pin connected to RC522's SS pin (SPI CS)
        #define RST_PIN D5 // GPIO pin connected to RC522's RST pin
        #define LED_PIN D3 // GPIO pin connected to the LED

        MFRC522 rfid(SS_PIN, RST_PIN);
        byte authorizedUID[4]; // Array to store the authorized UID
        bool isUIDSet = false; // Flag to check if the UID has been set

        void setup() {
          Serial.begin(9600);
          SPI.begin(); // Initialize SPI bus
          rfid.PCD_Init(); // Initialize MFRC522
          pinMode(LED_PIN, OUTPUT); // Set the LED pin as an output
          digitalWrite(LED_PIN, LOW); // Ensure the LED is off
          Serial.println("Tap an RFID/NFC tag to set it as the authorized UID");
        }

        void loop() {
          if (rfid.PICC_IsNewCardPresent() && rfid.PICC_ReadCardSerial()) {
            if (!isUIDSet) {
              for (byte i = 0; i < 4; i++) {
                authorizedUID[i] = rfid.uid.uidByte[i];
              }
              isUIDSet = true;
              Serial.println("Authorized UID set!");
            } else {
              if (memcmp(rfid.uid.uidByte, authorizedUID, 4) == 0) {
                digitalWrite(LED_PIN, HIGH); // Turn on the LED
                Serial.println("Access granted.");
              } else {
                digitalWrite(LED_PIN, LOW); // Turn off the LED
                Serial.println("Access denied.");
              }
            }

            // Print the UID in the Serial Monitor in hex format
            Serial.print("UID:");
            for (byte i = 0; i < rfid.uid.size; i++) {
              Serial.print(rfid.uid.uidByte[i] < 0x10 ? " 0" : " ");
              Serial.print(rfid.uid.uidByte[i], HEX);
            }
            Serial.println();

            rfid.PICC_HaltA(); // Halt PICC (Proximity Integrated Circuit Card)
            rfid.PCD_StopCrypto1(); // Stop encryption on PCD (Proximity Coupling Device)
          }
        }
In the first part of this week I was having problems with the servo, no matter what code I used, the code would not even compile and this is the part of the message that told me the problem was with the servo library "Multiple libraries were found for "Servo.h"".

To further test this, I compiled the same code using a different microcontroller. I used the first PCB I made, which has a Seeeduino Xiao SMD as the controller, and an Arduino Uno. Surprisingly, the code compiled and worked flawlessly. This observation suggests that the issue might indeed be a compatibility problem between the Arduino Nano ESP32 and the servo library.
After a quick Google search, I found that others went through similar issues with this combination, and the solution was to use a different servo library. So, I used the "ServoESP32" library, and the code compiled and worked perfectly. Here is a link to the forum where people discussed this issue and then the solution. Additionally, you can download a version of the ESP servo library compatible with your Arduino IDE software version here.
The next step was to control the servo with the RFID reader. This part (the cat door) of my final project is based on Pamela Martello's final project which uses an RFID activated door lock system. so for this I followed her documentation, and then used her code as a base and adapted it to my project.
        *
        Servo moves when RFID reads recognized tag
        Version1_works fine

        //inspired on: Viral Science tutorials
        //---RFID + SERVO MOTOR = MIRRU IN MIRRU OUT CODE---
        //adapted and modified by Pamela Martello
        //04 June 2019
        Pamela Martello
        */

        #include SPI.h> //peripheral communication
        #include MFRC522.h> ///RFID library
        #include Servo.h> // Servo library
        #define SS_PIN 10 // RFID PINS
        #define RST_PIN 9 //RFID PINS
        #define ACCESS_DELAY 10000 //delay open the lock 10,000millis=10secs
        #define DENIED_DELAY 1000
        MFRC522 mfrc522(SS_PIN, RST_PIN); // Create MFRC522 instance

        Servo myservo; // create servo object to control a servo

        //int pos = 0; // variable to store the servo position (not needed)

        void setup() {
        Serial.begin(9600); // Initiate a serial communication
        SPI.begin(); // Initiate SPI bus
        mfrc522.PCD_Init(); // Initiate MFRC522
        Serial.println("Put your card to the reader...");
        Serial.println();
        myservo.attach(3); // attaches the servo on pin 3 to the servo object
        myservo.write(100);
        mfrc522.PCD_SetAntennaGain(mfrc522.RxGain_max); //If you set Antenna Gain to Max it will
        //increase reading distance it increases about 1-2cm
        }

        void loop() {
        // Look for new cards
        if ( ! mfrc522.PICC_IsNewCardPresent())
        {
        return;
        }
        // Select one of the cards
        if ( ! mfrc522.PICC_ReadCardSerial())
        {
        return;
        }
        //Show UID on serial monitor
        Serial.print("UID tag :");
        String content= "";
        byte letter;
        for (byte i = 0; i < mfrc522.uid.size; i++) { Serial.print(mfrc522.uid.uidByte[i] < 0x10
        ? " 0" : " " ); Serial.print(mfrc522.uid.uidByte[i], HEX);
        content.concat(String(mfrc522.uid.uidByte[i] < 0x10 ? " 0" : " " ));
        content.concat(String(mfrc522.uid.uidByte[i], HEX)); } Serial.println();
        Serial.print("Message : ");
        content.toUpperCase();
        if (content.substring(1) == " 09 5E BB 59") //change here the UID of the card/cards that you want
        //to give access (to know the code use examples inside MFRC522>DumpInfo)
        {
        Serial.println("Authorize mirru access");
        Serial.println();
        delay(200);
        myservo.write(0);// lock position
        delay(ACCESS_DELAY); //delay to keep the lock open and let the cat go in
        myservo.write(90); // unlock position
        }
        else {
        Serial.println(" CATccess denied");

        delay(DENIED_DELAY);

        }
        *
        //inspired on: Viral Science tutorials
        //---RFID + SERVO MOTOR = MIRRU IN MIRRU OUT CODE---
        //adapted and modified by Pamela Martello
        //04 June 2019
        //adapted and modified by Bianca Guimarães
        //04 april 2024
        *

        #include <SPI.h>
        #include <MFRC522.h>
        #include <ESP32Servo.h>

        #define SS_PIN A4
        #define RST_PIN D5
        #define ACCESS_DELAY 10000 // 10 seconds
        #define DENIED_DELAY 1000
        #define LED_PIN D3 // Pin for the LED

        MFRC522 mfrc522(SS_PIN, RST_PIN);
        Servo myservo;

        void setup() {
          Serial.begin(9600);
          SPI.begin();
          mfrc522.PCD_Init();
          Serial.println("Put your card to the reader...");
          Serial.println();
          myservo.attach(2);
          myservo.write(100);
          pinMode(LED_PIN, OUTPUT); // Set LED pin as output
        }

        void loop() {
          if (!mfrc522.PICC_IsNewCardPresent()) {
            return;
          }
          if (!mfrc522.PICC_ReadCardSerial()) {
            return;
          }

          Serial.print("UID tag: ");
          String content = "";
          for (byte i = 0; i < mfrc522.uid.size; i++) {
            Serial.print(mfrc522.uid.uidByte[i] < 0x10 ? " 0" : " ");
            Serial.print(mfrc522.uid.uidByte[i], HEX);
            content.concat(String(mfrc522.uid.uidByte[i] < 0x10 ? " 0" : " "));
            content.concat(String(mfrc522.uid.uidByte[i], HEX));
          }
          Serial.println();

          content.toUpperCase();
          if (content.substring(1) == "29 62 73 5B") { // Authorized tag UID
            Serial.println("The cat may enter and feast");
            Serial.println("20 seconds until the servo moves back");
            Serial.println();
            digitalWrite(LED_PIN, HIGH); // Turn on the LED
            delay(200);
            myservo.write(0); // Lock position
            delay(ACCESS_DELAY); // Keep the lock open and let the cat go in
            myservo.write(100); // Unlock position
            digitalWrite(LED_PIN, LOW); // Turn off the LED
          } else {
            Serial.println("You shall not pass! Stinky cat");
            for (int i = 0; i < 4; i++) {
              digitalWrite(LED_PIN, HIGH); // Blink the LED
              delay(200);
              digitalWrite(LED_PIN, LOW);
              delay(200);
            }
            delay(DENIED_DELAY);
          }
        }