Cat gate
Mama mia that´s a lot of
programming

Throughout my assignments I have been learning and slowly programming parts of my final project. like in inputs week and outputs week. However so far I´ve been doing this in a very basic way, using the Arduino IDE. Now there isn´t anything wrong with that, but I want to take it a step further and learn how to program my board using a more advanced IDE. I also decided this when I realized that the code for my final project is going to be quite extensive and I want to be able to organize it in a way that makes sense. whereas in the Arduino IDE it´s all just in one file.
This ofcourse means that I was going to have to learn how to program my board using C++ and also learn how to use the platformio. I´m not going to lie, I´m was a bit nervous about this. I´d never programmed in C++ before. But luckly I´m not alone in this. My dad is quite familiar with C++ and he also did the FabAcademy in 2020. So he was able to help me out get started and set up with platformio.
I started by installing the platformio extension in Visual Studio Code. I used a ESP32platformio template to get started. I´m not going to lie, it was a bit of a struggle at first. But I knew that this was going to simplify my life in the long run.
The logic
Before I started programming, I had to think about the logic of my project. I started by imagining the different stages and processes of my project. Then, I broke it down into smaller parts. For example, the cat module has the following parts: the RFID reader, the servo motor, and it will be controlled by the "gate keeper board" and communicate with the main board " the brain" via I2C communication.
As for the feeding mechanism, it will be controlled by the "brain" and consists of two parts: the screw feeder and the tank movement. The feed screw is controlled by a Nema 17 stepper motor, and the tank movement is controlled by a Nema 23 stepper motor. The feed screw will sit on top of a turntable-like mechanism powered by the Nema 23 stepper motor.
Hardware Components
-
Main body (Reservoir and Feed Screw)
- ESP32: Central processor that communicates with modules via I2C and controls the feeding mechanism.
- Stepper Motor 1: Controls rotation of the reservoir (tank movement).
- Stepper Motor 2: Controls rotation of the feed screw.
- End stop: Indicates the home position of Stepper Motor 1.
- RTC: Keeps track of time.
-
Module/Food Bay
- RFID Reader: Detects the cat's presence.
- Servo Motor: Opens the door.
- Tiny1614 IC: Manages local operations and communicates with the ESP32 via I2C.
Phases and Steps
Phase 1: Daily Initialization and Calibration
- Trigger: ESP32 starts.
- Actions:
-
Calibrate the reservoir position:
- Move the reservoir anti-clockwise until it hits the end stop switch.
- Set this position as position 0.
- Subsequent positions will be calculated from this point.
-
Scheduled Feeding Check:
- Check log to see if the cat has entered before feed time; if not, send notice to the owner.
- At scheduled times (e.g., 9 a.m. and 6 p.m.), check if it's time to feed the cat.
- Calculate the required amount of food.
- Send signals to Stepper Motor 1 to rotate the reservoir to the correct position.
- Activate Stepper Motor 2 to dispense the food.
- Log the feeding event.
Phase 2: Cat Detection and Feeding
-
Event: Cat detected at the feeding portal
- Trigger: RFID reader detects a cat's presence.
- Actions:
-
Validate the cat's RFID information:
- Read the RFID tag from the cat.
- Validate the tag with the stored cat information.
-
Open the door:
- If the RFID tag is valid, send a signal to the servo motor to open the door and log it.
Code
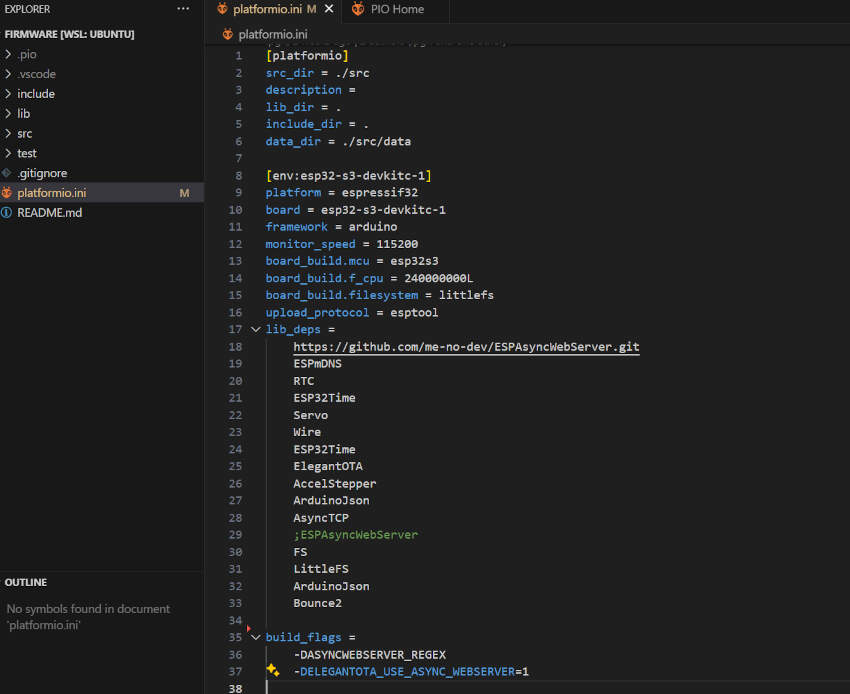
With every project in PlatformIO, I had to first edit the platformio.ini file. This file is used to configure the project. Here, I had to specify the board I was using, the framework, and the libraries I was going to use. scroll down to see the code.
platformio.ini configuration
        [platformio]
        src_dir = ./src
        description =
        lib_dir = .
        include_dir = .
        data_dir = ./src/data
	[env:esp32-s3-devkitc-1]
            platform = espressif32
            board = esp32-s3-devkitc-1
            framework = arduino
            monitor_speed = 115200
            board_build.mcu = esp32s3
            board_build.f_cpu = 240000000L
            board_build.filesystem = littlefs
            upload_protocol = esptool
            lib_deps =
			https://github.com/me-no-dev/ESPAsyncWebServer.git
			ESPmDNS
			RTC
			ESP32Time
			Servo
			Wire
			ESP32Time
			ElegantOTA
			AccelStepper
			ArduinoJson
			AsyncTCP
			;ESPAsyncWebServer
			FS
			LittleFS
			ArduinoJson
			Bounce2
- [env:esp32-s3-devkitc-1]
- platform = espressif32: This sets the platform to espressif32, which is the Espressif 32-bit IoT Platform.
- board = esp32-s3-devkitc-1: This sets the board to esp32-s3-devkitc-1.
- framework = arduino: This sets the framework to Arduino.
- monitor_speed = 115200: This sets the monitor speed to 115200 baud.
- board_build.mcu = esp32s3: This sets the MCU to esp32s3.
- board_build.f_cpu = 240000000L: This sets the CPU frequency to 240MHz.
- board_build.filesystem = littlefs: This sets the filesystem to LittleFS.
- upload_protocol = esptool: This sets the upload protocol to esptool.
- lib_deps: This is a list of library dependencies for the project. It includes libraries like ESPAsyncWebServer, ESPmDNS, RTC, ESP32Time, Servo, Wire, ElegantOTA, AccelStepper, ArduinoJson, AsyncTCP, FS, LittleFS, Bounce2, etc.
	build_flags =
	-DASYNCWEBSERVER_REGEX
	-DELEGANTOTA_USE_ASYNC_WEBSERVER=1
- build_flags: This is a list of build flags, this basically tells the compiler to include certain libraries or features in the build. In this case, it includes the following flags:
- -DASYNCWEBSERVER_REGEX this flag is used to enable regular expressions in the AsyncWebServer library.
- -DELEGANTOTA_USE_ASYNC_WEBSERVER=1 this flag is used to enable the use of the AsyncWebServer library in the ElegantOTA library.
this file looks like this
Depending on the board you are using, you will have to change the board name and configuration in the platformio.ini file. Usually, you can find this information online or in the platformio documentation. You will also need to change the libraries you are using. In my case, I'm using the ones listed above because they are necessary for my project.
The next major step was in the include and DATA folders. In the include folder, I created all of the header files for my project. This was done to split up all of my code into smaller parts. It makes it easier to read and understand. this means that I had to create a header file and a corresponding source code file (.cpp) with the same name for each part of the programm I split up of my project. The header file´s function is to declare the functions and variables that will be used in the source code file, along with the libraries that will be used, this means that in the files (of the data folder), I will only have to include the coresponding header file.
- catDetection - This part is still under development so it is not yet used in the main code.
- communication - This part is responsible for the communication between the modules and the main board. not yet included in the ain code because it is still under development.
- config - The handler file includes all of the libraries that will be used for my project, it incudes all of the handler files, and declares the external variables. the source code file "config.cpp" contains al of the global variables that will be used in the project, for example here is where I declare the pins that will be used, this makes changing the pins easier, as I only have to change it in one place. I also define the cat house "locations" whic just means what angle the stepper motor has to turn to in order to reach the desired location, and i also define other important variables like the stepper max speed and acceleration.
- handleEndstop - This part is responsible for handling the endstop switch. It is used to calibrate the stepper motor´s position and set the . The source code file "handleEndstop.cpp" contains the functions that will be used to handle the endstop switch.
- jsonHandler - This part is responsible for handling the JSON data that will be sent and received from the modules. The source code file "jsonHandler.cpp" contains the functions that will be used to handle the JSON data.
- scheduleHandler -This file is used to check the feeding schedule and feed the cats when it is time
- setupCatFeeder - This file prints on the serial monitor what is happening for example when the set up is complete it prints "feeder setup complete" the feeder set up is connecting to the local wifi and setting up the web server. then next the feeer will start moving unitl it hits the endstop, so while it is calibrating it will say "Calibrating reservoir..." and then when the endstop is hit it will say "Reservoir calibrated"
- stepperMove - This basically is just the code for moving the stepper motors, it calls the already defined locations, speed and acceleration from the config file. this code controlls the reservoir and the feed screw stepper motors for the feed screw controll the amount of food dispensed is not a set number, this can be changed in the web interface, this means that in this file I just say that i want the screw steeppper to move "amount" and this variable is defined in the web interface.
- storageHandler - The storage handler declares the StorageHandler class for managing data storage operations such as saving configurations, reading logs, and handling file operations on the ESP filesystem.
- timeHandler - This file is used to handle the time and date by syncing the internal RTC with the external RTC and printing the time. it also prints each step of what is happening in the serial monitor so that I can see what is happening and if something fails I can see where it failed.
- wifiHandler- This file is used to handle the wifi connection and the server by connecting to the wifi and setting up the server with the correct settings from the config file and the credentials file, the credentials file is a simple txt file that is not included in the git repository because it contains the wifi name and password of the networks that the feeder will connect to.
- webServerManager - Finally, the webServerManager file is used to handle the web server by serving the files and handling the requests by the user, such as updating the data.json file with the new data( like If i changed the feeding amount for a certain cat if this information is updated and stored so that if the power goes out the information is not lost). this file also contains the routes for the web server