GitLab and MkDocs
Git and Python
Git is a version control system designed to track changes in code. Git supports branching, merging, and committing changes and working on the same project with different people from multiple machines. GitLab builds upon Git to add a web interface for repository management, automated pipelines, and tools for collaboration and project tracking.
For documentation purposes, my GitLab repository will hold all of my documentation pages, file downloads, and images/videos. The FabCloud GitLab is a custom instance of GitLab that Fab Academy uses, and is custom built to facilitate integration with hosting documentation sites.
Due to prior coding experience, I already had both Git and Python installed on my computer. I had installed MkDocs a few months prior for documenting some of my coding projects.
However, when I was helping some of my friends, I noticed a few common errors:
- The term 'python' is not recognized as the name of a cmdlet, function, script file, or operable program.
- Add the Python installation directory (where Python is located on your local system) to your System Environment Variables.
- To access the System Environment Variables menu, open the Run menu (Windows + R) and type in "sysdm.cpl", or go to the "View Advanced System Settings" menu. Then, click Advanced on the top navigation bar and click Environment Variables. Add the Python installation location to the PATH variable (user or system) by clicking Path -> Edit -> New.
- Add the Python installation directory (where Python is located on your local system) to your System Environment Variables.
- The term 'pip' is not recognized as the name of a cmdlet, function, script file, or operable program.
- Run the
python -m ensurepipcommand. This will download pip automatically if you do not already have it. - Use the pip3 command instead of pip (e.g.
pip3 install mkdocsinstead ofpip install mkdocs).
- Run the
- The term 'mkdocs' is not recognized as the name of a cmdlet, function, script file, or operable program.
- Add the python Scripts folder to your System Environment Variables. After running
pip install mkdocs, the mkdocs.exe file should have been added to your Scripts folder. The scripts folder can be found in the same place Python is located. For example, I installed Python under "C:\myPython", so my MkDocs was at "C:\myPython\Scripts\mkdocs.exe" and I would add "C:\myPython\Scripts" to my PATH system environment variable. The steps to edit System Environment Variables are above.
- Add the python Scripts folder to your System Environment Variables. After running
- fatal: not a git repository (or any of the parent directories): .git
- You could be in the wrong directory, in which case run
cd your-git-repo-pathand re-run the command. For example, I would runcd C:\fab\richard-shan. - If the repository doesn't exist or you haven't created it yet, run
git clone git-repo-url.
- You could be in the wrong directory, in which case run
SSH Key Setup
An SSH key consists of a private key, which is kept secret and secure by the user, and a public key, which can be shared with others. The keys are used in Secure SHell protocol to authenticate a connection between my local computer and the remote Git repository.
When Git pushes changes to a remote repository, it needs to be authenticated to ensure that only someone who is supposed to be allowed to push is able to push. An SSH key pair functions as an alternative to entering my Git username and password every time I need to push.
To generate my SSH key, I followed the following steps. I used Windows Powershell as my terminal of choice, though others such as CMD and Git Bash would have achieved the same function.
- Open a terminal instance
- Run
git config -–global user.email “26shanr@charlottelatin.org”. - Run
ssh-keygen -t rsa -C “26shanr@charlottelatin.org”. - Specify a file to save the key into (click Return/Enter for none)
- Specify a password (click Return/Enter for none)
- Copy the generated key for storage. The key starts with SHA256 and ends with the closing quotation mark after your email address.
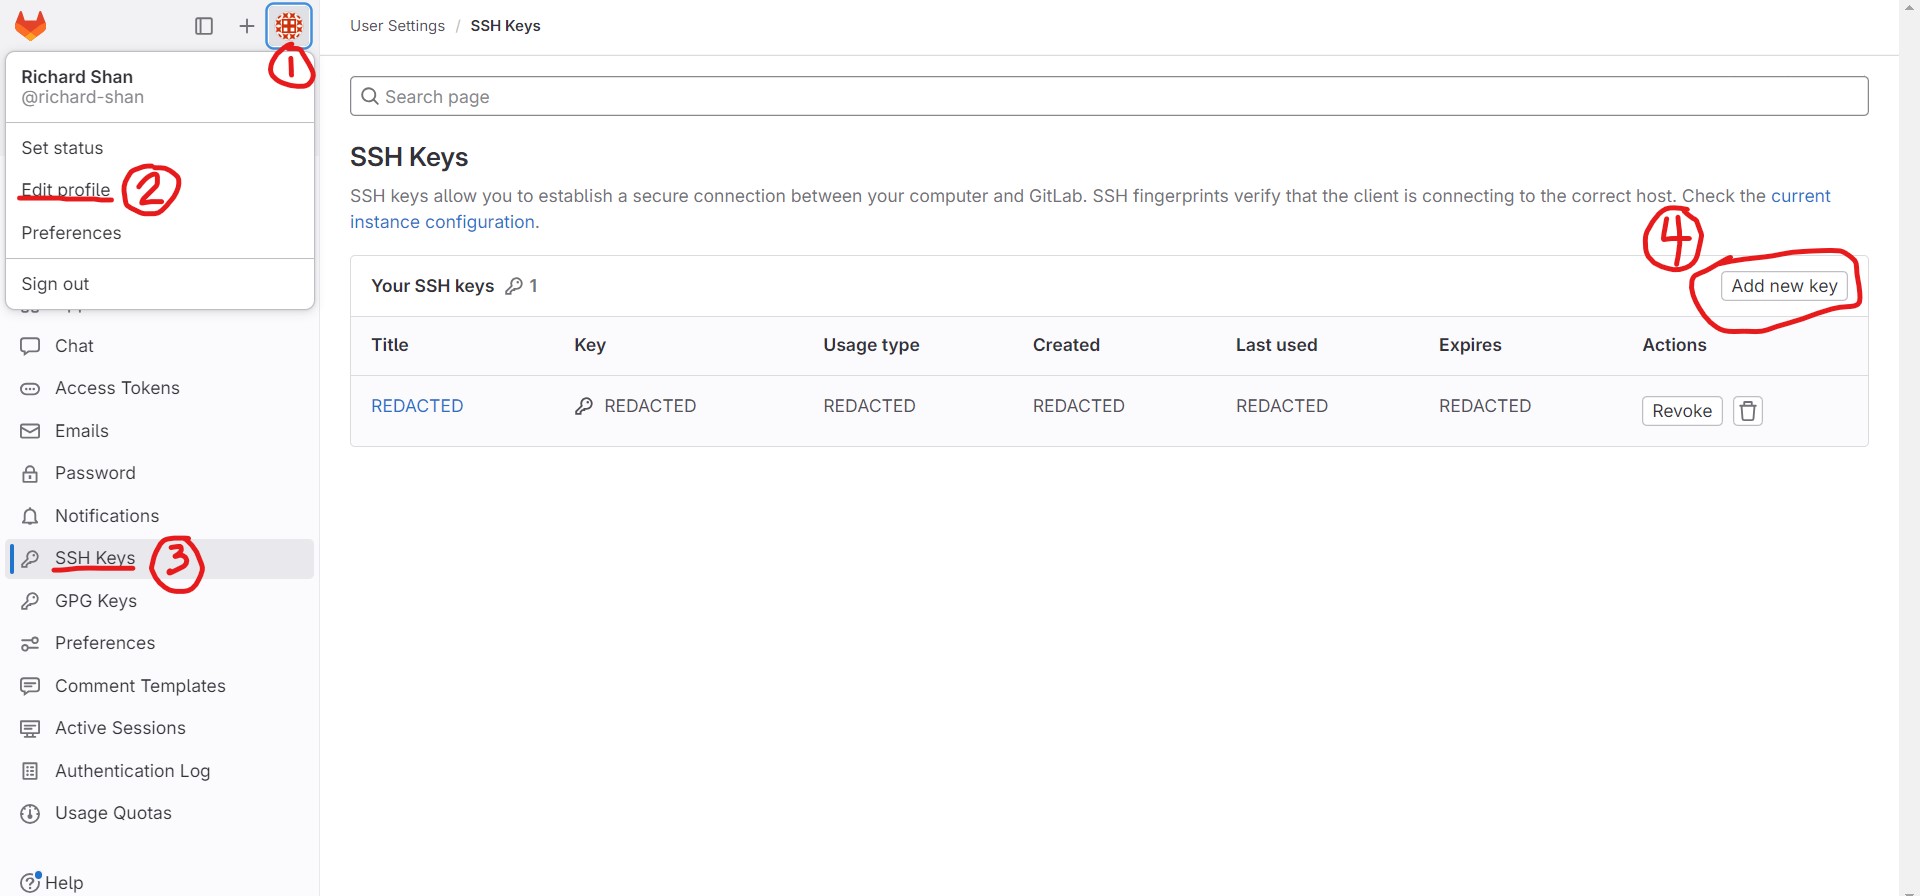
I then added the SSH key to my GitLabs account to allow pushing.
To view the key if you ever lose it, you can run cat ~/.ssh/id_rsa.pub.
Environment Setup
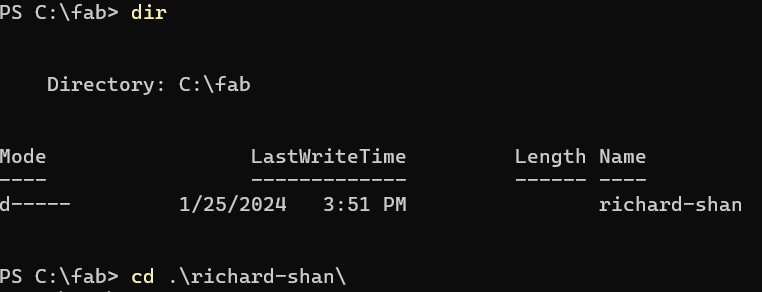
I navigated to the file directory that I was going to use, then cloned my repository from GitLabs.
PS C:\fab> git clone git@gitlab.fabcloud.org:academany/fabacademy/2024/labs/charlotte/students/richard-shan.git
Cloning into 'richard-shan'...
remote: Enumerating objects: 176, done.
remote: Counting objects: 100% (100/100), done.
remote: Compressing objects: 100% (83/83), done.
Receiving objects:  63% (111/176), 1.39 MiB | 2.76 MiB/seused 76
Receiving objects: 100% (176/176), 3.09 MiB | 3.39 MiB/s, done.
Resolving deltas: 100% (49/49), done.
PS C:\fab>
Cloning from Github created a new folder which I subsequently navigated into.
Having installed MkDocs via pip, I ran mkdocs new richard-shan in the top-level fab folder to initialize a new MkDocs project in my git directory. I then navigated to the project folder and ran mkdocs serve to locally host my website for testing and viewing.
PS C:\fab> mkdocs new richard-shan
INFO    -  Creating project directory: richard-shan
INFO    -  Writing config file: richard-shan\mkdocs.yml
INFO    -  Writing initial docs: richard-shan\docs\index.md
PS C:\fab> cd .\richard-shan\
PS C:\fab\richard-shan> mkdocs serve
INFO    -  Building documentation...
INFO    -  Cleaning site directory
INFO    -  Documentation built in 0.25 seconds
INFO    -  [19:57:25] Watching paths for changes: 'docs', 'mkdocs.yml'
INFO    -  [19:57:25] Serving on http://127.0.0.1:8000/
The groundwork for my website was now complete, and I could view the website on my localhost. After pushing to Git and changing the default markdown files, the site was ready!
Git and MkDocs Integration
The biggest difficulty I encountered was configuring the gitlab-ci.yml file to properly integrate with MkDocs. At first, I was using an outdated file which I copied into my gitlab-ci.yml file, which looked like this:
@Override
    image: python:3.8-buster

before_script:
  - pip install -r requirements.txt

test:
  stage: test
  script:
  - mkdocs build --strict --verbose --site-dir test
  artifacts:
    paths:
    - test
  rules:
    - if: $CI_COMMIT_REF_NAME != $CI_DEFAULT_BRANCH

pages:
  stage: deploy
  script:
  - mkdocs build --strict --verbose
  artifacts:
    paths:
    - public
  rules:
    - if: $CI_COMMIT_REF_NAME == $CI_DEFAULT_BRANCH
Unfortunately, I initially download my gitlab-ci.yml file from the MkDocs Gitlab repo, which meant that I was using an outdated file. Additionally, I did not download the requirements.txt file and thus I would recieve the following error when I pushed to Git:
ERROR: Could not open requirements file: [Errno 2] No such file or directory: 'requirements.txt'
[notice] A new release of pip is available: 23.0.1 -> 23.3.2
[notice] To update, run: pip install --upgrade pip
real    0m2.853s
user    0m2.665s
sys 0m0.168s
Cleaning up project directory and file based variables
00:01
ERROR: Job failed: exit code 1
I was unable to solve the error for about a half hour because I didn't know how to find the error message and I was stuck modifying code snippets which I thought were problematic. However, when I checked my email, I recieved a notification that my job failed and clicked the link which brought me to the Jobs page on GitLab. The Jobs page itself was a difficult location to navigate to, and only there could I see the actual console error message output. However, after I was able to see the error, debugging was easy.

I realized that I should be cloning from the Fab Academy Student Template GitLab repo as opposed to the MkDocs GitLab repo. From there, I downloaded the requirements.txt file along with a better suited .gitlab-ci.yml file. However, I downloaded the files manually instead of cloning the repo because I only needed 2 files. Additionally, I had prior experience working with MkDocs and wanted to setup my own framework instead of using the provided one. My updated .gitlab-ci.yml file looks like this:
image: python:3.9-slim

before_script:
  - time apt update && apt-get install -y git
  - time pip install -r requirements.txt

test:
  stage: test
  script:
  - time mkdocs build --site-dir test
  artifacts:
    paths:
    - test
  rules:
    - if: $CI_COMMIT_BRANCH == $CI_DEFAULT_BRANCH
      when: never

pages:
  stage: deploy
  variables:
    ENABLED_GIT_REVISION_DATE: "true"
    GIT_DEPTH: 1000
  script:
  - time mkdocs build --site-dir public
  artifacts:
    paths:
    - public
  rules:
    - if: $CI_COMMIT_BRANCH == $CI_DEFAULT_BRANCH
After updating my gitlab-ci file, the mkdocs.yml file was recognized and took precedence. My site changed to use the markdown files as opposed to the html files. The commits and pushes all succeeded and I was able to start working on the site with MkDocs.

MkDocs File Organization
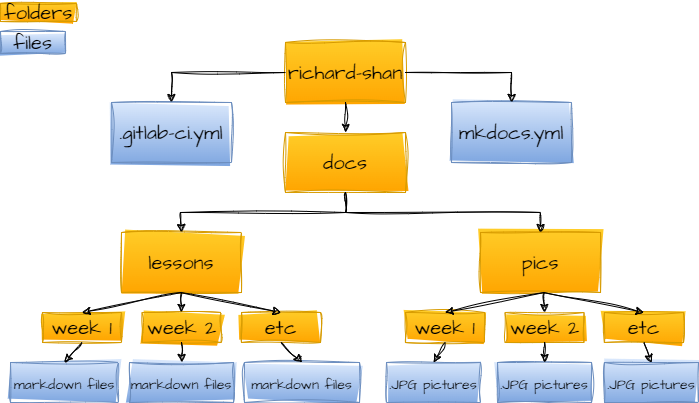
I decided not to use the Fab Student Template for setting up the week folders as I wanted to build my own directory system for documentation. The following image shows the file hierarchy that I built, starting from the root directory of the site at the top. Each page of this website is stored in a markdown (.md) file, which are stored under their respective week folders under the general lessons folder. Every image/video on this website is stored under its respective week folder under the pics folder. MkDocs's default starting directory is the docs folder, and as such, all of my documentation is stored in its subfolders.
For my documentation, I decided to go with an HTML-heavy approach. As such, all of my videos and images are in HTML code as opposed to using markdown. I chose to use HTML not only because I had prior experience with it, but also because HTML offers far more features compared to markdown such as built-in centering functions. In order to take advantage of those features and ensure seamless interoperability, I decided to go with a full out HTML approach so that HTML tags and markdown syntax wouldn't interfere with each other.
Configuring YML File
To setup the navigation menu and overall configuration of my site, I have to edit the mkdocs.yml file stored under the root directory of the site. This is what the file looks like:
site_name: Richard Shan - Fab Academy Documentation
nav:
  - Home: index.md
  - About: about.md
  - Final Project: lessons/final.md
  - "Documentation":
    - "Pre-Fab":
      - Pen Turning: lessons/prefab/pen.md
      - LED Glasses: lessons/prefab/glasses.md
      - TinyArcade: lessons/prefab/arcade.md
      - 3 Leaf Gyroscope Spinner: lessons/prefab/spinner.md
      - Cardboard Storage Box: lessons/prefab/box.md
      - RP2040: lessons/prefab/rp2040.md
    - "Week 1: Principles and Practices, Project Management":
      - GitLab & MKDocs: lessons/week1/gitlab.md
      - Final Project Brainstorming: lessons/week1/finalBrainstorming.md
      - Reflection: lessons/week1/reflection.md

[...]

theme: material
markdown_extensions:
  - pymdownx.highlight:
      anchor_linenums: true
      line_spans: __span
      pygments_lang_class: true
  - pymdownx.inlinehilite
  - pymdownx.snippets
  - pymdownx.superfences
The site_name definition is what web browsers will recognize the site as. This means that search engines like Google will index my site as "Richard Shan - Fab Academy Documentation" and the name of the site in the web browser will also be "Richard Shan - Fab Academy Documentation".
The Home, About, and Final Project links are defined under the navigation menu and link to their respective pages. On the left-hand side browser, those three buttons can be found at the top of the weeks list and each direct to a markdown file displayed in the browser.
I next define the Documentation dropdown tab. Under it, each of my weeks are visible where individual pages of documentation can be accessed. I link the documentation by creating a page name that will be displayed on the site to the relative path of the actual .md file.
I then choose a theme for my webpage. I originally used readthedocs theme, but I chose to switch to Material since it was easier on the eyes. The material theme shapes parts of the actual webpage - items such as the blue bar at the top and the design of the left-hand week selector.
I then configured my extensions. These are add-ons to mkdocs that provide additional features and functionality. The plugs I added so far allow me to create code blocks that have custom colors and highlighting on the keywords for the selected language. This was an important feature for me because readthedocs theme had built-in code highlighting, which I didn't want to lose out on when switching to Material.
Git Push File Size Limit
I had documented my PreFab work via MkDocs, and I now wanted to add it to my Fab site. However, I wasn't aware of the file size limit when documenting for PreFab and thus had many large files. I went through and used online video/image compressors to compress the files into a smaller size. Even after compressing and when only trying to push a few megabytes of data, I would sometimes still run into the following error:
PS C:\fab\richard-shan> git push
Enumerating objects: 66, done.
Counting objects: 100% (66/66), done.
Delta compression using up to 8 threads
Compressing objects: 100% (57/57), done.
remote: fatal: pack exceeds maximum allowed size
fatal: sha1 file '' write error: Broken pipe
error: remote unpack failed: unpack-objects abnormal exit
To gitlab.fabcloud.org:academany/fabacademy/2024/labs/charlotte/students/richard-shan.git
 ! [remote rejected] main -> main (unpacker error)
error: failed to push some refs to 'gitlab.fabcloud.org:academany/fabacademy/2024/labs/charlotte/students/richard-shan.git'
After doing some research online, I realized that this error was because my previous commit was still being cached in my .git folder, and was contributing to the 10MB file size limit. To stop caching this, I ran the git reset command.
PS C:\fab\richard-shan> git reset --soft HEAD~1After running the reset command, I was then able to push without any errors.
PS C:\fab\richard-shan> git add --all
PS C:\fab\richard-shan> git commit -m "Prefab documentation"
[main 847ff3e] Prefab documentation
 20 files changed, 123 insertions(+), 1 deletion(-) [...]
PS C:\fab\richard-shan> git push
Enumerating objects: 37, done.
Counting objects: 100% (37/37), done.
Delta compression using up to 8 threads
Compressing objects: 100% (29/29), done.
Writing objects: 100% (29/29), 9.65 MiB | 1.68 MiB/s, done. [...]
PS C:\fab\richard-shan>
The git add --all command tells git to start keeping track of all files in the directory. This means that any changes to existing files or creating new files will all be tracked by git.
The git commit -m "message" command creates a save state of the repository at the time of committing. The message allows for a quick description of what changes were made in this commit version.
The git push command pushes the repository from the local device to the Git repo in the cloud. This updates the actual documentation webpage which is not hosted locally on my computer.
References
Huge thank you to Stuart Christhilf for teaching me MkDocs during our Data Structures class last semester! Adrian Torres' and Adam Stone's documentations were also valuable resources for setting up GitLab.