6. 3D Scanning and printing
Download files:
Models And Blender files
3D model Second Try Print
3D model Kress Holder Part1
3D model Kress Holder Part2a
3D model Kress Holder Part2b
3D model of scanned Hand
Blender Files: First design
Blender Files: Kress Holder
Group Assignment
Objective:
Test the design rules for your 3D printer(s).
Know the machine:
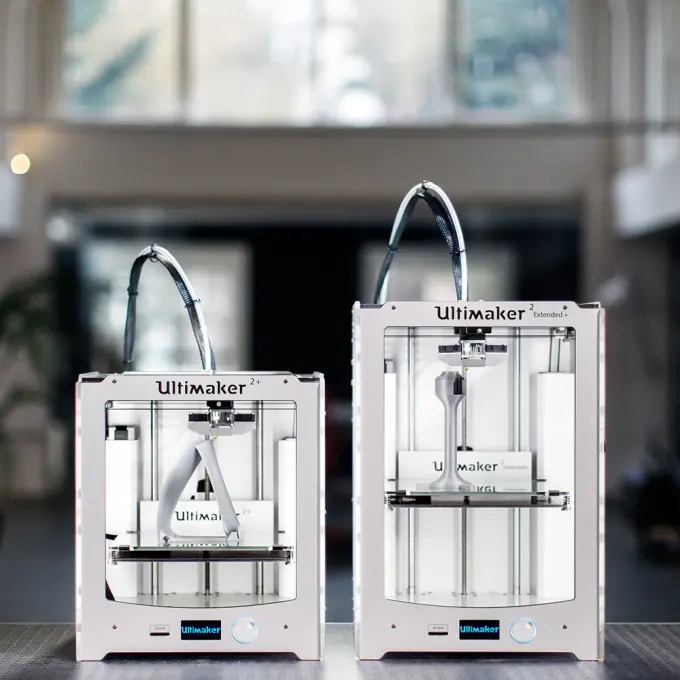
3D Printer: Ultimaker 2+
| Build volume | 223 x 223 x 205 mm |
| Print Technology | Fused filament fabrication (FFF) |
| Compatible filament diameter | 2.85 mm |
| Print head | Swappable nozzle |
| Nozzle diameters | 0.25, 0.4, 0.6, 0.8 mm |
Slicing Software: Ultimaker Cura
Machine tutorials:
We can see how to handel this machine by going to support page of the Ultimaker.
- Level the bed, Link.
- Loading material, Link.
- Printing, Link.
- Changing the material and nozzle, Link.
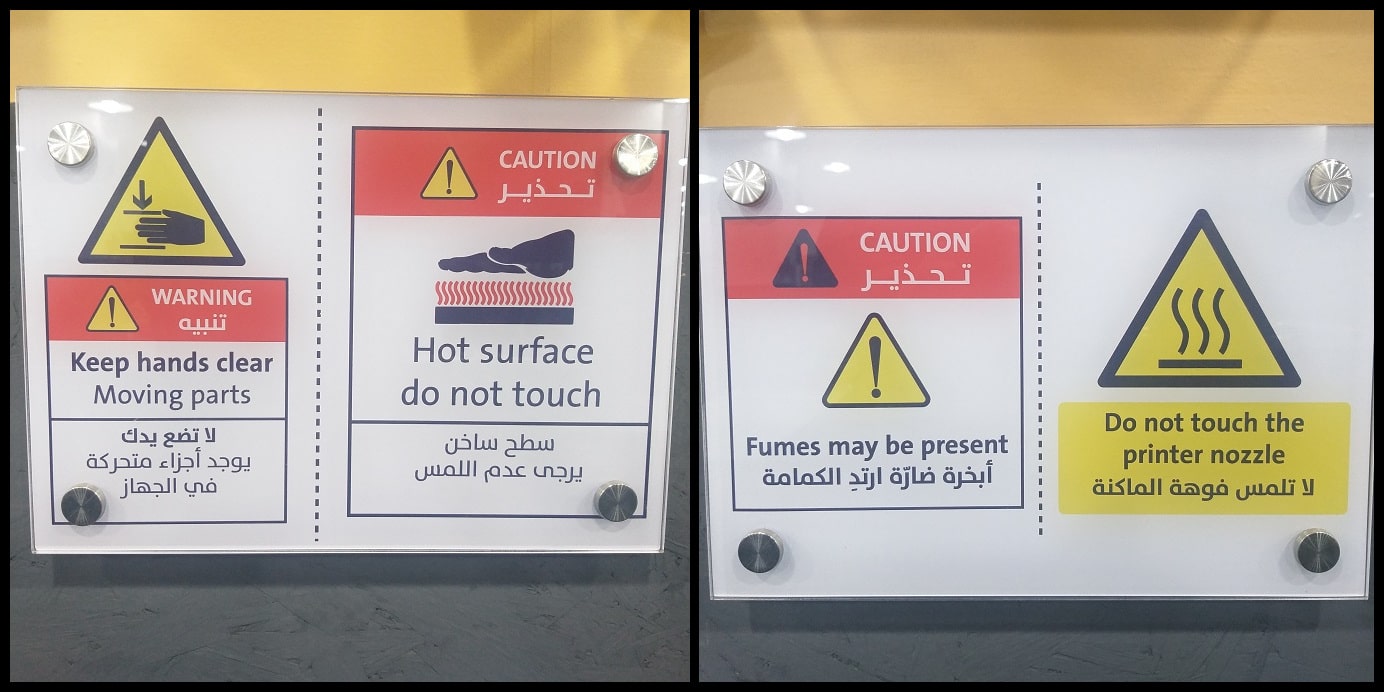
General Safety Rules:
- Keep Hands clear from moving parts.
- Don’t touch, Hot surface.
- Don’t touch the nozzle.
- Wear mask to avoid the fumes.
File Download to print:
From the page 3D Scanning and Printing, Under the design rules we download the STL files:
Supports:
Without supports:
Other tests:
Benefits of 3D printing
- Geometric complexity at no extra cost
- Very low start-up costs
- Customization of each and every part
- Low-cost prototyping with very quick turnaround
- Large range of (specialty) materials
Limitations of 3D printing
- Lower strength & anisotropic material properties
- Less cost-competitive at higher volumes
- Limited accuracy & tolerances
- Post-processing & support removal
Design Rules
There are some restrictions to design a model, so it can be printed.
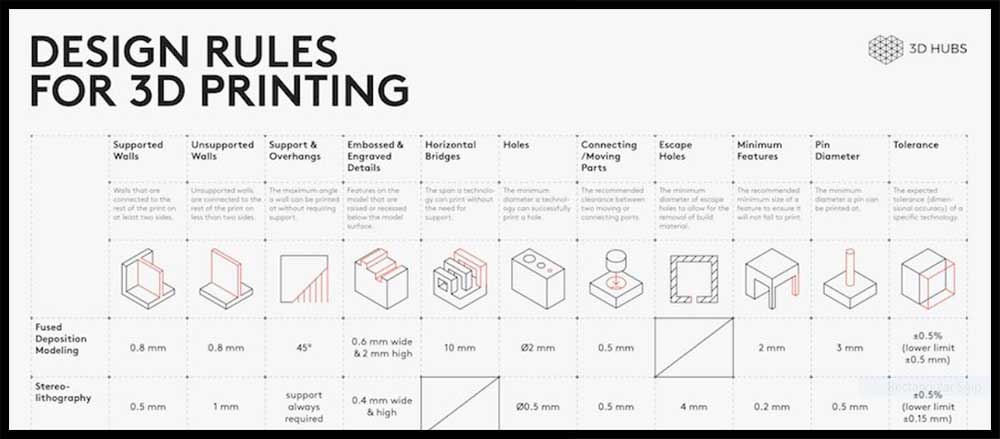
Here are the top 3 things to look out for:
- Overhangs & support: 3D printers cannot deposit material on thin air. Walls at an angle greater than 45° will require support, affecting the surface quality.
- Level of detail: The smallest feature a printer can create depends on the size of the end effector (nozzle or laser) it uses.
- Layer height: The layer height affects the vertical resolution of a part. It’s effects are visible are areas with greater curvature (it appears as stair-stepping).
For more design rules for FDM printing see 3DHub site.
Testing the design rules:
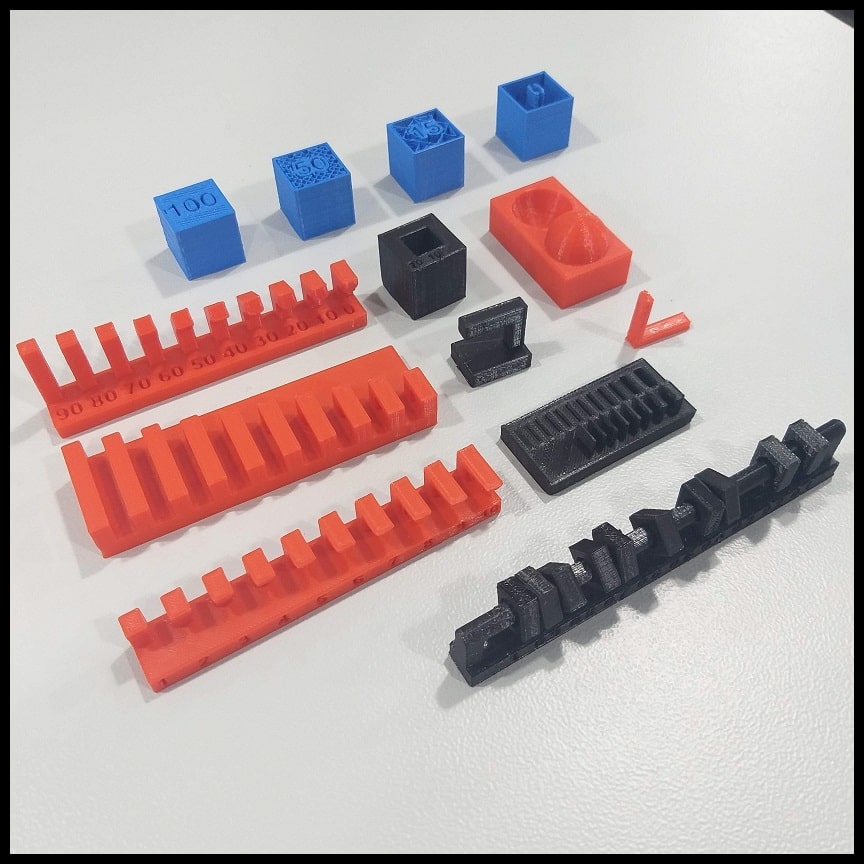
We printed 13 different designs to test the design rules on Ultimaker 2+.
General printer settings for the tests:
Open Cura and add Ultimaker 2+ printer, then choose from material:
Generic > PLA
or
Ultimaker > PLA
And select the 0.4mm nozzle.
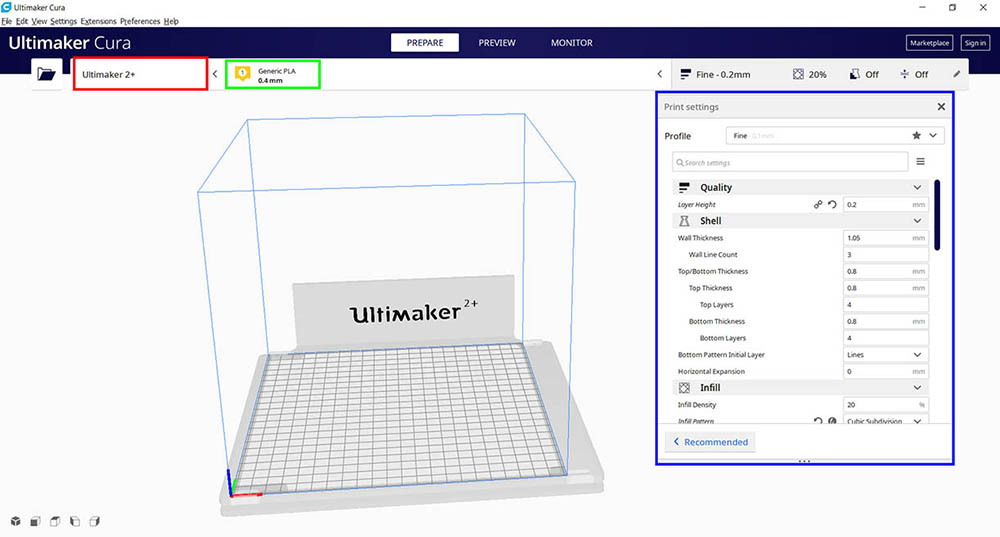
And change Printing Settings to Custom.
Test 1: Supported Overhangs and Clearance:
This print consists of two STL files. The point is to test the quality of supported overhang and clearance between moving parts.
- Click on “Open File(s)” icon and select the STL file. Use “Move”, “Scale” and “Rotate” to control the position, size and orientation of your print.
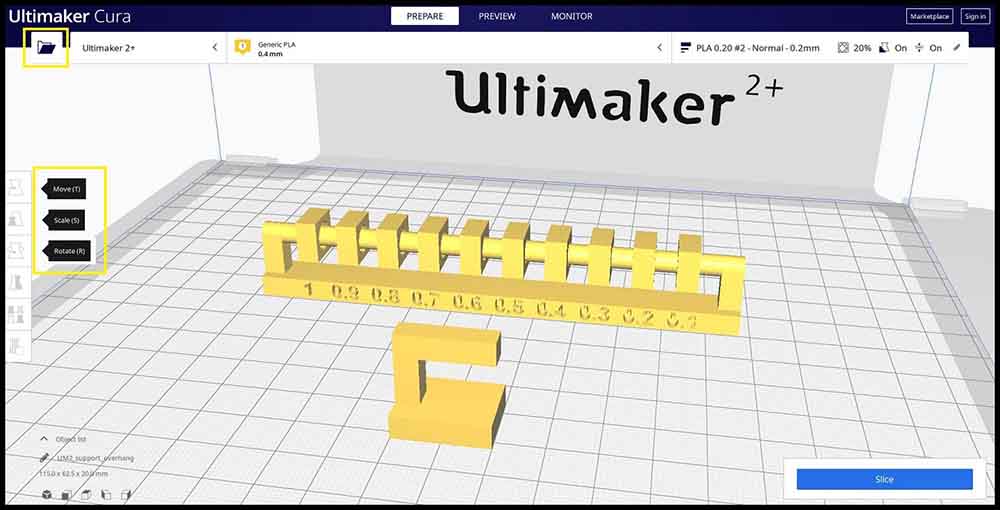
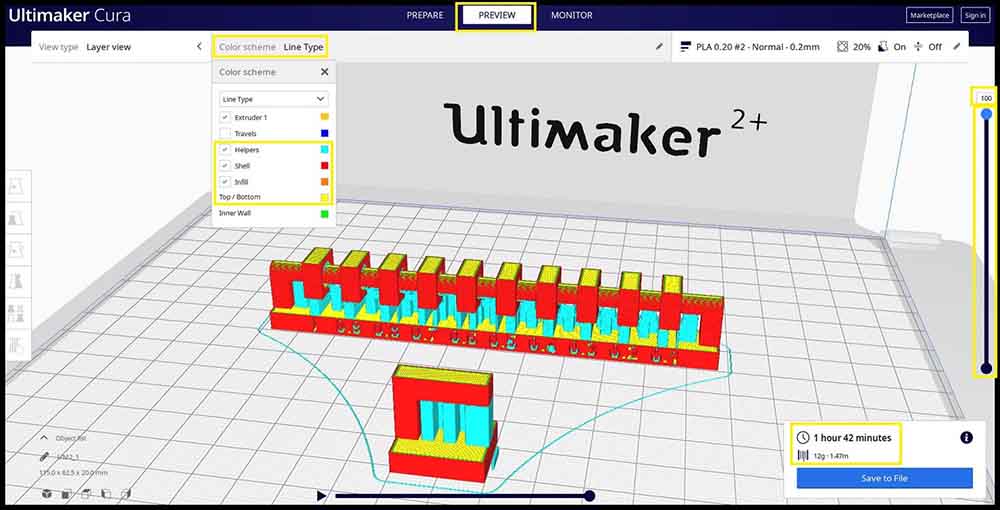
- Click on “Slice”. When slicing finishes you can see needed time to complete the print as well as quantity of material needed in grams and meters. Click on “Preview” and you can see number of layers (100), support and skirt (in blue), shell (in red), infill (in orange) and top/bottom layers (in yellow). Move the vertical slider bar to see layer by layer action.
We used the settings below to print the first part of design rules test.
Quality
Layer Height: 0.20 mm
Line Width: 0.35 mm

Shell
Wall Thickness: 0.7 mm
Top/Bottom Thickness: 0.6 mm

Infill
Infill Density: 20%
Infill Pattern: Grid

Material
Printing Temperature: 200 °C
Build Plate Temperature: 60 °C

Speed
Print Speed: 45 mm/s

Travel
Enable Retraction: Yes

Cooling
Enable Print Cooling: Yes
Fan Speed: 100%

Support
Generate Support: Check
Support Placement: Everywhere
Support Overhang Angel: 50°
Support Pattern: ZigZag

Build Plate Adhesion
Build Plate Adhesion Type: Skirt
-
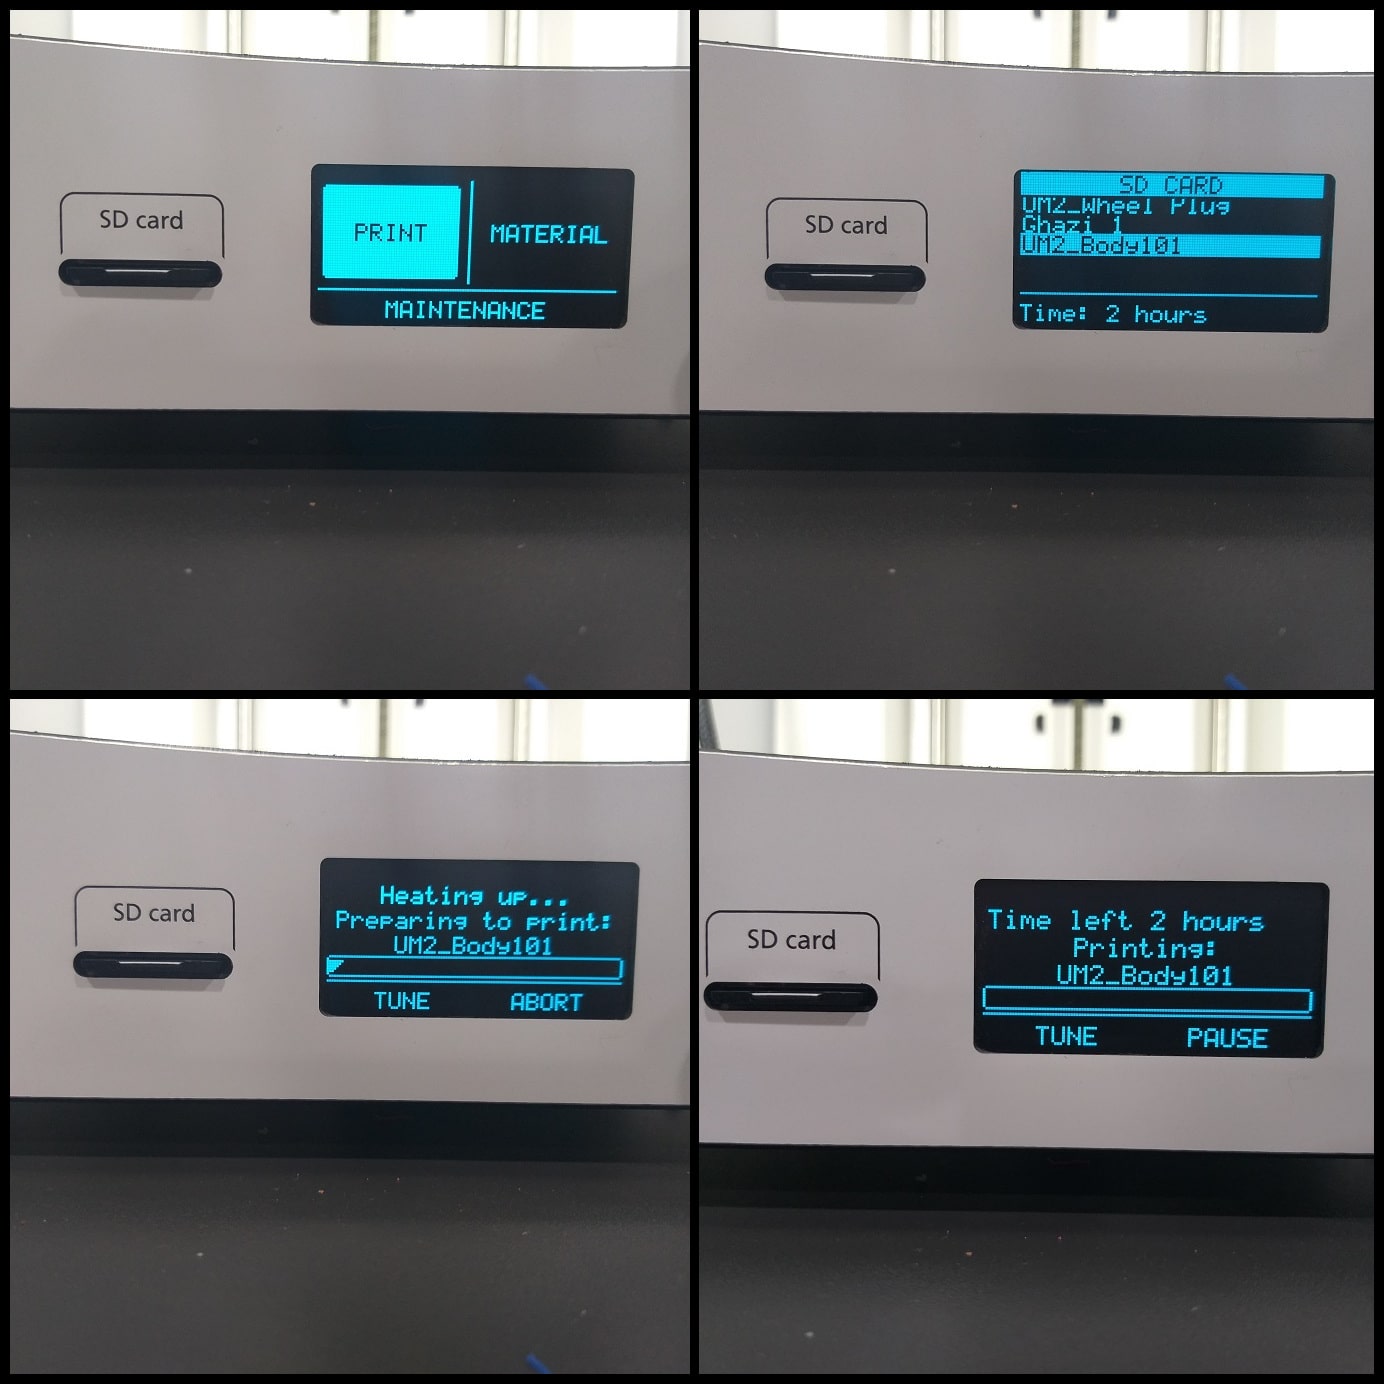
Click on “Save to File” and save the gcode file to printer storage media. Make sure that the correct material (PLA 2.85 mm) and nozzle (0.4 mm) are used on the printer.
-
Click on “Print” then find your model and press on the knob to select it and start printing. Printing will start heating up. When it is done printer will start printing and show remaining time.
Results:
Supported overhang shows good quality after support removal, there was lose threads under the overhang.
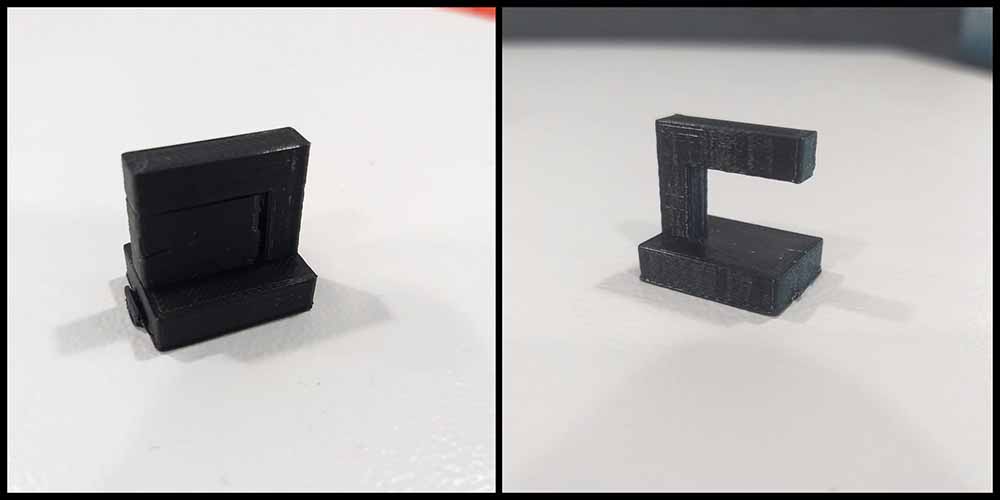
Supported clearance stars at 0.3 mm. Clearance less than 0.3 mm fused with the beam.
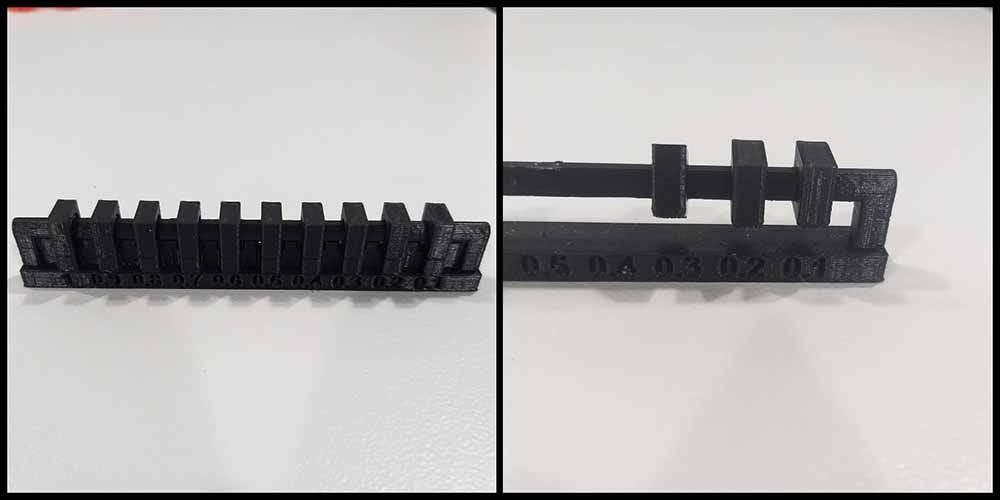
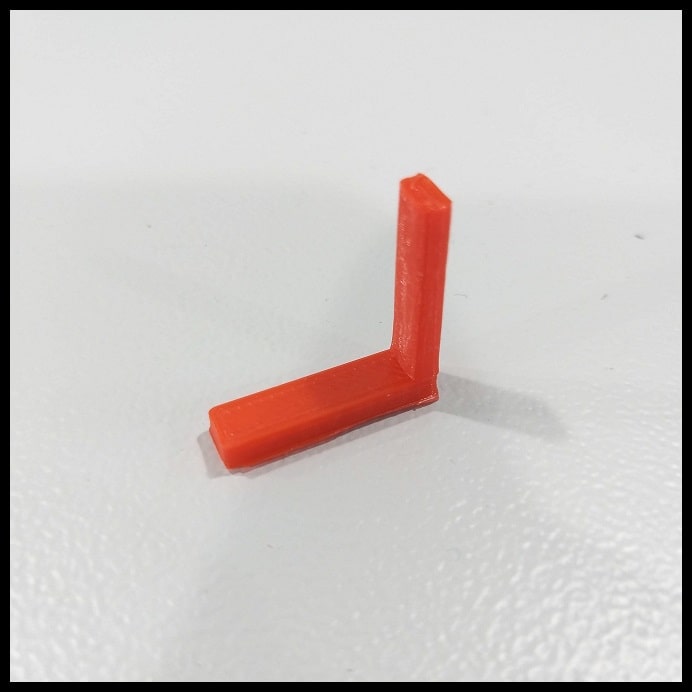
Test 2: Unsupported Overhangs, Bridging and Angle:
This print consists of three STL files. The point is to test the quality of unsupported overhangs, bridging and angles.
Redo the same steps to generate the gcode:

Slice settings:
Quality
Layer Height: 0.20 mm
Line Width: 0.35 mm

Shell
Wall Thickness: 0.7 mm
Top/Bottom Thickness: 0.6 mm

Infill
Infill Density: 20%
Infill Pattern: Grid

Material Printing Temperature: 200 °C
Build Plate Temperature: 60 °C

Speed
Print Speed: 45 mm/s

Travel
Enable Retraction: Yes

Cooling
Enable Print Cooling: Yes
Fan Speed: 100%

Support
Generate Support: Uncheck

Build Plate Adhesion
Build Plate Adhesion Type: Skirt
And load them like test 1.
Results:
Unsupported bridging shows good results for all lengths.
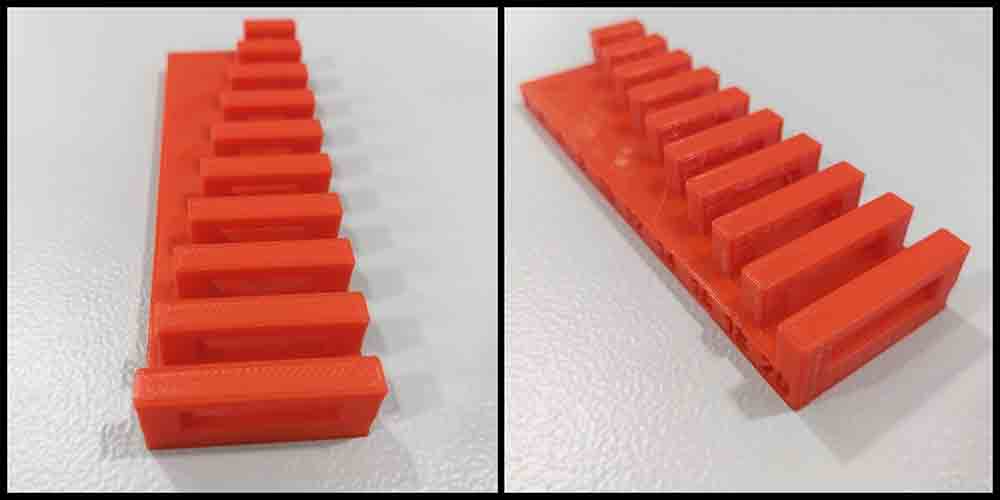
Unsupported overhangs show bad quality from the shortest length (1 mm).
Unsupported angles show good quality at angles >= 50 Deg.
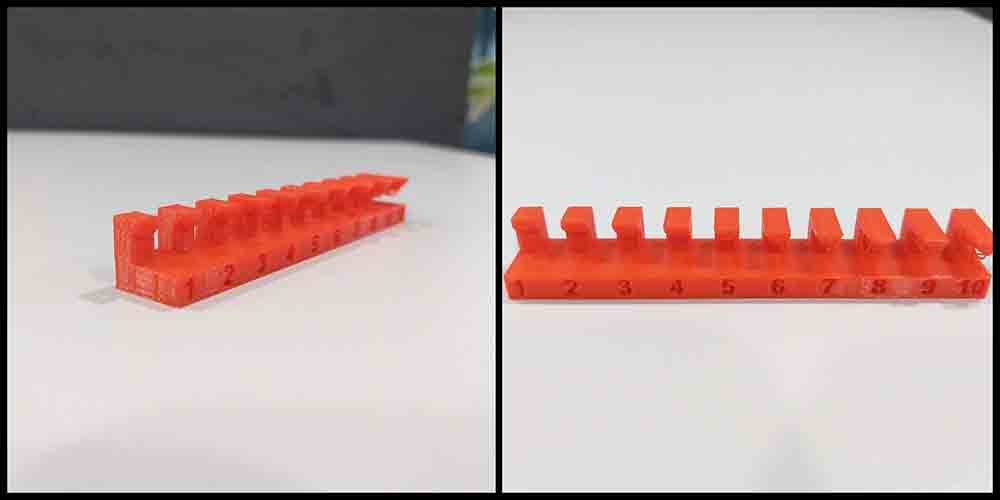
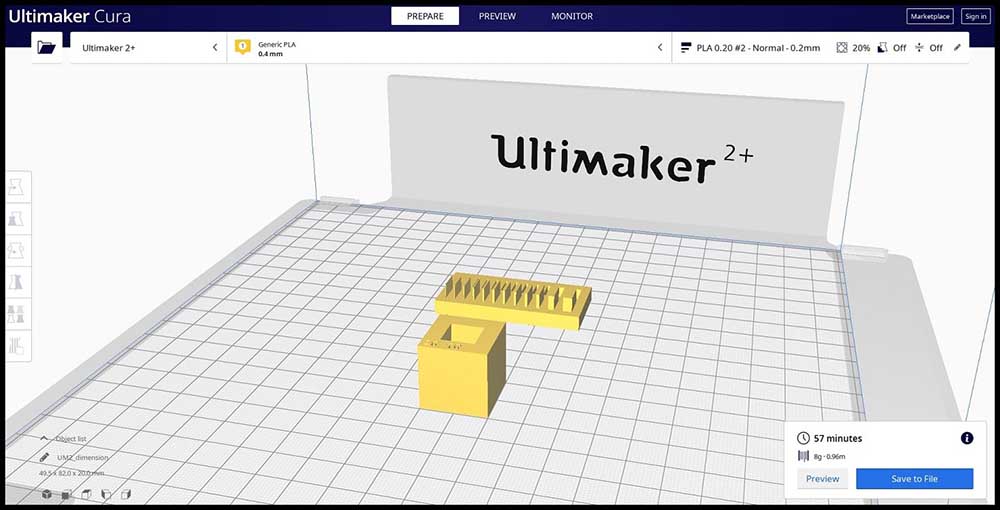
Test 3: Wall Thickness and Dimension:
This print consists of two STL files. The point is to test the quality of wall thickness and dimensions.
Redo the same steps to generate the gcode:
Slice settings:
Quality
Layer Height: 0.20 mm
Line Width: 0.35 mm

Shell
Wall Thickness: 0.7 mm
Top/Bottom Thickness: 0.6 mm

Infill
Infill Density: 20%
Infill Pattern: Grid

Material Printing Temperature: 200 °C
Build Plate Temperature: 60 °C

Speed
Print Speed: 45 mm/s

Travel
Enable Retraction: Yes

Cooling
Enable Print Cooling: Yes
Fan Speed: 100%

Support
Generate Support: Uncheck

Build Plate Adhesion
Build Plate Adhesion Type: Skirt
And load them like test 1.
Results:
Wall thickness less than 0.5 mm were not printed. Slots thickness over 0.1 mm seem to be printed fine.
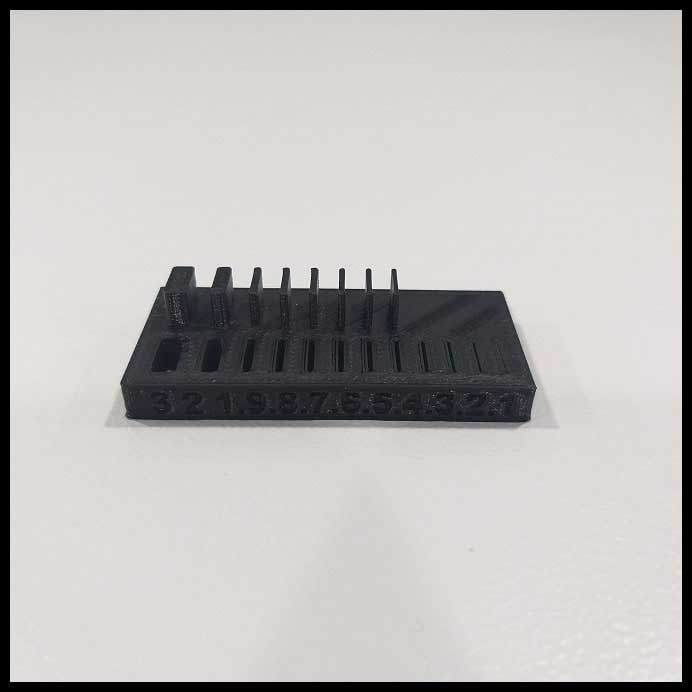
Dimensions There are dimensional errors in printed item. For the outs dimensions error is -0.06 mm, and for inner dimension error is -0.26 mm.

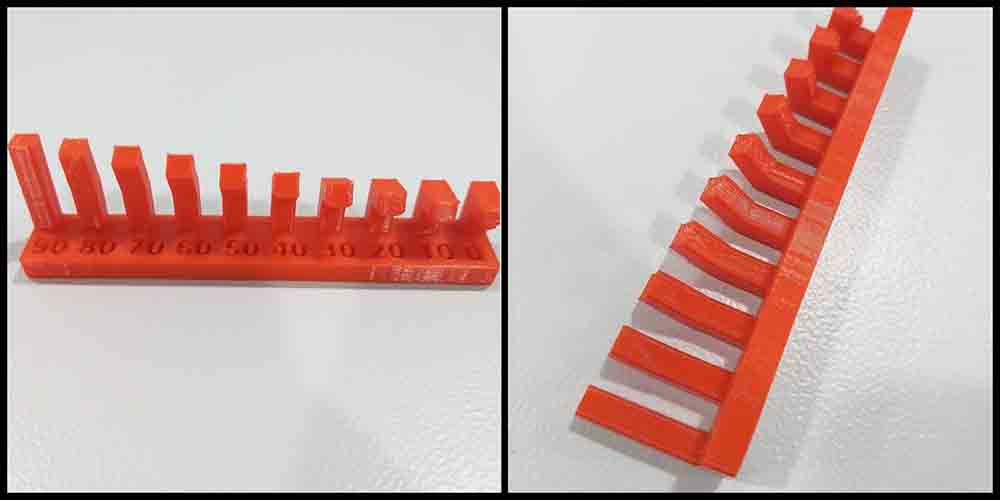
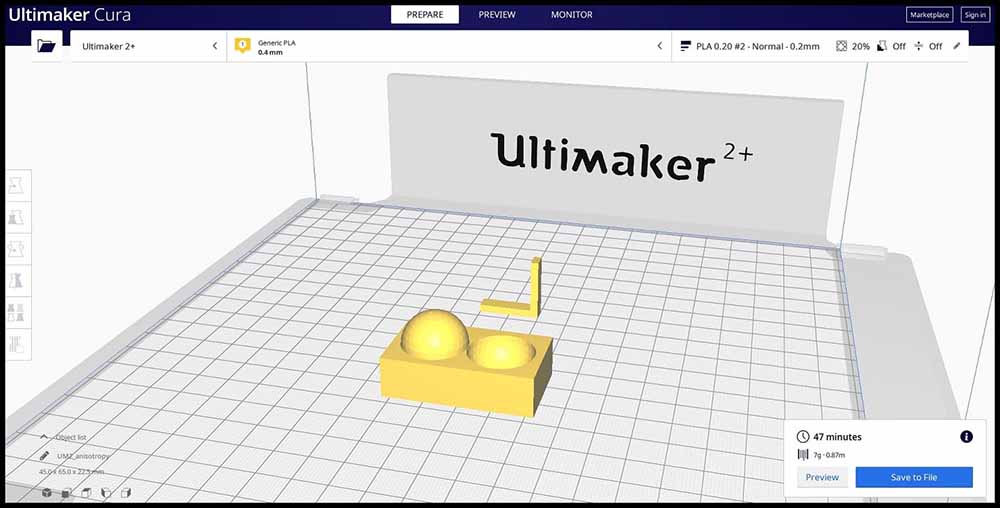
Test 4: Anisotropy and Surface Finish:
This print consists of two STL files. The point is to test the quality of anisotropy and surface finish.
Redo the same steps to generate the gcode:
Slice settings:
Quality
Layer Height: 0.20 mm
Line Width: 0.35 mm

Shell
Wall Thickness: 0.7 mm
Top/Bottom Thickness: 0.6 mm

Infill
Infill Density: 20%
Infill Pattern: Grid

Material Printing Temperature: 200 °C
Build Plate Temperature: 60 °C

Speed
Print Speed: 45 mm/s

Travel
Enable Retraction: Yes

Cooling
Enable Print Cooling: Yes
Fan Speed: 100%

Support
Generate Support: Uncheck

Build Plate Adhesion
Build Plate Adhesion Type: Skirt
And load them like test 1.
Results:
Surface Finish at 0.2 mm layer height shows good quality.
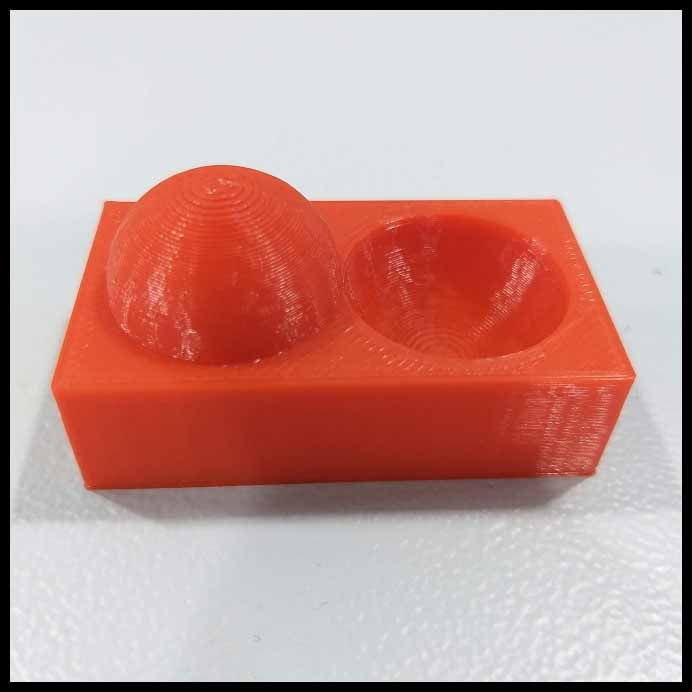
Anisotropy is having physical properties that vary with respect to direction. Item seems to show good quality and low variations.
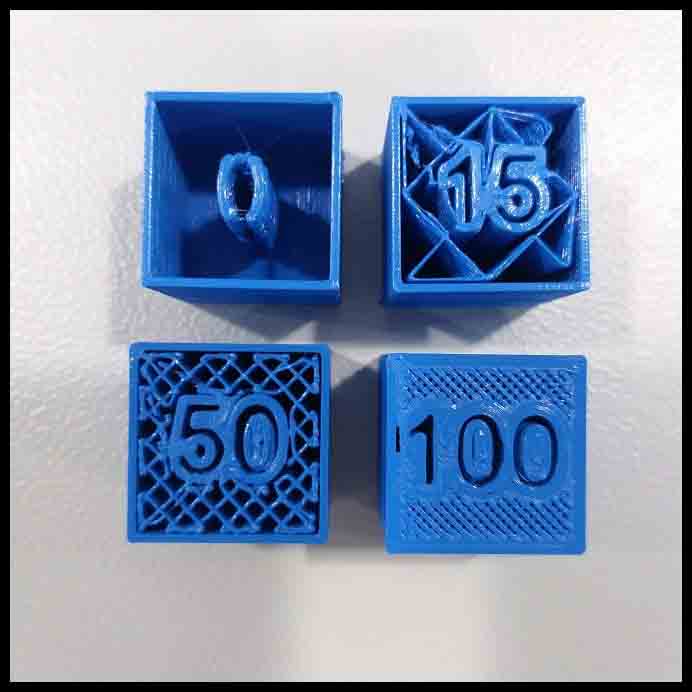
Test 5: Infill:
This print consists of four STL files, the point is to test the infill of 3D printing.
Redo the same steps to generate the gcode:

Slice settings:
Quality
Layer Height: 0.20 mm
Line Width: 0.35 mm

Shell
Wall Thickness: 0.7 mm
Top/Bottom Thickness: 0.6 mm

Infill
Infill Density: 0%, 15%, 50%, 100%
Infill Pattern: Grid

Material Printing Temperature: 200 °C
Build Plate Temperature: 60 °C

Speed
Print Speed: 45 mm/s

Travel
Enable Retraction: Yes

Cooling
Enable Print Cooling: Yes
Fan Speed: 100%

Support
Generate Support: Uncheck

Build Plate Adhesion
Build Plate Adhesion Type: Skirt
And load them like test 1.
Results:
Image below shows printing at 0%, 15%, 50% and 100% infill. Note how printing time changes as infill density increases.
Hero Shoot!
Gcodes:
Download Link.
Individual Assignment
Objective:
- Design and 3D print an object (small, few cm3, limited by printer time) that could not be made subtractively.
- 3D scan an object (and optionally print it).
Design and 3D print an object:
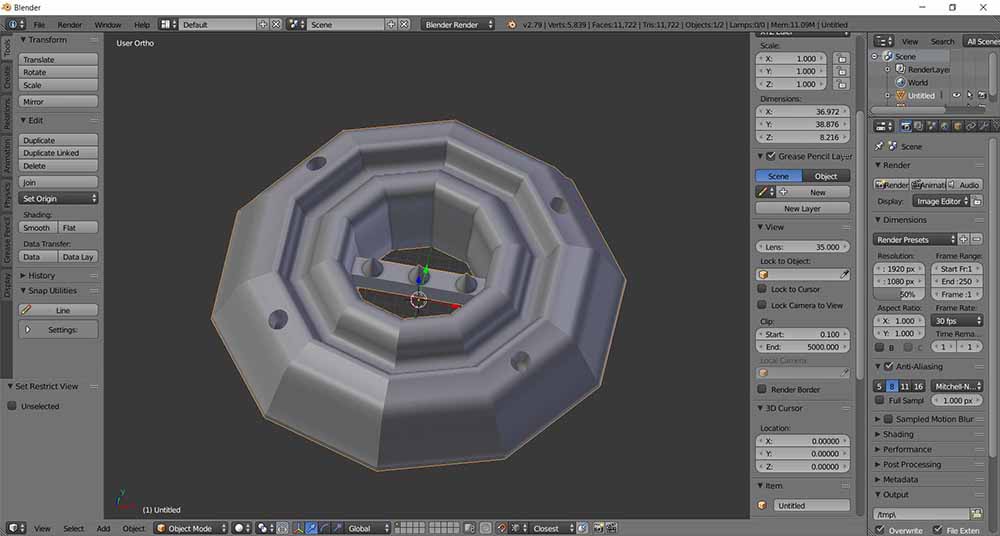
Program used:
Blender 2.79.
Frist try:
I made a random shape that can not be made subtractively, with angeled holes and a bridge.
Slice settings:
Quality
Layer Height: 0.10 mm
Line Width: 0.35 mm

Shell
Wall Thickness: 1.05 mm
Top/Bottom Thickness: 0.8 mm

Infill
Infill Density: 20%
Infill Pattern: Cubic Subdivision

Material Printing Temperature: 210 °C
Build Plate Temperature: 60 °C

Speed
Print Speed: 50 mm/s
Initial print speed: 30 mm/s
Travel
Enable Retraction: Yes

Cooling
Enable Print Cooling: Yes
Fan Speed: 100%

Support
Generate Support: Uncheck

Build Plate Adhesion
Build Plate Adhesion Type: Skirt
Results:
It was too small to show details, as well as the black color was not helpful to show the details, and the bridge was not good, because the width of the bridge.
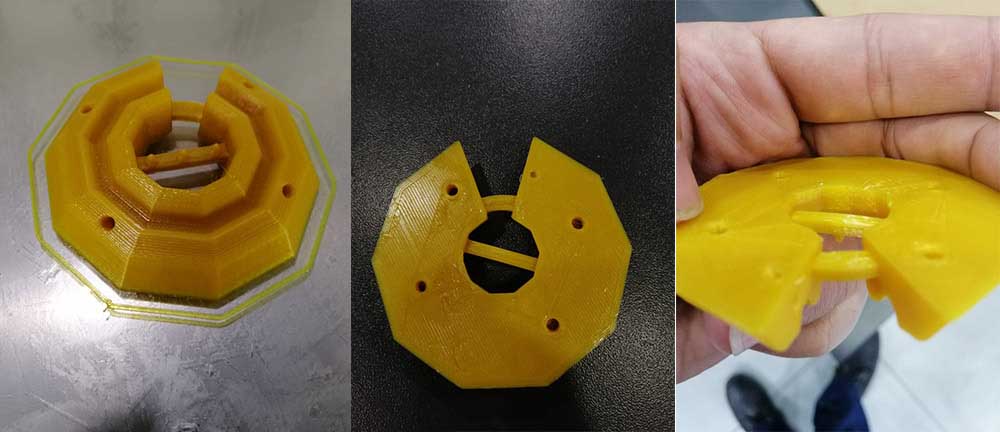
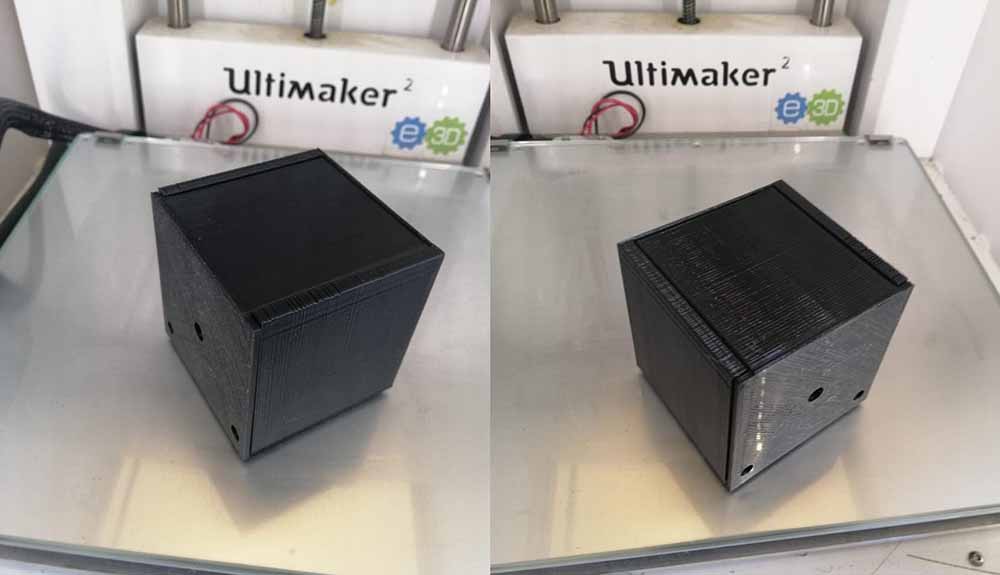
Second try:
I scale it up, and adjust the model and added an angled bridge, and I change the filament to the color yellow.

Slice settings:
Quality
Layer Height: 0.20 mm
Line Width: 0.35 mm

Shell
Wall Thickness: 1.05 mm
Top/Bottom Thickness: 0.8 mm

Infill
Infill Density: 20%
Infill Pattern: Cubic Subdivision

Material Printing Temperature: 210 °C
Build Plate Temperature: 60 °C

Speed
Print Speed: 50 mm/s
Initial print speed: 30 mm/s
Travel
Enable Retraction: Yes

Cooling
Enable Print Cooling: Yes
Fan Speed: 100%

Support
Generate Support: Uncheck

Build Plate Adhesion
Build Plate Adhesion Type: Skirt
Hero shoot:
Better details, but bad first layers did not stick well on the bed, better bridges, and more details shown because of the upscaling to the model.
Gcodes:
3D scan an object:
Machine Used:
Sense 3D scanner.
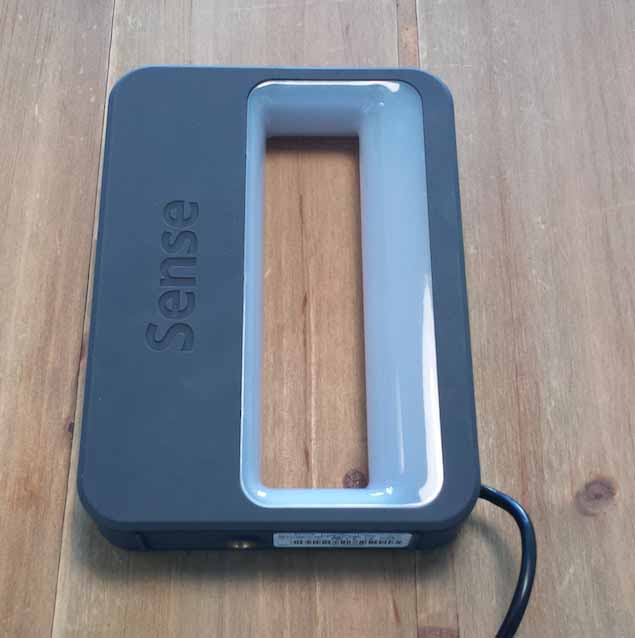
Program used:
3D Systems Sense

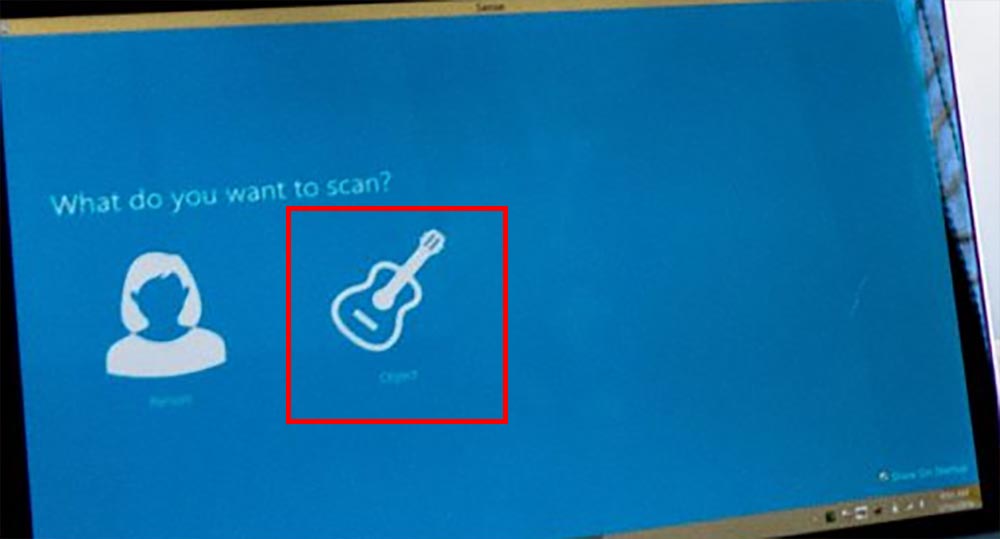
I scanned my colleague hand:
I choose to scan her hand as object, with high resolution
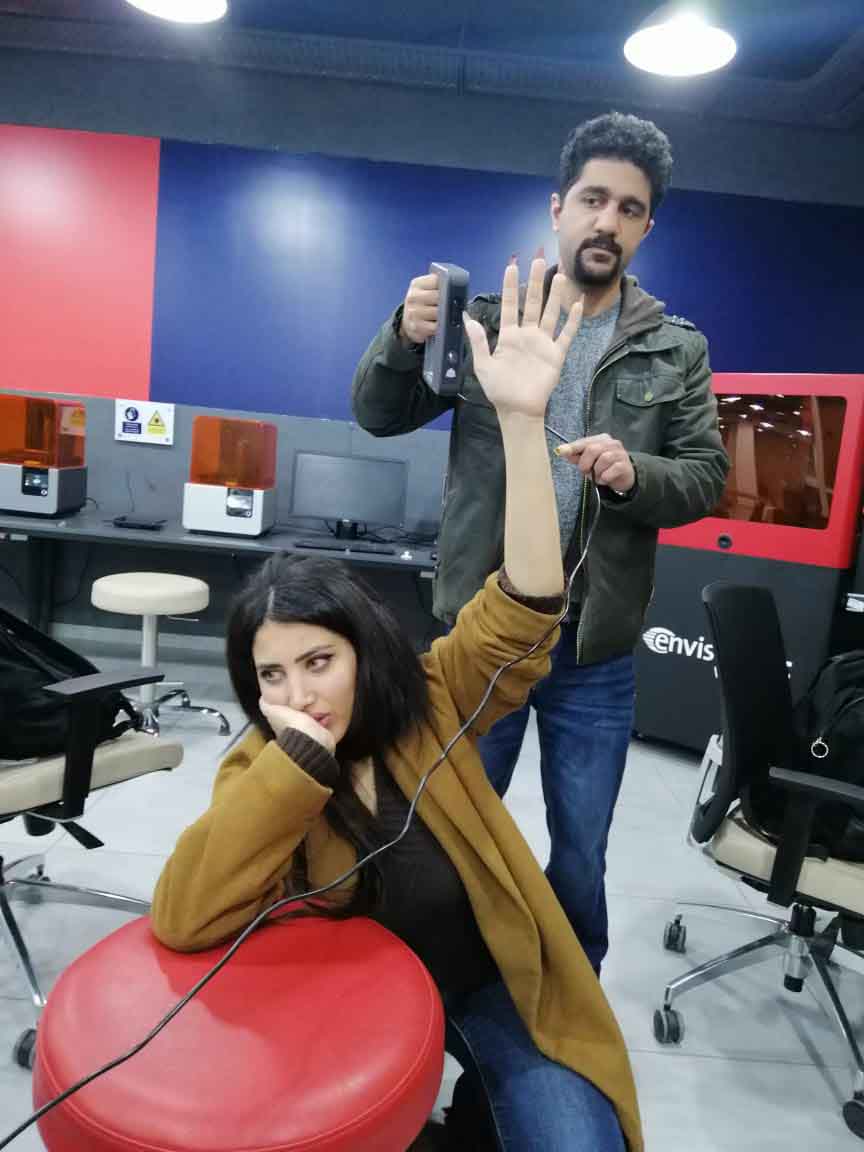
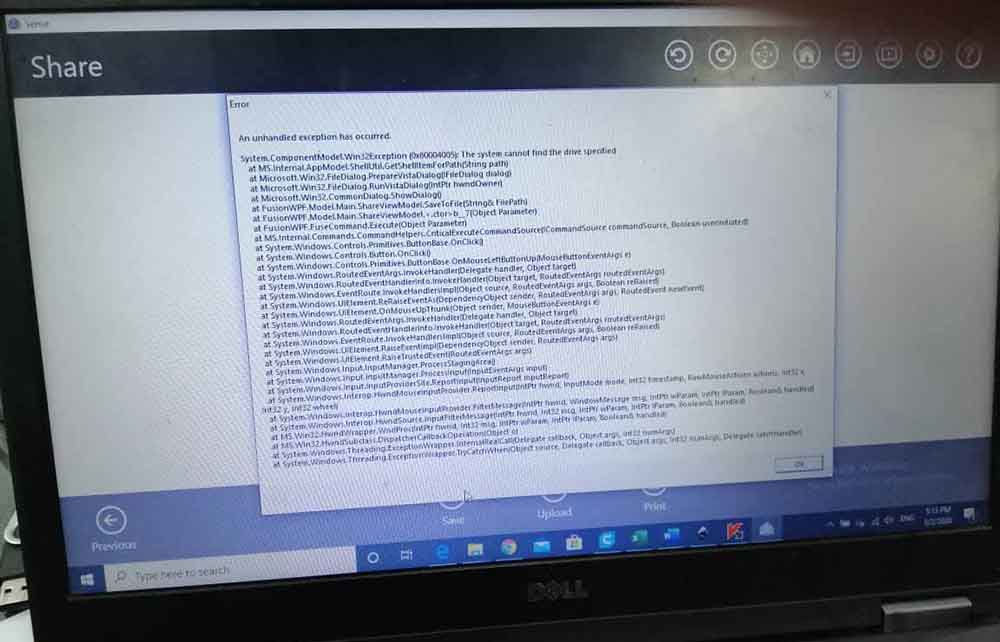
The output, but sadly there was an error we could not export it.
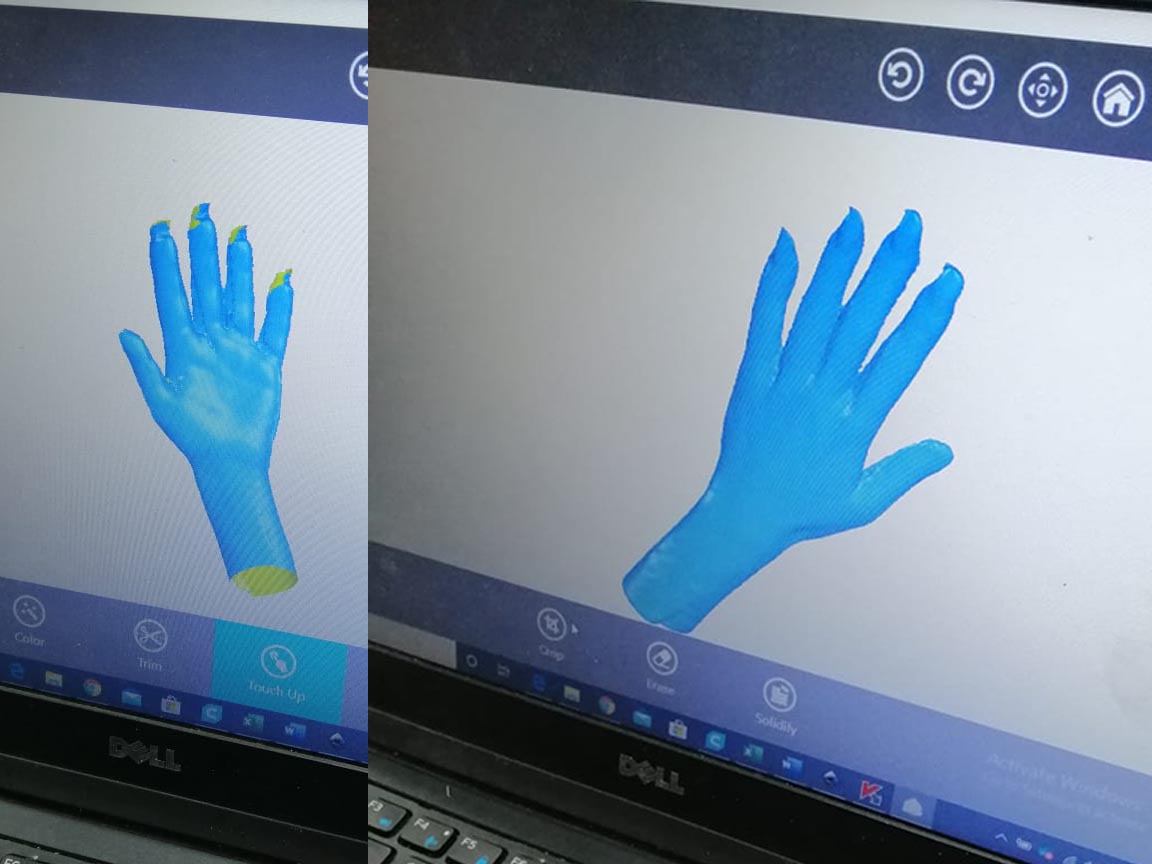
We do scan again on another computer and the result
Hero Shoot!!:
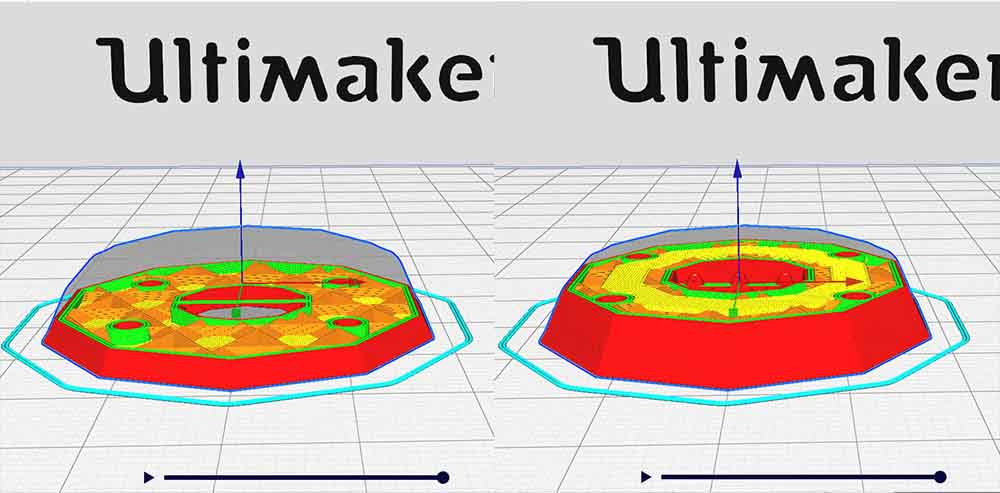
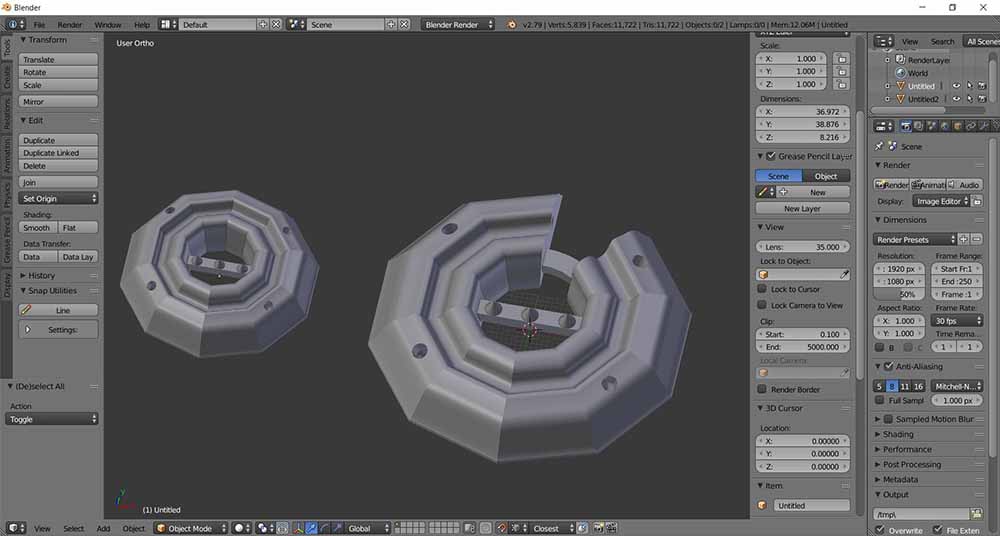
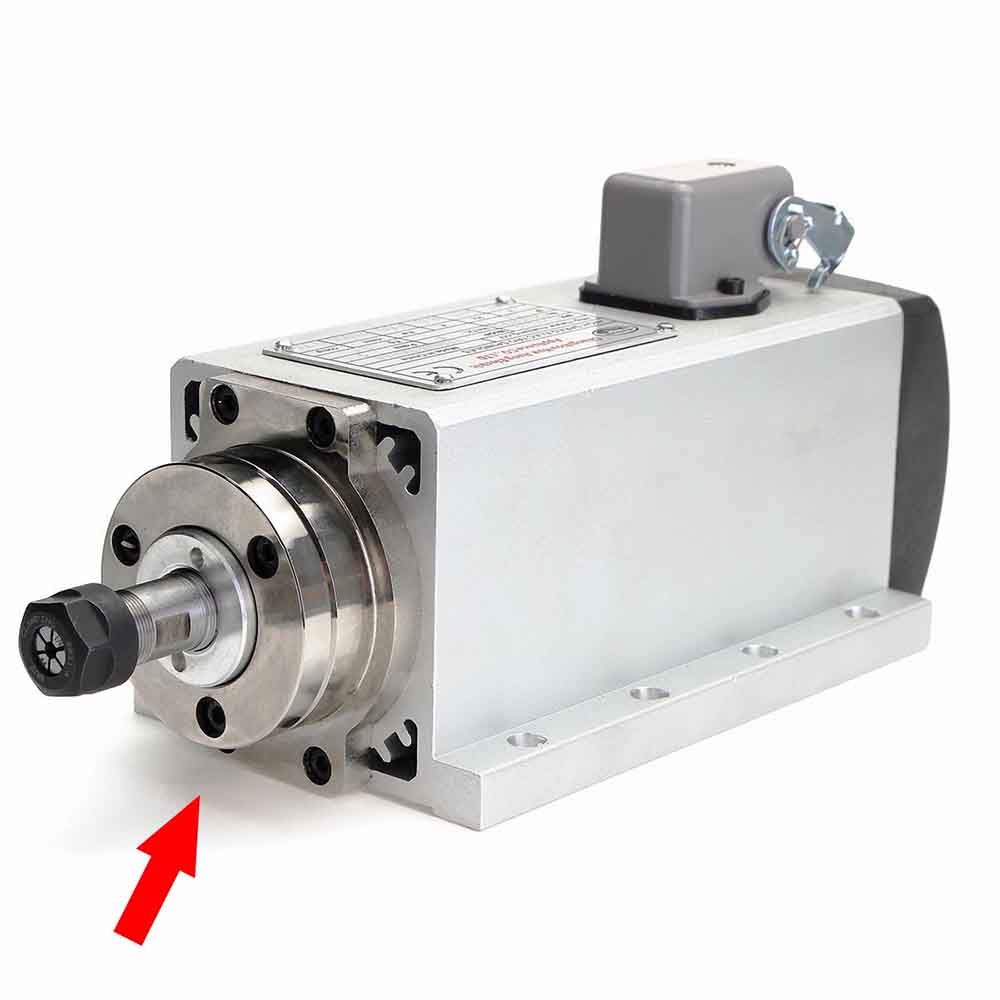
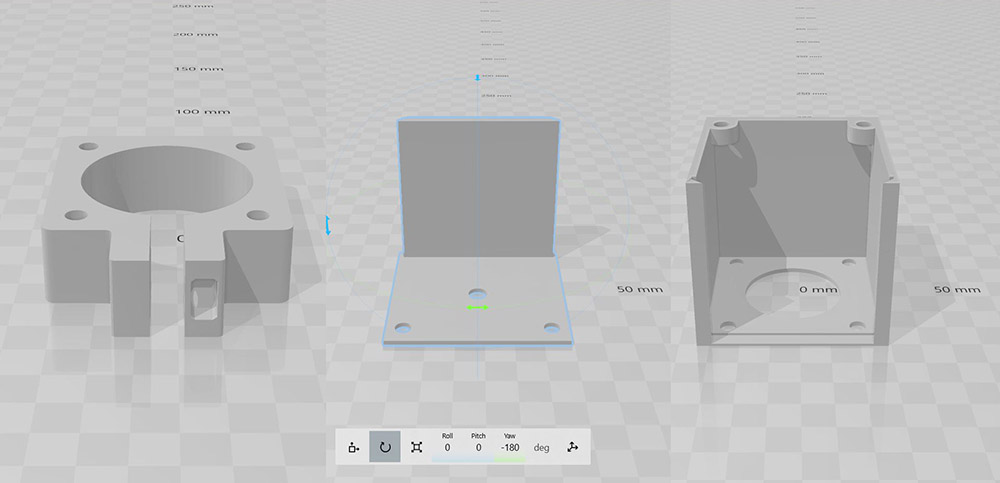
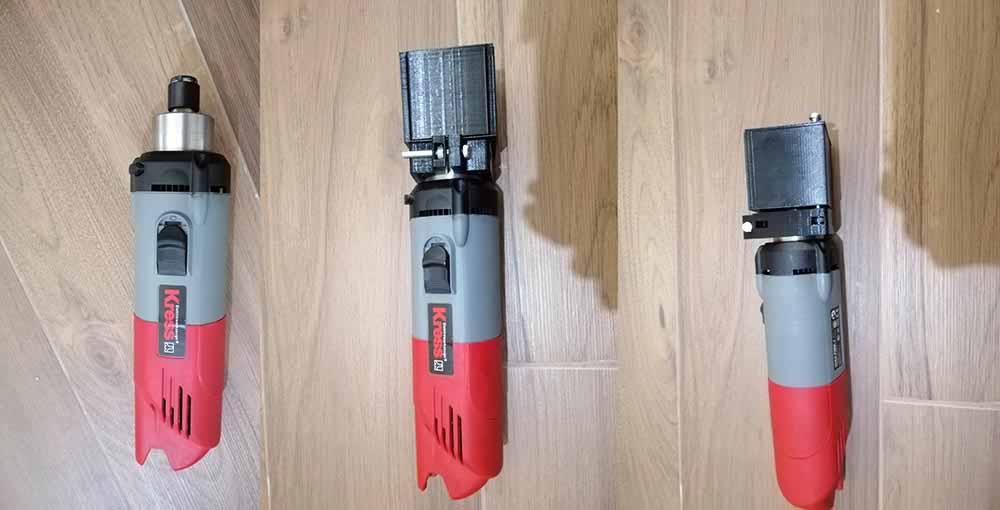
Designs attachment box to a spindle:
I have choosen a Kress 1050 FME-1 as a prototype, which looks similar to a CNC spindle, but smaller.
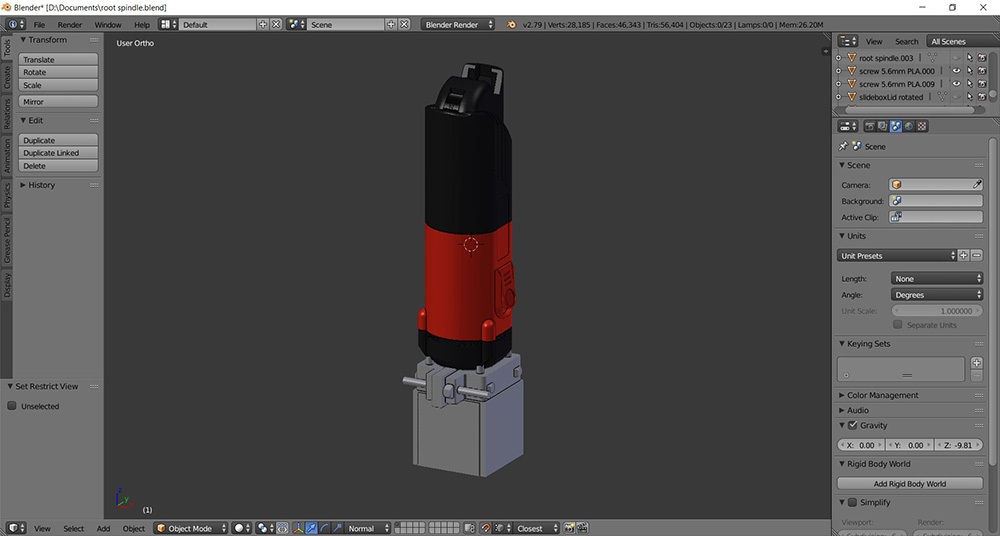
Designed 3D models:
I made three parts, one to be mounted, and a sliding box attached to the mount.
Print settings:
Different 3D printer used, with 0.5mm nozzle, with the same slice settings for all.
Quality
Layer Height: 0.25 mm
Line Width: 0.35 mm

Shell
Wall Thickness: 1.0 mm
Top/Bottom Thickness: 0.8 mm

Infill
Infill Density: 20%
Infill Pattern: Cubic Subdivision

Material Printing Temperature: 210 °C
Build Plate Temperature: 60 °C

Speed
Print Speed: 70 mm/s
Initial print speed: 10 mm/s
Number of slowed layers: 3 layers
Travel
Enable Retraction: Yes

Cooling
Enable Print Cooling: Yes
Fan Speed: 23%

Support
Generate Support: Uncheck

Build Plate Adhesion
Build Plate Adhesion Type: Skirt
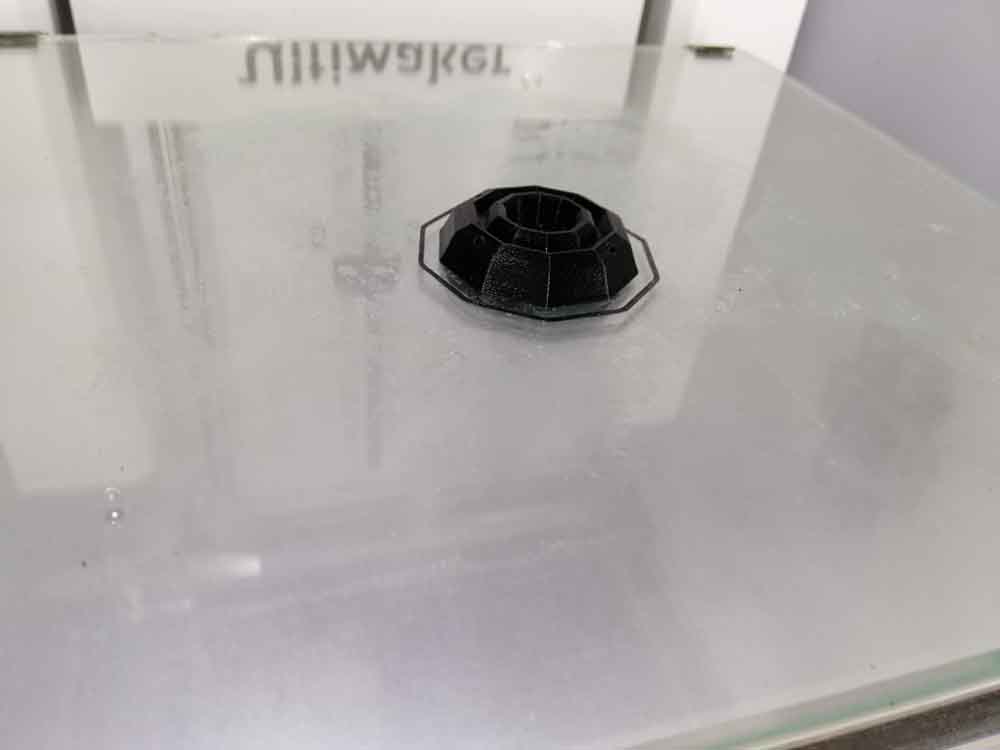
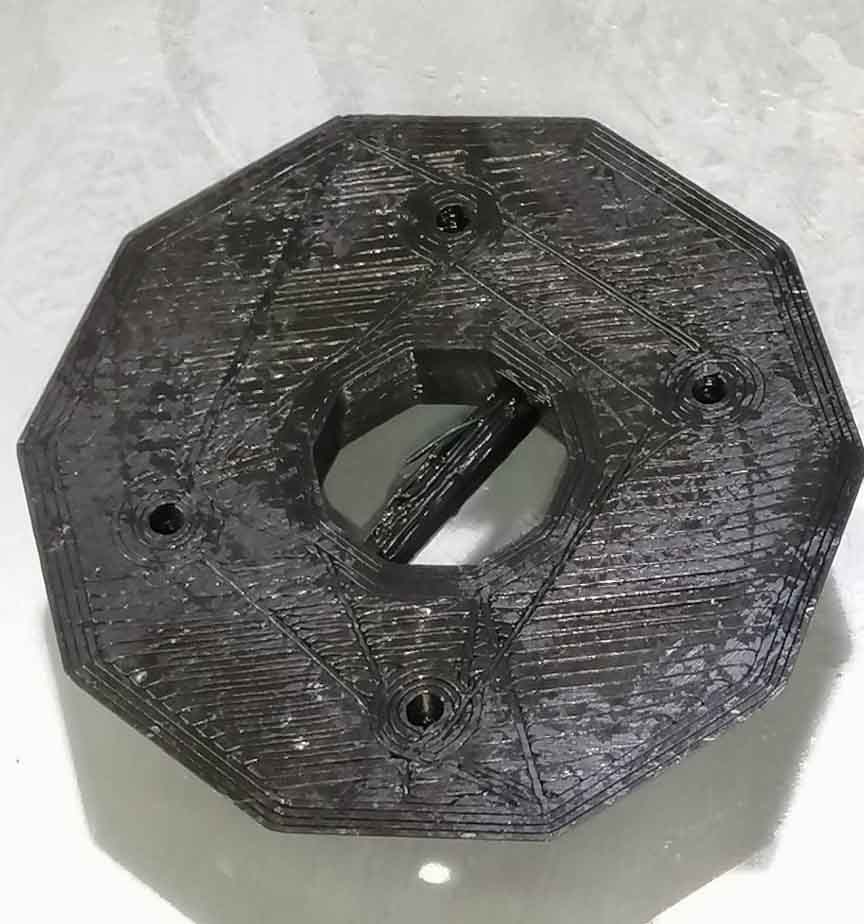
Results:
Part one from Box.
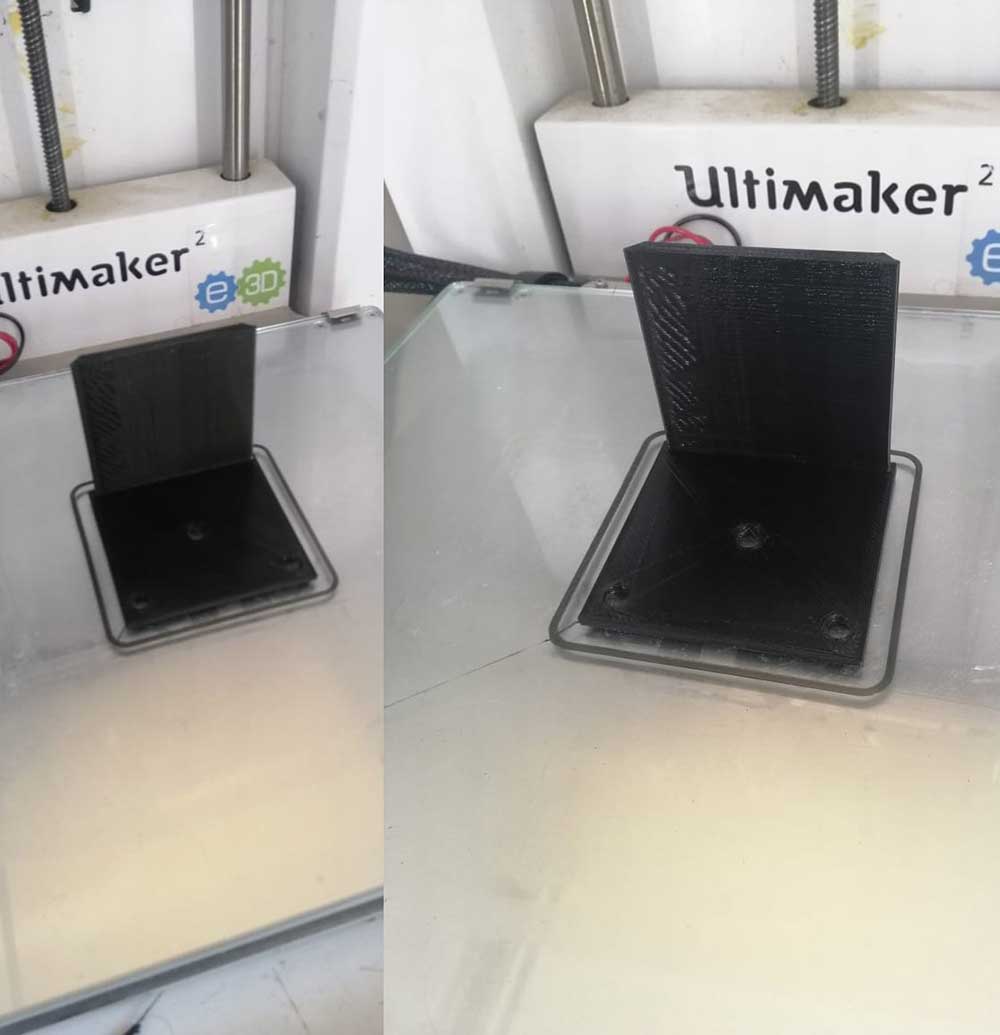
Part two from Box.
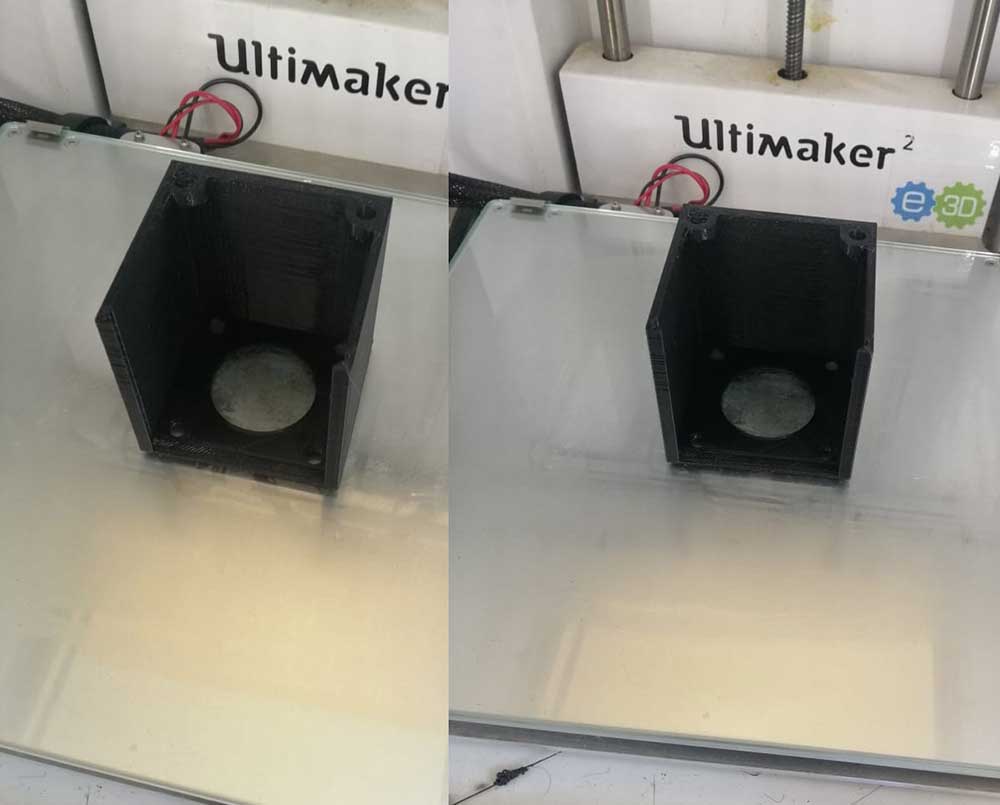
Mount to Kress spindle.
Sliding Box combined
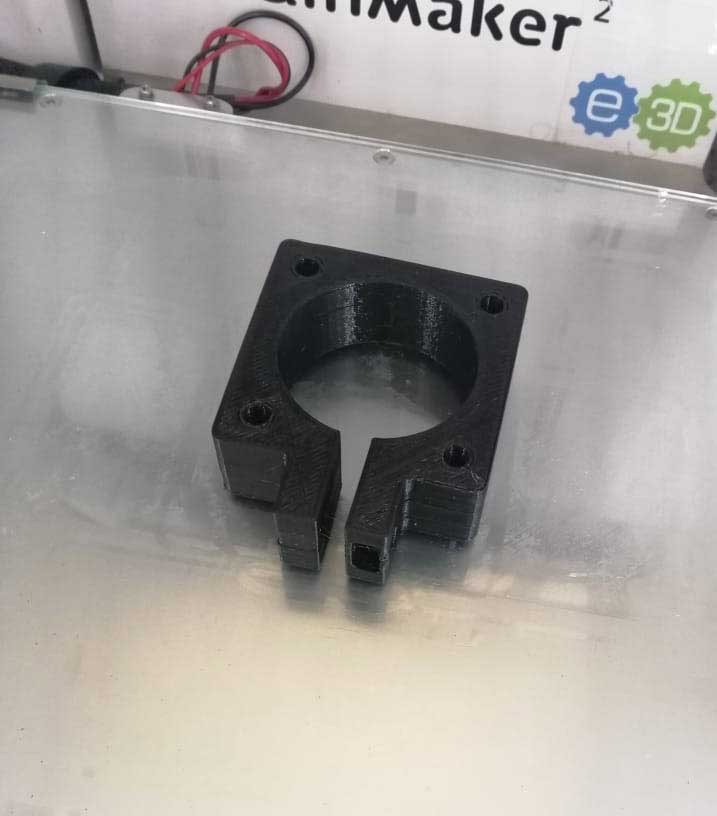
Assemble them by using M5 screws and nuts.
Hero shoot
Thingiverse Link
Gcodes:
Download Link.