Overall Plan
I was planning to achieve the minimum graduation requirements before the announcement. And if the minimum requirements are achieved, I will continue to develop the project.
My current situation
Development plan
June 4th
Plan
1) Test after connecting motor board to motor
2) Timing pulley 3D print
3) motor board & timing belt, pulley test (to make sure the paddle is moving well)
Workflow
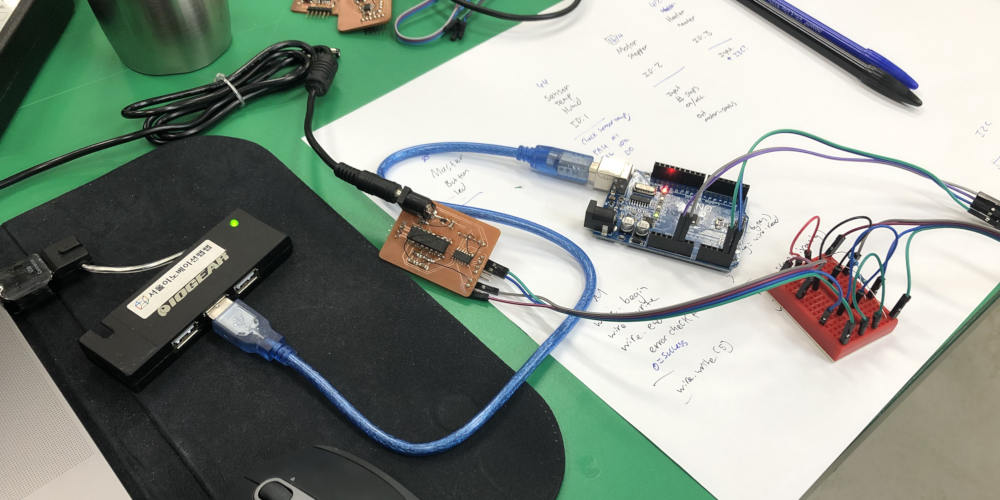
- Coding
Arduino Uno - jtag. Progremer
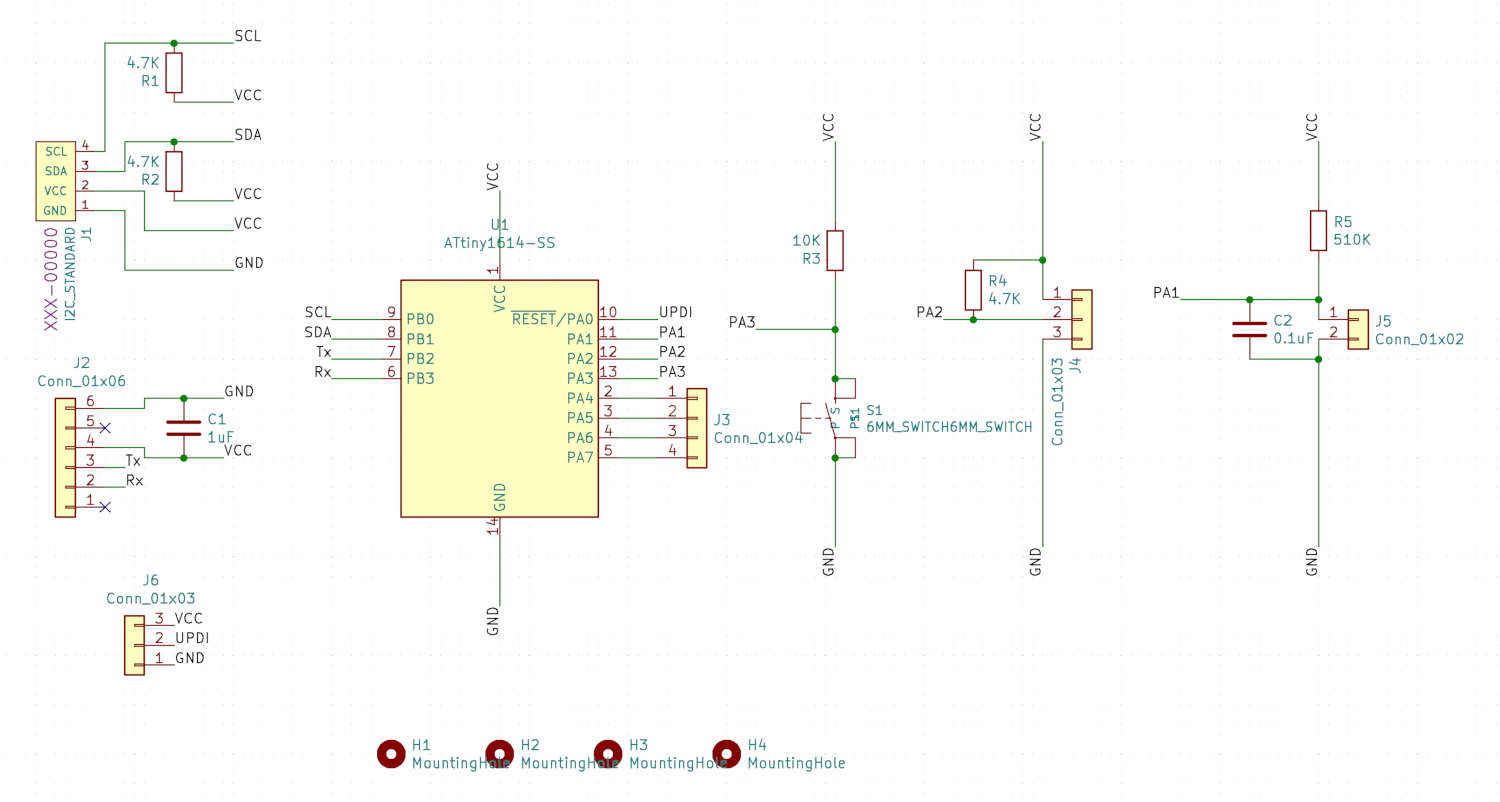
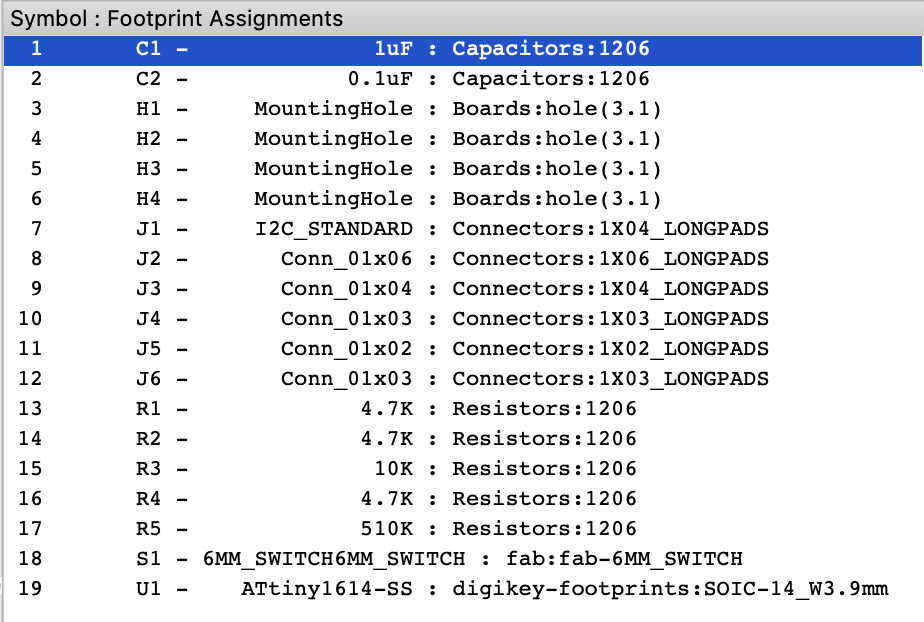
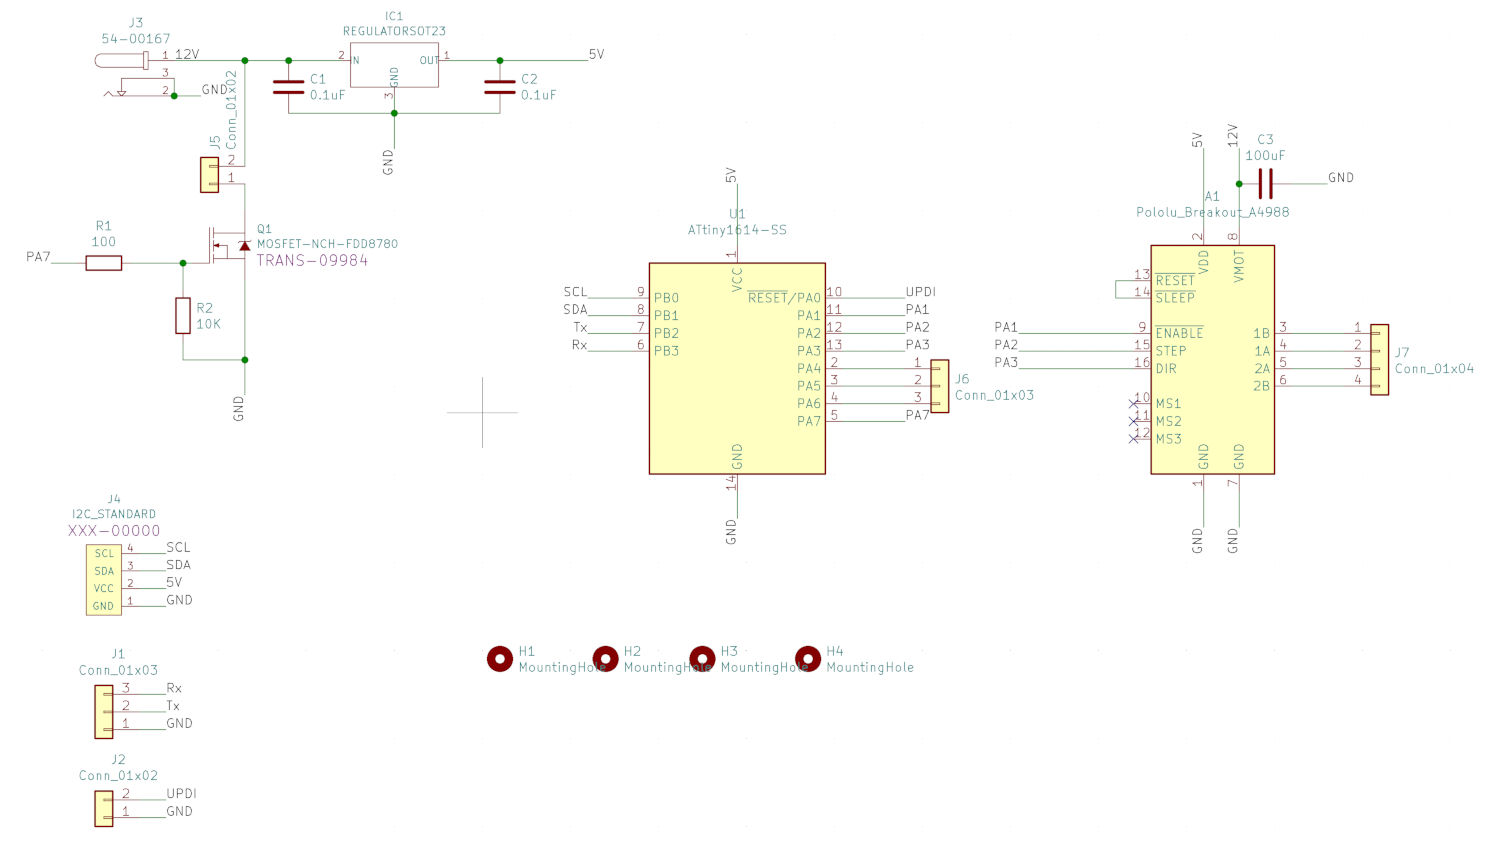
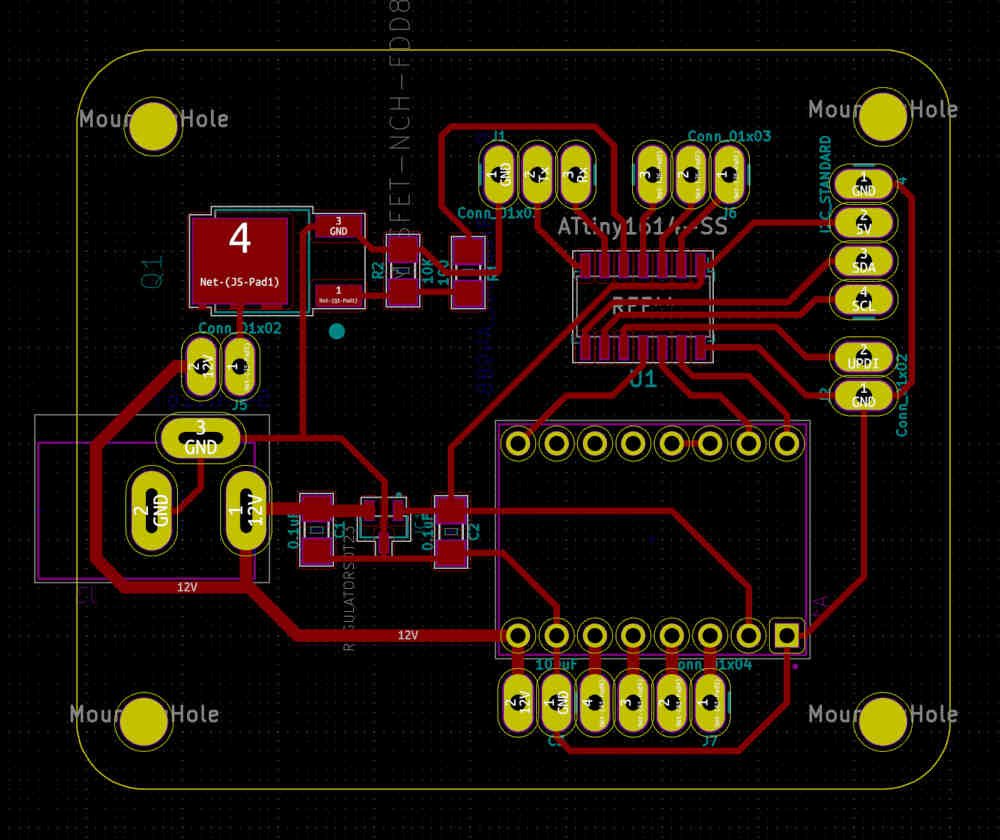
My Motor Drive Board - ATtiny1614
I referred to the code of Junghwan's output device week.
Slightly Modified Codeconst int DriverA_1 = 6; const int DriverA_2 = 1; const int DriverB_1 = 2; const int DriverB_2 = 3; void setup() { pinMode(DriverA_1, OUTPUT); pinMode(DriverA_2, OUTPUT); pinMode(DriverB_1, OUTPUT); pinMode(DriverB_2, OUTPUT); } void loop() { motor( HIGH, LOW, 1); } void motor(int a1, int a2, int d){ digitalWrite(DriverA_1, a1); digitalWrite(DriverA_2, a2); delay(d); digitalWrite(DriverB_1, a1); digitalWrite(DriverB_2, a2); delay(d); digitalWrite(DriverA_1, a2); digitalWrite(DriverA_2, a1); delay(d); digitalWrite(DriverB_1, a2); digitalWrite(DriverB_2, a1); delay(d); } - Using UPDI to Insert Code

- Connecting 12V power and turning the motor
Video
Problem
The motor drive has heated up.
SolutionMaybe it's because the power I'm using now is connected and there's a lot of current. (Initially, 12V 6A power was used.)
Therefore, using a power supply, check how much current is flowing, and check the lowest voltage the motor maintains performance.
And check the amount of current at that time.
image
1) 12V 0.6A
2) 9V 0.3A
The motor's performance was reduced below 8V and the voltage to be used was set at 9V.
VideoLearningThe motor drive has heated up.
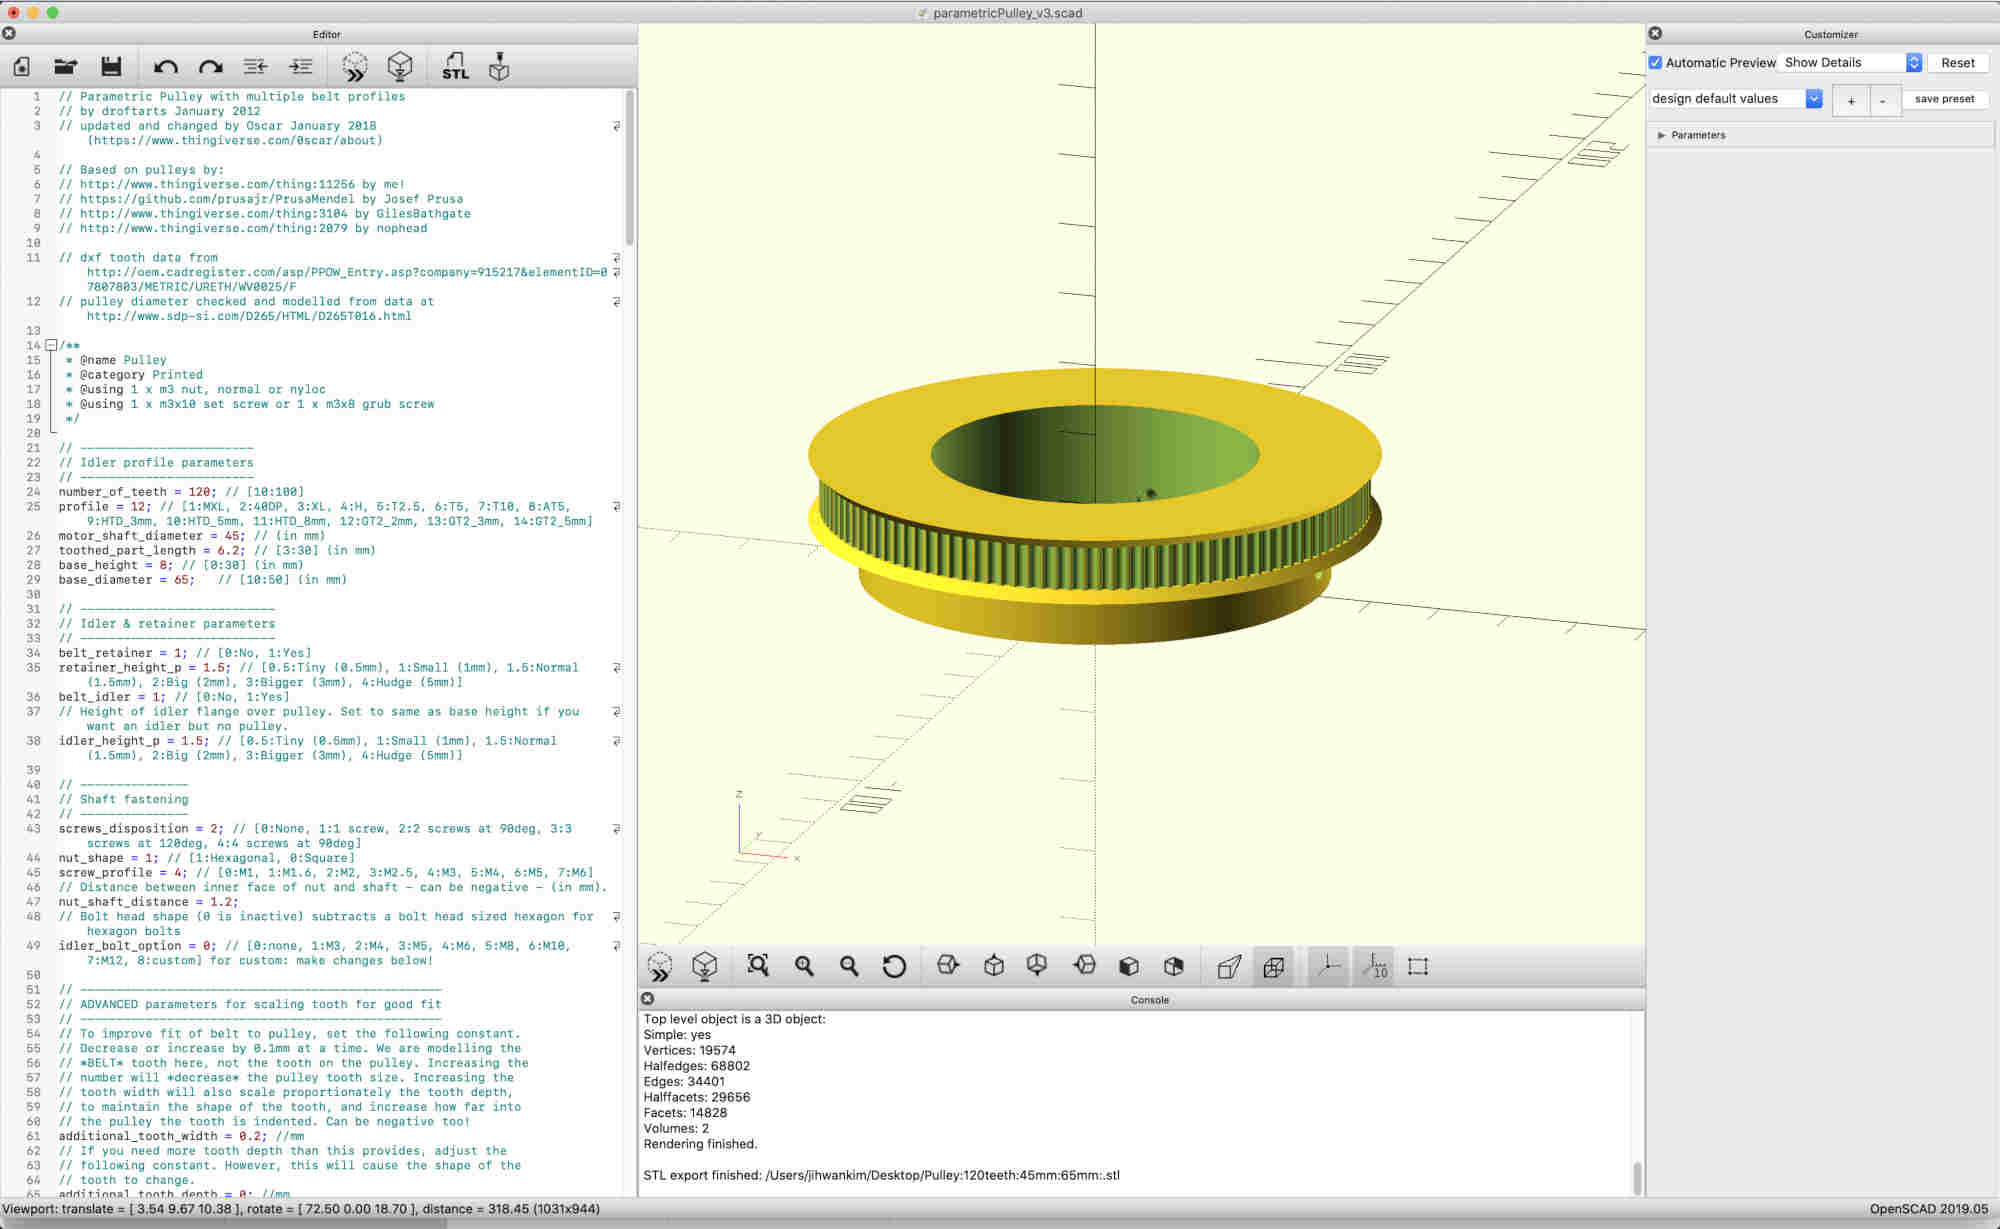
- Found the parametric timing pulley cad design in Thingiverse. (Oscar's parametric pulley)
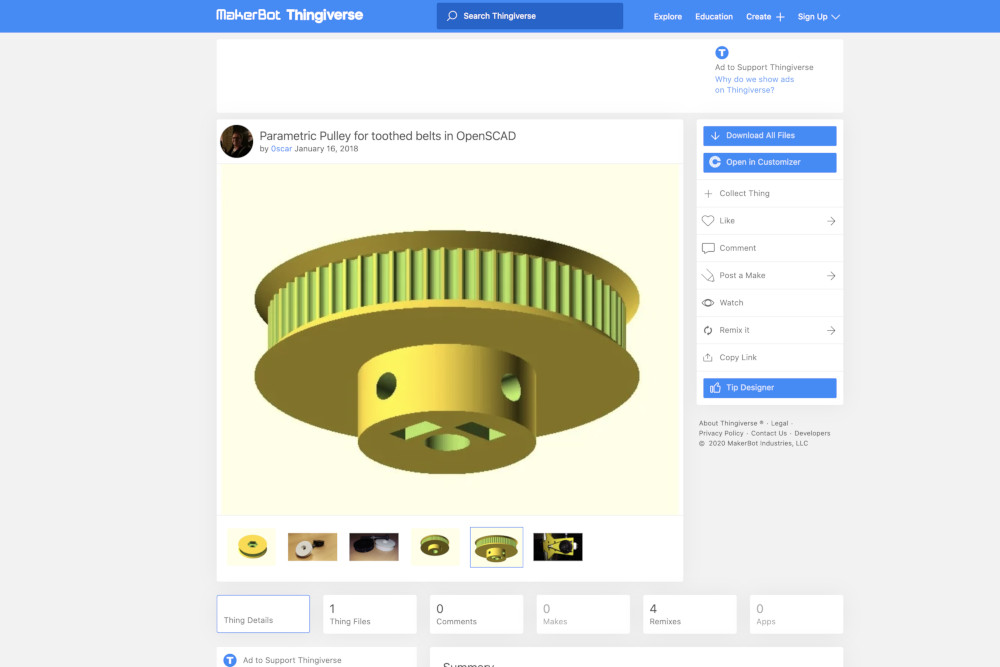
- And I downloaded openscad and set the pulley I wanted and 3D printed it.

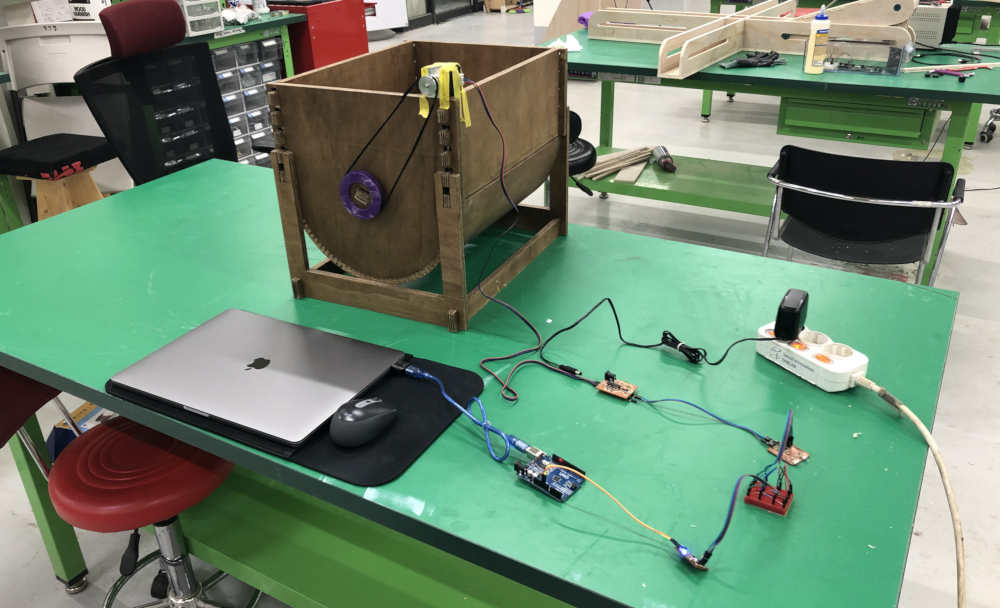
- I tried to operate the motor by connecting the timing belt. (With the prototype I made at CNC Week)
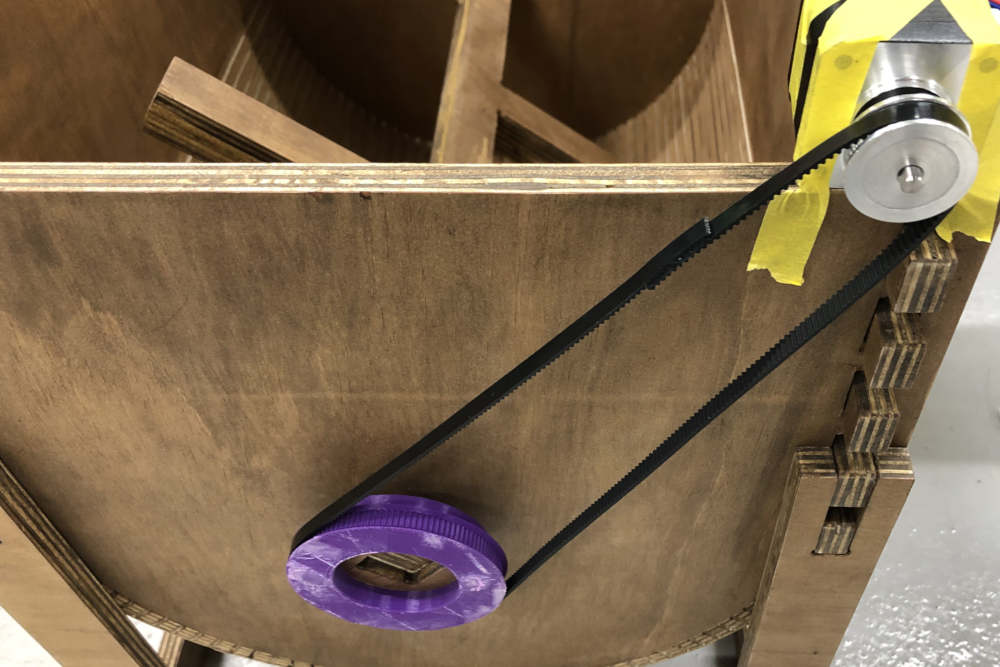 Problem
There was a stiff part of the paddle where the motor didn't work well. (At this time the pulley connected to the motor and the paddle had a ratio of 3:1 (the teeth 40:120).)
SolutionThe ratio of pulley had to be more than 1:60. (I was planning to make them 20:400, but... Maybe we should use another method.)
LearningA larger proportion is needed when a greater force is needed.
June 5th, 6th
Plan
1) Build a diagram for coding.
2) Modify the heater board made on the output device week to enable I2C communication.
3) Use I2C network to assemble the sensor board, heater board, and motor board. If you need more boards, use the blink board additionally.
Workflow
- To use I2C on the heater board, I cut the line connecting the switch to the SCL (PA2) pin, connected the switch to the PA6 pin, and connected the SCL (PA2) pin to the connector.
before image
after image
- I designed a code diagram.
code diagram
1. Power On
Sensor Board - The sensor board continues to send the values measured by the sensors to the master board.
Master board - Continue to receive the values sent by the sensor board.
2. Click on the master board button (1 status remains)
Master board - 1) Send the message "turn on" to the motor board and heater board. And keep it on. 2) If a temperature sensor is requested from the heater board, send it to the heater board.
Motor Board - Operates the motor when the message "turn on" is received.
Heater board - 1) When the message "turn on" is received, demand the measured value of the temperature sensor from the master board. 2) Activate the heater if the temperature sensor gives the master board a measured value and the value is below 20 degrees. Switch off the heater if it is above 25 degrees.
3. Click the Master Board button again (0 status remains).
Master board - sends the message "turn off" to the motor board and heater board.
Motor board - stops the motor from operating when the message "turn off" is received.
Heater Board - does not require a temperature sensor reading.
4. Alternative (About heater board) When you press the button on the master board, If the temperature is below 20 degrees, send a message "turn on" to the heater board and a message "turn off" when it is above 25 degrees.
- I made code for each board for I2C communication.
Master - Blink Board (ATtiny 85)
I2C Test
                  #include <SoftwareSerial.h>

                  #include <Wire.h>

                  SoftwareSerial mySerial(2, 1); // RX, TX

                  void setup() {
                  Wire.begin();
                  mySerial.begin(9600);
                  }

                  byte x = 0;

                  void loop() {
                  Wire.beginTransmission(1);
                  Wire.write("good ");
                  Wire.write(x);
                  Wire.endTransmission(1);

                  Wire.beginTransmission(2);
                  Wire.write("good ");
                  Wire.write(x);
                  Wire.endTransmission(2);

                  Wire.beginTransmission(3);
                  Wire.write("good ");
                  Wire.write(x);
                  Wire.endTransmission(3);

                  delay(500);

                  Wire.requestFrom(1, 4); //Request 4 byte to Slave (1)
                  while (Wire.available()) {
                    char c = Wire.read();
                    mySerial.print(c);
                  }
                  Wire.requestFrom(2, 4); //Request 4 byte to Slave (2)
                  while (Wire.available()) {
                    char c = Wire.read();
                    mySerial.print(c);
                  }
                  Wire.requestFrom(3, 4); //Request 4 byte to Slave (3)
                  while (Wire.available()) {
                    char c = Wire.read();
                    mySerial.print(c);
                  }
                  mySerial.println( " done");
                  x++;
                  if(x==6)x=0;
                  }
I2C Test (with only Sensor Board) (Reference Youtube Video)
                  // I2C Master : Uno (slave is SVR-01)

                  #include <SoftwareSerial.h>
                  SoftwareSerial mySerial(2, 1); // RX, TX

                  #include <Wire.h>
                  #define slave_adress 1
                  int count;
                  byte TH_data[2] ;

                  void setup() {
                   Wire.begin();
                   mySerial.begin(9600);
                  }

                  byte readI2C(int address) {
                   byte Value ;
                   long Past_time = millis();

                   Wire.requestFrom(address, 1); //1 byte data
                   while (Wire.available() == 0 )
                   { mySerial.println("Waiting"); }

                   if  (millis() - Past_time < 100 ) {
                    Value = Wire.read();
                    return Value;
                   }
                  }

                  void loop() {
                   while (readI2C(slave_adress) < 255) {
                     mySerial.print("..........");
                   }
                   for (count = 0; count < 2; count++) {
                     TH_data[count] = readI2C(slave_adress);
                   }
                   for (int i = 0; i < 2; i++) {
                     if(i==0) { mySerial.print(" Temp = ") ; }
                     else { mySerial.print(" Soil Mois = ") ; }
                     mySerial.print(TH_data[i]);
                     mySerial.print("\t");
                   }
                   delay(200);
                  }
I2C Test (with only Motor Board) (Reference Site)
                  #include <SoftwareSerial.h>
                  SoftwareSerial mySerial(2, 1); // RX, TX

                  #include <Wire.h>
                  #define slave_adress 2

                  int LED = 3;
                  int BUTTON = 4;
                  int flag1 = 0;
                  int flag2 = 0;
                  int state = 0;

                  void setup() {
                     Wire.begin();
                     pinMode(LED, OUTPUT);
                     pinMode(BUTTON, INPUT);
                     mySerial.begin(9600);
                  }

                  byte x = 0;

                  void loop() {
                     Wire.beginTransmission(slave_adress);
                     Wire.write("good ");
                     Wire.write(x);

                     flag1 = digitalRead(BUTTON);
                     if((flag1 == HIGH) && (flag2 == LOW)) {
                       state = 1 - state;
                       delay(10);
                     }
                     flag2 = flag1;

                     if(state == 1) {
                       digitalWrite(LED, HIGH);
                       Wire.write("1");
                     }
                     else {
                       digitalWrite(LED, LOW);
                       Wire.write("0");
                     }

                     Wire.endTransmission(slave_adress);

                     Wire.requestFrom(slave_adress, 4); //Request 4 byte to Slave (2)
                       while (Wire.available()) {
                         char c = Wire.read();
                         mySerial.print(c);
                       }
                     mySerial.println( " done");

                     x++;
                     if(x==6)x=0;
                  }
#include <SoftwareSerial.h> SoftwareSerial mySerial(2, 1); // RX, TX #include <Wire.h> int ledPin = 3; int buttonPin = 4; int buttonInput = 1; int buttonState = 0; void setup() { Wire.begin(); pinMode(ledPin, OUTPUT); pinMode(buttonPin, INPUT); mySerial.begin(9600); } void loop() { Wire.beginTransmission(2); buttonInput = digitalRead(buttonPin); if (buttonInput == 0) { if (buttonState == 0) { buttonState = 1; } else { buttonState = 0; } delay(500); } if (buttonState == 1) { digitalWrite(ledPin, HIGH); Wire.write(buttonState); } else { digitalWrite(ledPin, LOW); Wire.write(buttonState); } delay(500); Wire.endTransmission(2); Wire.requestFrom(2, 4); //Request 4 byte to Slave (2) while (Wire.available()) { char c = Wire.read(); mySerial.print(c); } }I2C Test (with only Heater Board)
                  #include <SoftwareSerial.h>
                  SoftwareSerial mySerial(2, 1); // RX, TX

                  #include <Wire.h>

                  int count;
                  byte TH_data[2] ;

                  int ledPin = 3;
                  int buttonPin = 4;
                  int buttonInput = 1;
                  int buttonState = 0;

                  void setup() {
                    Wire.begin();
                    pinMode(ledPin, OUTPUT);
                    pinMode(buttonPin, INPUT);
                    mySerial.begin(9600);
                  }

                  byte readI2C(int address) {
                    byte Value ;
                    long Past_time = millis();

                    Wire.requestFrom(address, 1); //1 byte data
                      while (Wire.available() == 0 ) {
                        mySerial.println("Waiting");
                      }
                      if  (millis() - Past_time < 100 ) {
                       Value = Wire.read();
                       return Value;
                      }
                  }

                  void loop() {
                    while (readI2C(1) < 255) {
                      mySerial.print("..........");
                    }
                    for (count = 0; count < 2; count++) {
                      TH_data[count] = readI2C(1);
                    }
                    for (int i = 0; i < 2; i++) {
                      if(i==0) { mySerial.print(" Temp = ") ; }
                      else { mySerial.print(" Soil Mois = ") ; }
                      mySerial.print(TH_data[i]);
                      mySerial.print("\t");
                    }

                   Wire.beginTransmission(3);

                   buttonInput = digitalRead(buttonPin);
                   if (buttonInput == 0) {
                     if (buttonState == 0) {
                     buttonState = 1;
                     } else {
                     buttonState = 0;
                     }
                     delay(500);
                   }
                   if (buttonState == 1) {
                     digitalWrite(ledPin, HIGH);
                     Wire.write(TH_data[0]);
                     } else {
                     digitalWrite(ledPin, LOW);
                     }
                     delay(500);

                   Wire.endTransmission(3);

                   Wire.requestFrom(3, 4); //Request 4 byte to Slave (2)
                   while (Wire.available()) {
                    char c = Wire.read();
                    mySerial.print(c);
                   }
                  }
I2C Test (with All)
                  #include <SoftwareSerial.h>
                  SoftwareSerial mySerial(2, 1); // RX, TX

                  #include <Wire.h>

                  int count;
                  byte TH_data[2] ;

                  int ledPin = 3;
                  int buttonPin = 4;
                  int buttonInput = 1;
                  int buttonState = 0;

                  void setup() {
                     Wire.begin();
                     pinMode(ledPin, OUTPUT);
                     pinMode(buttonPin, INPUT);
                     mySerial.begin(9600);
                  }

                  byte readI2C(int address) {
                     byte Value ;
                     long Past_time = millis();

                     Wire.requestFrom(address, 1); //1 byte data
                       while (Wire.available() == 0 ) {
                         mySerial.println("Waiting");
                       }
                       if  (millis() - Past_time < 100 ) {
                        Value = Wire.read();
                        return Value;
                       }
                  }

                  void loop() {
                     while (readI2C(1) < 255) {
                       mySerial.print("..........");
                     }
                     for (count = 0; count < 2; count++) {
                       TH_data[count] = readI2C(1);
                     }
                     for (int i = 0; i < 2; i++) {
                       if(i==0) { mySerial.print(" Temp = ") ; }
                       else { mySerial.print(" Soil Mois = ") ; }
                       mySerial.print(TH_data[i]);
                       mySerial.print("\t");
                     }

                    buttonInput = digitalRead(buttonPin);
                    if (buttonInput == 0) {
                      if (buttonState == 0) {
                      buttonState = 1;
                      } else {
                      buttonState = 0;
                      }
                      delay(500);
                    }
                    Wire.beginTransmission(2);
                    if (buttonState == 1) {
                      digitalWrite(ledPin, HIGH);
                      Wire.write(buttonState);
                      } else {
                      digitalWrite(ledPin, LOW);
                      Wire.write(buttonState);
                      }
                      delay(500);
                    Wire.endTransmission(2);

                    Wire.beginTransmission(3);
                    if (buttonState == 1) {
                      digitalWrite(ledPin, HIGH);
                      Wire.write(TH_data[0]);
                      } else {
                      digitalWrite(ledPin, LOW);
                      }
                      delay(500);
                    Wire.endTransmission(3);

                    Wire.requestFrom(2, 4); //Request 4 byte to Slave (2)
                    while (Wire.available()) {
                     char c = Wire.read();
                     mySerial.print(c);
                    }
                    Wire.requestFrom(3, 4); //Request 4 byte to Slave (2)
                    while (Wire.available()) {
                     char c = Wire.read();
                     mySerial.print(c);
                    }
                  }
Slave 1 - Sensors Board (ATtiny 44 / Soil Mois, Temperature)I2C Test
                  #include <Wire.h>

                  void setup() {
                   Wire.begin(1); //slave address
                   Wire.onRequest(requestEvent); //Invoke requestEvent function on demand
                   Wire.onReceive(receiveEvent); //Call the reciveEvent function when data is sent

                   Serial.begin(9600);
                  }

                  void loop() {
                   delay(500);
                  }

                  void receiveEvent(int howMany) { //Read Transfer Data
                   while (Wire.available()>1) {
                     char ch = Wire.read();
                     Serial.print(ch);
                   }
                   int x = Wire.read();
                   Serial.println(x);
                  }
                  void requestEvent() { //On-demand action function
                   Wire.write("ok!1\n");
                  }
I2C Test (as only Connecting Board) (Reference Youtube Video)
                  // I2C Slave : SVR-01_D

                   #include <Wire.h>

                   #include <OneWire.h>
                   #include <DS18B20.h>

                   #define ONE_WIRE_BUS 8

                   OneWire oneWire(ONE_WIRE_BUS);
                   DS18B20 sensor(&oneWire);

                   int sensor_pin = 7;
                   int output_value ;

                   #define slave_adress 1
                   int TH_data[2] ;
                   int count = 0;

                   void setup() {
                    Wire.begin(slave_adress);
                    Wire.onRequest(requestEvent);
                    Serial.begin(9600) ;
                    sensor.begin();
                   }

                   void requestEvent() {
                    byte Value;

                    switch (count) {
                      case 0:
                        Value = 255;
                        break;
                      case 1:
                        Value = TH_data[0];
                        break;
                      case 2:
                        Value = TH_data[1];
                        break;
                    }
                    Wire.write(Value);
                    count = count + 1;
                    if (count > 2) count = 0;
                   }

                   void readData() {
                    sensor.requestTemperatures();

                    output_value= analogRead(sensor_pin);
                    output_value = map(output_value,1023,0,0,100);

                    TH_data[0] = sensor.getTempC() ;
                    TH_data[1] = output_value ;

                   Serial.print(sensor.getTempC(), 0) ;
                   Serial.print("\t") ;
                   Serial.println(output_value, 0) ;
                    delay(20) ;
                   }

                   void loop() {
                   readData() ;
                   }
Slave 2 - Motor Board (ATtiny 1614)I2C Test
                  #include <Wire.h>

                  void setup() {
                   Wire.begin(2); //slave address
                   Wire.onRequest(requestEvent); //Invoke requestEvent function on demand
                   Wire.onReceive(receiveEvent); //Call the reciveEvent function when data is sent

                   Serial.begin(9600);
                  }

                  void loop() {
                   delay(500);
                  }

                  void receiveEvent(int howMany) { //Read Transfer Data
                   while (Wire.available()>1) {
                     char ch = Wire.read();
                     Serial.print(ch);
                   }
                   int x = Wire.read();
                   Serial.println(x);
                  }
                  void requestEvent() { //On-demand action function
                   Wire.write("ok!2\n");
                  }
I2C Test (as only Connecting Board) (Reference Site)
                  #include <Wire.h>

                  const int DriverA_1 = 6;
                  const int DriverA_2 = 1;
                  const int DriverB_1 = 2;
                  const int DriverB_2 = 3;
                  int Enable_Pin = 7;

                  #define slave_adress 2

                  void setup() {
                    Wire.begin(slave_adress); //slave address
                    Wire.onRequest(requestEvent); //Invoke requestEvent function on demand
                    Wire.onReceive(receiveEvent); //Call the reciveEvent function when data is sent

                    pinMode(DriverA_1, OUTPUT);
                    pinMode(DriverA_2, OUTPUT);
                    pinMode(DriverB_1, OUTPUT);
                    pinMode(DriverB_2, OUTPUT);
                    pinMode(Enable_Pin, INPUT);

                    Serial.begin(9600);

                  }

                  void loop() {
                    motor( HIGH, LOW, 1);
                  }

                  void motor(int a1, int a2, int d){
                    digitalWrite(DriverA_1, a1);
                    digitalWrite(DriverA_2, a2);
                    delay(d);
                    digitalWrite(DriverB_1, a1);
                    digitalWrite(DriverB_2, a2);
                    delay(d);
                    digitalWrite(DriverA_1, a2);
                    digitalWrite(DriverA_2, a1);
                    delay(d);
                    digitalWrite(DriverB_1, a2);
                    digitalWrite(DriverB_2, a1);
                    delay(d);
                  }

                  void receiveEvent() { //Read Transfer Data
                    while (Wire.available()) {
                      char c = Wire.read();
                      Serial.print(c);
                        if(c == 1) {
                          digitalWrite(Enable_Pin, HIGH);
                          Wire.write("Motor ON\n");
                        }
                        else {
                          digitalWrite(Enable_Pin, LOW);
                          Wire.write("Motor OFF\n");
                        }
                    }
                  }
                  void requestEvent() {
                    Wire.write("ok!\n");
                  }
#include <Wire.h> const int DriverA_1 = 6; const int DriverA_2 = 1; const int DriverB_1 = 2; const int DriverB_2 = 3; int Enable_Pin = 7; void setup() { Wire.begin(2); //slave address Wire.onRequest(requestEvent); //Invoke requestEvent function on demand Wire.onReceive(receiveEvent); //Call the reciveEvent function when data is sent pinMode(DriverA_1, OUTPUT); pinMode(DriverA_2, OUTPUT); pinMode(DriverB_1, OUTPUT); pinMode(DriverB_2, OUTPUT); pinMode(Enable_Pin, INPUT); Serial.begin(9600); } void loop() { motor( HIGH, LOW, 1); } void motor(int a1, int a2, int d){ digitalWrite(DriverA_1, a1); digitalWrite(DriverA_2, a2); delay(d); digitalWrite(DriverB_1, a1); digitalWrite(DriverB_2, a2); delay(d); digitalWrite(DriverA_1, a2); digitalWrite(DriverA_2, a1); delay(d); digitalWrite(DriverB_1, a2); digitalWrite(DriverB_2, a1); delay(d); } void receiveEvent() { //Read Transfer Data while (Wire.available()) { char c = Wire.read(); Serial.print(c); if(c == 1) { digitalWrite(Enable_Pin, HIGH); } else { digitalWrite(Enable_Pin, LOW); } } } void requestEvent() { while (Wire.available()) { char c = Wire.read(); if(c == 1) { Wire.write("Motor ON\n"); } else { Wire.write("Motor OFF\n"); } } }Slave 3 - Heater Board (ATtiny 412)I2C Test
                  #include <Wire.h>

                  void setup() {
                   Wire.begin(3); //slave address
                   Wire.onRequest(requestEvent); //Invoke requestEvent function on demand
                   Wire.onReceive(receiveEvent); //Call the reciveEvent function when data is sent

                   mySerial.begin(9600);
                  }

                  void loop() {
                   delay(500);
                  }

                  void receiveEvent(int howMany) { //Read Transfer Data
                   while (Wire.available()>1) {
                     char ch = Wire.read();
                     mySerial.print(ch);
                   }
                   int x = Wire.read();
                   mySerial.println(x);
                  }
                  void requestEvent() { //On-demand action function
                   Wire.write("ok!3\n");
                  }
#include <Wire.h> int peltier = 4; void setup() { Wire.begin(3); //slave address Wire.onRequest(requestEvent); //Invoke requestEvent function on demand Wire.onReceive(receiveEvent); //Call the reciveEvent function when data is sent Serial.begin(9600); } void loop() { delay(500); } void receiveEvent() { //Read Transfer Data while (Wire.available()) { char c = Wire.read(); Serial.print(c); if(c < 20) { analogWrite(peltier, 120); // Look first on how much voltage your peltier unit can handle 255 = 12V } if(c > 25) { analogWrite(peltier, 0); } } } void requestEvent() { while (Wire.available()) { char c = Wire.read(); if(c < 20) { Wire.write("Heater ON\n"); } if(c > 25) { Wire.write("Heater OFF\n"); } } }//I2C bus support #include <Wire.h> //OneWire bus suport #include <OneWire.h> //DS18B20 temperature sensor support #include <DS18B20.h> //DS18B20 sensor pin #define ONE_WIRE_BUS 8 // Setup a oneWire instance to communicate with any OneWire devices // (not just Maxim/Dallas temperature ICs) OneWire oneWire(ONE_WIRE_BUS); // Pass our oneWire reference to DS18B20. DS18B20 sensor(&oneWire); //Soil Moisture sensor pin number int sensor_pin = 7; int output_value ; void setup(void) { //slave address Wire.begin(1); //Invoke requestEvent function on demand Wire.onRequest(requestEvent); //Call the reciveEvent function when data is sent Wire.onReceive(receiveEvent); Serial.begin(9600); sensor.begin(); } void loop(void) { delay(100); } void receiveEvent(int howMany) { //Read Transfer Data while (Wire.available()>1) { char ch = Wire.read(); Serial.print(ch); } int x = Wire.read(); Serial.println(x); } void requestEvent() { //On-demand action function Wire.write("Temperature : "); Wire.write(sensor.getTempC()); Wire.write("°C"); Wire.write("Soil Mositure : "); Wire.write(output_value); Wire.write("%"); } void readData() { sensor.requestTemperatures(); output_value= analogRead(sensor_pin); output_value = map(output_value,1023,0,0,100); } }
June 7th
Plan
1) Modeling the CAD design of my final project
June 8th
Plan
1) Solving the problem found on the 4th (Paddle that did not turn because it was too stiff)
2) Code test designed on the 5th and 6th
(0) Master Board Blink Test with Button
(1) ISP Network
(2) Sensor Board - Master Board
(3) Motor Board - Master Board
(4) Sensor Board - Master Board - Heater Board
(5) Assamble all of those codes
3) If I can test the boards and objects together.
Workflow
- The stiff paddle that didn't turn well was sharpened using a file.
The stiff paddle Video
- I checked that it was turning well and connected the motor back to work.
Turning well Paddle Video with Stepper Motor Board
- I found a code to change the button to a switch. (Reference Code)
State_change.ino
                /*
                  Set a state of a variable when you press a pushbutton ( the
                  button went from off to on ).

                  created 01-12-2009 by kasperkamperman.com
                  based on example 'State change detection' by Tom Igoe
                */

                const int buttonPin  = 4;     // the pin that the pushbutton is attached to
                const int ledPin     = 3;    // the pin that the LED is attached to

                int buttonState      = 0;     // current state of the button
                int lastButtonState  = 0;     // previous state of the button
                int ledState         = 0;     // remember current led state

                void setup() {
                  pinMode(buttonPin, INPUT);  // initialize the button pin as a input
                  pinMode(ledPin, OUTPUT);    // initialize the button pin as a output
                }

                void loop() {
                  // read the pushbutton input pin
                  buttonState = digitalRead(buttonPin);

                  // check if the button is pressed or released
                  // by comparing the buttonState to its previous state
                  if (buttonState != lastButtonState) {

                    // change the state of the led when someone pressed the button
                    if (buttonState == 1) {
                      if(ledState==1) ledState=0;
                      else            ledState=1;
                    }

                    // remember the current state of the button
                    lastButtonState = buttonState;
                  }

                  // turns LED on if the ledState=1 or off if the ledState=0
                  digitalWrite(ledPin, ledState);

                  // adding a small delay prevents reading the buttonState to fast
                  // ( debouncing )
                  delay(20);
                }
June 9th
Plan
First, I set a primary goal. Among the output boards I had, I decided to solve the problem of the motor board first. We then concluded that the second goal was to add a heater board.
The motor board works but does not send a message to the master board using I2C. (We didn't even check if we received a message from the master board.)
I decided to proceed like the work flow that I did at the networking week.
1) Check the motor board for errors. through an error message
2) The motor board receives a number from the master board, rotates as many times as possible, and sends a message to the master board that the rotation is over.
Workflow
- I put the code to check the error message on the master board and the motor board.
ATtiny 85 (Master Board)
                  #include <SoftwareSerial.h>


                  SoftwareSerial mySerial(2, 1); // RX, TX

                  #include <Wire.h>

                  int message = 1;
                  byte error;

                  void setup() {
                   mySerial.begin(9600);
                   Wire.begin(2);
                  Wire.onReceive(myHandler);
                  }
                  void loop() {
                   Wire.beginTransmission(1);
                   Wire.write(message);
                   error = Wire.endTransmission(1);
                   mySerial.println(error);
                   mySerial.print("Master");

                   delay(178);
                  }
                  void myHandler(int numBytes) {
                   mySerial.print("some");
                   while(Wire.available())    // slave may send less than requested
                   {
                     int c = Wire.read();    // receive a byte as character
                     mySerial.print(c);         // print the character
                   }
                  }
ATtiny 1614 (Motor Board)#include <Wire.h> int message = 4; byte error; void setup() { // put your setup code here, to run once: Serial.begin(9600); Wire.begin(1); } void loop() { // put your main code here, to run repeatedly: Wire.beginTransmission(2); Wire.write(message); error = Wire.endTransmission(); Serial.print(error); Serial.print(message); Serial.print("Slave"); delay(200); } - An error message of 4 was printed on the serial monitor.
- I thought there would be a problem with these codes, so I decided to use the code I used to solve the problem with error messages during the networking week. (Used the Arduino board as the master board.)
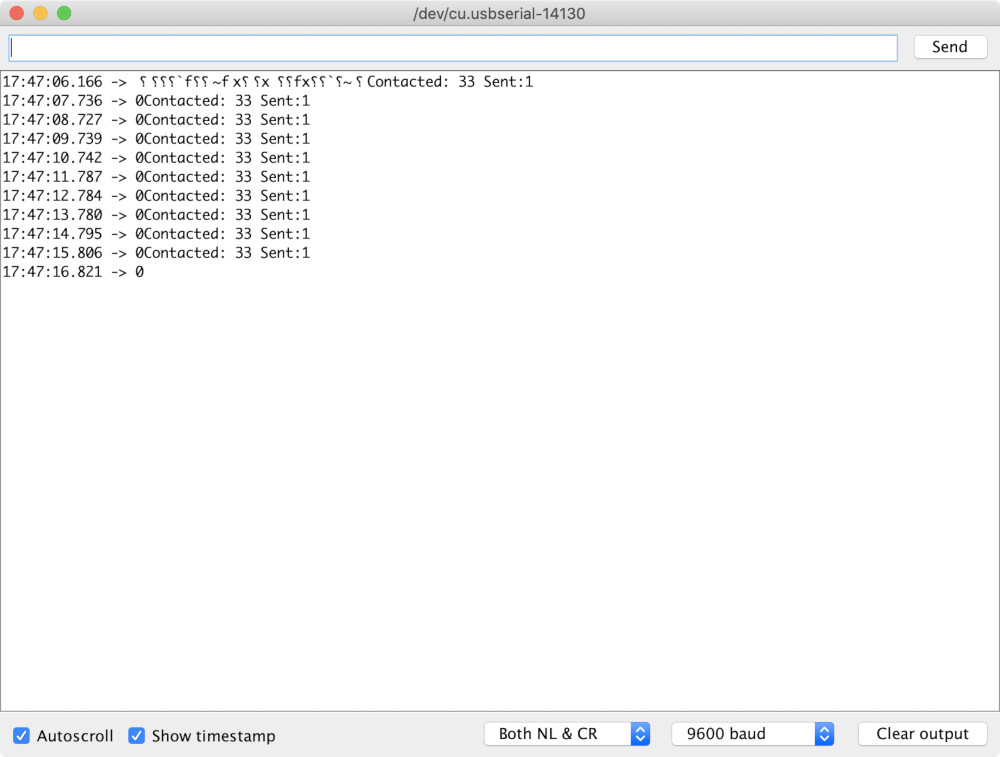
Arduino UNO (Master Board)
                  #include <Wire.h>

                  //const int SDA = A4;
                  //const byte SCL = A5;
                  const int myAddress =74; // 01001001 0x4a

                  const int myFriends[] = {33, 4, 7, 1, 44, 55};
                  int message = 1;
                  byte error;

                  void setup() {
                   Serial.begin(9600);
                   Wire.begin(myAddress);
                  }
                  void loop() {
                   Wire.beginTransmission(myFriends[0]);
                   Wire.write(message);
                   Serial.print("Contacted: ");
                   Serial.print(myFriends[0]);
                   Serial.print(" Sent:");
                   Serial.println(message);
                   error = Wire.endTransmission();
                   Serial.print(error);
                   delay(1000);
                  }
ATtiny 1614 (Motor Board)#include <Wire.h> const int myAddress =33; int message = 1; void setup() { // put your setup code here, to run once: Wire.begin(myAddress); } void loop() { // put your main code here, to run repeatedly: Wire.beginTransmission(74); Wire.write(message); Wire.endTransmission(); delay(2000);*/ }ProblemAn error message of 2 was printed on the serial monitor. (Reference Arduino Site)
Solution1) While looking at how to solve it, I remembered that I was using the SCL, SDA alternative pins of ATtiny1614.
2) So I read Datasheet again.
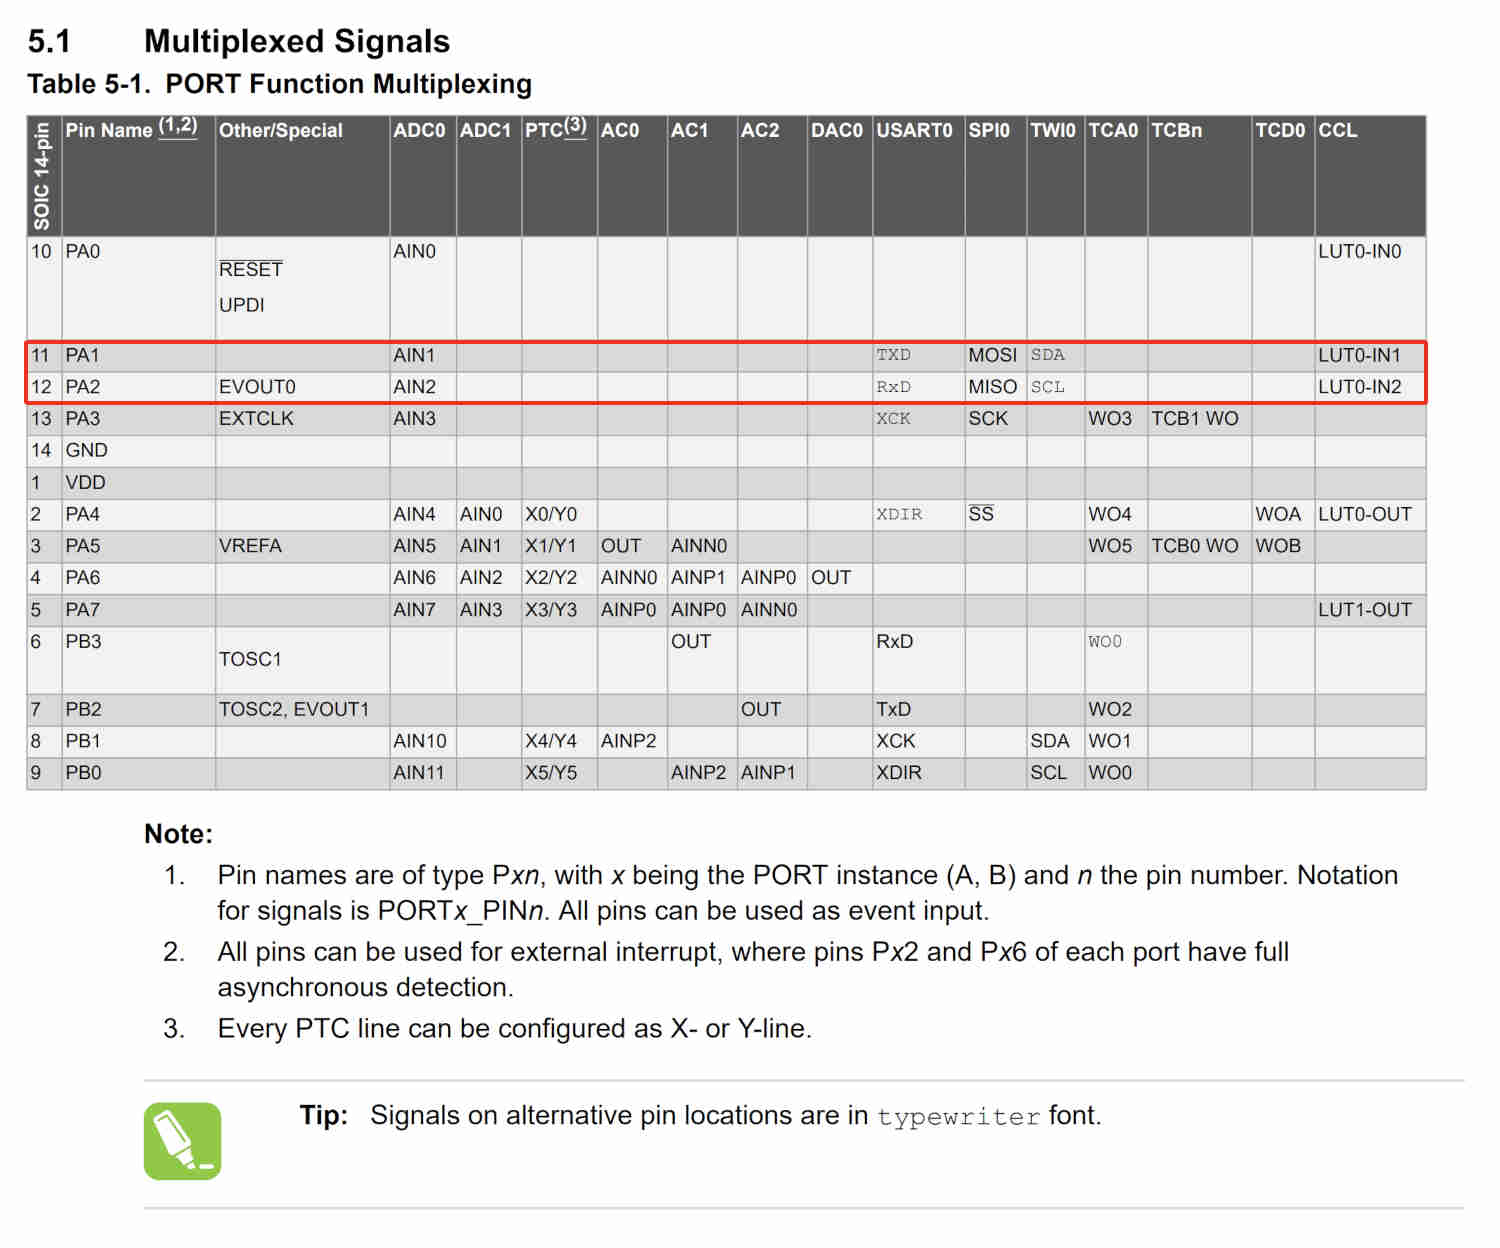
3) I went to the MegaTinyCore site and found the swap-related part in the I2C section. (My instructor told me how to use alternative pins.)
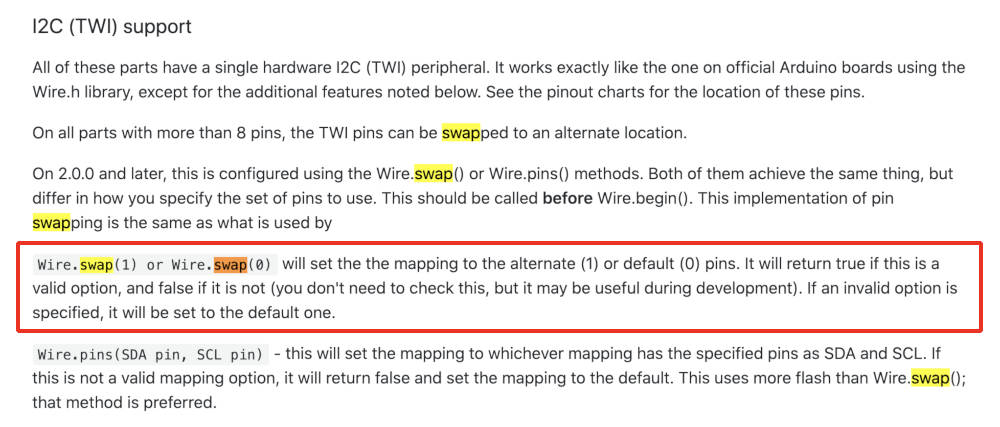
4) Then I added "
Wire.swap(1);" to the code on the ATtiny1614 Board (Motor Board).ATtiny 1614 (Motor Board)
                    #include <Wire.h>

                    const int myAddress =33;
                    int message = 1;

                    void setup() {
                     // put your setup code here, to run once:
                     Wire.swap(1);
                     Wire.begin(myAddress);
                    }

                    void loop() {
                     // put your main code here, to run repeatedly:
                      /*Wire.beginTransmission(74);
                      Wire.write(message);
                      Wire.endTransmission();
                      delay(2000);*/
                    }
5) As a result, I was able to receive a message of 0(success) on the serial monitor.
 Learning
I learned that if an alternative pin is used among the pins of the microcontroller, a swap code is needed for it.
- I tried to communicate with my boards using simple I2C code.
Code applied to the Master Board(Blink Board)
                #include <SoftwareSerial.h>

                #include <Wire.h>

                SoftwareSerial mySerial(2, 1); // RX, TX


                void setup() {
                 Wire.begin();
                 mySerial.begin(9600);
                }

                byte x = 0;

                void loop() {
                  mySerial.print("Hellow");
                 Wire.beginTransmission(1);
                 Wire.write("good ");
                 Wire.write(x);
                 Wire.endTransmission();

                 delay(500);

                 Wire.requestFrom(1, 4); //Request 4 byte to Slave (1)
                 while (Wire.available()) {
                   char c = Wire.read();
                   mySerial.print(c);
                 }
                 x++;
                 if(x==6)x=0;
                 mySerial.print("");
                }
Code applied to the Sensor Board & Motor Board
#include <Wire.h> void setup() { Wire.swap(1); Wire.begin(1); //slave address Wire.onRequest(requestEvent); //Invoke requestEvent function on demand Wire.onReceive(receiveEvent); //Call the reciveEvent function when data is sent Serial.begin(9600); } void loop() { delay(500); Serial.print("Hi"); } void receiveEvent(int howMany) { //Read Transfer Data while (Wire.available()>1) { char ch = Wire.read(); Serial.print(ch); } int x = Wire.read(); Serial.println(x); } void requestEvent() { //On-demand action function Wire.write("ok!1\n"); }ProblemEven though I solved the problem above, my motor board did not receive and send message.
When tested with the same code on the sensor board(ATtiny 44) and the motor board(ATtiny 1614), the sensor board did a good job of receiving and sending messages, but the motorboard did not.
SolutionSo I asked my instructor(Craig) for help. And found the cause of the problem.
It was because , In the code, the "
void responseEvent() {}" and "void requestEvent() {}" sections were located below the "void setup() {}" section.Code applied to the UNO Board (Master Board)
                  #include <Wire.h>

                  //const int SDA = A4;
                  //const byte SCL = A5;
                  const int myAddress =74; // 01001001 0x4a

                  const int myFriend = 37;
                  char message = 8282;
                  byte error;

                  void setup() {
                  Serial.begin(9600);
                  Wire.begin(myAddress);
                  }
                  void loop() {
                  Wire.beginTransmission(myFriend);
                  Wire.write(message);
                  Serial.print("Contacted: ");
                  Serial.print(myFriend);
                  Serial.print(" Sent:");
                  Serial.println(message);
                  error = Wire.endTransmission();
                  Serial.print(error);
                  Wire.requestFrom(myFriend, 4); //Request 4 byte to Slave (1)
                   while (Wire.available()) {
                     char c = Wire.read();
                     Serial.print(c);
                   }
                  delay(1000);
                  }
Code applied to the Motor Board (Slave Board)
                  #include <Wire.h>

                  void receiveEvent(int howMany)
                  {
                    Serial.print("incoming:");
                    Serial.println(howMany);
                    while(1 < Wire.available()) // loop through all but the last
                    {
                      char c = Wire.read(); // receive byte as a character
                      Serial.print(c);         // print the character
                    }
                    int x = Wire.read();    // receive byte as an integer
                    Serial.println(x);         // print the integer
                    char ack = 3;
                    Wire.write(ack);
                  }

                  void requestEvent()
                  {
                    Wire.write("cake"); // respond with message of 6 bytes
                                         // as expected by master
                  }

                  void setup() {
                    Wire.swap(1);
                    // put your setup code here, to run once:
                    Wire.begin(37);
                    Wire.onReceive(receiveEvent); // register event
                    Wire.onRequest(requestEvent);
                  Serial.begin(9600);           // start serial for output
                  }

                  void loop() {
                    // put your main code here, to run repeatedly:
                    delay(500);
                  }
And I fixed the first code in the form above, and it succeeded.
#include <Wire.h> void receiveEvent(int howMany) { //Read Transfer Data while (Wire.available()>1) { char ch = Wire.read(); Serial.print(ch); } int x = Wire.read(); Serial.println(x); } void requestEvent() { //On-demand action function Wire.write("ok!1\n"); } void setup() { Wire.swap(1); Wire.begin(37); //slave address Wire.onRequest(requestEvent); //Invoke requestEvent function on demand Wire.onReceive(receiveEvent); //Call the reciveEvent function when data is sent Serial.begin(9600); } void loop() { delay(500); Serial.print("Hi"); }LearningIn I2C networking, the parts "
void responseEvent() {}" and "void requestEvent() {}" shall be located above the parts "void setup() {}". (Maybe the parts that need to be defined as the code progresses should be located above the setup.)QuestionThe remaining question for me is, "Why didn't the code work normally on the sensor board but not properly on the motor board?"
- Code designed to be used later in I2C networking
                #include <SoftwareSerial.h>
                SoftwareSerial mySerial(2, 1); // RX, TX

                #include <Wire.h>

                const int buttonPin  = 4;     // the pin that the pushbutton is attached to
                const int ledPin     = 3;    // the pin that the LED is attached to

                int buttonState      = 0;     // current state of the button
                int lastButtonState  = 0;     // previous state of the button
                int ledState         = 0;     // remember current led state

                void setup() {
                Wire.begin();
                pinMode(ledPin, OUTPUT);
                pinMode(buttonPin, INPUT);
                mySerial.begin(9600);
                }

                byte x = 0;

                void loop() {
                 mySerial.print("Master");
                 Wire.beginTransmission(2);

                 // read the pushbutton input pin
                 buttonState = digitalRead(buttonPin);

                 // check if the button is pressed or released
                 // by comparing the buttonState to its previous state
                 if (buttonState != lastButtonState) {

                   // change the state of the led when someone pressed the button
                   if (buttonState == 1) {
                     if(ledState==1) ledState=0;
                     else            ledState=1;
                   }

                   // remember the current state of the button
                   lastButtonState = buttonState;
                 }

                 // turns LED on if the ledState=1 or off if the ledState=0
                 digitalWrite(ledPin, ledState);
                 //Wire.write(buttonState);
                 Wire.write(x);
                 Wire.endTransmission(2);
                 // adding a small delay prevents reading the buttonState to fast
                 // ( debouncing )
                 delay(20);

                 Wire.requestFrom(2, 4); //Request 4 byte to Slave (2)
                 while (Wire.available()) {
                  char c = Wire.read();
                  mySerial.print(c);
                 }
                 delay(20);

                 x++;
                 if(x==6)x=0;
                }
#include <Wire.h> // Include the Arduino Stepper Library #include <Stepper.h> // Number of steps per output rotation const int stepsPerRevolution = 200; // Create Instance of Stepper library Stepper myStepper(stepsPerRevolution, 6, 1, 2, 3); void setup() { Wire.swap(1); Wire.begin(2); //slave address Wire.onRequest(requestEvent); //Invoke requestEvent function on demand Wire.onReceive(receiveEvent); //Call the reciveEvent function when data is sent // set the speed at 20 rpm: myStepper.setSpeed(20); // initialize the serial port: Serial.begin(9600); } void loop() { delay(100); Serial.print("Hi"); } void receiveEvent(int howMany) { //Read Transfer Data while (Wire.available()>1) { char ch = Wire.read(); Serial.print(ch); } int x = Wire.read(); Serial.println(x); // step one revolution in the other direction: Serial.println("counterclockwise"); myStepper.step(-x*stepsPerRevolution); Wire.write("rotation"); Wire.write(x); Wire.write(" done"); delay(100); } void requestEvent() { //On-demand action function Wire.write("ok!1\n"); }
June 10th
Plan
1) Using the code I made yesterday, I will use the motorboard and the master board to do I2C networking.
2) Coding for Sensor Board and Heater Board.
Workflow
- I tried to communicate with the motor board(ATtiny1614) and the master board(ATtiny85) today using the code that succeeded in I2C networking the Arduino board and the motor board yesterday
Problem
But the motor board was still unable to receive and send signals.
WorkflowSo I put in the code to check the error message and checked it. I could check error message 4 continuously.
I thought there would be a problem with my master board, so I experimented with Jeong-hwan's ATtiny45 board (femily like ATtiny85), and I checked with my ATtiny44 (sensor board), but still I2C communication was impossible.
LearningSo I have concluded that I2C communication is impossible between the boards of ATtinyCore Femily and MagatinyCore Femily.
QuestionIs it really impossible to communicate I2C between ATtinyCore's board and MagatinyCore's board?
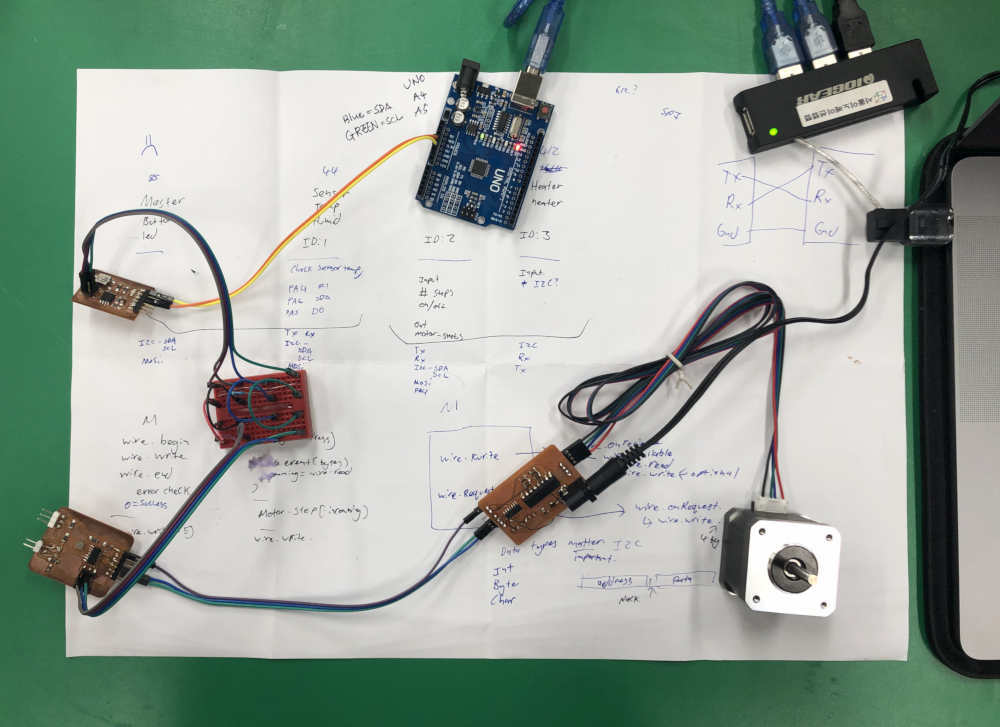
- And my instructor suggested an alternative called Hack.
An alternative called Hack
First of all, the master board and sensor board, which are ATtinyCore families, communicate with I2C, and the sensor board and motorboard with extra pins belong to different families, so we decided to use serial networking.
- So I coded the motor to work when I sent the serial message first.
- But the damn uploading didn't work and the microcontroller burned. The cause was vcc (5V) and vc (12V) connected within the board.
June 11th
Plan
1) I make a motorboard again that I burned yesterday.
2) Proceed with networking mixed with I2C and Serial as planned yesterday. (Most coding and testing)
3) all the boards are Assamble.
Workflow
- I tested the code that sent 1 and 2 from the serial monitor to turn the motor.
Problem
But it didn't work as I wanted.
#include <Stepper.h> int in1Pin = 3; int in2Pin = 1; int in3Pin = 2; int in4Pin = 6; Stepper motor(200, in1Pin, in2Pin, in3Pin, in4Pin); void setup() { // put your setup code here, to run once: pinMode(in1Pin, OUTPUT); pinMode(in2Pin, OUTPUT); pinMode(in3Pin, OUTPUT); pinMode(in4Pin, OUTPUT); motor.setSpeed(30); Serial.begin(9600); } void loop() { // put your main code here, to run repeatedly: int steps = 200; int direct = Serial.parseInt(); if (direct == 1) { Serial.print("It's Normal Direction!\n\n"); motor.step(steps); } else if (direct == 2) { Serial.print("It's Reverse Direction!\n\n"); motor.step(-steps); } else Serial.print("You only choose '1' or '2'\n\n"); } }WorkflowSo I added a code that can check the input value as it is and checked it.
                int inByte = 0;

                void setup() {
                Serial.begin(9600);
                }

                void loop() {
                if (Serial.available()) {
                  inByte = Serial.read();
                  Serial.print(inByte);
                }
As expected, the input value was not printed as it was, but it was distorted and printed. (But the code worked properly on the Arduino board.)
ConclusionAnd the cause could not be found. So we decided to give up the serial communication and give the output value through the extra pin. (Gives up using the serial network between the sensor board and the motor board)
- And made the codes.
Master Board (Button & LED / ATtiny85 / I2C)
                  #include <Wire.h>

                  const int buttonPin  = 4;
                  const int ledPin     = 3;

                  int buttonState      = 0;
                  int lastButtonState  = 0;
                  int ledState         = 0;

                  void setup() {
                    Wire.begin();
                    pinMode(ledPin, OUTPUT);
                    pinMode(buttonPin, INPUT_PULLUP);
                  }

                  void loop() {
                    buttonState = digitalRead(buttonPin);
                      if (buttonState != lastButtonState) {
                        if (buttonState == 1) {
                          if(ledState==1) ledState=0;
                          else {
                            ledState=1;
                            Wire.beginTransmission(2);
                            Wire.write('p');
                            Wire.endTransmission(2);
                          }
                        }
                        lastButtonState = buttonState;
                      }
                    digitalWrite(ledPin, ledState);
                    delay(20);
                  }
Sensor Board (ATtiny44)#include <Wire.h> int stepPin = 1; //Tx int dirPin = 2; //Rx void receiveEvent(int howMany) { //Read Transfer Data Serial.print(howMany); while (Wire.available()>1) { int ch = Wire.read(); Serial.print(ch); digitalWrite(stepPin, HIGH); digitalWrite(dirPin, HIGH); delay(300); } } void setup() { Wire.begin(2); //slave address Wire.onReceive(receiveEvent); //Call the reciveEvent function when data is sent pinMode(stepPin, OUTPUT); pinMode(dirPin, OUTPUT); Serial.begin(9600); } void loop() { delay(20); digitalWrite(stepPin, LOW); digitalWrite(dirPin, LOW); }Motor Board (ATtiny1614)#include <Stepper.h> // change this to fit the number of steps per revolution // for your motor const int stepsPerRevolution = 200; // initialize the stepper library on pins 8 through 11: Stepper myStepper(stepsPerRevolution, 2, 6, 3, 1); int stepPin = 4; // Rx int dirPin = 5; // Tx void setup() { // set the speed at 60 rpm: myStepper.setSpeed(60); pinMode(stepPin, INPUT); pinMode(dirPin, INPUT); } void loop() { boolean stepping = digitalRead (stepPin); if (stepPin == HIGH) { if (dirPin == HIGH) { myStepper.step(stepsPerRevolution); delay(500); } else{ myStepper.step(-0*stepsPerRevolution); delay(500); } } delay(10); }
June 12th
Plan
1) Do the documant first.
2) After connecting the boards to which the codes are embedded, test whether the codes work well. And I film it.
3) Establish and edit the slide and the video concepts.
4) Think about how to secure the boards and a motor after making a lid.
5) If I have time, I will design new boards (check motor drives), modify CNC design, calculate pulley size and print that out again.
Workflow
- I had a problem with the codes I made yesterday, so I fixed them.
Master Board (Button & LED / ATtiny85 / I2C)
                  #include <Wire.h>

                  const int buttonPin  = 4;
                  const int ledPin     = 3;

                  int buttonState      = 0;
                  int lastButtonState  = 1;
                  int ledState         = 0;

                  void setup() {
                    Wire.begin();
                    pinMode(ledPin, OUTPUT);
                    pinMode(buttonPin, INPUT_PULLUP);
                  }

                  void loop() {
                    buttonState = digitalRead(buttonPin);
                      if (buttonState != lastButtonState) {
                        Wire.beginTransmission(2);
                            Wire.write('p');
                            Wire.endTransmission(2);
                        if (buttonState == 1) {
                          if(ledState==1) ledState=0;
                          else {

                            ledState=1;
                          }
                        }
                        lastButtonState = buttonState;
                      }
                    digitalWrite(ledPin, ledState);
                    delay(20);
                  }
Sensor Board (ATtiny44)#include <Wire.h> int stepPin = 1; //Tx int dirPin = 2; //Rx void receiveEvent(int howMany) { //Read Transfer Data //Serial.print(howMany); while (Wire.available() > 0) { //int ch = Wire.read(); //Serial.print(ch); digitalWrite(stepPin, HIGH); digitalWrite(dirPin, HIGH); delay(300); } } void setup() { Wire.begin(2); //slave address Wire.onReceive(receiveEvent); //Call the reciveEvent function when data is sent pinMode(stepPin, OUTPUT); pinMode(dirPin, OUTPUT); //Serial.begin(9600); } void loop() { delay(20); digitalWrite(stepPin, LOW); digitalWrite(dirPin, LOW); }Motor Board (ATtiny1614)/* Stepper Motor Control - one revolution This program drives a unipolar or bipolar stepper motor. The motor is attached to digital pins 8 - 11 of the Arduino. The motor should revolve one revolution in one direction, then one revolution in the other direction. Created 11 Mar. 2007 Modified 30 Nov. 2009 by Tom Igoe */ #include <Stepper.h> const int stepsPerRevolution = 200; // change this to fit the number of steps per revolution // for your motor // initialize the stepper library on pins 8 through 11: Stepper myStepper(stepsPerRevolution, 2, 6, 3, 1); int stepPin = 9; // MOSI int dirPin = 8; // MISO void setup() { // set the speed at 60 rpm: myStepper.setSpeed(60); // initialize the serial port: Serial.begin(9600); pinMode(stepPin, INPUT); pinMode(dirPin, INPUT); } void loop() { // step one revolution in one direction: //if (Serial.available() > 0) { //get incoming byte: //inByte = Serial.read(); //Serial.print(inByte); boolean stepping = digitalRead (stepPin); boolean diring = digitalRead (dirPin); if (stepping == HIGH) { Serial.print("yo"); if (diring == HIGH) { //Serial.println("clockwise"); Serial.print("yes"); myStepper.step(stepsPerRevolution); delay(500); } else{ // step one revolution in the other direction: //Serial.println("counterclockwise"); myStepper.step(-stepsPerRevolution); delay(500); } } //} Serial.println("ready"); delay(10); } - I put the code on boards and tested it with my prototype.
June 13th
Workflow
- Created CNC file by using Fusion360.

1) First, the stock point should go to the bottom of the stock. (Not on the top surface)
2) As with V-carve (computer controlled machining week) You need to make a place to fix the stock using the Drilling function.
3) If the size of the tools to be milled is different, files must be created individually.
June 14th
Workflow
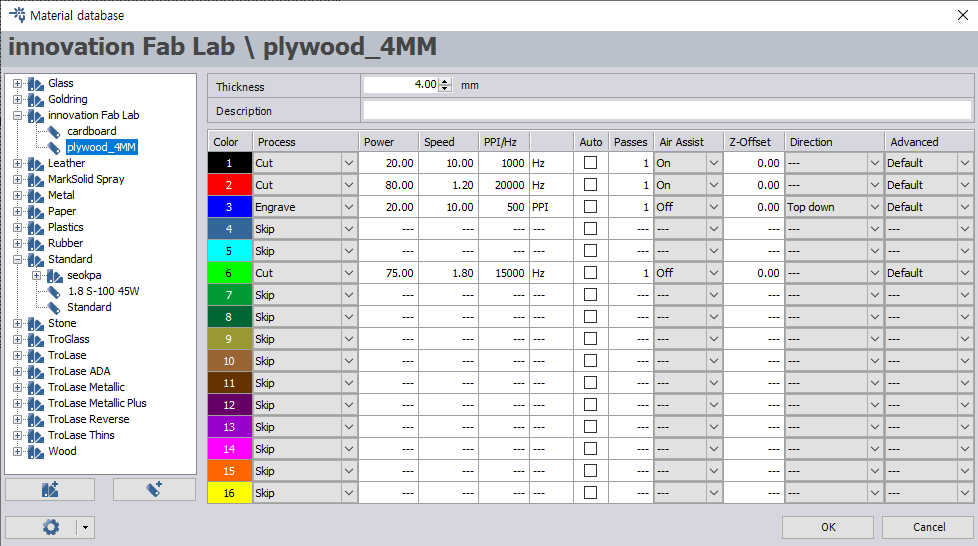
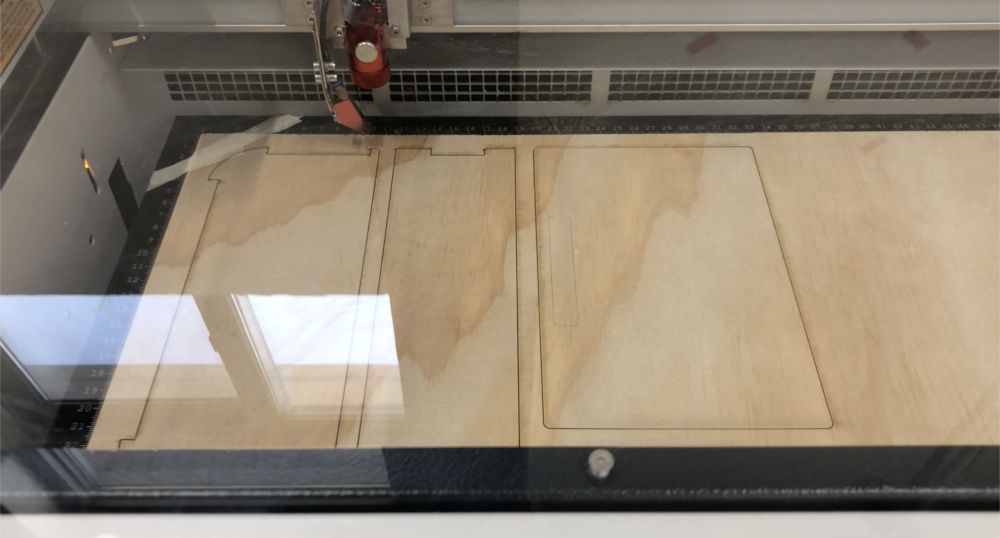
- Using laser cutters to make a lid and control box parts
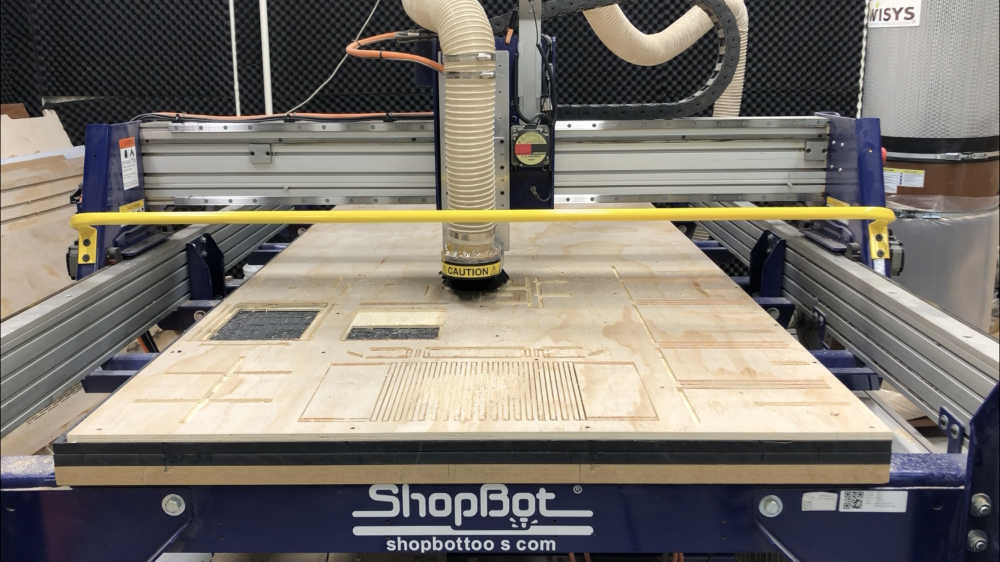
- I cut the whole frame using a shotbot.
- I sanded it, finished it, and assembled it.

June 15th
Workflow
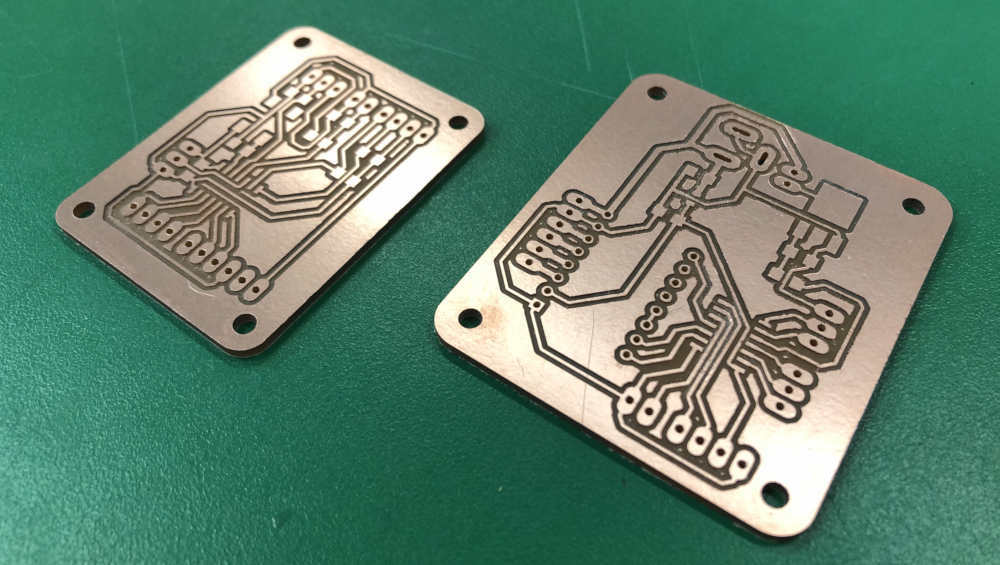
- I designed the new boards.
button & Sensors Board (ATtiny1614)
Motor & Heater Board (ATtiny1614)

- The new boards were milled from the bantam (CNC).
June 16th
Workflow
- The new boards weren't milled and scraped off with a knife.
- Soldered these boards.
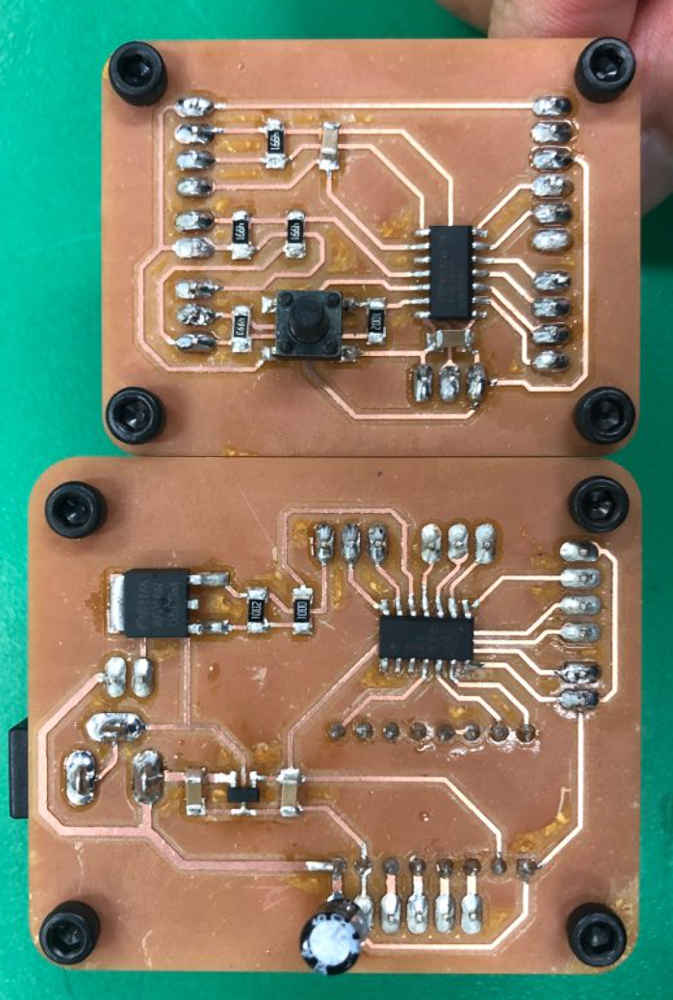 Problem
When tested with a multimeter, 5V and gnd were connected.
Solution1) When tested with a multimeter, 5V and gnd were connected.
2) First I connected the 100uF capacitor in the opposite direction, so I soldered again in the right direction. But the problem has not been solved.
3) When I tested the motor drive I plugged in, 5V and gnd of the motor drive were connected. The motor drive was broken.
4) So, I replaced the motor drive to new one.
- I checked if the code was uploaded using the Arduino program.
Problem
I put in the code to turn the motor for the motor driver and tried to operate it. But the motor didn't work properly.
Solution1) After checking the pins of the stapper motor, the results were the same.
2) We determined there could be a problem with the current flowing into the motor.
3) I decided to adjust the stepstick on the motor drive.
4) I needed a value of about 2.5 since the current to flow to the actual motor is 1.5A and the Sense_resistor value of the A4988 motor drive is 0.05.
5) I adjusted the value using a screwdriver.
6) Still, the problem has not been solved. So replaced with a small capacity stepper motor.
- The replaced motor worked well.
- I brought the code that I made last time and modified it and tried to operate it.
- And I modified the code again the way I wanted.
Sensors & Button Board Code
                  #include <Wire.h>

                  const int buttonPin  = 10;

                  int buttonState      = 0;
                  int lastButtonState  = 1;

                  void setup() {
                   Wire.begin();
                   pinMode(buttonPin, INPUT);
                  }

                  void loop() {
                   buttonState = digitalRead(buttonPin);
                     if (buttonState != lastButtonState) {
                       if (buttonState == 1) {
                           Wire.beginTransmission(2);
                           Wire.write('p');
                           Wire.endTransmission(2);
                       }
                       lastButtonState = buttonState;
                     }
                   delay(20);
                  }
Motor & Heater Board Code#include <Wire.h> int STEP = 9; int DIR = 10; boolean turn = false; void receiveEvent(int howMany) { //Read Transfer Data while (Wire.available() > 0) { int A = Wire.read(); Serial.print(A); turn = !turn; } } void setup() { Wire.begin(2); //slave address Wire.onReceive(receiveEvent); //Call the reciveEvent function when data is sent Serial.begin(9600); pinMode(STEP,OUTPUT); pinMode(DIR,OUTPUT); } void loop() { if(turn == true) { motergo(); } delay(20); } void motergo() { digitalWrite(DIR,HIGH); // + Direction for(int x = 0; x < 200; x++) { // 200 pulses one revolution digitalWrite(STEP,HIGH); delayMicroseconds(1200); digitalWrite(STEP,LOW); delayMicroseconds(1200); } } - Timing pulley for motors was printed out with a 3D printer. The number of teeth is 240, which is higher than last time.
- And the outer frame was not cut well, so I designed the frame for the corner at Fusion360, and printed it out using a 3D printer.
- The supporter for fixing the motor was also found and modified in Thingiverse. And similarly, it was printed using a 3D printer.
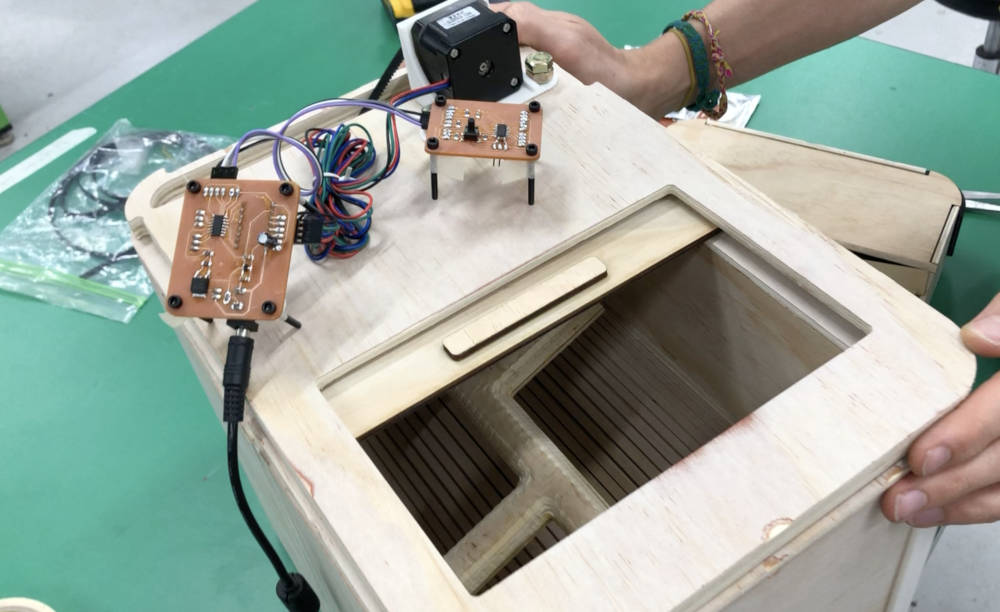
- Assembly
June 17th
Workflow
- I filmed a video in the studio of Innovation Fab Lab (with Hyunho).
- I made a slide for the presentation.

- I edited the video for the presentation.

- And finally I presented my final project.
Make a ventilation system so that the smell can escape.
Current Situation Check (Q&A)
Q1. what tasks have been completed, and what tasks remain?
---> A. Based on Prototype 2, the overall appearance is almost complete. And I connected two boards using I2C networking to operate the motor according to the button. The remaining part is left to connect the sensors and the heater to the board and operate.
Q2. what has worked? what hasn't?
---> A. The motor has been operated, and now further development remains for sensors and heaters.
Q3. what questions need to be resolved?
---> A. The question of whether the heater operates according to the measured value of the temperature sensor needs to be solved. (Problem with code)
Q4. what will happen when?
---> A. If possible, I will proceed as much as I thought in July. (of adding and operating sensors and heaters, i.e. the completion of code)
Q5. what have you learned?
---> A. I learned many things by solving the above problems. It can be checked in the above process.