
Model (raster, vector, 2D, 3D, render, animate, simulate, ...) a possible final project, compress your images and videos, and post it on your class page.
I started with looking at 2D drawing programs. At first I studied the difference between raster and vector images. Based on my newly gained knowledge, I decided to use the programs GIMP and Inkscape, since each works with a different format.
If you hover your mouse over one of the cat pictures below, you can see the zoomed in
picture in box on the right.
The original image includes the grid format on the left and the same image as vector format on the
right.
The differences between raster and vector is clearly visible.

With a vector file, the data is stored in paths, which enables zooming without loss of quality.
With raster files, the image information is stored in pixels, therefore you can see small colored squares
(pixelation) instead of straight lines when
zooming in.
These will merge into each other as soon as you zoom out.
The two images on the left side look the same in size, but zoom shows the
difference.
If it does not work reload the page or change the browser.
GIMP is a pixel based graphic program, which can be used for digital paintings of raster graphics. It is free to use. For the next step, I tried to put two sketches together to get a better view of the model.
GIMP is well suited to edit, resize, or modify images. But to create sketches for a laser cutter or other similar devices, a programm that works well with vector files is needed. Therefore I have started to work more with Inkscape.

First I open the picture I want to work with.

Then I select the area I want to cut.

I click on the scissors to cut out the marked area.

I open the second picture.

I add the first picture

I cut out the picture as before and now I have a combined picture.

Create new sketch.

In the document settings, I can define the size of the working area. I can also define the units of measurement I would like to work with. In my case mm.

First I want to draw a rectangle. I click the rectangle symbol on the left side. Now I can draw a rectangle on the screen. If I want to have exact measurements for the edges I can set them in the menu bar above.

Then I create a second smaller rectangle.

I would like to clone this one. For this I go to Edit > Clone. The advantage of this is that if I change the size of the first one I also change the size of the second one.

I clone ascond one.

To assemble my rectangles I can position them on my grid or set the x and y coordinates of the lower left corner in the top menu bar.

Following the principle described above, I create even more rectangles.

Now I want to turn one of my rectangles. Since I want to rotate it by 135 degrees and not by 90 degrees I go to Object > Transformation.

A window opens. In this window I can set the number of degrees by which I want to rotate my object under the tab Rotate.

Now I would like to merge the created rectangles into one shape. To do so, I select the two shapes I want to merge and go to Path > Merge.

The result after merging. Now I do not like the form to 100%.

Therefore I double click on my object to change the path
Fusion360 is a software that can be used to design 2D sketches and 3D objects. In addition, there are several possibilities to perform simulations. The software is free of charge for educational purposes.

First of all I have created a new project in which I created a construction.

In the next step I made a new sketch in my construction. I pressed the yellow marked button and then selected the area I want to draw on.

Now I have switched to a 2D layer. Also a new toolbar is available, enabeling me to draw.

I start with a rectangle in which I select the symbol in the menu bar. After that, a menu pops up on the right, where I click on the button to draw my rectangle from the middle. Now I can define the length of the sides. I create a rectangle with the sides 50 mm x 50 mm.

Next, I draw a circle similar to the rectangle.

I need four circles. Instead of drawing every single one, I use the round arrangement function of fushion 360. I find this under the buttons of rectangle and circle named "create". Then a dropdown menu opens were I select "round arrangement". Now a menu appears on the right side. In this menu, I first select the area or line I want to arrange. Then I select the point around which I want to arrange. In the last step I choose how many duplicates I want and now we have four equal circles.

Before I can continue working I need a few guidelines. Therefore I look for the line symbol in the menu bar at the top. Then a menu pops up again on the right. By clicking on the yellow circled symbol I tell the program that I want to draw guidelines. These are shown dashed. Here I can also determine the length.

I connect all end points of the guidelines with a spindle.

When I clicked on a dot, two different dots appear, with which I can round the sharp corners. I adjust these points until I like it.

Now I'm done with the 2D drawing and click on finish sketch in the left menu. In the next step I can start with the 3D drawing.

I now have the first menu bar at the top again. To turn the 2D drawing into a 3D object I click on the icon to extrude it. Then I select the areas I want to extrude. To do so, I can now either simply drag the arrow or enter a fixed value. So I have my first 3D object.

We can now further modify our 3D object. For example, I would like to have the holes from the first sketch as slots in my object. To do this, I activate the visibility of the sketch again by clicking on the eye on the left side of the sketch. Now I can extrude this as I choose the option extrusion only, and this time I do not create a body but cut pieces out.

I would like to modify my object on another page. Therefore I click on a side of my object and create a new sketch. Now I can create a 2D drawing on this side.

I do the same on the side next to it.

Then I first cut the triangles away from one side...

...and from the other.

Now the object is finished.

Now I would like to turn my 3D object into a cube. To do this I copy my model by selecting the object on the left menu bar. Then I click on it with the right mouse button. There I choose copy/move. Again a menu on the right side opens. For copying it is now very important that I select the rake below. Now I can move it to the place where I want to have it.

I add the back side.

I add the right side.

I add the bottom.

I add the left side.

I add the front.
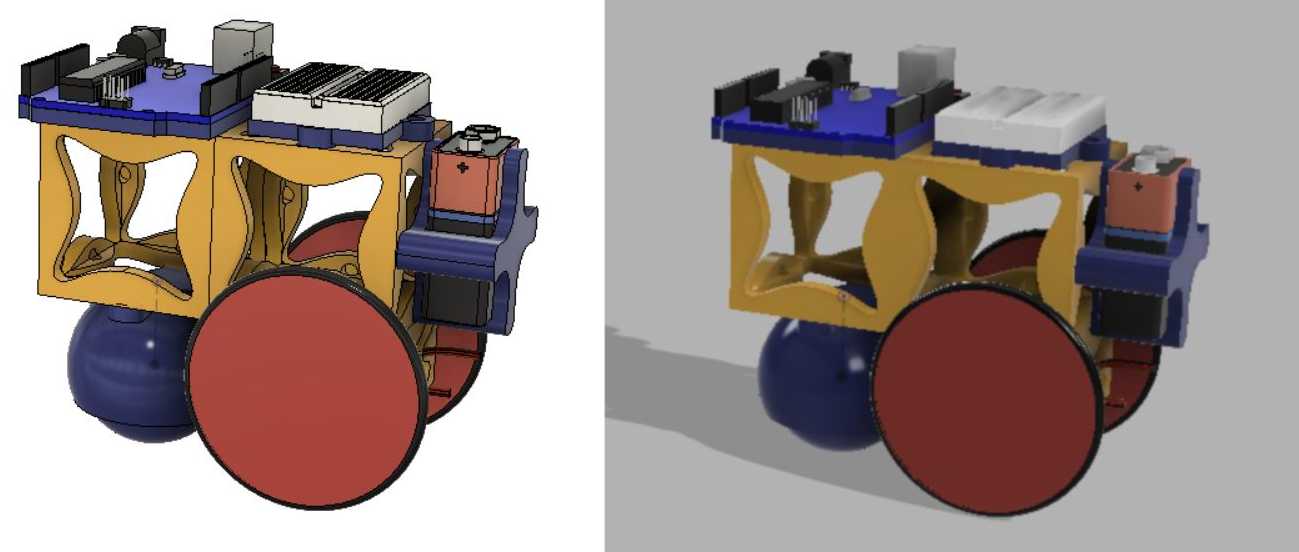
I also tested other features of Fusion360. For example the rendering which creates a realistic representation based on the specified materials. For this purpose I created two constructions of my robot system.

With the construction drawing, a 2D view of the object can be created. Furthermore it can be viewed from all sides, dimensions can be displayed or it can be splitted.

With the animation you can build your object step by step and visualize it with a small video.
I have also tried a few other programs such as Freecut. I realized that these do not seem useful to me,
since I
have been working with Fusion 360 for some time.
Before I started Fusion 360 I used to draw most things with sketchup. But with sketchupp you quickly reach your
limits
because this program doesn't work with dependencies. This means that once you have drawn something it is difficult
to
change the information later. For example I have drawn a hole for a screw in an object but after the first
pressure I
realize that the hole could be a little bit bigger, then I have to change or redo my drawing. In Fusion 360 I
have the
chance to simply change the diameter of the hole and can immediately reprint the object.

When you start Sketchup you see a 3D coordinate system with an example cube. You can easily remove it by taking the eraser and clicking on one of the outer edges.

Now we can start to select the pen from the menu bar at the top and draw lines. The length can be set by entering the desired length in the lower left corner before drawing the 2 points of the line. When you connect your lines you can create an area. Alternatively you can also create an area directly with the tool next to it.

But now we want to create a 3D object. Therefore we choose the sixth simbol from the left side. With it we can select a surface which we can pull out.

Now you can start a new sketch on any surface and draw new things and pull or push them out. Or you can also take a line and pull it in one direction.

