This weeks taks was to work through a git tutorial, build a personal site in the class archive and to describe me and my final project.
Git is a free and open source distributed version control system. I had already used git quite a few times, but was not familiar with all of its commands and features. Therefore I worked with this tutorial to familiarize myself with git further. As a first step, I generated a ssh key and added it to gitlab. The ssh key allows me to simplify my work with git. Instead of typing in my username and password every time, I put my public ssh key in git once. This lets me use git from my pc without any further inconvenience. To generate the key I entered the following line in the command line.
$ ssh-keygen -t rsa -b 4096 -C "E-Mail"
The next step was to create a new git directory at the place where I wanted to store my source code.
$ git init
Since we were provided with an existing git repository I cloned it first with the following line.
$ git clone https://gitlab.fabcloud.org/academany/fabacademy/2020/labs/bottrop/students/lena-hagenauer.git
Because I want my website to have a different structure, I deleted the existing files. It would not have been sufficient to just delete the files in my local copy, therefore I also had to delete them from the archive.
$ git rm -r --cached docs
$ git commit -m "Removed folder from repository"
$ git push origin master
Now that I had an empty directory I could copy my files into it. To save them in the repository, I first have to select the files I want to upload. Since I have saved all my files in the docs folder I choose this one.
$ git add docs
In order to stay on top of things, I added a comment to the commit. This allows me to identify versions of my website faster if I want to go back to an earlier version.
$ git commit -m "Commit-Nachricht"
To load this file into the repository I have to push it into the master branch.
$ git push origin master
Since I am the only fabacademy-student from our fablab this year, I do not expect any merge issues and therefore do not need the respective commands.
During my studies I have already created a few small websites, so I creating my own website was not too difficult. For this I used HTML and Bootstrap.
Bootstrap is a front-end component library. It makes the creation of a good and professional looking website easier, since it provides me with a hugh amount of templates for navbars, grid systems, buttons and much more. For this website, I used Bootstrap 4.
Hypertext Markup Language (HTML) is a text based language, which allows to structure text, pictures, videos
and more for a user to present on a website.
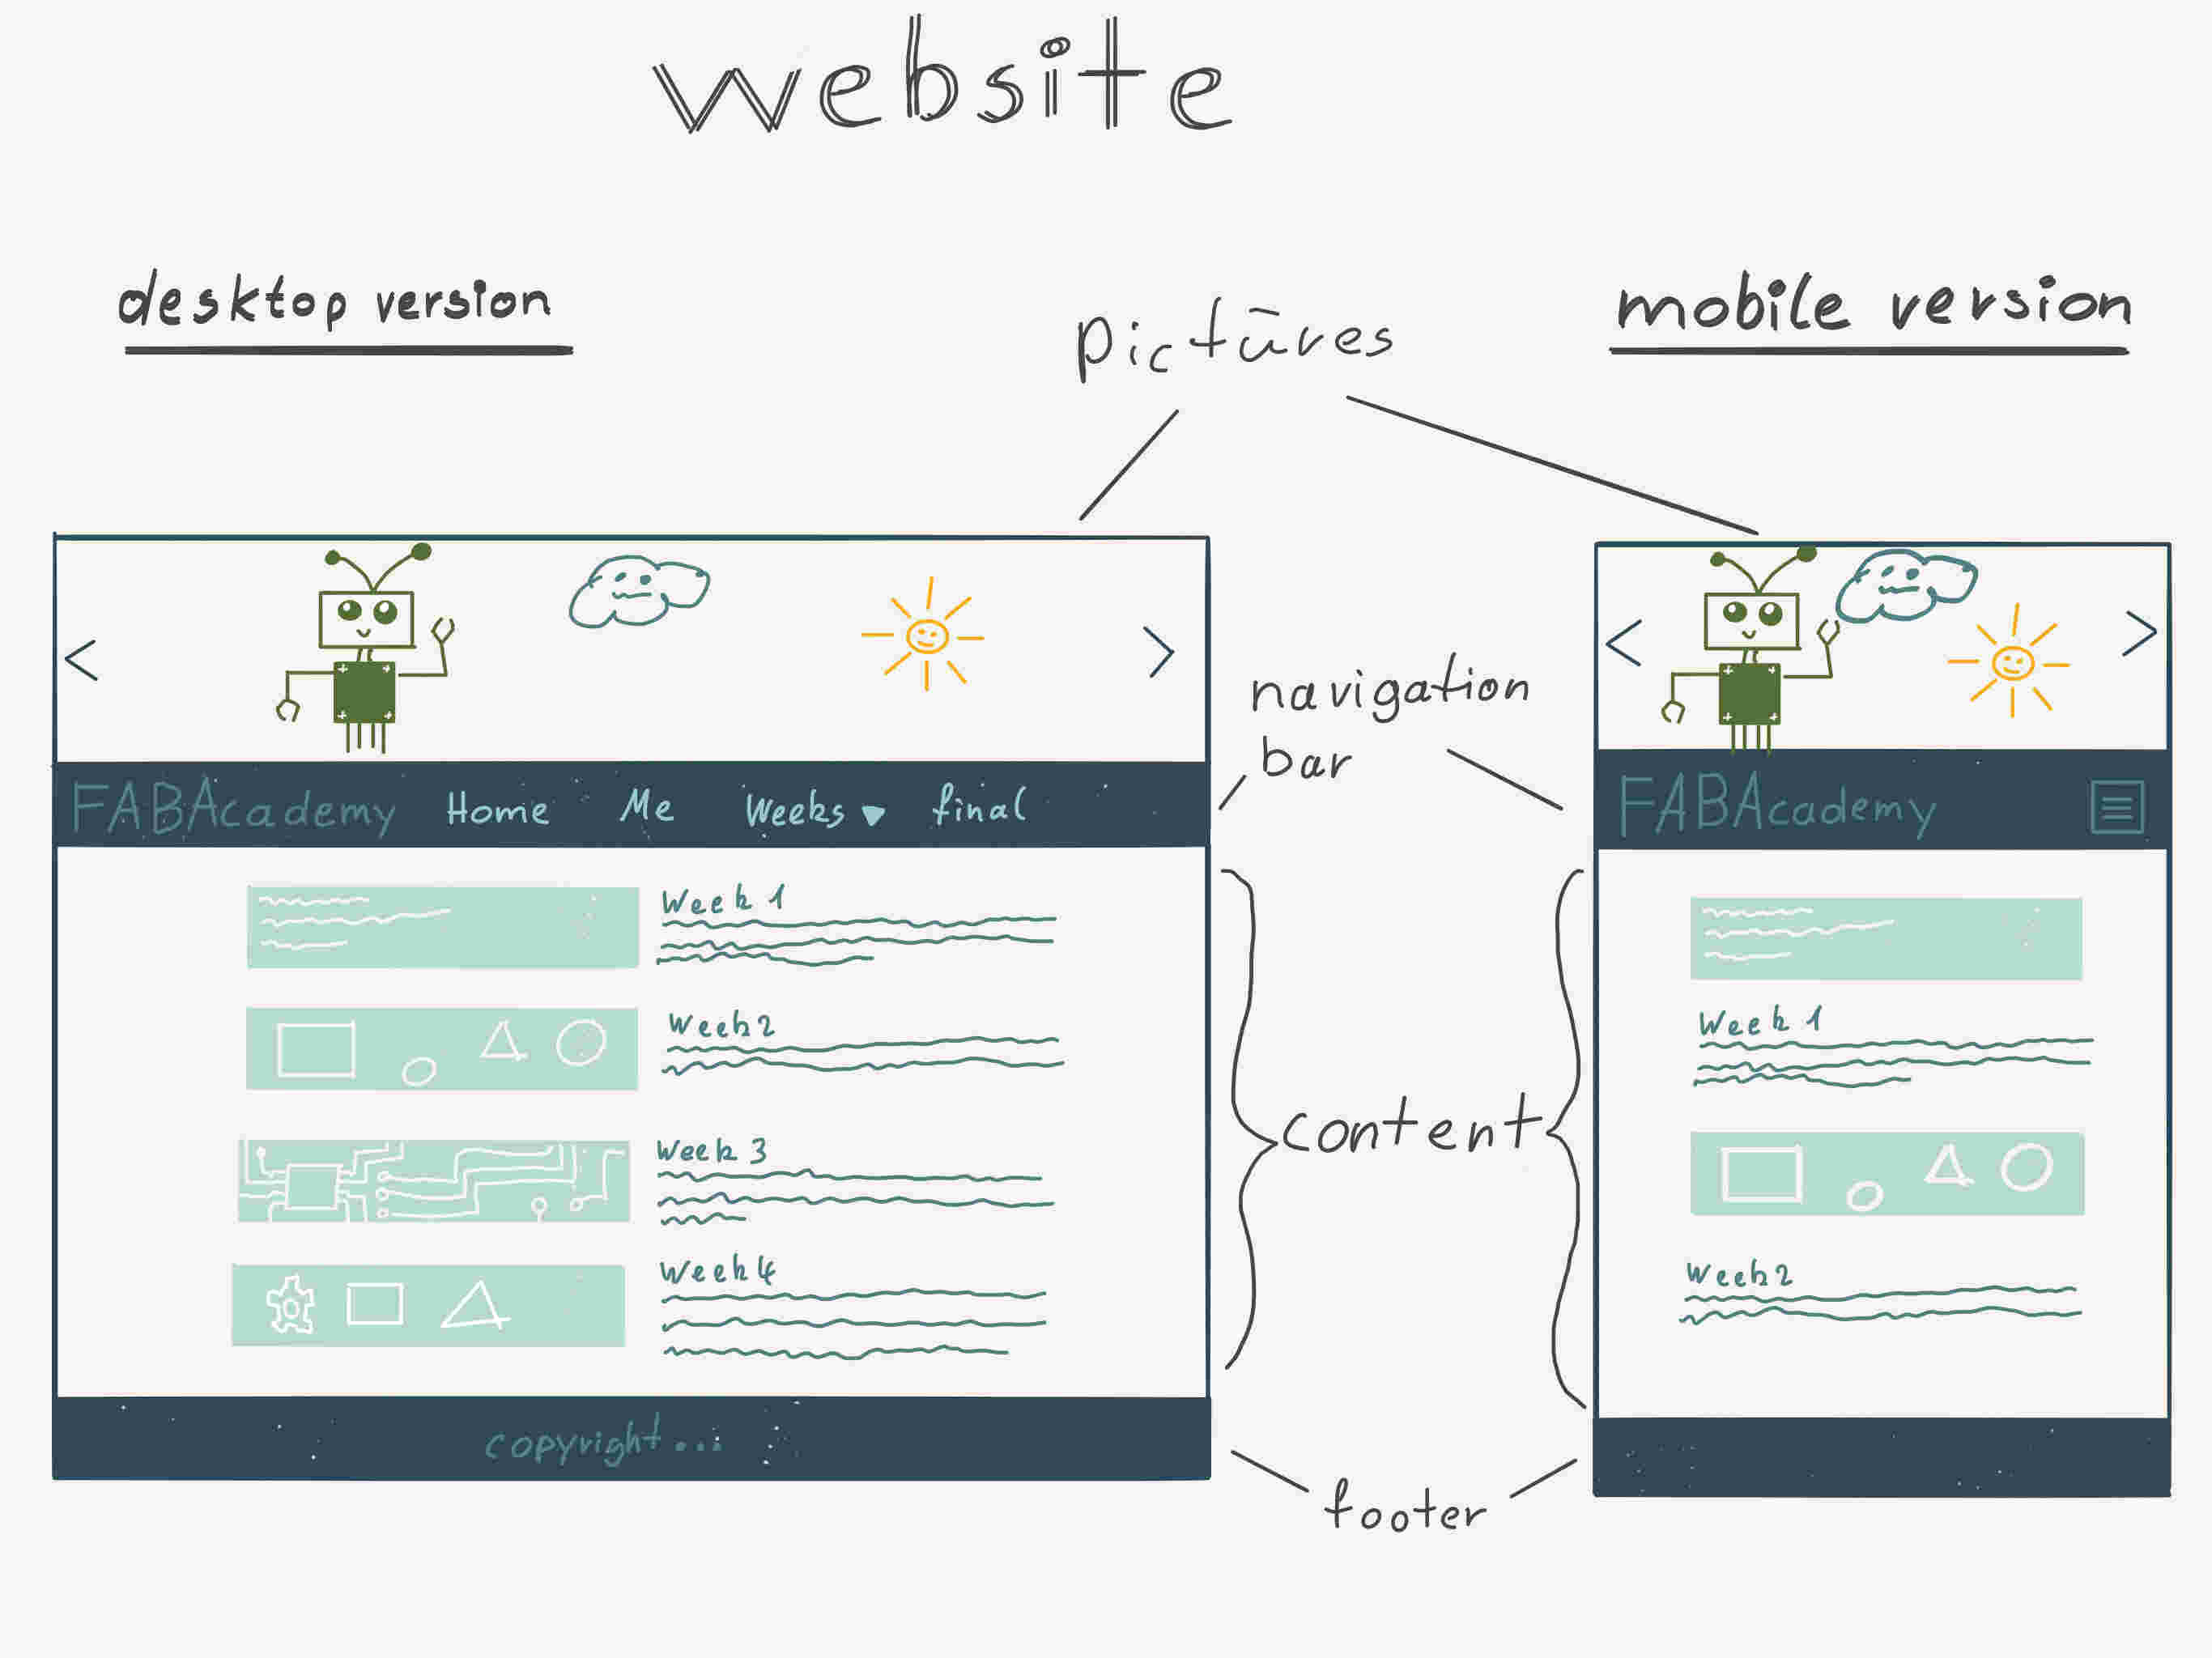
The basic structure of a website will be explained in the following.
The standard structure of a HTML website is pictured below. It consists of a head and a body. In the head objects as the title of the website and the symbol are defined. Rules for graphical display and logical expressions can be referenced directly, but that is considered a bad style. The display of elements should be described by css commands, which can be imported through external files. The actual page is created in the body. The example website below displays 'Hello World'.
  <html>
    <head>
      <title>Title</title>
    </head>
    <body>
      <p>Hello World</p>
    </body>
  </html>
Since the basics are now clear, a brief summary of the implementation and structure of my website will be given.
First, I included Bootstraps compiled CSS, JS,
Popper.js, and jQuery filse from here.
Now I can use all functions bootstrap provides. Afterwards I set the title which is displayed in the browser tab
and added our Fablab logo.
To get a first impression of my work and our laboratory I wanted to insert pictures.
Since I did not want to visually overload the website I decided to create a slideshow with changing images in the
header.
Bootstrap has a template for this, which I used.
Because I did not want everything to be displayed simultaneously on one page, I created subpages home, me, weeks,
and final.
To navigate through the pages, I needed a navigation bar. Therefore I worked with the template from Bootstrap
again. After some research and testing
I discovered how use responsive design for my website so it can be used on a mobile phone as well as on
a desktop.
For the body of the main page I have a 3x6 grid so visitors can get first impression of my work. There they can
see teasers
of the weekly assignments.
If you click on an icon in the 3x6 grid you will be redirected accordingly. Finally, I created a footer at the
bottom with license
conditions and informations about myself.
Below is an example of the basic structure of all my pages.
  <html lang="de">
  <head>
    <title>FabAcademy Final Project</title>
    <link rel="icon" type="image/png" href="pic/FabLabLogoHRW.png">
    <meta charset="utf-8">
    <meta name="viewport" content="width=device-width, initial-scale=1, shrink-to-fit=no">
    <link rel="stylesheet" href="https://stackpath.bootstrapcdn.com/bootstrap/4.4.1/css/bootstrap.min.css">
    <link rel="stylesheet"  href="styles.css">
    <script src="https://code.jquery.com/jquery-3.4.1.slim.min.js"></script>
    <script src="https://cdn.jsdelivr.net/npm/popper.js@1.16.0/dist/umd/popper.min.js"></script>
    <script src="https://stackpath.bootstrapcdn.com/bootstrap/4.4.1/js/bootstrap.min.js"></script>
  </head>
  <body>
    <section class="head-carusell"></section>
    <div id="demo" class="carousel slide" data-ride="carousel">
      <div class="carousel-inner">
        <div class="carousel-item active img-fluid">
          <img class="d-block w-100" src="../pic/week00.jpg" >
        </div>
      </div>

      <a class="carousel-control-prev" href="#demo" data-slide="prev">
        <span class="carousel-control-prev-icon"></span>
      </a>
      <a class="carousel-control-next" href="#demo" data-slide="next">
        <span class="carousel-control-next-icon"></span>
      </a>
    </div>

    <nav class="navbar navbar-expand-lg navbar-dark bg-dark sticky-top">
      <div class="container">
        <a class="navbar-brand" href="https://fabacademy.org/">FabAcademy 2020</a>
        <button class="navbar-toggler" type="button" data-toggle="collapse" data-target="#navbarNav" aria-controls="navbarNav" aria-expanded="false" aria-label="Toggle navigation">
          <span class="navbar-toggler-icon"></span>
        </button>
        <div class="collapse navbar-collapse" id="navbarNav">
          <ul class="navbar-nav">
            <li class="nav-item">
              <a class="nav-link" href="../index.html">Home</a>
            </li>
            <li class="nav-item">
              <a class="nav-link" href="me.html">Me</a>
            </li>
            <li class="nac-item dropdown">
              <a class="nav-link dropdown-toggle" data-toggle="dropdown" data-target="dropdown_target" herf="#">
                <span class="caret">Assignments</span>
              </a>
              <div class="dropdown-menu" aria-lablleby="dropdown_target">
                <a class="dropdown-item" href="week01.html">Week 1</a>
              </div>
            </li>
            <li class="nav-item">
              <a class="nav-link" href="final.html">Final Project</a>
            </li>
          </ul>
        </div>
      </div>
    </nav>

    <div class="container">
      <br>
      <h1>Final Project</h1>
      <p>here could be my final project</p>
    </div>

    <footer id="sticky-footer" class=" container-fluid py-4 bg-dark text-white-50>
      <div class="container text-center">
        <small>to to</small>
      </div>
    </footer>

    </body>
  </html>