Skip to content

Final Project

New Idea

alt text

alt text

alt text

Coffee 101

Coffee comes from an evergreen shrub grown in tropical regions along the equator, also refered as the coffee belt. The plant produces fruit called coffee cherries, and the coffee bean is actually the seed found inside. To extract this seed, farmers use different processing methods that change the final flavor, such as washed, natural, honey, and anaerobic.

Most coffee comes from two distinct plant species known as Arabica and Robusta. Arabica accounts for most specialty coffee because it offers a sweet, complex flavor with vibrant acidity. However, these plants require higher altitudes and delicate care to grow. In contrast, Robusta plants are much hardier and thrive at lower elevations. Robusta beans contain nearly double the caffeine of Arabica, which creates a much stronger, more bitter, and earthy taste that is ideal for instant coffees and espresso blends.

Roasting

Roasting coffee is not so difficult as it seems to be… In fact, I am learning more as this project evolves. However it is important to understand that coffee, like any other fruit, is consumed best when it’s fresh.

When roasting, the two key elements to watch are color changes and the cracking stages.

The coffee color spectrum breaks down into five distinct phases: 

Green: unroasted, raw beans.
Yellowing: the early stage of color change.
Light roast: the first brewable stage, pulled after the first crack.
Medium roast: the specialty coffee industry favorite, offering a balanced profile.
Dark roast: generally less preferred, roasted mostly past the second crack, has visible oils and surface cavities.

After the yellowing stage, a thin skin called chaff starts breaking off the bean. This debris is highly undesirable in both the roaster and the grinder. In a roaster it a potential fire hazard, whereas in a grinder, it ends up in your cup, creating an unpleasant, bitter taste profile. 

Components

Initial Idea

alt text 
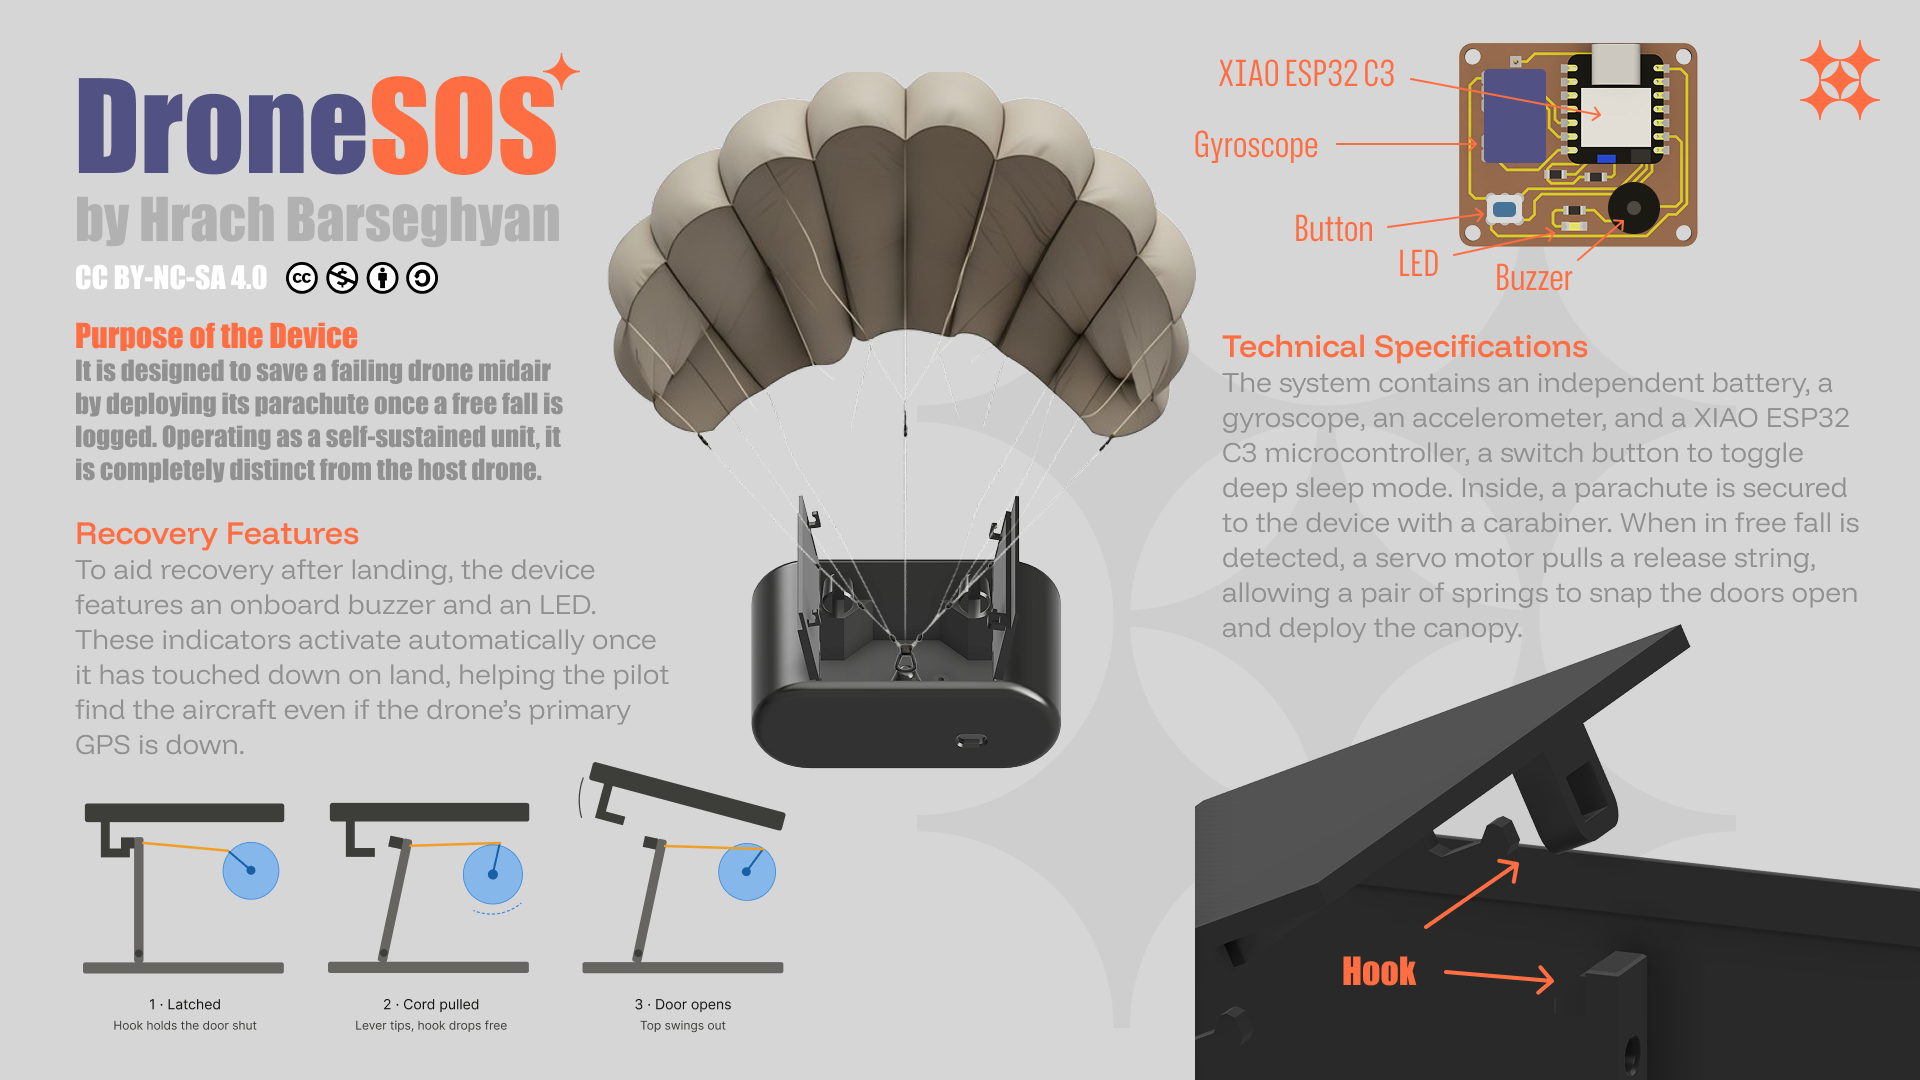
A self-contained parachute unit that attaches to consumer drones without any electronic or software integration with the host device. An independent onboard sensor monitors flight state and triggers deployment upon detecting free-fall. The system operates entirely on its own power source and logic, making its function unaffected by drone system failures. Compatible with a range of drone form factors via a universal mounting bracket.

The Backstory

When I was a 14, I started working and saving up for a drone, and small sized consumer drones were new to the market. Mine happend to be DJI Spark.

I recall how bad the flight-time then was, the drone would fly just 14 minutes at full charge. Also, the battery was very bad at enduring cold temperatures.

After some months of usage winter had come, and I took it to a ski resort. 3 minutes after take off the drone had collaps midair. The propellers had stoped spinning, yet the camera transmitted the view. I started searching the drone, but the GPS was not precise, and 15 minutes later found the drone with a broken arm.

Indeed, I was quite worried for the drone to fail, at the end of the day I bought it with the money I had worked for, and knew its value. So even before having it failed, I had already looked up for backup systems.

The offical repair cost more than the drone itself, so I took the matter into my own hands, and ordered the chassis. This was my first attempt to repair an electronics item, and the soldering was not the prettiest. But the fact is that it could fly.

After having the drone fixed I did not have the same courage to fly it. The accessory market for drones was quite vast, you could find propeller guards, various chargeres, landing mats, camera lenses, etc.1 Though one thing I needed was a parachute system that would prevent the drone from breaking if caught in free fall.

8 years later, the market does not offer a solution to this…

Sketching

The initial sketches, from Week 2 are as follows.

alt text

Desiging

Since my drone is quite small, the real challenge is scaling everything down while still fitting every detail into such a compact design. So if this fits on a small drone, it will surely fit on bigger ones. Whereas with bigger area, the device can see design improvements.

drone's scale 1 drone's scale 2

alt text To overcome this small footprint, I decided to lift the device onto a base, whereas in the base I will place the battery to keep the center of gravity as low as possible.

PCB

PCB design sketch

favicon backdrop