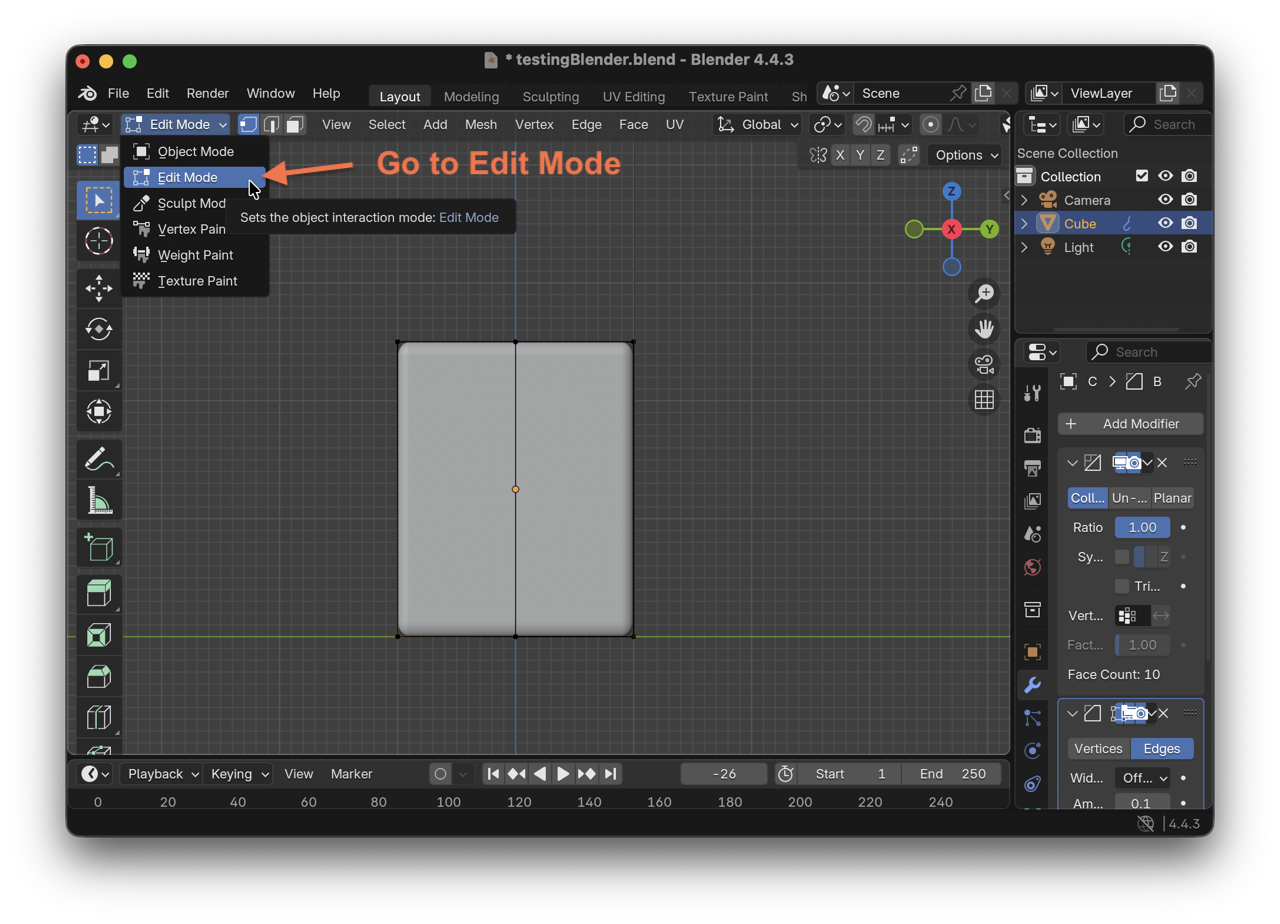
Week 2: Computer Aided Design
Potential Final Project
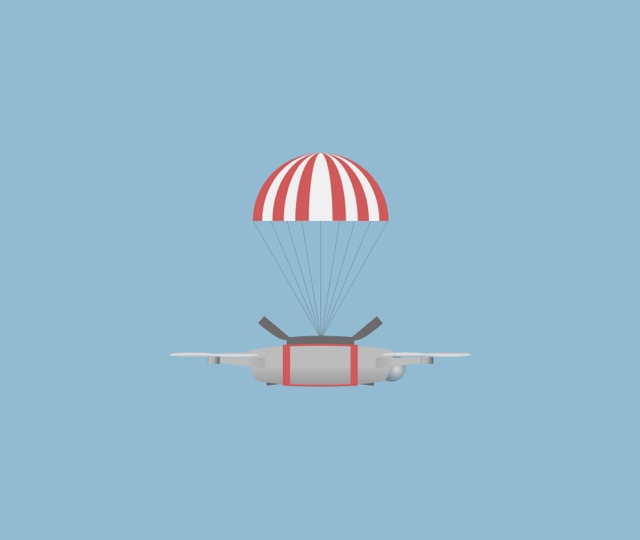
 About 10 years ago, I was flying my drone in winter, when it suddenly collapsed. The weather was dry, the temperature not very cold, above the extreme rating. But it fell about a 100m, and one of its arms got broken.
After repairing, I started looking into attachable parachute options, because I couldn’t fly it with the same courage. But commercial drones were new to the market, and such products were not available. Years later, I still have the drone, no a parachute, and a great idea to solve!
CAD
When I was 15, I had taken an introductory course on graphic design, which unsurprizingly had reflected more on my adaptation and navigation skills to new software than sense of design thinking…
What is CAD?
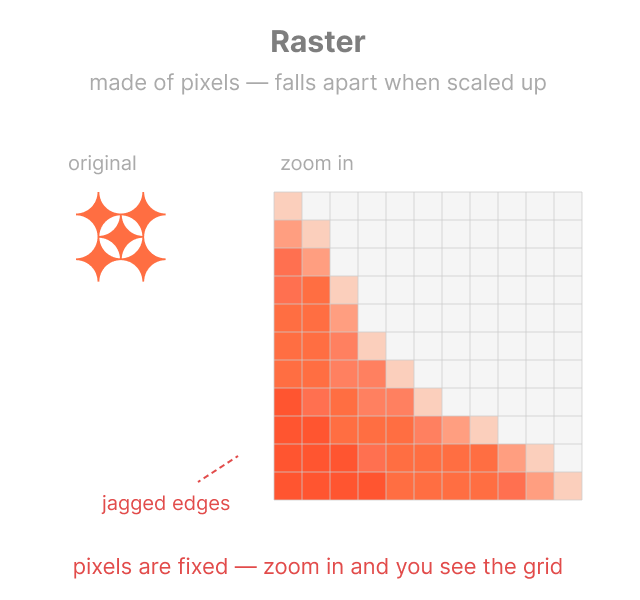
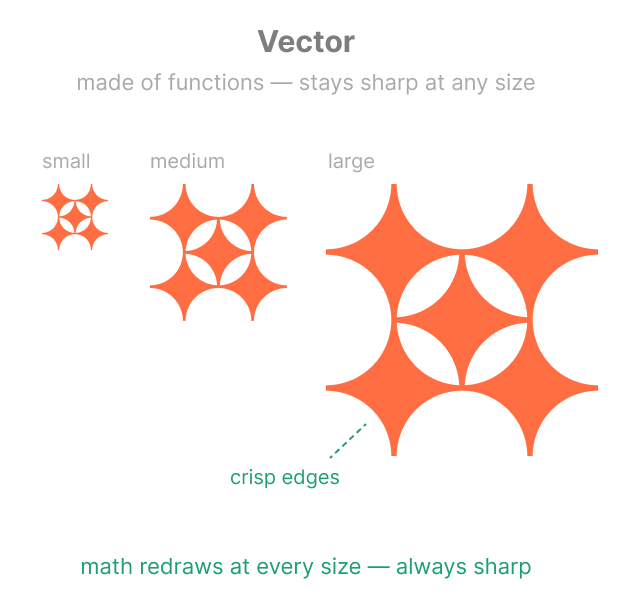
CAD is the digital evolution of technical drafting, enabling the creation of precise 2D blueprints and 3D models for engineering and architecture. It relies on vector geometry — mathematical paths that maintain perfect clarity at any size – rather than raster pixels, which blur when scaled. This precision allows designers to move seamlessly from a digital concept to a physical product through accurate, scalable data. CAD almost always uses vectors!
There are also native file types, meaning the default format a specific software used to save its work.
Raster vs. Vector
When learning about CAD, the first thing one probably encounters with are the terms raster and vector. Raster files are comprized of pixels, and are generally larger than vector files. Whereas vectors are lighter, and are made of mathematical equations. Here’s a visual example on my favicon to compare the two variations.
*Prompt2.1a
*Prompt2.1b
Common file formats
DXF: CAD exchange; moves geometry between different drafting apps
SVG: Web-standard; ideal for scalable logos and icons
Raster [pixels]:
PNG: High quality; supports transparent backgrounds
JPG: Small files; best for photographs and web images
TIFF: Zero quality loss; the standard for high-end printing
Exception:
PDF: Universal container; can hold both vector functions and raster pixels in one file
What to use: JPEG or PNG?
JPEGs are recommended because of their compression flexibility, letting you compress a JPEG much better than a PNG. JPEGs achieve their massive file size reduction through a process called “lossy” compression. This method permanently discards data that the human eye is naturally bad at perceiving, such as extremely fine textures and microscopic shifts in color. By keeping the overall brightness and major shapes intact, the algorithm throws away the invisible “noise,” creating a file that looks virtually identical to the original at a glance while using only a fraction of the digital storage space.
So, after multiple iterations of compressing and saving the same JPEG file, the resulting image will look noticeably degraded.
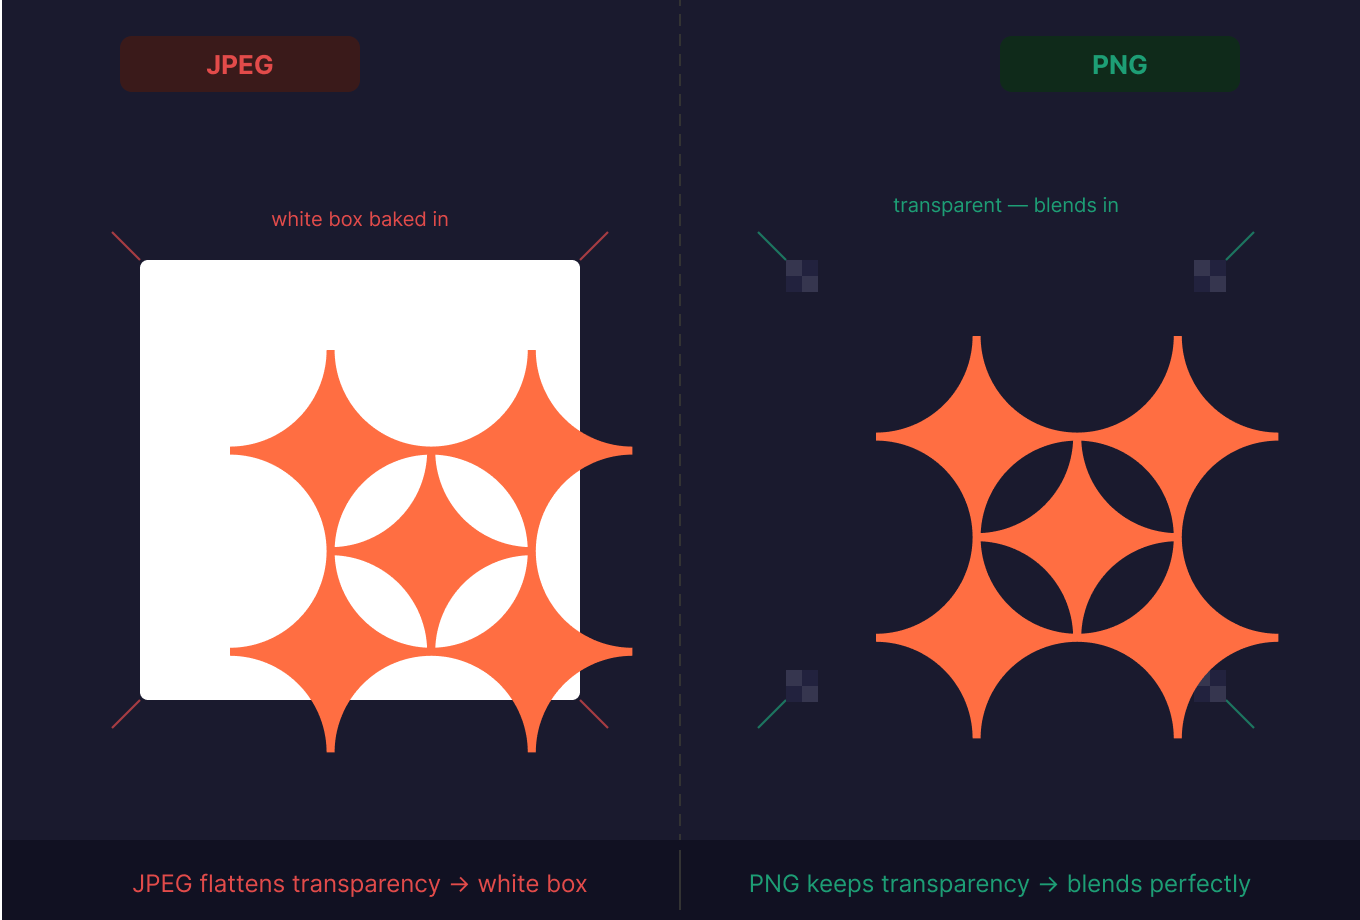
However, JPEGs cannot have a transparent background, whereas PNGs can! So, in dark mode, in the images below you can clearly notice the difference between the left JPEG file with white background, and color-matched background PNG file on the right. To get a better understanding of JPEGs I recommend this video!
 *Prompt2.2
Software
Throughout the first several weeks I have tried out many apps. During our local lectures we primarily used FreeCAD for learning purposes, yet for me, the most prominent ones were Fusion, Blender, and Figma.
FreeCAD
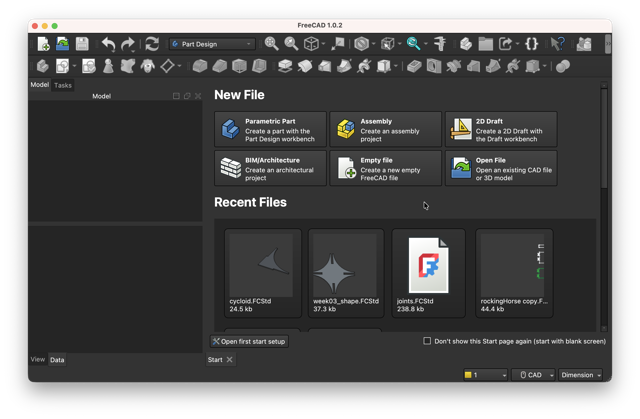
![]() This was my first experience with FreeCAD, in fact I did not know of any open-source CAD software before. In the begining it was a complete love and hate relationship between me and FreeCAD, it was not straightforward whatsoever. But eventually I got used to the interface, and its endless errors.
This was my first experience with FreeCAD, in fact I did not know of any open-source CAD software before. In the begining it was a complete love and hate relationship between me and FreeCAD, it was not straightforward whatsoever. But eventually I got used to the interface, and its endless errors.
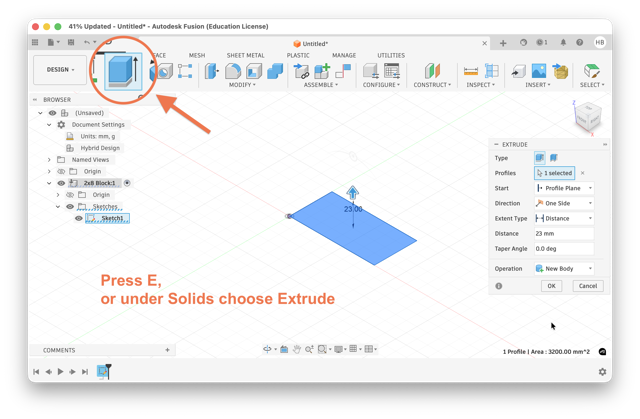
Step-by-step
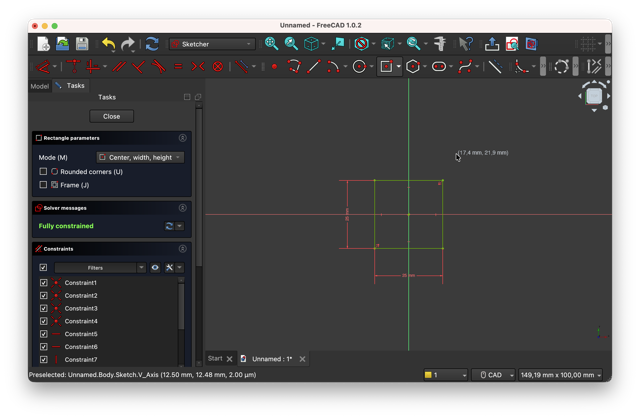
 This step-by-step is faily easy. I first created a parametric file. If you create the file as parametric, the body comes pre-opened in the file, whereas if you create an empty file, yoou should mannualy add the body.
 It is important to note that all the geometric manipulations in FreeCAD are based on a body.
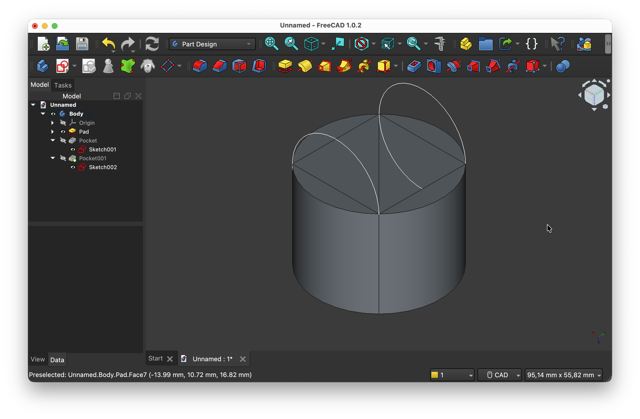
Then I selected the XY-plane which lays flat. After, I proceeded to creating a sketch – the blank paper icon with and red drawings on it. In a sketch is where one can start drawing flat shapes such as circles, triangles, freeform, etc. NOTE: always close the sketch in the left panel to be able to proceed with body-operations.
It is important to note that all the geometric manipulations in FreeCAD are based on a body.
Then I selected the XY-plane which lays flat. After, I proceeded to creating a sketch – the blank paper icon with and red drawings on it. In a sketch is where one can start drawing flat shapes such as circles, triangles, freeform, etc. NOTE: always close the sketch in the left panel to be able to proceed with body-operations.

 Once the desired shape is achieved, I extruded the form, using the pad tool – the yellow floating cube icon. And to adjust the extrusion sizing, in the left panel, I gave a specific thickness. By defualt, all the mesurements are in millimeters, whereas the extrusion thickness comes in 10mm.
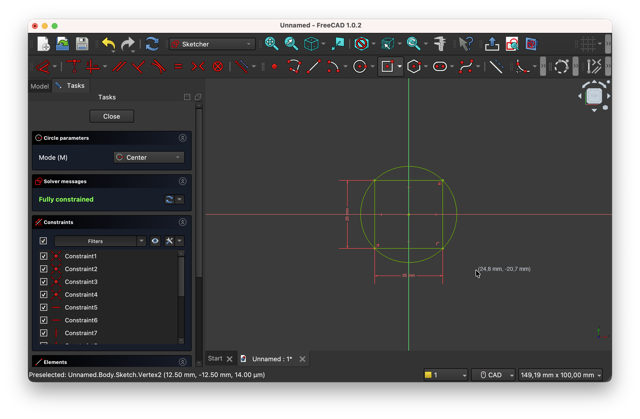
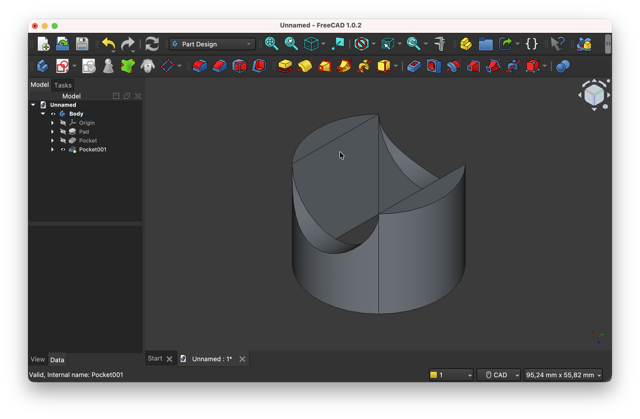
 As of the last step, I selected two parralel inner walls of the body, placed semi-circles, and cut these off of the main body using the pocket tool – the blue cube with red inner walls.
OpenSCAD
![]() I did not get to use much of OpenSCAD, but it was a very intriguing software. It actually reminded my of CAD apps on dumbphones. Despite, I am planning on returning to OpenSCAD!
I did not get to use much of OpenSCAD, but it was a very intriguing software. It actually reminded my of CAD apps on dumbphones. Despite, I am planning on returning to OpenSCAD!
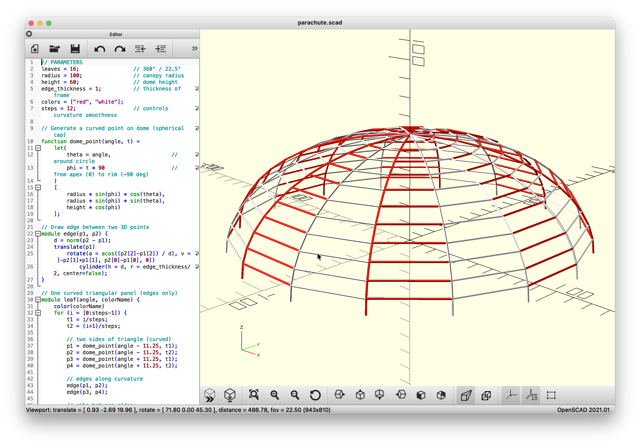
I did an experiment – giving the same prompt to several popular LLMs, more specifically Claude, ChatGPT, and Grok. After much back and forth, the reults were not very pleasing. The most popular one – chatGPT performed the worst [results not included]. But the rest – Claude and Grok had their results more or less close to what a parachute would look like.
Claude
These were the two “okay” version generated by Claude, but the second file was made up of too many poligons, hence the file was very heavy and slow to operate.
*Prompt2.3 to Claude
Create an OpenSCAD script for a parachute canopy consisting of 16 panels [22.5° each] that form a dome shape, not flat slices. The canopy should be hollow [edge surfaces only], with each triangular panel meeting at the apex and connecting along the rim. Panels must alternate red and white, and the overall shape should resemble a real curved parachute canopy, not a pizza slice or flat/open structure.
Grok
With Grok I achieved the prettiest results, and overall Grok is best at generating visuals of any kind. However, the problem with this file was the presence of internal polygons [2nd image below].
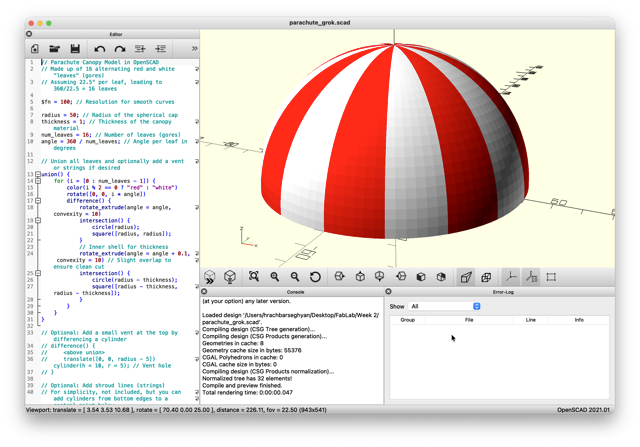
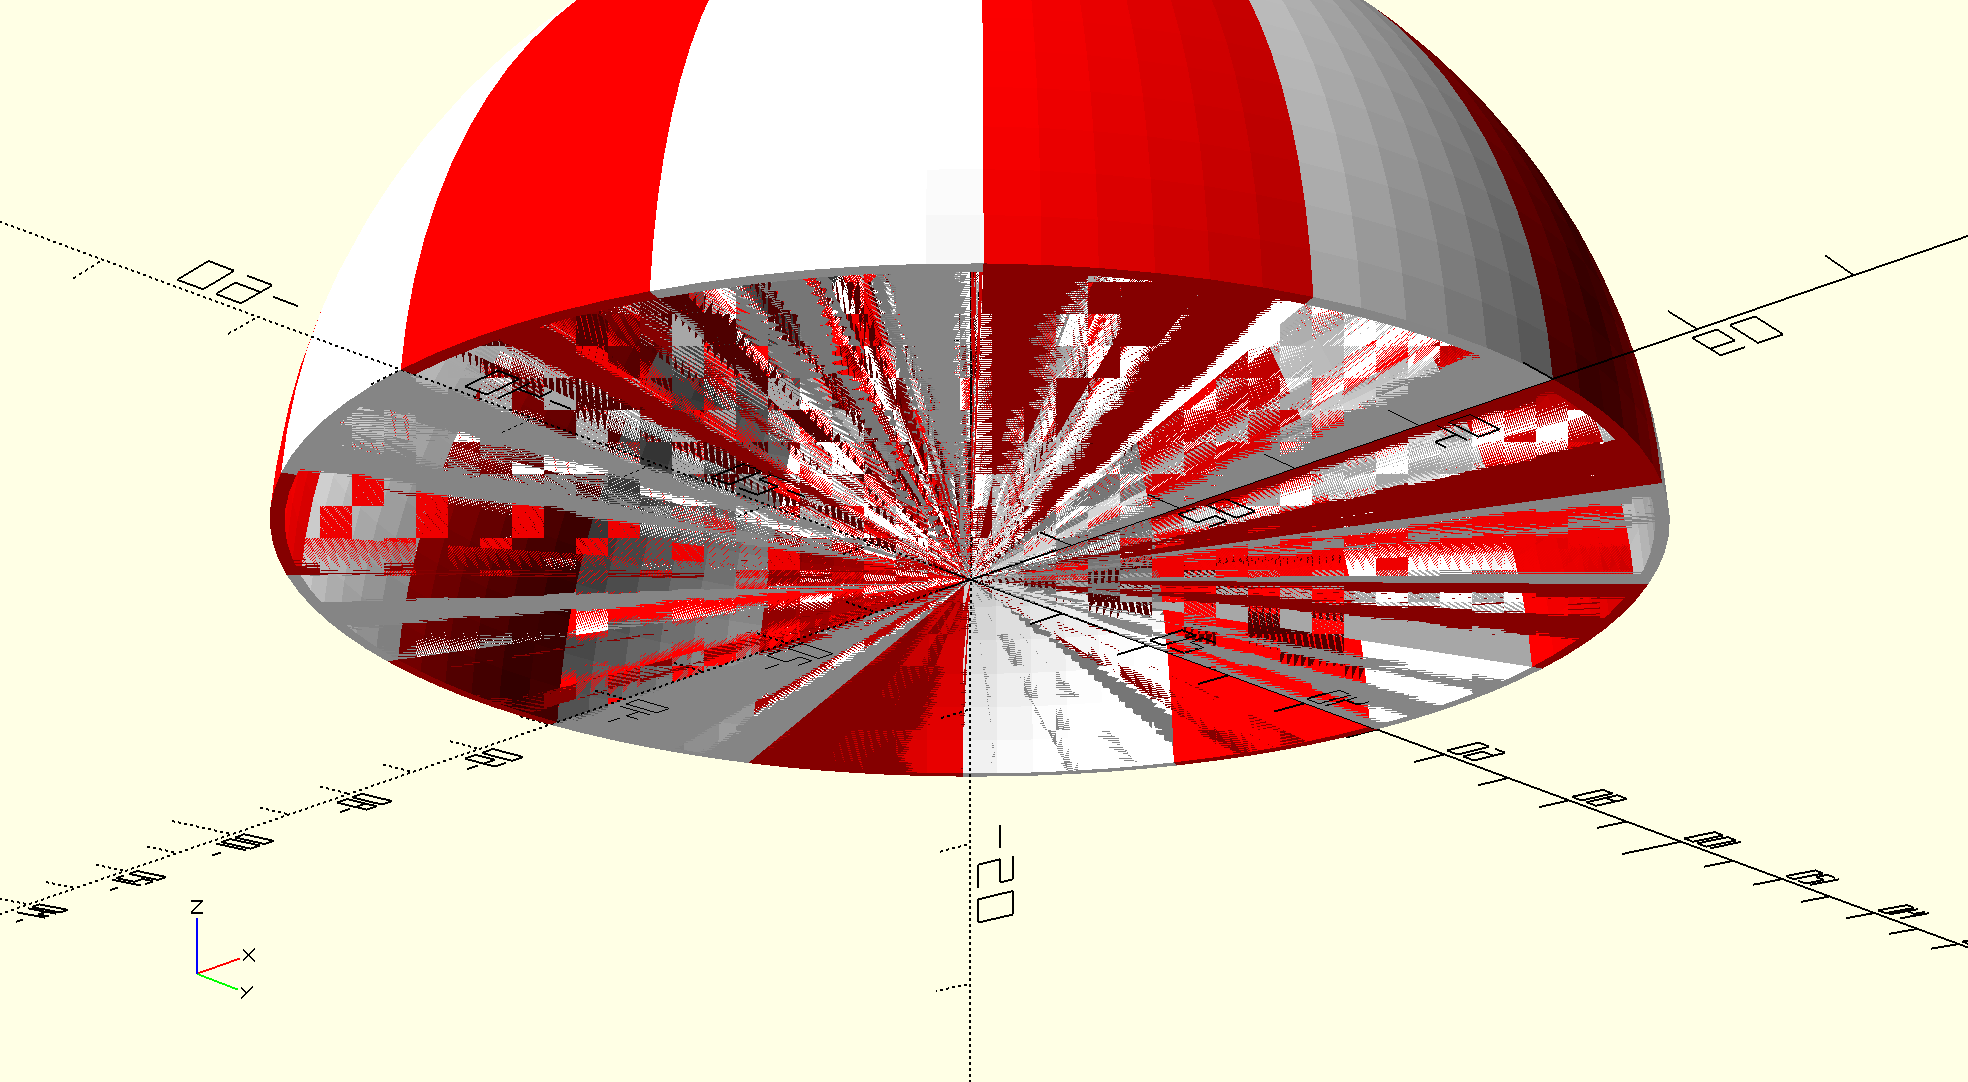
*Prompt2.3 to Grok – same as to Claude
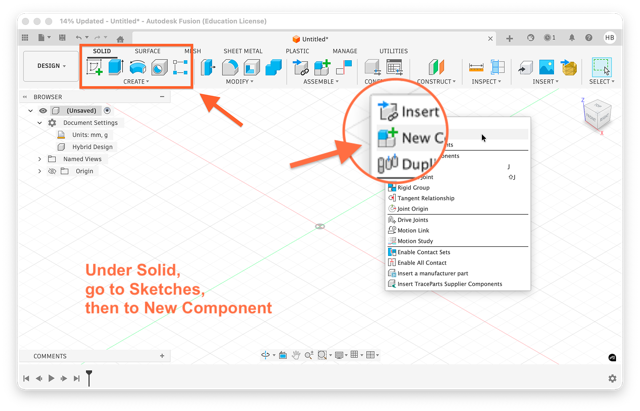
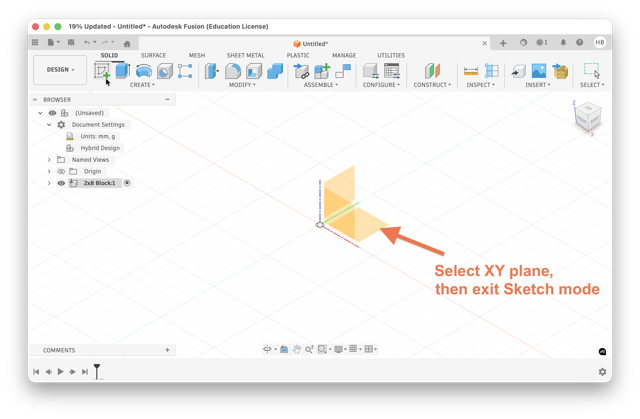
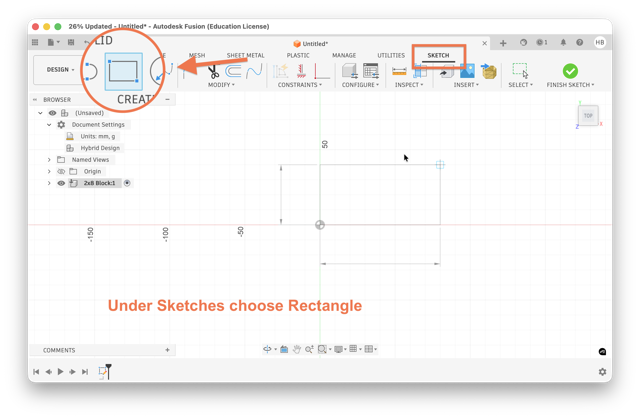
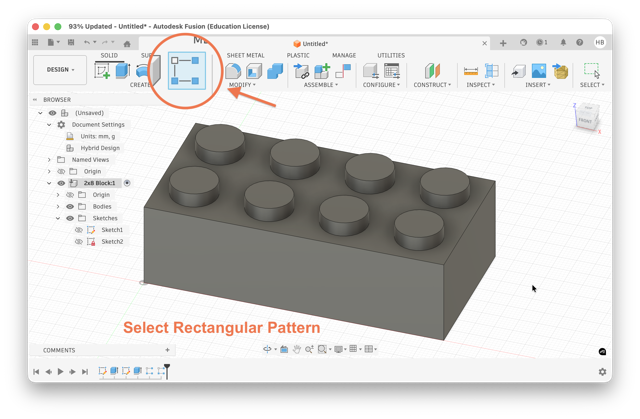
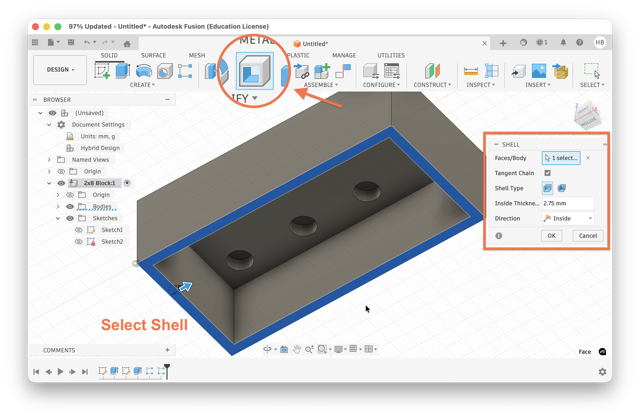
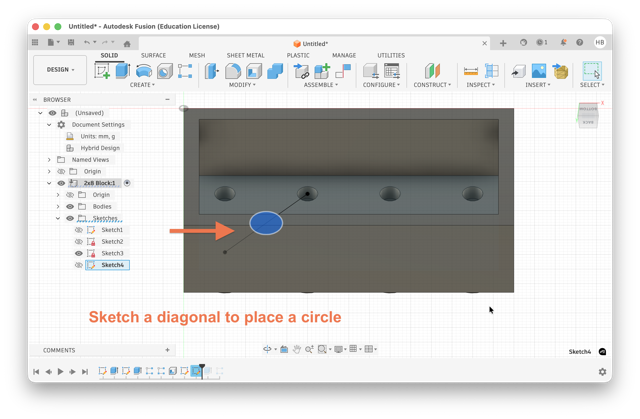
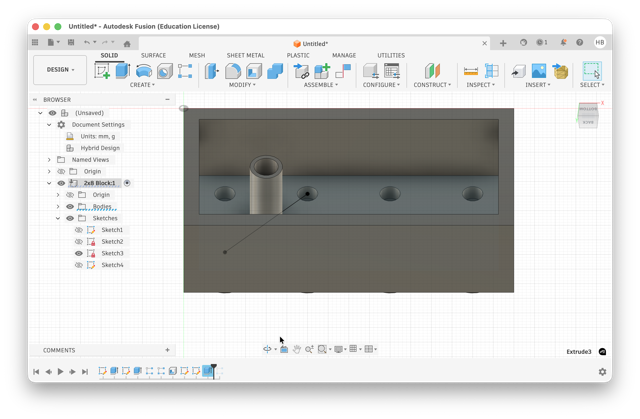
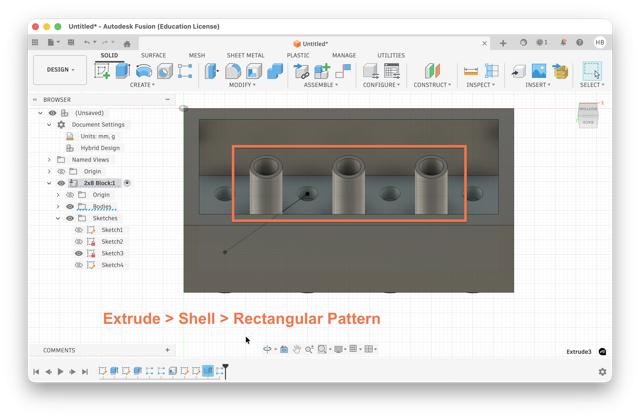
Fusion
![]() In the beginning, I could not get my account verified for a while. But after having talked to Fab Academy Administration folks the issue was solved. I quite enjoyed the UI of the app, and it was much easier to navigate through. After FreeCAD, Fusion was a total relief. For Fusion, besides YouTube tutorials, I also found official learning material on AutoDesk’s website.
In the beginning, I could not get my account verified for a while. But after having talked to Fab Academy Administration folks the issue was solved. I quite enjoyed the UI of the app, and it was much easier to navigate through. After FreeCAD, Fusion was a total relief. For Fusion, besides YouTube tutorials, I also found official learning material on AutoDesk’s website.
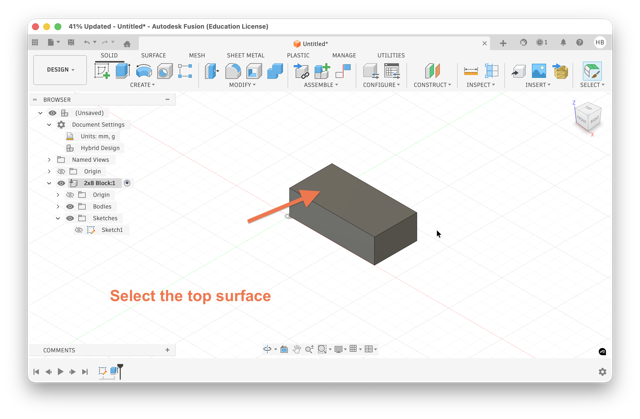
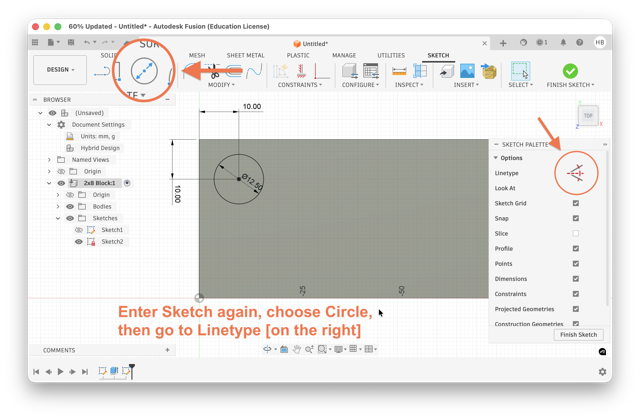
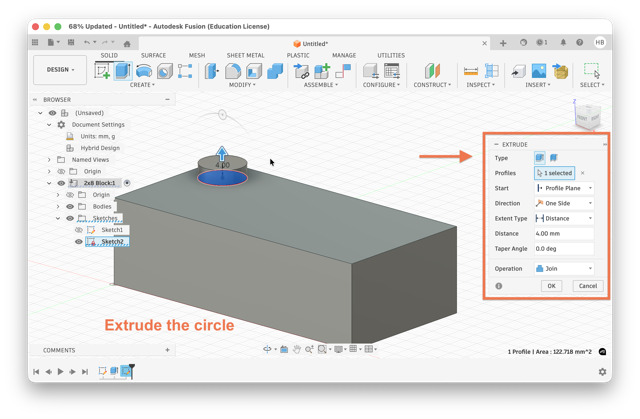
Step-by-step
For a quick onboarding project I followed this project based tutorial.
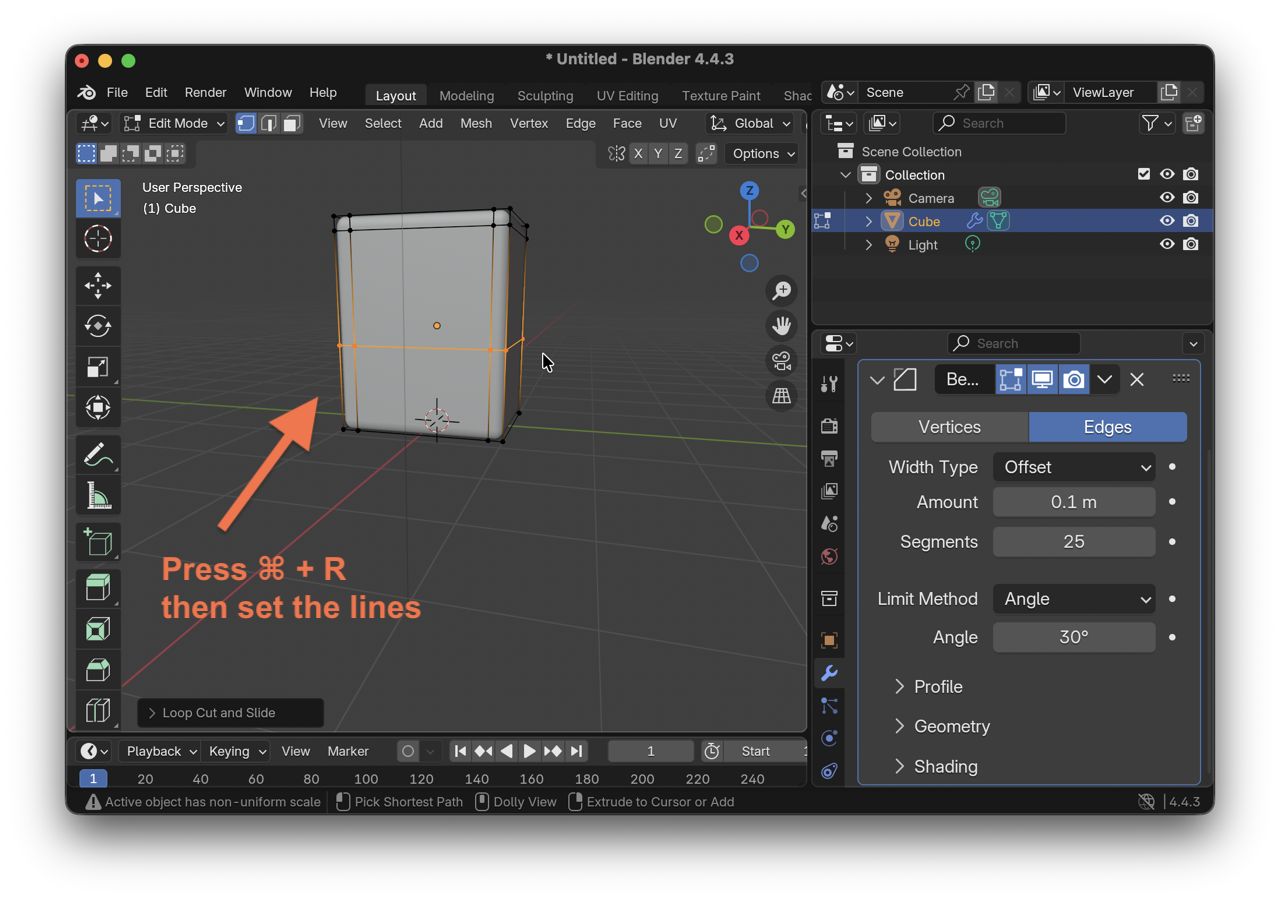
Blender
![]() I had previously worked with Blender, in fact it was last spring, during a wrokshop in my Fab Academy node.
I had previously worked with Blender, in fact it was last spring, during a wrokshop in my Fab Academy node.
The workshop was about creating a digital twin of an object. We first made a small objects with clay, then let them dry. After we 3D scanned them, and imported onto Blender to improve their surfaces. We resulted in 3D printing them, and coating them in copper by dipping in anodized baths.
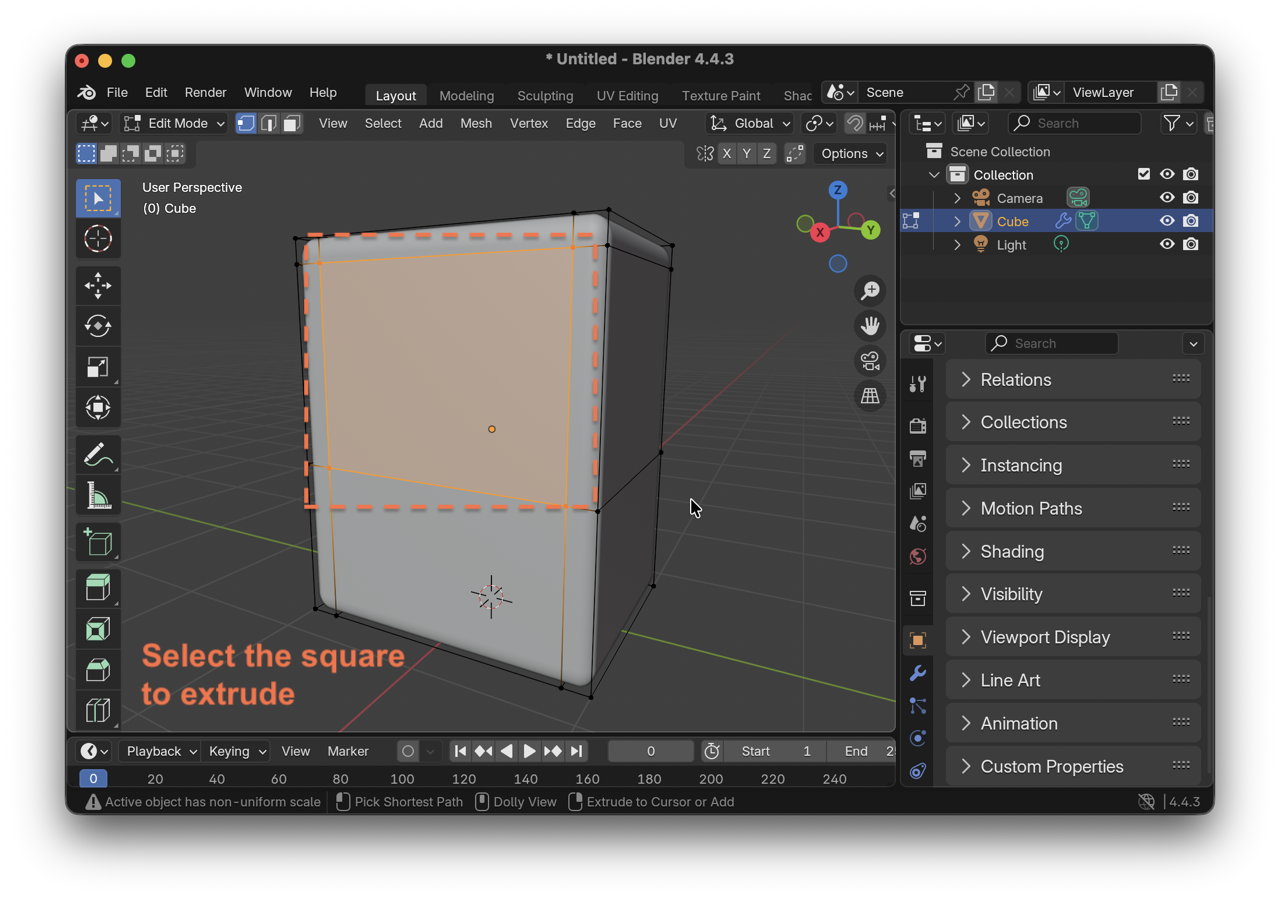
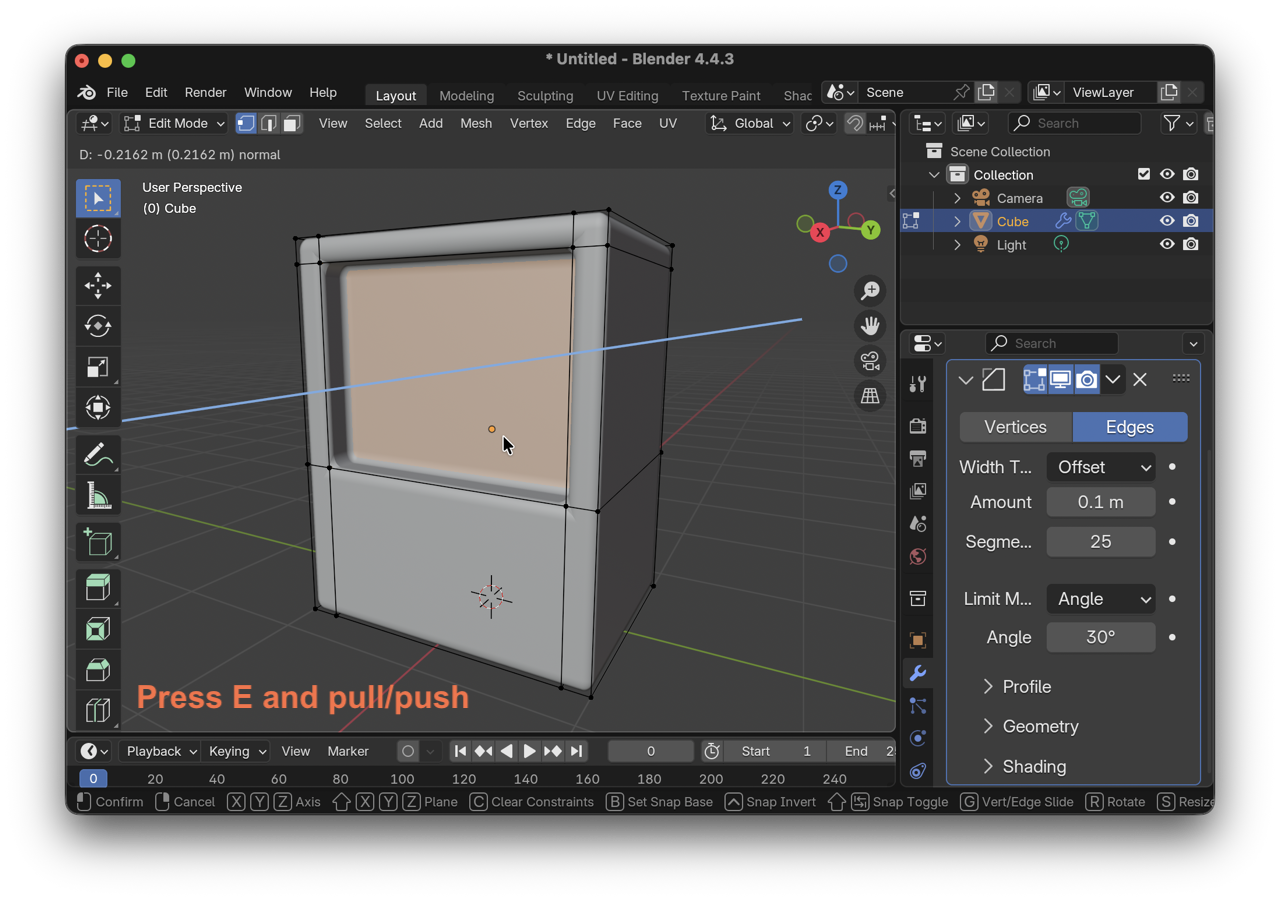
Step-by-step
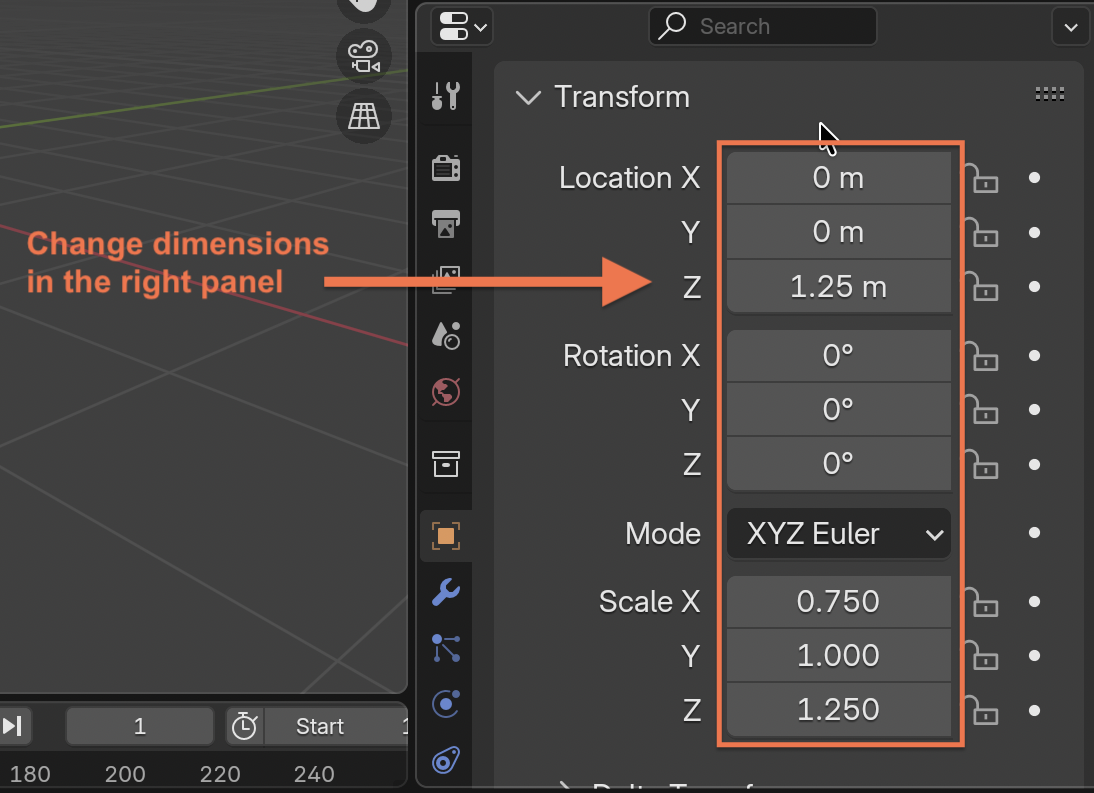 Here’s a brief example of an old TV I worked on to revive my skills with Blender.
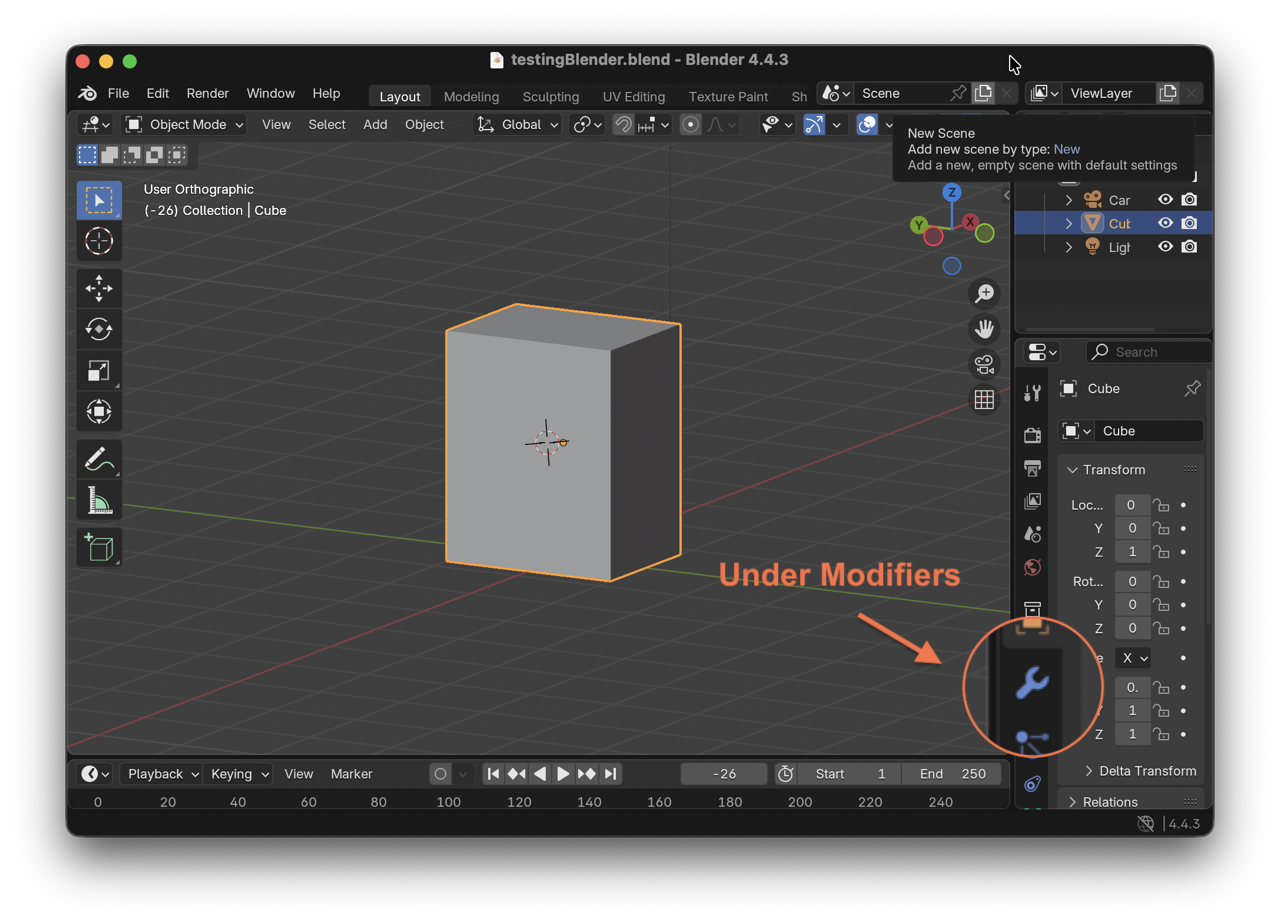
When you frist enter Blender, by defualt there’s a 1x1x1m cube. To change its size click on it, then go to the right panel, under Transform you can change both its size, and axis placement.
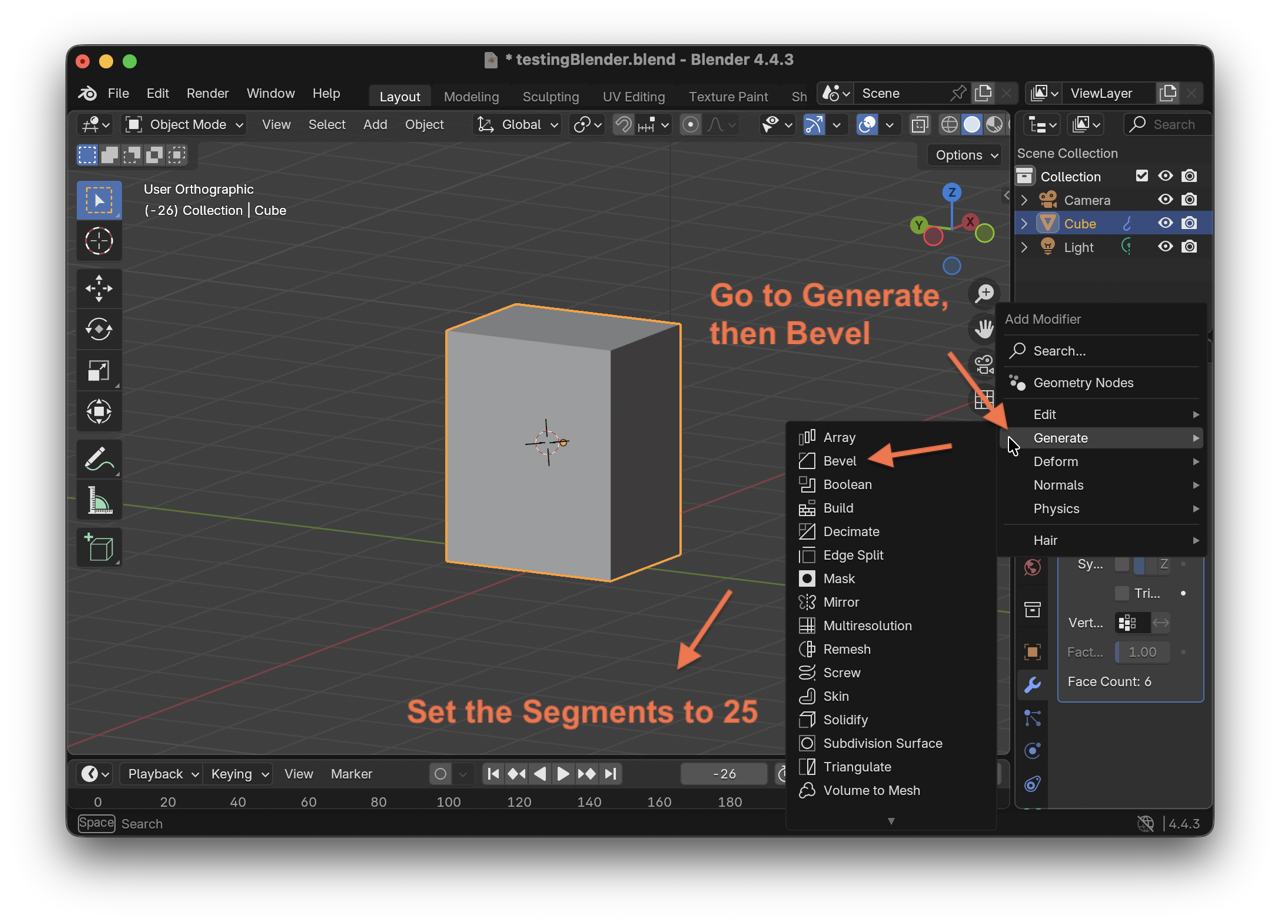
To add bevels on the edges go to the blue wrench icon, called Modifier:
click on Add Modifer > General > Bevel > Segments > change number of segments
Figma
![]() Figma is a cloud-based collaborative design tool used primarily for creating user interfaces [UI], and user experiences [UX]. It offers a forever-free standard plan. Though I do not use the app to its full potential, it comes in handy when working with basic iconography. This is a great alternative for Adobe Illustartor, which also offers a user-friendly interface.
Figma is a cloud-based collaborative design tool used primarily for creating user interfaces [UI], and user experiences [UX]. It offers a forever-free standard plan. Though I do not use the app to its full potential, it comes in handy when working with basic iconography. This is a great alternative for Adobe Illustartor, which also offers a user-friendly interface.
Step-by-step
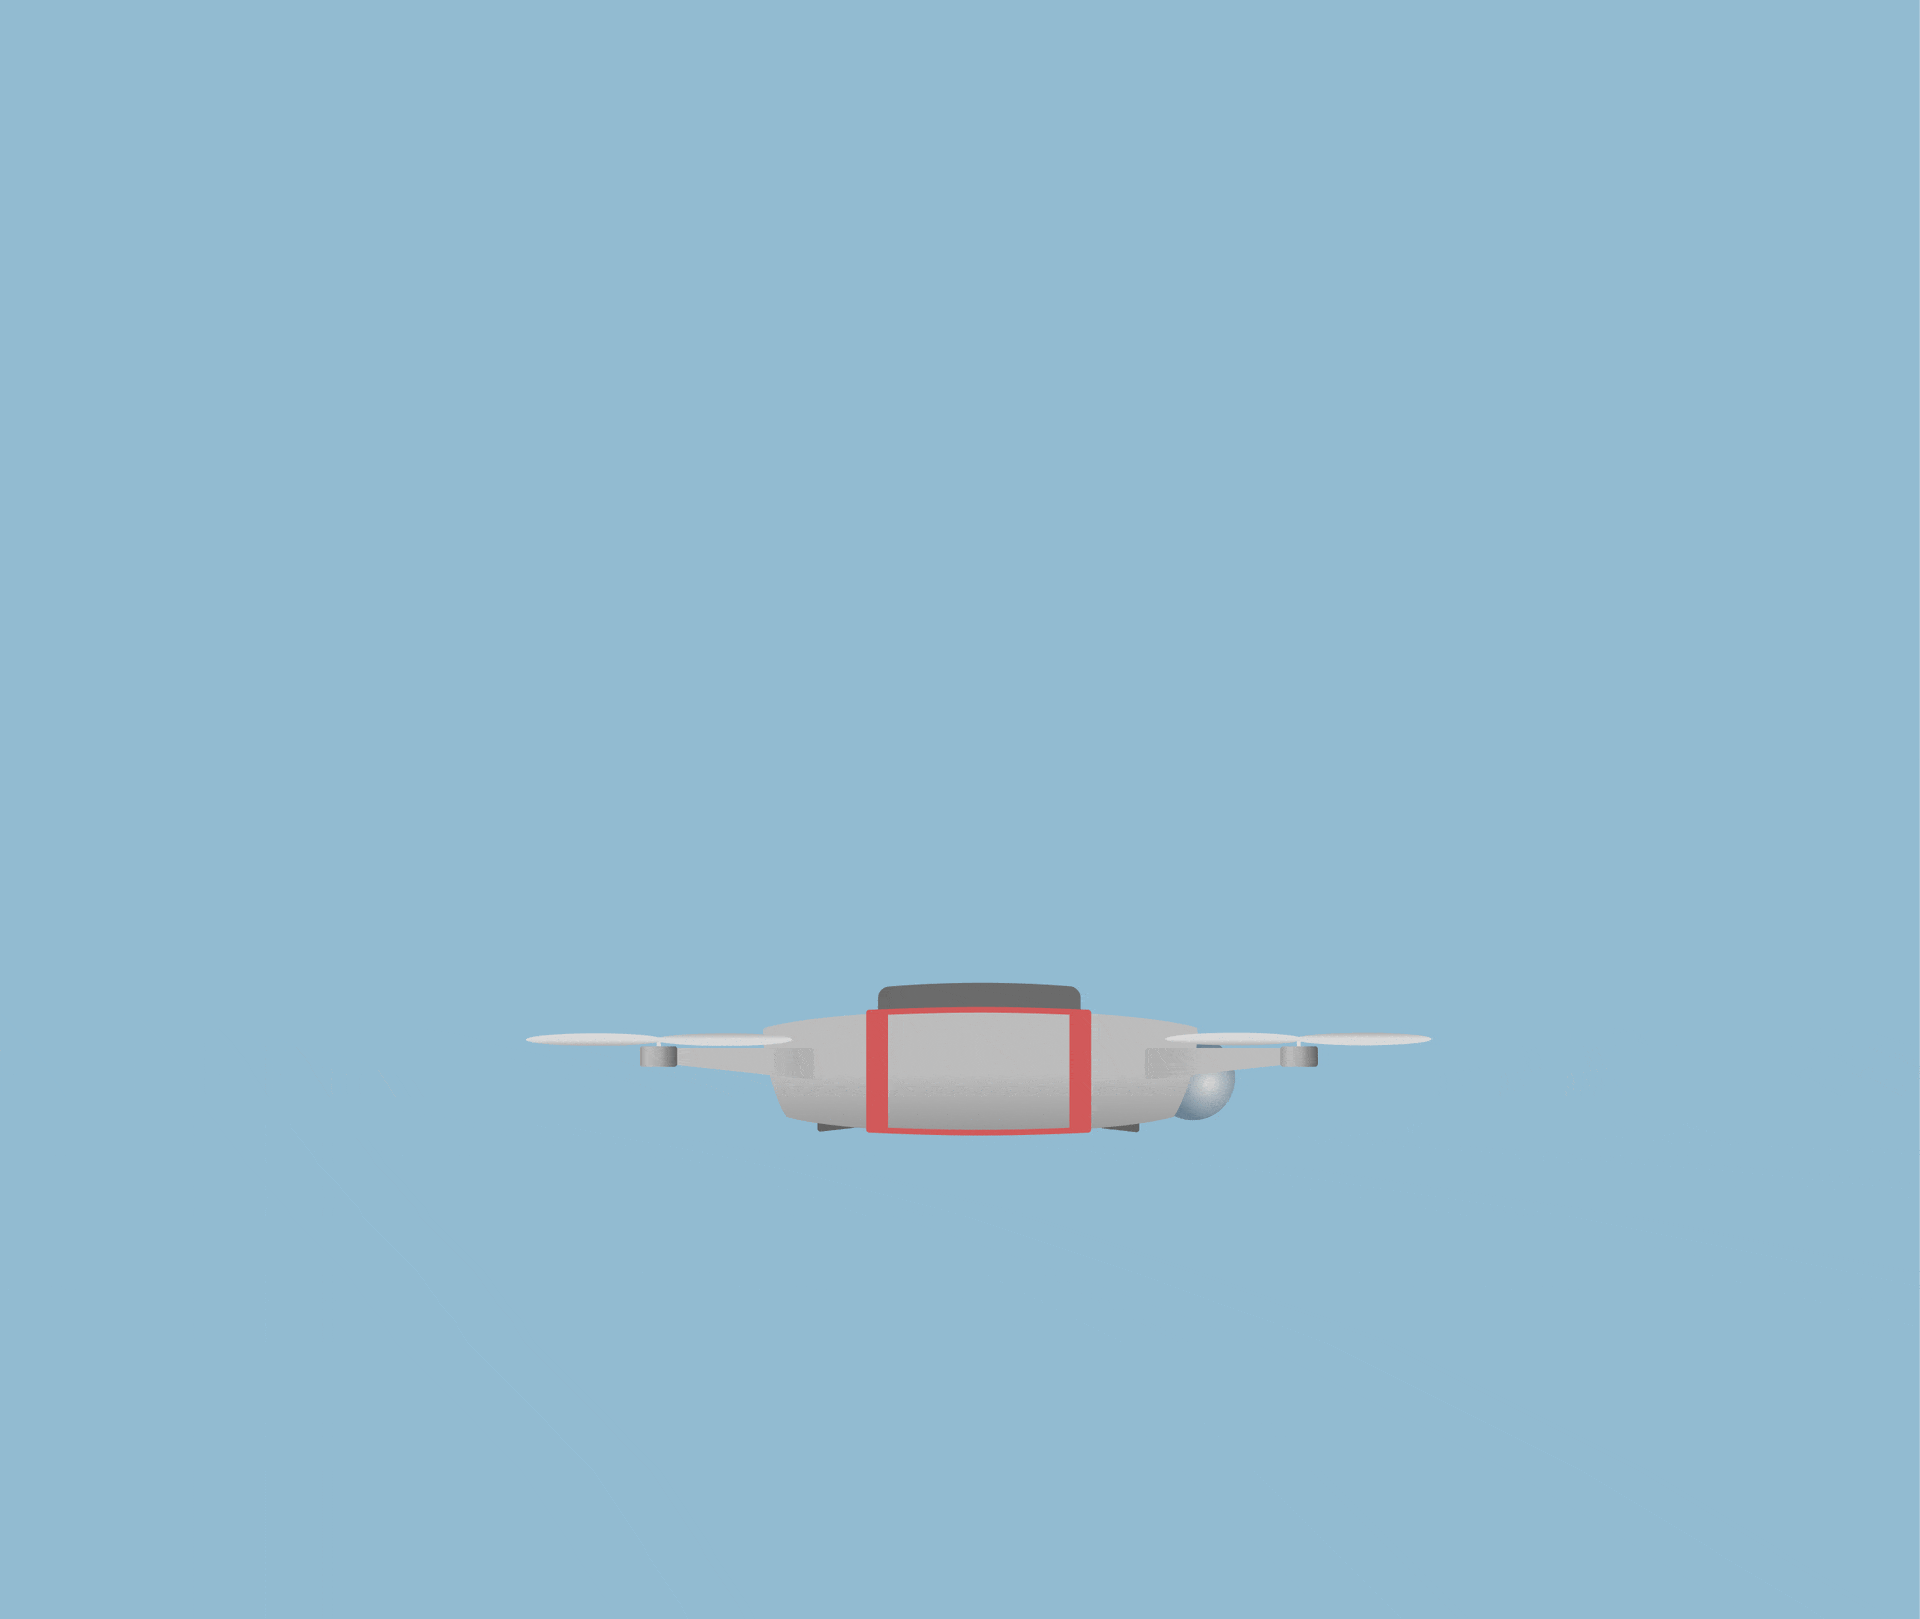
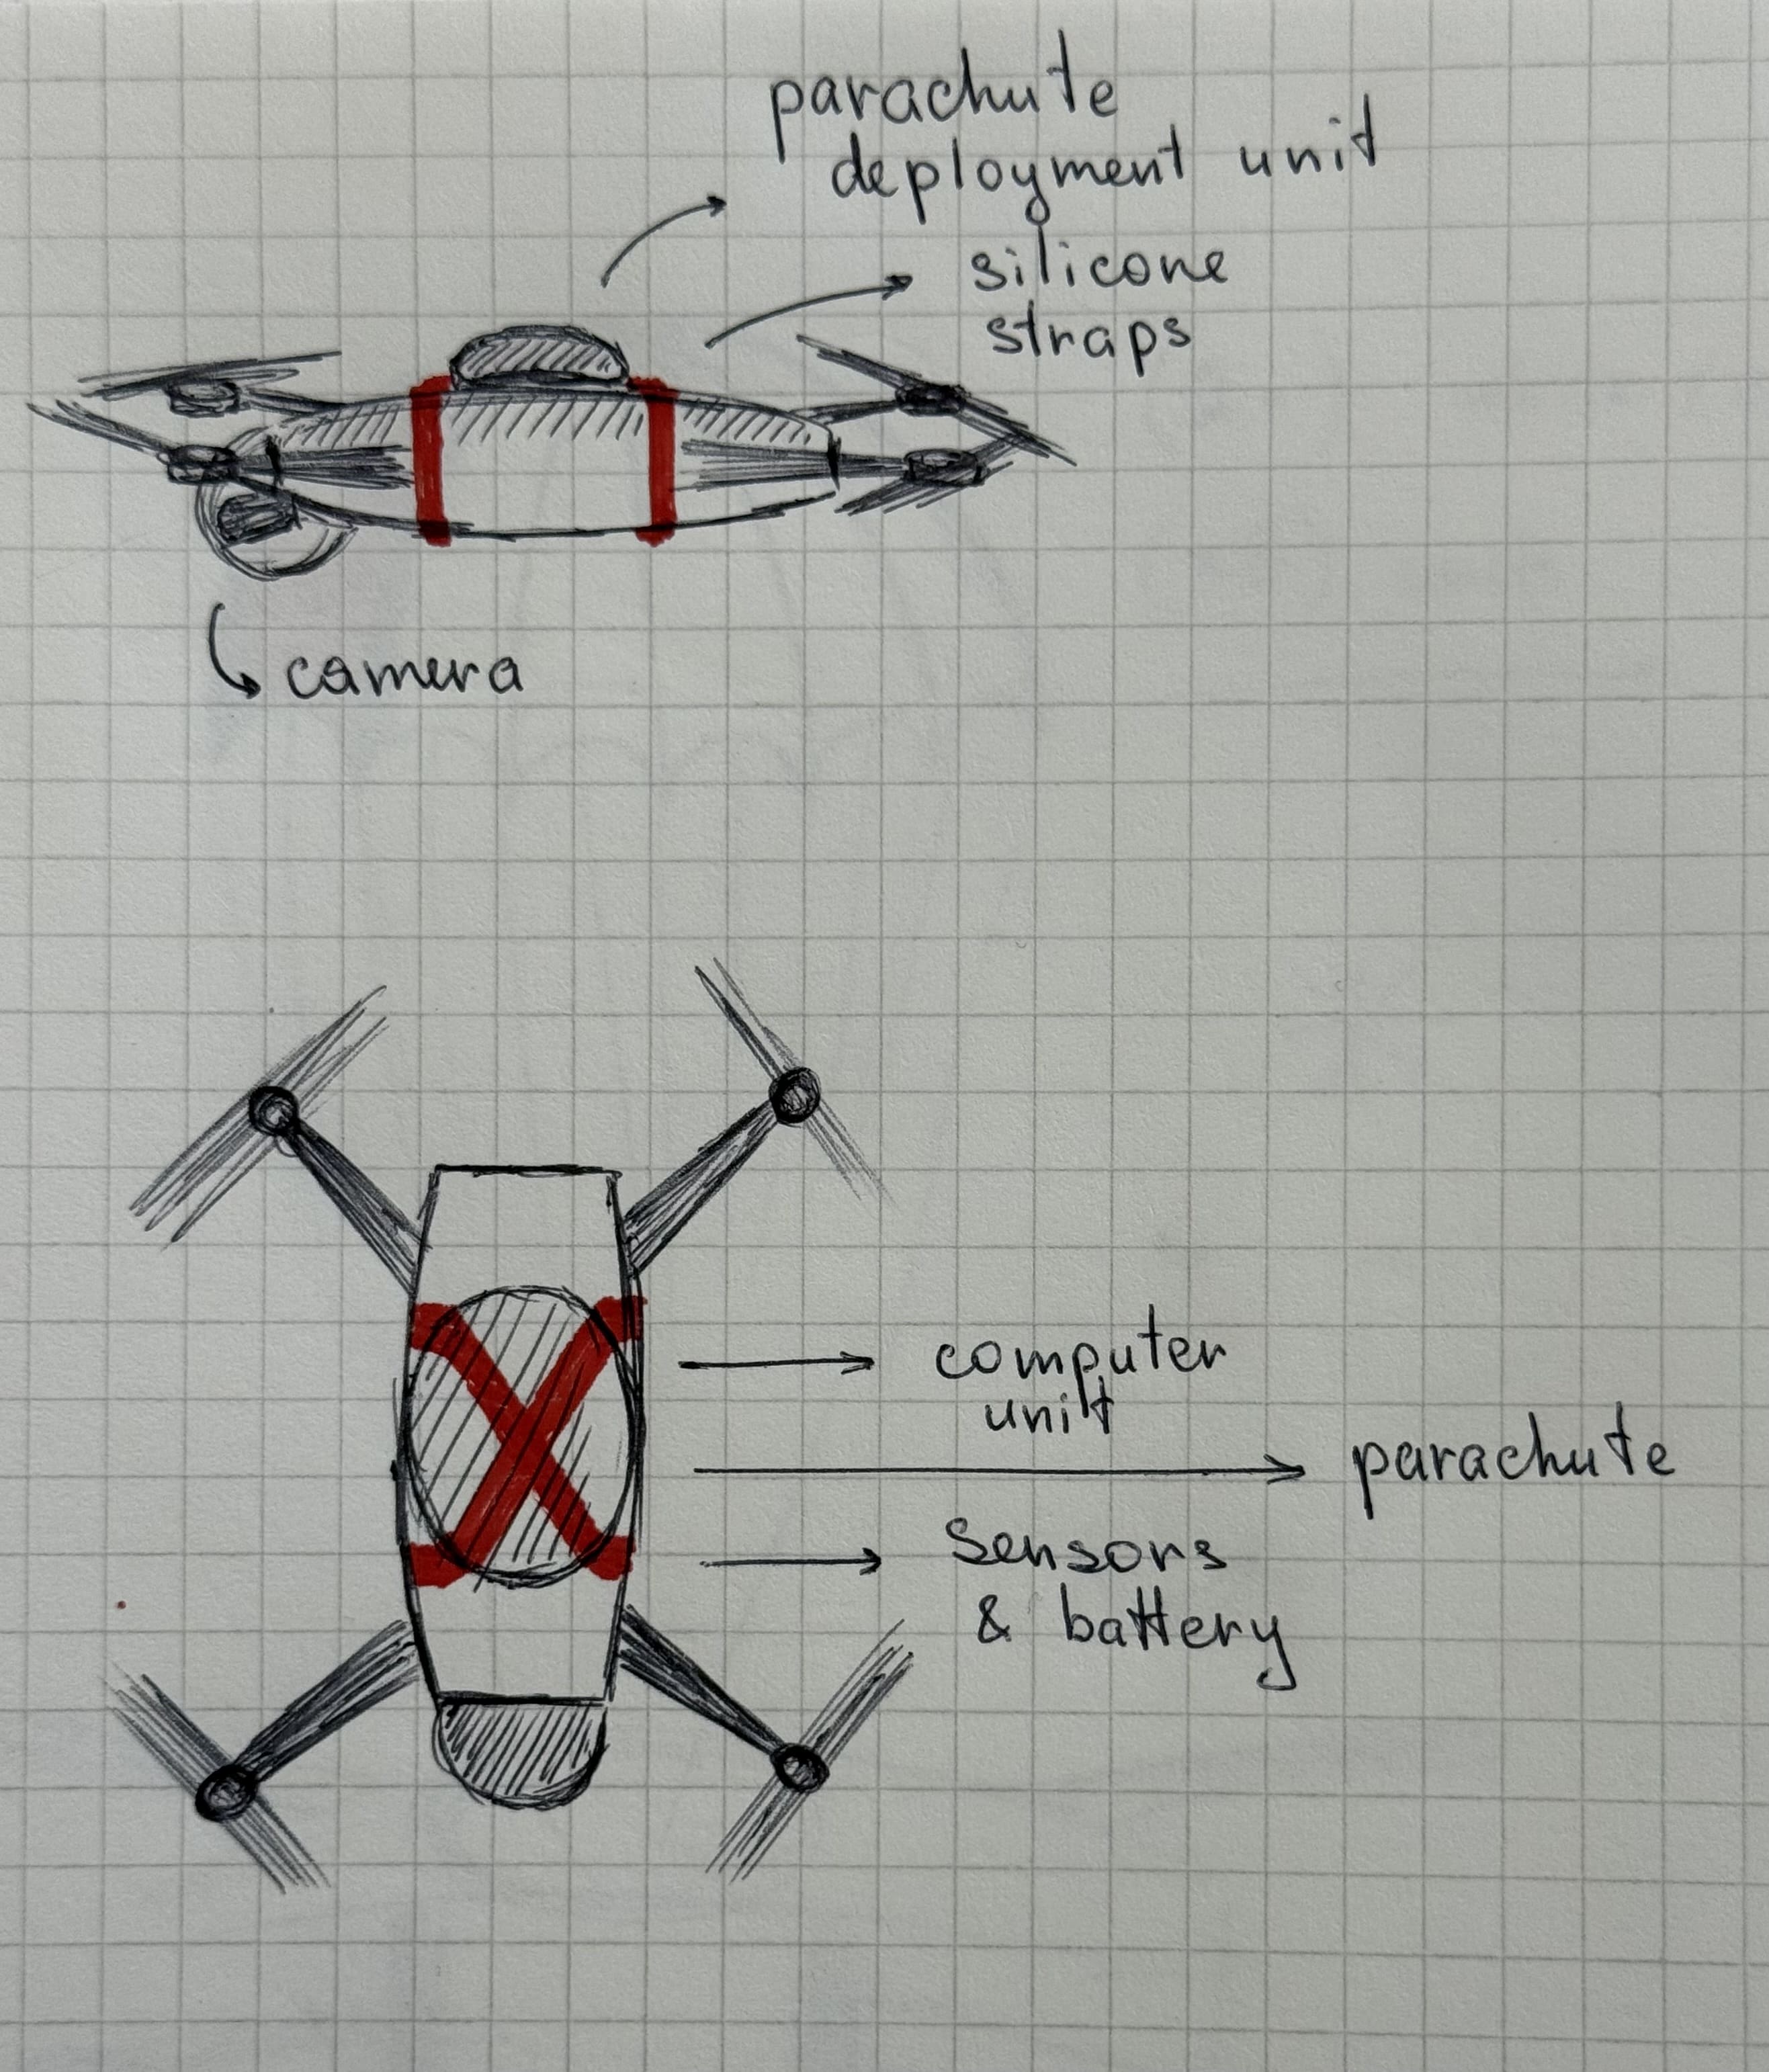
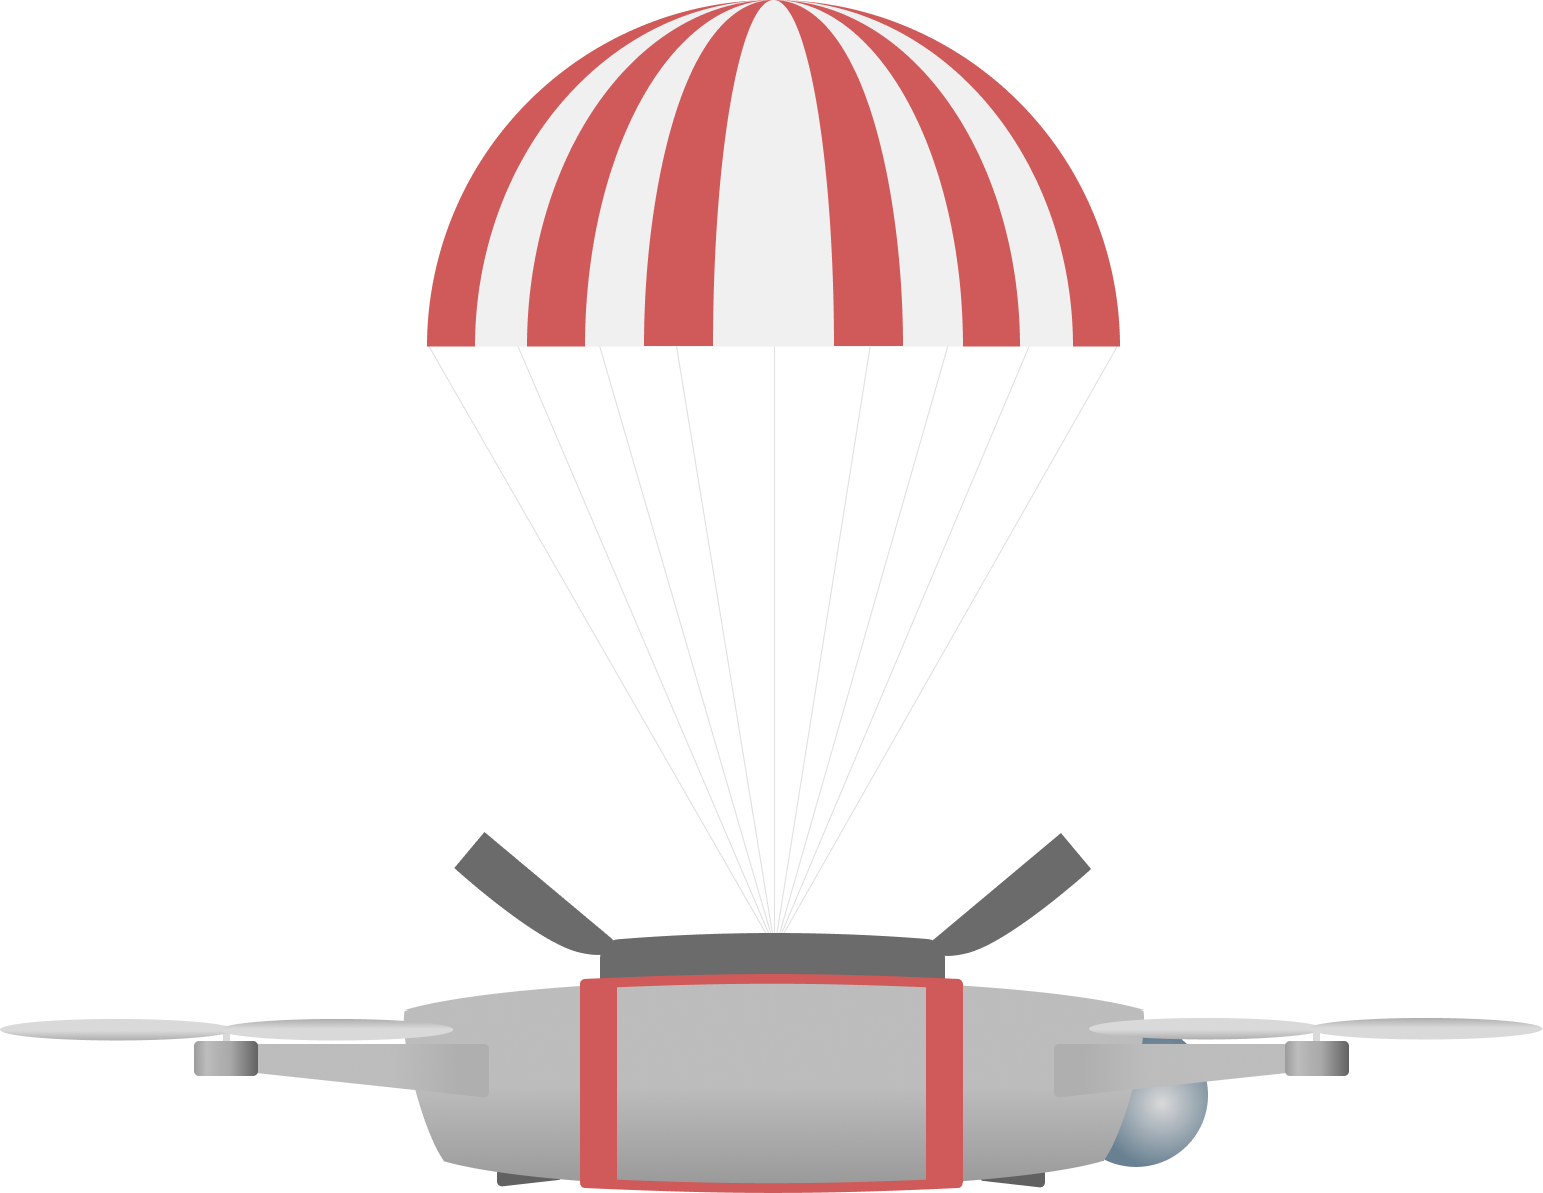
I began making the drone body by intersecting 4 circles: 2 smaller ones for the sides, and 2 larger ones for the top and bottom. After having the main body, I continued with creating other components, such as the straps, parachute chamber, canopy, and the camera dome. Throughout all of these staps I kept on naming the geometries, located on the left-side panel.
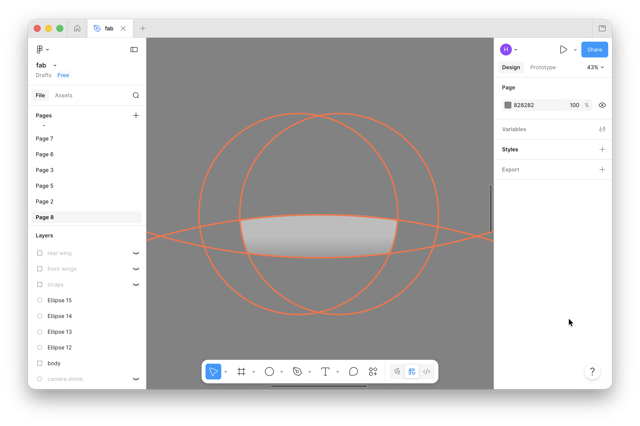
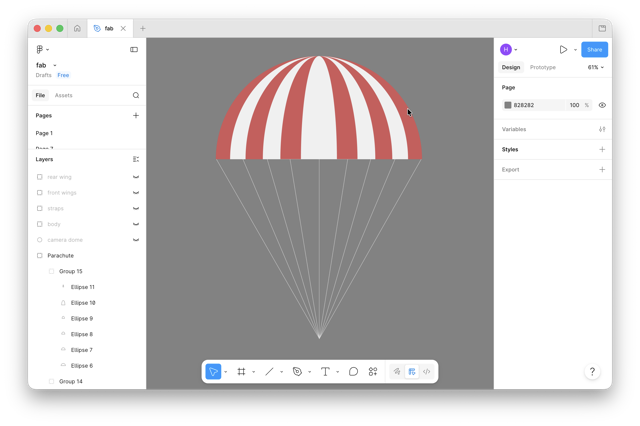
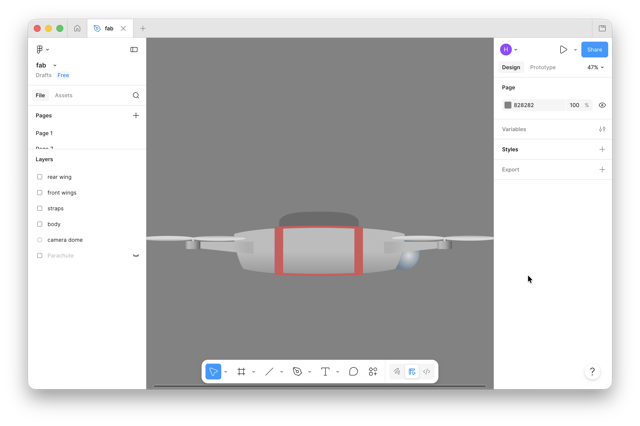
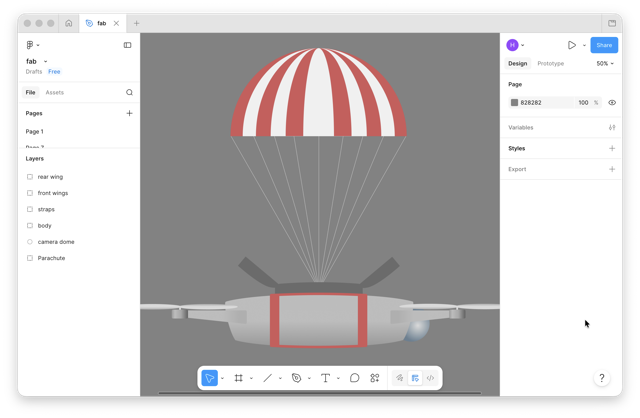
For illustrational purposes, I also changed the background, and highlighted the LEDs located on the doors, and the canopy.

Making a GIF
 Here’s an example of how I use Figma, and have been using for some time now. Through it, I created multiple frames of the drone falling, and deploying the parachute; then animated this all with a
 .gif file. Then I went online, to ezgif.com, and uploaded the folder with all the frames:
GIF maker > Choose Files > Upload Files > Adjust delays > Adjust FPS > Create
Gimp & Inkscape
Although I had downloaded Gimp and Inkscape, I did not proceed to explore much of these apps. I don’t always follow the saying “don’t judge a book by its cover,” and indeed with these app interfaces the first interaction is not as easy, and not very intuitive to navigate through. I mostly get to use these apps only with our lab computers connected to machines, especially Inkspace.
Gimp Step-by-step
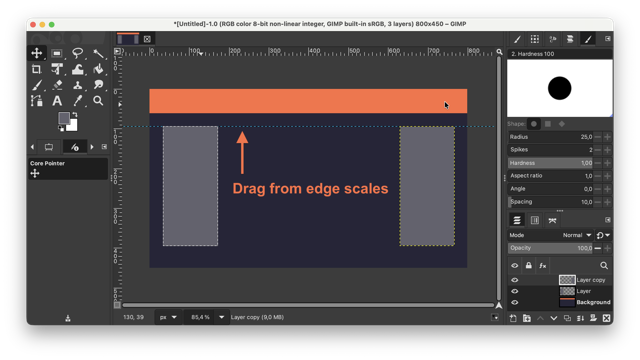
To understand a bit more about Gimp, I made a simple template of my website in dark mode.
 When you first launch the app you need to create a new image, Command + N. Then you type in the desired dimentions.
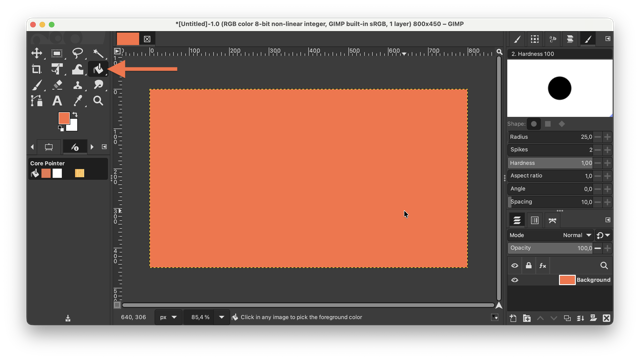
Once you have the image you can create a new layer, Command + Shift + N, and in my case color the layer with the Bucket tool. I filled in the page with my page’s orange hex value.
With the Rectangle Selection tool I created a new shape, and painted it with indigo, and placed two smaller rectangles resempling the assignments and headings on the pages. To align these two lighter rectangles either use the Align tool, or hold and drag a dotted line from the rilered edges.
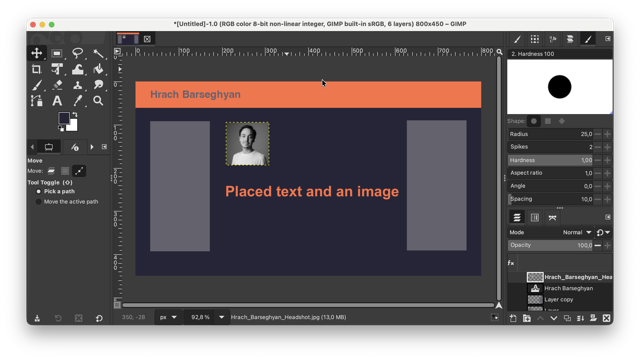
And finally inserted a text box with my name, and a headshot image of mine.
Inkscape Step-by-step
At first I had some trivial issues with downloading Inkscape, which lead me to thinking that perhaps Inkscape is not Mac compatible. Indeed, I did make sure to download the Apple silicon compatible version, but the app would not launch. So, I just bailed on the idea of using the app, but eventually ended up returning to it.
As I have already used Figma, and feel confident in using the app, and orient fast enough to accomplish a simple task I decided to not keep Figma my main tool for 2D vector graphics. But in anycase was still feeling obliged to at least give Inkscape a chance.
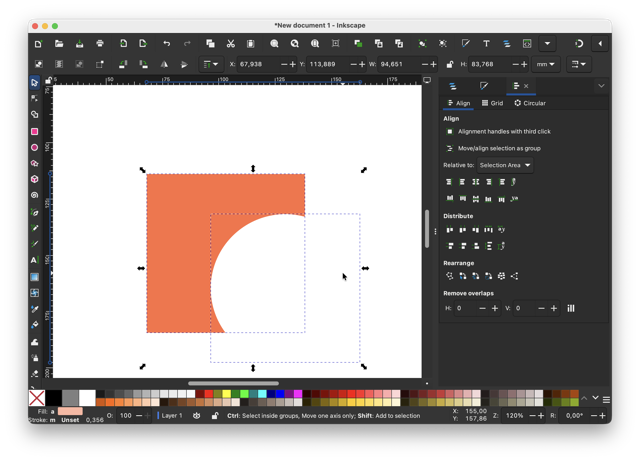
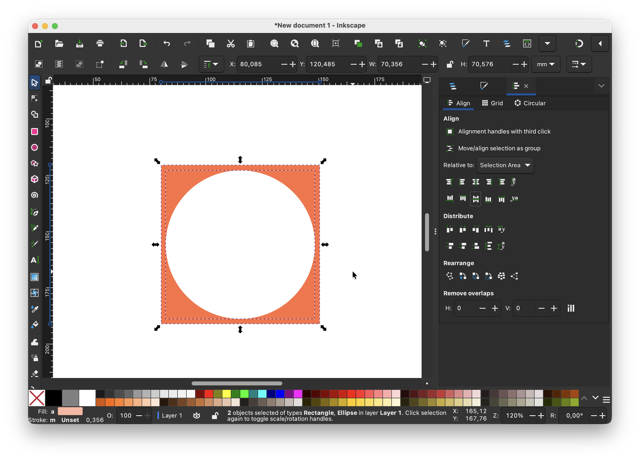
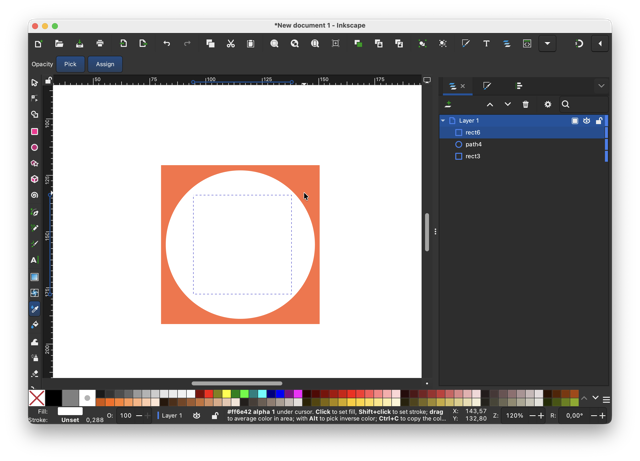
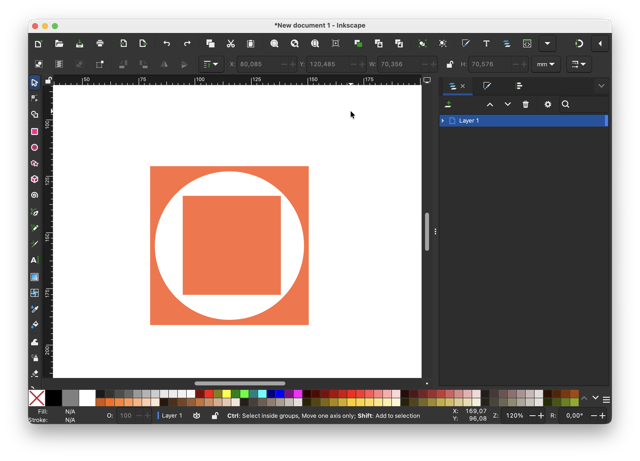
This step by step is by far the simples: a square inscribed in a circle, which already is inscribed in a square. I colored the larger square by changing its RGB value, whereas the saller square was colored by using the pipet tool, in the toolbar, on the left side. Finally, I aligned the shapes by their central axis in the right panel using the alignment tools.
Compressions
Theoratically, there are infinate ways to compress images, and videos, but my top three highlights are: Image Magick, OS-based compression, and Web-based compression.
What to use: JPEG or PNG?
Note, JPEGs cannot have a transparent background, whereas PNGs can! So, in dark mode, in the images below you can clearly notice the difference between the left JPEG file with white background, and color-matched background PNG file on the right.
To get a better understanding about JPEGs I recommend this video!
Image Magick
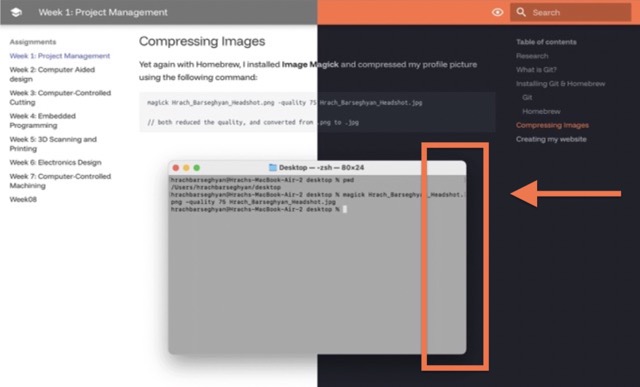
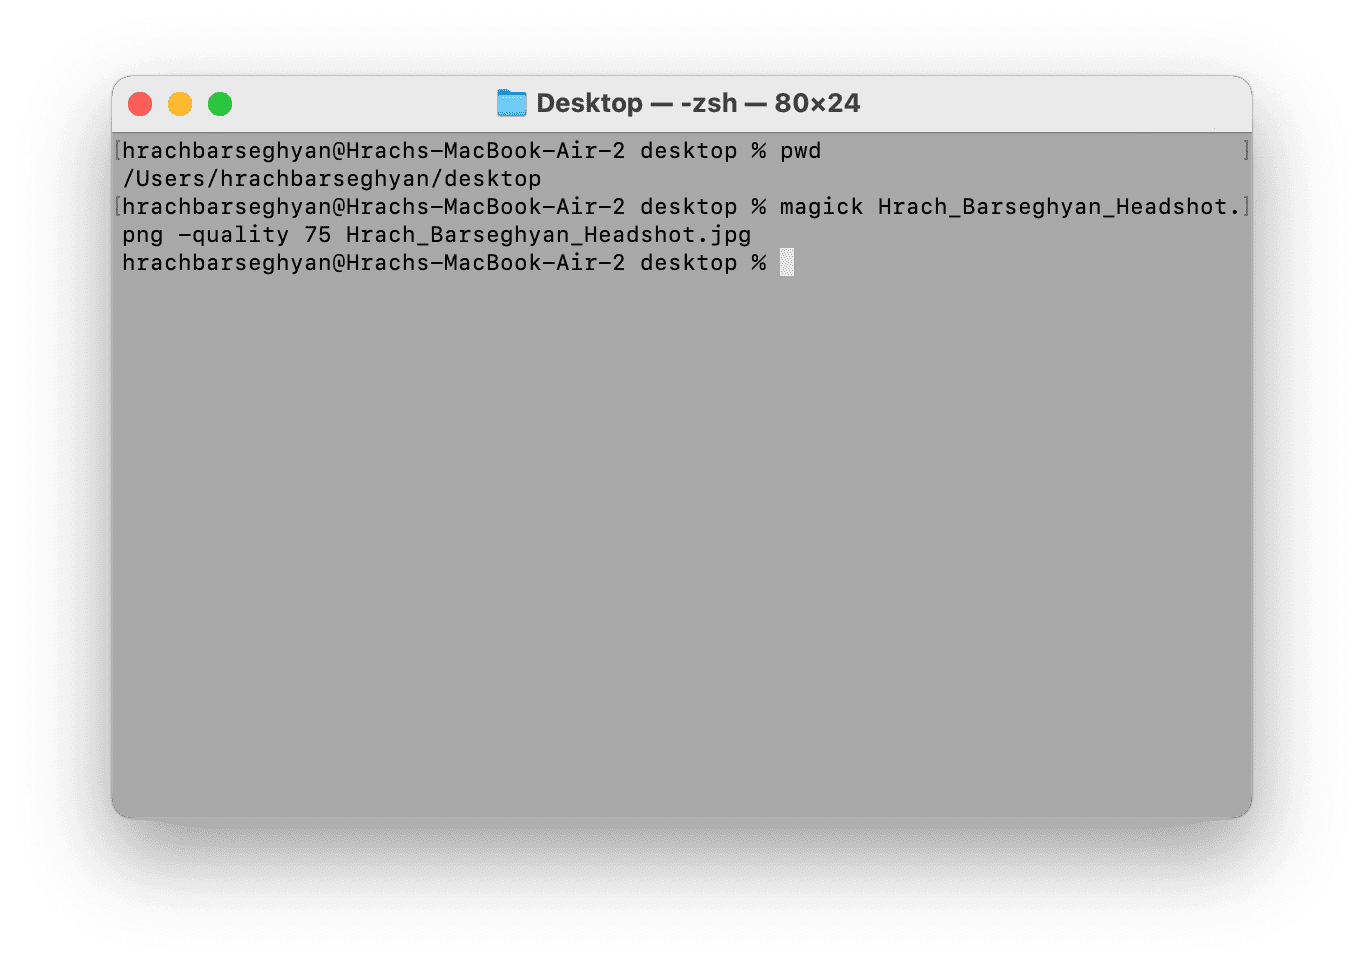
Yet again with Homebrew, I installed Image Magick and compressed my profile picture using the following command:
magick Hrach_Barseghyan_Headshot.png -quality 75 Hrach_Barseghyan_Headshot.jpg

// both reduced the quality, and converted from .png to .jpg
OS-based compression
 For image compressions this method is by far the fastest for me, but I see noticable quality loss over its bit-size. Anyway, on macOS, when you right-click a file, in a dropdown menu go to:
Quick Action > Convert Image > Choose Format & Size > Convert
Web-based compression
Some of the most popular, and user-friendly UI sites are:
Video
.mov format videos. Instead the format should be .mp4.
![]()
Previously, I also have used HandBreak, an open-source tool with a vast amount of video formats. Frankly, not very intuitive, especially if you are not familiar with formats, and their encodings. In any case, I still recomend this tool.
Conclusion
The second week went by faster than the first one. At the end of the week, I realized I should have been more patient and dedicated more time to go over introductory tutorials. I wish I would have learned more than I had!
Resources
• Parachute by Claude
• Parachute by Grok
• FreeCAD Demo
• 2x4 Lego Brick
• TV with Blender
• Template via Gimp
Prompts
Prompt2.1 Create an example to show the difference between raster and vector file formats, using the provided logo. A simple example, no background needed, each format in a separate file.
Prompt2.2 Make an illustration comparing .jpeg and .svg files in one photo. It must show the added white background when saving as .jpeg, whereas with .png there is no background, it is transparent. It is most evident with darker backgrounds, as the white in .jpegs stands out. Additionally, I will give you a logo, please use it in your example, and please keep this all in a single image.
Prompt2.3 Create an OpenSCAD script for a parachute canopy consisting of 16 panels [22.5° each] that form a dome shape, not flat slices. The canopy should be hollow [edge surfaces only], with each triangular panel meeting at the apex and connecting along the rim. Panels must alternate red and white, and the overall shape should resemble a real curved parachute canopy, not a pizza slice or flat/open structure.