Week 5: 3D Scanning and Printing
*Sectional pause of the individual work
Group Assignment
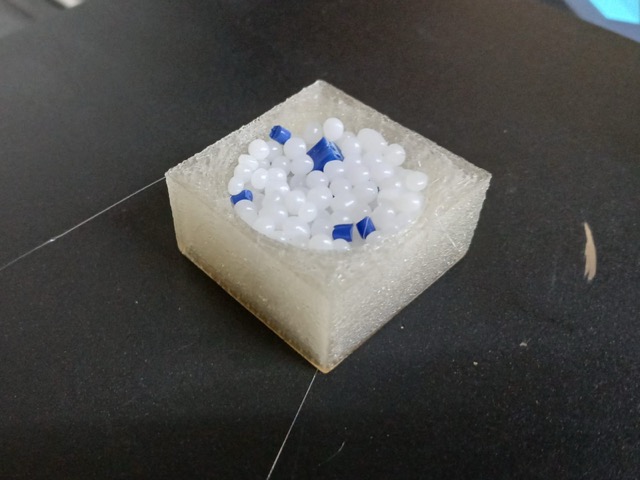
Our group assignment began with introduction to 3D scanning. We used both a Creality’s LiDAR scanner, and also the LiDAR scanner on one of our phones. As one of the phone models had a LiDAR, and the other did not, we tried both camera scanning and LiDAR scanning.
After scanning, we were introduced to 3D printers: heating components, overall servicing, cleaning the beds, how to level both by hand, and automatically. We also had a brief crash course on filament types: their best use cases, pitfalls and caution, also how to store and dry the filaments.
Finally after an overview of printer calibrations, printing test towers, and flowrate tests, we ended up printing our scans obtained by the Creality’s scanner. We first refined the mesh, then sliced it to print.
Safety Training
The printer has three things that can hurt you: a hot nozzle, a hot bed, and moving parts that don’t know your fingers are there.
Bed: 50–110°C, less catastrophic, but easy to forget about.
Motors: pull with surprising force. Don't reach in while it's moving — pause first, tie back hair and loose sleeves.
NOTE: keep filament dry as wet filament pops as water turns to steam at the nozzle.
Common filaments
PETG is what you switch to when PLA isn't tough enough. Prints almost as easily, handles heat and impact better.
TPU is the rubbery one. Great for anything bendy and perhaps strechy. Slow to print and behaves like a noodle instead of a wire in the extruder.
ABS is the LEGO plastic. Strong and heat-resistant, but warps as it cools and releases fumes one should not be breathing. Needs a heated bed, enclosure, and ventilation. Not approved by Neil!
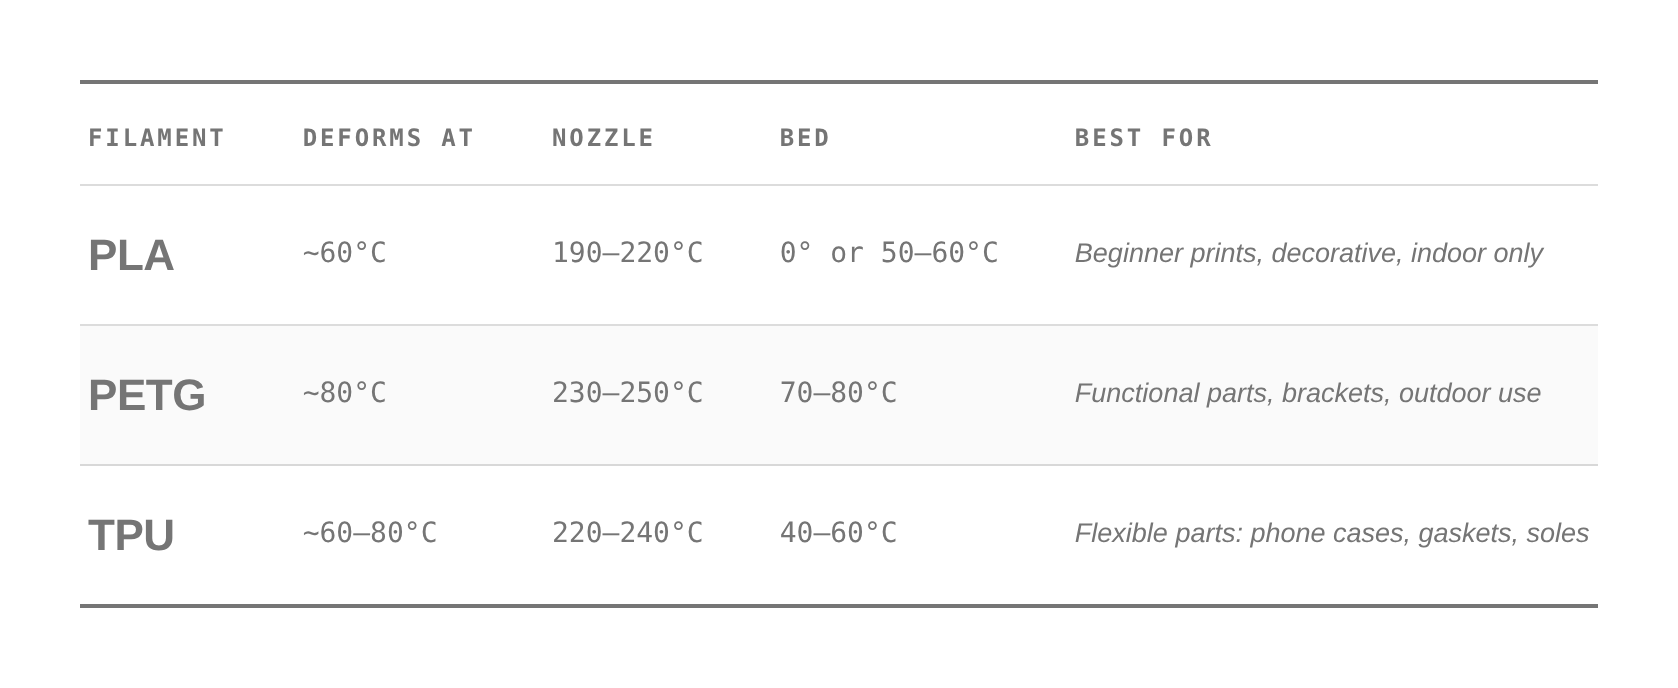
Filament Cheatsheet
Printing temperature towers, flowrate, and other tests, help you avoid common pitfalls and is essential when working with no name filaments.
*Prompt5.1
Slicer
![]() We have been using this free open-soucre slicer, called Orca Slicer. You can downloaad it here, and if you scroll down you will see the instructions for your specific OS.
We have been using this free open-soucre slicer, called Orca Slicer. You can downloaad it here, and if you scroll down you will see the instructions for your specific OS.
I quite like the slicer, though I have not used any other. But from what I have seen online, on YouTube reviews, all of them basically do the same job. Except sometimes printer producing companies end up underdeveloping their native slicers.
A good hack!
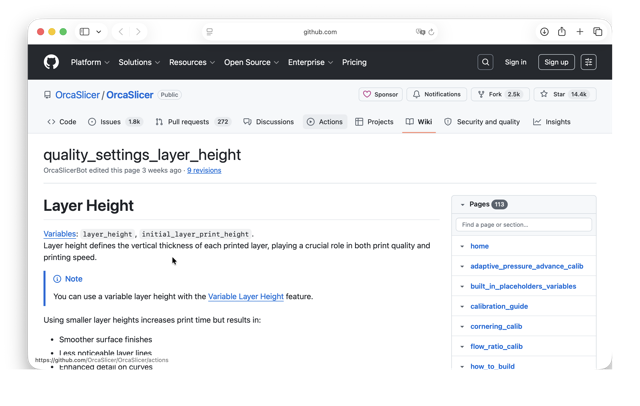
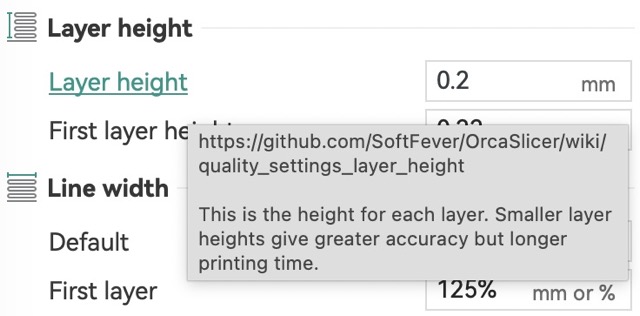 You can hover your cursor over a certain setting, the names are clicking, and will take you to Orca Slicer’s wiki page – describing the specifics of the setting [shown below].
Flowrate Test
Within the slicer you can slice the tests under Calibration, more steps shown in the video.
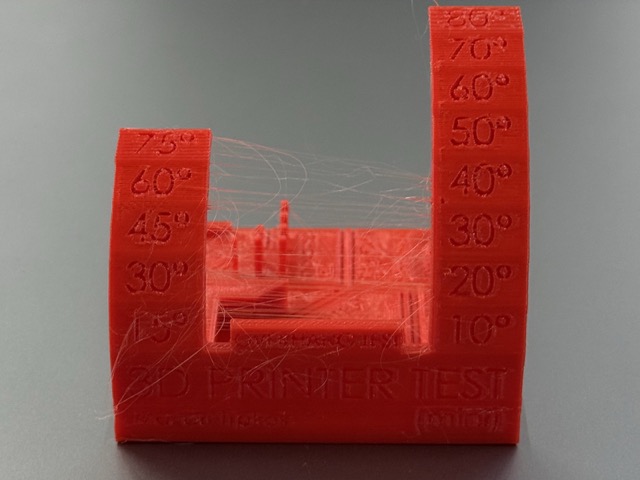
Temp Towers Test
Same as the flowrate test, teh temp tower can be enabled through Orca Slicer [video below].
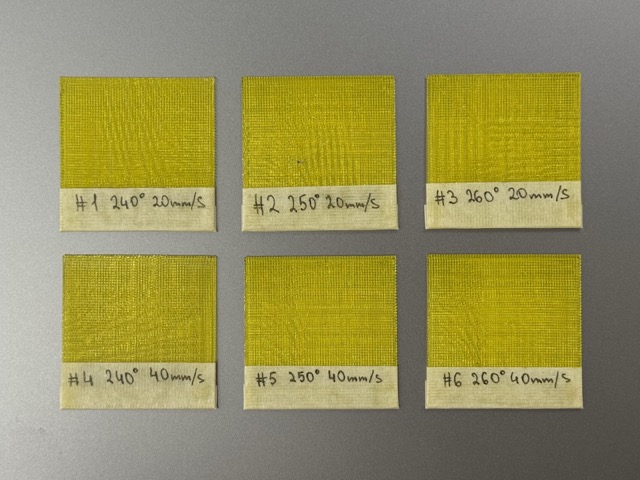
I used 2 printers to compare these temp toweres. On the left image is the Creality Ender 3 V3, and on the right is the Elegoo Neptune 4 Max.
Mixed Test
Overall, the overhangs of the test qre quite good, the embossed details are not bad either. The major flaw is the stringing, which I assumed could have been prevented either by drying the filament, or lowering the temperature.
Are filaments toxic?
Yes, to some extent… When filament melts, it releases ultrafine particles [UFPs] – small enough to slip past your lungs and into your bloodstream. PLA is the cleanest, but cleanest isn’t clean. ABS is much worse. Whereas nylon releases compounds which smells awful.
Food safety is separate. Even “food safe” PLA isn’t really food-safe once printed, because layer lines create microscopic crevices where bacteria move in and never leave.
When prints fail?
Warping: corners lift up. Increase bed temperature, lower the cooling fan speed, or add a brim in your slicer.
Stringing: thin plastic hairs between parts. Increase retraction settings or lower the nozzle temperature.
Under-extrusion: gappy, fragile, or skipped layers. Check for a partial nozzle clog or dry your filament.
Printing Overview
You can design almost anything you can imagine. It doesn’t need molds, it handles crazy curves, and hollow inner parts quite easily. Nevertheless, it’s a total gamechanger for making things perfectly tailored to one’s needs. And what I particularly like about 3D printers is that it can get physical ideas out of the computer and into your hands in hours.
I don’t like the waste it generates. Unlike subtractive methods, which take away far more material than 3D printing does, it only uses mostly what it needs. But supports, and printer poops are still considered waste, yet relatively minor.
Printers are also slow, but they are not as slow as placing an order to a factory which can take up weeks, if not months. It’s also important tu understand that 3D printers are for prototyping purposes, and not production purposes – at least that’s how I perceive them.
Printer chambers are only so big that if you want to make something huge, you have to print it in pieces and glue them together [or make joints].
So frankly speaking, if printers have any negative sides, then all their positive ones cover the negatives!
Individual Assignment
Probably everyone in their youth has played with construction toys like Lego or similar. It has been something I have always found a lot of attrection to, whether its simplicity, sleek design, high quality, or timeless and ageless presence. But Legos also have their drawback of being limited in shapes, and builds, despite having other tech-product series.
3D Scanning
![]() We used Creality Scan which let us connect to the device [image below] and adjust the file right on the computer.
We used Creality Scan which let us connect to the device [image below] and adjust the file right on the computer.
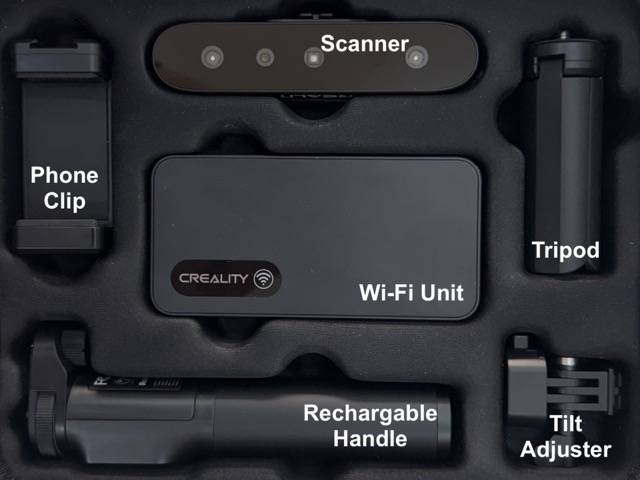
*Creality CR-Scan Ferret [Pro], and all its parts.
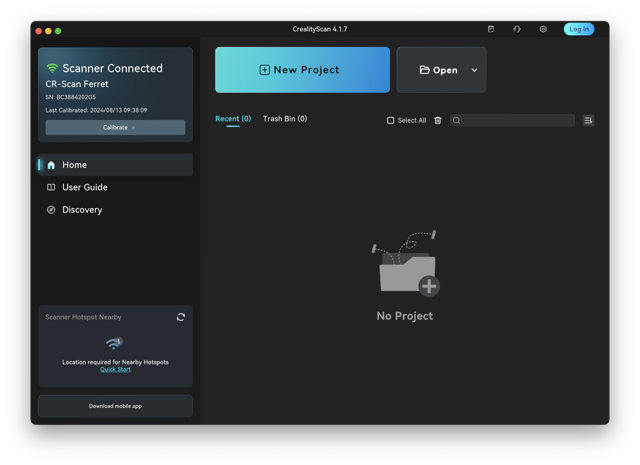
Once the app was installed, we scanned the QR code to install the linked app on our mobile phone whic then would connect to the device via WiFi. The app would let us view the processing result on-device, despite the computer also mirroring the same results.

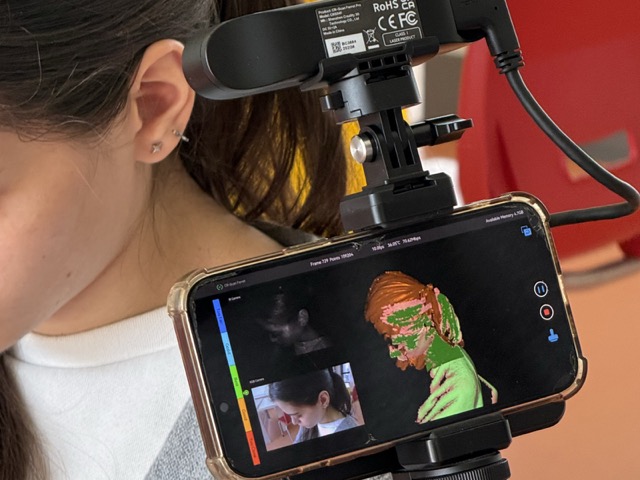
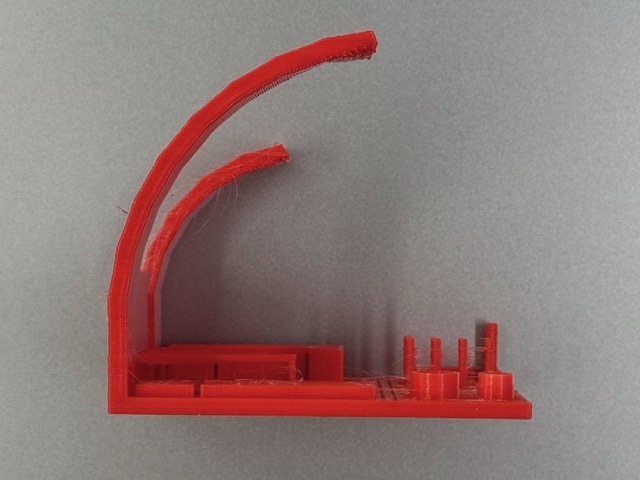
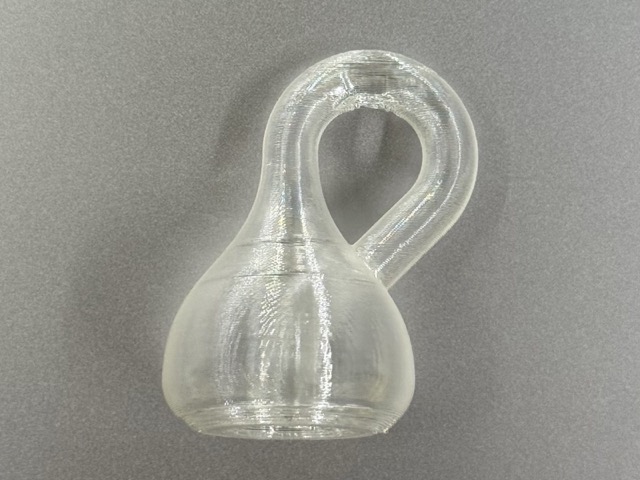
Scanning one another using Ferret Pro paired through the CrealityScan app.
Scan to Print
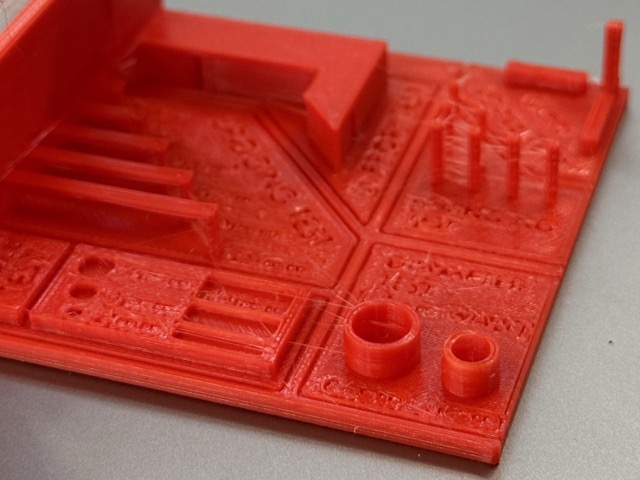
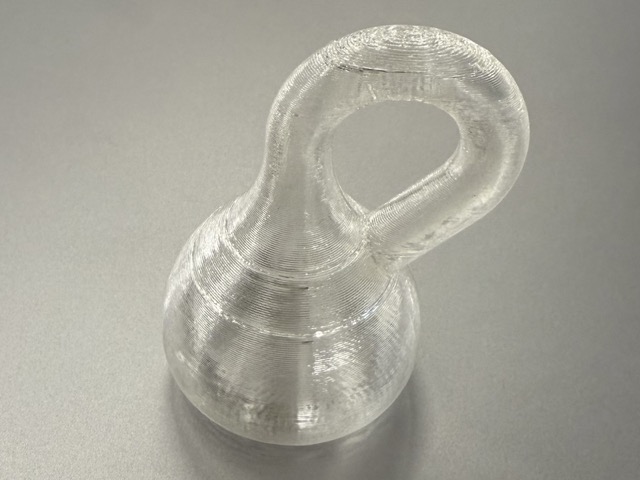
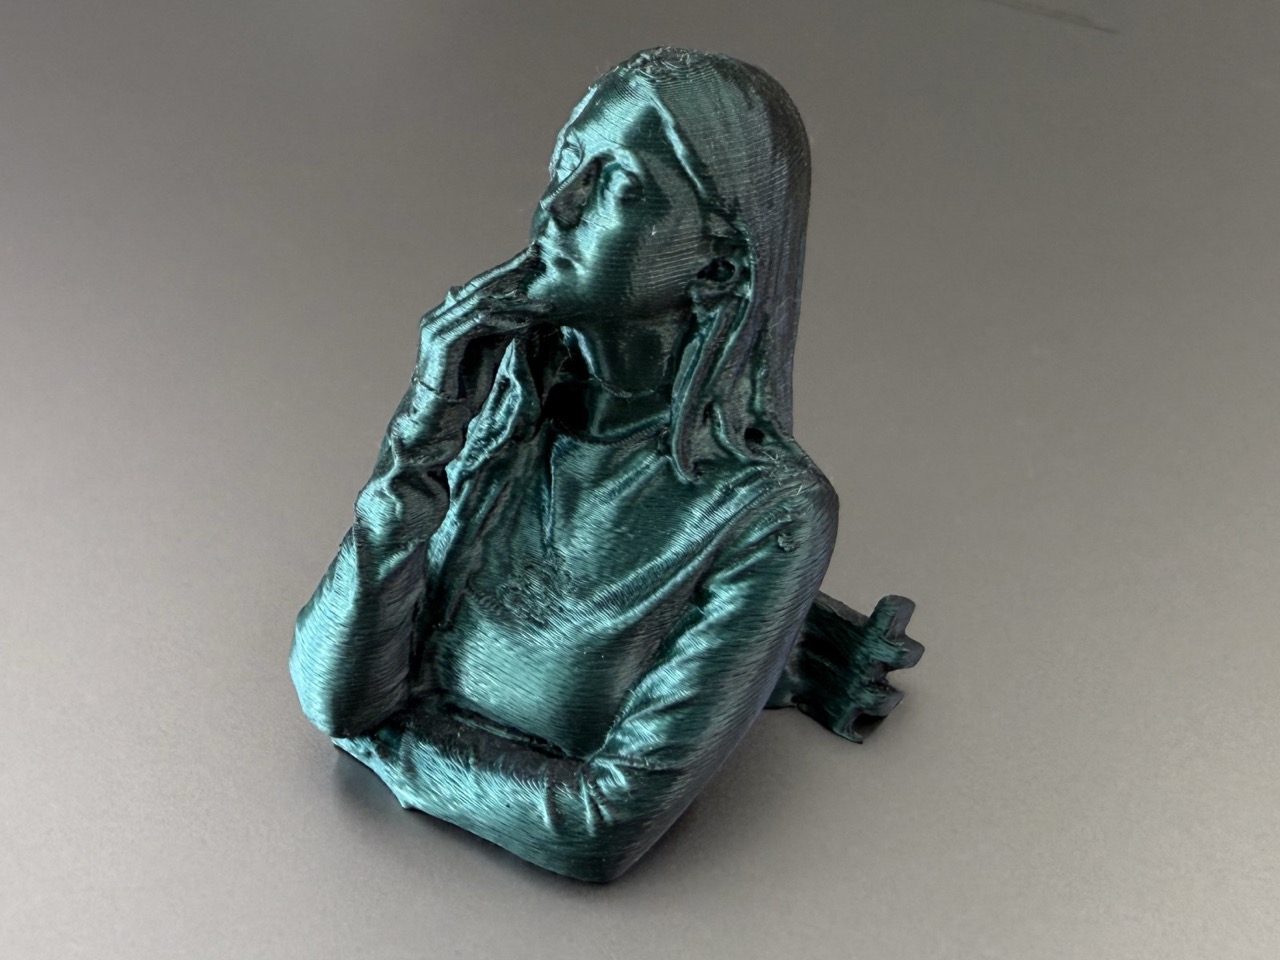 We used Silk PLA to print one another’s scans.
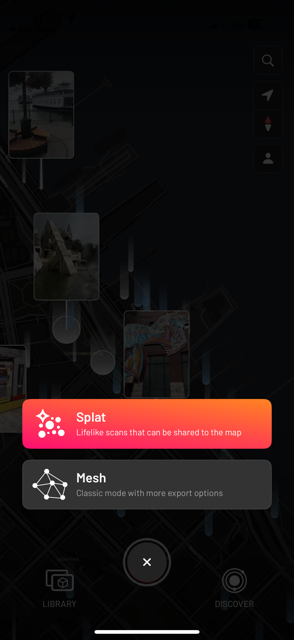
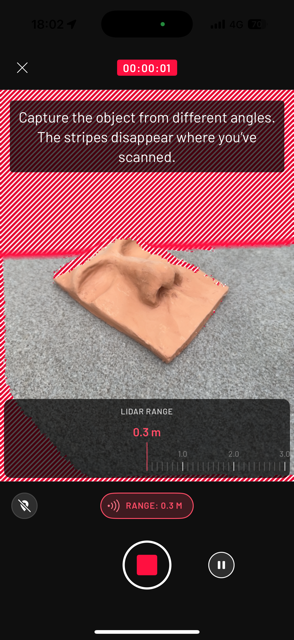
Phone Scanner
![]()
Despite my phone having a LiDAR, I used Scaniverse. The good thing is this app [maybe others too] does not require a the device to have a LiDAR, so you can simple use your phone camera. P.S. I have even used this app to scan an Armenian church.
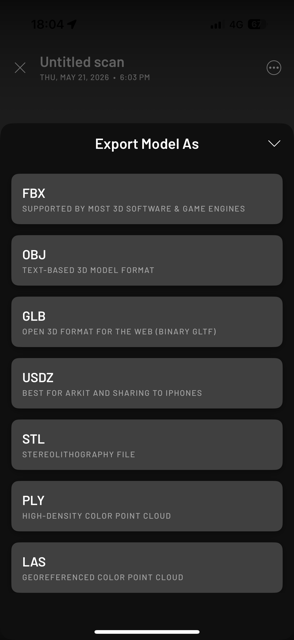
Here’s a step-by-step on how to scan anything using your phone! First you choose a Mesh [this has more export options], then you choose the size of the object, and start scanning. Once complete you choose in which file type you’d like to export.
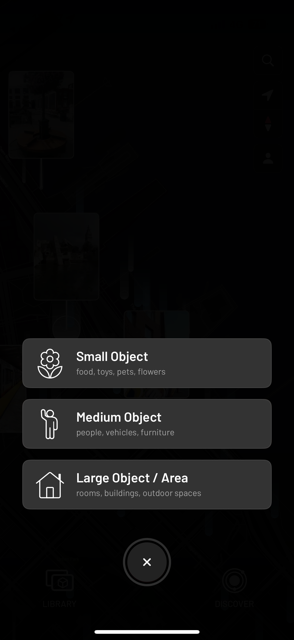
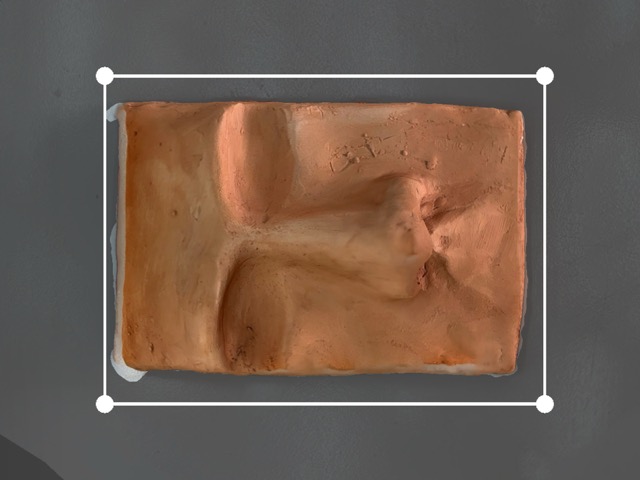
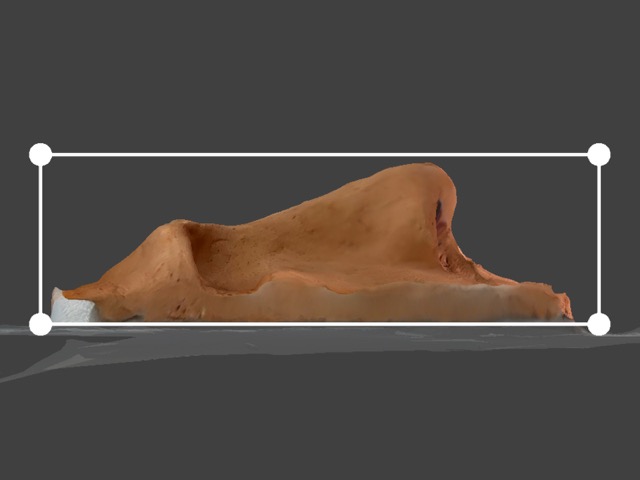
Additionally, in the app, using the framing dots you can adjust export file.
Initial Thoughts
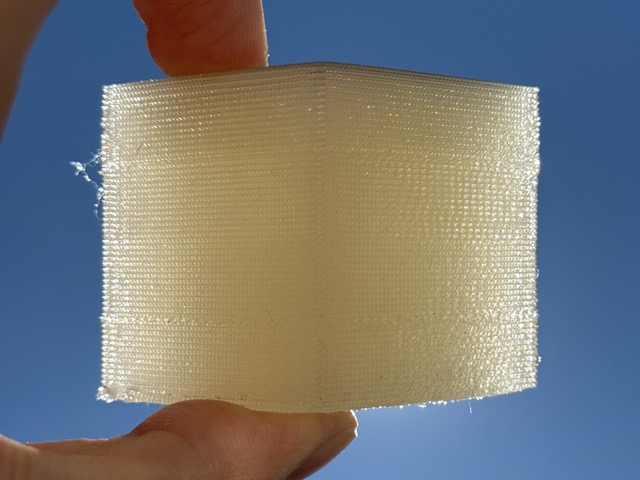
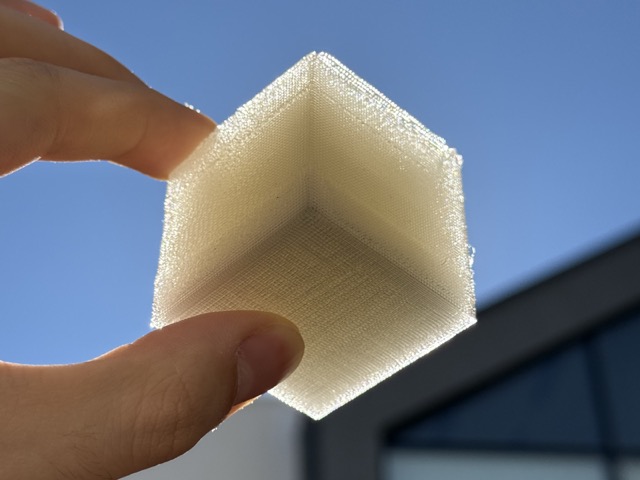
At first I wanted to design a sphere inscribed in a cube. This would be printed with transparent filament, which would show the insides. Indeed, to me this seemed to be a smart workaround which would still satisfy the task.
For this I ended up using PETG, to know why please forward to Test 2, under Experiments.
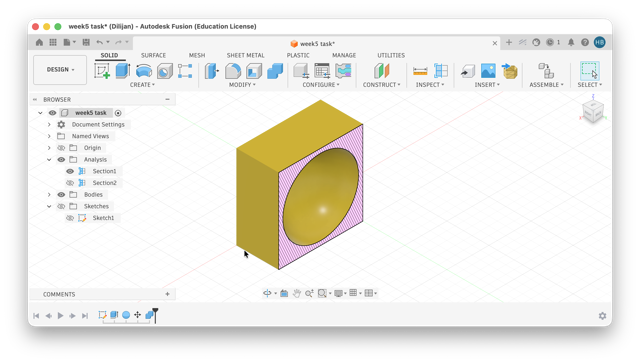
*The sliced view in Fusion.
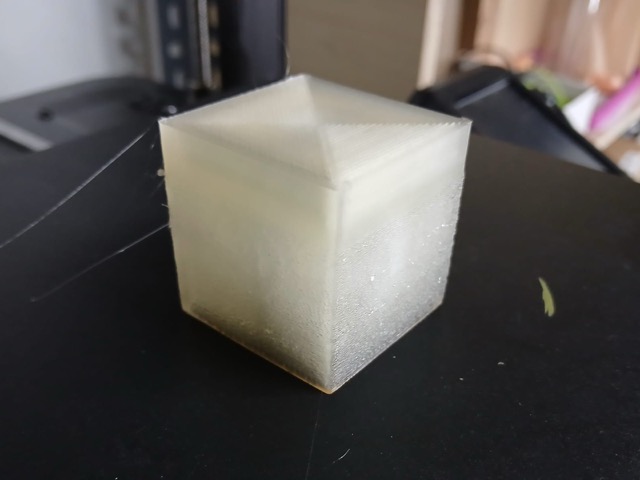
This is a solid block – it cannot be disassambled. If it could be divided into parts then perhaps using usbtractive methods would be another option. But as the cube is translucent, and the inner sphere can be detected with a help of a flashlight, or more transparent print, I believe this would not be achieve otheriwise.
Designing
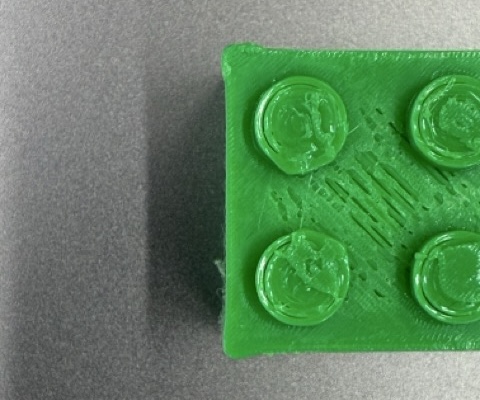
I began with sketching a Lego 2x4 brick. Interestingly enough, I did not look up he dimentions, simply calculated snap-to-fit internal components, although I had a minor miscalculation, and/or I incorrectly chose the shell function in Fusion. Despite the sketch having small outlines, but the inner beams turned our smaller than calculated.
In anycase, to go over the design process follow this link which will take you to my Week 2.
The brick has very narrow and delicate parts. Because of its hollow underside, and internal support tubes subtractive tools would hardly [if not fail to do so] reach these areas.
On the other hand... accuracy! Flipping the tiny brick for multi-sided milling introduces microscopic alignment errors that could potentially ruin the bricks' attachment.
Printing
For printing the bricks I used a regular PLA, and additionally turned ironing the topmost surface on. I did not like how the prints turned out, but it was also quite suspicious to me how all of the bricks had failed walls in the same exact spots.
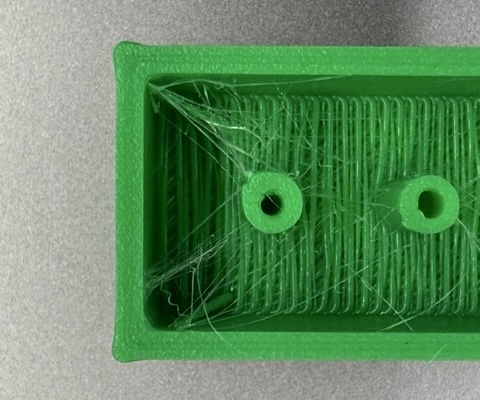
This time I ended up skipping supports. The pieces were small enough already, and when slicing I checked for overhangs which did not seem to be critical. But that did not speak for the fct that there was so much threading inside, which led me to thinking that I probably should have lowered the temperature of the nozzle.
Experiments
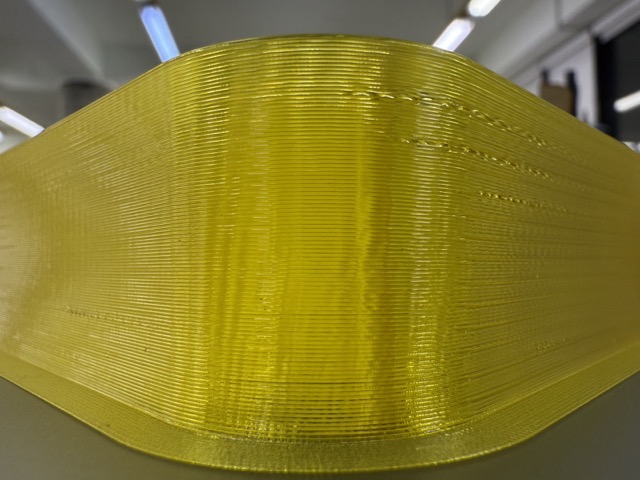
Before getting to printing, I had a big interest in transparent filaments. Though as soon as I got to working with transparent ones, I realized it’s not as appealing as the spools of filaments. I am mainly concerned by the light defusion caused by the thin layers, and the infill type. So I looked into ways of adapting to these factors. While I understand that printed transparent plastic is not the same as an injected plastic objects, I still wish to experiment to achieve good transparency results.
Test 1
It’s important to me to stay efficient and sustainable with my resources, and not to waste much material. But in order not to have failed results, and therefor more unwanted waste, sparing a couple hundred grams on tests seems to be a clever approach.
The object is pretty simple. To test the translucency I printed a 40x40x40mm PLA cube with no top/bottom shells, or outer walls. The cube is devided into four 10mm sections, each increasing the temperatur and speed. To test the translucency, the test object was split into 4 10mm tall layers. First layer 20mm/s at 180C°, then 40mm/s at 190C°, 60 at 200° and 80 at 210°.
The test sample doesn’t have top or bottom layers, neither outer walls — pure 100% infill.
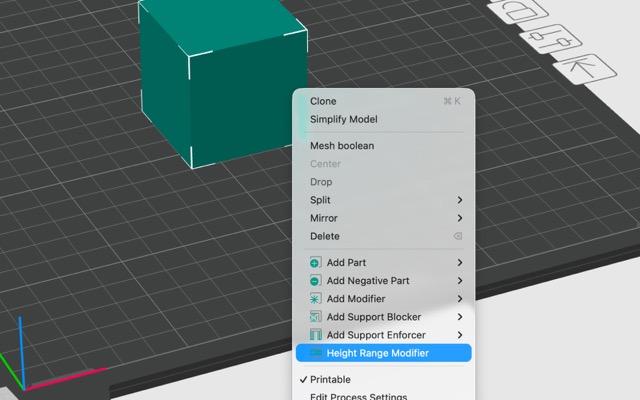
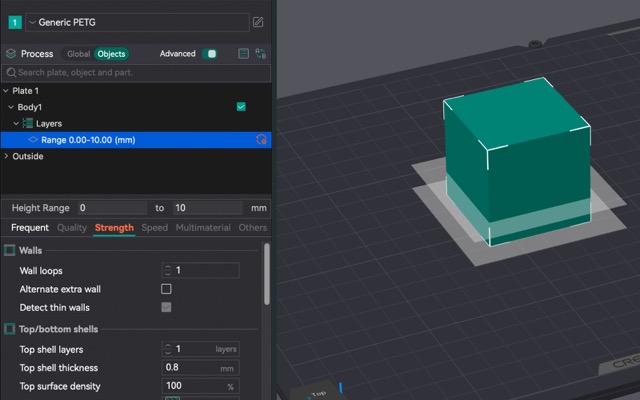
Go to Prepare > Right-click model > select Height Range Modifier > go to Objects panel [on the left] > click Layers > use Plus icon [ +] to create height ranges > Right-click individual ranges > choose Add settings > modify each setting
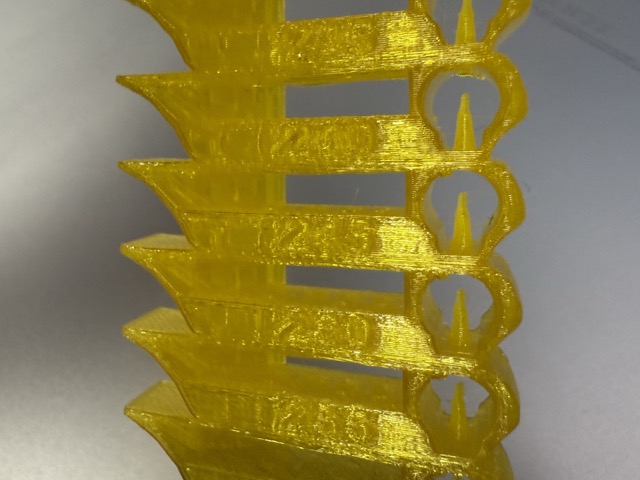
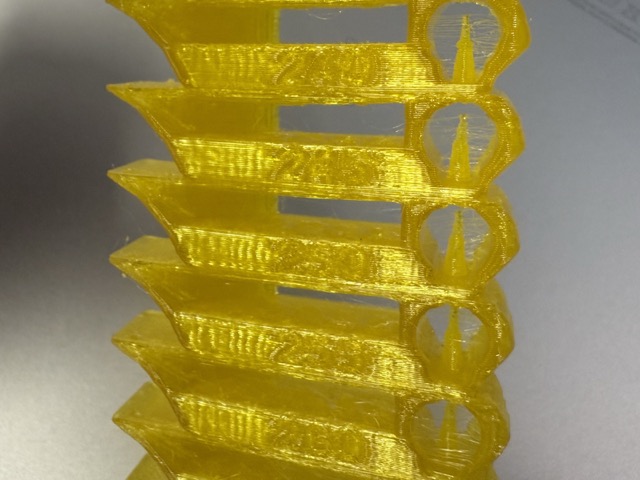
Test 2
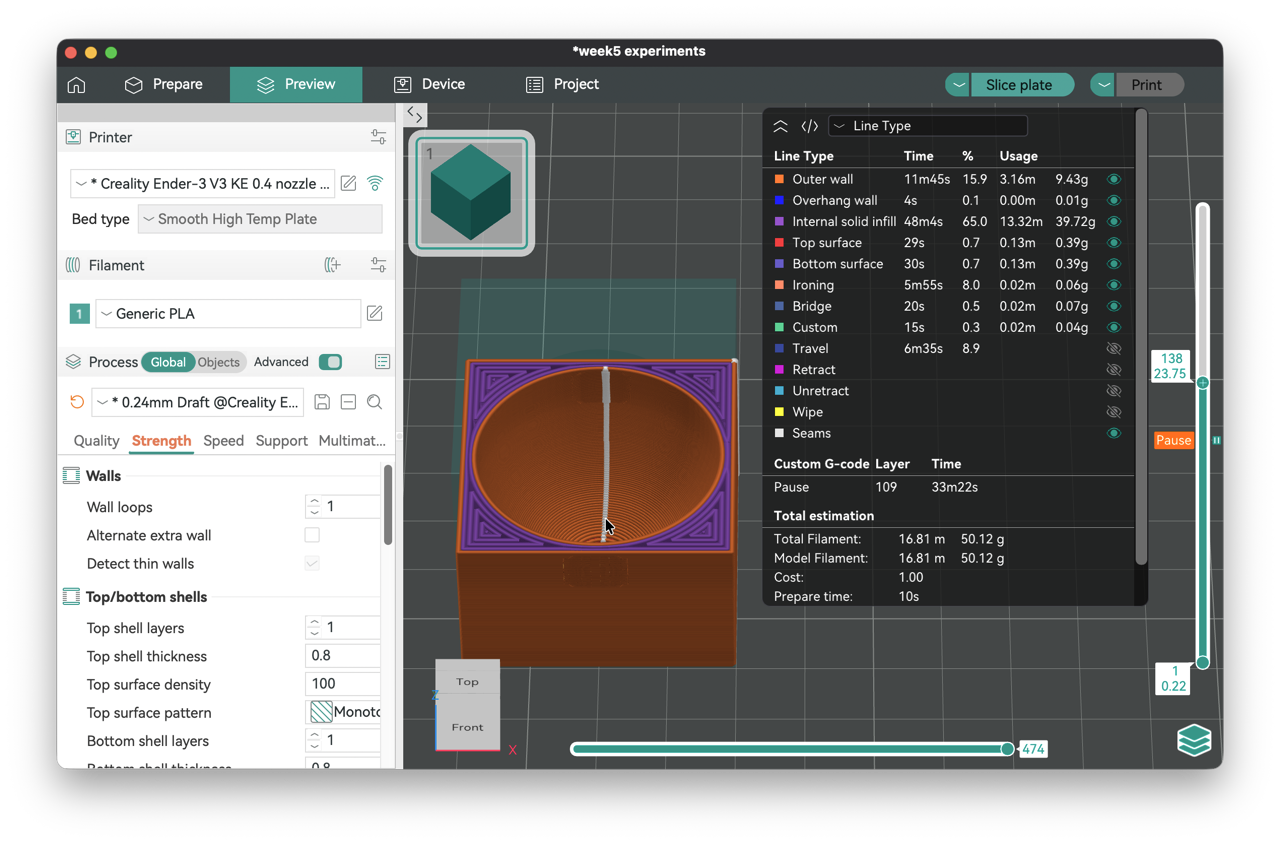
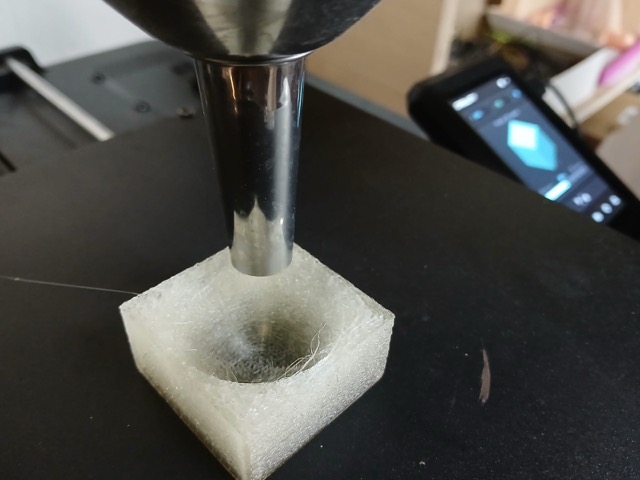
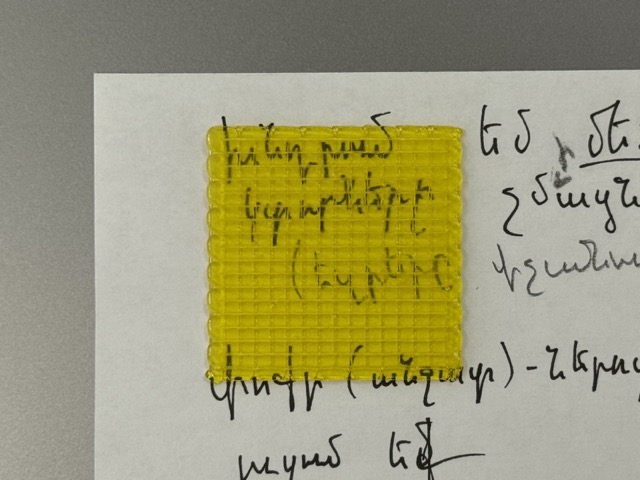
As I did not like the fused design, and therefore the result, I decided to test out a new set of test samples. Later, I also found out that transparent PLA tends to be more cloudy than transparent PETG, so I switched to PETG. I first printed a temperature tower, then a flowrate test, and finally procedeed to the test different variables. Swatches shown and annotated in the images below.
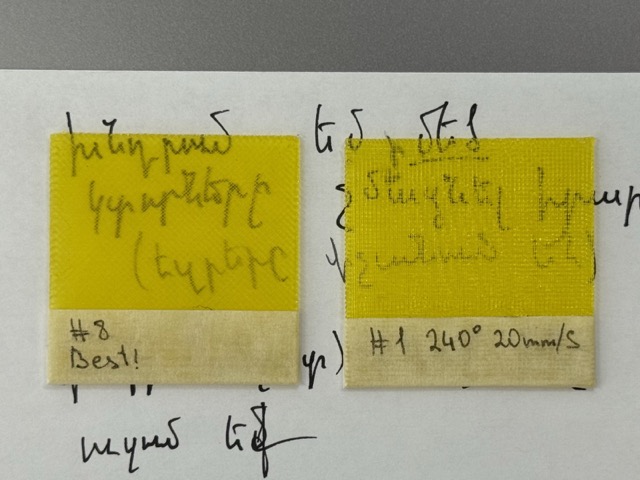
The best results were achieved with rectilinier infill [diagonal movement] no specific temp or speed difference between the swatches, only turning ironing on.
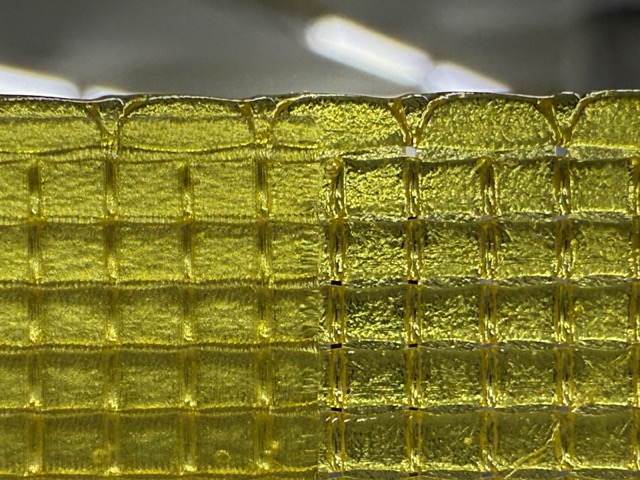
In the two images above you can see a much wider stroke of fillament. This was achieved by tricking the slicer, making it think that the nozzle is 2mm wide, instead of the actual 0.8mm one.
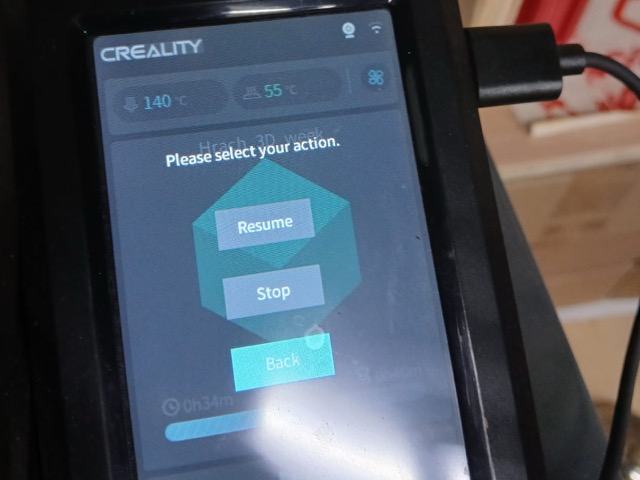
I additionally enabled ironing on the top surface, and stopped printing midway achieving this dual surface effect. The more matte image is where ironing was on, and the more shiny side [left side of the print] is where ironing was turned off.
Test 3
When I first read the requirements for the individual task, first thing that came to mind was a Klein Bottle. While I will not go into the proof of why it is a one sided object, I believe it is enough to say that one of the only ways to make one is not subtractive for sure.
While I have not yet developed good CAD skills yet, I could not acheieve a good Klein Bottle design. As I would need to design the file myself I struggle faily to create one in FreeCAD. So, to complete the task I decided to ask ChatGPT, Claude, and Grok to come up withe the 3D model of a Klein Bottle in OpenSCAD. In fact, I did this experiment before, but not for a Klein Bottle. Check out week 2’s OpenSCAD section.
P.S. As this would not satisfy the task criteria, I decided to put this in the experiments’ section.
Conclusion
When I had first heard of Fab Labs, I though the only thing they do is use 3D printers, which I found to be very limiting for a maker space. It’s not a surprize how people precieve 3D printers to be the future, but interestingly enough we are living that theoretical future.
Working with a 3D printer was something I have been looking forward to for a very long time. In fact, I had once placed an order for a 3D model I purchased online from this one freelancer. This was 2 years ago, and it did not occur to me that I could find a way to tie these two together, meaning, I’d both design and print a file myself. So, my inital expectation of Fab Labs being limited to 3D printers has drastically shifted.
Resources
STL
• 2x4 Bricks
• Sphere in a Cube
• Test 1
• Test 2
• Mariam’s Scan
P.S. Mariam’s .stl file was too large to push onto GitLab, please download from Google Drive.
3MF
• 2x4 Bricks
• Sphere in a Cube
• Test 1
• Test 2
G-Code with Pause
Prompts
Prompt5.1 Make a trabsparent background png cheatsheet table for PLA, PETG, and TPU — showing the temperature each one starts to soften, plus the nozzle and bed temps needed to print them. Also a “best for” column which should tell which one to grab depending on whether you want something pretty, something tough, or something bendy.