What I Built
I created a demonstration of the Nokia 5110 LCD display (84x48 pixels) using my Xiao RP2040 board. The demo shows text centering, display rotation, and contrast adjustment capabilities.
Display rotation
Text centering
Contrast control
Measuring the stepper motor's power consumption revealed how load conditions dramatically affect power requirements. I learned that current limiting is not optional but essential for safe operation. The most surprising discovery was how much power the motor consumes even when idle due to holding current.
This knowledge will be crucial for designing proper power supplies and managing thermal considerations in future motor control projects.
Exploring retro display capabilities with modern microcontroller
I created a demonstration of the Nokia 5110 LCD display (84x48 pixels) using my Xiao RP2040 board. The demo shows text centering, display rotation, and contrast adjustment capabilities.
Display rotation
Text centering
Contrast control
Compact but powerful microcontroller
84×48 pixel monochrome display
For making connections
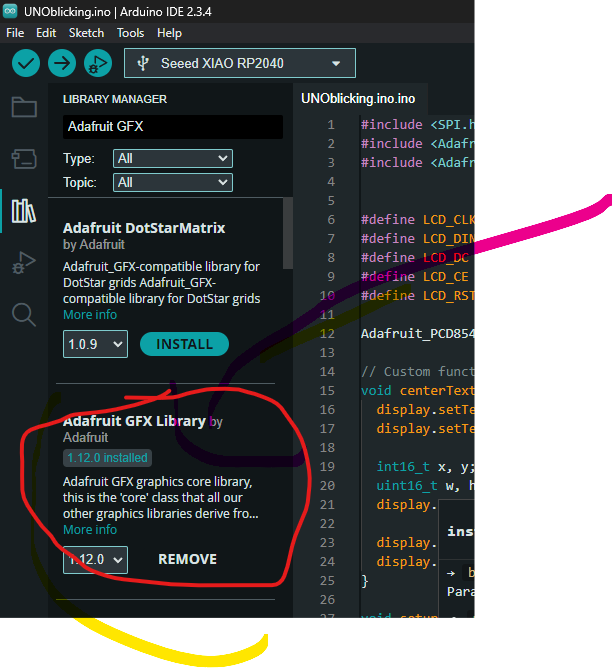
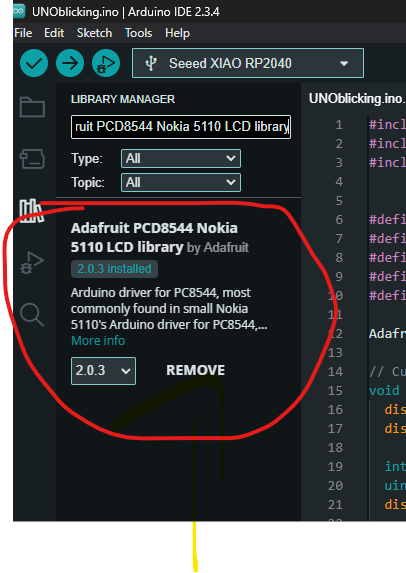
I installed the following libraries through the Arduino Library Manager:
I wired the Nokia 5110 to my Xiao RP2040 like this:
| Nokia 5110 Pin | Xiao RP2040 Connection |
|---|---|
| CLK (SCK) | D8 |
| DIN (MOSI) | D10 |
| DC (Data/Command) | D3 |
| CE (Chip Enable) | D2 |
| RST (Reset) | D0 |
| VCC | 3.3V |
| GND | GND |
The Nokia 5110 LCD is controlled using SPI communication. My demo shows several key features:
Here's the Arduino code I used:
#include <SPI.h>
        #include <Adafruit_GFX.h>
        #include <Adafruit_PCD8544.h>

        #define LCD_CLK   D8  // SCK
        #define LCD_DIN   D10  // MOSI
        #define LCD_DC    D3  // Data/Command
        #define LCD_CE    D2  // Chip Enable
        #define LCD_RST   D0  // Reset

        Adafruit_PCD8544 display = Adafruit_PCD8544(LCD_CLK, LCD_DIN, LCD_DC, LCD_CE, LCD_RST);

        // Custom function to center text
        void centerText(const char *text, uint8_t textSize = 1, int16_t yOffset = 0) {
          display.setTextSize(textSize);
          display.setTextColor(BLACK);

          int16_t x, y;
          uint16_t w, h;
          display.getTextBounds(text, 0, 0, &x, &y, &w, &h);

          display.setCursor((display.width() - w) / 2, (display.height() - h) / 2 + yOffset);
          display.print(text);
        }

        void setup() {
          Serial.begin(115200);
          Serial.println("Nokia 5110 LCD Demo");
          // Initialize display
          display.begin();
          display.setContrast(60);  // Adjust contrast (0-127)
          display.setRotation(2);   // 180° rotation
          display.clearDisplay();
          // Display startup message
          centerText("Manzi Armel Test", 1, -10);
          centerText("Rotated 180°", 1, 0);
          centerText("Fablab", 1, 10);
          display.display();
          delay(2000);
        }

        void loop() {
          // Animation sequence
          for (int i = 0; i < 4; i++) {
            display.clearDisplay();
            display.setRotation(i);  // Cycle through rotations

            // Draw a rotating rectangle
            display.drawRect(10, 10, display.width()-20, display.height()-20, BLACK);
            display.fillCircle(display.width()/2, display.height()/2, 5, BLACK);

            // Show current rotation
            centerText("Rotation:", 1, -10);
            centerText(String(i * 90).c_str(), 2, 5);

            display.display();
            delay(1500);
          }

          // Contrast adjustment demo
          for (int c = 10; c < 70; c += 5) {
            display.clearDisplay();
            display.setContrast(c);
            centerText("Contrast:", 1, -10);
            centerText(String(c).c_str(), 2, 5);
            display.display();
            delay(200);
          }
}SPI.h: Handles SPI communication with the displayAdafruit_GFX.h: Provides graphics functionsAdafruit_PCD8544.h: Nokia 5110-specific driverBuilding an access system with XIAO RP2040 will help me with final project
I created access control system that combines RFID authentication with visual feedback. When users scan their RFID cards, the system instantly verifies authorization and displays the result on a classic Nokia 5110 LCD screen.
I used the rfid in the previous input device week09
RFID card reading
Nokia LCD feedback
LED status indicators
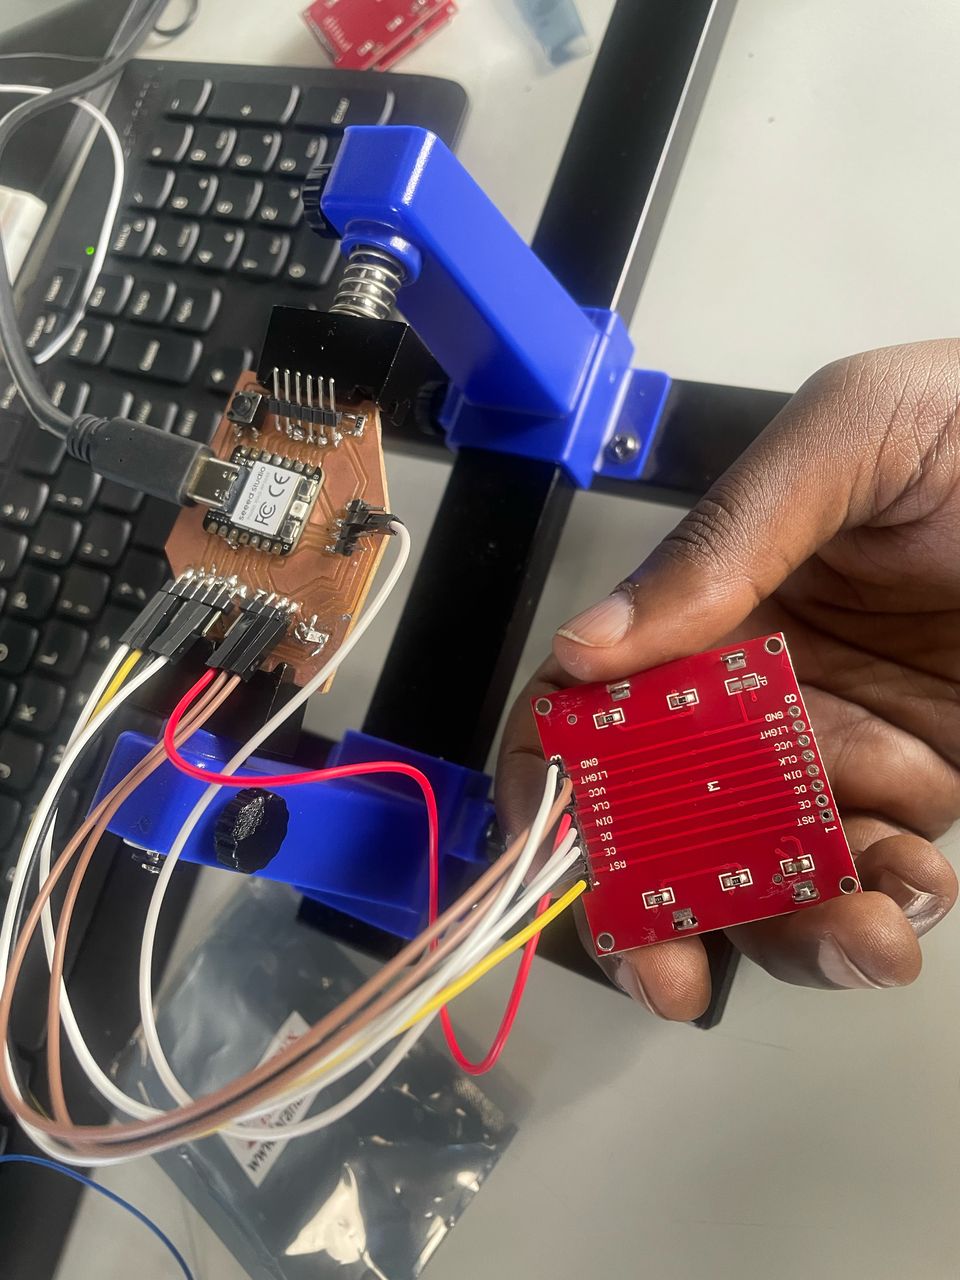
Here's what I gathered from my workbench:
The brains of the operation - small but powerful!
My security guard - scans cards up close
Retro display with crisp pixels
Connecting everything required some careful pin planning:
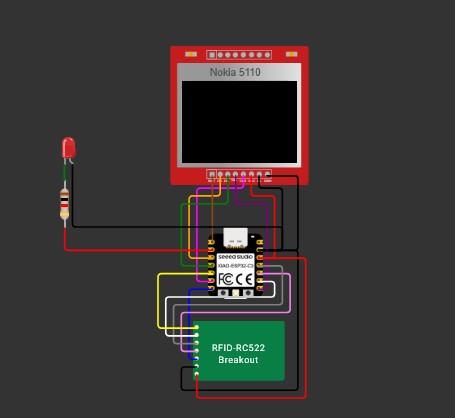
| Component | XIAO Pin | Note |
|---|---|---|
| RFID SDA | D4 | Chip select |
| RFID SCK | D8 | Shared clock |
| LCD RST | D0 | Display reset |
| LCD CE | D2 | Chip enable |
| LED | D1 | Status indicator |
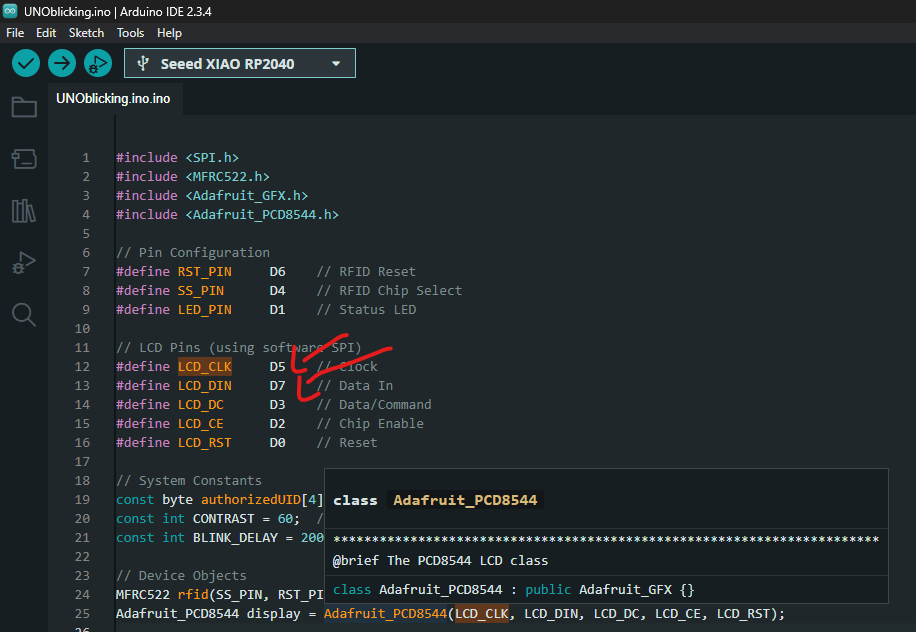
Issue Face: I experienced an issue where the RFID card reader only works when you comment out or remove certain LCD-related code. This suggests there might be a conflict between the RFID and LCD functionality, likely related to SPI communication or pin usage. Cause D8 CLK and D10 MOSI both device was requesting those port
How i solved it:I changed the connection for the lcd (DIN MOSI pin was connected to D7 and CLK connected to D5) then i let the RFID use the normal D8 for SCK and D10 for MOSI and it worked

Getting the code ready was half the battle:
              #include
              #include
              #include
              #include

              // Pin Configuration
              #define RST_PIN     D6    // RFID Reset
              #define SS_PIN      D4    // RFID Chip Select
              #define LED_PIN     D1    // Status LED

              // LCD Pins (using software SPI)
              #define LCD_CLK     D5    // Clock
              #define LCD_DIN     D7    // Data In
              #define LCD_DC      D3    // Data/Command
              #define LCD_CE      D2    // Chip Enable
              #define LCD_RST     D0    // Reset

              // System Constants
              const byte authorizedUID[4] = {0xAA, 0xC4, 0x2F, 0x43}; // Replace with your card UID
              const int CONTRAST = 60;  // LCD contrast (0-127)
              const int BLINK_DELAY = 200; // LED blink duration

              // Device Objects
              MFRC522 rfid(SS_PIN, RST_PIN);
              Adafruit_PCD8544 display = Adafruit_PCD8544(LCD_CLK, LCD_DIN, LCD_DC, LCD_CE, LCD_RST);

              void setup() {
                initializeSerial();
                initializeLED();
                initializeDisplay();
                initializeRFID();
                showStartupScreen();
              }

              void loop() {
                indicateSystemActive();

                if (isCardPresent()) {
                  handleCardDetection();
                }

                delay(100); // Main loop delay
              }

              // Initialization Functions
              void initializeSerial() {
                Serial.begin(115200);
                while (!Serial);
                Serial.println("\nStarting Access Control System");
              }

              void initializeLED() {
                pinMode(LED_PIN, OUTPUT);
                blinkLED(3, BLINK_DELAY);
              }

              void initializeDisplay() {
                display.begin();
                display.setContrast(CONTRAST);
                display.setRotation(0);
                display.clearDisplay();
                display.display();
              }

              void initializeRFID() {
                SPI.begin();
                rfid.PCD_Init();

                byte version = rfid.PCD_ReadRegister(rfid.VersionReg);
                Serial.print("RFID Version: 0x");
                Serial.println(version, HEX);

                if (version == 0x00 || version == 0xFF) {
                  showRFIDError();
                  while (true) blinkLED(1, 100); // Halt on error
                }
              }

              // Display Functions
              void showStartupScreen() {
                display.clearDisplay();
                centerText("Access", 1, -10);
                centerText("Control", 1, 0);
                centerText("System", 1, 10);
                display.display();
                delay(2000);
                showReadyScreen();
              }

              void showReadyScreen() {
                display.clearDisplay();
                centerText("Ready", 1, -5);
                centerText("Scan Card", 1, 10);
                display.display();
              }

              void showRFIDError() {
                display.clearDisplay();
                centerText("RFID", 1, -10);
                centerText("ERROR", 2, 5);
                display.display();
                Serial.println("RFID Communication Failed!");
              }

              void centerText(const char *text, uint8_t textSize, int16_t yOffset) {
                display.setTextSize(textSize);
                display.setTextColor(BLACK);

                int16_t x, y;
                uint16_t w, h;
                display.getTextBounds(text, 0, 0, &x, &y, &w, &h);

                display.setCursor((display.width() - w) / 2, (display.height() - h) / 2 + yOffset);
                display.print(text);
                display.display();
              }

              // RFID Functions
              bool isCardPresent() {
                return rfid.PICC_IsNewCardPresent() && rfid.PICC_ReadCardSerial();
              }

              void handleCardDetection() {
                Serial.println("Card detected!");
                showCardDetectedScreen();

                String uidString = getUIDString();
                Serial.print("Card UID: ");
                Serial.println(uidString);

                displayUID(uidString);
                delay(1500);

                if (isAuthorized(rfid.uid.uidByte)) {
                  grantAccess();
                } else {
                  denyAccess();
                }

                cleanupRFID();
                showReadyScreen();
              }

              String getUIDString() {
                String uid;
                for (byte i = 0; i < rfid.uid.size; i++) {
                  if (rfid.uid.uidByte[i] < 0x10) uid += "0";
                  uid += String(rfid.uid.uidByte[i], HEX);
                  if (i < rfid.uid.size - 1) uid += " ";
                }
                return uid;
              }

              void displayUID(String uid) {
                display.clearDisplay();
                centerText("UID:", 1, -15);
                centerText(uid.c_str(), 1, 0);
                display.display();
              }

              void showCardDetectedScreen() {
                display.clearDisplay();
                centerText("Card", 1, -10);
                centerText("Detected", 1, 5);
                display.display();
                delay(500);
              }

              bool isAuthorized(byte* cardUID) {
                for (byte i = 0; i < 4; i++) {
                  if (cardUID[i] != authorizedUID[i]) {
                    return false;
                  }
                }
                return true;
              }

              void cleanupRFID() {
                rfid.PICC_HaltA();
                rfid.PCD_StopCrypto1();
              }

              // Access Control Functions
              void grantAccess() {
                Serial.println("ACCESS GRANTED");
                display.clearDisplay();
                centerText("ACCESS", 1, -5);
                centerText("GRANTED", 2, 10);
                display.display();

                digitalWrite(LED_PIN, HIGH);
                delay(5000);
                digitalWrite(LED_PIN, LOW);
              }

              void denyAccess() {
                Serial.println("ACCESS DENIED");
                display.clearDisplay();
                centerText("ACCESS", 1, -5);
                centerText("DENIED", 2, 10);
                display.display();

                for (int i = 0; i < 15; i++) {
                  digitalWrite(LED_PIN, !digitalRead(LED_PIN));
                  delay(100);
                }
                digitalWrite(LED_PIN, LOW);
              }

              // Utility Functions
              void blinkLED(int count, int duration) {
                for (int i = 0; i < count; i++) {
                  digitalWrite(LED_PIN, HIGH);
                  delay(duration);
                  digitalWrite(LED_PIN, LOW);
                  delay(duration);
                }
              }

              void indicateSystemActive() {
                static unsigned long lastBlink = 0;
                if (millis() - lastBlink > 1000) {
                  digitalWrite(LED_PIN, HIGH);
                  delay(50);
                  digitalWrite(LED_PIN, LOW);
                  lastBlink = millis();
                }
              }
Watch the system grant and deny access
Store multiple authorized UIDs in EEPROM
Add a buzzer for access notifications
Record access attempts via WiFi