interface and application programming
Topic(s) of this week
- interface and application programming (video, review)
- Implement a User Interface (UI) using programming and explore protocols to communicate with an embedded board.
Hero shots
P5 based midi mp3 sample player
P5 based midi synth
Assignments
Group assignment
- Compare as many tool options as possible.
- Document your work on the group work page and reflect on your individual page what you learned.
Individual assignment
- Write an application that interfaces a user with an input and/or output device(s) on a board that you made.
What I think I already know
Similarly to previous weeks where programming is involved, I have a good working knowledge on this subject. Especially on web-oriented languages like PHP, javascript and such, but in the past I used java, C++, C# .NET, Python, and others. And it all started with autoexec.bat…
What I want to learn
I’d be interested to find out a bit more on HTML5 audio support, specifically I want to see if I can make a MIDI controlled synth or sample player that runs in the webbrowser.
SSTM planning
Supply
| Day | Supply | Tasks |
|---|---|---|
| Thursday | 08:00-09:30 (train) | work on FP |
| 10:00-18:00 | Waag group assignment | |
| 20:30-21:30 | document | |
| Friday | 9:00-13:00 (fablab) | final project casting & lasercutting |
| Sunday | 21:00-01:00 | final project design fixtures & PCB |
| Monday | 9:00-17:30 (fablab) | final project lasercutting, casting, PCB soldering |
| 19:00-23:00 | documentation, weekly 14 individual assignment | |
| Tuesday | 9:00-17:30 (fablab) | final project casting, PCB soldering |
| Wednesday | 9:00-12:00 (fablab) | |
| 12:00-13:00 | Local review | |
| 13:00-14:00 | Regional review | |
| 15:00-18:00 | Neil time |
Tasks
Have you answered these questions?
- Documented your process.
- Explained the UI that you made and how you did it.
- Explained how your application communicates with your embedded board.
- Explained any problems you encountered and how you fixed them.
- Included original source code (or a screenshot of the app code if that’s not possible).
- Included a ‘hero shot’ of your application running & communicating with your board.
- Leave feedback in Nueval that this weekly is ready for evaluation.
WAAG session and group assignment
Bas gave us a workshop on application development.
Processing
Processing is using an IDE similar to the Arduino IDE. It’s a good platform to communicate to embedded systems. The language is Java based. Bas created a great tutorial which can be found here.
Similar to Arduino, the basics is that you have a setup() and a draw() function. The draw function is similar to the loop function of Arduino and is called 60 times per second.
// Called once at the start:
void setup(){
    // Specify the size of the window
    size(800, 600, P2D); // P2D makes it faster by using the GPU

    // Initialization code here
}

// called 60 times per second until the program stops:
void draw(){
    background(0, 0, 0); // Actually clears the screen with a color
    // Use built in functions to draw things:
    ellipse(mouseX, mouseY, 200, 200);
}
mouseX and mouseY are variables in which the position of the mouse cursor is stored.
Background is an internal Processsing function that clears the screen. It should have been called like that.
The order in which you draw matter. So this
    background(0, 0, 0);
    ellipse(mouseX, mouseY, 200, 200);
will show the ellipse. But this doesn’t:
ellipse(mouseX, mouseY, 200, 200);
background(0, 0, 0); // Actually clears the screen with a color
```
As processing is java based and after compiling you'll get an executable. That doesn't mean you can actually get that app to run on any computer. The app requires a bunch of libraries and other stuff. In the IDE you can export it as a fully contained executable, including the java platform. But that's quite a hassle and it cannot run in a web environment.
### P5.js
The processing equivalent but then in javascript is P5.js. Again Bas made a great tutorial for this. [Find it here](https://fabacademy.org/2022/labs/waag/students/bas-pijls/p5js/p5js/).
#### Basics
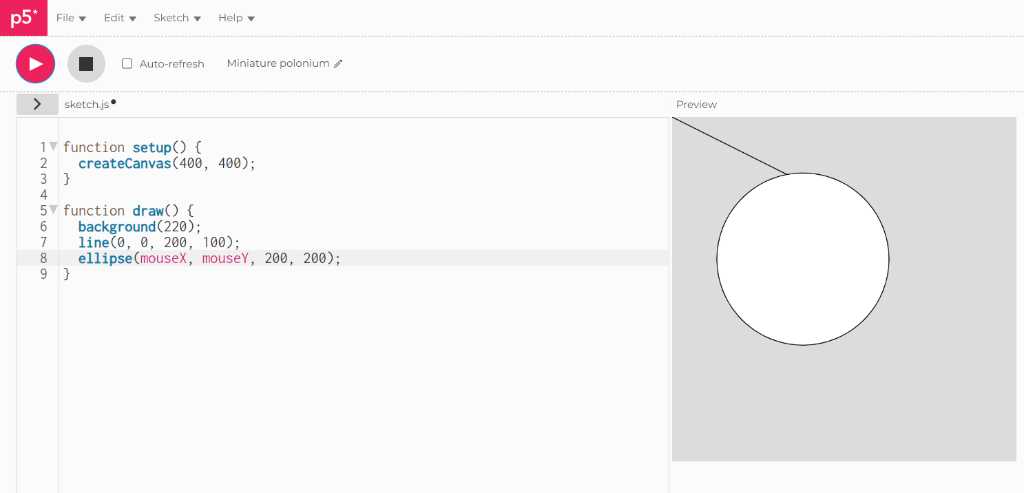
So P5.js is a javascript library used to create interactive webpages. It uses the HTML5 canvas to draw to. An example is:
```html
<!DOCTYPE html>
<html lang="en">
<head>
<script src="https://cdnjs.cloudflare.com/ajax/libs/p5.js/1.9.2/p5.js"></script>
<script src="https://cdnjs.cloudflare.com/ajax/libs/p5.js/1.9.2/addons/p5.sound.min.js"></script>
<link rel="stylesheet" type="text/css" href="style.css">
<meta charset="utf-8" />
</head>
<body>
<main>
</main>
<script>
function setup() {
createCanvas(400, 400);
}
function draw() {
background(220);
line(0, 0, 200, 100);
ellipse(mouseX, mouseY, 200, 200);
}
</script>
</body>
</html>
The support for external devices was improved a lot over the last years so you can also use it to communicate to embedded systems.
P5.js has an online editor that you can use to try. Find it here..
A lot of examples that can be found on the web can also be used in P5.js. Maybe some slight changes are required, but not too much. You can even embed it in markdown documentation! (some configuration things are necessary: you should use instance-mode instead of global-mode).
The Coding Train on Youtube has a good and elaborate P5.js learning playlist.
There’s no IDE for P5.js, so you can use any IDE, e.g. Visual studio Code. Good extensions for this:
- live-p5 -> live preview of P5 in VSCode
- P5.vscode -> create and manage P5 projects (press F1 to create a new project)
Drawing and animations
Pay attention to commands like fill() and stroke(). Everything you draw after these commands are done using these settings. So:
function draw() {
    fill(255,0,0);
    ellipse(mouseX, mouseY, 200, 200); // red ellipse
    fill(0,255,0);
    ellipse(mouseX, mouseY, 100, 100); // green ellipse
}
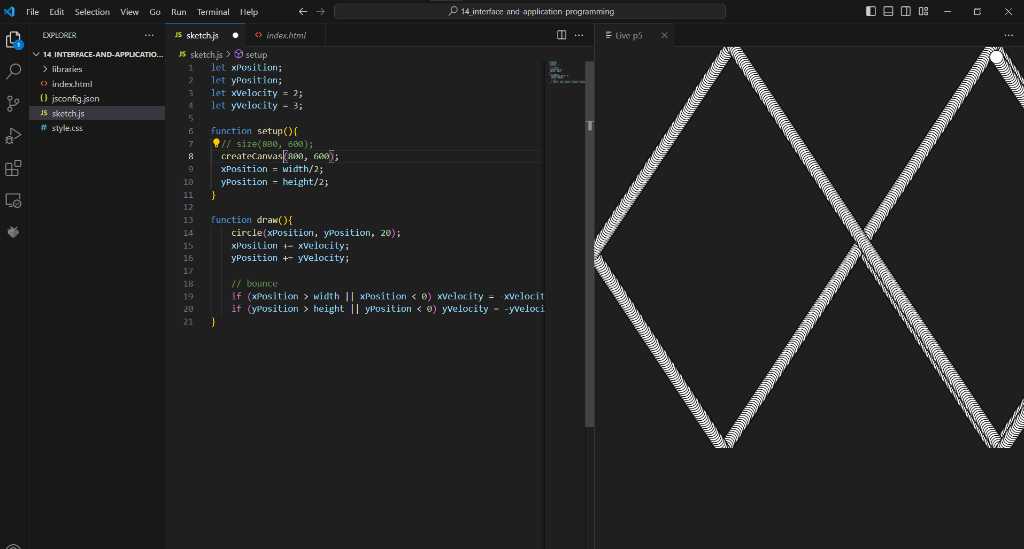
Animations are just rapidly changing images. So if you change shapes in the draw() function, this shape is painted 60 times per seconds. This is the bouncing ball example of Bas:
let xPosition;
let yPosition;
let xVelocity = 2;
let yVelocity = 3;

function setup(){
  size(800, 600);
  xPosition = width/2;
  yPosition = height/2;
}

function draw(){
    circle(xPosition, yPosition, 20);
    xPosition += xVelocity;
    yPosition += yVelocity;

    // bounce
    if (xPosition > width || xPosition < 0) xVelocity = -xVelocity;
    if (yPosition > height || yPosition < 0) yVelocity = -yVelocity;
}
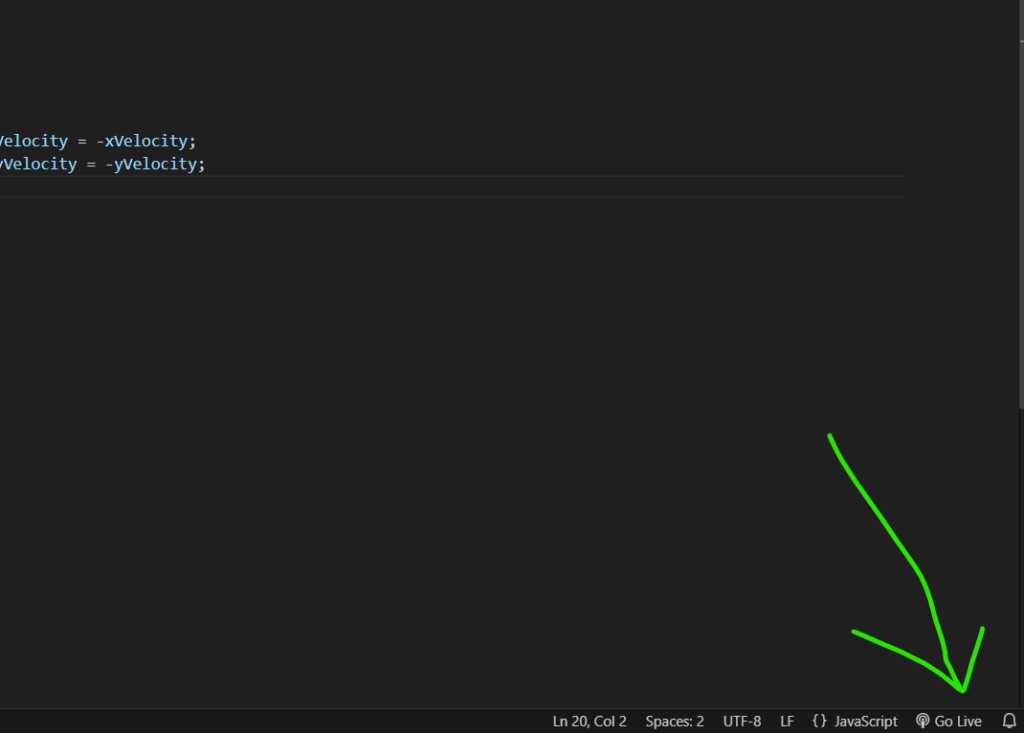
In VSCode, if you want to run your P5 script locally, click the “Go Live” button in the bottom right corner:
Classes
Creating objects in P5.js is done using Classes. See documentation of Bas. A class is like a recipe, e.g.:
class Blob {

    constructor(){
        this.xPosition = 200;
        this.yPosition =200;
    }
}

let blob1;
let blob2;

function setup() {
  createCanvas(400,400);
    blob1 = new Blob();
    blob2 = new Blob();
}
function draw(){
    background(0);
    circle(blob1.xPosition, blob1.yPosition, 10);
    circle(blob2.xPosition, blob2.yPosition, 10);
}
This code will work in VSCode P5Live, but WARNING: it will not work in the P5 online editor, because the class Blob is already defined by other P5 stuff (audio). So make sure to use classnames that aren’t defined already.
P5 Web Serial
Next is to get P5.js to talk to external devices. In some browsers, you can use direct serial communication (webserial). As of the time of writing, this works on Chrome, Edge and Opera. Firefox has support for it added very very recently.
To use Web Serial in P5.js, you use this library: https://github.com/gohai/p5.webserial. You cannot open a serial port automatically. You have to use a UI button to trigger it. This is a safety measure.
Include this:
<script src="https://unpkg.com/@gohai/p5.webserial@^1/libraries/p5.webserial.js"></script>
let port;
const BAUDRATE = 9600;

function setup() {
  createCanvas(400, 400);
  port = createSerial();

  // fetch the list of serial ports that were previously approved
  let usedPorts = usedSerialPorts();
  if (usedPorts.length > 0) {
    port.open(usedPorts[0], BAUDRATE);
  }
  else { // if no ports have been approved yet
    // add a button to open the serial port
    let button = createButton('open serial port');
    button.mousePressed(() => {
      // open the port
      port.open(BAUDRATE); // this will show a popup window asking the user to select a serial port
    });
  }
}
You can add this UI trigger in P5, but you can also do this outside of P5 and have it interact with the P5 canvas/code. See the P5 DOM documentation.
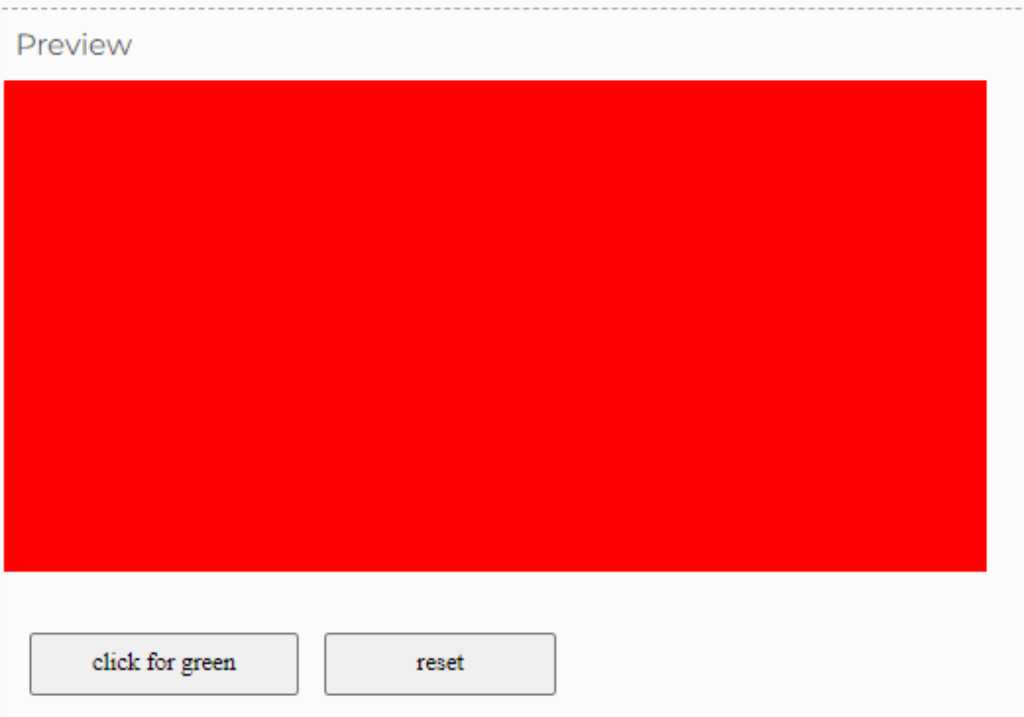
let btn_cycle, btn_reset;
let newCol = 0;

function setup() {
  createCanvas(400, 200);
  background(0);
  btn_cycle = createButton("click for red");
  btn_cycle.style('fontFamily: Source Code Pro');
  btn_cycle.size(110, 25);
  btn_cycle.position(10, 225);
  btn_cycle.style('font-size', '10px');

  btn_reset = createButton("reset");
  btn_reset.style('fontFamily: Source Code Pro');
  btn_reset.size(95, 25);
  btn_reset.position(130, 225);
  btn_reset.style('font-size', '10px');

  btn_cycle.mouseClicked(nextCol);
  btn_reset.mouseClicked(reset);
}

function nextCol() {
  let col;

  switch (newCol) {
    case 0:
      col = color(255, 0, 0);
      btn_cycle.html('click for green');
      break;
    case 1:
      col = color(0, 255, 0);
      btn_cycle.html('click for blue');
      break;
    case 2:
      col = color(0, 0, 255);
      btn_cycle.html('click for red');
      break;
  }
  background(col);
  newCol++;

  if (newCol == 3) newCol = 0;
}

function reset() {
  background(0);
}
Note that Arduino Serial.print() will only send ASCII characters. To send binary data, use Serial.write()!
If you want to send data over and you don’t really need a highly optimized and fast way, a good way is to use JSON. This is based on key/value pairs. Going from variables to JSON is called serialization. Going from JSON to variables this is called deserialization. There’s a Arduino library specifically for this, called https://arduinojson.org/.
More stuff regarding Web Serial and P5 can be found in the documentation of Bas.
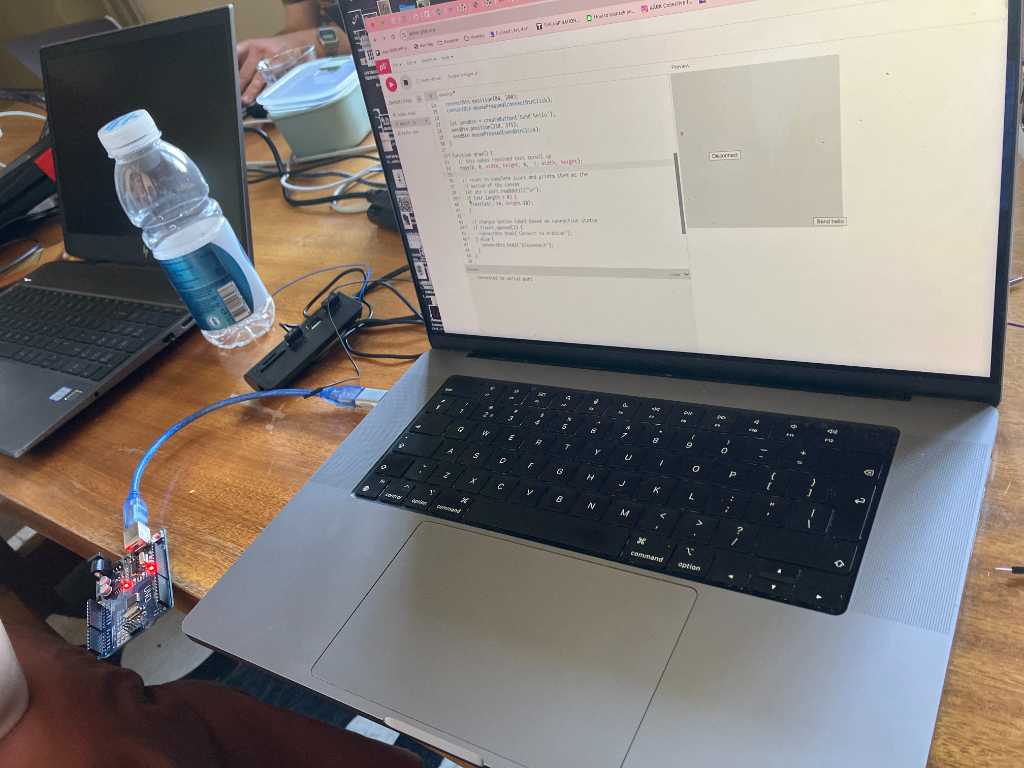
Joany and I used P5 webserial to communicate with her Arduino Uno. We used the Gohai webserial library.
The code that we came up with after spending time reading and trying various online examples is this:
const BAUDRATE = 9600;
let port;
let connectBtn;

function setup() {
    createCanvas(400, 400);
    background(220);

    port = createSerial(); // in setup, we can open ports we have used previously // without user interaction

    let usedPorts = usedSerialPorts();
    if (usedPorts.length > 0) {
        port.open(usedPorts[0], 9600);
    }

    // any other ports can be opened via a dialog after // user interaction (see connectBtnClick below)

    connectBtn = createButton('Connect to Arduino');
    connectBtn.position(80, 200);
    connectBtn.mousePressed(connectBtnClick);

    let sendBtn = createButton('Send hello');
    sendBtn.position(330, 375);
    sendBtn.mousePressed(sendBtnClick);
}

function draw() {
    // this makes received text scroll up
    copy(0, 0, width, height, 0, -1, width, height);

    // reads in complete lines and prints them at the
    // bottom of the canvas
    let str = port.readUntil("\n");
    if (str.length > 0) {
        text(str, 10, height-20);
    }

    // changes button label based on connection status
    if (!port.opened()) {
        connectBtn.html('Connect to Arduino');
    }
    else {
        connectBtn.html('Disconnect');
    }
}

function connectBtnClick() {
    if (!port.opened()) {
        port.open(BAUDRATE);
    }
    else {
        port.close();
    }
}

function sendBtnClick() {
    port.write("Hello from p5.js\n");
}
and the code that is running in the arduino is simply:
void setup() { pinMode(13, OUTPUT); // set LED pin as output digitalWrite(13, LOW); // switch off LED pin Serial.begin(9600); // initialize serial communication at 9600 bits per second:

}

void loop() {


Serial.println('1'); digitalWrite(13, HIGH);
delay(3000); Serial.print('0'); digitalWrite(13, LOW);

`delay(3000);`

}
This code fully relies on the availability of Webserial support in the webbrowser that you’re using. If you’re browser doesn’t support this (currently: firefox, safari), this tutorial seems to have you covered. It does rely on a “man-in-the-middle” piece of software though:
https://itp.nyu.edu/physcomp/labs/labs-serial-communication/lab-serial-input-to-the-p5-js-ide/
See the documentation of Joany for further info here: https://fabacademy.org/2022/labs/waag/students/joany-beer/
P5 websockets
P5 can also communicate over websockets. See the notes of Bas about this subject. This is actually what is used in the “man-in-the-middle” example linked above.
We haven’t really tried this today, but still worth mentioning here.
Random programming recipes for various animations of Bas can be found here.
Individual assignment
Webbrowser midi sample player
My final project, the Marimbatron, sends out MIDI data. It would be cool if I could have a webbrowser based MIDI player so that when I play the Marimbatron, I can go to this website to change the sounds that you hear.
So I searched the internet, looking for examples and found a sketch that implements MIDI-in that triggers a mp3 sample when it receives midi. After a bit of fiddling around, I was able to get it to work with my final project PCB.
The example that I based this on is this one: https://editor.p5js.org/hychu31/sketches/_hPurTbHg
Here’s the code:
index.html
<!DOCTYPE html>
<html>
  <head>
    <script src="https://cdnjs.cloudflare.com/ajax/libs/p5.js/0.6.0/p5.min.js"></script>
    <script src="https://cdnjs.cloudflare.com/ajax/libs/p5.js/0.6.0/addons/p5.dom.min.js"></script>
    <script src="https://cdnjs.cloudflare.com/ajax/libs/p5.js/0.6.0/addons/p5.sound.min.js"></script>
<script src="https://cdn.jsdelivr.net/npm/webmidi@next/dist/iife/webmidi.iife.js"></script>
        <link rel="stylesheet" type="text/css" href="style.css">
    <meta charset="utf-8" />
  </head>
  <body>
    <script src="sketch.js"></script>
  </body>
</html>
/*

This is a p5js sketch that uses the WebMIDI.js library to receive MIDI messages

In the project folder, to the left of this coding window,
you can look at the index.html file and see the following on line 7:

<script src="https://cdn.jsdelivr.net/npm/webmidi"></script>

This is added to the otherwise normal p5js boilerplate,
and bring in the WebMIDI.js library, allowing our browser and JS program
to receive MIDI messages from all types of software and hardware

*/


//background color variable
var bgColor;

//color of a square
var squareColor;

//text to be displayed
var displayText;

//sound to be played
var soundFX;

function setup() {
  //400 by 400 pixel canvas
  createCanvas(400, 400);

  //starting background color
  bgColor= color(220,220,200);

  //starting square color
  squareColor = color(100);

  //starting text
  displayText="Nothing received";

  //loading a sound file to play
  //this can be seen inside of the project folder to the left of the code window
  soundFX = loadSound('piano.mp3');


  ////
  //Setting up MIDI
  ////

    WebMidi.enable(function (err) { //check if WebMidi.js is enabled

  if (err) {
      console.log("WebMidi could not be enabled.", err);
    } else {
      console.log("WebMidi enabled!");
    }

  //name our visible MIDI input and output ports
  console.log("---");
  console.log("Inputs Ports: ");
  for(i = 0; i< WebMidi.inputs.length; i++){
     console.log(i + ": " + WebMidi.inputs[i].name);
  }

  console.log("---");
  console.log("Output Ports: ");
  for(i = 0; i< WebMidi.outputs.length; i++){
        console.log(i + ": " + WebMidi.outputs[i].name);

    }

  //Choose an input port
  inputSoftware = WebMidi.inputs[0];
    //The 0 value is the first value in the array
    //Meaning that we are going to use the first MIDI input we see
    //This can be changed to a different number,
    //or given a string to select a specific port

  ///
  //listen to all incoming "note on" input events
  inputSoftware.addListener('noteon', "all",
    function (e) {
            //Show what we are receiving
        console.log("Received 'noteon' message (" + e.note.name + e.note.octave + ") "+ e.note.number +".");
            displayText = "Received 'noteon' message (" + e.note.name + e.note.octave + ") "+ e.note.number +".";

        //change the background color variable
            var randomR = random(0,255);
        var randomG = random(0,255);
        var randomB = random(0,255);
        bgColor = color(randomR,randomB,randomG);

        //This will happen any time any note on message is received
        //But you can specify particular notes that you want to respond to:

        //If the incoming note is a "D" in any octave, then...
        if(e.note.name=="D"){
        console.log("A D note has been received, any octave");

        //Re-using the background color variable
        //Just re-arranging the random colors
        squareColor = color(randomB, randomG, randomR);
      }
        //Or you can specify the note
        if((e.note.name + e.note.octave)=="C3"){
        console.log("A C4 note has been received, specifically");

        //set speed of sound playback, changing the tone
        soundFX.rate(0.555);
        //change the volume of the sound, scale of 0.0 to 1.0
        soundFX.setVolume(1);
        //play sound
        soundFX.play();
      }
        //Or use the MIDI note number instead
        if(e.note.number==64){
        console.log("Detected MIDI note number 64 turned ON");

        //displayText="Note number 64 is on";
      }
    }
  );


    //The note off functionality will need its own event listener
    //You don't need to pair every single note on with a note off

    inputSoftware.addListener('noteoff', "all",
    function (e) {
            //Show what we are receiving
        console.log("Received 'noteoff' message (" + e.note.name + e.note.octave + ") "+ e.note.number +".");

        if(e.note.number==64){
        console.log("Detected MIDI note number 64 turned OFF");

        //displayText="Note number 64 is off";
      }
    }
  );
    //
    //end of MIDI setup
    //
    });


}

function draw() {
  //Draw background with background color variable
  //Will change every time there is a note on
  background(bgColor);

  //Drawing a rectangle, with no outline,
  //Middle of the screen (width and height divided by two)
  //Changes
  fill(squareColor);
  noStroke();
  rect(100,100,width/2,height/2);

  //Displaying text
  //Little bit under the box above
  //Changes the text when a number 64 MIDI note is on and off
  fill(0);
  textAlign(CENTER);
  textSize(20);
  text(displayText,width/2,350);

}
Webbrowser midi synth
I wanted to extend this example a bit further and ran into the limits of P5js as synth. Fairly quickly the browser stops responding. Maybe adding to much delay isn’t nice on memory?
Here’s the sketch that I made:
/*
This is a p5js sketch that uses the WebMIDI.js (webmidi.iife.js) library to receive MIDI messages

*/


var bgColor; //background color variable
var squareColor; //color of a square
var displayText; //text to be displayed
var sample; //sound to be played
var logTexts = []; // text to log to the canvas
var midiConnectButtons = []; // buttons that hold available midi in devices
var midiConnectButtonsX = 150; // location of midiConnectButtons
let synth; // synth object
let reverb, delay, distortion; // effects
let volumeSlider, reverbSlider, delaySlider, distortionSlider; // sliders to control the effects
let volumeSliderText, reverbSliderText, delaySliderText, distortionSliderText; // labels
let attackSlider, decaySlider, sustainSlider, releaseSlider;
let attackSliderText, decaySliderText, sustainSliderText, releaseSliderText;

function setup() {
  createCanvas(600, 600);  //400 by 400 pixel canvas
  bgColor= color(220,220,200);  //starting background color
  background(bgColor);
  squareColor = color(100);  //starting square color
  displayText="";  //starting text

  // Create the polysynth
  // synth = new p5.PolySynth(); // default is 8 voices
  synth = new p5.MonoSynth(); // 1 voice only, but allows more sound manipulation like changing oscillator types
  // synth.oscillator.setType('sawtooth');

  // Create effects
  reverb = new p5.Reverb();
  delay = new p5.Delay();
  distortion = new p5.Distortion();

  // synth.disconnect();
  synth.connect(reverb);
  synth.connect(delay);
  synth.connect(distortion);

  // Create sliders
  volumeSlider = createSlider(0, 1, 0.5, 0.01);
  reverbSlider = createSlider(0, 1, 0.5, 0.01);
  delaySlider = createSlider(0, 1, 0.5, 0.01);
  distortionSlider = createSlider(0, 1, 0.5, 0.01);
  attackSlider = createSlider(0, 1, 0.01, 0.01);
  decaySlider = createSlider(0, 1, 0.01, 0.01);
  sustainSlider = createSlider(0, 1, 0.5, 0.01);
  releaseSlider = createSlider(0, 1, 0.1, 0.01);

  // Position sliders
  volumeSlider.position(100, 50);
  reverbSlider.position(100, 90);
  delaySlider.position(100, 130);
  distortionSlider.position(100, 170);
  attackSlider.position(100, 220);
  decaySlider.position(100, 260);
  sustainSlider.position(100, 300);
  releaseSlider.position(100, 340);

  // text labels
  volumeSliderText = createP("volume");
  volumeSliderText.position(50,35);
  reverbSliderText = createP("reverb");
  reverbSliderText.position(60,75);
  delaySliderText = createP("delay");
  delaySliderText.position(65,115);
  distortionSliderText = createP("distortion");
  distortionSliderText.position(40,155);

  attackSliderText = createP("attack");
  attackSliderText.position(60,205);
  decaySliderText = createP("decay");
  decaySliderText.position(60,245);
  sustainSliderText = createP("sustain");
  sustainSliderText.position(55,285);
  releaseSliderText = createP("release");
  releaseSliderText.position(55,325);

    WebMidi.enable(function (err) { //check if WebMidi.js is enabled
    if (err) {
        logTexts.push("WebMidi could not be enabled.", err);
      } else {
        logTexts.push("WebMidi enabled!");
      }

    //list all MIDI input and output ports connected to the computer
    logTexts.push("---");
    logTexts.push("Inputs Ports: ");
    text("Select MIDI input:", 10, 10);
    for(i = 0; i< WebMidi.inputs.length; i++){
      createMidiConnectButton(i + ": " + WebMidi.inputs[i].name, i);
      // createMidiConnectButton(i + ": " + "test", i);
      logTexts.push(i + ": " + WebMidi.inputs[i].name);
    }
    });
}

function draw() {
  background(bgColor);
  fill(0);
  textAlign(LEFT);
  textSize(15);

  text("Select MIDI input: ", 10, 15);

  updateLog();
  fill(0);
  textAlign(CENTER);
  textSize(20);
  text(displayText,width/3,(height-75));

  // Control the synth parameters with the sliders
  synth.amp(volumeSlider.value());
  reverb.process(synth, reverbSlider.value(), 2);
  delay.process(synth, delaySlider.value(), .5, 2300);
  distortion.process(synth, distortionSlider.value());

  let ADSRattack = attackSlider.value(); // cannot use the variablename attack because thats reserved
  let ADSRdecay = decaySlider.value();
  let ADSRsustain = sustainSlider.value();
  let ADSRrelease = releaseSlider.value();

  synth.setADSR(ADSRattack, ADSRdecay, ADSRsustain, ADSRrelease);
}

function updateLog() {
  fill(0); // Set the fill color to black
  noStroke(); // No border around the text
  textSize(16); // Set the text size

  // Display the texts in reverse order
  for (let i = 0; i < logTexts.length; i++) {
    text(logTexts[i], 2*(width/3), height - i * 20);
  }

  // If the texts go beyond the canvas, remove the oldest one
  if (logTexts.length * 20 > height - 20) {
    logTexts.shift();
  }
}

function createMidiConnectButton(label, index) {
  let button = createButton(label);
  button.position(midiConnectButtonsX, 2);
  midiConnectButtonsX = midiConnectButtonsX + button.width;
  button.mousePressed(() => buttonMidiConnectClicked(index));
  button.style('background-color', 'gray');
  midiConnectButtons.push(button);
}

function buttonMidiConnectClicked(buttonNumber) {
  logTexts.push('Button ' + buttonNumber + ' clicked');
  // Change the color of all buttons to gray
  for (let i = 0; i < midiConnectButtons.length; i++) {
    midiConnectButtons[i].style('background-color', 'gray');
    if (typeof midi !== 'undefined') { // check if midi input was already used
      if (midi.hasListener('noteon')) {
        midi.removeListener(); // remove all listeners
      }
    }
  }

  midiConnectButtons[buttonNumber].style('background-color', 'green');    // Change the color of the clicked button to green
  midi = WebMidi.inputs[buttonNumber];   //Choose an input port (0 = select first midi input. Can also be a string of the portname)
  userStartAudio(); // required to tell the browser that the user did an action to start audio.
  synth.setADSR(0.1, 0.4, 0.3, 0.05); // attackTime, decayTime, susRatio, releaseTime
  midi.addListener('noteon', "all",   //add listener function to listen to all incoming "note on" input events
    function (e) {
      let pitch = midiToFreq(e.note.number);
      let velocity = e.velocity;

      if (velocity == 0) { // note off
        logTexts.push("'noteoff' " + e.note.name + e.note.octave + " ("+ e.note.number +")");
        displayText = e.note.name + e.note.octave + "("+ e.note.number +") " + velocity * 127;
      }
      else { // note on
        //Show what we are receiving
        logTexts.push("'noteon' " + e.note.name + e.note.octave + " ("+ e.note.number +") " + velocity * 127);
        displayText = e.note.name + e.note.octave + "("+ e.note.number +") " + velocity * 127;

        //change the background color variable
        var randomR = random(0,255);
        var randomG = random(0,255);
        var randomB = random(0,255);
        bgColor = color(randomR,randomB,randomG);

        synth.play(pitch, velocity, 0, 1); // play note
      }
    }
  );

  //The note off functionality will need its own event listener. A lot of midi keyboards send a noteon with velocity 0 instead of noteoff. So not doing anything now.
  midi.addListener('noteoff', "all",
    function (e) {
      //Show what we are receiving
      console.log("Received 'noteoff' message (" + e.note.name + e.note.octave + ") "+ e.note.number +".");
      logTexts.push("Received 'noteoff' message (" + e.note.name + e.note.octave + ") "+ e.note.number +".");
    }
  );

}
First you’ll have to select the MIDI input. All available MIDI input devices are listed as separate buttons. Click the one that you want to use:
Next you can start playing and tweaking the sound.
With every note the background is changed to a random color.
So does it work? Well, a bit.
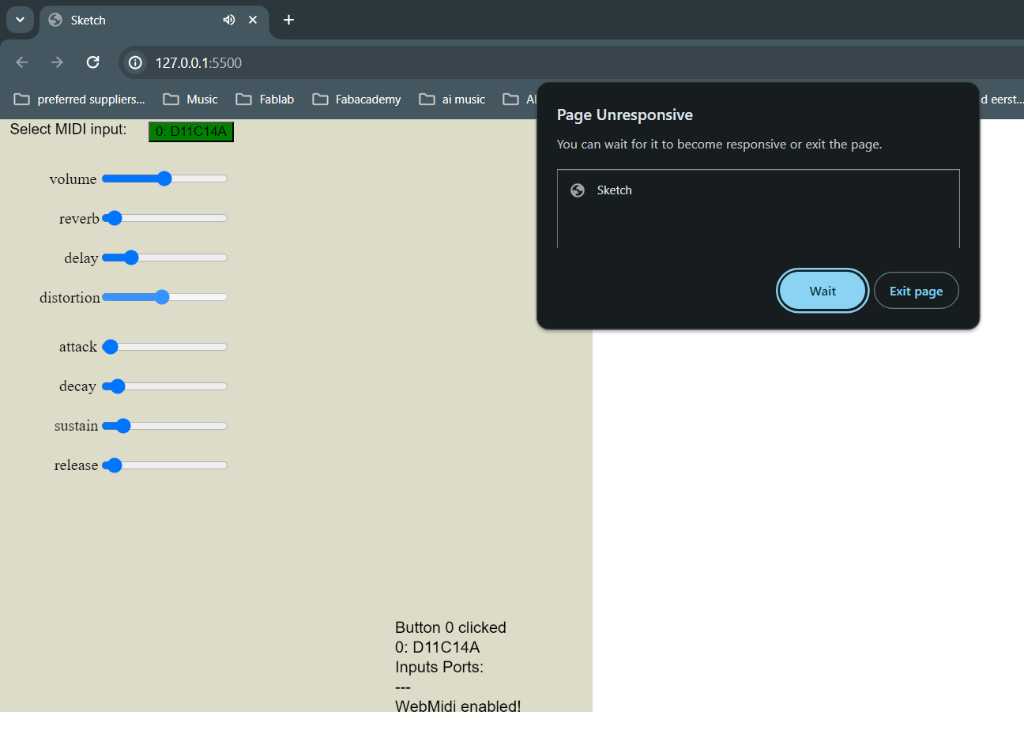
The page becomes unresponsive very quickly. Also, I had to unplug my board and plug it back in a lot of time because it wouldn’t detect after a page refresh. So I’d say creating a synth in a webbrowser using P5 is not a good idea. But fun.
use P5.js to send and receive messages via MQTT
What would be really cool is to use MQTT to send the midi notes to the MQTT broker and then someone else could connect to the same MQTT channel and hear me playing in his own local webbrowser :-)
Although I was able to get MQTT to work in the webbrowser, I didn’t have time to send midi data. But combining the script above with this MQTT client should not be that hard.
I wanted to quickly test if I could send and receive message via the fabacademy MQTT server, using this example as a start. At first it didn’t work because the MQTT server was only connected to TCP port 1883. Julian quickly fixed this so port 8083 was also going to the MQTT server (this is needed because webbrowsers cannot directly talk to a TCP port):
<!DOCTYPE html>
<html lang="en">
  <head>
    <script src="https://cdnjs.cloudflare.com/ajax/libs/p5.js/1.1.9/p5.js"></script>
    <script src="https://cdnjs.cloudflare.com/ajax/libs/p5.js/1.1.9/addons/p5.sound.min.js"></script>
    <link rel="stylesheet" type="text/css" href="style.css">
    <meta charset="utf-8" />
      <script src="https://cdnjs.cloudflare.com/ajax/libs/paho-mqtt/1.0.1/mqttws31.min.js" type="text/javascript"></script>

  </head>
  <body>
    <script src="sketch.js"></script>
  </body>
</html>
/*
    p5.js MQTT Client example
    This example uses p5.js: https://p5js.org/
    and the Eclipse Paho MQTT client library: https://www.eclipse.org/paho/clients/js/
    to create an MQTT client that sends and receives MQTT messages.
    The client is set up for use on the shiftr.io test MQTT broker (https://shiftr.io/try),
    but has also been tested on https://test.mosquitto.org
    created 12 June 2020
    modified 20 Aug 2020
    by Tom Igoe
*/

// MQTT client details:
let broker = {

  hostname: 'mqtt.fabcloud.org',
  port: 8083
};
// MQTT client:
let client;
// client credentials:
let creds = {
  clientID: 'Leo@WAAG', // choose whatever name you want
  userName: 'fabacademy', // unique Key from token
  password: 'fabacademy' // unique Secret from token
}
// topic to subscribe to when you connect:
let topic = 'fabacademy/waag';

// a pushbutton to send messages
let sendButton;
let localDiv;
let remoteDiv;
let inpt;

let input2
let sendButton2;
let localDiv2;
let remoteDiv2;

// intensity of the circle in the middle
let intensity = 255;

let leds = [];

function setup() {
  createCanvas(800, 400);

  for (let i = 0; i < 4; i++) {
    leds[i] = new Led(i * 50 + 20, height / 2, color(120,120,120), false);
  }
  // Create an MQTT client:
  client = new Paho.MQTT.Client(broker.hostname, Number(broker.port), creds.clientID);
  // set callback handlers for the client:
  client.onConnectionLost = onConnectionLost;
  client.onMessageArrived = onMessageArrived;
  // connect to the MQTT broker:
  client.connect({
    onSuccess: onConnect, // callback function for when you connect
    userName: creds.userName, // username
    password: creds.password, // password
    useSSL: true // use SSL
  });
  // create input
  // inpt = createInput("enter 0-255");
  // inpt.position(20, 0);
  // // create the send button:
  // sendButton = createButton('send to LED 1');
  // sendButton.position(20, 20);
  // sendButton.mousePressed(sendMqttMessage);
  // create a div for local messages:
  localDiv = createDiv('local messages will go here');
  localDiv.position(20, 50);
  localDiv.style('color', '#fff');
  // create a div for the response:
  remoteDiv = createDiv('waiting for messages');
  remoteDiv.position(20, 80);
  remoteDiv.style('color', '#fff');


  for (let i = 0; i < leds.length; i++) {
    if (i == 0) {
      leds[i].name = "ledR";
      leds[i].infill = color(255, 0, 0);
    }
    if (i == 1) {
      leds[i].name = "ledY";
      leds[i].infill = color(255, 255, 0);
    }
    if (i == 2) {
      leds[i].name = "ledG";
      leds[i].infill = color(0, 255, 0);
    }
    if (i == 3) {
      leds[i].name = "ledB";
      leds[i].infill = color(0, 125, 255);
    }
  }

}

function draw() {
  background(50);
  for (let i = 0; i < leds.length; i++) {
    leds[i].show();
    leds[i].detect();
  }
  // draw a circle whose brightness changes then a message is received:
  // fill(intensity);
  // circle(width / 2, height / 2, width / 2);
  // subtract one from the brightness of the circle:
  // if (intensity > 0) {
  //   intensity--;
  // }
}

function mousePressed() {
  for (let i = 0; i < leds.length; i++) {
    if(leds[i].detect()){
      leds[i].sendMsg();
    }
  }
}

// called when the client connects
function onConnect() {
  localDiv.html('client is connected');
  client.subscribe(topic);
  console.log("connected")
}

// called when the client loses its connection
function onConnectionLost(response) {
  if (response.errorCode !== 0) {
    localDiv.html('onConnectionLost:' + response.errorMessage);
  }
}

// called when a message arrives
function onMessageArrived(message) {
  remoteDiv.html('I got a message:' + message.payloadString);
  let incoming = split(trim(message.payloadString), "/");
  console.log(incoming);
  // let incomingNumber = parseInt(message.payloadString);
  // if (incomingNumber > 0) {
  //   intensity = incomingNumber;
  // }
}

// called when you want to send a message:
function sendMqttMessage() {
  // if the client is connected to the MQTT broker:
  if (client.isConnected()) {
    // make a string with a random number form 0 to 15:
    // let msg2 = String(round(random(15)));
    let msg2 = String(inpt.value());
    let msg = "ledG/" + msg2;
    // start an MQTT message:
    message = new Paho.MQTT.Message(msg);
    // choose the destination topic:
    message.destinationName = topic;
    // send it:
    client.send(message);
    // print what you sent:
    localDiv.html('I sent: ' + message.payloadString);
  }
}

// called when you want to send a message:
function sendMqttMessage2() {
  // if the client is connected to the MQTT broker:
  if (client.isConnected()) {
    // make a string with a random number form 0 to 15:
    //let msg2 = String(round(random(15)));
    let msg2 = String(input2.value());

    let msg = "ledY/" + msg2 + "\n";
    // start an MQTT message:
    message = new Paho.MQTT.Message(msg);
    // choose the destination topic:
    message.destinationName = topic;
    // send it:
    client.send(message);
    // print what you sent:
    localDiv2.html('I sent: ' + message.payloadString);
  }
}


class Led {
  constructor(x, y, fil, onOff) {
    this.x = x;
    this.y = y;
    this.infill = fil;
    this.size = 30;
    this.onOff = onOff;
    this.name = "";
  }
  sendMsg() {
    if (client.isConnected()) {
      // make a string with a random number form 0 to 15:
      // let msg2 = String(round(random(15)));
      this.onOff = !this.onOff;
      let out;
      if (this.onOff) {
        out = String(255);
      } else {
        out = String(0);
      }

      let msg = this.name + "/" + out;
      // start an MQTT message:
      let message;
      message = new Paho.MQTT.Message(msg);
      // choose the destination topic:
      message.destinationName = topic;
      // send it:
      client.send(message);
      // print what you sent:
      localDiv.html('I sent: ' + message.payloadString);
    }

  }

  show() {
    if (this.onOff) {
      fill(this.infill);
    } else {
      fill(120);
    }
    circle(this.x, this.y, this.size);
  }

  detect() {
    if (dist(mouseX, mouseY, this.x, this.y) <= this.size) {
      //fill(this.inFill);
      return true;

    } else {
    //  fill(120);
      return false;
    }
  }
}
I used an online testclient called testclient-cloud.mqtt.cool that does not rely on websockets (in its backend there’s something running that does the conversion). This testclient is connected to tcp://mqtt.fabcloud.org:1883.
In p5.js I connect to the websocket that Julian has kindly set up so that a webbrowser can directly communicate with the fabcloud MQTT broker. P5 is connected to wss://mqtt.fabcloud.org:8083.
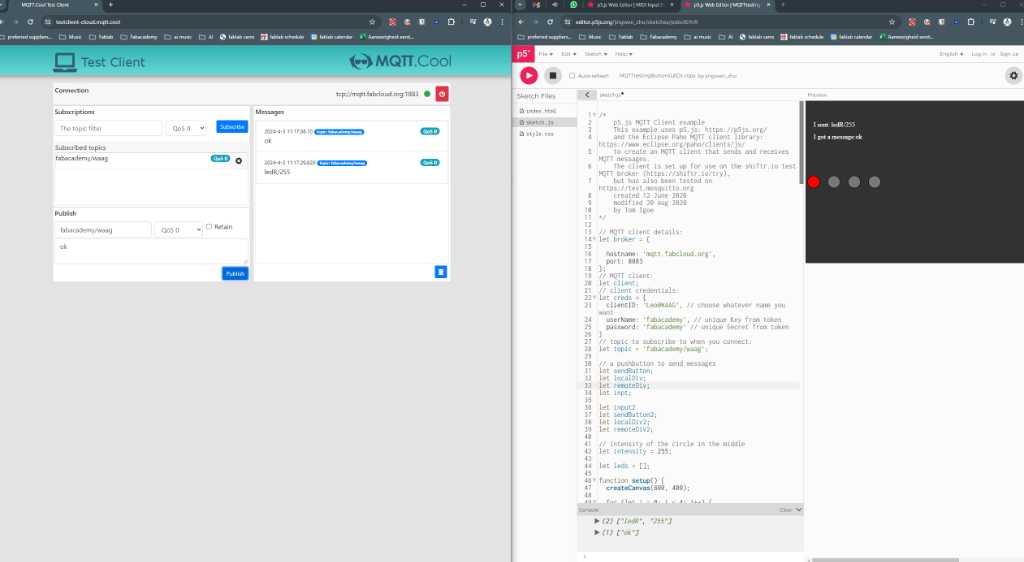
as you can see, messages to the channel fabacademy/waag are send back and forth between the p5.js client and the mqtt.cool testclient. The dots are actually buttons that you can press and they wiill send messages to the MQTT channel.
Link to repo
P5 based midi synth
P5 based MQTT client
What I learned this week
Successes
I didn’t have a lot of time to work on this subject this week. Majority of time went into my final project. But still, I managed to create a little browser based midi synth and got the browser based MQTT client running.
Too bad that I didn’t have time to combine the midi synth with the MQTT client…
Fails & Fixes
Webbrowsers and midi (polyphonic) synths are not a good combination.