WOW - Way of Working
When documenting, I think it will be a good idea that I think of some standardized procedures how to do things: my Way of Working.
This is how I do things:
Photos
- use the iOS camera app
- annotate if required
- share -> copy image -> paste in Obsidian.
- Obsidian will ask to rename because of the plugin ‘paste image rename’.
- Uploaded photos and videos to the repo should be compressed. Max 150kB.
- Have photos taken by colleagues of yourself doing the work.
Videos
- use the iOS app Blackmagic camera.
- Only landscape (so use settings -> fix orientation)
- videos will stay in app, not to camera roll.
- select video to export -> share to Obsidian App.
- Next click add to note to insert video into the note.
- Unfortunately there’s no way to automatically popup the rename plugin.
- No youtube videos. No watermark. Short. Horizontal.
New fabacademy week
- Every week’s file go into their own branche on gitlab.
- Every week’s documentation goes into its own folder.
- Documentation starts with what I want to learn that week based on Neils lecture and local fablab meeting.
- Documentation ends with a section where I talk about if I have achieved that goal.
Repo organisation
repo -- docs -- + -- 00_bootcamp  --+-- week00.md -> doc for this week
                |                   +-- lecture-notes.md -> my notes of Neils lecture
                |                   +-- assets -> img and vids for documentation
                |                   +-- files -> all other in subdirs. e.g. cad, ai, c
                |
                +-- 01_p&p        --+-- week01.md -> doc for this week
                |                   +-- lecture-notes.md -> my notes of Neils lecture
                |                   +-- assets -> img and vids for documentation
                |                   +-- files -> all other in subdirs. e.g. cad, ai, c
                |
                +-- 02_CAD-design --+-- week02.md -> doc for this week
                |                   +-- lecture-notes.md -> my notes of Neils lecture
                |                   +-- assets -> img and vids for documentation
                |                   +-- files -> all other in subdirs. e.g. cad, ai, c
                .
                .
                .
                +-- final-project --+-- finalProject.md -> doc for final project
                |                   |-- <00doc1>.md -> more documentation (per phase?)
                |                   |-- <01doc2>.md -> even more documentation
                |                   +-- assets -> img and vids for documentation
                |                   +-- files -> all other in subdirs. e.g. cad, ai, c
                |
                +-- other         --+-- Other stuff like cheatsheets
                |
                +-- about.md -> information about me
                +-- student-agreement.md -> the fabacademy student agreement
Document in Obsidian MD
I write my documentation in Obsidian MD, both on windows as well as on iOS. Photos and videos taken by phone I add to obsidian as well, so it all gets sync’ed.
My initial documentation will go to my personal github account in a private repo. Next I push and pull to keep everything in sync on Windows and iOS. Instructions taken from here:
Push and Pull
after installation (see below) the following commands are to be used in iSH on iOS to perform push and pull. This can’t be automated due to limitation of git on iOS. iSH is a project to get a Linux shell environment running locally on your iOS device.
push
in iSH on iOS:
cd ~/obsidian```git add.git commit -m “Commit from mobileee”git push`
Force push in Windows:
in obsidian command palette -> obsidian git: create backup
pull
in iSH on iOS:
cddd ~/obsidian
git pull
Force pull in Windows:
in obsidian command palette -> obsidian git: pull
Installation
Installation on Windows
see https://forum.obsidian.md/t/the-easiest-way-to-setup-obsidian-git-to-backup-notes/51429 Requirements: git and Obsidian MD windows app.
For reference here’s a copy of the forum post:
step 1
Create a repository or fork the md repo 895 in github
step 2
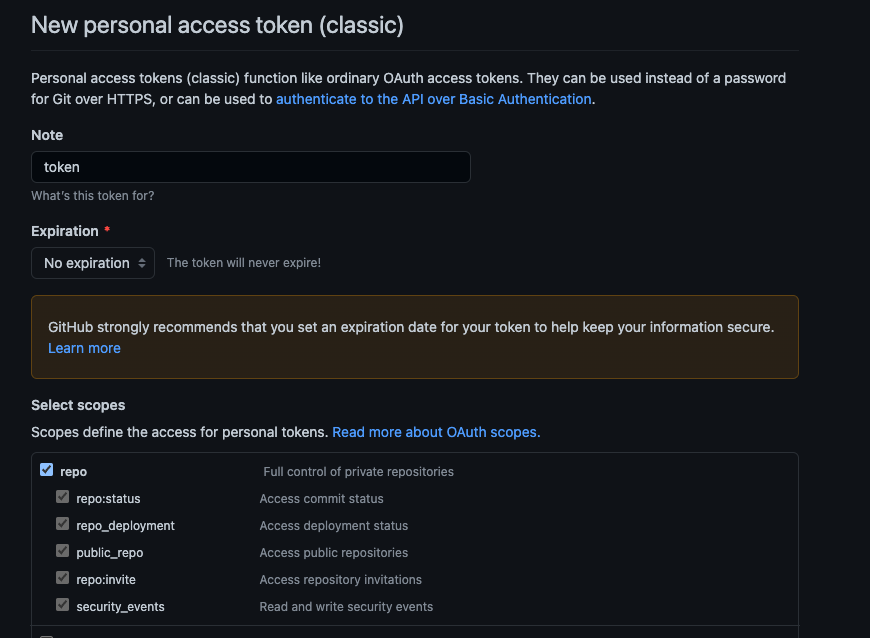
Create a personal access token 817 from github -> make sure it’s a “classic” token.
step 4
Install the Obsidian Git 816 community plugin
step 5
Create a folder to store the repository. (e.g. remote-blog/). Set scopes to repo & expiration to no expiration
step 6
Run the command (CMD/Ctrl + P): Clone an existing remote repo 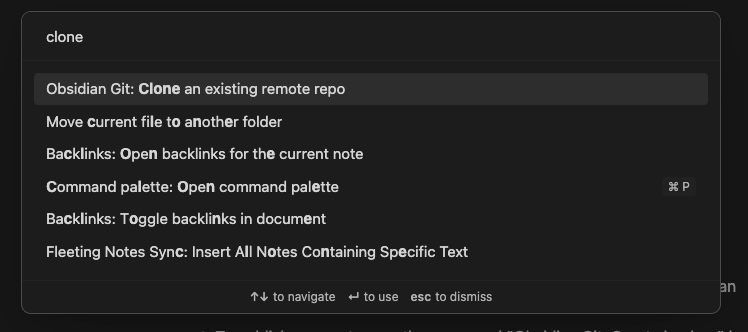
step 7
Paste the URL of the forked repository in the following format
https://<PERSONAL_ACCESS_TOKEN>@github.com/<USERNAME>/<REPO>.git
For example it might look like this:
https://ghp_XXXXXXXXXXXXXXXXXXXXXXXXXXXXXXXXXXXX@github.com/ithinkwong/linked-blog-starter-md.git
step 8
Then type in the folder you created in step 5 (e.g. remote-blog/)
step 9
Restart Obsidian
step 10
Make edits to your notes
step 11
Publish your notes run the command “Obsidian Git: Create backup” by opening the command palette (CMD/Ctrl + P)
step 12
In git sync plugin set auto push and auto pull to 1 minute.
Installation on iOS
see https://www.reddit.com/r/ObsidianMD/comments/yhahdp/a_relatively_simple_guide_on_syncing_windows_with/?utm_source=share&utm_medium=web2x&context=3
Requirements: iSH Shell and Obsidian MD iOS app.
For reference here’s a copy of the reddit post:
step 1
Install the Obsidian Git plug-in in Obsidian and enable it.
step 2
Make an account at github.com and create an empty repository.
step 3
Open GitHub Desktop and login to your account by selecting File > Options > Account
Now, press File > Clone Repository, and select the empty repository you just created. Where you clone this repository doesn’t matter, as long as you remember its location.
In the top toolbar once again, select Repository > Open in Command Prompt.
Paste git config --global credential.helper wincred and press enter. That should set up your credentials.
Next you want to go to file explorer and select View > Show > Hidden items. This is for windows 11 it should be a similar path for Windows 10.
step 4
Open the location of the cloned repository and select the formerly hidden .git folder. Cut this folder and paste it into your vault’s root directory.
Open GitHub desktop. It should normally have a notification informing you it can no longer find your repository.
Press locate, and point it to the location of your vault, which should now also house the .git folder.
GitHub desktop will have registered a vast number of changes made to your repository. This is perfectly normal. In the bottom-left corner, fill in the summary and description and then press commit.
After committing, press push origin. This button may also read Publish repository to GitHub.
At this point your vault files should be visible in your repository on GitHub and backing up should be as easy as using a hotkey in Obsidian, you can customise when to automatically baaackup in the plug-in along with a bunch of other options.
Huge shout out to this guide for the steps above if you want pictures to follow along please check it out.
step 5
Create an empty local vault in Obsidian on iOS ideally with the same name as your existing Vault. Do not click store in iCloud.
step 6
Open iSH and do the following:
1. In iSH:
1. Install git:
1. Update Alpine repos: apk update
2. Install git: apk add git
2. Create a directory called obsidian in your home directory by running cd ~ && mkdir obsidian
3. Mount your local vault folder into the obsidian folder
1. Run mount -t ios . obsidian
2. A file picker will show up
3. Choose the folder with your local vault, so open the Obsidian folder and then the folder with your vault which should be empty
4. Clone your git repository into obsidian
1. Change directory to obsidian: cd obsidian
2. Delete the .obsidian folder: rm -rf .obsidian
3. git clone https://github.com/ForceBru/ObsidianVaultTest . - use your own repository instead. Don’t forget the period . - this is what allows you to clone the repo into the current folder.
4. (Optional) Run ls -a to see whether your files are there
5. In Obsidian
1. Restart Obsidian (might not be necessary)
2. Open the file explorer
3. Use your Obsidian vault!
2. To push your changes, go back to iSH
1. Change directory to obsidian in your home directory: cd ~/obsidian
2. Run git status to confirm that there are modified files
3. Tell git who you are:
1. Set username: git config user.name ForceBruMobile
2. Set e-mail address: git config user.email "ForceBru@users.noreply.github.com"
4. Add files, commit and push. For example:
1. Add all files into the commit: git add .
2. Commit: git commit -m "Commit from mobile"
3. Push: git push
4. That’s it! Take a look at this example commit from iSH 65
3. To pull changes from GitHub:
1. In iSH:
1. Change directory to obsidian in your home directory: cd ~/obsidian
2. (Optional) Check whether there is stuff to pull
3. Actually update from the remote repo: git pull
2. In Obsidian:
1. Go to file explorer
2. If you don’t see your new notes, do the sort trick again:
3. Updates to existing notes seem to be reflected correctly
also install file and imagemagick: in iSH ->
apk add --no-cache file
apk add imagemagick