Assignment
Individual Assignment:
- Write an application that interfaces a user with an input &/or output device that you made
Group Assignment:
Link to Group Work- Compare as many tool options as possible.
. .
Individual Assignment
For this weeks assignment I decided to use Arduino and Processing together. I have a basic understanding of Processing App from running summer programs at PAST so it was not completely new to me. Although, I did have to go back and watch a few tutorial videos to be able to take this to the next level. While researching how to use Processing for this weeks assignment I did find a video that was somewhat helpful.
Processing Instructions
Below basic guide to get you started:
- Download and Install Processing: - Visit the official Processing website (https://processing.org/) and download the latest version for your operating system. - Follow the installation instructions to set up Processing on your computer.
- Open Processing: - Launch the Processing application after installation.
- Sketch Structure: - In Processing, your code is called a "sketch." A sketch consists of two main functions: `setup()` and `draw()`. - `setup()`: Runs once at the beginning of your sketch and is used for initial setup (e.g., setting the canvas size). - `draw()`: Loops continuously and is where you put the code for your animations or interactive elements.
- Basic Drawing:
- Use functions like `point()`, `line()`, `rect()`, `ellipse()`, etc., to draw shapes on the canvas.
- Example:
       ```java
       void setup() {
         size(400, 400);  // Set canvas size
       }

       void draw() {
         background(255); // Set background color to white
         ellipse(200, 200, 50, 50); // Draw a circle
       }
```
- Interactivity:
- You can capture user input using functions like `mousePressed()`, `keyPressed()`, etc.
- Example:
       ```java
       void mousePressed() {
         fill(random(255), random(255), random(255)); // Change fill color on mouse click
         ellipse(mouseX, mouseY, 50, 50);
       }
       ```
. - Variables:
- Use variables to store and manipulate data. For example, `int`, `float`, and `color` are common variable types.
- Example:
       ```java
       float circleSize = 50;

       void setup() {
         size(400, 400);
       }

       void draw() {
         background(255);
         ellipse(200, 200, circleSize, circleSize);
       }
```
- Functions and Libraries: - Processing comes with a variety of built-in functions for math, color manipulation, etc. - Explore the reference (https://processing.org/reference/) for a list of functions and libraries.
- Exporting: - Once you've created your sketch, you can export it as a standalone application or share it as a web app.
The first thing I did was to wire up an LED and resistor through a breadboard to connect to the Arduino to make sure the LED would blink as planned.
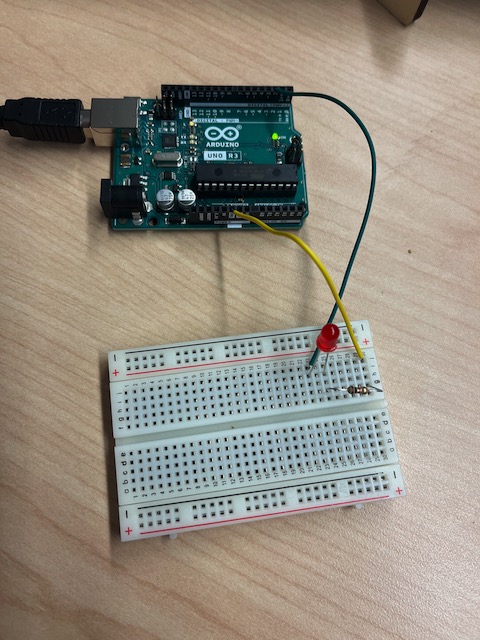
The Arduino code for the LED was pretty straight forward.
    int redLed = 3;

unsigned long millisFromStart = 0;
unsigned long millisPrvReadRedLed = 0;
unsigned long redLedInterval = 1000;


void setup() {
  // put your setup code here, to run once:
  pinMode(redLed, OUTPUT);

}

void blinkRedLed() {

}

void loop() {
  // put your main code here, to run repeatedly:

  digitalWrite(redLed, HIGH);
  delay(1000);
  digitalWrite(redLed, LOW);
  delay(1000);

}
After switching to Processing, I tried the code and Arduino set up from the video but I was unable to get the Java window to display the two buttons so I had to do more research as to why that was not working.
More research led back to the same video so after entering the code from the video and running the code I would keep getting this error. So I copied the error and did a Google search for solutions. The error was related to usb port. I tried several attempts to modify the code to connect to the proper port.
      java.lang.RuntimeException: Error opening serial port USB: Port not found
	at processing.serial.Serial.(Unknown Source)
	at processing.serial.Serial.(Unknown Source)
	at sketch_231102a.setup(sketch_231102a.java:65)
	at processing.core.PApplet.handleDraw(PApplet.java:2051)
	at processing.awt.PSurfaceAWT$9.callDraw(PSurfaceAWT.java:1386)
	at processing.core.PSurfaceNone$AnimationThread.run(PSurfaceNone.java:356)
Eventually, I was able to find this code below to list what ports were available in Processing.
// Example by Tom Igoe

import processing.serial.*;

// The serial port
Serial myPort;

// List all the available serial ports
printArray(Serial.list());
I had to change this line of code String portName = "USB";//Enter your COM port to make it work. In end the code line was String portName = "/dev/cu.usbmodem1101";//Enter your COM port in order for it to connect properly.
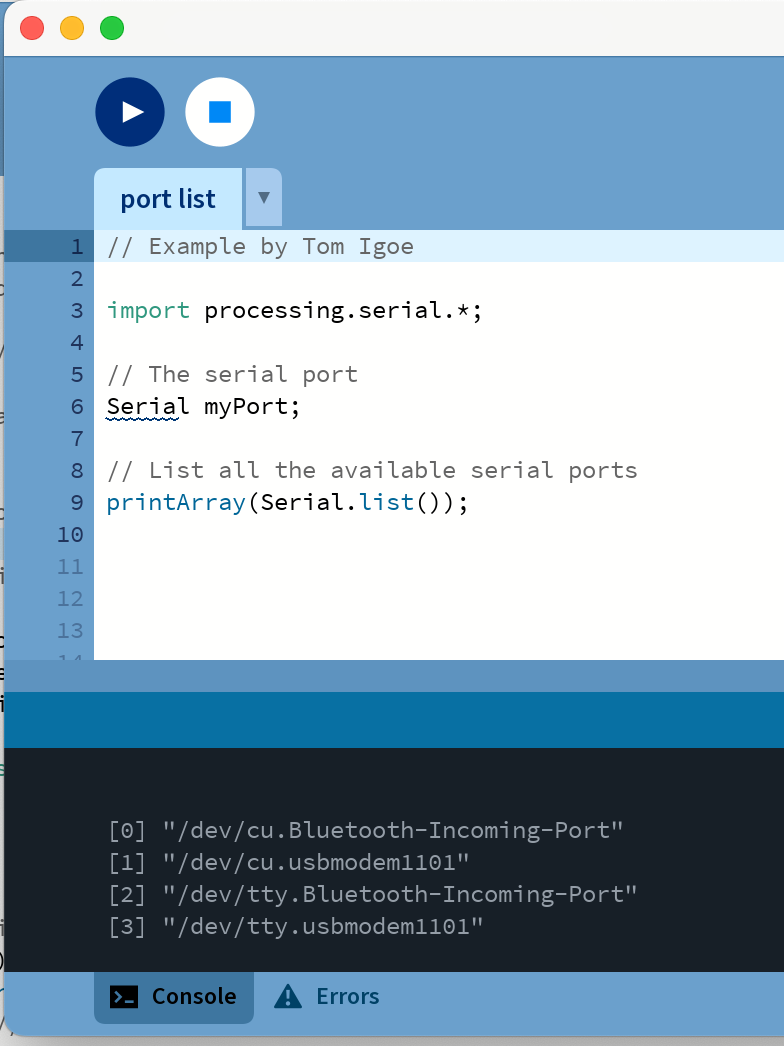
This helped fix the port issue so for future projects, I suggest that you execute this sketch first to see list of ports available and the exact name of those ports.
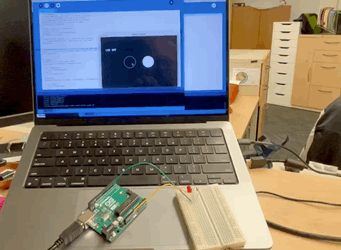
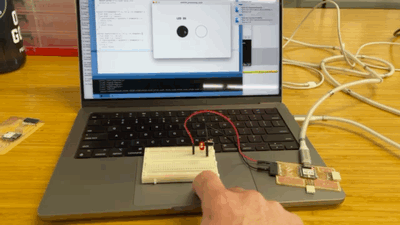
Even after changing the port in the code I was not able to get the Processing code to work SO, after a bit MORE research I found out that USB-C adapters have an up side and a down side. SO, after flipping the USB-C adapter over I was able to get Processing and Arduino to communicate. SUCCESS!! Everything worked. See the video below.
Processing Code
// Code from this website: https://srituhobby.com/processing-ide-with-led-on-and-off/
//code modified for Fab Academy by Andy Bruening

import processing.serial.*;//import serial communicate library

Serial myPort;//create serial object

int circleOneX, circleOneY;      // Position of button one
int circleX, circleY;  // Position of button two
int circleOnesize = 90;     // Diameter button one
int circleSize = 90;   // Diameter of button two

color currentColor, baseColor;//color variable
color circleOnecolor, circleColor;//color variable
color circleOneHighlight, circleHighlight;//color variable

boolean circleOneOver = false;
boolean circleOver = false;

PFont f;//font type
void setup() {
  size(600, 400);//screen size
  circleOnecolor = color(51);//set colors to variable
  circleOneHighlight = color(51);//set colors to variable
  circleColor = color(255);//set colors to variable
  circleHighlight = color(204);//set colors to variable
  baseColor = color(102);//set colors to variable
  currentColor = baseColor;

  circleX = width/2+circleSize/2+25;
  circleY = height/2;
  circleOneX = width/2-circleOnesize+15;
  circleOneY = height/2;

  printArray(PFont.list());//print fonts list your computer
  f = createFont("Menlo-Bold", 20);//Enter your font name
  textFont(f);


  String portName = "/dev/cu.usbmodem101";//Enter your COM port
  myPort = new Serial(this, portName, 9600);//select first port
  print(portName);
}

void draw() {
  update(mouseX, mouseY);//main method
  background(currentColor);//background color

  if (circleOneOver) {
    fill(circleOneHighlight);
  } else {
    fill(circleOnecolor);
  }
  stroke(255);
  ellipse(circleOneX, circleOneY, circleOnesize, circleOnesize);//drow circle one

  if (circleOver) {
    fill(circleHighlight);
  } else {
    fill(circleColor);
  }
  stroke(0);
  ellipse(circleX, circleY, circleSize, circleSize);//drow circle two

  textAlign(LEFT);
  fill(255);//black color
  text("LED OFF", 37, 110);//display text


  textAlign(RIGHT);
  fill(0);//white color
  text("LED ON", 255, 110);//display text

}

void update(int x, int y) {
  if ( overCircle(circleX, circleY, circleSize) ) {
    circleOver = true;
    circleOneOver = false;
  } else if (circleOneOver(circleOneX, circleOneY, circleOnesize) ) {
    circleOneOver = true;
    circleOver = false;
  } else {
    circleOver = circleOneOver = false;
  }
}

void mousePressed() {
  if (circleOver) {
    currentColor = circleColor;
    myPort.write('1');//send value one
    print("LED on");
  }
  if (circleOneOver) {
    currentColor = circleOnecolor;
    myPort.write('0');//send value ziro
    print("LED off");
  }
}

boolean circleOneOver(int x, int y, int diameter) {
  float disX = x - mouseX;
  float disY = y - mouseY;
  if (sqrt(sq(disX) + sq(disY)) < diameter/2 ) {
    return true;
  } else {
    return false;
  }
}

boolean overCircle(int x, int y, int diameter) {
  float disX = x - mouseX;
  float disY = y - mouseY;
  if (sqrt(sq(disX) + sq(disY)) < diameter/2 ) {
    return true;
  } else {
    return false;
  }
}