Assignment
Individual Assignment
- Design a mold around the stock and tooling that you'll be using, mill it (rough cut & three-axis finish cut) and use it to cast parts.
Group Assignment:
Group Assignment
Review of Safety Data Sheet for Oomoo 25
Oomoo 25 consists of a two part solution know by the Trade name of
Part A: Body Double® & Body Double® SILK; Dragon Skin® Series & F/X Pro;
         Ecoflex® Series & Gel; Encapso® K; Equinox® Series; EZ Brush® Silicone;
         EZ-Spray® Silicone Series; Mold Max® Series; Mold Star® Series;
         OOMOO® Series; PoYo® Putty 40; Psycho Paint®; Rebound® Series;
         Rubber Glass®; Silicone 1515; Silicone 1603; Silicone 3030; Skin Tite®;
         Smooth-Sil® Series; Solaris®; SomaFoama® Series; SORTA-Clear® Series;
         Silicone 1708
 Part B: Body Double® & Body Double® SILK; Dragon Skin®
         Series & F/X Pro; Ecoflex® Series & Gel; Encapso® K; Equinox®
         Series; EZ Brush® Silicone; EZ-Spray® Silicone Series; Psycho
         Paint®; Mold Star® Series; OOMOO® Series; Rebound® Series;
         Rubber Glass®; Skin Tite®; Smooth-Sil® Series; Soma Foama®
         15 and 25; Solaris®; SORTAClear® Series; Silicone 1603;
         Silicone 1708
It is a silicone elastomer with no know restrictions on use. It is not a hazardous substance or mixture according to the US OSHA and the Canadian Workplace Hazardous Materials Information System.
General Precautions:
- If medical advice is needed, have product container or label on hand
- Keep out of reach of Childern
- Read label before use.
Description of First Aid
- Inhalation - Remove source(s) of contamination and move victim to fresh air. If breathing has stopped, give artificial respiration, then oxygen if needed. Contact physician immediately.
- Eye Contact - Flush eyes with plenty of water. If irritation persists, seek medical attention.
- Skin Contact - In case of skin contact, wash thoroughly with soap and water.
- Ingestion - Do not induce vomiting unless instructed by a physician. Never give anything by mouth to an unconscious person.
The full MSDS document can be found here.
>For our work with Oomoo 25, we followed all safety precautions and worked in our open shop area with good lighting and good ventilation. We followed all directed clean up and disposal proceedures as well.
Link
Individual Assignment
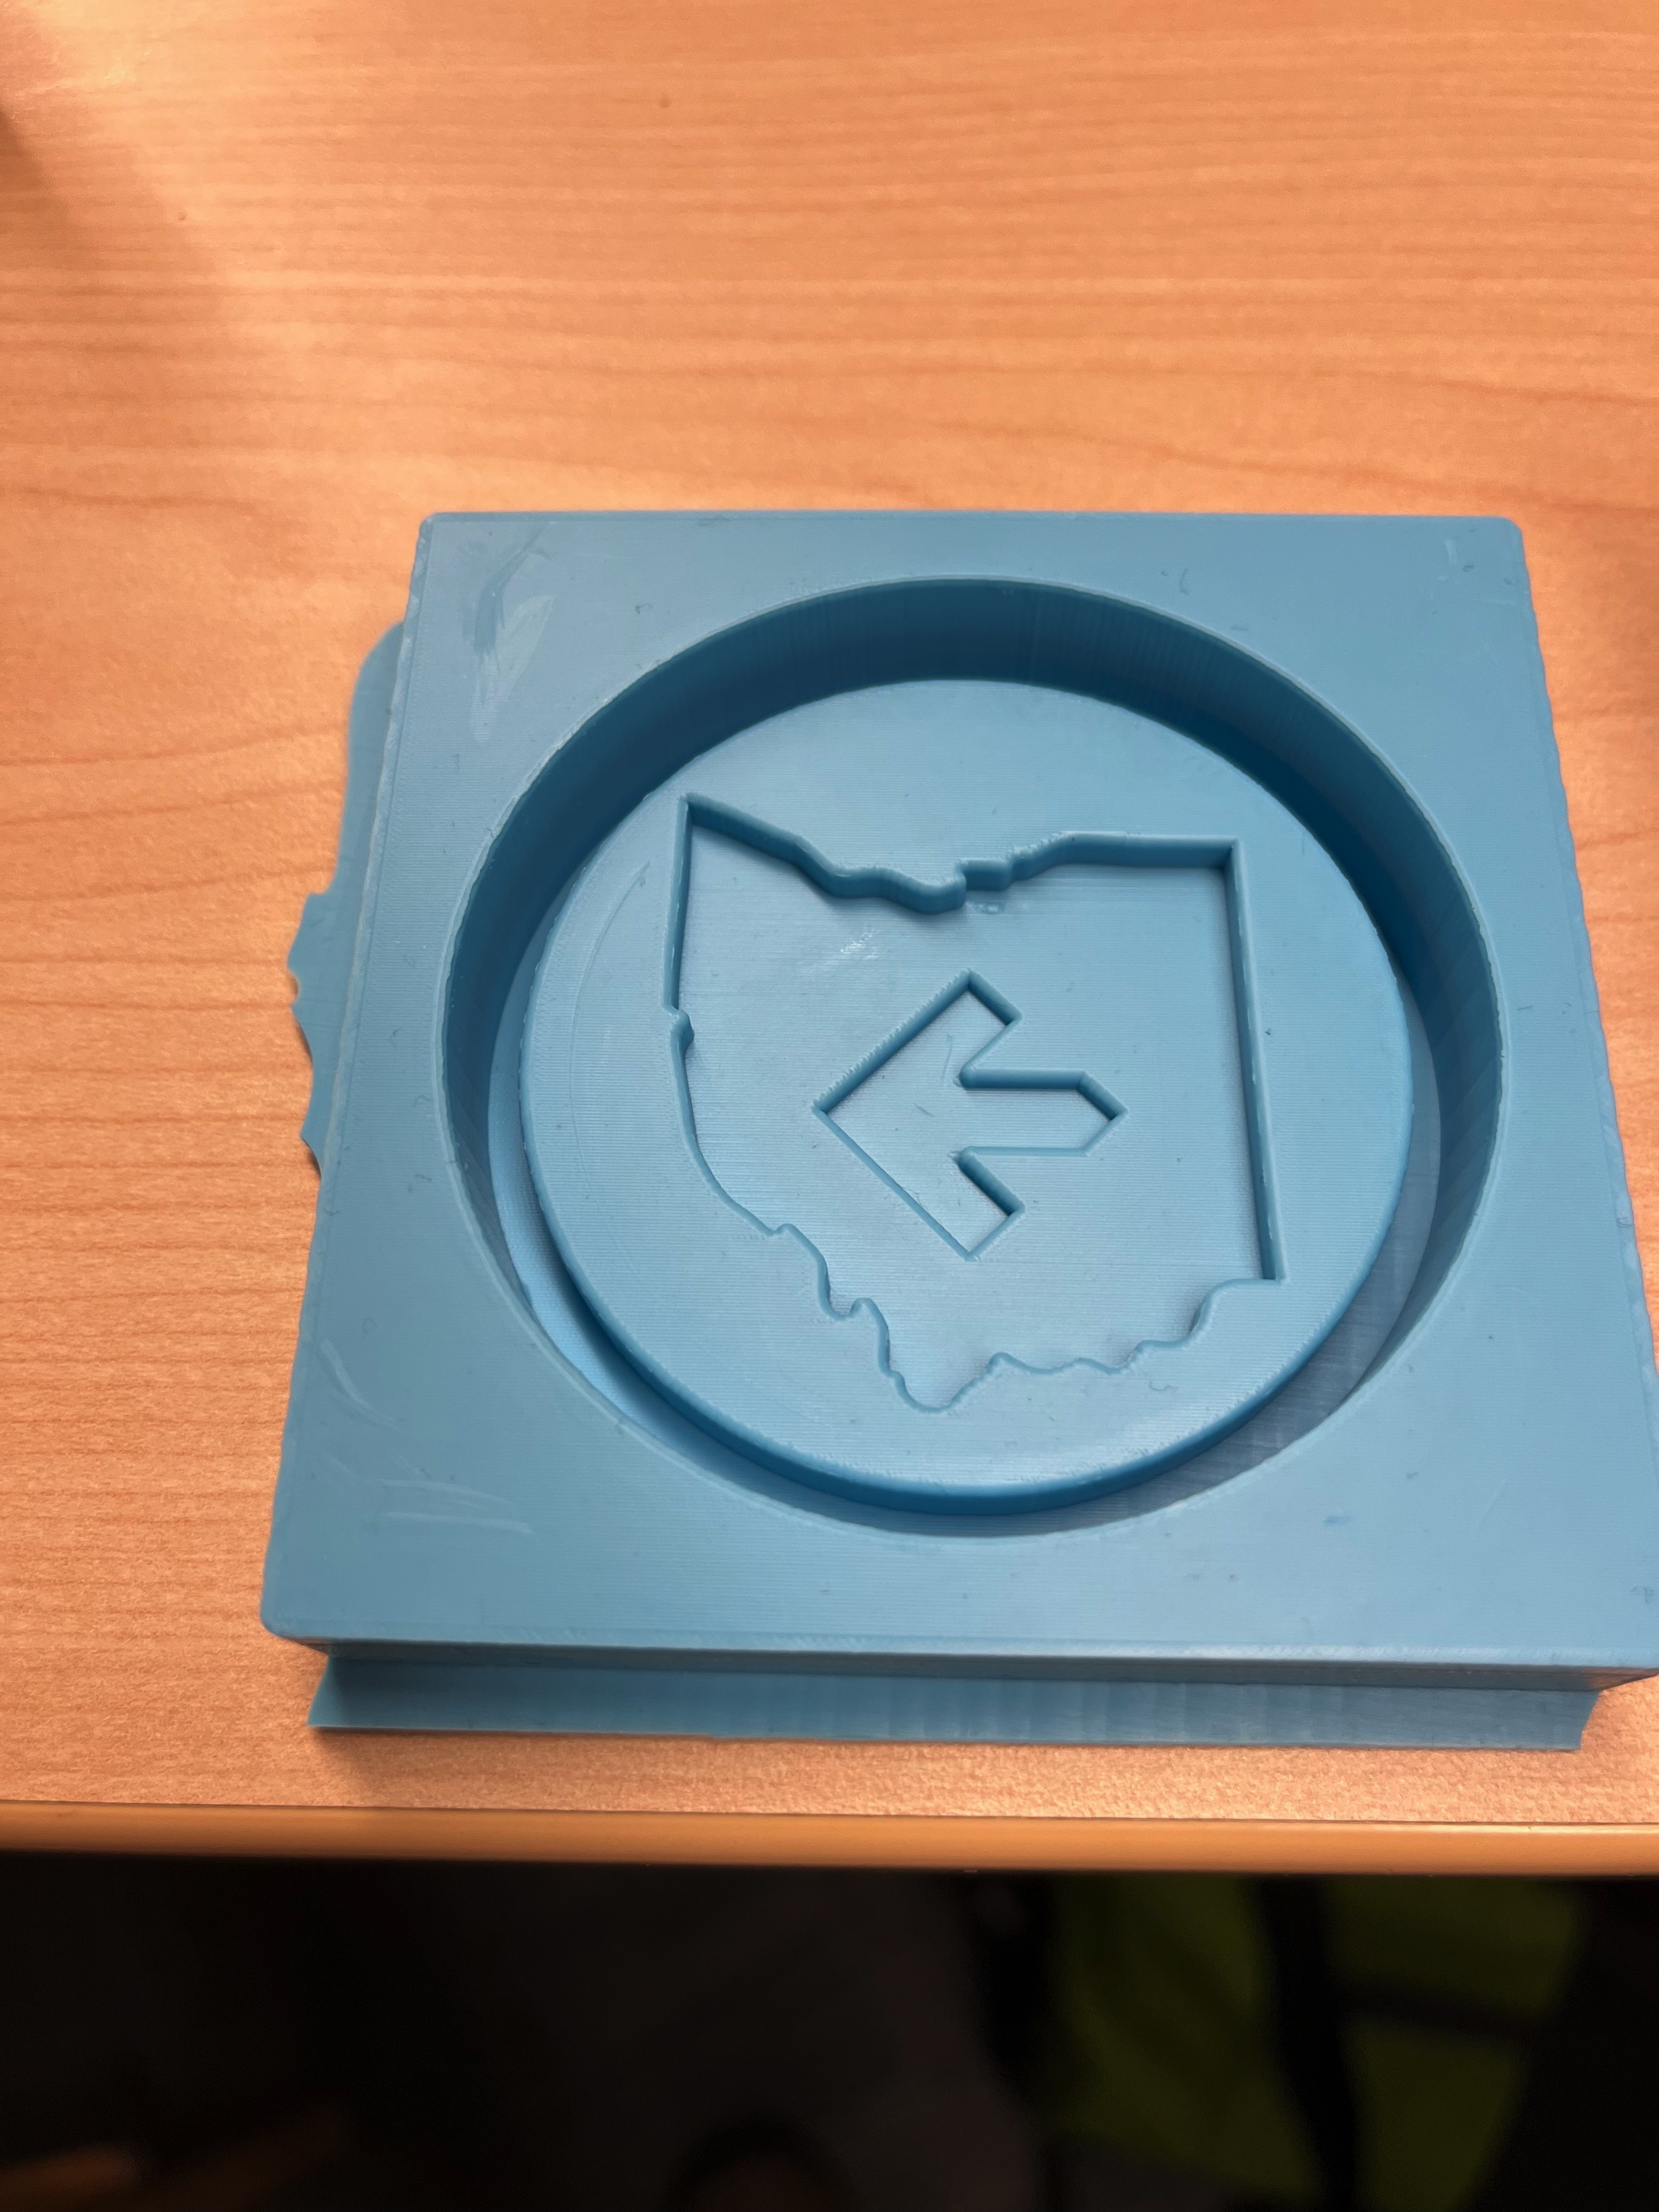
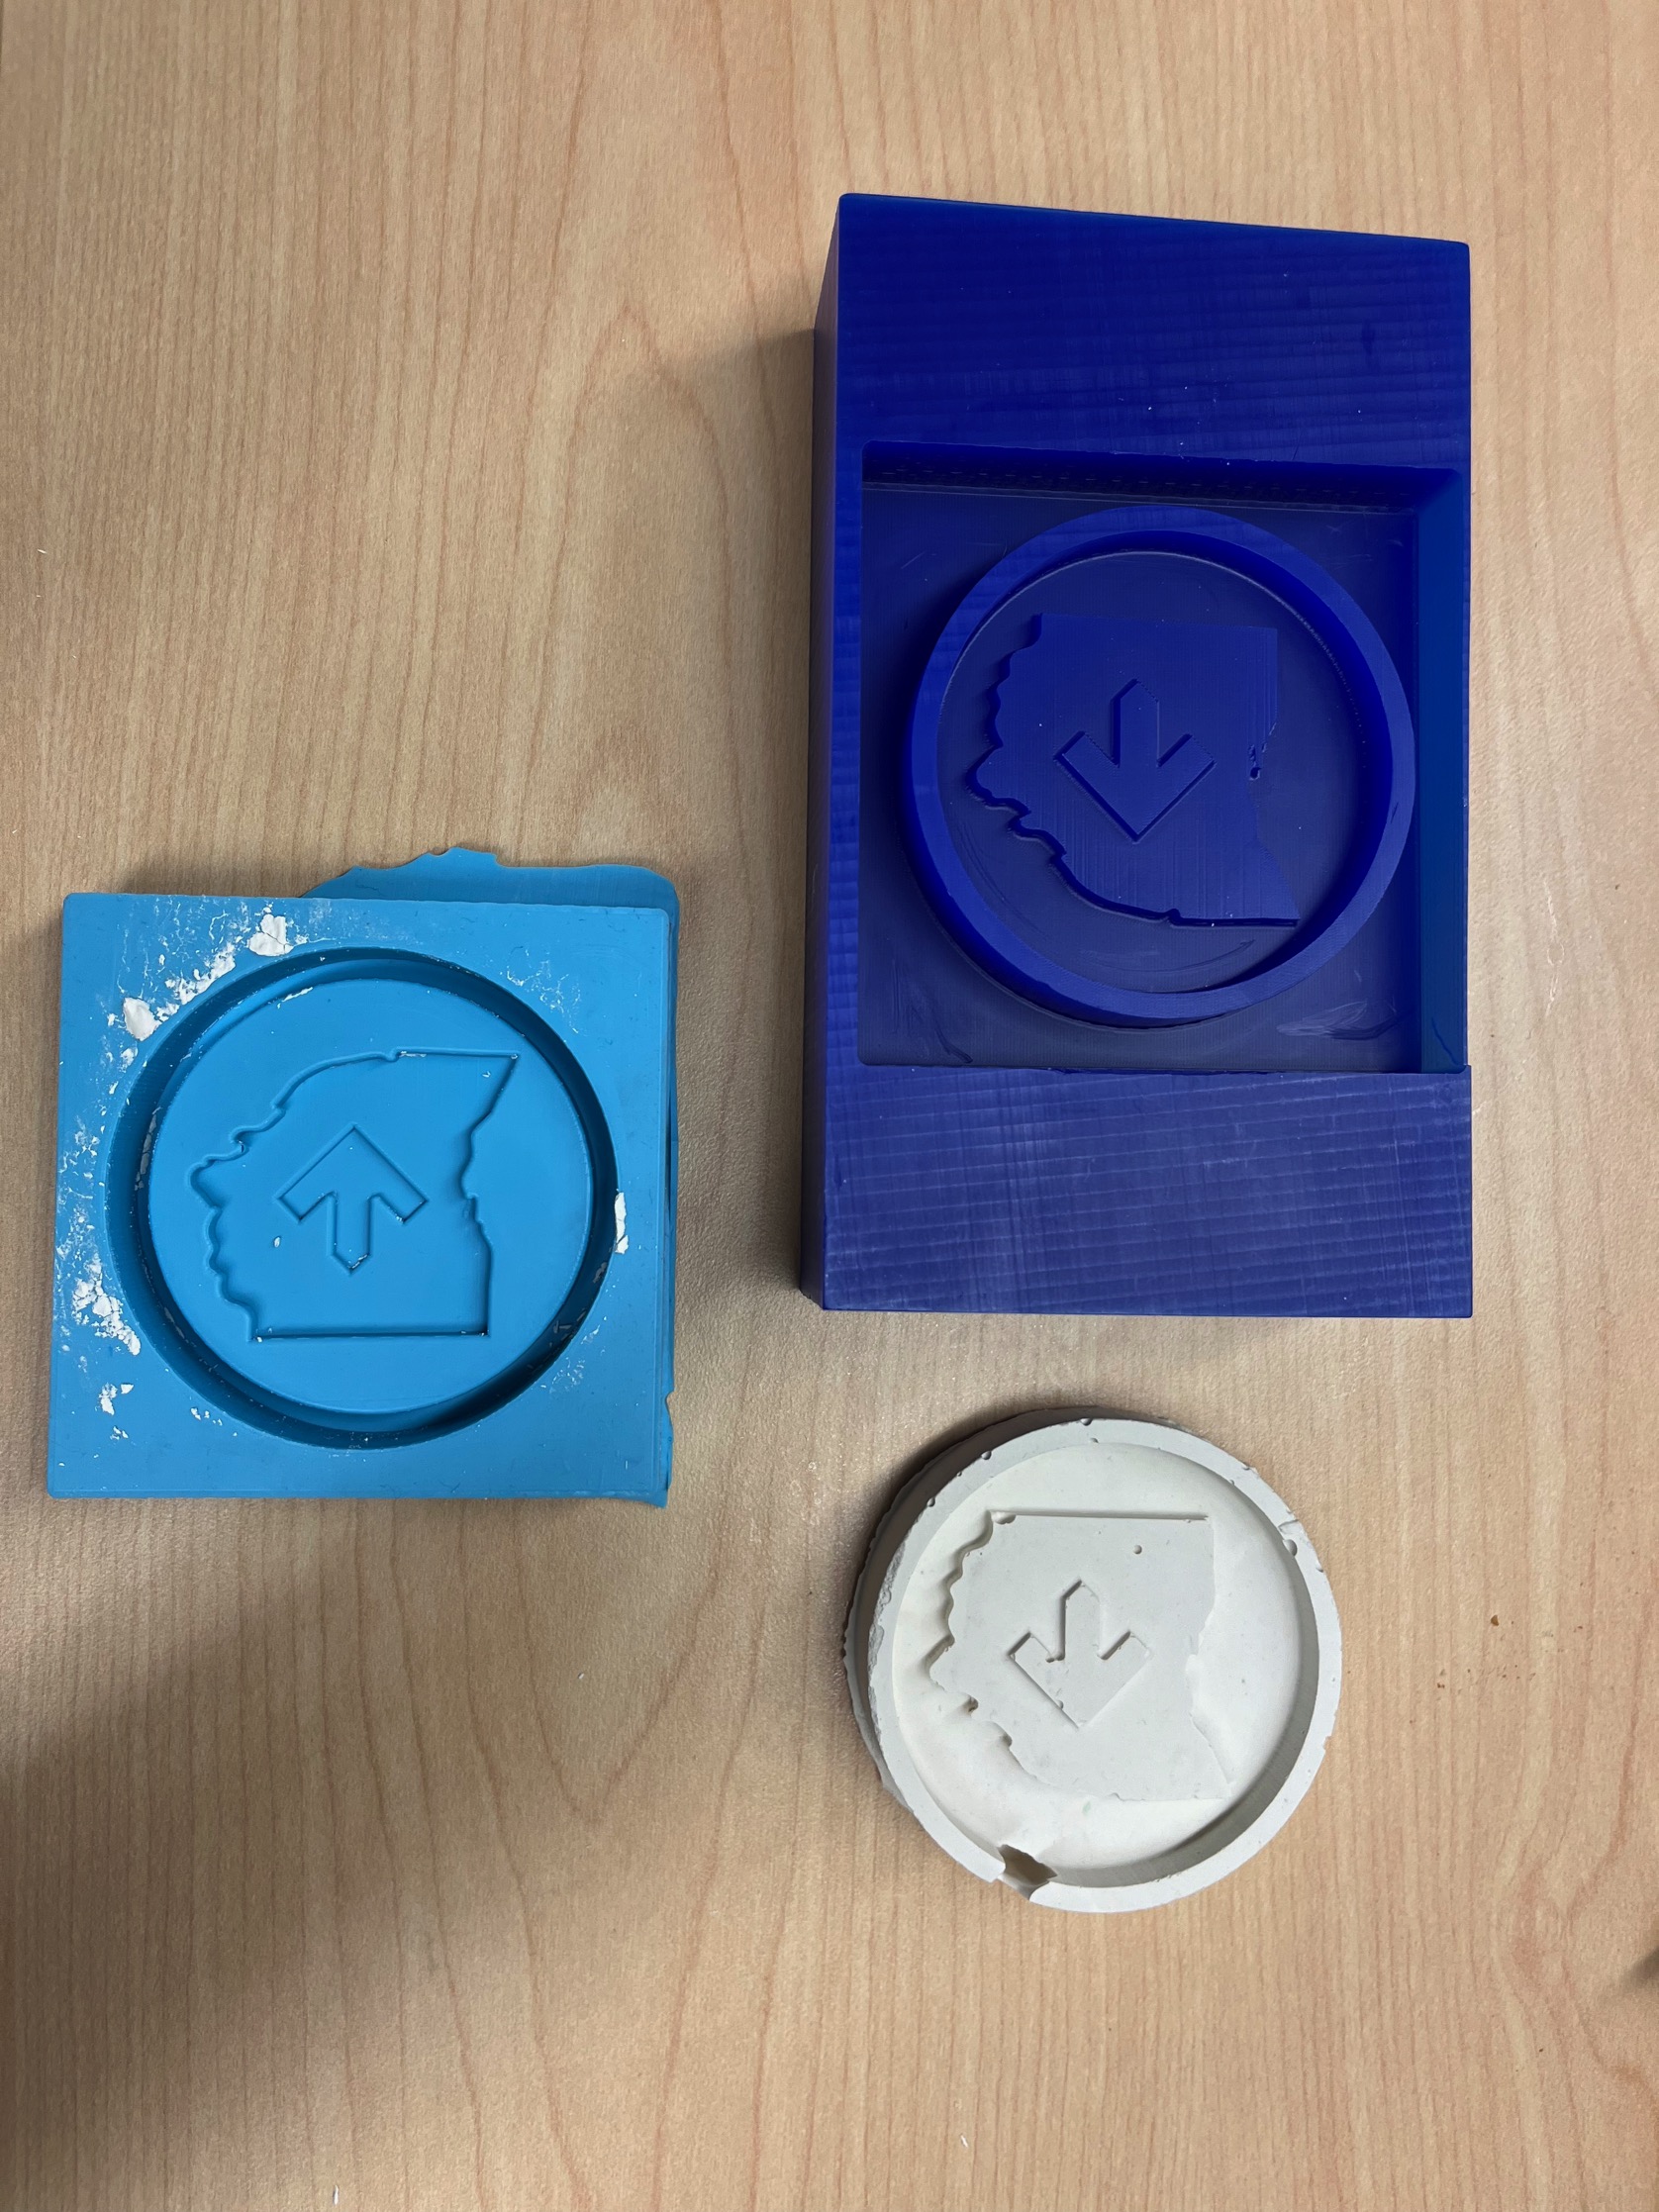
- I decided to design something that might be used as part of my fundraising efforts for my cancer research ride with Pelotonia. Pelotonia
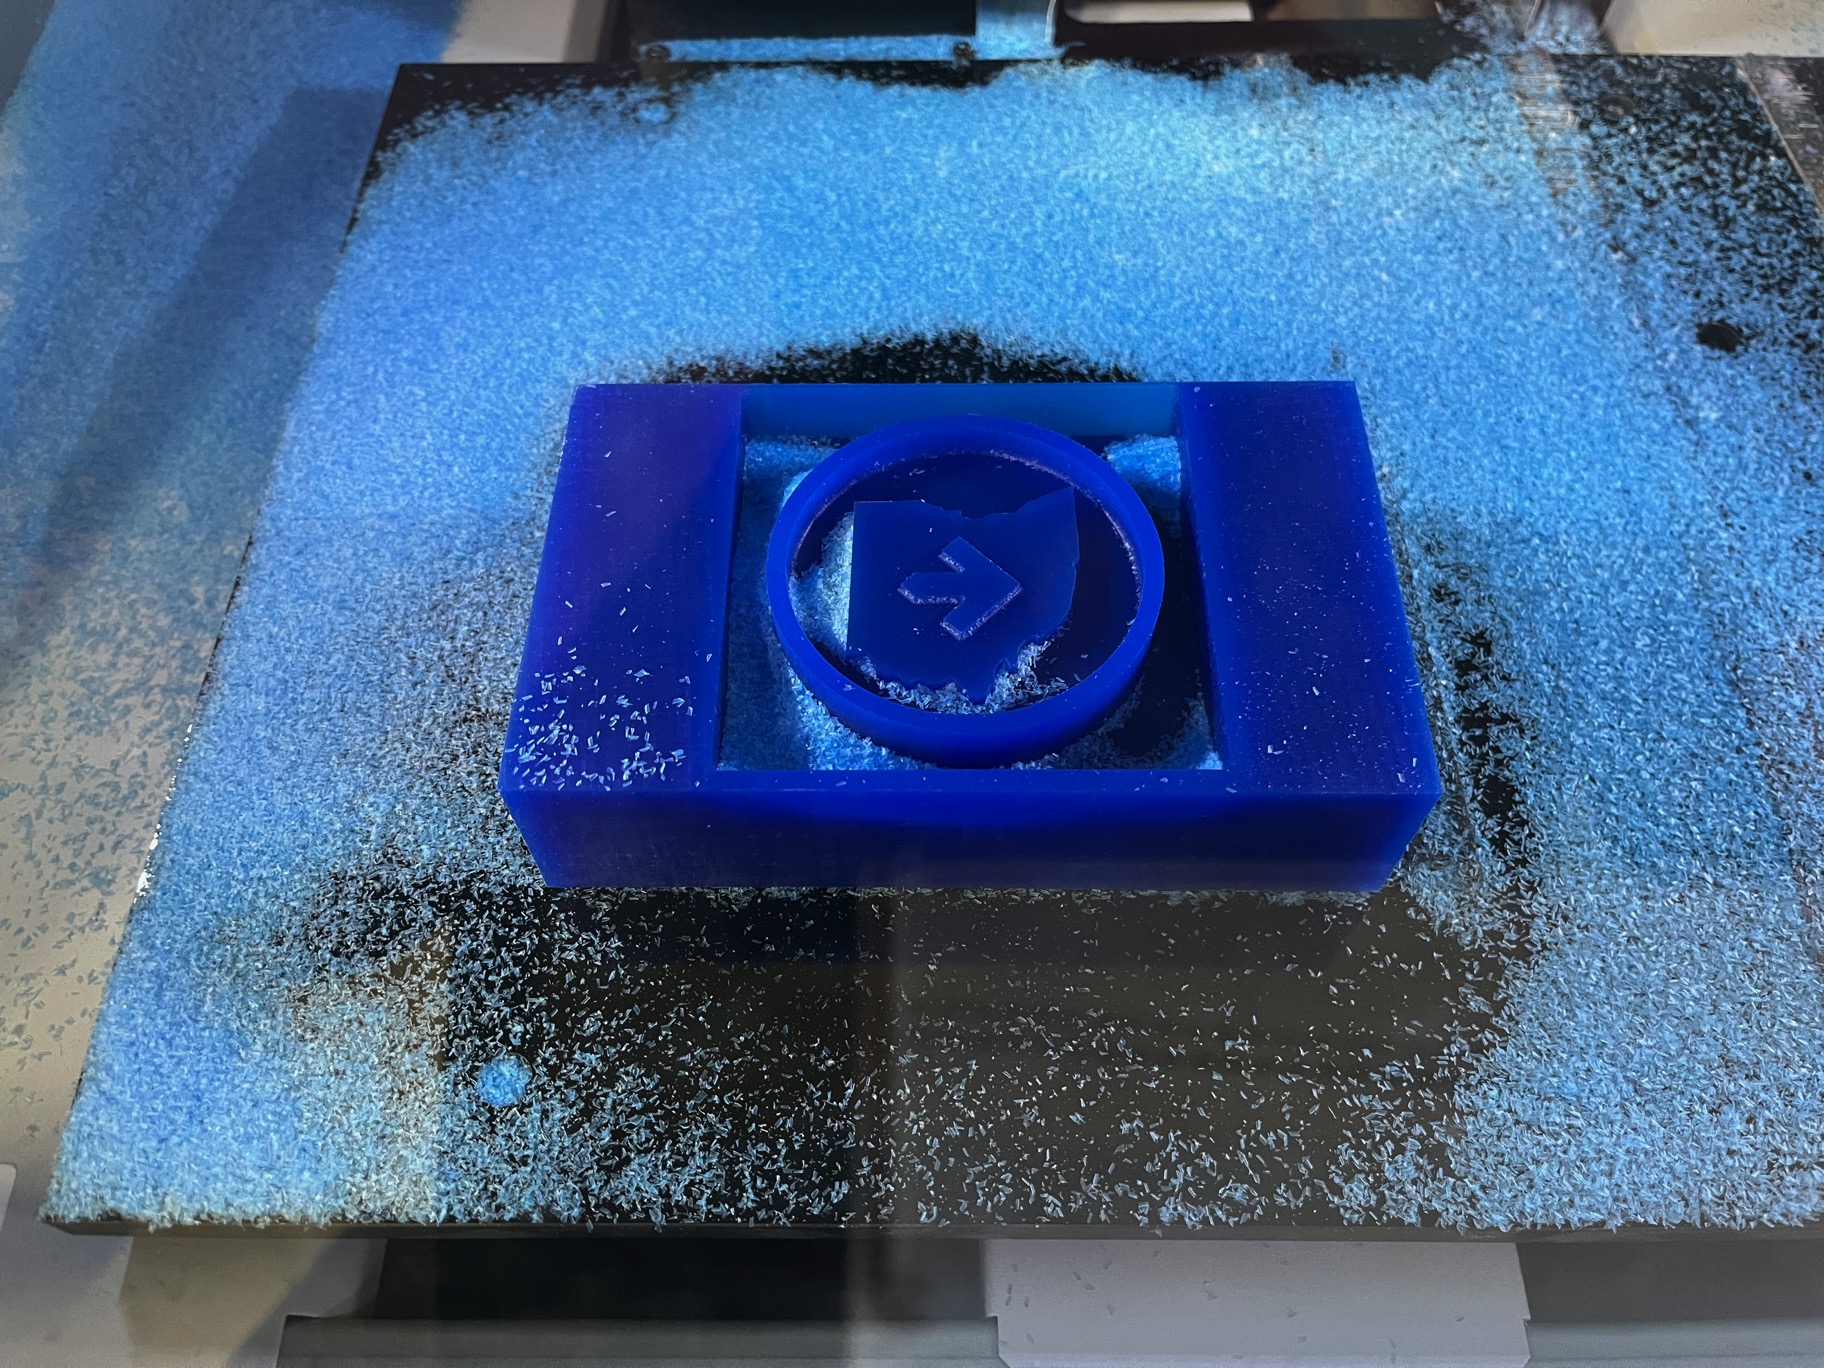
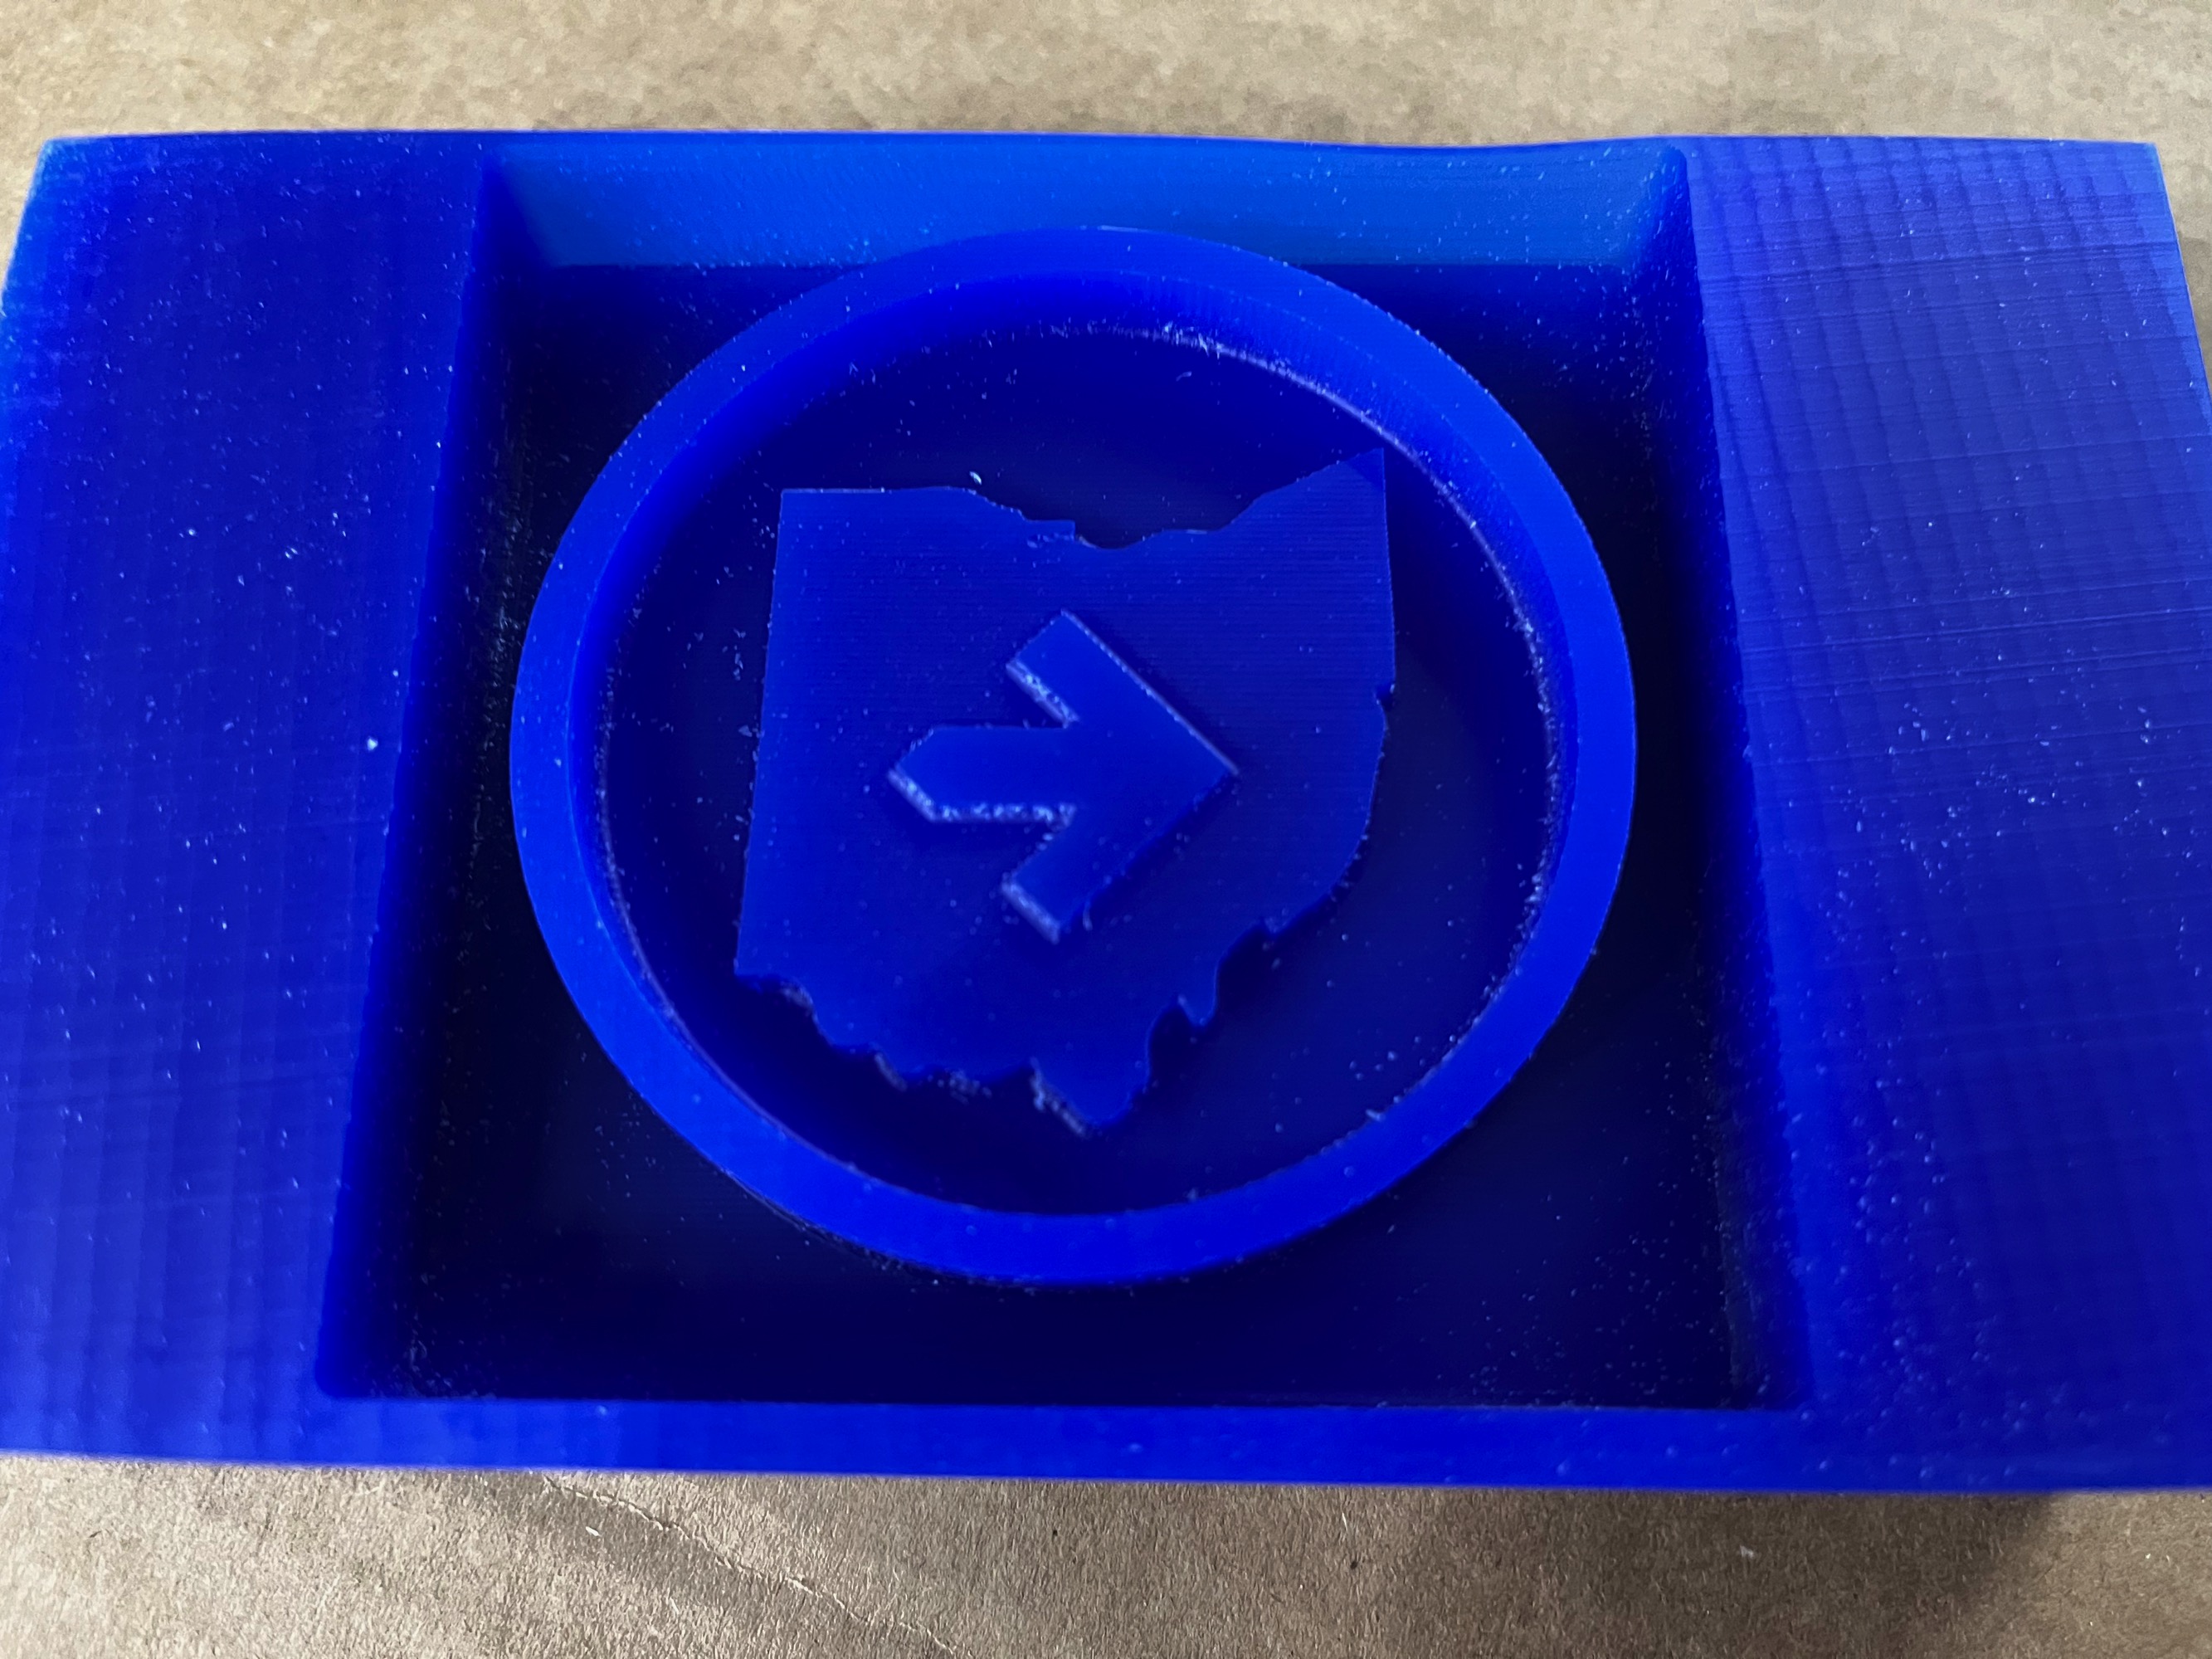
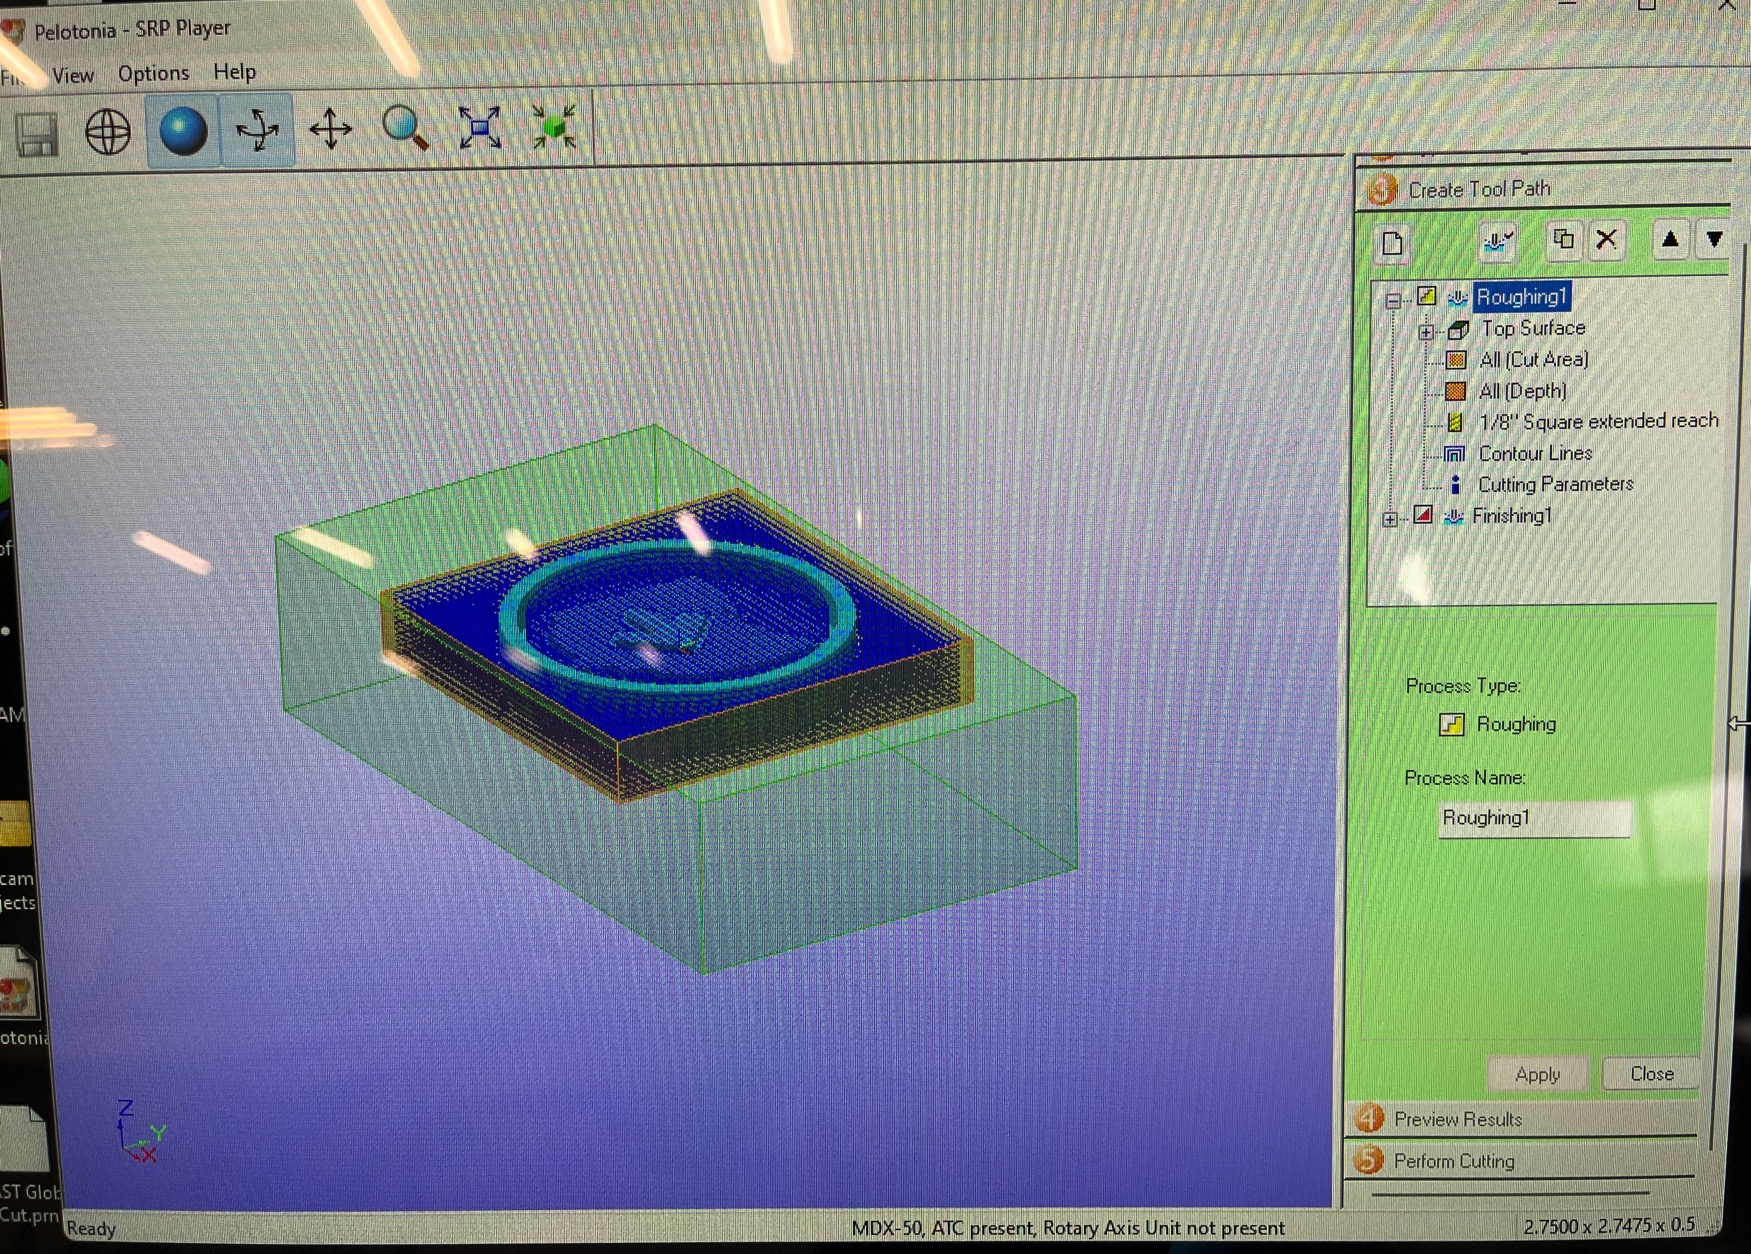
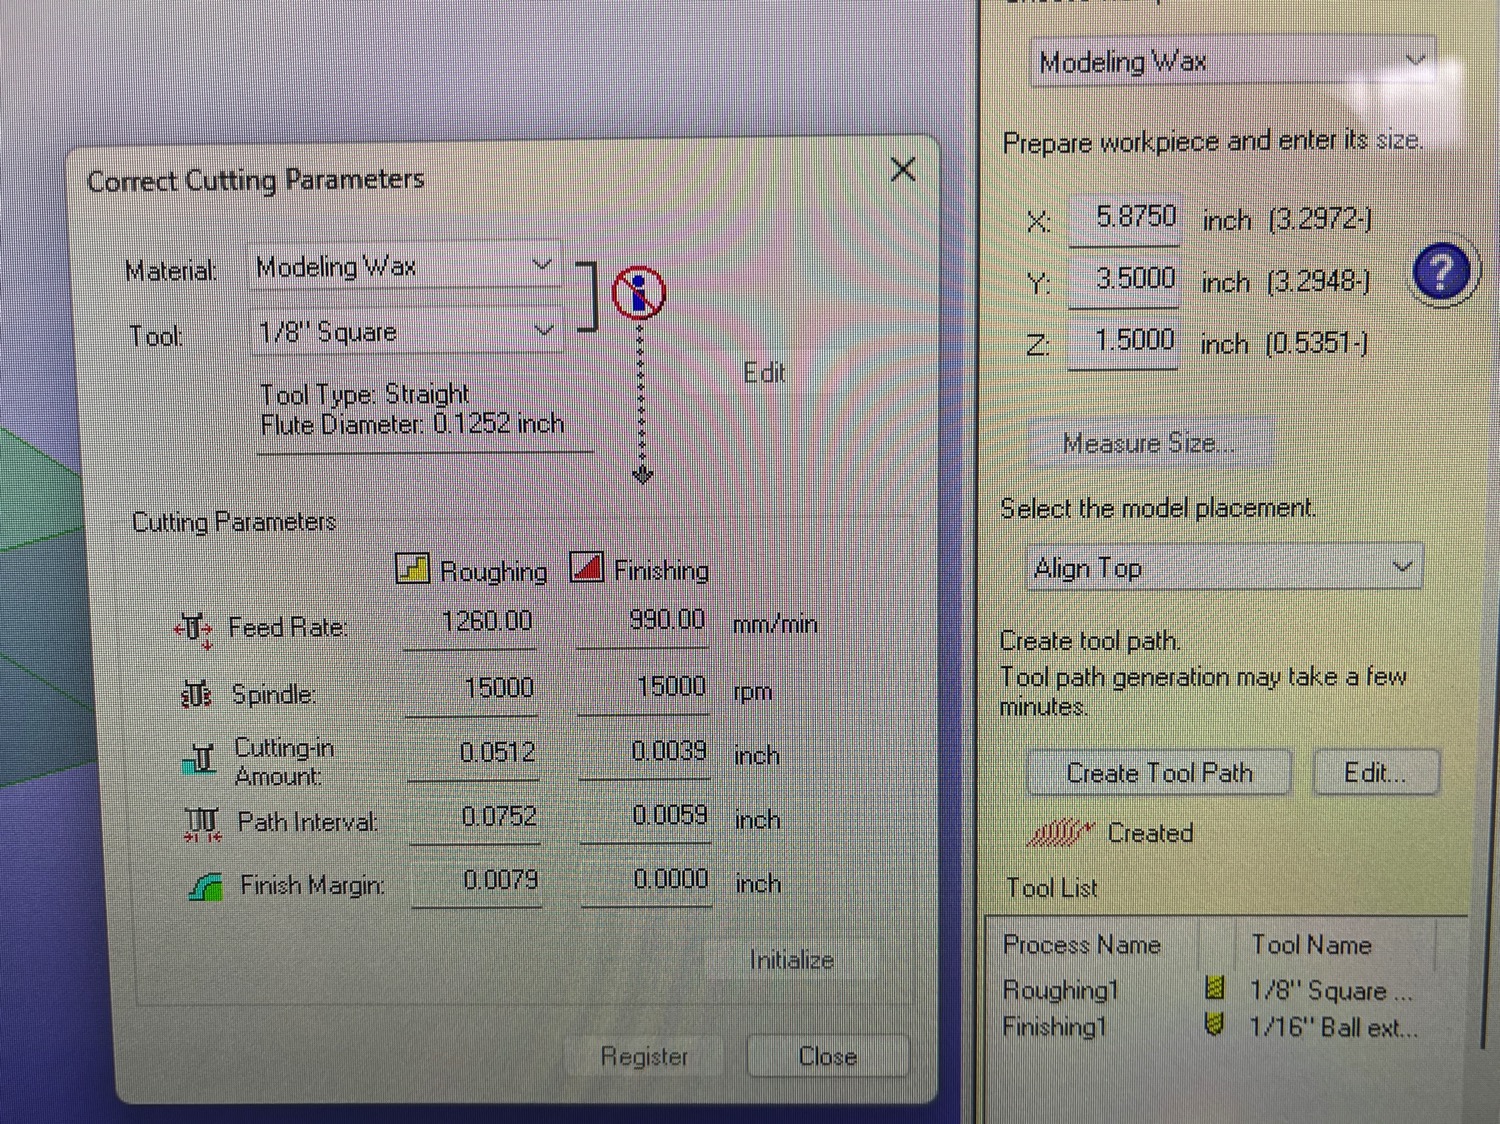
- I used a 5.875"x 2.5'x 1.5" block of machineable wax as the stock
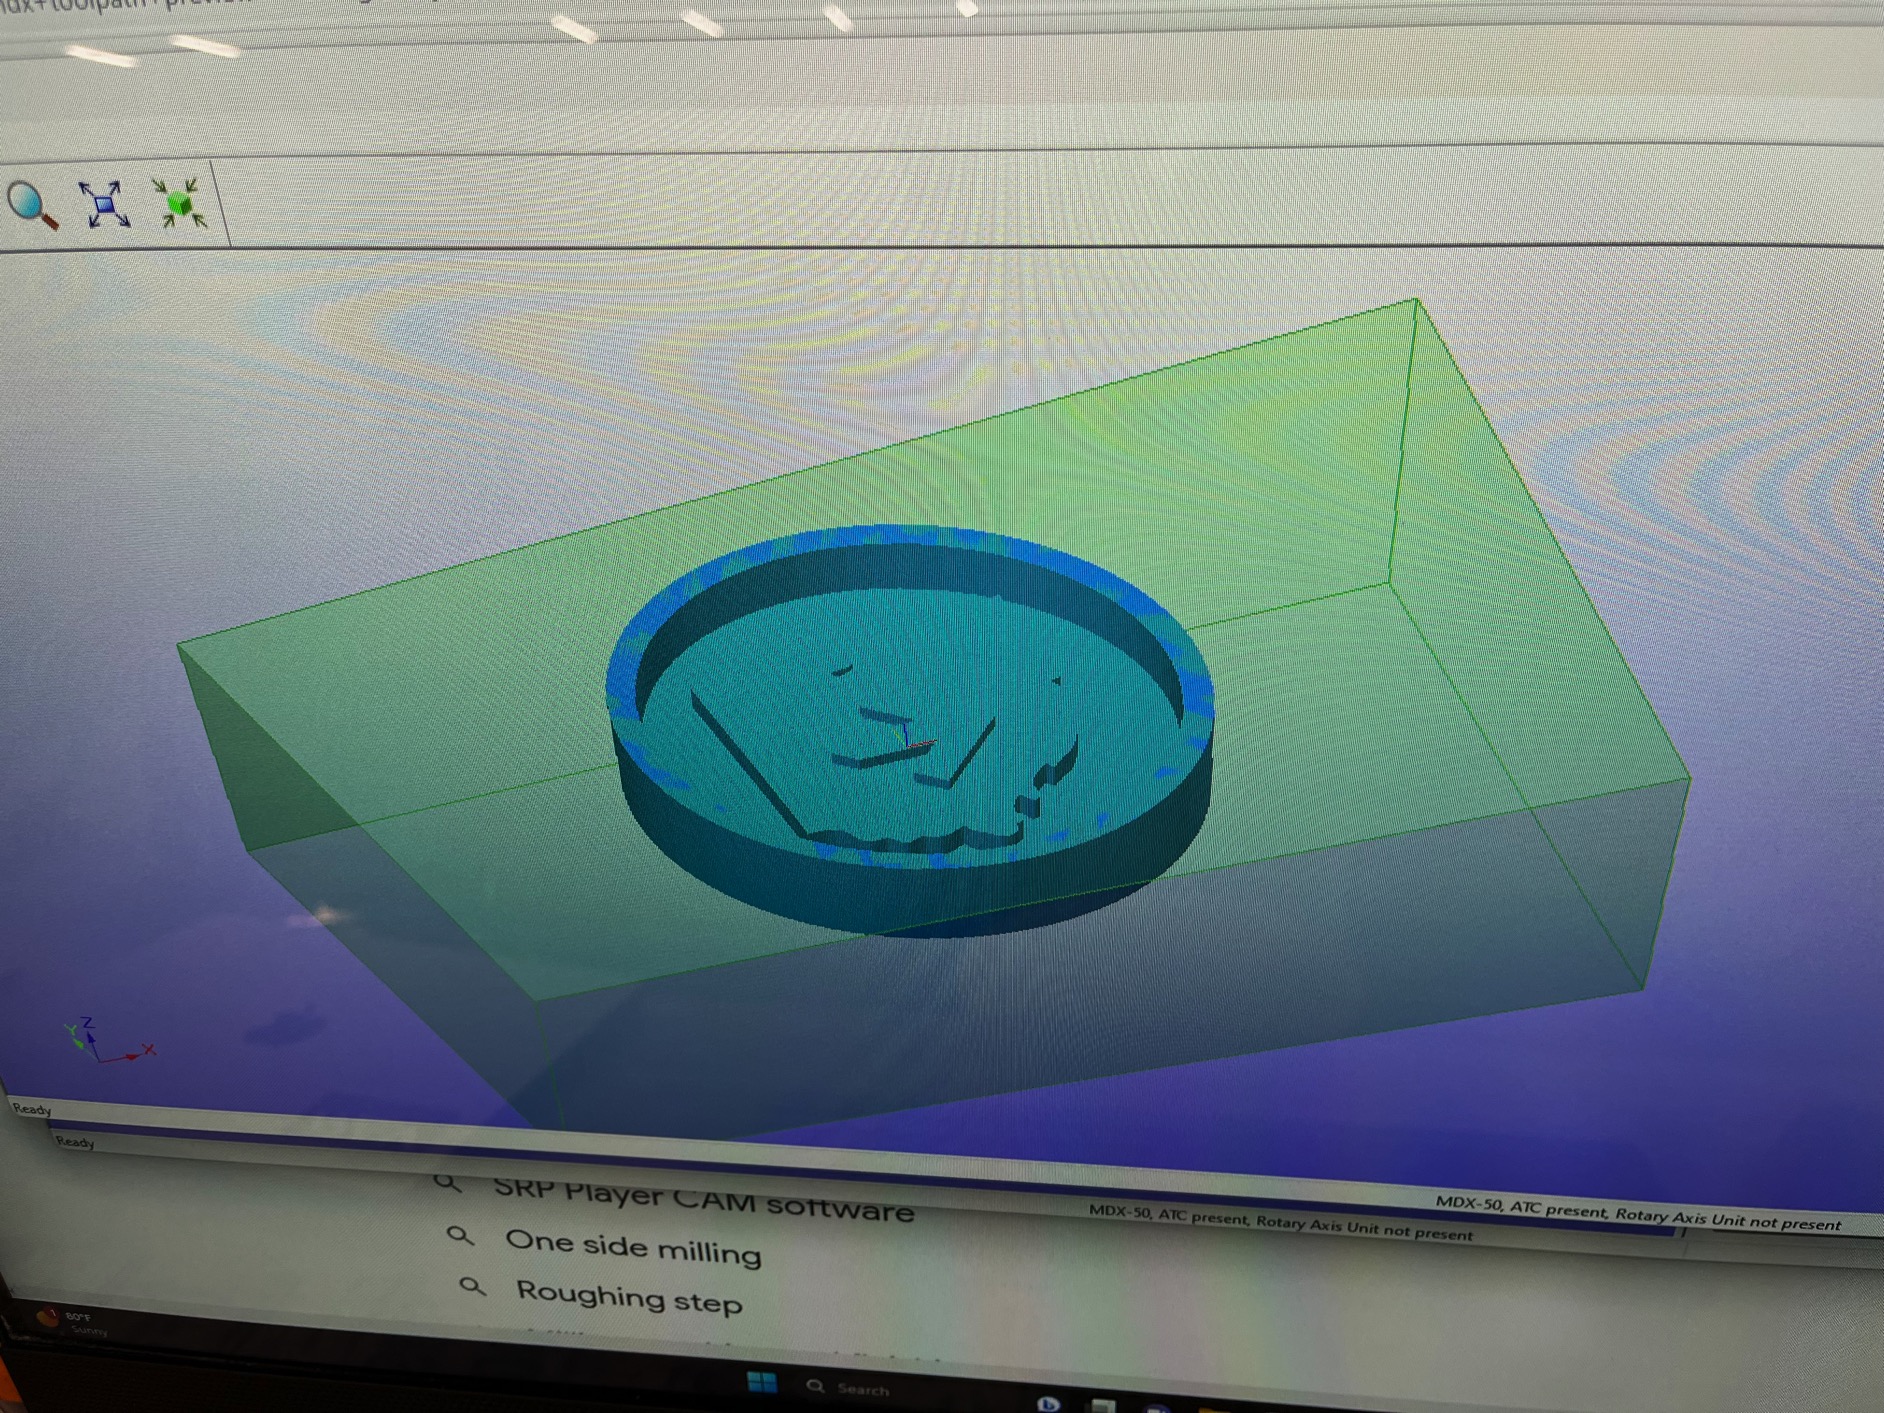
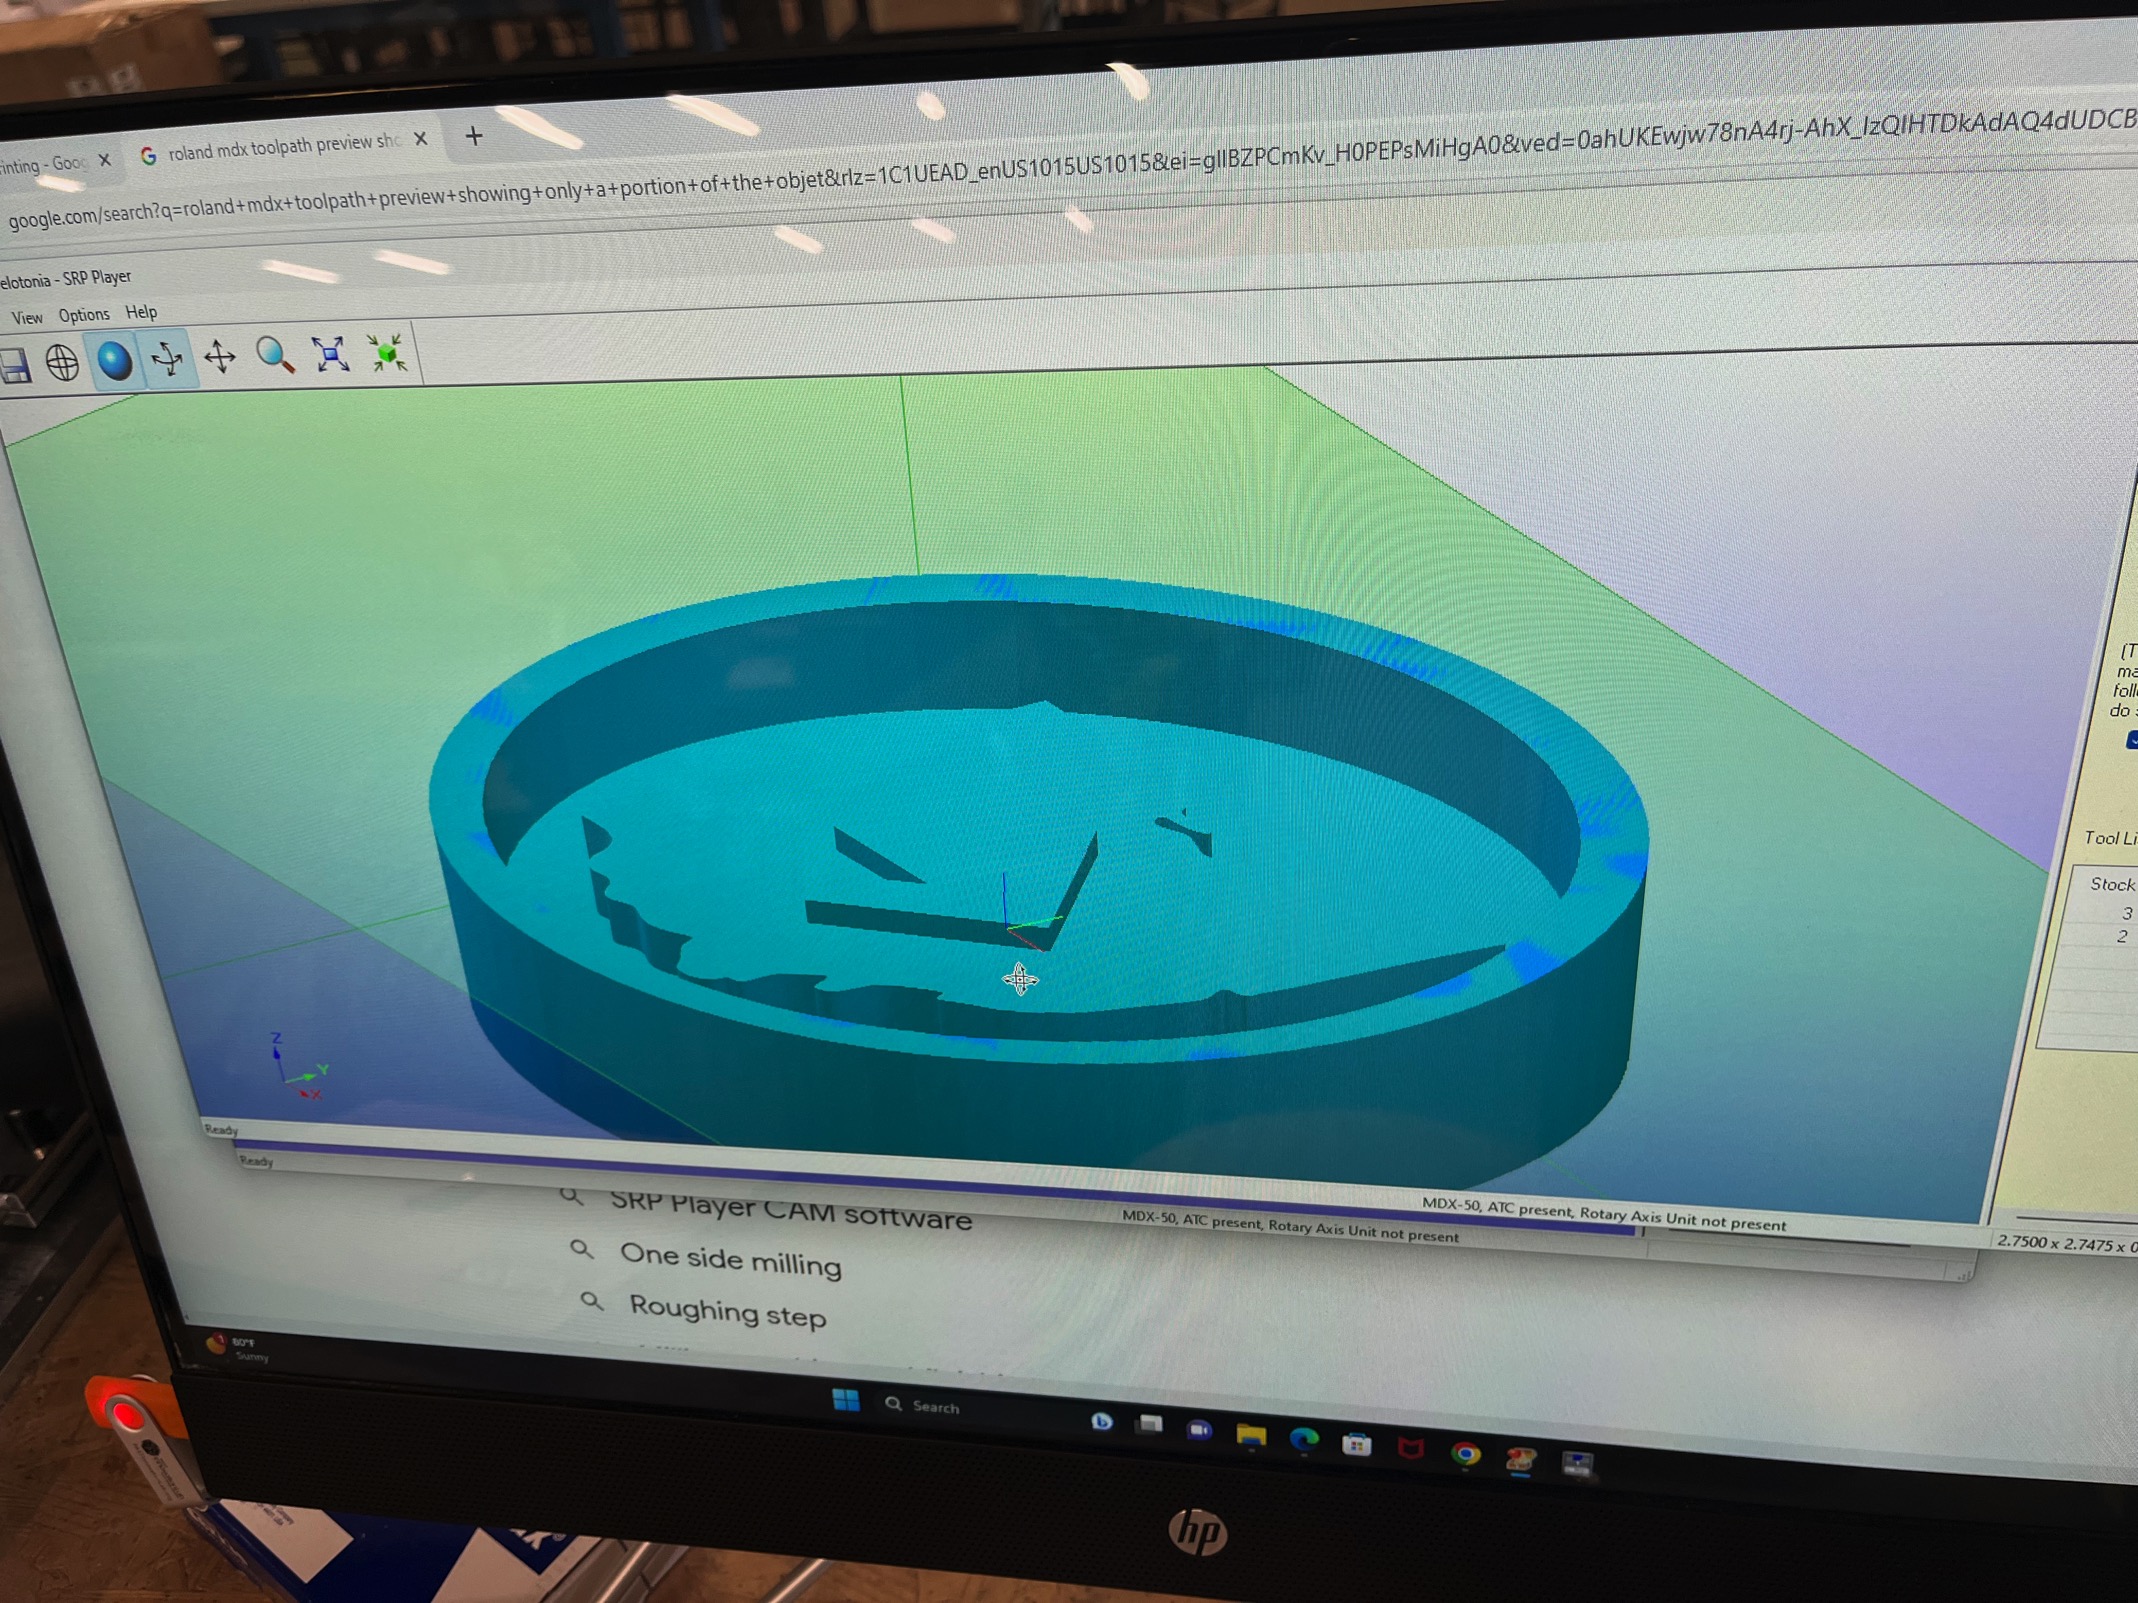
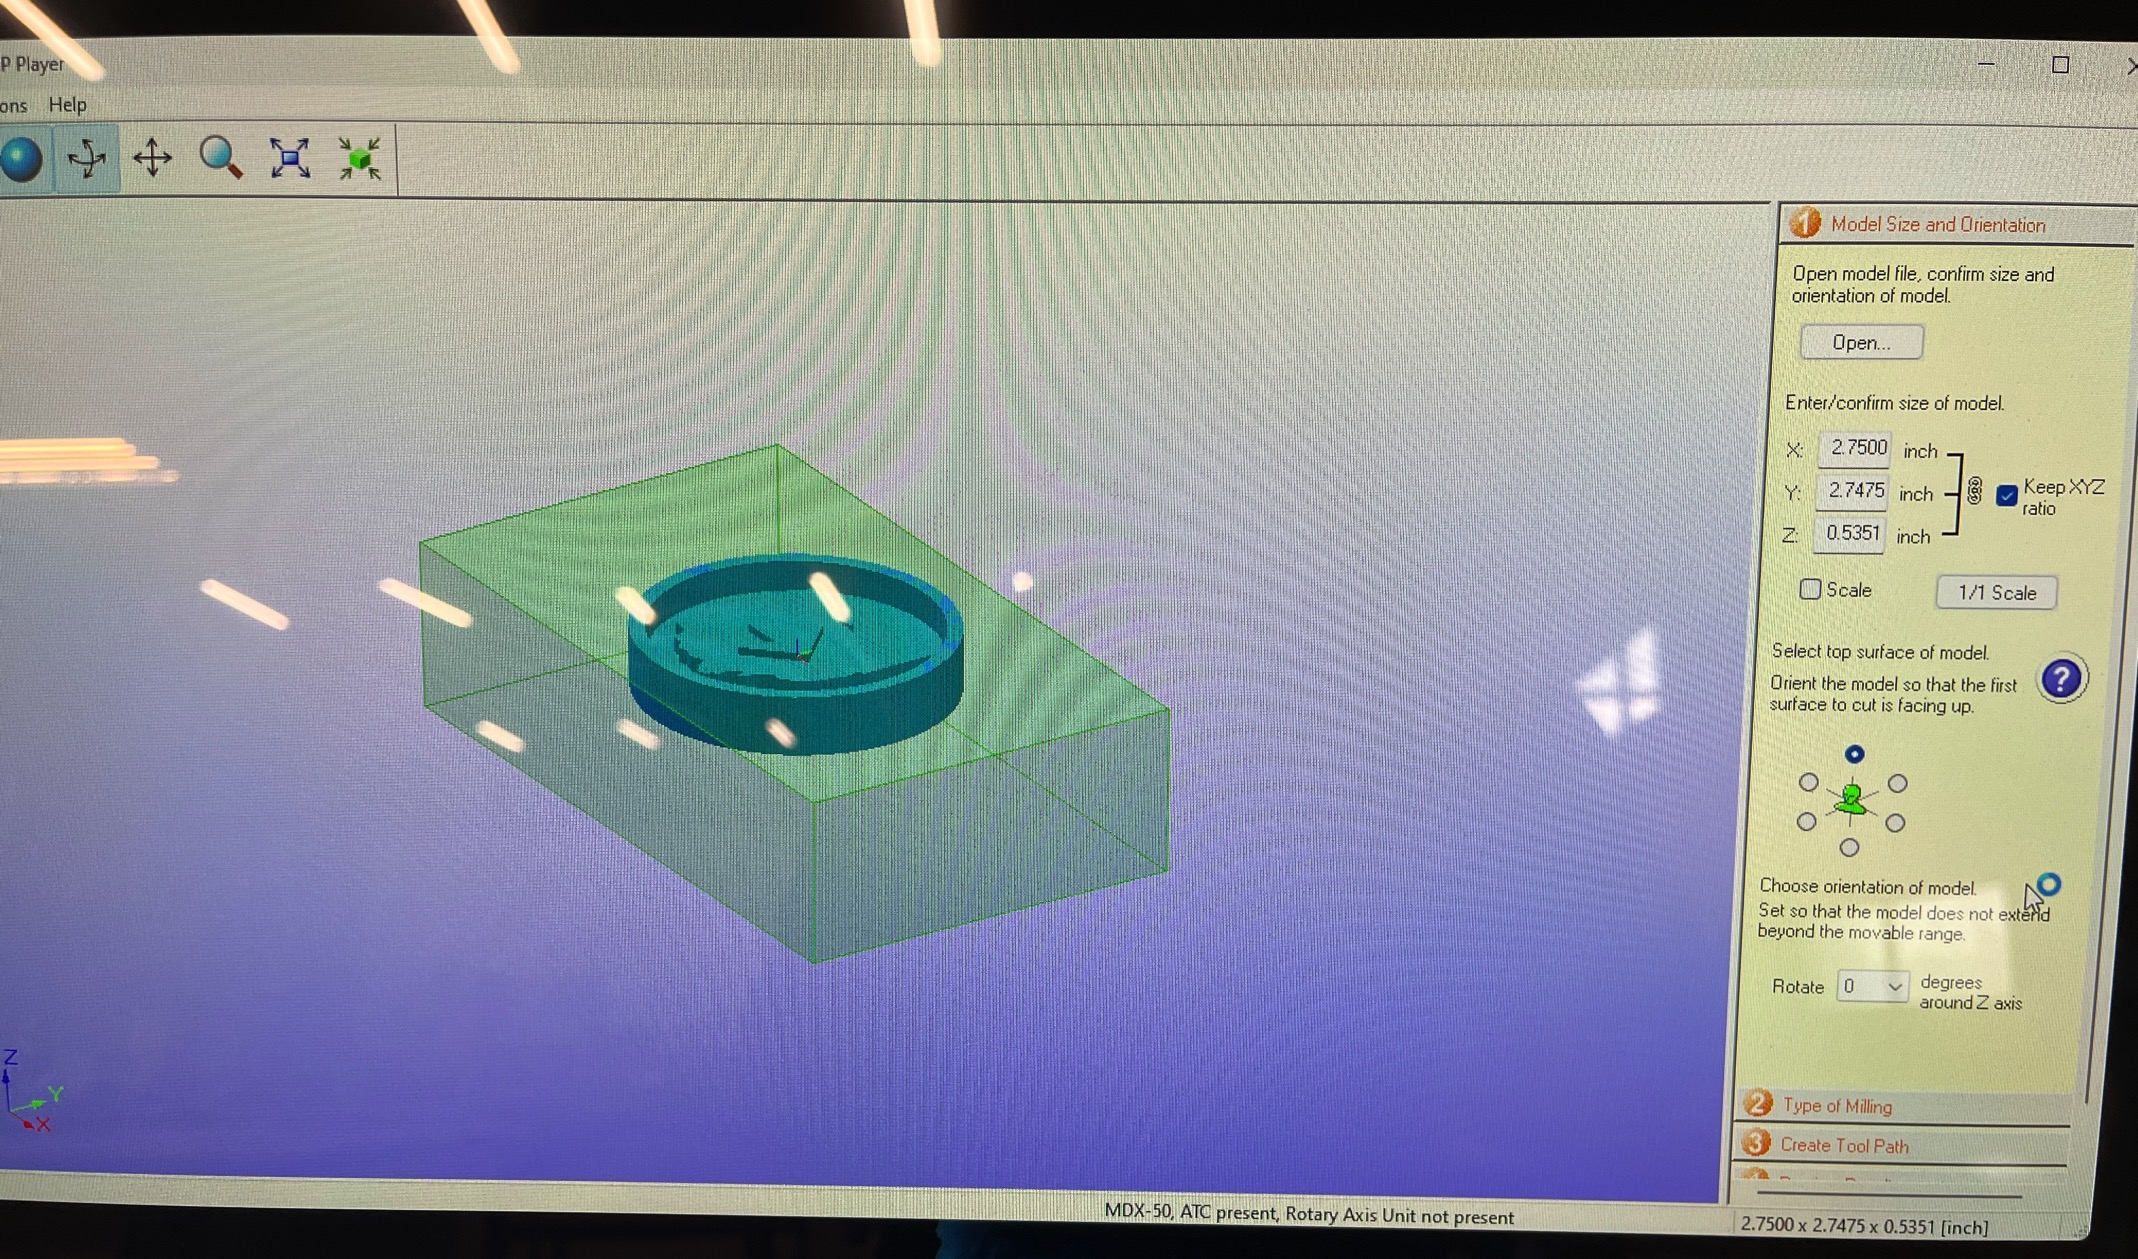
- Created the .stl file in Onshape and then opend it in the SRP player for the Modela MDX 50.
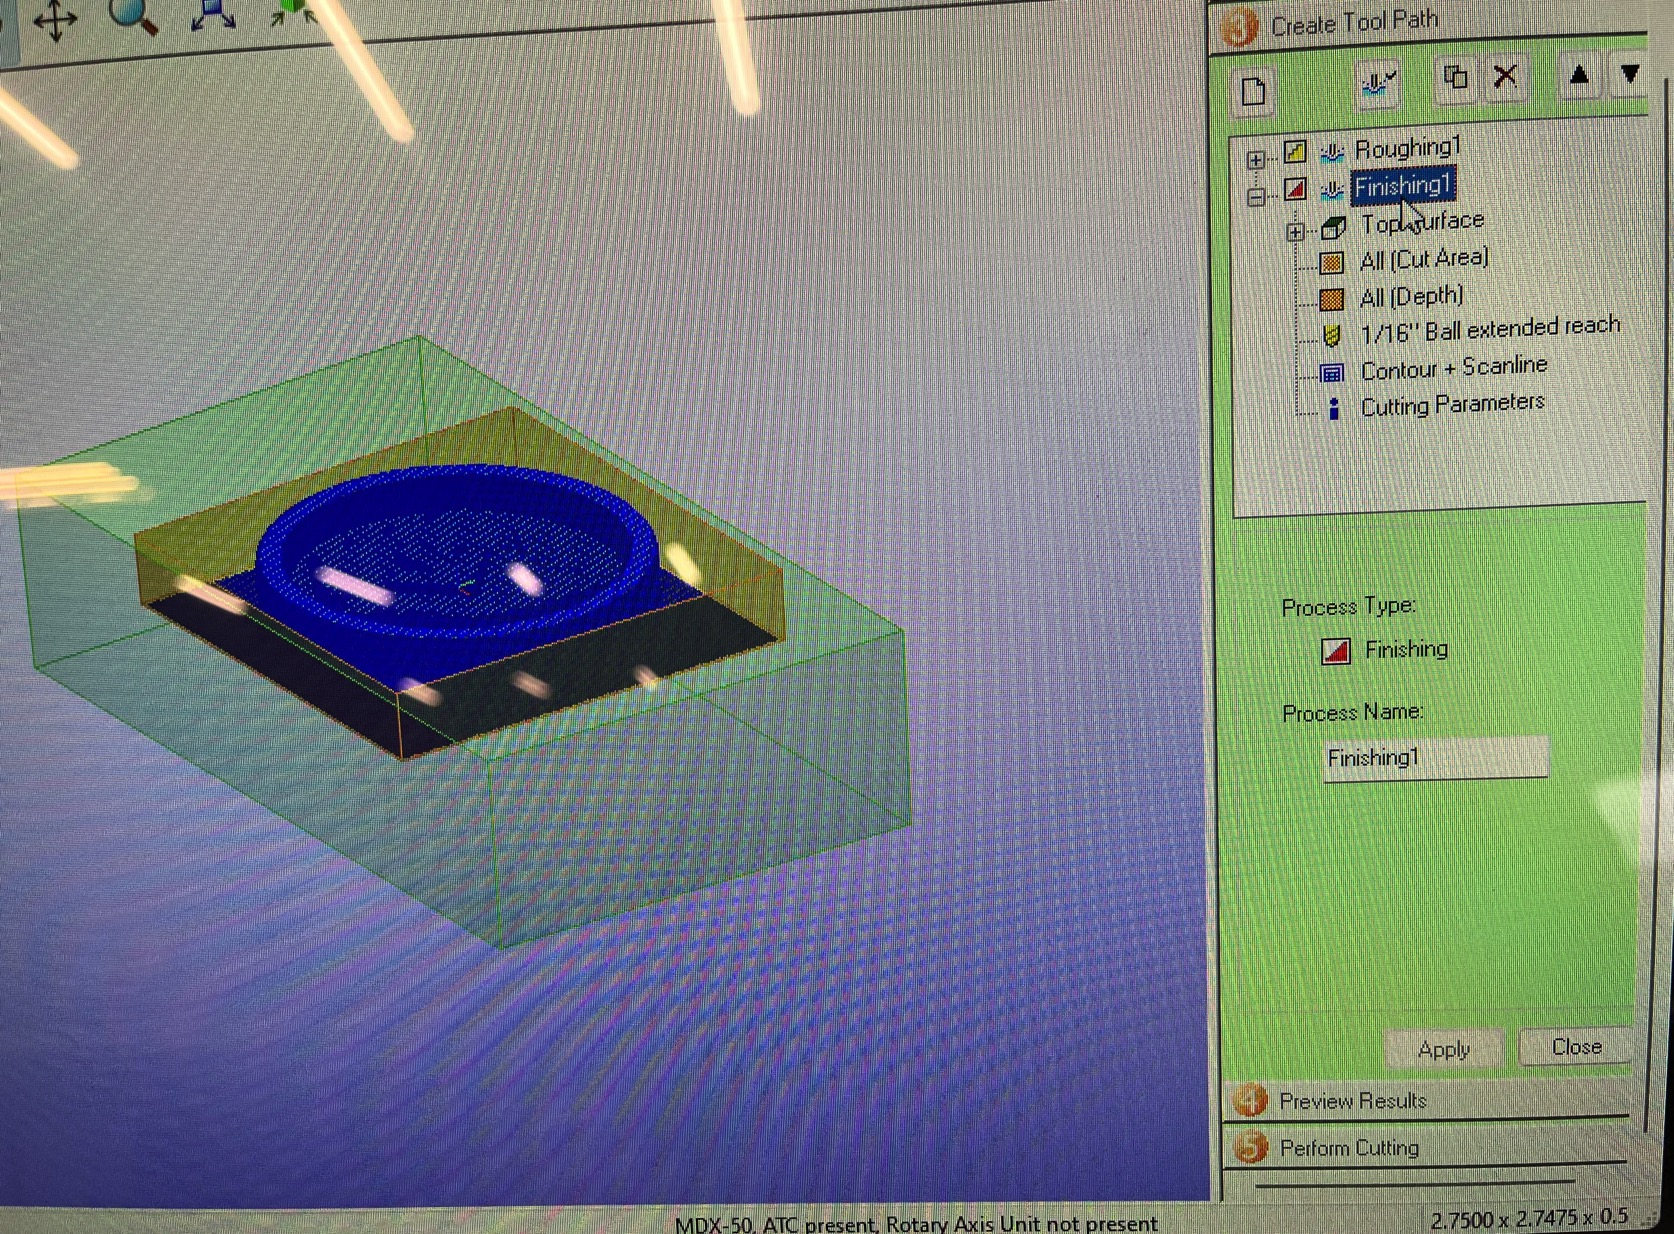
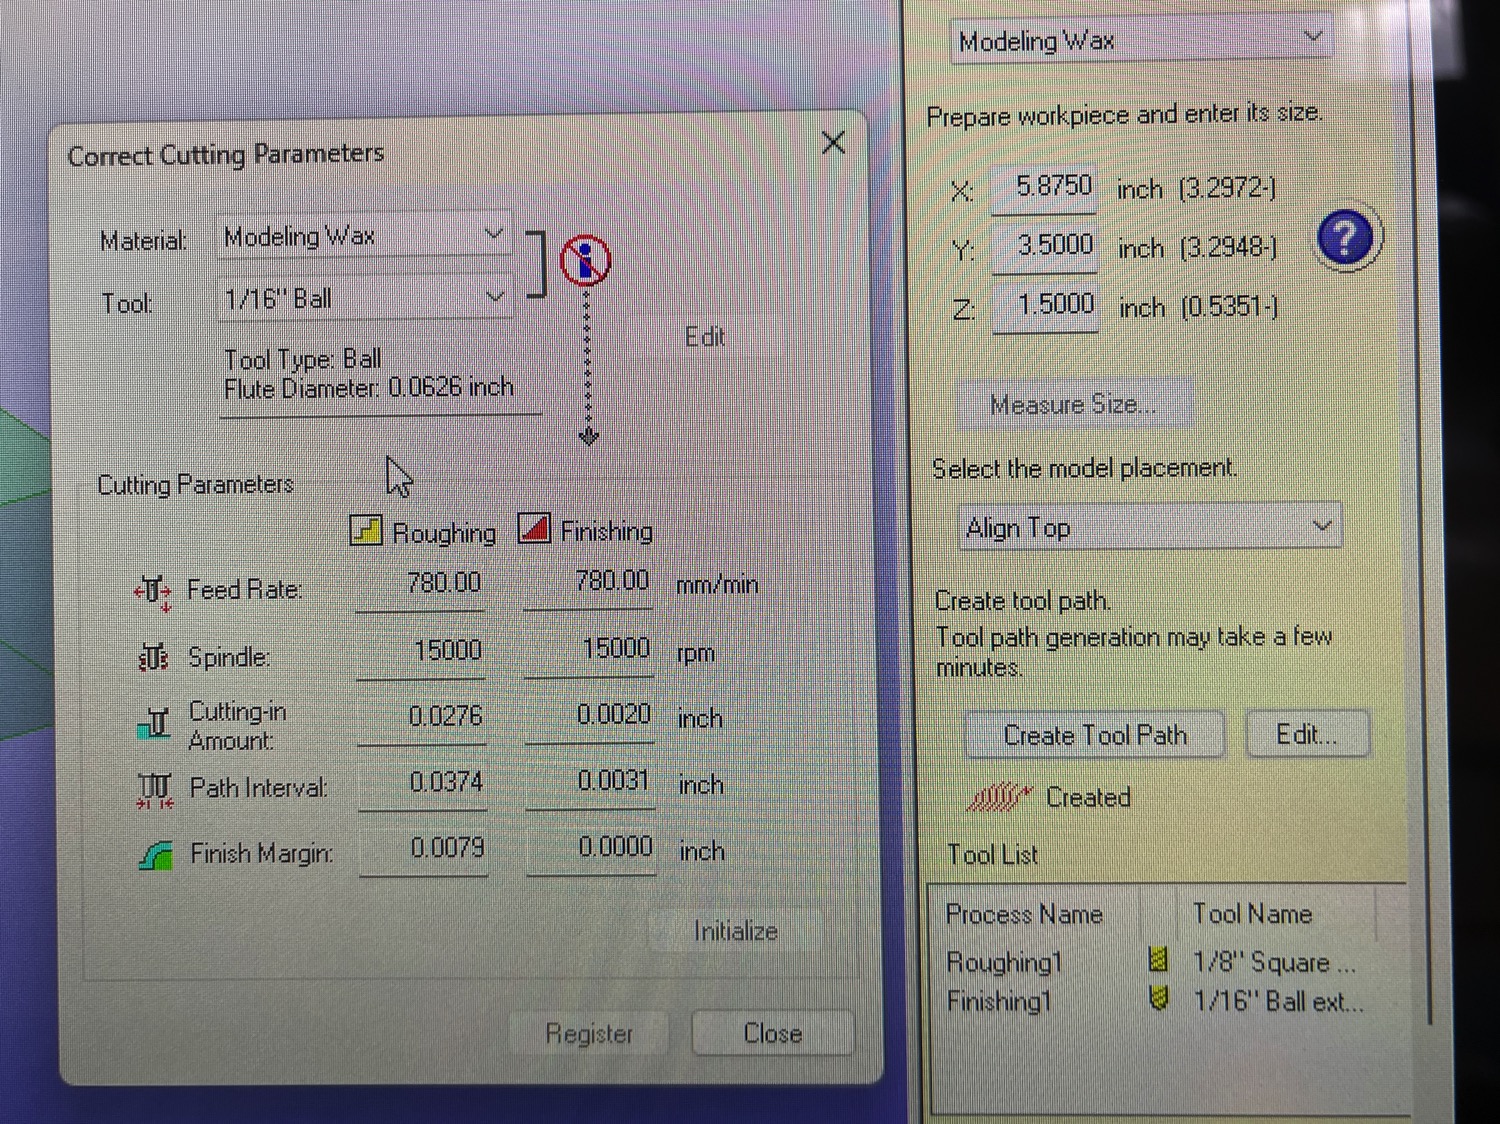
- I created a roughing pass using a 1/8in end mill and then a finishing pass using a 1/16in round ball.
- For the mold I used Oomoo 25 and followed the instructions on the packaging.
To create a part using the Modela MDX-50, follow these general steps:
- Prepare Your Design: Start by creating a 3D model of the part you want to mill. You can use 3D modeling software like Autodesk Fusion 360, SolidWorks, or any other compatible software to design your part. Make sure the design is in a format that can be read by the Modela MDX-50 (commonly STL or compatible file formats).
- Import the Design: Use the software provided with the Modela MDX-50 (like Roland's SRP Player) to import your 3D design file.
- Secure the Material: Place the material you intend to mill (e.g., a block of wood or plastic) onto the milling bed of the Modela MDX-50. Ensure it is securely fixed in place to prevent any movement during the milling process.
- Zero the Machine: Zeroing the machine is the process of setting the home or starting point for your milling job. This is crucial for accurate positioning. Follow the instructions in the machine's manual to zero the X, Y, and Z axes.
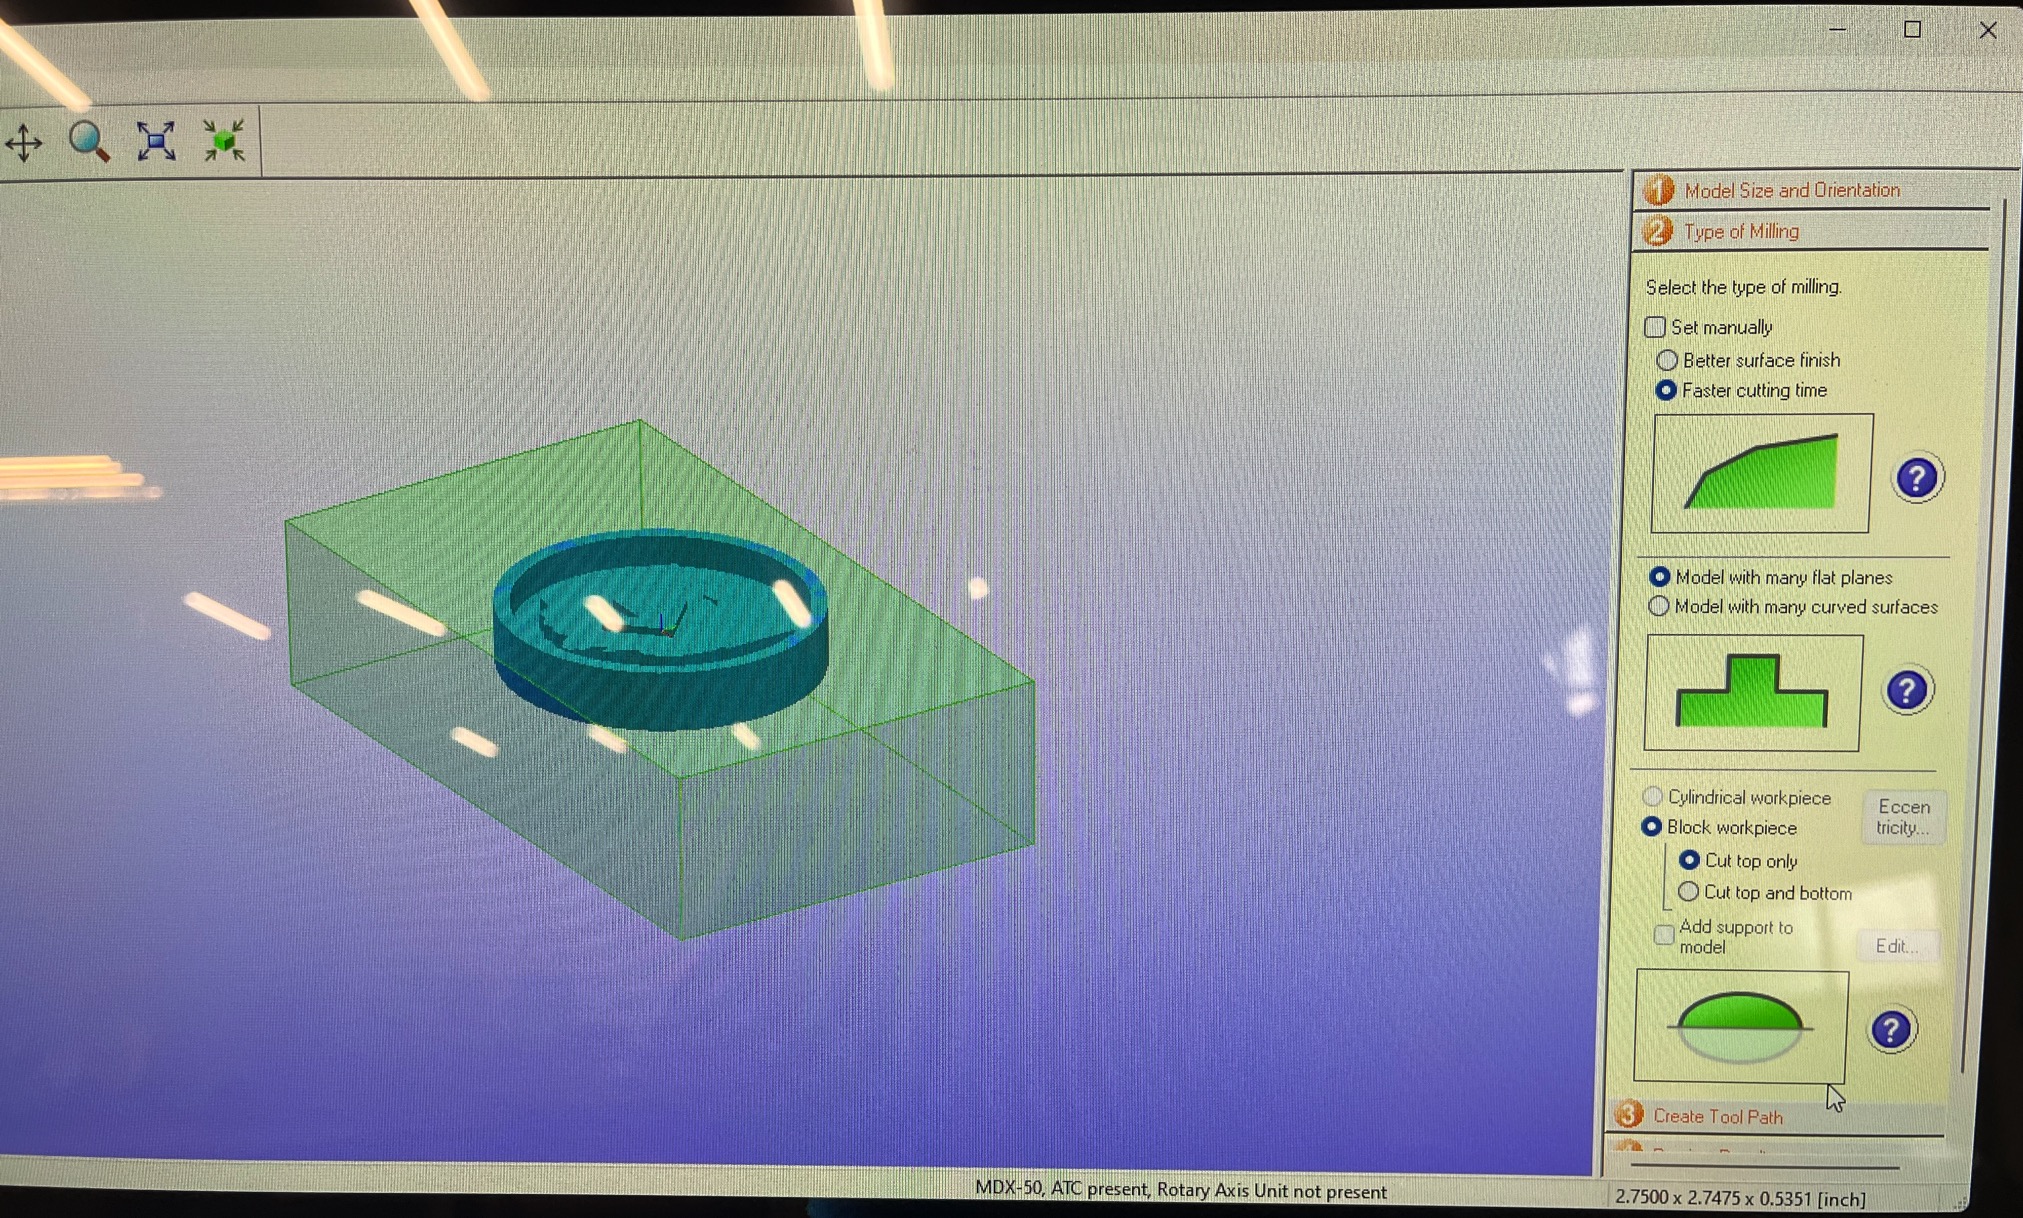
- Set Cutting Parameters: Configure the cutting parameters in the SRP software by selecting the material type. In this case I used Machineable wax. This includes specifying the tool you'll be using, the cutting speed and depth.
- Roughing Pass: - In the SRP Player software, set up a roughing pass. This involves using a larger tool to remove most of the excess material quickly. In this case I used a 1/8in square end mill with speed settings for the machineable wax (set in SRP) - Execute the roughing pass, and the machine will remove bulk material, leaving behind a rough form of your object.
- Finishing Pass: - After the roughing pass, set up a finishing pass using a smaller, finer milling tool. - Adjust parameters for finishing, such as cutting speed, feed rate, and stepover. Finishing passes are designed to achieve a smoother surface finish. In this case I used a 1/16in ball with speed settings for the machineable wax (set in SRP) - Execute the finishing pass to refine the details and achieve the desired surface quality.
- Preview the Toolpaths: Before starting the actual milling process, use the software to preview the toolpath. This will help you ensure that the tool won't collide with the material or the clamps.
- Start Milling: Once everything is set up and you're confident in your toolpath, start the milling process. The Modela MDX-50 will automatically follow the toolpath, cutting or engraving your part based on the design you provided.
- Monitor the Process: Keep an eye on the machine while it's working to ensure that everything is going smoothly. Be prepared to pause or stop the machine if there are any issues or if the material needs to be adjusted.
- Post-Processing: After the milling process is complete, you may need to perform some post-processing steps, such as sanding, painting, or assembly, depending on your specific part and design requirements.
- Remove the Part: Carefully remove the milled part from the machine's bed. Make sure to turn off the machine and clean up any debris or dust.
- Quality Control: Inspect the milled part for accuracy and quality. Make any necessary adjustments to your milling setup or design if needed.
Oomoo 25 is a two-part liquid silicone rubber mold-making material produced by Smooth-On. It's commonly used for creating flexible molds for casting a wide range of materials, including resin, plaster, concrete, and more. Here's a step-by-step guide on how to use Oomoo 25 to make a mold:
Materials and Tools You'll Need:- Oomoo 25 Part A and Part B (both are included in the kit)
- Mixing containers
- Mixing sticks
- The object you want to make a mold of (the master object)
- Mold release agent (e.g., Mann Ease Release 200)
- A plastic or cardboard box to contain the mold
- Rubber bands or clamps (if needed)
- A level surface
- A scale or measuring cup for accurate measurements
Step-by-Step Instructions:
Part/Project Files
See Images Below