WEEK 16
ON THIS PAGE WE WILL FIND A BRIEF DESCRIPTION OF MY JOB THROUGHOUT THE SIXTEENTH WEEK
GENERALITIES
Although in all the previous weeks the objective was to use the techniques to advance in the final project, in this week, more than in the others, the work is oriented to the final project.
With the help of a few questions, I will try to establish or mark the steps for the development of the final project.
This week I will have to clarify my ideas about materials and forms and costs of the construction of my lamp.
As I said the week before, I was lost and needed advice so I talked to my friend Pedro García, professor of architecture at the University of Cartagena. He told me about a lamp, a lamp designed by the Catalan architect Coderch. My reaction was immediate, I needed to look for it and find out what could be cool about the design of the lamp.
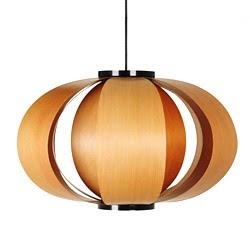
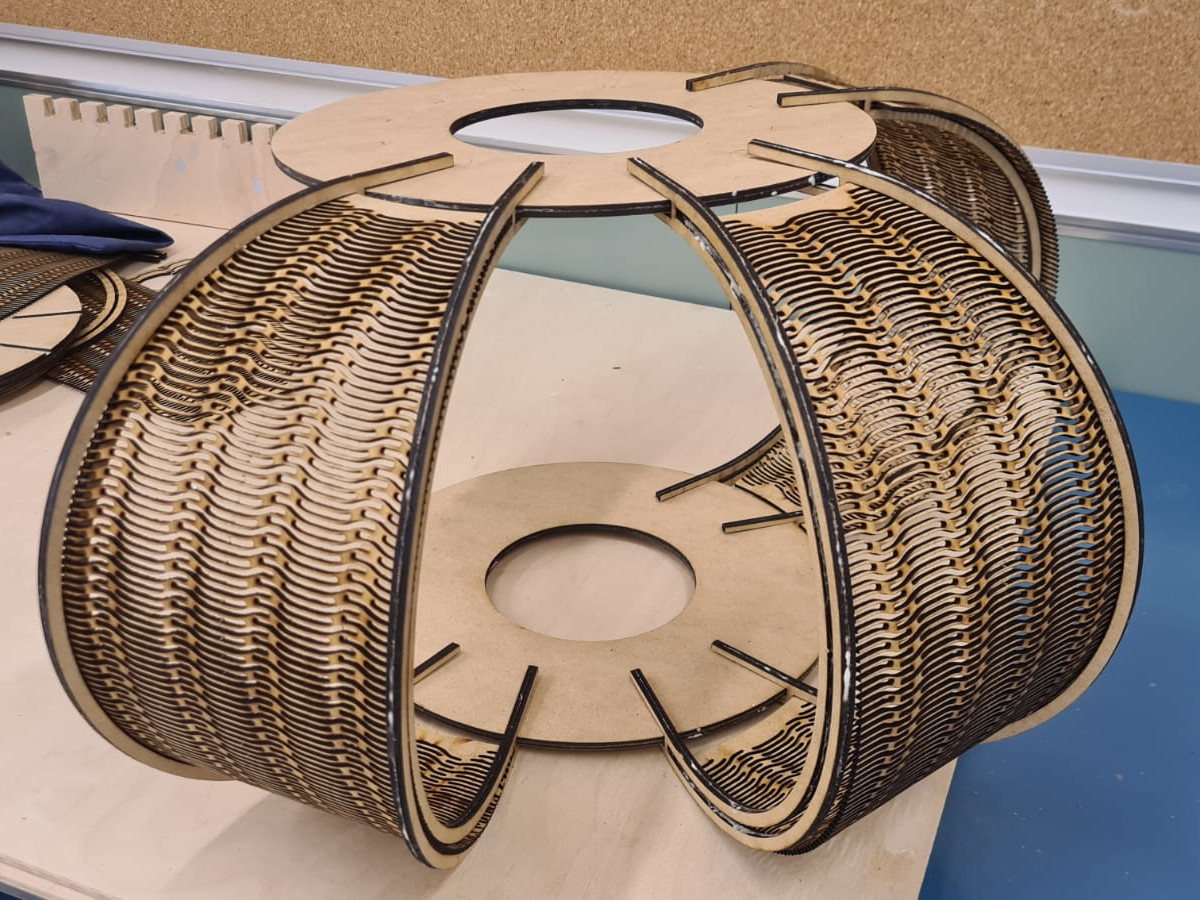
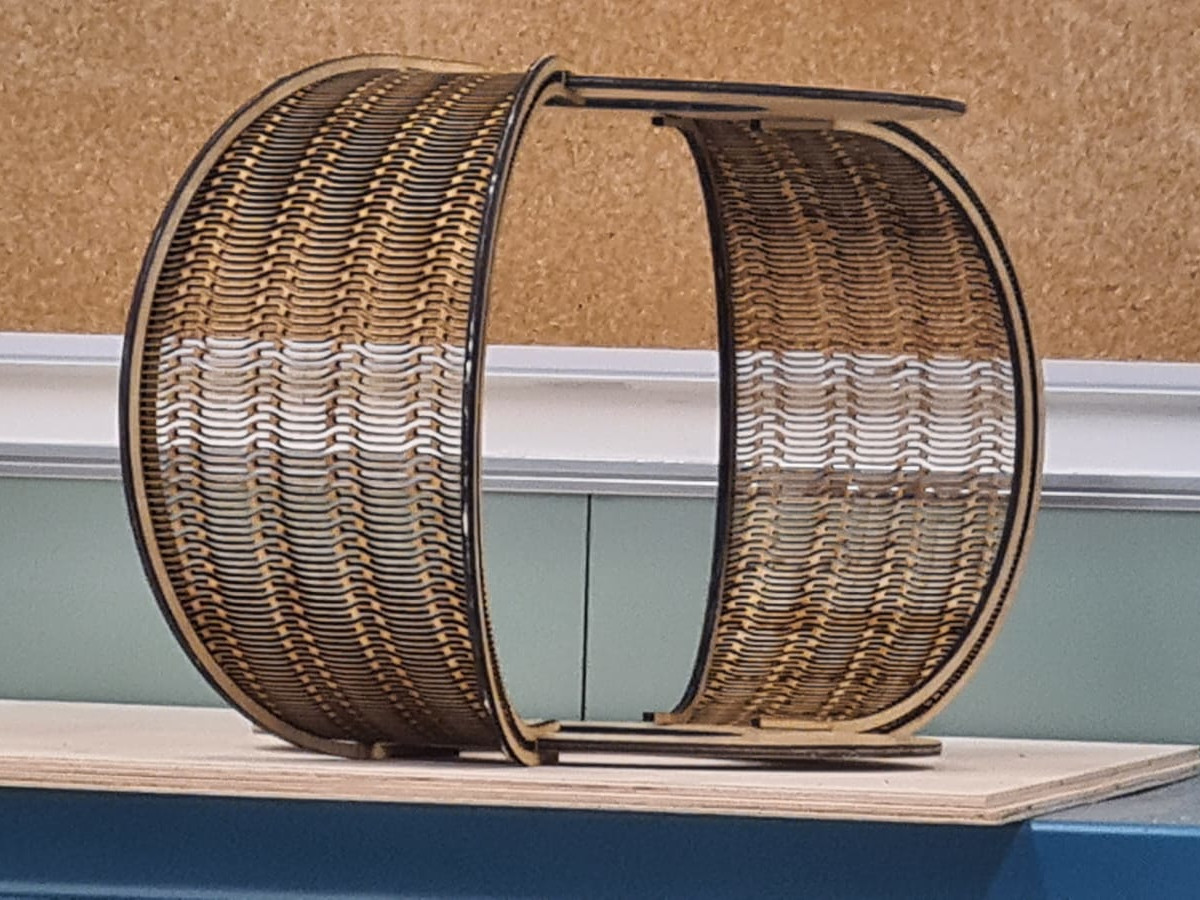
I really liked the design, it was simple and effective. From what I have been able to find out on the internet it seems that the source of inspiration is a pumpkin.
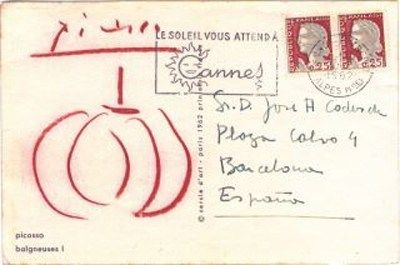
Among the stories that are told, there is one that deserves to be told. It seems that the architect, after having finished the manufacture of the lamp, sent a copy to mount to his friends and architects and artists of the time.
He also sent a copy to Picasso. The artist sent him a postcard with the design of the lamp as recognition.
Well, I'm going to post the weekly schedule and I'm going to work on the weekly homework. I have thought of making a petal of the lamp with the thermoformer. We hope everything goes well for me!!!!
WHAT WILL IT DO?
My main objective is to use the techniques tested throughout these months to make the Coderch lamp, a spectacular lamp, an intelligent lamp, capable of being the heart of a house.
To achieve the objective, it has to be a well-placed lamp, for a living room, that is capable of illuminating the environment with intensity but that does not lose the faint charm that it had in its day.
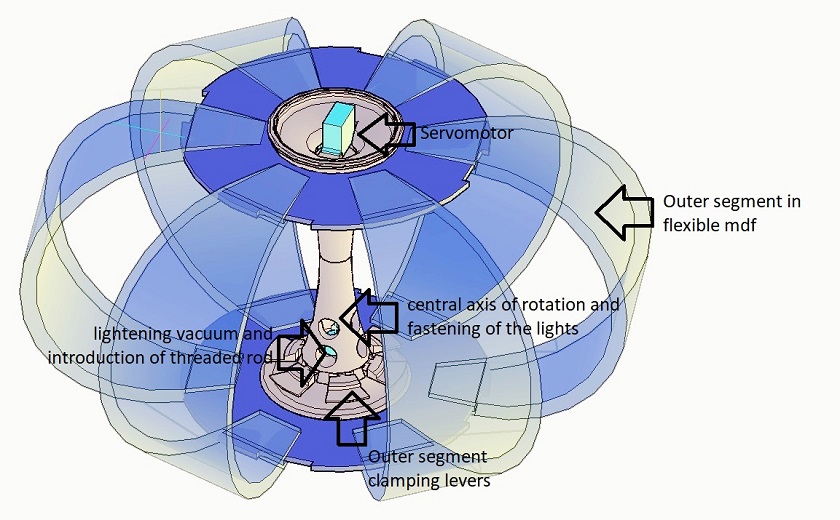
To control the movement of the axes I think it will be appropriate to create a PCB equipped with a microprocessor like the ESP32 that has a bluetooth module and is capable of connecting to the lamp to be able to move the segments and distribute them along the axis. Unlike the original lamp, the rotation of the axes makes it necessary to design the interior.
To keep the manufacture of the lamp under control, it will be very useful for me to have a table of costs and location of each manufacturer. This I will do, each project needs a budget.
WHO'S DONE WHAT BEFOREHAND?
Well, I've been looking at a lot on the internet. Apart from the architect who invented the lamp, there have been some reinstalings but none of them go in the direction I'm looking for.
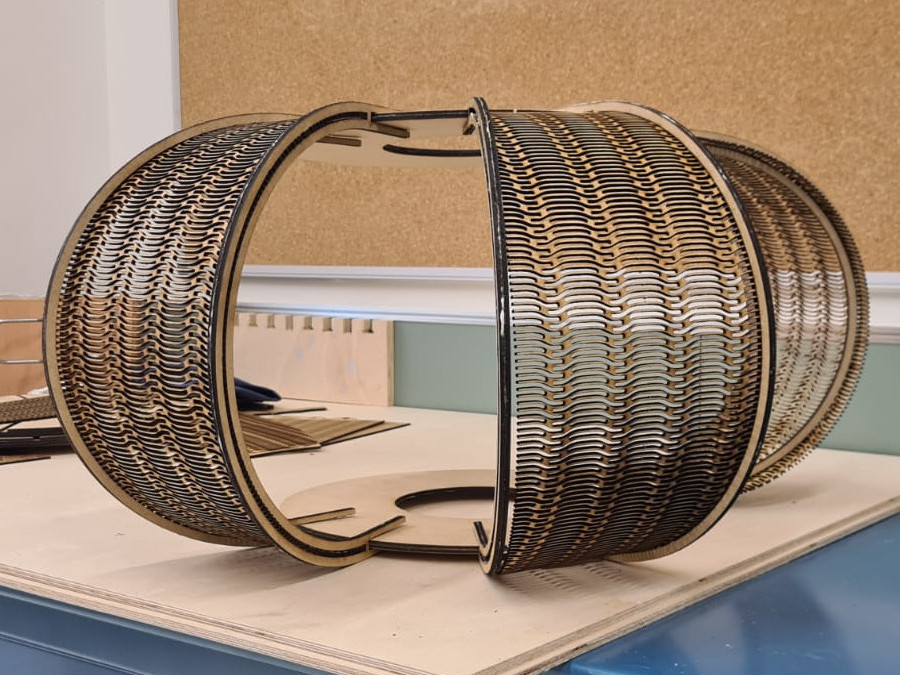
In the search for information I have found modifications of the lamps aimed at providing it with more light, keeping the original shape. I think my idea is original, when the petals are rotated and arranged on the same axis, they will really let the light pass through.
On the other hand, I have also been looking for similar projects in the fabacdemy and there is a project carried out in 2019 by Elena Cardiel that I really liked in terms of the functionalities of the lamp.
To see the project of elena cardiel you can click here.
To see other interpretations of the coderch lamp you can click here.
But the lamp is not only form and matter but movement. Movements and lights that act according to need. To achieve that goal I will have to look for codes to program the microprocessor. There are examples on the web and I will leave a link.
to see the arduino code on power and light intensity you can click here.
To see examples of code for voice control and light intensity you can click here.
WHAT WILL YOU DESIGN?
- With the 2D design, the casing or outer volume of the lamp will be made. Also the patterns that will let the light pass through and create the play of shadows. The logo and the panel of the project.
- Structure of the rotating shaft and lamp support, it must be able to rotate without friction. The material thought is 3D printing. The shape of the inner segments being able to add little weight.
- Integral electronic board, with the microcontroller, drivers, end stepper sensor and additional pins, powered by a single power supply, with a single cable.
- Drivers for the motors, although finally I will use some prefabricated DRV8825 modules, because a driver was burned with the tests and the new spare parts do not arrive in time.
- The system is a rotating system to move the inner segments so that they are coupled to the outer ones.
- A basic environment for machine control that can be improved in the future.
WHAT MATERIALS AND COMPONENTS WILL BE USED?
- 3D printing materials: I have chosen PLA for being one of the cheapest and with good resistance, although the other types of thermoplastic material available can be chosen, ABS, ASA, PET, Nylon ... it depends on each user.
- 3mm wood sheets: for being a material with a very good surface finish and easy to cut with a laser cutter.
- Electronic components: the ESP32 microcontroller as a base, supported by the drivers for the motors, the end stepper and the other components that I will indicate in the table and in the development of the project.
- Screws and rods: two smooth rods and one threaded. In addition to M3 (3mm) metric screws with different lengths, depending on the piece to be fastened.
HOW MUCH WILL THEY COST? / WHERE WILL COME FROM?
These two responses are defined in the following table
| PART | MATERIAL AND COMMENTS | PRICE | FONT |
|---|---|---|---|
| Axis of rotation and clamping of the lamp Base | PLA 850 White (22 hours and 36 minutes) 251.40 gr [Ender 3pro printer] | 5,34 € | click here. |
| Axis of rotation and fastening of the lamp Top part | PLA 850 White (22 hours and 25 minutes) 245.89 gr [Ender 3pro printer] | 5,21 € | click here. |
| Top cap | PLA 850 White (7 hours and 50 minutes) 82.32 gr [Ender 3pro printer] | 1,75 € | click here. |
| Bottom plug | PLA 850 White (7 hours and 45 minutes) 78.30 gr [Ender 3pro printer] | 1,66 € | click here. |
| 14 pcs Inner Segment Closure units | PLA 850 White (2 day 2 hours and 28 minutes) 14x45,87 gr [Ender 3pro printer] | 11,75 € | click here. |
| Threaded rod | 1x (8mm x330mm) | 15,99 € | click here. |
| Nema17 motors | NEMA17 1.3A 40mm | 17,84 € | click here. |
| flexible fixation | (6 x 8 x 25) mm, Diameter: 19 mm | 8,99 € | click here. |
| ESP32-WROOM-32D | MODULO WIFI 32MBITS SPI FLASH | 2,42 € | click here. |
| Power supply | 240W 12V 21A | 21,15 € | click here. |
| LED transformer 12V 24V 6W 9W | 12V 9 W | 10,69 € | click here. |
| 5V regulator | 5v; 1 A | 0,83 € | click here. |
| 3V regulator | 3,3v; 1 A | 0,70 € | click here. |
| 8825 DRV driver modules | DRV8825 18 pins | 1,37 € | click here. |
| 100uf capacitors | Aluminum electrolytic capacitors (with radial leads) | 1,66 € | click here. |
| 3 0K resistors | BRIDGE RES SMD 0 OHM 1/4W 1206 | 1,21 € | click here. |
| 2 1uF capacitors | CER PLUG 1UF 50V X7R 1206 | 0,48 € | click here. |
| 10uf capacitor | CER PLUG 10UF 35V X5R 1206 | 0,43 € | click here. |
| 1K resistor | RES SMD 1K OHMIOS 1% 1/4W 1206 | 0,10 € | click here. |
| 1 smd led (blue) | LED AZUL TRANSPARENTE CHIP SMD | 0,46 € | click here. |
| Reset button | TOUCH SWITCH SPST-NO 0.05A 24V | 0,42 € | click here. |
| Switch | Slide Switch, SPDT, Through Hole, SSSS9, 100 mA | 1,20 € | click here. |
| 4 pcs Male Connecting Pin | 40POS 2.54MM SMD HEAD CONNECTOR | 4,87 € | click here. |
| 32-pin female connection for controller | CONN HDR 8POS 0.1 TIN PCB | 12,80 € | click here. |
| 2-pin square power connector | TERM BLK 2POS SIDE IN 3.5MM PCB | 1,07 € | click here. |
| 6 pcs MDF boards | Raw MDF board 61x122x0.3 cm (width height thickness) | 31,14 € | click here. |
| Polyurethane foam for mold | High quality Phenolic foam: | 9,60 € | click here. |
| Epoxy resin + hardener | epoxy resin + hardener | 17,99 € | click here. |
| 2 pcs natural linen fabric | 100x148 Cms linen | 17,95 € | click here. |
| TOTAL | 207,07 |
€ |
What parts and systems will be made? What processes will be used?
These are the processes I am going to use:
- WEEK 02: COMPUTER-AIDED DESIGN: CAD
- WEEK 03: COMPUTER-CONTROLLED CUTTING:LASER CUTTING MACHINE
- WEEK 04: ELECTRONICS PRODUCTION: BOARDS
- WEEK 05: 3D SCANNING AND PRINTING: 3D PRINTER
- WEEK 06: ELECTRONICS DESIGN: BOARDS
- WEEK 08: EMBEDDED PROGRAMMING: ARDUINO CODE
- WEEK 09: MOLDING AND CASTING: INTERIOR SEGMENT FOR TERMOCONFORMER
- WEEK 10: OUTPUT DEVICES: LIGTH AND SERVO
- WEEK 11: MECHANICAL DESIGN, MACHINE DESIGN
- WEEK 12: INPUT DEVICES: lIGHT SENSOR, VOICE SENSOR
- WEEK 13: NETWORKING AND COMMUNICATIONS: BLUETOOTH CONEXION
- WEEK 14: INTERFACE AND APPLICATION PROGRAMMING: SMARTPHONE APPS
- WEEK 15: WILDCARD WEEK: TERMOCONFORMER
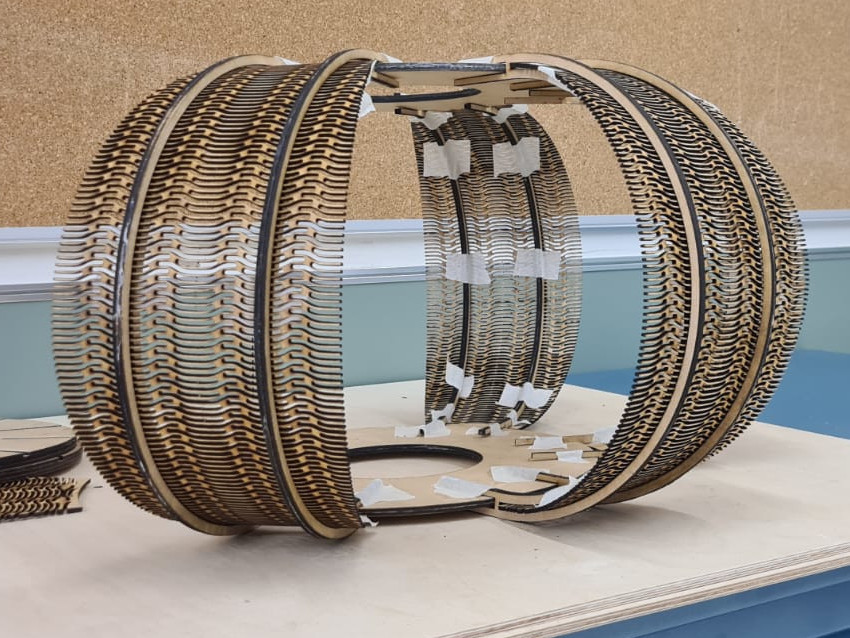
I have made the central axis that has a double function in PLA with knots printed in 1 print run. The difficulty is that the axes that hold the inner segments must not have friction for the servo motor to work well.
Well I leave some images from last week so that you can appreciate the flexible wood
What questions need to be answered?
How am I going to create an interface or environment to control my electronic lamp?
Will I have stability or problems with vibrations or friction?
Will I get the segments to rotate correctly and know how to make an acceptable play of light and shadow?
How will it be evaluated?
It is a lamp that in the latest version has been tried to improve it with LED lights so that dimly lit environments. In my version I want to keep the materials warm and I want the luminosity to be done by the turns on the axis.
I want that with a bluetooth application you can control the opening by means of a slider..
I want there to be an ambient light sensor that turns the servo to the optimal position depending on the lack of light and a potentiometer to adjust the intensity.
I would like the lamp to be able to return a luminous greeting if I say "hello".
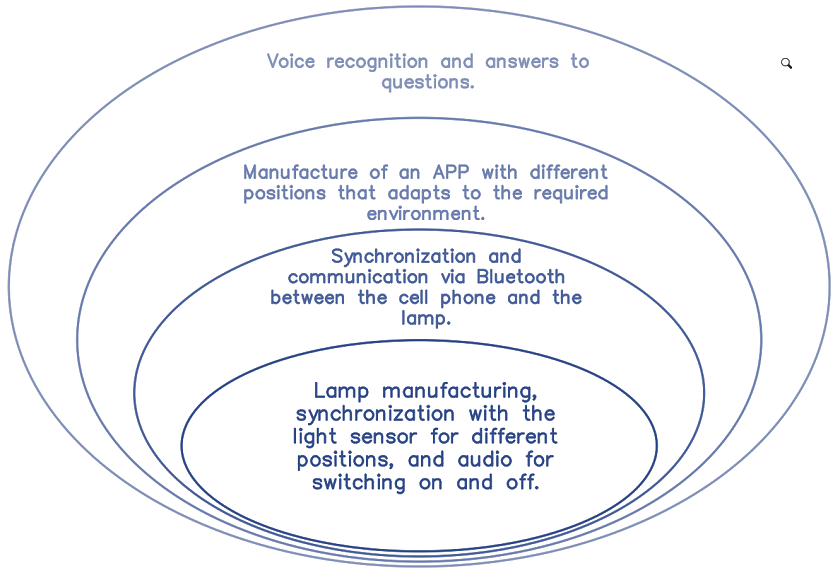
SPIRAL MODEL DIAGRAM
This scheme intends to structure the scope by stages. In the smallest spiral we will have the predetermined minimum objective and in the largest one the top of the scope of the project.
CONCLUSIONS OF THE WEEK
It is a preparatory week for the final project, these questions make you reflect properly on your project and how to carry it out.
Apart from the questions, it is essential to make a planning, time is running out and not everything will turn out well, a race against the clock.
“What went wrong”: My initial approach to the lamp was not the right one, I had to work a lot to be able to channel the work.
“What went well”: I think everything in my head is starting to fall into place.


