WEEK 15
ON THIS PAGE WE WILL FIND A BRIEF DESCRIPTION OF MY JOB THROUGHOUT THE FIFTEENTH WEEK
GENERALITIES
This week I am going to try to adopt some technique to take advantage of it in my final work. In the end I will do my final work on the manufacture of a lamp. In the previous weeks I had proposed a design for my lamp according to the types of input and output that I would have liked to put on it.
But I didn't like design very much, so I had been looking for some inspiration for a month, something that would have fascinated me and pushed me to work harder. An interesting project.
I needed some advice and I spoke with my friend Pedro Garcia, professor of architecture at the University of Cartagena. He told me that he really liked a lamp, a lamp designed by the Catalan architect Coderch. My reaction was immediate, I needed to look for it and know what could be cool in the design of the lamp.
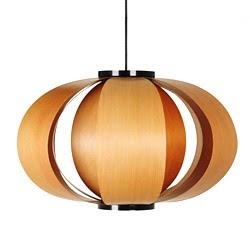
I really liked the design, it was simple and effective. From what I have been able to find out on the internet it seems that the source of inspiration is a pumpkin.
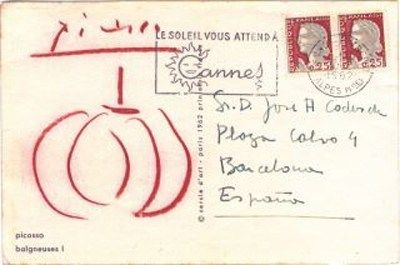
Among the stories that are told, there is one that deserves to be told. It seems that the architect, after having finished the manufacture of the lamp, sent a copy to mount to his friends and architects and artists of the time.
He also sent a copy to Picasso. The artist sent him a postcard with the design of the lamp as recognition.
Well, I'm going to post the weekly schedule and I'm going to work on the weekly homework. I have thought of making a petal of the lamp with the thermoformer. We hope everything goes well for me!!!!
| Day | Wenesday | Thursday | Friday | Saturday | Sunday | Monday | Tuesday |
|---|---|---|---|---|---|---|---|
| 09:00 | |||||||
| 10:00 | Meeting CT | Assigments | Local Review | ||||
| 11:00 | Meeting CT | Assigments | Local Review | ||||
| 12:00 | Assigments | ||||||
| 13:00 | Assigments | Regional Review | |||||
| 14:00 | Assigments | Regional Review | |||||
| 15:00 | Fabacademy | Assigments | Assigments | ||||
| 16:00 | Fabacademy | Assigments | Assigments | Review Documents | |||
| 17:00 | Fabacademy | Assigments | Assigments | Assigments | Assigments | write Documents | Review Documents |
| 18:00 | Fabacademy | Assigments | Assigments | Assigments | Assigments | write Documents | Review Documents |
| 19:00 | Assigments | Assigments | Assigments | Assigments | write Documents | Review Documents | |
| 20:00 | |||||||
| 21:00 | Tutorial | Assigments | Assigments | Assigments | write Documents | ||
| 22:00 | Tutorial | Assigments | Assigments | Assigments | write Documents | Write Documents | |
| 23:00 | Tutorial | Tutorial | Assigments | Assigments | write Documents | Write Documents | |
| 24:00 | Tutorial | Tutorial | Assigments | Assigments | write Documents | ||
| 01:00 | |||||||
| 02:00 |
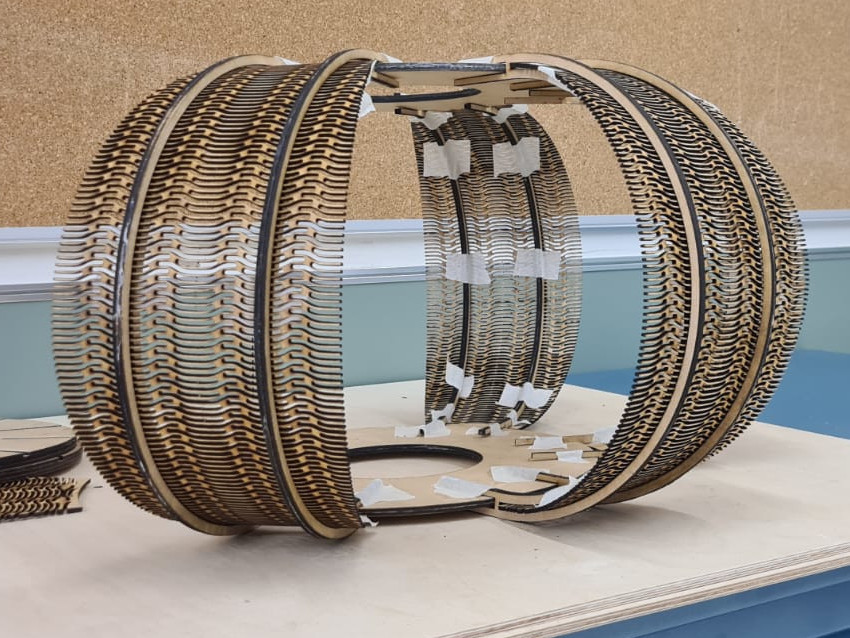
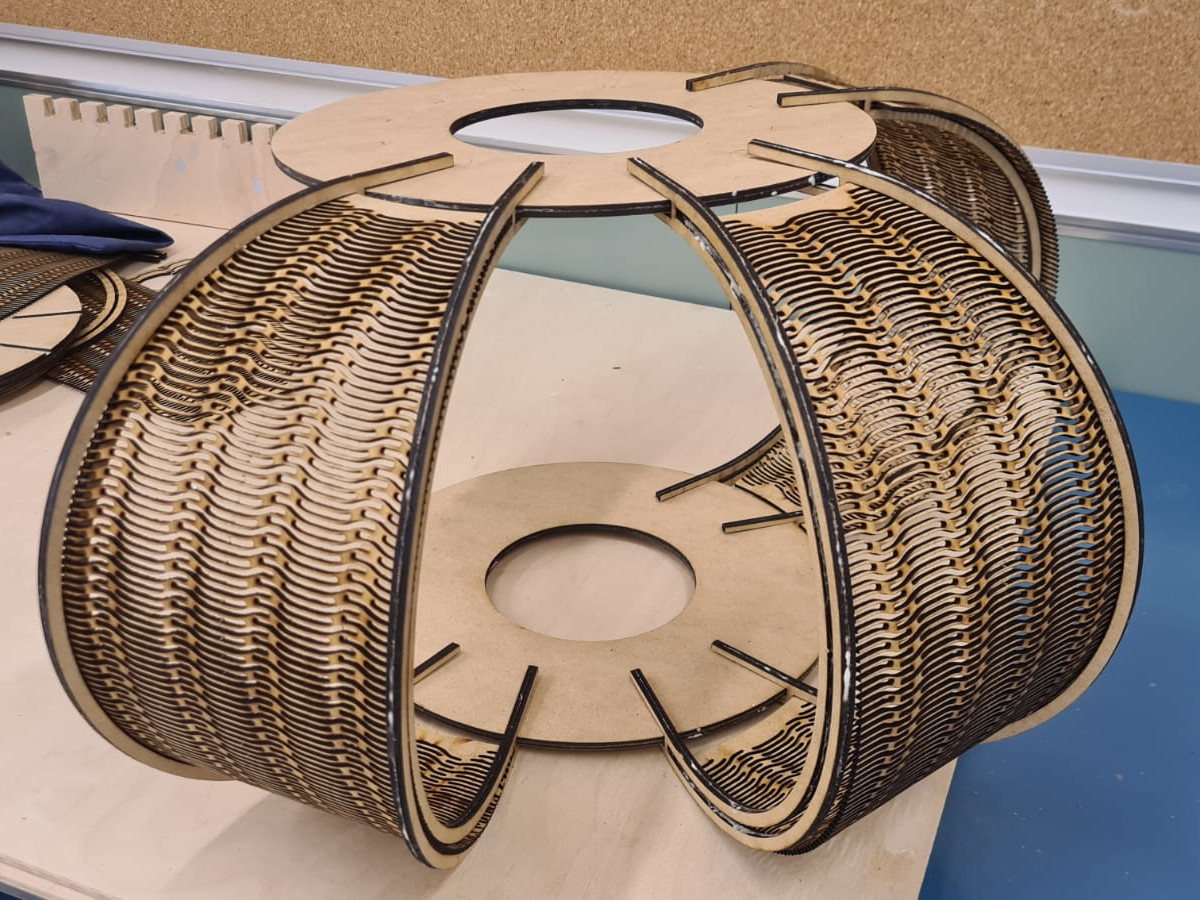
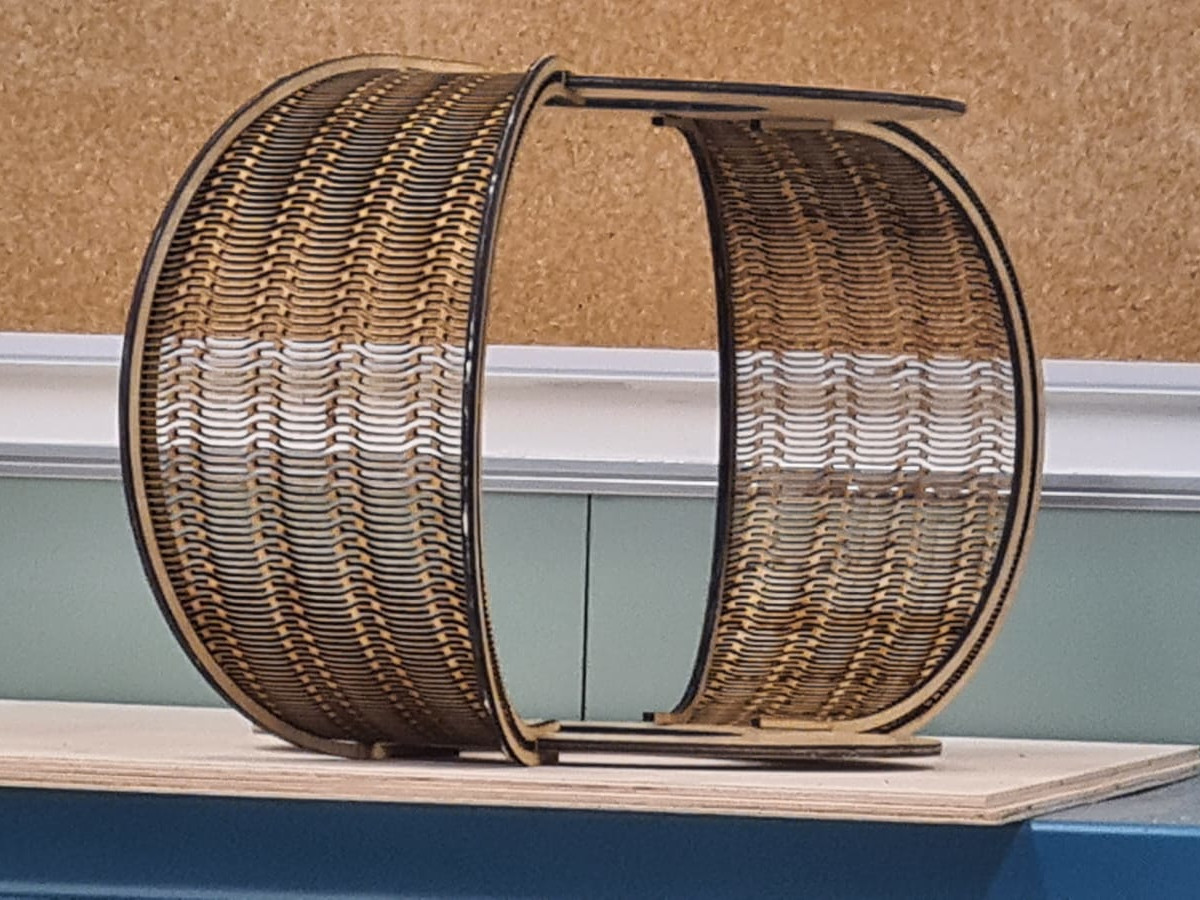
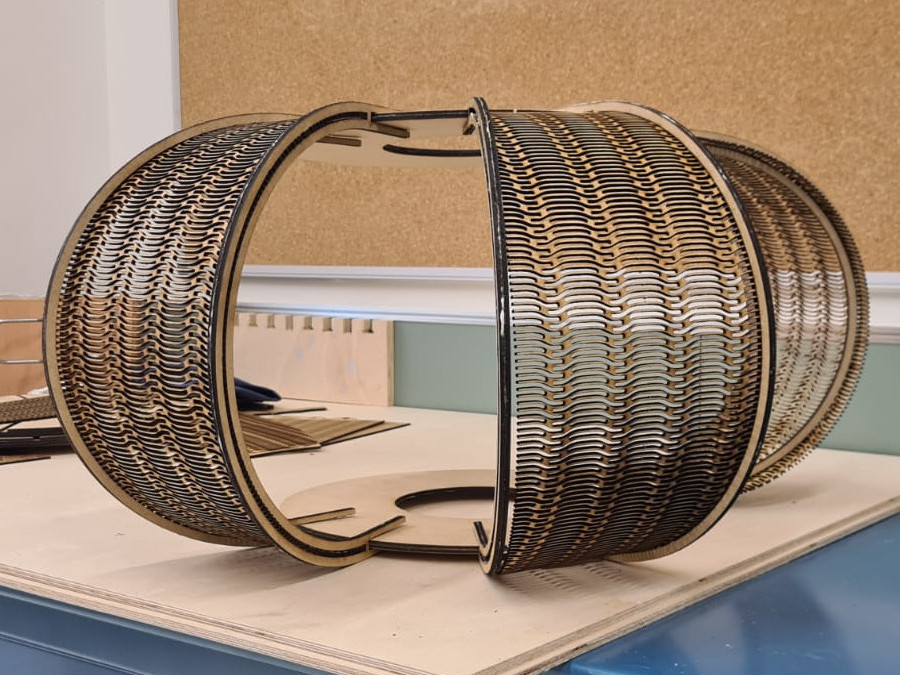
Well, finally. It has been a very complicated week with a lot of work. Before starting with the design of the petal of the lamp, I had to have a clearer idea about the final design of my lamp, so I drew the outer petal first in order to be able to design an inner petal that would be integrated with the design of the whole.
I tried a lot of patterns, but none fit the design, and in other cases it just failed.
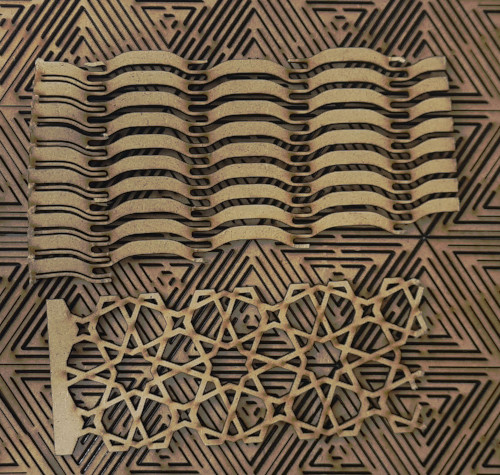
After many attempts, I understood that I had to make a pattern for this type of curvature and make it transparent enough to let light through.
I did some more testing, testing the curves, transparency, and adaptability of the design to the inspiring image. In the end I decided that the best pattern is the one I leave in the photo. I will use it as my first petal and this week I will make the second one with the thermoformer.!!!!
Well, for the inner petal!!!! I hope my inspiration doesn't fail me!!!
WORKING WITH GRASSHOPPER
In this paragraph I am going to explain how I have made a pattern with the Grasshopper program.
Grasshopper™ is a visual programming language developed by David Rutten at Robert McNell & Associates. Grasshopper is a plug-in that runs within the Rhinoceros 3D CAD application. Programs are created by dragging components onto the work area.
Components have inputs and outputs, the outputs are connected to the inputs of subsequent components.
It is primarily used for programming generative algorithms. Many of Grasshopper's components create 3D geometry.
The programs may also contain other types of algorithms, such as numerical, textual, audiovisual and haptic applications.
I had never worked with the software, so to be able to use it I was looking at some tutorials, I leave the link here
Then, to make another part of the lamp, I am going to design an elliptical surface and apply a parametric and three-dimensional shading on it.
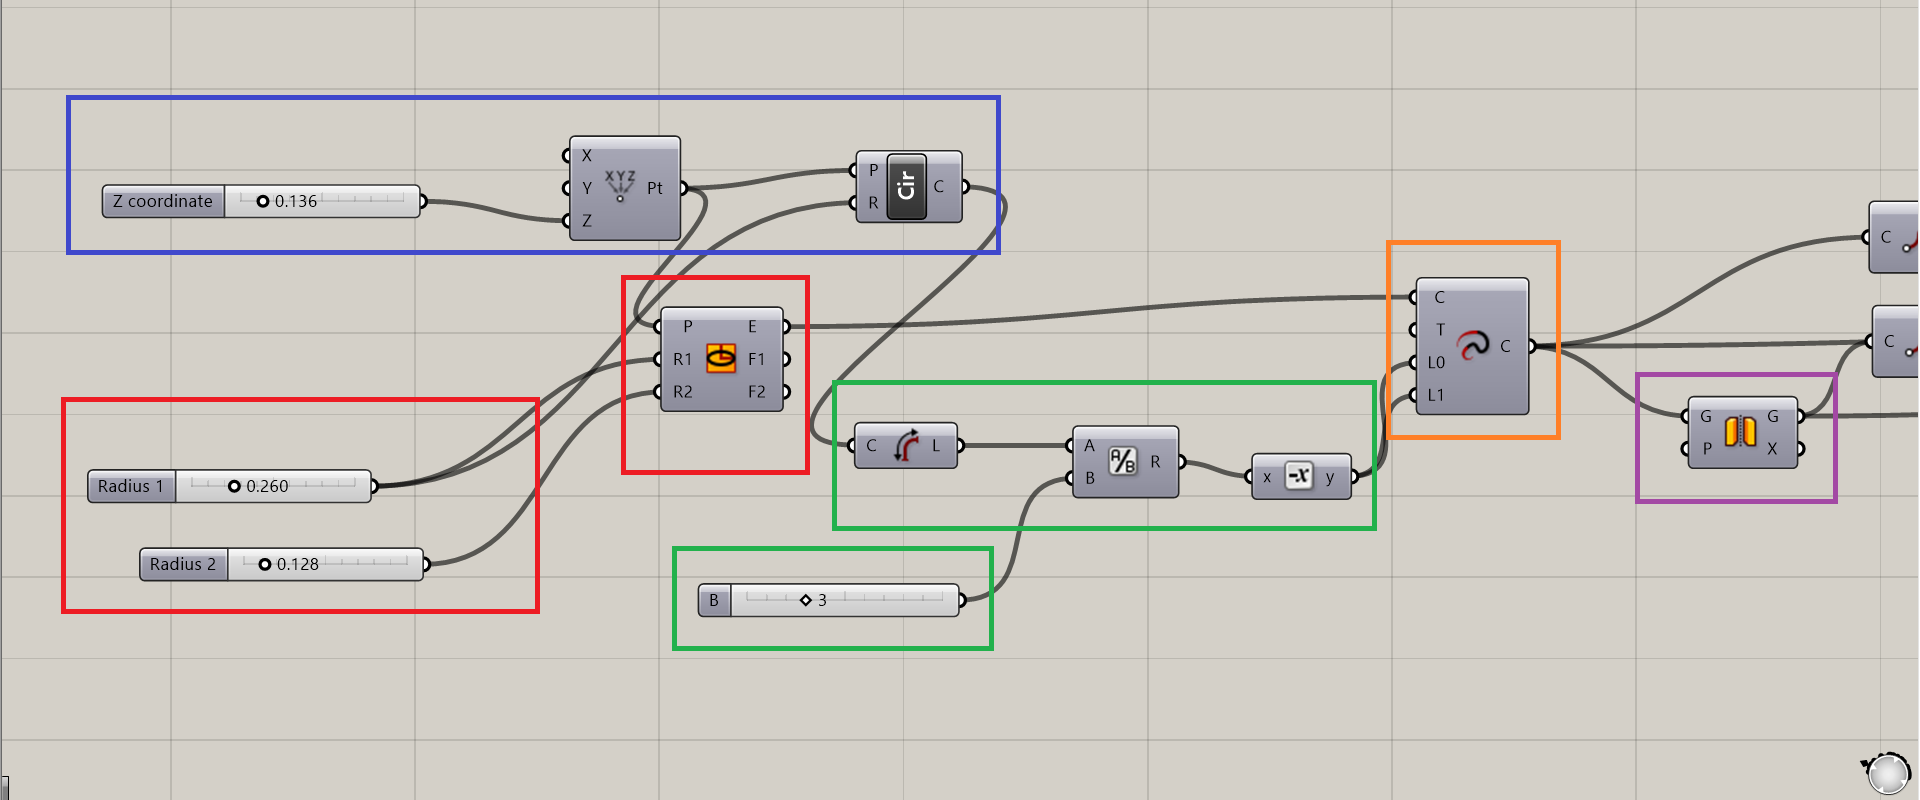
This part of the code sets a circumference and gives it a Z height
With this function we can draw an ellipse, we must put some parameters that define the ellipse as the radii.
With these parameters the dimensions of the circumference are defined and only the third part of it is used
Extend Curve: Extend a curve by a specified distance.
The curve defined between the ellipse and the circle will be mirrored.
With this command we extract the final points of a function.
This is the line command and it joins the points drawn in the previous points
with this command set, we draw a parametric arc on top of the previous line
This is the sweep 2 command and it creates a sweep surface with two lane curves.
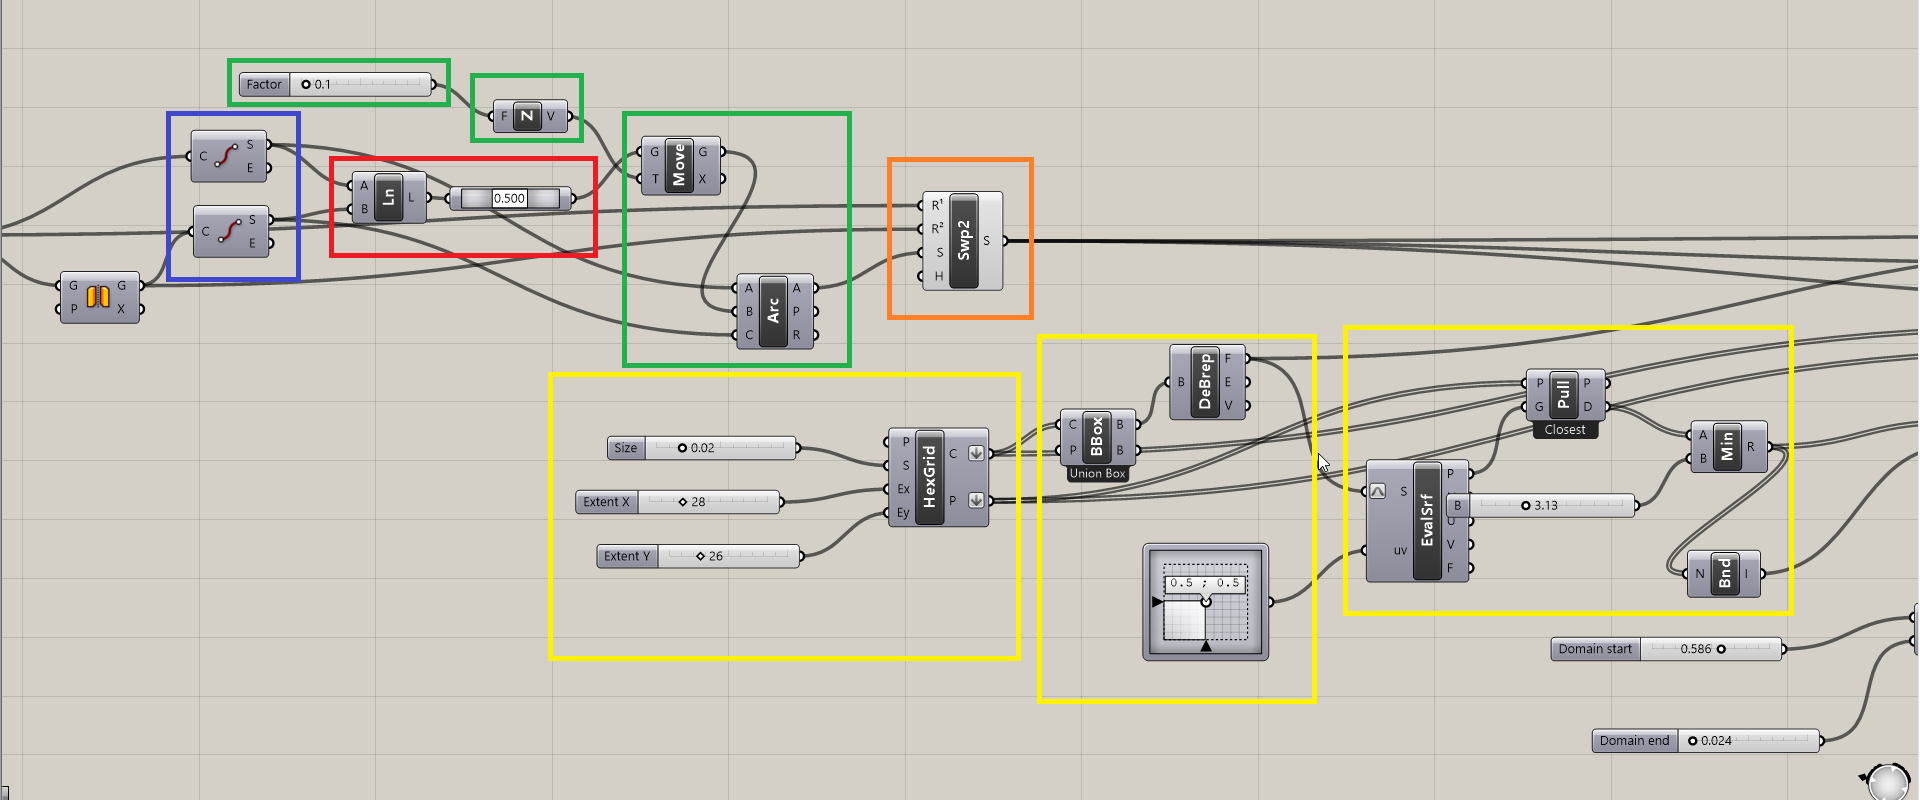
Create a hexagon-shaped pattern with a given size that will be duplicated 28 times on the x-axis and 26 times on the y-axis.
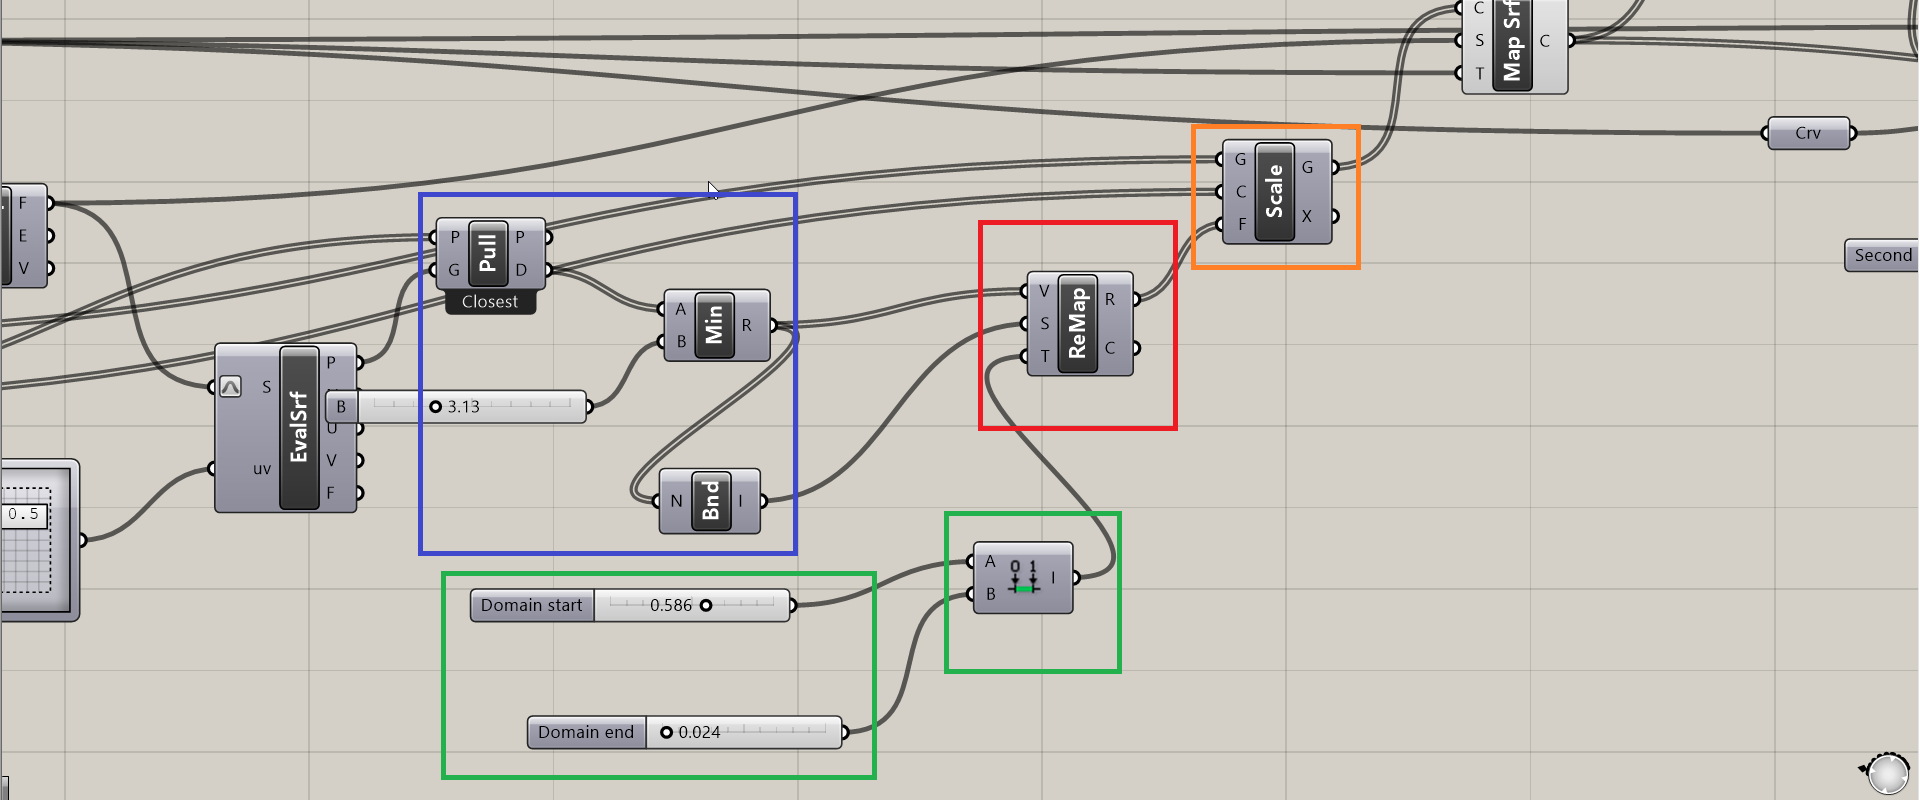
Pull a point to a geometry manifold with Point at [G] closest to [P] and Distance between [P] and its projection onto [G]
Remap numbers into a new numeric domain. Then, to make another part of the lamp, I am going to design an elliptical surface and apply a parametric and three-dimensional shading on it. Target T Target domain. Output: Mapped R Remapped number Number and Clipped C Remapped and clipped number Number
Create a numeric domain from two numeric extremes. Input 1: Domain start A, Start value of numeric domain and Type Number. Input 2: Domain end B, End value of numeric domain and Type Number. Output: it is Numeric domain between {A} and {B} and type domian
Scale an object uniformly in all directions.
The curve defined between the ellipse and the circle will be mirrored.
Find the closest point on a curve. It need the Point to project onto curve and Curve to project onto. Output the distance between base point and curve
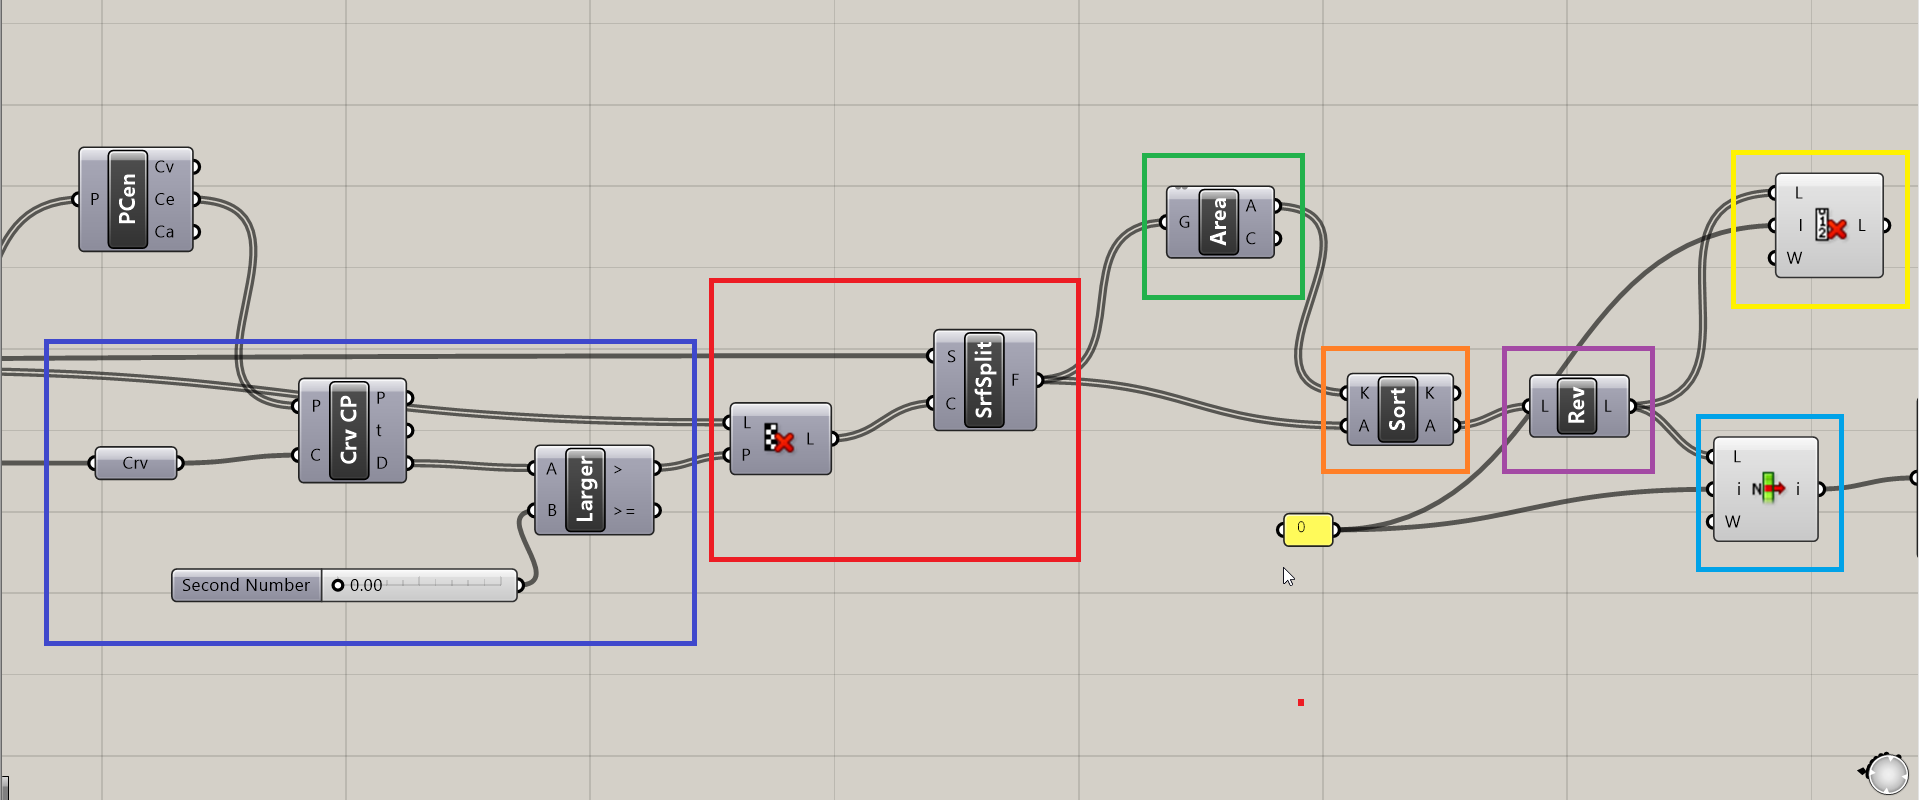
Split a surface with a bunch of curves. input Base surface and Splitting curves. The output is Splitting fragments.
Solve area properties for breps, meshes and planar closed curves. Input Brep, mesh or planar closed curve for area computation and output Area of geometry in number
Sort a list of numeric keys. Input List of sortable keys and Optional list of values to sort synchronously. Output Synchronous values in A
Reverse a List
Cull (remove) indexed elements from a list. Input List to cull and Culling indices
Retrieve a specific item from a list. Input Base list and Output Item index
Now I'm going to play with the parameters in grasshopper to see that everything can be changed simultaneously.
In this video you can see how to be a whole parameter function I can move the pattern with a table of values.

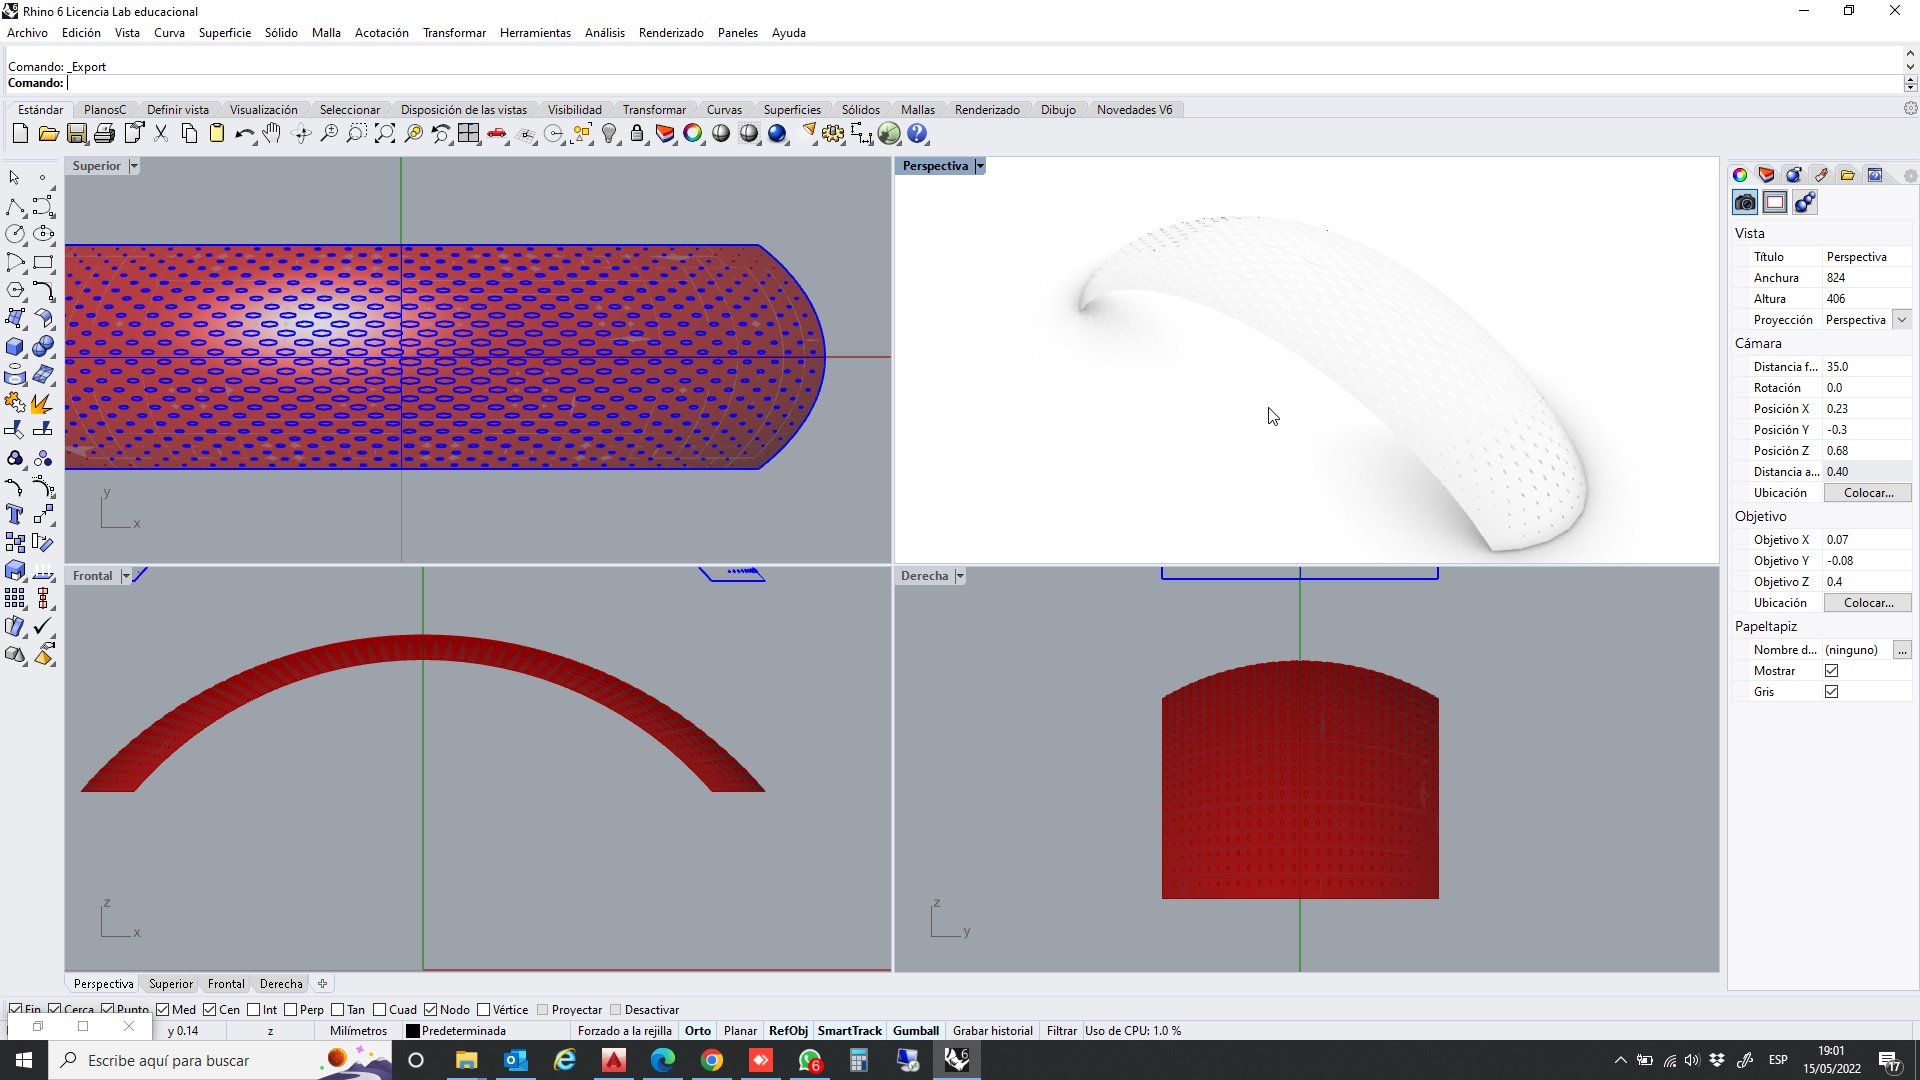
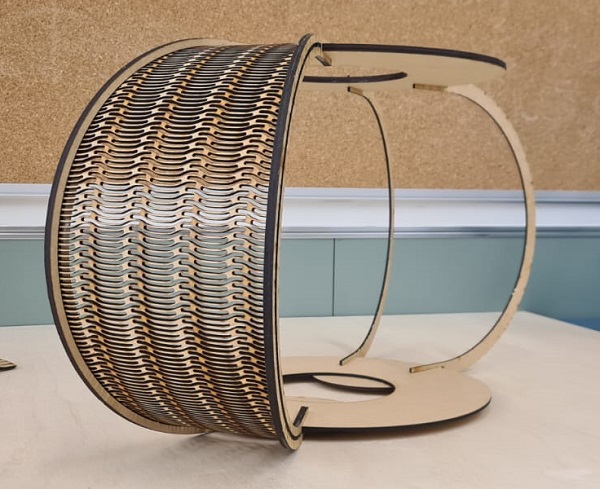
Therea are a two screenshots of the finished inner petal in Rhino.
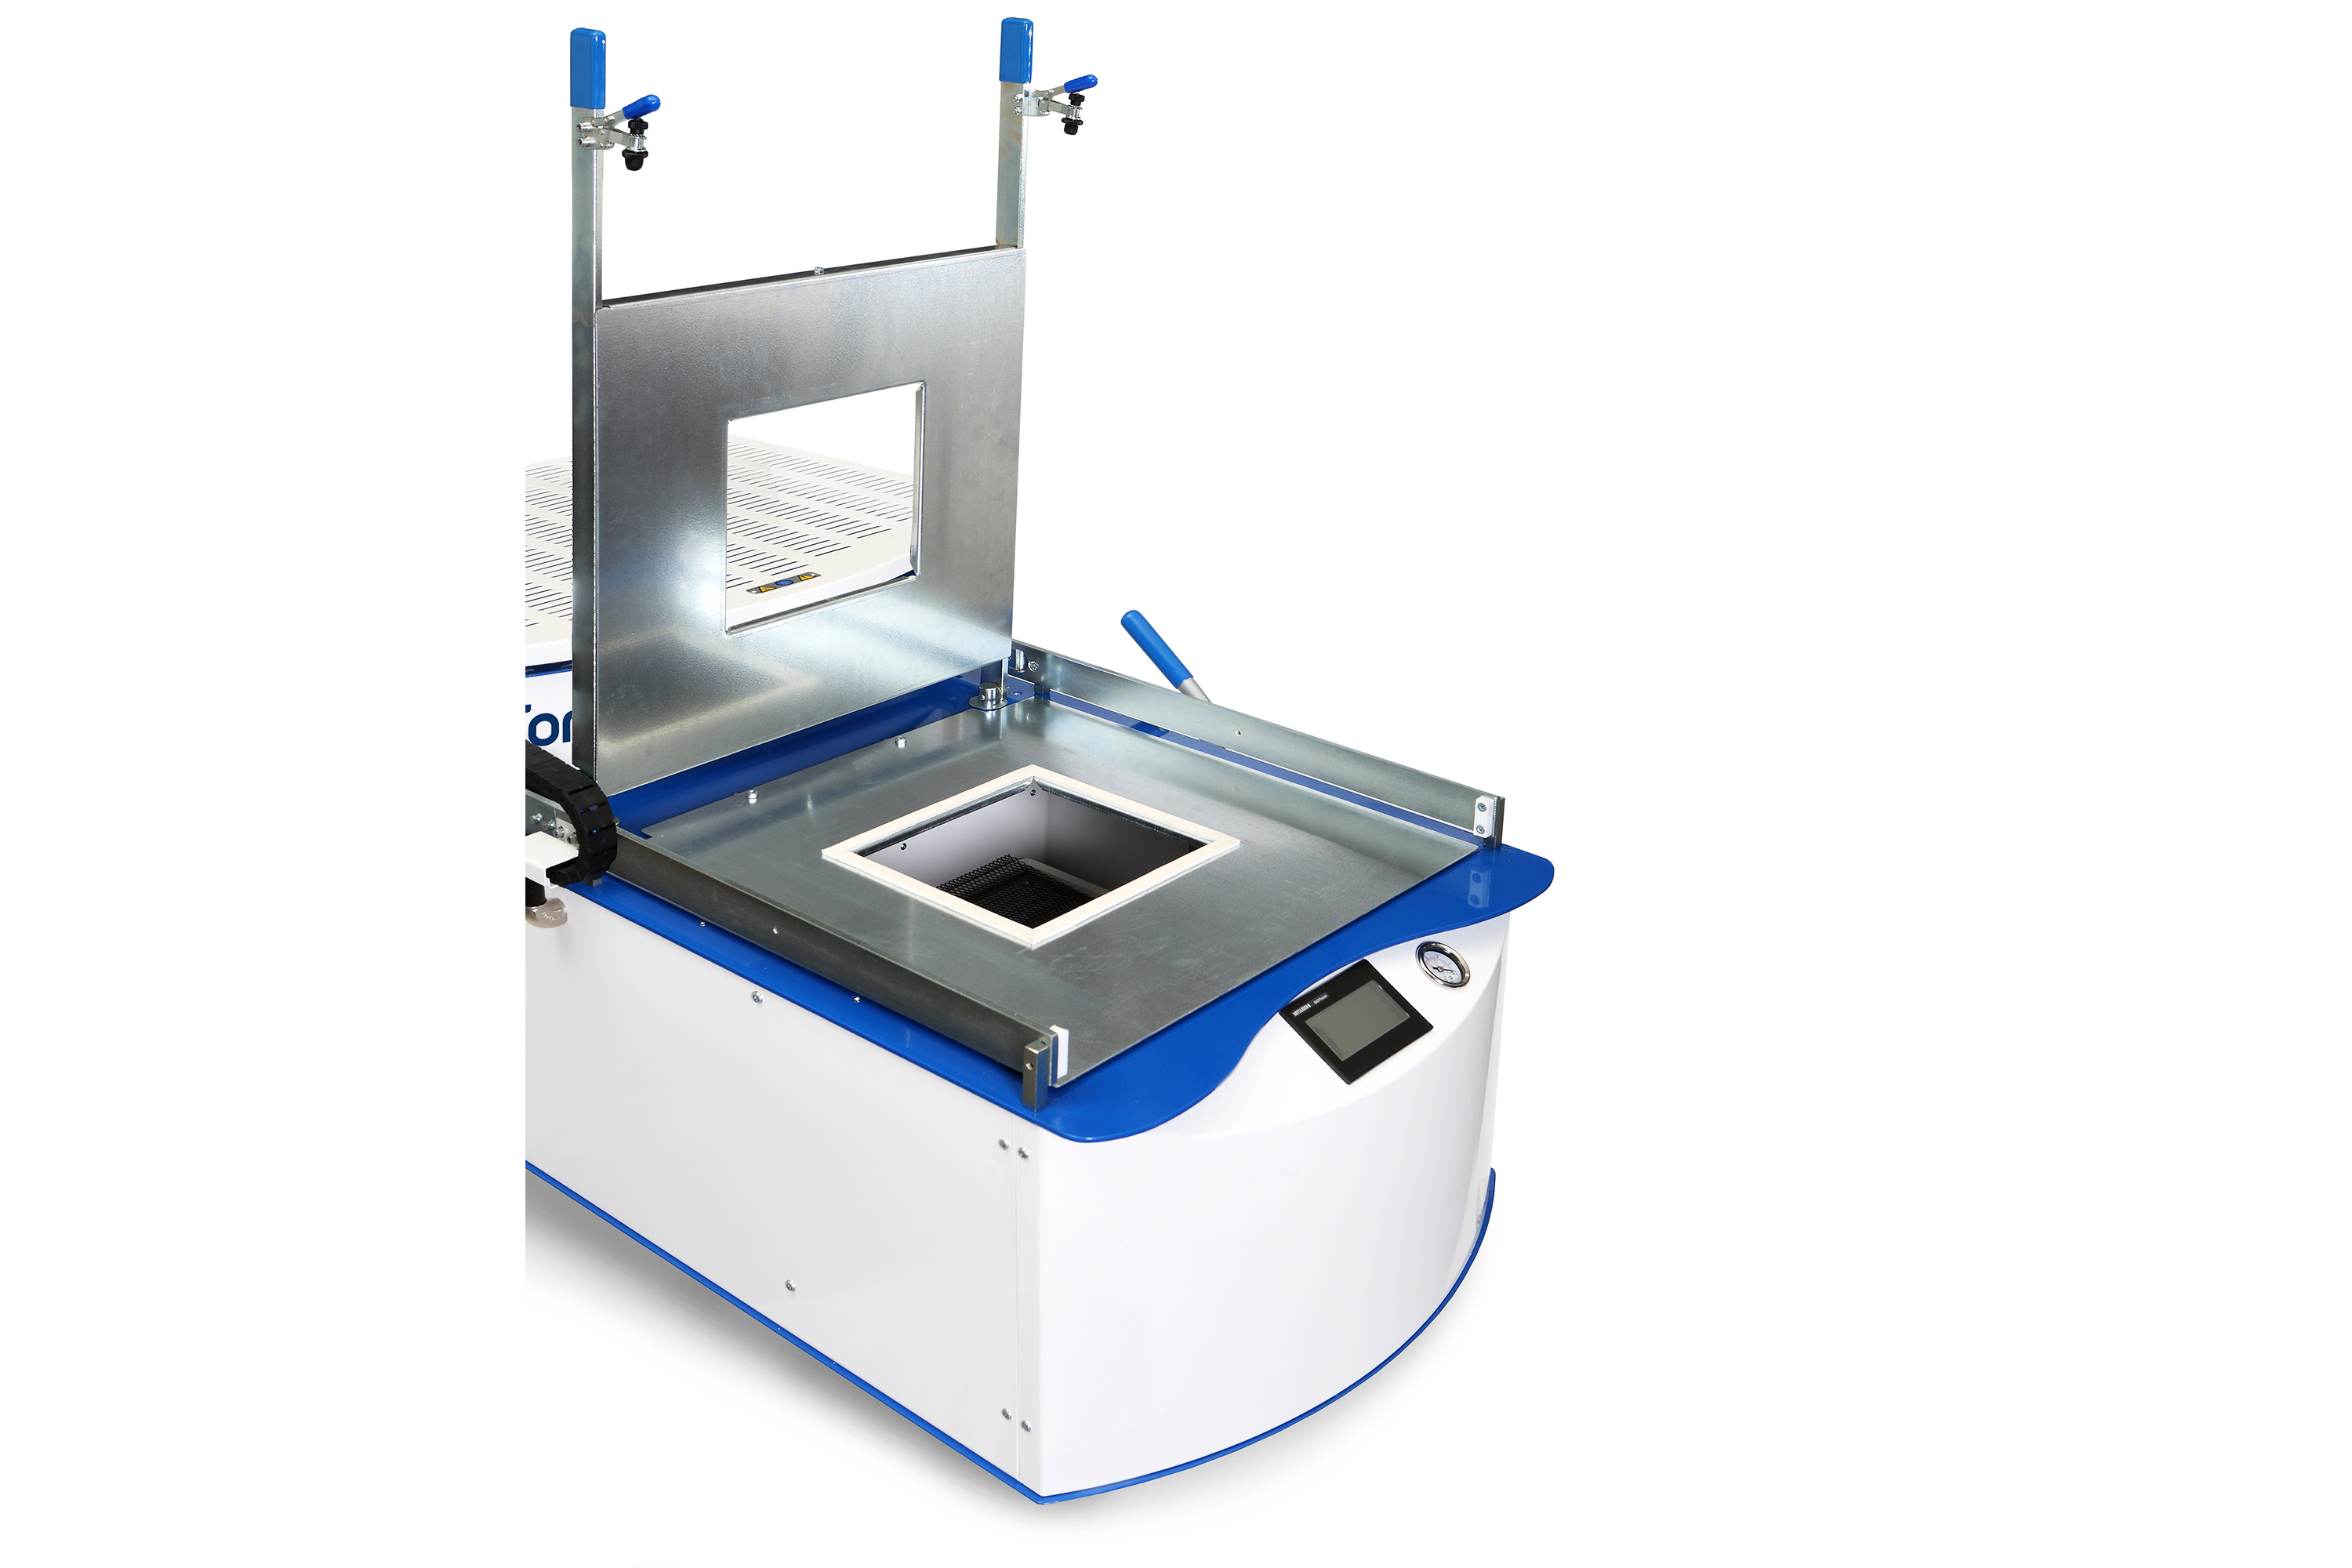
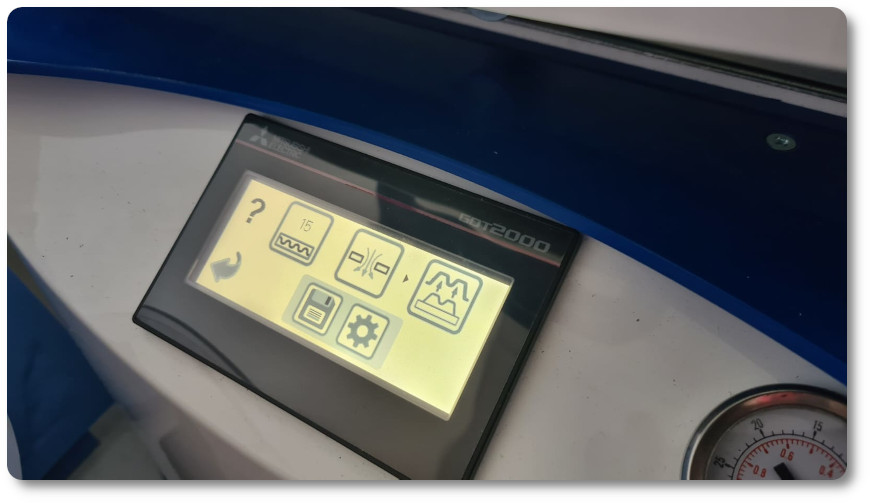
Formech 508DT Thermoforming Machine
Featuring PLC touch screen control, Formech’s plug and play 508DT is a user friendly desktop machine with the power and capability to form demanding shapes and materials. Rapid, energy efficient quartz heaters with variable standby means the 508DT is ready to form iless than 5 minutes. 20 programme memory to recall heater profile and timing settings for each project. A dedicated trolley option provides a minimal footprint with the convenience of portability and optimum working height.
| Forming Area (mm / inches) | Sheet Size (mm / inches) | Max Depth of Draw | Max Material Thickness | Heating Zones | Heater Type | Width | Height | Depth | Power Consumption |
|---|---|---|---|---|---|---|---|---|---|
| 482 x 432mm / 19 x 17" | 508 x 457mm / 20 x 18" | 185mm / 7.3" | *6mm / 0.25" | 4 | Quartz | 720mm / 28.4" | 538mm / 21.2" | 1394mm / 54.9" | 3.2kW |
Among the main characteristics of this machine we can assert:
- PLC Control with 4” Mono Touch Screen
- 20 Programme Memory
- Quartz Heaters with Variable Standby
- 4 Independently Controllable Heating Zones
- Safety Interlock
- Vacuum & Release
- Vacuum Gauge
There are a lot of videos that explain how to work with this machine, but I'm going to post the one from the formech company, which is amazing!!!!!! They don't miss any detail!
Now I am going to leave some information so that nothing can be wrong!!!
- Run from standard 208-240v
- Intuitive Touch screen
- max material thickness 6mm
- 0.74 bar pressure
- Press Start Vacuum
- Press Release
- remove folded material
what material to use in a thermoformer
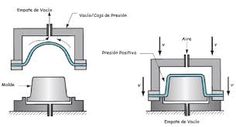
Originally, the availability of sheets of thermoplastic materials gave rise to the idea of building female moulds, placing a sheet of these materials on them, fixing it so that the gap between the mold and the piece was sealed, heating it to its softening temperature and making the vacuum in said hole, so that the material stretches and adapts to the surface of the mold. Once the piece is cold, it is extracted, the excess material is trimmed and a finished piece is obtained.
The most used material in thermoforming is PS, both in sheets and in extruded foam. In the first case, as for other traditional sheets, no more sophistication of the process than that described is required. However, to obtain deep foam stamping (EPS), pressure forming is not enough because the internal pressure of the gas contained in the cells makes it difficult. One solution is heating with steam, which diffuses rapidly through the cells and deep drawing is obtained at temperatures of the order of 105 C.
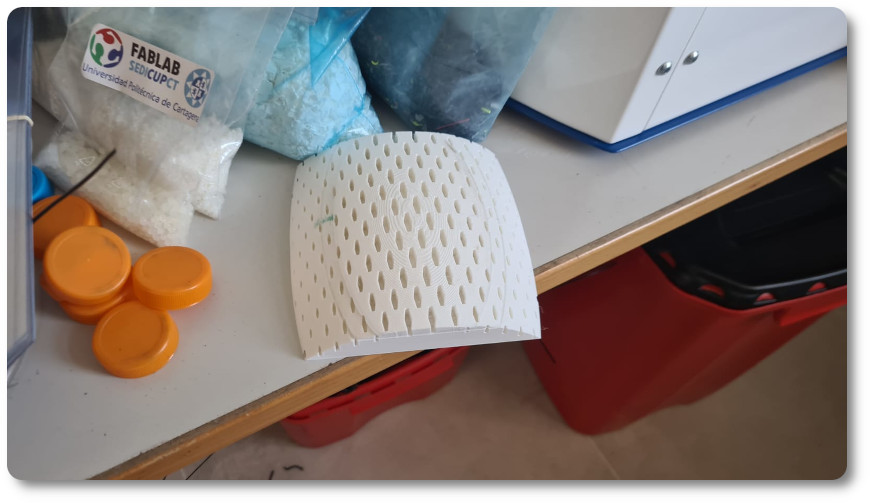
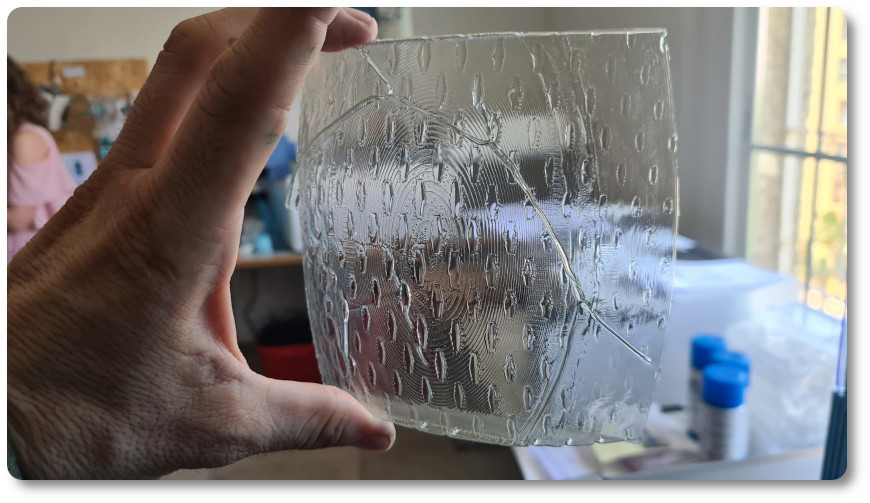
In my case I have made the mold with a normal acetate, to test materials and the truth is that it turned out very well!
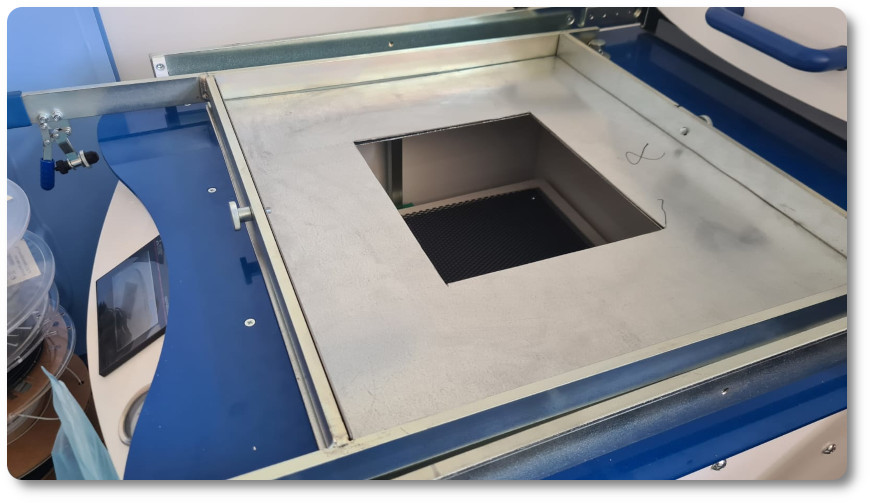
WORK WITH THE THERMOFORMER
Although I have worked this week with folding using math with form and function, I was very curious to use the thermoformer. I wanted to use it because it is a technique that maybe I will use in my final work.
In order to achieve the objective, I am going to make a part of the inner petal of my lamp with an acetate, a very cheap material and that will make me understand if the pattern made in grassoppher will be appreciated in reality.
The first step will be to make the mold. As I have little time available, I am going to make it with the 3D printer and a part that is more striking and so that I can make a decision.
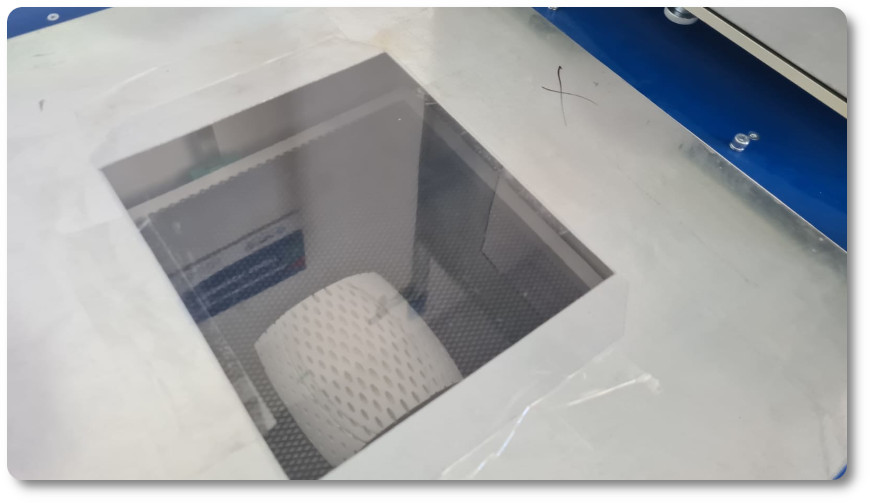
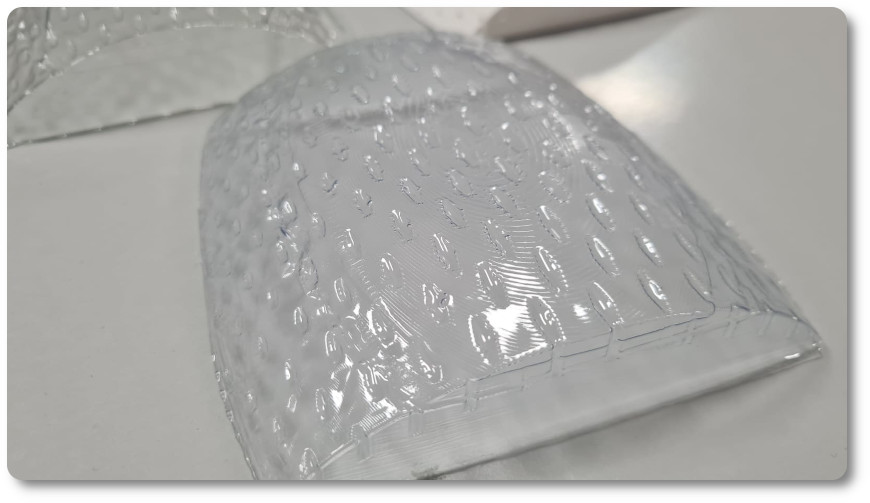
The first job with the thermoformer has not gone very well. The surface had wrinkled due to overheating of the material.
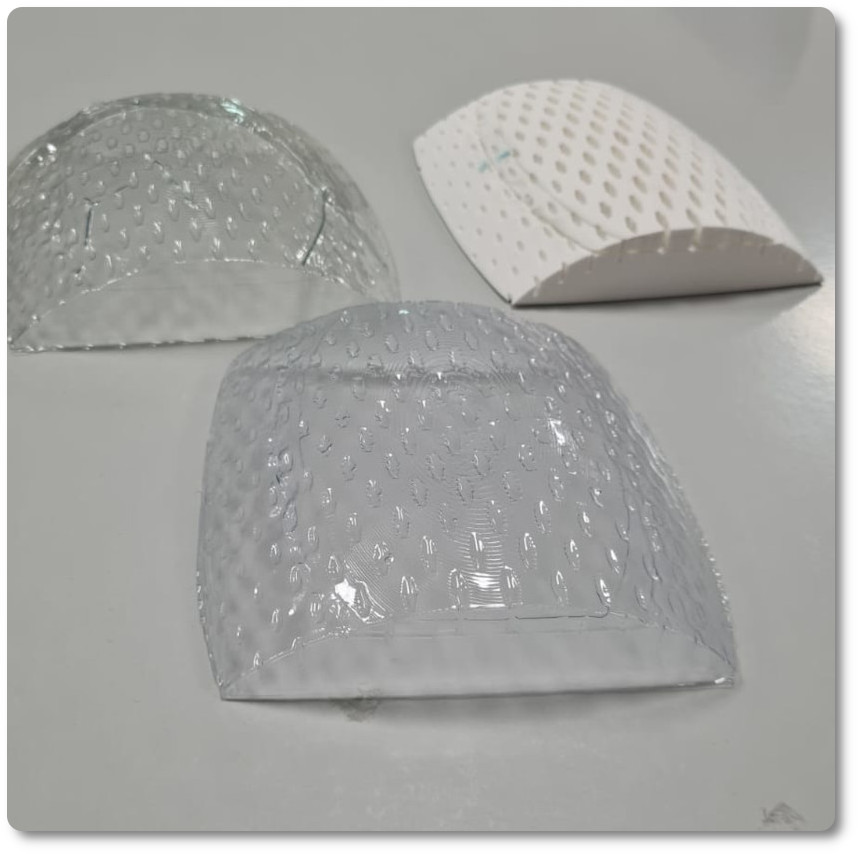
So, we have done it again without lowering the heating time and everything went perfectly.
CONCLUSIONS OF THE WEEK
This week I have been able to work more on topics that caught my attention, due to my training, but that I have not been able to try due to lack of time or knowledge.
Working with grasshopper has given me the possibility to investigate parametric drawings with mathematical functions. Today in architecture there is a lot of work with these types of patterns, both in large-scale architecture such as facades and small-scale ones, I am thinking of interior design.
I really like rehearsing, if we had more time to do it it would be perfect.
“What went wrong”: I liked the thermoformer a lot but I admit that I would have liked to work with other types of acetates but we didn't have any and so I couldn't do more color tests.
“What went well”: I've loved going from rhino to thermoformer, it's all so close together yet they are the most extreme elements of CAD and CAM manufacturing.
“What will you do differently next time?”: I would like to try with food materials!!!!
MY FILES
Here I am uploading the files that I have been making this week


