8. Embedded Programming
This is going to be difficult for me. I struggle a lot with programming, so this will be a lot of trial and error, lots of research, and probably a lot of frustration.
Research - Data Sheet
The chip I’ll be using, at least for now, is a ATTiny412. I don’t know much about it, so this will be really helpful in learning more about how the chip works.
This is the ATTiny412 Data Sheet.
Thanks to Garrett for sharing the link.
First impressions: It’s a lot. Holy cow.
I started with just skimming the table of contents. I know there is a lot of information in here that I won’t understand, so I decided to start with things that looked and/or sounded familiar.
The first thing I saw was about the pinouts, so off to a good start. The specific chip I’ve used so far is the ATTiny412, which has eight pins.
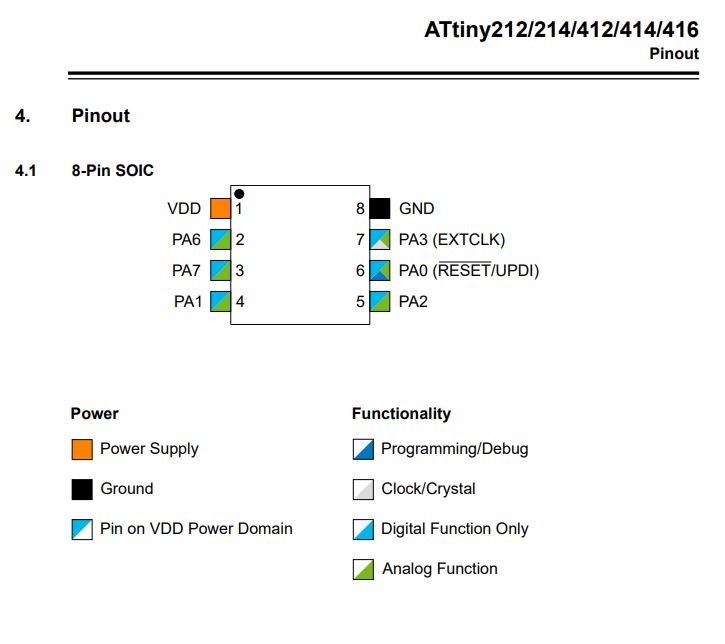
Found on page 14.
It was interesting to see how each pin, aside from power and ground, is able to do multiple things. The key was also very easy to follow and understand, which I appreciated.
When I scrolled back up, I noticed the following image:
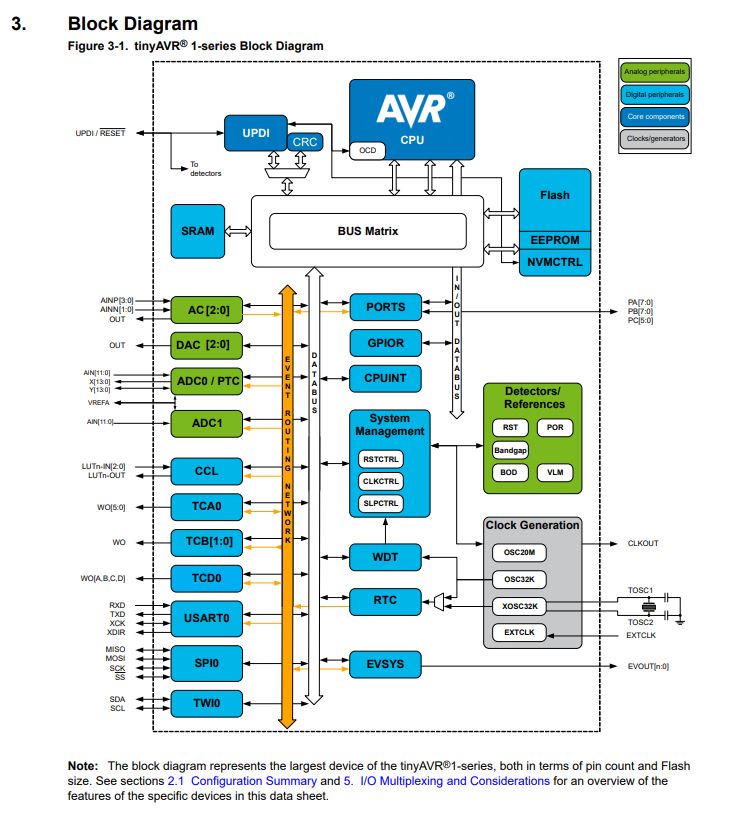
This is everything that goes on inside an ATTiny! Found on page 13.
There is so much information and processing and just stuff inside those chips. I do recognize a few things listed, such as the basic CPU and SRAM, Flash memory, the UPDI, but also MISO and MOSI and the port assignments.
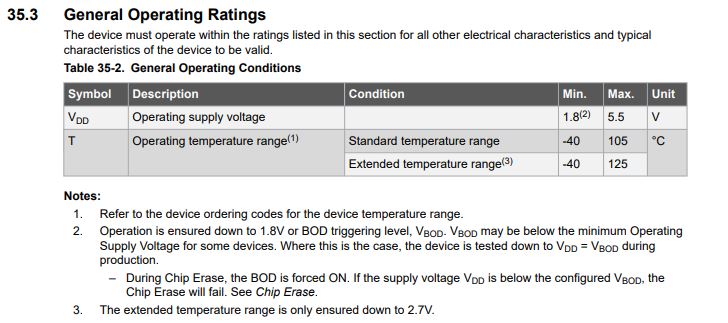
Found on page 500.
There were lots of charts about the voltage, but the one most useful for me was the first, which listed the minimum and maximum operating voltage. Good to know!
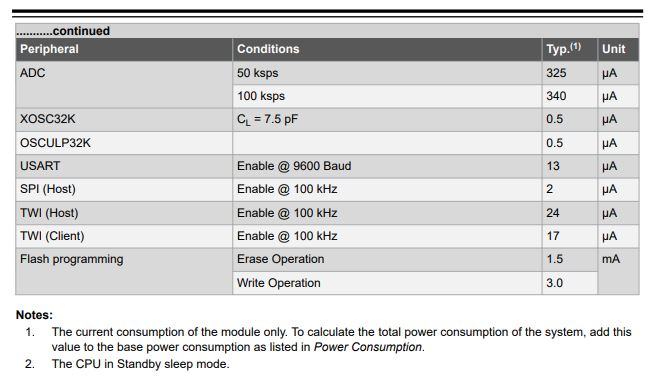
Found on page 504.
Yet another chart. This one is about the power consumption of different peripherals, though the ones I’m interested in are SPI and TWI.
NeoPixels
I’m going to be using NeoPixels for my project, and I’ve already made boards that use them, but I needed another board that I could use for multiple differet tests. And I needed more practice designing a board in general.
Enter my next attempt!

I’m just glad I got it into a square! No more crazy shapes, though I do still like my first attempts. They have character.
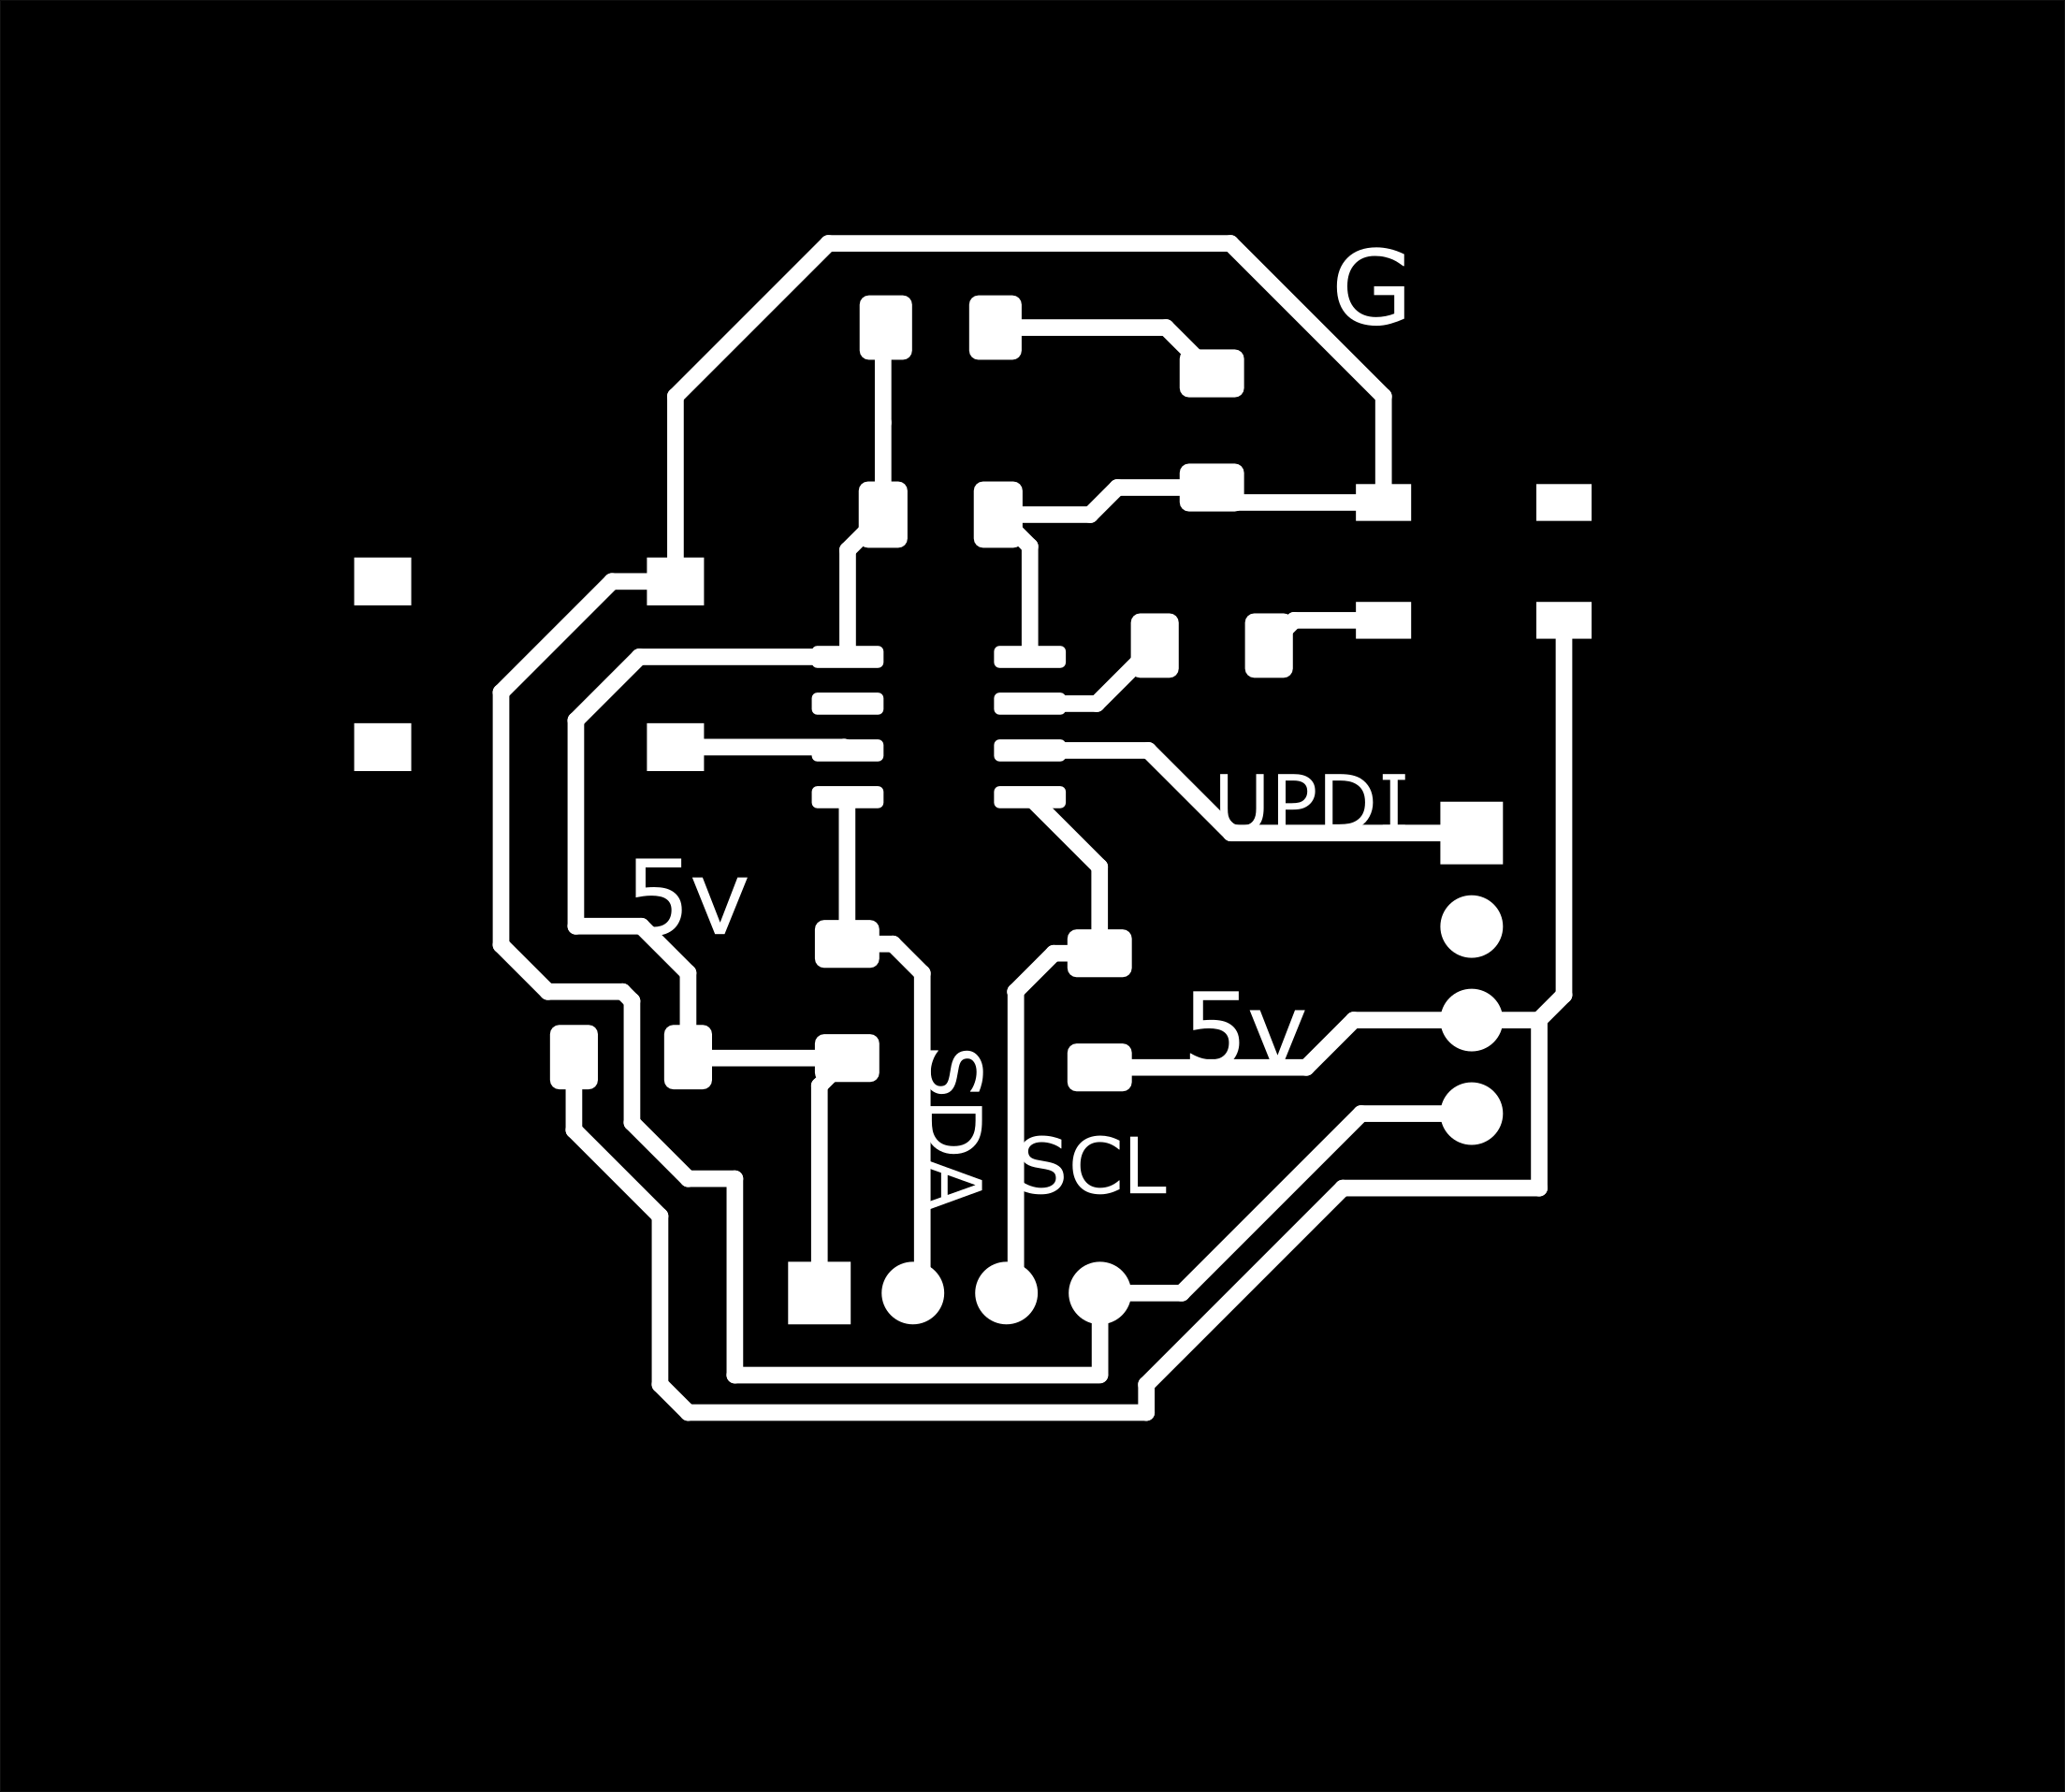
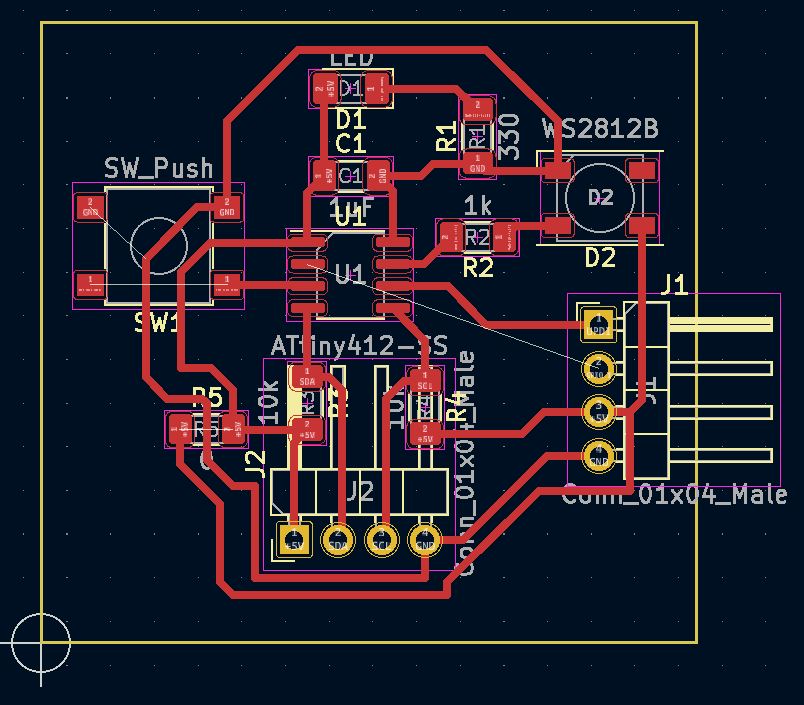
More KiCad and Milling
I won’t go into detail on the process. That can be found on Week 6 - Electronics Design. The main thing about this board is that while playing the traces game, I did have to cave and use a 0 resistor to jump across a trace, but that’s not too bad.
| Qty | Component |
|---|---|
| 1 | ATTiny412 |
| 1 | Button - Push |
| 1 | NeoPixel |
| 2 | 1x4 Horizontal Header |
| 3 | 10k Resistor |
| 1 | 330 Resistor |
| 1 | 0 Resistor |
| 1 | 1uF Capacitor |
| 1 | LED (Green or Red) |
The headers I selected were for through pins, but they worked out all the same while milling. The second set of headers is also flipped in the traces, but were soldered the correct way on the board.
Let’s Blink, Please
I needed to program my board with the NeoPixel. All I want it to do was blink. Seems simple enough, yet it never is, not for me. I wanted to do this programming at home, and I started with a programmer that I know works, with a board that I had programmed before, but now I wanted to make some adjustments.
The code I used was from Garrett’s page, and one I had used before:
// https://github.com/adafruit/Adafruit_NeoPixel/blob/master/examples/strandtest/strandtest.ino
// and
// https://create.arduino.cc/projecthub/robocircuits/neopixel-tutorial-1ccfb9
// NeoPixel Ring simple sketch (c) 2013 Shae Erisson
// Released under the GPLv3 license to match the rest of the
// Adafruit NeoPixel library

#include <tinyNeoPixel.h>
// NeoPixel Ring simple sketch (c) 2013 Shae Erisson
// Released under the GPLv3 license to match the rest of the
// Adafruit NeoPixel library

// Which pin on the Arduino is connected to the NeoPixels?
#define PIN        4 // Cori's Attiny Neopixel Board

// How many NeoPixels are attached to the Arduino?
#define NUMPIXELS 1 // only 1 on board

// When setting up the NeoPixel library, we tell it how many pixels,
// and which pin to use to send signals. Note that for older NeoPixel
// strips you might need to change the third parameter -- see the
// strandtest example for more information on possible values.
tinyNeoPixel pixels(NUMPIXELS, PIN, NEO_GRB + NEO_KHZ800);

#define DELAYVAL 500 // Time (in milliseconds) to pause between pixels

void setup() {

  pixels.begin(); // INITIALIZE NeoPixel strip object (REQUIRED)
  pixels.setBrightness(85); // about 1/3 brightness
}

void loop() {
  pixels.clear(); // Set all pixel colors to 'off'
  delay(DELAYVAL);
  // pixels.Color() takes RGB values, from 0,0,0 up to 255,255,255
  // Here we're using a moderately bright green color:
  pixels.setPixelColor(0, pixels.Color(0, 150, 0));
  pixels.show();   // Send the updated pixel colors to the hardware.
  delay(DELAYVAL); // Pause before next pass through loop
  pixels.clear();
  delay(DELAYVAL);
  pixels.setPixelColor(0, pixels.Color(150, 0, 0));  //red
  pixels.show();
  delay(DELAYVAL);
  pixels.clear();
  delay(DELAYVAL);
  pixels.setPixelColor(0, pixels.Color(0, 0, 150));  //blue
  pixels.show();
  delay(DELAYVAL);


}
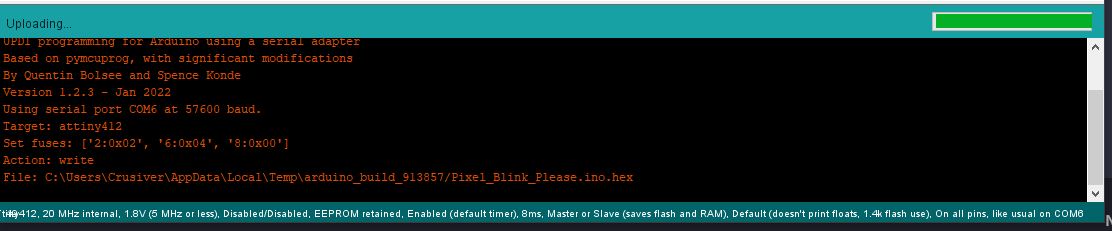
I immediately ran into problems though. The recurring problem I had was that the upload would just churn and churn without making any progress. Normally at school, if something doesn’t work, it spits out an error message immediately. Not with my computer.
I thought at first I had the wrong port, so I switched to a different one in the menu, but it didn’t fix the issue. I didn’t think that it would, as it usually says if that is the exact issue, but I was trying to work through the short list of things I had done wrong in the past. Next, I tried a different USB port. This didn’t work either.
Then I tried changing the pin number. Even with the pinout for the ATTiny up at all times, I still don’t get the correct pin without a bit of trial and error. However, this didn’t solve the main issue: the program takes ages to upload.
When I click on the error message for more information, it says:
An error occurred while uploading the sketch
Okay. Helpful.
Next I switched to a second board that had also been programmed prior to this and went through all the steps again. Still no luck.
I decided to back up a few steps. Since I’m using NeoPixels, I needed to make sure I had the library installed. At school, I’m not the only one who is using them, so it was probably already installed and ready to go. After checking on Garrett’s site again, I followed his link to AdaFruit’s github that had the library. After some reading, I found that I hadn’t installed the library on my computer. Silly mistake. I followed the instructions and installed the library and tried again.
The Next Day
As always, I have better luck in the lab. I’ll have to figure out what the problem is at home, but in the meantime, went back to the lab and tried again. This time, I had much better luck!
![]()
Finally!!
Now that I know that I have the correct pins and that everything functions, I can start messing around a bit more. I wanted to see how bright these could actually get since the original code had them at 85, or ⅓ brightness, so I changed it to its top level at 255. I also put the board in my test pocket to see how the light diffuses with my current setup.
![]()
![]()
It’s a substantial difference.
I was surprised at how much better it looked at maximum brightness. Though the light was concentrated at the center, it still looked pretty good around the edges with the felt. The frosted acrylic on top didn’t change the effect much, but it does look pretty cool with the light flashing. I’ll have to work on this some more!
So What’s the Problem?
I spoke with Adam and Garrett about my problem. Clearly it’s not my boards or the programming, becuase both worked in the lab. There’s something going on with my computer, so I’ll have to try updating drivers and the Arduino program to see if that fixes the issue.
It’s quite frustrating to not have access to programming when I know and want to try something. Instead, I have to wait until I have time to get to the lab before making any changes or running any tests.
I’ll update if and when I figure out the problem.
Group Project
The link to the group project is found here.